Sizzling Bacon Cheeseburger Queso Dip: Ultimate Flavor Explosion

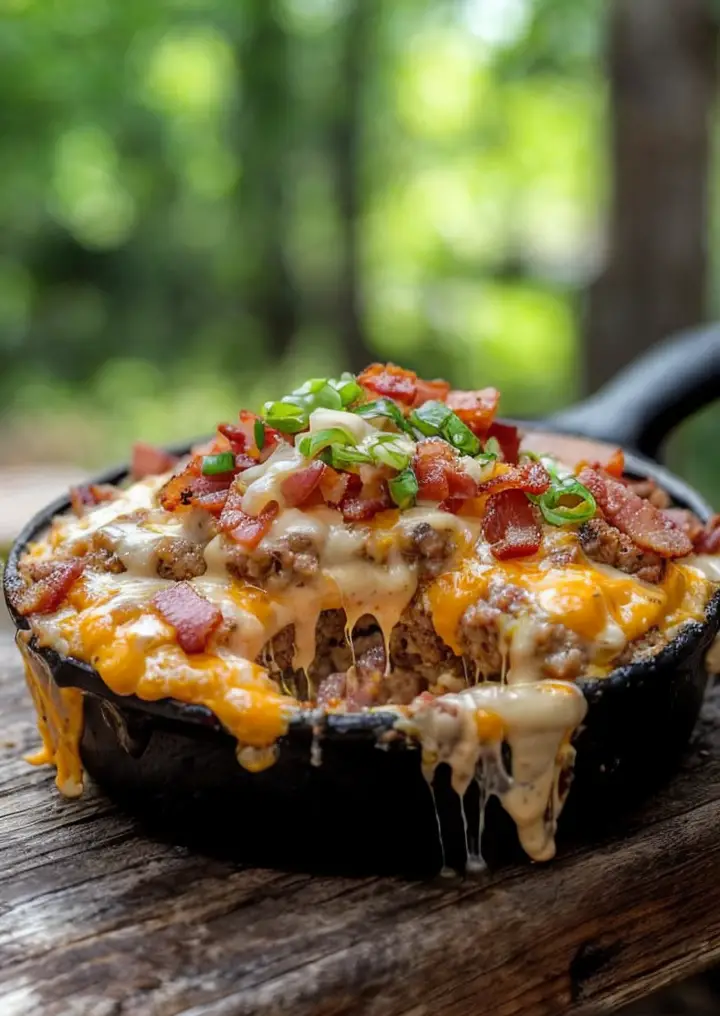
Sizzling Bacon Cheeseburger Queso Dip: The Ultimate Flavor Bomb

⚖️
Difficulty
Easy

⏲️
Prep Time
10 mins

🕒
Cook Time
20 mins

⏱️
Total Time
30 mins

🍽️
Servings
8

Discover the joy of indulgence with our Sizzling Bacon Cheeseburger Queso Dip—a dish that marries the hearty richness of a classic cheeseburger with the creamy, gooey goodness of queso dip. This delightful dip is perfect for gatherings, game days, or cozy nights in, ensuring that every bite is packed with flavor. Picture layers of melted cheese, crisp, sizzling bacon, and seasoned ground beef coming together to create an irresistible appetizer that will have everyone at the table coming back for more.

The combination of textures is truly what makes this recipe stand out. The creaminess of the cheese melds beautifully with the crunch of perfectly cooked bacon, while the seasoned beef adds a savory depth that elevates this simple dip into a showstopper. A sprinkle of vibrant green onions or a dollop of sour cream on top not only enhances the presentation but also adds a fresh contrast to the richness below.

Quick Recipe Highlights

  • Flavor Profile: The rich, creamy queso combined with the savory bacon and seasoned beef creates an explosion of flavors that satisfies every craving.
  • Texture: Expect a delightful blend of creamy, crunchy, and tender textures—melted cheese, crispy bacon, and finely ground beef come together perfectly.
  • Aroma: Aromatic notes of sizzling bacon and melted cheese fill the air, inviting everyone to dig in and enjoy.
  • Visual Appeal: The golden cheese, crispy bacon bits, and vibrant green onions not only taste amazing but also look irresistible.
  • Skill Level Needed: This recipe is easy enough for even novice cooks to master, making it perfect for everyone.
  • Special Equipment: A large skillet or slow cooker is essential for achieving the ideal blend of flavors and textures.

Recipe Overview

  • Difficulty Level: This dish is classified as easy, which means you don’t need extensive cooking experience. Basic skills like sautéing and mixing are all that’s required.
  • Category: This recipe fits perfectly in the appetizer category, making it an ideal choice for parties and gatherings.
  • Cuisine: While this dip draws inspiration from classic American cuisine, it’s a fun fusion that embodies comfort food at its finest.
  • Cost: Expect to spend around $20 for a full batch, making it budget-friendly for larger gatherings.
  • Season: Enjoy this dip anytime, but it truly shines during football season or summer barbecues.
  • Occasion: Perfect for casual get-togethers, birthday parties, or even as a game night appetizer.

Why You’ll Love This Recipe

This Sizzling Bacon Cheeseburger Queso Dip delivers on both taste and texture. The delightful combination of gooey cheese and crispy bacon tantalizes your taste buds, while the seasoned ground beef adds just the right touch of umami. The richness of the cheese creates a luxurious mouthfeel that will keep you reaching for more.

Its convenience cannot be overstated. With minimal prep time and a straightforward cooking process, you’ll have a crowd-pleaser ready in about 30 minutes. This dip can be made in a large quantity, making it perfect for feeding a group without endless cooking. Just set it out with tortilla chips or crackers and let your guests dive in.

Nutritionally, while it leans on the indulgent side, you can always adjust the ingredients to enhance its health quotient. Using leaner ground beef or alternative cheeses can reduce the calorie count while maintaining the flavor integrity.

Socially, this dip is a star attraction. Whether you’re hosting a watch party or a potluck, the Sizzling Bacon Cheeseburger Queso Dip invites people to gather around. It’s an interactive dish that encourages sharing and laughter, bridging the gap between strangers and friends alike.

Cost-effectiveness is another highlight of this recipe. You can create a lavish dip without breaking the bank, making it accessible to everyone. Its ingredients are commonplace and affordable, ensuring you won’t have to hunt for expensive items to impress.

Historical Background and Cultural Significance

The origins of cheeseburger dip can be traced back to America’s love for cheeseburgers and the rise of dip culture in the 1970s. As the popularity of cheese dips surged, home cooks began experimenting with the idea of amalgamating the delightful flavors of a classic cheeseburger into a cheesy dip format.

In American culture, tailgating events and game nights have become synonymous with hearty, shareable foods. The Cheeseburger Queso Dip stands as an iconic dish that captures the camaraderie of these gatherings. It embodies both comfort and convenience desired in party settings.

Over the years, this recipe has evolved with variations appearing in different regions. From adding spicy jalapeños in the South to incorporating unique cheeses in the North, every locale gives this dish a distinct flavor twist, expanding its appeal.

Today, this dip is not just a favorite at parties or game days; it has also found its way into restaurants and bars, symbolizing the fusion of traditional American fare with the innovative spirit of modern cooking.

Ingredient Deep Dive

– **Cream Cheese**: A staple in many creamy dips, cream cheese adds rich texture and depth to the dip. It’s low in carbohydrates and provides a good source of calcium, making it a favorable option for cheeseburger dip recipes. When selecting cream cheese, opt for a full-fat version for the best flavor. Store it in the fridge and seal it tightly to maintain freshness.

– **Ground Beef**: This ingredient is central to replicating the cheeseburger experience. Ground beef is an excellent source of protein and essential nutrients like iron and vitamin B12. Choose lean ground beef for a healthier dish. Store raw beef in the refrigerator for up to two days, and remember to cook it thoroughly.

– **Bacon**: The crispy, smoky flavor of bacon brings savory notes to the dip. Bacon is high in protein but also loaded with fat, so moderation is key. Choose thick-cut bacon for more substantial pieces in your dip. Store cooked bacon in an airtight container in the fridge for several days, or freeze for longer storage.

Common Mistakes to Avoid

  • Overcooking the cheese: Melting cheese too long can cause it to become rubbery. Keep heat low and stir frequently.
  • Using low-quality cheese: High-quality cheese melts better. Avoid pre-shredded cheese as it contains anti-caking agents.
  • Not seasoning enough: Seasoned beef is vital for flavor. Don’t overlook salt and pepper in your recipe.
  • Too much liquid: Adding excess liquid can make the dip runny. Focus on the right cheese and a little cream for perfect consistency.
  • Cooling too much: Ensure the dip remains warm while serving to keep it gooey and delicious.
  • Forgetting garnishes: A sprinkle of green onions or jalapeños can elevate the dish both in flavor and presentation.
  • Using old ingredients: Always check the expiration dates on dairy products to ensure freshness for optimal taste.
  • Not letting it rest: Allowing the dip to sit for a few minutes after cooking enhances the flavor melding.
  • Serving without accompaniments: Although delicious by itself, serve with crackers or tortilla chips for the best experience.
  • Skipping the toppings: Toppings add delicious crunch and vibrant colors. Don’t skip the finishing touches!

Essential Techniques

– **Melt Cheese Properly**: Melting cheese correctly is crucial for achieving the desired texture. Heat should be gentle to avoid clumping. Stir continuously and monitor closely for the best results.

– **Cooking the Beef**: Brown the ground beef until fully cooked to enhance its flavor. Use a spatula to break it into small pieces for even cooking. Drain excess grease to prevent a greasy dip.

– **Crisping Bacon**: Cooking bacon until crispy adds crunch and flavor. Use medium heat and allow the fat to render out fully. Drain on paper towels to absorb excess grease.

Pro Tips for Perfect Sizzling Bacon Cheeseburger Queso Dip

– Use a variety of cheeses for depth of flavor; cheddar, Monterey Jack, and cream cheese work wonderfully together.
– For a spicy kick, add diced jalapeños or a splash of hot sauce to the dip.
– If making ahead, store in an airtight container in the fridge and reheat gently when serving.
– Consider using a slow cooker for a hands-off approach. Combine ingredients on low for a melt-in-your-mouth dip.
– Don’t forget to taste and adjust seasonings as you combine ingredients; each cheese brand may vary in saltiness.
– Serve with a variety of dippers such as tortilla chips, fresh veggies, or sliced baguette.
– To make it even heartier, add sautéed peppers or mushrooms for additional flavor.
– Always warm the dip before serving to keep that desirable gooeyness.

Variations and Adaptations

– Regional variations can include the addition of spicy sausage or buffalo chicken to give the dip a unique twist.
– Seasonal adaptations, such as incorporating pumpkin spice or roasted vegetables, can offer a seasonal touch for festive gatherings.
– For dietary modifications, consider using ground turkey for a lighter option or using dairy alternatives for a vegan version.
– Experiment with flavor variations such as smoky BBQ, spicy jalapeño, or even a Mediterranean twist with feta and spinach.
– Texture modifications can be achieved by blending in crushed nuts for added crunch or using a food processor for an ultra-smooth dip.
– Presentation alternatives such as mini corn tortillas or stuffed bell peppers can also serve as unique serving options.

Serving and Presentation Guide

– Plating techniques can involve serving in a cast-iron skillet for rustic appeal or glass bowls for an elegant touch.
– Garnishing ideas like fresh cilantro, or sliced olives offer vibrant color and complement the creamy dip.
– Traditional accompaniments include tortilla chips or crackers, providing a perfect vehicle for scooping.
– Modern serving suggestions can involve mini bread bowls filled with dip for a trendy presentation.
– Important temperature considerations, such as ensuring the dip is warm when served, will enhance the indulgent experience.
– Portion control tips suggest using small bowls to avoid overindulgence at gatherings, while still encouraging sampling.

Wine and Beverage Pairing

– Wine pairings can include crisp Sauvignon Blanc or fruity Zinfandel, balancing the richness of the dip with their acidity.
– Non-alcoholic alternatives such as sparkling cider or iced tea provide refreshing contrasts.
– If your gathering calls for coffee or tea, opt for a bold brew to complement the dish’s flavor profile without overpowering it.
– Ensure that beverages are served at the ideal temperature for enjoyment, whether chilled or at room temperature.

Storage and Shelf Life

To store your Sizzling Bacon Cheeseburger Queso Dip, allow it to cool slightly before transferring to an airtight container. Refrigerate for up to three days. Ensure it’s stored at a consistent temperature to maintain quality.

For signs of spoilage, look for an off smell or discoloration. If reheating, warm gently in the microwave or on the stovetop, adding a splash of milk to restore its creamy consistency.

For longer storage, this dip can be frozen for up to two months. Seal it in a freezer-safe container, and thaw overnight in the fridge before reheating.

Make Ahead Strategies

Plan your prep with a timeline. You can cook the beef and bacon in advance and store them separately in the fridge. This allows you to easily combine everything before serving, saving time on the day of the event.

Clamp an airtight container while ingredients cool down to simply combine and stir them on the day of serving. You can even prepare the dip the day before; just reheat with a little extra cheese or cream.

When reheating, focus on restoring freshness by pairing with fresh toppings, like green onions or diced tomatoes, to invigorate the flavor.

Scaling Instructions

Scaling this recipe can easily accommodate larger gatherings. To halve the dip, cut ingredients in half and adjust quantities, but keep seasoning consistent for even flavor.

For doubling or tripling the recipe, ensure you have ample cooking equipment like larger skillets or slow cookers to handle increased volume.

Monitor cooking time as ingredients increase in volume, and be prepared to adjust timing to ensure even cooking. Plan storage accordingly for leftovers, especially if made in large batches.

Nutritional Deep Dive

When considering the macro breakdown, this dip provides protein from beef and cheese, while also incorporating fats from bacon. A well-rounded nutrient profile makes it a satisfying option.

In terms of micronutrient analysis, ingredients contribute vitamins B12 and D, while dairy offers calcium, crucial for bone health.

For those conscious of health benefits, using lean ground beef and low-fat cheese can create a dip that is flavorful yet slightly healthier.

Assessment of portion analysis can be beneficial to help maintain dietary goals while enjoying this treat, without feeling deprived.

Finally, for weight management tips, pair the dip with plenty of veggies for dipping, encouraging a balanced approach.

Dietary Adaptations

– Gluten-free options can be achieved simply by ensuring all ingredients, particularly seasonings, are gluten-free.
– A dairy-free adaptation could involve using cashew cheese or vegan cream cheese to maintain a creamy texture.
– For a vegan version, swap out beef with textured vegetable protein or mushrooms, retaining that hearty feel.
– Low-carb variations can substitute ketchup with low-carb options, along with a choice of full-fat cheeses for ketogenic diets.
– The keto diet can also utilize only high-fat cheeses and eliminate carbohydrates altogether.
– Paleo dieters can enjoy this dip by incorporating fresh ingredients and avoiding processed components.
– Low-FODMAP adaptations are possible with lactose-free cheeses and seeking low-FODMAP vegetables for dipping.

Troubleshooting Guide

If your dip has texture issues, such as being too thick, add a little milk or cream to loosen it while reheating.

For flavor balance, check that seasoning is consistent throughout; adding a pinch of salt can elevate the flavors if found lacking.

Should temperatures become problematic, ensure proper warming methods: avoiding high heat to prevent bacon from burning while keeping everything else warm.

If equipment challenges arise, consider using alternative cooking methods such as a microwave or stovetop to revive leftovers easily.

Ingredient substitutions should be noted; for instance, different cheese types could lead to varying flavors and textures.

Lastly, manage timing concerns by sticking to the suggested preparation time, ensuring ingredients are ready when you need them.

Recipe Success Stories

Feedback from the community has been overwhelmingly positive, with many sharing their discoveries in adapting the original recipe for various preferences and dietary needs.

Several readers organized potlucks featuring the Sizzling Bacon Cheeseburger Queso Dip and experienced success in getting others enthusiastically engaged in cooking.

Readers also provided invaluable suggestions, such as pairing the dip with grilled vegetables and different dips, showcasing flexibility and creative spirit.

Photography tips emerged from those wanting to share their culinary creations on social media, highlighting the importance of plating and garnishing for captivating photos.

Adaptation stories poured in as fans started to create themed versions of this dish, offering possibilities that added variety to their menus.

Frequently Asked Questions

Can I make this dip vegetarian?
Yes! Substitute the ground beef with plant-based meat or mushrooms, and you can achieve a similar texture without the meat.

How do I reheat leftover queso dip?
Gently reheat it on the stovetop over low heat or in the microwave, adding a bit of cream or milk to restore its creamy consistency.

Can I freeze the dip?
Absolutely! Freeze the dip in an airtight container for up to two months. Thaw in the fridge and reheat before serving.

Is this dip spicy?
It’s not inherently spicy, but you can adjust the heat by adding jalapeños or hot sauce to taste.

What can I serve with the dip?
Tortilla chips, crackers, fresh veggies, or even pretzel bites make excellent choices for dipping.

Will this dip thicken as it cools?
Yes, it may thicken as it cools. Adding a little liquid when reheating can help regain its consistency.

Can I use other cheeses?
Definitely! Cheddar, Monterey Jack, or even pepper jack will work beautifully for creating a flavorful dip.

How long can I store leftovers?
Store leftovers in an airtight container in the refrigerator for up to three days.

Can I add other ingredients?
Feel free to add additional ingredients like onions, peppers, or even salsa for extra flavor.

Is this a suitable party dish?
Yes! This dip is perfect for parties, game days, or gatherings; it’s a crowd-pleaser!

Additional Resources

For those wanting to explore more delicious recipes, consider checking out our other dip recipes and appetizers that make for perfect party snacks. Detailed technique guides are available for mastering the art of cheese sauce and flavor balancing in dips.

For specific ingredient information, our guides on cheese varieties and meat selection will help you choose the best components. Equipment recommendations help streamline your cooking process, ensuring a fantastic outcome every time.

Seasonal variations can also inspire your next culinary project, offering fresh ways to enjoy familiar recipes throughout the year.

Join the Conversation

We love hearing from our community! Share your experience with the Sizzling Bacon Cheeseburger Queso Dip on social media. What variations did you try? How did your guests respond?

Photography tips could help others capture their creations beautifully. Leave your suggestions in the comments, and inspire others with your unique touch on this classic recipe.

Finding success stories and recipe variations enriches the cooking experience for everyone involved. Join the conversation, and let’s keep creating culinary joy together!

The Recipe

Sizzling Bacon Cheeseburger Queso Dip

Serves: 8

Prep Time: 10 mins

Cook Time: 20 mins

Total Time: 30 mins

Kitchen Equipment Needed

  • Large skillet or slow cooker
  • Wooden spoon or spatula
  • Airtight storage container for leftovers

Ingredients

  • 8 oz cream cheese, softened
  • 1 lb ground beef
  • 8 oz shredded cheddar cheese
  • 4 oz bacon, cooked and crumbled
  • 1/2 cup diced tomatoes
  • 1/2 cup chopped green onions
  • 1 tbsp taco seasoning
  • Salt and pepper to taste
  • Chips for serving

Directions

  1. In a large skillet, cook the ground beef over medium heat until browned. Drain excess fat.
  2. Add cream cheese, cheddar cheese, and taco seasoning to the skillet. Stir until melted and creamy.
  3. Mix in crumbled bacon and diced tomatoes. Stir until fully combined.
  4. Season with salt and pepper to taste, then top with chopped green onions.
  5. Serve immediately with chips for dipping.

Recipe Notes

  • For added spice, include diced jalapeños or use pepper jack cheese.
  • Leftovers can be refrigerated for up to three days or frozen for two months.
  • This dip can also be served in mini bread bowls for a festive touch.

Delicious Sopapilla Cheesecake Bars Recipe for Sweet Indulgence

Sopapilla Cheesecake Bars: A Sweet Delight with a Twist

⚖️
Difficulty
Easy

⏲️
Prep Time
15 mins

🕒
Cook Time
30 mins

⏱️
Total Time
45 mins

🍽️
Servings
12 Bars

Sopapilla Cheesecake Bars are a delightful fusion of traditional Mexican flavors and classic cheesecake goodness. This recipe captures the essence of sopapillas—fluffy, sweet pastries—combined with a creamy cheesecake filling. The experience begins with the warm aroma of vanilla and cinnamon wafting through your kitchen, enticing everyone to gather around. The contrast between the buttery, flaky crust and the rich, velvety filling creates a mouthwatering treat that is perfect for any occasion.

Serving these bars warm is recommended, as the gooey filling oozes slightly when cut, revealing its enticing goodness. Each bite offers a sweet symphony, where velvety cream cheese meets a hint of cinnamon and sugar, leaving a deliciously comforting aftertaste that will have your guests coming back for more. These Sopapilla Cheesecake Bars are not just a dessert; they are a slice of happiness, making them a perfect addition to family gatherings, holidays, or simply as a sweet indulgence after dinner.

Quick Recipe Highlights

  • Flavor Profile: A delightful blend of sweet cinnamon and rich cream cheese creates a comforting dessert that feels indulgent yet familiar.
  • Texture: The buttery, flaky crust contrasts beautifully with the creamy center, making each bite a perfect balance of texture.
  • Aroma: Expect warm notes of cinnamon and sugar that fill your kitchen, inviting everyone to enjoy these bars.
  • Visual Appeal: The golden, slightly caramelized top gives way to a creamy filling, making these bars as beautiful as they are delicious.
  • Skill Level Needed: This recipe is easy enough for beginners, requiring minimal skills but yielding impressive results.
  • Special Equipment: Springform pan or baking dish is ideal for creating the perfect layered structure.

Recipe Overview

  • Difficulty Level: This Sopapilla Cheesecake Bars recipe is easy to follow. Even novice bakers can achieve delicious results, making it an accessible choice for anyone looking to sweeten their day.
  • Category: These bars are perfect for dessert, snacks, or even as a delightful breakfast treat, showcasing their versatility.
  • Cuisine: Inspired by Mexican cuisine, these bars blend traditional flavors with classic dessert elements, making them a unique offering.
  • Cost: The ingredients are affordable, making this recipe a budget-friendly choice for gatherings or everyday treats.
  • Season: Enjoy these bars year-round, but they’re particularly delightful during the fall and winter months when warm desserts are especially comforting.
  • Occasion: Great for festive occasions, family gatherings, or even a simple weeknight dessert, these bars are sure to please!

Why You’ll Love This Recipe

Sopapilla Cheesecake Bars bring together the best of both worlds—the comforting flavor of sopapillas and the creaminess of a cheesecake. The taste is incredibly satisfying; the sweetness is perfectly balanced with the hint of cinnamon, creating an irresistible flavor that will enchant your taste buds. The luxurious texture of the cheesecake filling is complemented by the light, airy crust, making each bite an experience worth savoring.

Convenience plays a key role in this recipe. With just a few simple steps, you can prepare a stunning dessert that requires minimal kitchen time. The ability to serve this dish warm or make it ahead of time adds to its appeal, making it an excellent choice for busy hosts. Whether you’re entertaining guests or treating yourself, these bars deliver with flavor without demanding too much effort.

Additionally, the nutritional aspects of this dessert shouldn’t be overlooked. While it is a treat, it includes cream cheese, which offers some protein and calcium. When prepared thoughtfully, within dietary limits, it can be a satisfying indulgence that doesn’t derail a balanced eating plan.

Socially, these bars can be a centerpiece of conversation around the table. Serving them at parties encourages sharing and connecting, as guests marvel at the delightful combination of textures and flavors. Each bite can spark stories and memories, making them a hit at any gathering.

Finally, these Sopapilla Cheesecake Bars are not only delicious but also cost-effective. Using common pantry ingredients, they are affordable to make, allowing you to create an impressive dessert without breaking the bank. This accessibility makes them an appealing choice for anyone looking to satisfy their sweet tooth.

Historical Background and Cultural Significance

Sopapillas have a rich history rooted in traditional Mexican cuisine, where they have long been enjoyed as a sweet treat. Originating from the Spanish “sopapilla,” these pastries were traditionally fried and served with honey. Over time, these delightful pastries made their way into American dessert culture, particularly in the southwestern United States, giving rise to numerous variations, including this cheesecake bar adaptation.

Culturally, sopapillas hold significance as they embody the warmth and hospitality typical of Mexican gatherings. These treats are often served during festive occasions and celebrations, symbolizing abundance and joy. The evolution of the classic sopapilla into a cheesecake bar reflects the adaptability of traditional recipes to modern tastes and preferences, bridging culinary worlds.

As the recipe for Sopapilla Cheesecake Bars has evolved, it has gained immense popularity among dessert lovers. Families have embraced this sweet treat for its unique flavor and texture while keeping the essence of its sopapilla roots intact. This delicious crossover makes it a standout dessert in modern kitchens.

Regionally, variations of sopapillas can include different fillings or toppings, displaying the diversity of flavors found in Mexican cuisine. As communities adapt recipes to suit local ingredients and tastes, Sopapilla Cheesecake Bars exemplify how culinary traditions can evolve while maintaining a connection to their origins.

Ingredient Deep Dive

  • Cream Cheese: A staple in cheesecakes, cream cheese adds richness and depth to Sopapilla Cheesecake Bars. It is on the sweeter side, which balances beautifully with the cinnamon and sugar. Nutritionally, cream cheese provides protein and calcium, making it a satisfying ingredient in desserts. When selecting cream cheese, look for full-fat versions for a creamier texture. For storage, keep it refrigerated and use it before the expiration date; it can also be frozen for longer preservation. If you’re looking for alternatives, Neufchâtel cheese or a dairy-free cream cheese can substitute effectively, but the flavor might slightly differ.
  • Sugar: Sugar is essential for sweetness and adds to the overall flavor profile of the bars. Both granulated sugar and powdered sugar play roles in enhancing taste and finish. Nutritionally, sugar should be consumed in moderation, but it does provide quick energy. When selecting sugar, opt for organic options if possible, as they are less processed. Store sugar in a cool, dry place. Substitutes like honey or maple syrup can alter the flavor profile but can be used to reduce refined sugar intake.
  • Butter: Butter serves as a key component in the crust, giving it a rich flavor and flaky texture. The use of unsalted butter is recommended to better control the overall saltiness in the recipe. Butter also contributes important fat-soluble vitamins, but it’s important to moderate intake due to its saturated fat content. Look for high-quality, grass-fed butter for the best flavor and health benefits. Store it in the refrigerator or freezer, and remember that it can be easily substituted with margarine or a plant-based alternative if needed.
  • Cinnamon: A warm spice that adds depth and complexity to the flavor of Sopapilla Cheesecake Bars, cinnamon is rich in antioxidants and has anti-inflammatory properties. When purchasing cinnamon, choose Ceylon or true cinnamon for superior flavor and health benefits. Store it in a cool, dark place to preserve its freshness. If you’re seeking flavor variations, consider using nutmeg or pumpkin spice as alternatives to the traditional cinnamon flavor profile.
  • Vanilla Extract: The aromatic addition of vanilla elevates the dessert, rounding out the flavor experience. It provides a sweet and warm essence, making it a staple in many dessert recipes. When selecting vanilla extract, opt for pure vanilla rather than imitation for better taste. It can be stored in a pantry but should be kept away from light to maintain its quality. For variations, consider almond extract to impart a unique flavor twist.

Common Mistakes to Avoid

  • Not softening cream cheese: Always allow cream cheese to come to room temperature before mixing. This ensures a smoother texture and avoids lumps in the filling.
  • Overmixing: When combining ingredients, mix just until combined to avoid a tough texture. Overmixing can incorporate too much air, leading to cracks when baked.
  • Skipping flour: Use flour in the crust preparation to create structure and prevent excess greasiness. Not using flour can result in a soggy base.
  • Not preheating the oven: Make sure the oven is preheated to the appropriate temperature. Baking in a too-cold oven can lead to uneven cooking.
  • Cutting too soon: Allow the bars to cool completely before slicing. Slicing while they’re warm can cause the filling to spill out and ruin the presentation.
  • Using too much sugar: While sweetness is key, too much sugar can overpower the other flavors and affect the texture. Measure carefully!
  • Covering while cooling: Avoid covering the bars while they cool, as it can trap steam and make the crust soggy.
  • Not adjusting oven racks: Ensure that your baking pan is in the center of the oven to allow even cooking and browning.
  • Skipping the garnish: A sprinkle of powdered sugar or cinnamon on top adds a lovely finishing touch—don’t skip this simple step for enhanced appeal!
  • Using metal pans without adjustments: If using metal pans, reduce the cooking time slightly, as they conduct heat better than glass or ceramic.

Essential Techniques

Creaming: This technique is crucial for achieving a smooth, fluffy cream cheese filling. Start by beating softened butter and sugar together until light and fluffy. This traps air and creates a lighter texture in your final bars. Be mindful not to overmix, as this can lead to a denser texture. Look for a creamy consistency with no lumps for best results.

Layering: Layering ingredients properly is essential for the structure of Sopapilla Cheesecake Bars. Start by pressing the dough into the bottom of the pan evenly, ensuring the base supports the filling without sinking. Next, spread the cream cheese filling gently to avoid disturbing the crust. Observing these layers will contribute to a beautiful final product.

Baking: Baking at the correct temperature is vital. Ensure your oven is preheated, and use the middle rack to allow even heat distribution. Watch for visual cues; the edges should be golden brown, and the center should be slightly set but still soft for that creamy texture. Overbaking can lead to dry bars, so check a few minutes early!

Cooling: Cooling the bars at room temperature before refrigerating allows the flavors to meld and the texture to stabilize. This prevents condensation that can ruin the crust. Allowing them to cool completely makes slicing easier and keeps the layers intact, so be patient!

Pro Tips for Perfect Sopapilla Cheesecake Bars

1. Use room temperature ingredients: Let your cream cheese, eggs, and butter come to room temperature before mixing. This helps achieve a smoother texture and better consistency in your bars.

2. Don’t overbake: Keep an eye during the last few minutes of baking. The cheesecake should be set but still slightly jiggle in the center for the perfect creamy texture.

3. Incorporate flavor variations: Add lemon zest for a hint of brightness or a dash of espresso powder for a coffee-infused twist.

4. Experiment with toppings: Top with fresh berries, whipped cream, or a drizzle of honey for added flavor and aesthetic appeal.

5. Use quality ingredients: Opt for high-quality cream cheese and butter for a richer taste and creamy texture.

6. Make it in advance: These bars can be prepared a day ahead; they actually taste better after chilling overnight, allowing the flavors to meld.

7. Ensure even slicing: Use a sharp, hot knife for cutting the bars into even pieces, mirroring the bars’ beautiful layered structure.

8. Store properly: Wrap the remaining bars tightly in plastic wrap before refrigerating to maintain freshness and flavor.

Variations and Adaptations

For seasonal variations, consider incorporating pumpkin puree into the cheesecake filling for a fall twist or fresh strawberries in the summer. These fruit additions not only offer vibrant color but also enhance the flavor profile of the bars.

For dietary modifications, consider creating gluten-free crust using almond flour or gluten-free flour mixtures. Substituting dairy-free cream cheese allows for a completely dairy-free dessert option without sacrificing flavor.

If you’re looking to experiment with flavor variations, add a hint of coconut extract or pecans to the crust for an extra layer of deliciousness. Adjusting the sugar levels can help cater to lower-calorie needs while still delivering on taste.

For texture modifications, consider adding a layer of chocolate ganache or a nuts topping to amplify the dessert’s richness. Each of these adaptations can create a unique experience while honoring the core of Sopapilla Cheesecake Bars.

Serving and Presentation Guide

When plating your Sopapilla Cheesecake Bars, ensure that they are beautifully arranged on a serving dish, perhaps garnished with a dusting of powdered sugar and fresh mint leaves for a pop of color. This elevates the visual appeal and entices guests even more.

Garnishing with a drizzle of caramel or chocolate sauce can enhance both flavor and presentation. Consider serving alongside a scoop of vanilla ice cream to complement the sweetness and richness of the bars.

Temperature considerations are also key; serve these bars lukewarm or at room temperature to maximize the creamy texture and flavor. When portioning, aim for uniformity to provide a pleasing aesthetic and ensure everyone gets a fair share of this delicious dessert.

Wine and Beverage Pairing

A light, sweet Riesling or a Moscato makes an excellent pairing with Sopapilla Cheesecake Bars, enhancing their creamy sweetness. Alternatively, a rich coffee, such as a dark roast or espresso, complements the dessert’s flavors beautifully.

If you’re seeking non-alcoholic options, consider a refreshing iced tea with hints of lemon or a cinnamon-infused apple cider that echoes the spices of the bars. These beverage pairings can elevate the overall dining experience and create memorable moments.

Storage and Shelf Life

Store Sopapilla Cheesecake Bars in an airtight container in your refrigerator. They will maintain their best flavor and texture for about 5 days. A layer of plastic wrap can also help to keep them fresher for longer.

If you want to store them for an extended period, freezing is an option. Wrap the bars tightly in plastic wrap followed by aluminum foil, and they can be kept in the freezer for up to 3 months. Thaw them in the refrigerator before serving to maintain the best quality.

Observe signs of spoilage, such as unusual odors or discoloration, which indicate it’s time to dispose of your bars. Additionally, when reheating, do so gently in the microwave or oven to avoid drying them out.

Make Ahead Strategies

You can efficiently prepare Sopapilla Cheesecake Bars in advance by making the crust and filling a day prior. Store each component separately in the refrigerator until you’re ready to assemble and bake.

Between steps, allow any cooled elements to stay covered to maintain freshness, ensuring optimal flavor when you’re ready to combine and bake. Post-baking, let them cool completely before refrigerating for improved texture when served.

When reheating, consider adding fresh elements, such as whipped cream or fruits, to enhance flavor and presentation, ensuring the bars taste freshly made even after a few days.

Scaling Instructions

To halve the Sopapilla Cheesecake Bars recipe, simply divide each ingredient by two while maintaining the baking time. This adjustment works well for smaller gatherings or if you want to try different variations without excess leftovers.

If doubling or tripling the recipe, be prepared for a bit longer cooking time. Ensure you adjust the pan size accordingly; larger baking dishes often require a longer bake time, while smaller pans may call for reduced time. Keep an eye out for visual cues to ensure perfectly baked bars!

When scaling, remember to use accordingly sized kitchen equipment, such as larger mixing bowls or pans, to accommodate the increased volume of ingredients, ensuring even mixing and baking.

Nutritional Deep Dive

These bars typically break down macronutrients into 23g of carbohydrates, 8g of fat, and 4g of protein per serving. This substantial carbohydrate content is due to the sugar and crust, providing quick energy while still being manageable in moderation.

Micronutrient-wise, the bars can offer calcium from cream cheese and potassium from added fruits. They can fit into various dietary considerations, allowing room for indulgence as a treat rather than a daily staple.

With the right portion analysis, Sopapilla Cheesecake Bars can be a part of a balanced diet. Moderation is key to enjoying these rich bars while keeping your nutritional goals in mind. For those mindful of their intake, this dessert can make an enjoyable occasional treat.

Dietary Adaptations

For gluten-free variations, substitute all-purpose flour in the crust with a gluten-free blend. Numerous products on the market are formulated specifically for baking, allowing you to achieve a similar texture.

If you’re aiming for a dairy-free option, use a blend of dairy-free cream cheese and coconut milk for the filling. These substitutions still yield delicious results while catering to dietary restrictions.

To make these bars vegan, replace eggs with flaxseed meal or applesauce as a binding agent and ensure all other ingredients are plant-based. Both adaptations keep the rich flavor intact while accommodating those with specific dietary needs.

Troubleshooting Guide

Texture issues often arise when the cream cheese is not properly softened. Ensure it has reached room temperature before mixing. If the bars turn out too wet, ensure they are adequately cooled in the refrigerator before serving.

Flavor balance can be a concern, particularly with too much cinnamon or sugar. Allow the ingredients to blend harmoniously during mixing; if noticed afterward, adjust with a pinch of salt to round out the flavor.

Temperature problems during baking can lead to uneven results. Make sure your oven is properly calibrated—if baked too hot or not hot enough, adjust oven settings accordingly for future batches.

If using substitutions, keep an eye on moisture content; different ingredients can lead to variations in hydration, which can affect the final bars. Experiment and document adjustments for future trials.

Recipe Success Stories

Readers often share their excitement about how this recipe has become a family favorite. Many appreciate how easy it is to customize to personal taste, adding their unique twists to the classic preparation.

Adaptations have led to successful variations, from adding fruit fillings to experimenting with different flavored fillings, creating unique treats that have delighted friends and family alike. Posts often highlight photos showcasing these beautiful desserts, making them visually appealing.

Suggestions from readers frequently include tips to make the bars even easier, such as using parchment paper to line the baking pan for easier removal. These insights bring the community together, fostering creativity in the kitchen.

Frequently Asked Questions

Can I freeze Sopapilla Cheesecake Bars? Yes, you can freeze them once completely cooled. Wrap tightly in plastic wrap and aluminum foil and freeze for up to 3 months.

How long do leftovers last in the fridge? Leftover bars can be stored in the refrigerator for up to 5 days in an airtight container.

Can I use low-fat cream cheese? Yes, but keep in mind that using low-fat cream cheese may alter the texture slightly, making it less creamy.

What can I serve alongside these bars? They are delicious on their own, but you can serve them with whipped cream, fresh fruits, or a drizzle of chocolate sauce for added taste.

Can I make the filling ahead of time? Yes, you can prepare the filling a day ahead. Just store it in the refrigerator until you’re ready to use it.

Is it necessary to use vanilla extract? While it’s not strictly necessary, vanilla adds depth of flavor that enhances the overall taste of the bars.

What should I do if the crust is too crumbly? If your crust crumbles, try adding a tablespoon of water or milk to help bind it together better.

Can I double the recipe without adjustments? Yes, you can double the recipe; just be mindful of baking time, as it may take a bit longer.

Are these bars suitable for parties? Absolutely! They are a crowd-pleaser and easy to cut into individual servings, making them perfect for gatherings.

What is the best way to cut these bars? Use a sharp knife and wipe it clean between cuts for clean edges and a tidy presentation.

Additional Resources

Explore other delectable dessert recipes to complement your baking repertoire. From traditional Mexican desserts to contemporary takes on classic sweets, there’s a treasure trove of recipes to try.

Check out technique guides which cover the essential skills needed for successful baking, such as mixing methods and understanding ingredient interactions. Understanding these techniques can elevate future baking endeavors.

Further ingredient information can help you connect with the flavors and nutritional profiles of what you cook, enabling thoughtful substitutions to cater to dietary preferences.

Join the Conversation

We encourage readers to share their experiences, adaptations, and reviews to foster a vibrant cooking community. Engage with us on social media platforms to showcase your beautiful Sopapilla Cheesecake Bars and discuss photos, tips, and tricks.

Don’t forget to leave your feedback and suggestions below! We love hearing your success stories and any variations you’ve created, as well as your photography tips to capture these beautiful treats in all their glory. Join us in celebrating the joy of cooking through this delightful dessert!

The Recipe

Sopapilla Cheesecake Bars

Serves: 12 Bars

Prep Time: 15 mins

Cook Time: 30 mins

Total Time: 45 mins

Kitchen Equipment Needed

  • 9×13 inch baking dish
  • Mixing bowls
  • Electric mixer
  • Spoon or spatula
  • Measuring cups and spoons
  • Whisk

Ingredients

  • 2 cans of crescent roll dough
  • 2 packages (8 oz each) cream cheese, softened
  • 1 cup granulated sugar
  • 1 teaspoon vanilla extract
  • 1 teaspoon ground cinnamon
  • ½ cup unsalted butter, melted
  • 1 cup powdered sugar (for dusting)

Directions

  1. Preheat the oven to 350°F (175°C).
  2. In a mixing bowl, blend together the softened cream cheese, sugar, vanilla extract, and cinnamon until smooth.
  3. Roll out one can of crescent roll dough in the bottom of a greased 9×13 inch baking dish.
  4. Spread the cream cheese mixture over the dough evenly.
  5. Roll out the second can of crescent roll dough and lay it over the cream cheese filling.
  6. Brush the melted butter over the top, and sprinkle with cinnamon and sugar.
  7. Bake in the preheated oven for 25-30 minutes or until golden brown.
  8. Allow to cool before slicing into bars and dust with powdered sugar before serving.

Recipe Notes

  • Feel free to adjust sweetness by modifying the sugar measurements to your taste.
  • Add a layer of chocolate or fruit for added flavor variations.
  • Store bars in the refrigerator for optimal freshness.

Delicious Spicy Shrimp & Avocado Rice Bowl Recipe to Try

Spicy Shrimp & Avocado Rice Bowl: A Flavorful Delight

⚖️
Difficulty
Medium

⏲️
Prep Time
15 mins

🕒
Cook Time
10 mins

⏱️
Total Time
25 mins

🍽️
Servings
4

Indulge your taste buds in a culinary experience with the Spicy Shrimp & Avocado Rice Bowl! This delightful dish combines vibrant flavors and fresh ingredients, creating a perfect balance of heat and creaminess. Each bite offers a journey through a medley of spices, succulent shrimp, and buttery avocado, making it an ideal meal for those who appreciate bold and exciting flavors. With its bright colors and inviting presentation, this rice bowl is sure to impress at any dining occasion.

Elevate your weeknight meals with this quick and satisfying recipe. The spicy shrimp gives a satisfying kick, perfectly complemented by the refreshing avocado and fluffy rice. Packed with essential nutrients, this meal not only delights your palate but also nourishes your body. Whether you’re preparing it for family or entertaining guests, the aesthetics and taste of this rice bowl will have everyone reaching for seconds!

Quick Recipe Highlights

  • Flavor Profile: The dish bursts with zesty, spicy, and creamy flavors that tantalize the palate.
  • Texture: Experience a delightful contrast between the crunchy shrimp and soft avocado.
  • Aroma: The aromatic mix of spices and lime will fill your kitchen, making it irresistible.
  • Visual Appeal: With its colorful components, this bowl is a feast for the eyes.
  • Skill Level Needed: Ideal for cooks of all levels; it’s simple yet impressive.
  • Special Equipment: A skillet and a rice cooker or pot are all you need to whip this up.

Recipe Overview

  • Difficulty Level: The Spicy Shrimp & Avocado Rice Bowl is classified as medium in difficulty, ideal for home cooks with a bit of experience looking to enhance their skills.
  • Category: This dish is perfect for lunch or dinner, ideal for meal prep or a casual dining experience.
  • Cuisine: With influences from Southeast Asian and Mexican flavors, it offers a unique fusion that brings together diverse culinary traditions.
  • Cost: This recipe is budget-friendly, with accessible ingredients that won’t break the bank.
  • Season: Enjoy this dish any season, especially in warmer months when avocados and shrimp are at their peak freshness.
  • Occasion: Perfect for casual get-togethers, weeknight dinners, or as a striking dish for entertaining.

Why You’ll Love This Recipe

Taste and texture appeal reign supreme in this Spicy Shrimp & Avocado Rice Bowl. Each ingredient brings something special; the shrimp is sautéed to create a crispy exterior while remaining succulent on the inside. The creamy avocado adds a rich mouthfeel that beautifully balances the heat from the spices. You’ll love how the flavors meld together while each component maintains its unique character.

Another reason to fall in love with this recipe is the convenience it offers. Ready in just 25 minutes, this dish fits right into your busy lifestyle. The quick preparation and cooking times mean you can whip up a delicious meal even on the busiest of weeknights. Plus, the ingredients are straightforward and easy to find, making it an accessible choice for everyone.

Nutritionally, this rice bowl packs a punch. Rich in protein from the shrimp, healthy fats from the avocado, and carbohydrates from the rice, it provides a well-rounded meal perfect for sustaining you through your day. It’s a great option for those who want to eat healthy without sacrificing taste, combining various nutrients in one bite.

This recipe also shines when it comes to social value. It encourages a sense of community as you gather around the table to enjoy something that’s not only visually appealing but also delicious. Sharing this rice bowl with friends or family elevates any meal into a delightful experience, enhancing connections throughout your dining experience.

Lastly, this dish is remarkable for its cost-effectiveness. With simple and readily available ingredients, you can create restaurant-quality food at home without overspending. The recipe is adaptable, allowing for ingredient substitutions based on what you have on hand, making it a smart choice for budget-minded home cooks.

Historical Background and Cultural Significance

The origin of the Spicy Shrimp & Avocado Rice Bowl stems from a convergence of culinary traditions, combining elements from both Southeast Asian and Latin American cuisines. This fusion showcases the adaptability of comfort food and how cultural exchange can create something entirely new yet familiar.

Culturally, shrimp has been a staple in coastal communities around the world. Historically, the spice blends used in this recipe might bring to mind the tropical regions where bold flavors are embraced. Avocado, revered for its health benefits and culinary versatility, is celebrated in many cultures, adding richness to various dishes.

As food evolves, so too have the ingredients and methods we use. The modern take on this bowl incorporates fresh techniques and contemporary flavor profiles, ensuring that it appeals to a new generation of diners. This evolution exemplifies how classic dishes can morph while retaining their essence in modern cuisine.

Regional variations of this rice bowl add to its charm. From different spice blends used in the shrimp to how the rice is prepared, variations can be found across different cultures, showcasing the universal appeal of combining readily available ingredients to create satisfying meals.

Ingredient Deep Dive

Shrimp is a star ingredient in this recipe. Historically, shrimp fishing has played a pivotal role in many coastal communities, providing sustenance and economic opportunity. Nutritionally, shrimp is low in calories while rich in protein and essential nutrients like iodine and selenium. When selecting shrimp, look for firm, shell-on options, and choose sustainably sourced to support seafood conservation efforts.

Ac avocado is cherished for its creamy texture and healthy fats. Native to South Central Mexico, this fruit has gained global popularity not only for its taste but also for its cardiovascular benefits. When selecting avocados, choose fruits that yield slightly to pressure but are not overly soft. They should be stored at room temperature until ripe, then in the refrigerator if not used immediately.

Rice acts as an excellent base for this meal, providing carbohydrates that fuel the body. Various types of rice can be used, from jasmine to brown rice, each offering unique texture and nutritional profiles. When selecting rice, consider using organic or whole grain varieties for added health benefits. Proper storage includes a cool, dry place to maintain quality, and techniques vary from soaking to rinsing, depending on the desired consistency.

Common Mistakes to Avoid

  • Overcooking shrimp: One of the most common mistakes is cooking shrimp for too long, which can lead to a rubbery texture. Keep an eye on them and cook until just opaque.
  • Using unripe avocados: Unripe avocados can ruin the dish. Always ensure your avocados are ripe and ready to eat for the best flavor and texture.
  • Neglecting seasoning: Failing to properly season shrimp can result in bland flavor. Ensure the shrimp are well-coated with seasoning before cooking.
  • Skipping the resting time: Allowing cooked rice to rest can enhance its texture. Skipping this step could yield overly sticky rice.
  • Ignoring freshness: Always use fresh ingredients for the best taste. Stale spices or old shrimp can diminish the quality of your dish.
  • Measuring ingredients improperly: Precision in measuring spices and rice can affect the overall balance of flavors. Consider using a kitchen scale for accuracy.
  • Forgetting about garnish: Garnishing can elevate your bowl visually and in flavor. Don’t skip the fresh herbs or lime; they’re key!
  • Not balancing flavors: Ensure you’re balancing heat, acidity, and richness when preparing the dish for a well-rounded flavor profile.

Essential Techniques

Sautéing is a fundamental technique used in the Spicy Shrimp & Avocado Rice Bowl. It’s essential because it allows food to caramelize and develop flavors quickly. To master this technique, heat oil in a pan until hot before adding shrimp, ensuring they sear rather than steam. Look for a golden-brown edge and cook until opaque for the perfect texture.

Cooking rice properly is crucial for achieving the right mouthfeel in your rice bowl. Rinse the rice before cooking to remove excess starch and prevent clumping. Using the correct water-to-rice ratio will ensure that the rice cooks evenly. Look for fluffy grains as an indicator of success.

Pro Tips for Perfect Spicy Shrimp & Avocado Rice Bowl

1. Use fresh shrimp and check for any fishy odor, which can indicate age.
2. Marinate shrimp for at least 15-30 minutes to enhance flavor before cooking.
3. Experiment with different types of rice, such as sushi rice or quinoa, for varied texture.
4. Mix in a splash of lime juice to enhance the flavors of the shrimp just before serving.
5. Consider adding your favorite veggies, like bell peppers or carrots, for added crunch.
6. Use a non-stick skillet to minimize sticking and ensure even cooking of shrimp.
7. Adjust the spice level by incorporating more or less chili powder based on your preference.
8. For a richer flavor, consider adding coconut milk to the rice while cooking.

Variations and Adaptations

For regional variations, try adding different spices that reflect the culinary traditions of your preference. A Caribbean twist could involve using jerk seasoning on the shrimp, or for a Mediterranean flavor, add some olives and feta cheese.

Seasonally, adapt your rice bowl by incorporating seasonal vegetables like corn in summer or roasted squash in the fall. Keep the avocados as a consistent topping, adding creamy texture and healthy fats.

Dietary modifications are easy with this recipe. For a vegan version, substitute the shrimp with marinated tofu or chickpeas and use plant-based rice. For a low-carb option, use cauliflower rice instead of traditional rice for a lighter meal.

Flavor variations can be achieved by swapping out the chili powder for Sriracha or using a spice blend from different cuisines, such as za’atar.

Texture modifications could see the addition of crunchy toppings, like pumpkin seeds or crushed tortilla chips, to introduce an interesting contrast to the smooth avocado.

Presentation alternatives can include serving this bowl in lettuce wraps for a fun and interactive meal that’s also gluten-free.

Serving and Presentation Guide

Plating techniques can enhance the visual appeal of your rice bowl. Start with a generous scoop of rice at the bottom, then layer the shrimp and avocado strategically on top to create height and dimension.

For garnishing, fresh cilantro or parsley can add a pop of color and freshness, drizzling a little extra lime juice over the top will enhance the flavor.

Traditional accompaniments might include tortilla chips or a side of fresh pico de gallo, providing a nice crunch and freshness together with the bowl.

Modern serving suggestions could feature the bowl on wooden boards or rustic plates for an aesthetic appeal.

Temperature considerations are key; serve the bowls warm to maintain the integrity of the avocado and shrimp.

Lastly, portion control is important. Ensuring each bowl is balanced with protein, carbs, and healthy fats will keep your meal fresh and satisfying without overwhelming.

Wine and Beverage Pairing

For wine pairings, a crisp Sauvignon Blanc or a fruity rosé complements the Spicy Shrimp & Avocado Rice Bowl very well. The acidity in the wine helps balance out the richness of the avocado.

For non-alcoholic alternatives, a sparkling water infused with lime can enhance the dish’s fresh flavor profile.

If you want a warm beverage, consider serving a light, fragrant green tea that will not clash with the spices.

Temperature considerations are crucial, and serving your beverages chilled will provide a delightful contrast to the warm rice bowl.

Storage and Shelf Life

To store leftovers, place the bowl components separately to maintain freshness, particularly the avocado, which can brown quickly. Store shrimp and rice together in an airtight container in the fridge for up to three days.

Temperature requirements are essential; ensure the cooked shrimp are cooled to room temperature before refrigerating to avoid condensation and sogginess.

For containers, use glass or BPA-free plastic to prevent any chemical leaching. Shrimp should be reheated gently to preserve moisture and texture.

Signs of spoilage include off smells or discoloration in the shrimp. Never consume food if you’re uncertain of its freshness.

To reheat, microwave the shrimp in short bursts, ensuring they don’t overcook. For freezing, rice and shrimp can be safely stored in airtight compartments for up to one month.

Make Ahead Strategies

For an effective prep timeline, consider marinating the shrimp a few hours ahead of time to deepen the flavors. Preparing the rice in advance and cooling it in the fridge can also enhance the texture.

During storage between steps, keep ingredients like avocado whole until just before serving to prevent browning.

Quality impact assessments yield that flavors are more pronounced when shrimp is allowed to marinate overnight.

For assembly tips, laying out all components makes it easy to assemble and serve your bowl without unnecessary delays.

Reheating should be done on low heat to avoid overcooking shrimp, ensuring they remain tender.

Finally, adding fresh ingredients like cilantro or lime juice right before serving brightens up the dish, making it taste freshly prepared.

Scaling Instructions

To halve the recipe, reduce all ingredients proportionately while maintaining the same cooking techniques.

Doubling or tripling the bowl is straightforward; however, ensure that your cooking equipment can accommodate larger quantities, especially the shrimp, to avoid overcrowding.

Equipment adjustments may include using a larger skillet or multiple pots for simultaneous cooking, ensuring everything is ready to serve at the same time.

Timing modifications may be minimal when scaling; however, keeping to a close watch on cooking times for shrimp is essential, as they can easily overcook.

For storage considerations, make sure to label revised portions clearly, so there’s no confusion when reheating leftovers.

Nutritional Deep Dive

Macro breakdown reveals that each serving of the Spicy Shrimp & Avocado Rice Bowl is well-balanced. It generally provides ample protein from shrimp, healthy fats from avocado, and carbohydrates from rice, creating a fulfilling meal.

The micronutrient analysis highlights the freshness of ingredients. Shrimp delivers essential minerals while avocados are high in potassium. Rice, particularly whole grain, provides dietary fiber, promoting digestive health.

Health benefits from this dish include high protein content, omega-3 fatty acids, and heart-healthy fats that support overall wellness, making it a nutritious choice.

Dietary considerations should include balancing this dish with fresh vegetables or greens to add additional nutrients without significantly impacting calorie totals.

A portion analysis could suggest a half-cup of rice per serving, one avocado per bowl, and five to six shrimp, providing an optimal balance for a healthy lifestyle.

Weight management tips encourage portion control, especially with higher-calorie ingredients like avocado, maintaining moderation for an overall balanced diet.

Dietary Adaptations

For gluten-free diets, rest assured this recipe is naturally gluten-free. No specific flour or sauces containing gluten are used.

For a dairy-free version, simply omit any cheese and focus on flavoring your dish with spices and the creamy avocado.

Vegans can replace shrimp with marinated tofu or tempeh, providing quality protein while keeping the dish plant-based.

Low-carb options can substitute traditional rice with cauliflower rice or other non-starchy vegetables.

Keto enthusiasts can enjoy this dish by keeping the rice portion minimal while increasing healthy fats like avocado and incorporating high-fiber veggies.

For those following a paleo diet, simply remove rice and replace it with spiralized zucchini for a fresh take.

Low-FODMAP options can consider rice as the main base while substituting regularly with low-FODMAP vegetables and avoiding high-fructose components.

Troubleshooting Guide

Texture issues like rubbery shrimp can occur if cooked at a high temperature for too long. To prevent this, focus on cooking at medium heat and timing closely.

Flavor balance can falter if too much spice is added. Always start small and gradually increase until you achieve your desired level of heat.

Temperature problems often arise when cooking rice. Using too much water or not enough heat can lead to mushiness. Keep an eye on the water-to-rice ratio for success.

Equipment challenges may arise if your skillet isn’t non-stick. Using the right cookware is vital to prevent shrimp from sticking and ensure even cooking.

Ingredient substitutions can lead to flavor discrepancies. Understanding the core flavors of each ingredient can help you maintain balance if you’re forced to swap something out.

Timing concerns are paramount; preparing shrimp concurrently with rice can ensure everything is served hot. Always prioritize timing for an enjoyable meal experience.

Recipe Success Stories

Community feedback has been overwhelmingly positive, with many praising the dish’s balance of flavors and ease of preparation. Variations shared by readers have highlighted how individual tastes can enhance the experience, such as using different spices or varying heat levels.

Adaptation stories shine bright as home cooks personalize their bowls, transforming this recipe into a family favorite that reflects their culinary creativity. Photography tips shared within the community encourage innovative plating styles that enhance visual appeal.

Readers have suggested modifications that seamlessly integrate local favorites, accommodating preferences while retaining the essence of the original dish.

Shared experiences have showcased the dish’s versatility and depth, making it not only a meal but a shared adventure in cooking.

Frequently Asked Questions

Q1: Can I use frozen shrimp for this recipe?
Yes, frozen shrimp can work well. Ensure to thaw them thoroughly before cooking for even results and better texture.

Q2: How can I store leftovers?
Leftovers should be stored in an airtight container in the refrigerator, and enjoyed within 3 days for optimal freshness.

Q3: Can I make the rice ahead of time?
Absolutely! Cooking the rice in advance and keeping it in the fridge can save time. Just reheat it when ready to serve.

Q4: Is there a gluten-free option for this bowl?
Yes, the ingredients used are naturally gluten-free. Always check sauces and seasonings to ensure they meet your dietary needs.

Q5: What are some recommended substitutions for shrimp?
You can use cooked chicken, marinated tofu, or even chickpeas for a plant-based variant of this dish.

Q6: How spicy is this dish?
The spice level can be adjusted based on your preference, so feel free to reduce or increase the chili powder or add additional hot sauce.

Q7: Can I prepare this rice bowl in advance?
While the shrimp and avocado are best fresh, you can prep ingredients ahead of time and assemble the bowl right before serving.

Q8: What type of rice works best for this recipe?
Jasmine or brown rice are excellent choices, but feel free to experiment with jasmine rice for a slightly sweet flavor or quinoa for added nutrition.

Q9: Can I freeze this dish?
While it’s best served fresh, you can freeze shrimp and rice separately, though consuming them within a month is recommended for best taste.

Q10: What sides can I serve with this bowl?
Fresh greens, a side salad, or tortilla chips complement the bowl well, balancing the richness of the avocado and shrimp.

Additional Resources

Explore related recipes that pair beautifully with our Spicy Shrimp & Avocado Rice Bowl. Check out our collection of zesty salsa recipes or quick and healthy side dishes that enhance the main meal.

Technique guides provide insights on perfecting the sautéing technique, ensuring you achieve that glorious golden crust on your shrimp every time.

Ingredient information is also available, delving deep into the culinary worlds of shrimp and avocados, including their diverse uses in cooking.

Equipment recommendations can help you choose the best cookware for your kitchen needs, ensuring a seamless cooking process.

For seasonal variations, feel free to explore how to adapt this rice bowl based on the best ingredients during each season!

Join the Conversation

We invite you to share your culinary adventures by posting photos on social media using our recipe hashtag! Join our community where you can swap tips and stories, discover delicious variations of this dish, and provide your thoughts on what you loved about the recipe.

Seeking photography tips? We’ve got plenty of advice to help you capture your made dishes beautifully for sharing!

Your recipe reviews greatly enrich our community, offering valuable insights for fellow cooks, and don’t hesitate to suggest your modifications that showcase your creativity!

The Recipe

Spicy Shrimp & Avocado Rice Bowl

Serves: 4

Prep Time: 15 mins

Cook Time: 10 mins

Total Time: 25 mins

Kitchen Equipment Needed

  • Skillet
  • Cooking pot or rice cooker
  • Measuring cups and spoons
  • Cutting board
  • Chef’s knife

Ingredients

  • 1 pound shrimp, peeled and deveined
  • 1 cup jasmine rice
  • 2 avocados, diced
  • 2 tablespoons olive oil
  • 1 teaspoon chili powder
  • 1 teaspoon garlic powder
  • Salt and pepper, to taste
  • Juice of 1 lime
  • Fresh cilantro, for garnish

Directions

  1. Start by cooking the rice according to package instructions.
  2. In a large skillet, heat olive oil over medium-high heat.
  3. Add shrimp to the skillet, seasoning with chili powder, garlic powder, salt, and pepper. Cook for 2-3 minutes until pink and opaque.
  4. Once the rice is cooked, fluff it with a fork and add lime juice.
  5. To serve, layer rice, shrimp, and diced avocado in a bowl. Garnish with fresh cilantro.
  6. Enjoy your Spicy Shrimp & Avocado Rice Bowl warm!

Recipe Notes

  • Feel free to adjust the spice levels according to taste.
  • For added veggies, incorporate bell peppers or greens of choice.
  • Leftovers can be stored in the fridge for up to three days.
  • Avocados should be added just before serving to maintain freshness.

Irresistible Chicken Ricotta Meatballs in Creamy Spinach Alfredo Sauce

Chicken Ricotta Meatballs with Spinach Alfredo Sauce: A Delightful Dinner Treat

⚖️
Difficulty
Medium

⏲️
Prep Time
20 mins

🕒
Cook Time
30 mins

⏱️
Total Time
50 mins

🍽️
Servings
4

Chicken Ricotta Meatballs with Spinach Alfredo Sauce is a delectable dish that brings together rich, comforting flavors in one stunning meal. Combining tender chicken meatballs stuffed with creamy ricotta cheese and vibrant spinach, this dish is a wholesome and satisfying option for family dinners or gatherings. The luscious Spinach Alfredo Sauce adds a velvety touch that enhances the flavors beautifully while delivering a hearty commitment to taste and nutrition.

With every bite, you will experience a symphony of textures and flavors. The meatballs are juicy and flavorful, while the ricotta adds a creamy richness that balances the dish. The velvety Alfredo sauce, infused with fresh spinach, not only offers a pop of color but also a burst of freshness that ties the entire dish together. This Chicken Ricotta Meatballs recipe celebrates the joys of comfort food while making it easy to prepare.

Quick Recipe Highlights

  • Flavor Profile: Savory chicken and creamy ricotta combined with the earthy taste of spinach create a delightful symphony of flavors.
  • Texture: Juicy meatballs provide a satisfying bite, while the rich Alfredo sauce offers a smooth and creamy finish.
  • Aroma: The enticing smell of garlic and freshly cooked chicken fills the kitchen, making it impossible to resist.
  • Visual Appeal: The dish is a feast for the eyes with its vibrant spinach offsetting the golden-brown meatballs and creamy sauce.
  • Skill Level Needed: Suitable for home cooks with basic skills, as it requires straightforward techniques that yield impressive results.
  • Special Equipment: No special equipment is necessary, just standard kitchen tools like mixing bowls, a skillet, and a baking sheet.

Recipe Overview

  • Difficulty Level: Medium, making it perfect for those looking to take their cooking skills up a notch without too much complexity.
  • Category: A hearty main dish that can elevate any dinner table, fitting perfectly in family meals or casual gatherings.
  • Cuisine: Inspired by Italian culinary traditions, where meatballs are celebrated and often paired with creamy sauces.
  • Cost: The approximate cost per serving is budget-friendly, making it accessible for most home cooks while providing great value.
  • Season: Ideal for any season, as the warmth of the dish makes it perfect for cozy nights in, but the freshness of spinach brings lightness suitable for spring.
  • Occasion: Perfect for family dinners, festive occasions, or as a make-ahead meal for busy weeknights.

Why You’ll Love This Recipe

The taste and texture of Chicken Ricotta Meatballs with Spinach Alfredo Sauce truly enchant the palate. The meatballs are savory and tender, packed with flavor that is enhanced by the creamy ricotta. They nestle into a rich, silky Alfredo sauce that beautifully complements the meat’s textures while the spinach adds vibrancy and a pop of color, giving each bite an appealing freshness.

Convenience is another reason to love this dish. Preparing the meatballs only requires a few simple steps, and cooking them is quick and straightforward. They bake perfectly in the oven while you whip up the creamy spinach Alfredo sauce, making it an effortless choice for a delicious homemade dinner.

Nutritionally, this dish shines with the inclusion of lean chicken, nutrient-rich spinach, and calcium-filled ricotta. Together, they create a balanced meal that satisfies hunger without sacrificing health-conscious choices. Families will appreciate the wholesome attributes while enjoying a comforting and delicious flavor profile.

Socially, this recipe is wonderful for entertaining. The inviting aroma and appealing presentation make it easy to serve for a gathering. Combining a fun cooking experience with a dish that can spark conversation creates lasting memories at your dinner table.

Cost-effectiveness also adds to its appeal. Using ingredients that are typically budget-friendly, you can create a restaurant-quality dish at home. With minimal effort and time, impressive results can be achieved, allowing each person to enjoy a delightful meal without breaking the bank.

Historical Background and Cultural Significance

The origin of meatballs can be traced back to ancient Rome, where ground meats were mixed with various ingredients, baked, or fried. Over the centuries, meatball recipes spread across Europe, most notably into Italian cuisine, which popularized the meatball as a staple in many households. The Italian-American version emphasizes hearty sauces, cheeses, and savory spices, leading to the creations we enjoy today.

Culturally, meatballs signify comfort and familial connections in many regions. In Italy, they are traditionally associated with Sunday dinners, where families gather around the table to share stories and laughs. The act of making meatballs often involves family members working together to form and cook them, enhancing the communal aspect of the dish.

The evolution of Chicken Ricotta Meatballs with Spinach Alfredo Sauce reflects changing culinary trends. While meatballs have remained a mainstay, variations such as the addition of ricotta and the creamy spinach sauce illustrate how modern recipes can innovate traditional favorites. As health consciousness grows, incorporating nutrient-dense ingredients has become crucial in maintaining their popularity.

Regional variations of meatballs abound, showcasing local ingredients and preparation techniques. For instance, in southern Italy, meatballs might incorporate breadcrumbs and eggs, whereas, in northern Italy, cheese often plays a significant role. This diversity emphasizes how one dish can adapt to various cultural contexts while still honoring its roots.

Ingredient Deep Dive

Chicken serves as the foundational protein in this recipe. Traditionally a versatile and lean choice, it is celebrated across cultures for its ability to absorb flavors. Chicken is rich in protein and essential nutrients, making it a staple in balanced diets. When selecting chicken, look for fresh cuts without added hormones or preservatives. Store in the refrigerator and consume within a few days or freeze for extended storage.

Ricotta cheese, known for its creamy texture and mild flavor, plays a crucial role in making the meatballs moist and rich. Originating from Italy, it has become a beloved ingredient in various cuisines. Nutritionally, ricotta is a good source of protein and calcium. When selecting ricotta, opt for fresh varieties made from whole milk for the best flavor. Store it in the refrigerator, and use within a week for optimal quality.

Spinach, a key ingredient in the Alfredo sauce, is as nutritious as it is visually appealing. This leafy green is packed with vitamins A, C, and K, as well as iron and folate. Associated with Mediterranean diets, spinach’s versatility is celebrated in a wide variety of dishes worldwide. Choose bright green leaves without wilting, and store them in the refrigerator in a breathable container. Consider using frozen spinach if fresh isn’t available, making it a great kitchen staple.

The Alfredo sauce typically features butter, heavy cream, and Parmesan cheese, contributing to its luscious texture. Butter adds richness, while heavy cream ensures a silky mouthfeel. Parmesan cheese, aged to perfection, brings depth of flavor to the sauce. Using quality ingredients will greatly affect the final taste. Look for freshly grated cheese and high-fat cream for the best results.

Common Mistakes to Avoid

  • Overmixing the meatball mixture can lead to dense, tough meatballs. Mix just until combined to maintain a tender texture.
  • Not browning the meatballs before baking can result in a lack of flavor. Searing them enhances their taste through caramelization.
  • Using low-quality cheese in the sauce can diminish the flavor. Always choose good-quality Parmesan for authentic taste.
  • Adding too much liquid to the sauce can make it thin. Start with less and adjust as necessary for desired consistency.
  • Skipping the seasoning can lead to bland meatballs. Don’t shy away from spices and herbs to enhance flavor.
  • Rushing the sauce preparation can prevent it from thickening properly. Take your time and allow it to reduce for better texture.
  • Not allowing the meatballs to rest post-cooking can lead to them falling apart. Let them sit for a few minutes before serving.
  • Neglecting to taste as you cook means missing out on achieving perfect flavor balance. Adjust seasoning as needed at each step.
  • Using dry, stale bread crumbs in the meatballs can prevent proper moisture retention. Fresh or homemade bread crumbs are preferred.
  • Ignoring the importance of using fresh spinach can impact the flavor and nutritional value of the sauce. Fresh is always best.

Essential Techniques

Mastering the art of making meatballs is essential for success in this dish. The key is in the mix—combine ingredients gently to prevent dense meatballs. Use your hands for optimal control and ensure even distribution of flavors. The visual cue for ideal meatball size is to form them slightly larger than a golf ball; they will shrink slightly as they cook.

Searing meatballs before baking enhances their flavor through Maillard reactions. Heat oil in a skillet until shimmering, then add meatballs without overcrowding to ensure even browning on all sides. Watch for a golden color as a sign they’re developing an enhanced flavor profile.

Making a creamy Alfredo sauce requires proper temperature management. Gently heat butter and cream together, being cautious not to boil, which can lead to separation. Whisk continuously to blend, observing the sauce thicken as the Parmesan cheese is added. The right consistency is when it coats the back of a spoon.

Incorporating spinach into the sauce should be done at the end to maintain its vibrant color and nutritional benefits. Add the spinach leaves just before serving; they only need a couple of minutes to wilt properly without losing their color and texture.

Pro Tips for Perfect Chicken Ricotta Meatballs with Spinach Alfredo Sauce

1. For the juiciest meatballs, use a mix of dark and light chicken meat for balanced flavor and moisture.
2. Opt for fresh herbs like parsley and basil in the meat mixture for an aromatic boost that brightens the dish.
3. Allow the meat mixture to chill in the refrigerator for 20-30 minutes before forming meatballs for better texture.
4. Preheat your oven adequately for even cooking; a hot oven ensures the meatballs develop a crispy exterior.
5. When preparing the Alfredo sauce, warm the cream slowly; boiling will negatively impact the sauce’s texture.
6. Try adding a splash of white wine to the sauce for added depth and complexity in flavor.
7. Experiment with different cheese types, such as Asiago or Pecorino, to put a personal twist on the sauce.
8. Serve immediately for the best flavor and texture; leftovers can be reheated but may lose creaminess over time.

Variations and Adaptations

Regional variations of this recipe can focus on different spices or ingredients reflective of local tastes. For a Mediterranean twist, consider adding kalamata olives or sun-dried tomatoes to the meat mixture. Seasonal adaptations might include using zucchini noodles instead of pasta to create a lighter, summer dish, pairing beautifully with the creamy sauce.

Dietary modifications can cater to various preferences. For a vegetarian option, substitute the chicken with mushrooms or a plant-based protein alternative, ensuring to retain the ricotta for creaminess. A lower-carb adaptation can be achieved by serving the meatballs over spiralized vegetables.

Texture modifications could introduce crispy baked panko tops to the meatballs for crunch, adding variation to their traditional softness. Additionally, consider presenting the meatballs on a bed of fluffy mashed potatoes for a comforting, hearty meal that contrasts the creamy Alfredo sauce.

Serving and Presentation Guide

Plating this dish beautifully can enhance the dining experience significantly. Start with a base of the creamy spinach Alfredo sauce, placing the meatballs artfully on top. Drizzle some extra sauce over the meatballs for added flavor and a visually appealing shine.

Garnishing with freshly chopped parsley or a sprig of basil adds a touch of color and aroma. For a modern look, consider serving on rustic wooden platters, or use elegant plates for a more formal affair. Accompanying the dish with crusty garlic bread or a fresh garden salad elevates the overall presentation and provides complementary flavors.

Temperature is essential when serving. Ensure the meatballs are warm when plated; this enhances the flavors and provides a comforting meal without cold spots.

For portion control, serve two or three meatballs alongside a generous scoop of the Alfredo sauce to keep the focus on the dish while allowing guests to experience both the meatballs and sauce equally.

Wine and Beverage Pairing

Pairing wine with Chicken Ricotta Meatballs can elevate the meal experience. A full-bodied white wine like Chardonnay complements the creamy flavors of the Alfredo sauce beautifully. Alternatively, consider a light, fruity red like Pinot Noir that enhances the savory notes of the chicken without overpowering the dish.

For those preferring non-alcoholic options, a sparkling water with a twist of lemon can cleanse the palate while providing a refreshing experience. If coffee is appealing, a mild roast serves as an excellent counterbalance to the richness of the dish.

Temperature is crucial for wine serving. White wines should be chilled slightly before serving, while reds should be slightly below room temperature to maintain balance.

Storage and Shelf Life

Storing leftovers properly ensures that Chicken Ricotta Meatballs with Spinach Alfredo Sauce can be enjoyed later without losing quality. Allow the dish to cool to room temperature before storing it in airtight containers in the refrigerator, where it can last for up to three days.

If longer storage is needed, freezing is an excellent option. Package the meatballs and sauce separately to preserve textures. They can be frozen for up to three months; be sure to label the containers clearly with dates.

Signs of spoilage include unusual odors, discoloration, or off-putting textures. When reheating, ensure the dish reaches an internal temperature of 165°F to maintain food safety standards. To reheat, gently warm on the stovetop or in the microwave, adding a splash of cream to revive the sauce’s consistency.

Make Ahead Strategies

Preparing certain components ahead of time can streamline the cooking process. Meatballs can be mixed and shaped several hours in advance, stored in the refrigerator, and cooked right before serving. This allows for flexibility when planning your meal.

The spinach Alfredo sauce can also be made a day ahead. Prepare the sauce by following the recipe, letting it cool before storing it in an airtight container in the refrigerator. Reheat gently before serving, adding fresh spinach just before serving to keep it vibrant.

Quality impact can be assessed through flavors that develop over time; pre-preparation often results in a more well-rounded sauce. When assembling, ensure to have all elements ready to go to facilitate a quick cooking process on meal day.

Scaling Instructions

To accommodate varying group sizes, scaling the Chicken Ricotta Meatballs recipe can be easily done. When cutting the recipe in half, make sure to adjust side dishes as needed, so everything scales appropriately for the family gathering.

When doubling or tripling, account for the increased baking time, as larger batches may take longer to cook through. Ensure to use a larger baking sheet or multiple trays to avoid overcrowding, promoting even cooking.

Consider adjustments to equipment, as larger quantities require bigger pots or pans. For storage, consider using larger containers or multiple small ones, appropriately noted with dates for freshness and food safety practices.

Nutritional Deep Dive

This dish provides an excellent macro breakdown. Chicken offers lean protein essential for muscle maintenance, while ricotta adds potentially beneficial fats and additional protein. The spinach brings a wealth of vitamins, including A, C, and K, crucial for overall health.

Looking into micronutrient analysis, this recipe shines with calcium from ricotta, iron from spinach, and B vitamins from chicken. Ultimately, these nutrients support various bodily functions, including strong bones, immunity, and energy metabolism.

Health benefits extend beyond nutrition, with balanced meals like these aiding in weight management, especially when served with well-portioned servings alongside vegetables.

For those mindful of dietary considerations, it’s advisable to pay attention to portion sizes to maintain a healthy balance while enjoying this indulgent dish.

Dietary Adaptations

For gluten-free options, simply use gluten-free breadcrumbs in place of traditional ones. For a dairy-free version, substitute ricotta with cashew cheese and replace the cream in the sauce with coconut cream for a comparable texture.

Vegan adaptations can also be achieved by using plant-based ground meat, nutritional yeast for cheesy flavor, and non-dairy milk in the sauce, ensuring all textures and flavors are still representative of the original recipe.

Low-carb variations might involve serving the dish atop spaghetti squash or zucchini noodles rather than traditional pasta, while ensuring all sauces and meat components remain compliant with ketogenic standards.

Low-FODMAP adherents should consider omitting garlic from the sauce and using lactose-free ricotta to avoid digestive discomfort while still enjoying this hearty meal.

Troubleshooting Guide

Texture issues can arise if the meatballs are overmixed or under-baked. Monitor them closely, performing the toothpick test to ensure they’re firm and properly cooked.

Flavor balance might need adjustments after cooking; a small pinch of salt or fresh herbs can enhance taste if the dish feels bland. Adding an acidity component such as lemon juice can also elevate flavors significantly.

Temperature problems can be handled by using an instant-read thermometer to check meatballs’ internal temperature, ensuring doneness without overcooking.

Equipment challenges can be overcome by utilizing extra cooking sheets if your oven space is limited, ensuring a safe distance between meatballs for proper cooking.

Ingredient substitutions should be approached with caution; testing new substitutes on a small batch will assist in ensuring flavors meld well.

Timing concerns, such as needing more cooking time, can be alleviated by covering the dish with foil during the last minutes in the oven to retain moisture while they finish baking.

Recipe Success Stories

Community feedback on Chicken Ricotta Meatballs with Spinach Alfredo Sauce has been overwhelmingly positive, with many readers praising the dish’s flavor and ease of preparation. It has become a favorite to introduce to friends and family during gatherings, surprising guests with its comforting and rich flavors.

Many have successfully adapted variations of the recipe, incorporating different herbs, cheeses, or pasta alternatives, showing how versatile the dish can be. Success stories often share how the creamy sauce can elevate even the simplest of weeknight dinners, taking them to another level.

Readers have also offered suggestions for ingredient substitutions based on personal preferences, such as using different proteins or dairy alternatives, showcasing its adaptability across dietary needs while maintaining deliciousness.

Photography tips from readers emphasize capturing the vibrancy of the sauce and meatballs, which not only makes the dish visually appealing but also represents the heartwarming experience it offers for any table setting. The stunning colors of green spinach against creamy white sauce create a feast for the eyes.

Frequently Asked Questions

1. Can I use ground turkey instead of chicken?
Yes, ground turkey works nicely and can deliver lower-fat content while maintaining similar flavors. Season appropriately to enhance taste.

2. How can I make this dish gluten-free?
Just replace regular breadcrumbs with gluten-free alternatives, and ensure that all sauces and additional ingredients are gluten-free.

3. Can I freeze these meatballs?
Yes! These meatballs freeze well. Just cook them, let cool, and store in airtight containers or freezer bags.

4. What if I don’t have ricotta cheese?
Cream cheese or cottage cheese can serve as substitutions, although the flavor and texture will differ slightly.

5. How can I add more vegetables to the dish?
Incorporate sautéed mushrooms or bell peppers into the meatballs or serve alongside roasted vegetables to enhance nutrition.

6. Can I prepare the meatballs in advance?
Absolutely! Prepare and shape the meatballs ahead of time, refrigerating until ready to bake for convenience.

7. What’s the best way to reheat leftovers?
Reheat in a skillet over low heat, adding a splash of cream to revive the sauce’s consistency and prevent drying out.

8. Do I have to use heavy cream for the sauce?
You can substitute half-and-half for a lighter option, but avoid using low-fat milk as it may separate.

9. Is this dish suitable for meal prep?
Yes, it’s great for meal prep, as the components can be stored separately and portioned for easy dining throughout the week.

10. Can I replace the spinach in the sauce?
Other greens, such as kale or Swiss chard, can also work nicely if you prefer different flavors or textures.

Additional Resources

For those interested in expanding their cooking skills, related recipes like classic marinara sauce or homemade garlic bread will seamlessly accompany Chicken Ricotta Meatballs and enhance your meal. Furthermore, delicious side dishes such as a Caesar salad or roasted vegetables will bring a balanced experience to the table.

Techniques for mastering meatballs are crucial in this journey; look for guides specifically focused on perfecting flavor, moisture retention, and cooking methods.

Ingredient information on sourcing high-quality items will also be valuable, particularly for selecting the best poultry, cheeses, and produce vital to this dish’s success.

As seasons change, experimenting with seasonal variations of this recipe will keep it fresh and engaging. Incorporating seasonal veggies or herbs can lead to delightful new interpretations as the palate shifts year-round.

Join the Conversation

Engaging with our community on this delicious recipe is encouraged! Share your cooking experiences, feedback, and tips with others who enjoy Chicken Ricotta Meatballs with Spinach Alfredo Sauce.

Photography enthusiasts may share images of their culinary creations on social media, inspiring others while showcasing personal twists on the classic recipe. Leave reviews and share adaptations to help foster a community that thrives on delicious experiences and fresh ideas.

Exploring variations can also be fun—consider telling us about unique ingredients you’ve added or changes you’ve made to suit your tastes. Let’s celebrate our shared passion for cooking and keep the conversation lively!

The Recipe

Chicken Ricotta Meatballs with Spinach Alfredo Sauce

Serves: 4

Prep Time: 20 mins

Cook Time: 30 mins

Total Time: 50 mins

Kitchen Equipment Needed

  • Mixing bowls
  • Skillet
  • Baking sheet
  • Whisk
  • Measuring cups and spoons

Ingredients

  • 1 lb ground chicken
  • 1 cup ricotta cheese
  • 1 cup fresh spinach, chopped
  • 1/2 cup breadcrumbs
  • 1 egg
  • 1/4 cup Parmesan cheese, grated
  • 2 garlic cloves, minced
  • Salt and pepper to taste
  • 2 cups heavy cream
  • 1 cup spinach for sauce
  • 4 tbsp butter
  • 1 cup Parmesan cheese for sauce, grated

Directions

  1. Preheat the oven to 400°F (200°C).
  2. In a large bowl, combine the ground chicken, ricotta, chopped spinach, breadcrumbs, egg, Parmesan, garlic, salt, and pepper.
  3. Form mixture into meatballs, placing them on a baking sheet.
  4. Bake meatballs for 25 minutes until golden brown.
  5. In a skillet, melt butter and add heavy cream over medium heat, stirring until smooth.
  6. Stir in grated Parmesan and spinach until everything is well combined.
  7. Place meatballs in the sauce and simmer for a few minutes to absorb flavors.
  8. Serve warm, garnished with extra Parmesan if desired.

Recipe Notes

  • Feel free to customize the herbs and spices in the meatballs to match your taste.
  • For a lighter sauce, substitute heavy cream with half-and-half or a non-dairy alternative.
  • Add fresh herbs like basil or parsley to the sauce for extra flavor.

Savor Delicious Ribeye Steak with Caramelized Onions and Fries

Ribeye Steak with Caramelized Onions and Crispy French Fries: The Ultimate Comfort Meal

⚖️
Difficulty
Medium

⏲️
Prep Time
15 mins

🕒
Cook Time
30 mins

⏱️
Total Time
45 mins

🍽️
Servings
2

Ribeye steak, renowned for its rich marbling and bold flavor, is the star of this dish, elevated by sweet caramelized onions and crispy French fries. This combination not only offers an exquisite dining experience but also brings a sense of warmth and comfort that can easily turn any meal into a special occasion. The buttery texture of the ribeye paired with the sweetness of the onions creates a symphony of flavors that dance on your palate, while the French fries add a delightful crunch that contrasts beautifully with the steak.

Cooking ribeye steak may seem intimidating, but with this straightforward recipe, anyone can achieve a restaurant-quality dish at home. Sizzling in a hot skillet, the steak develops a beautiful crust, locking in the juices for a tender bite. As the onions caramelize to a deep golden color, they provide a rich, savory sweetness that enhances the overall flavor of the steak. Whether it’s a weeknight dinner or a weekend gathering, this ribeye steak with caramelized onions and crispy French fries is sure to impress.

Quick Recipe Highlights

  • Flavor Profile: This dish features a rich and savory flavor from the ribeye steak, complemented by the sweet, caramelized onions and finishing with the salty crunch of French fries.
  • Texture: Expect a tender, juicy bite from the steak, contrasted by the soft and sweet onions, and crispy, golden fries that provide a satisfying crunch.
  • Aroma: The aroma of seared meat mingling with sweet onions and crispy fries creates an enticing smell that will make your mouth water.
  • Visual Appeal: The beautifully seared ribeye steak garnished with golden onions and perfectly fried fries offers a vibrant and inviting plate which is a feast for the eyes.
  • Skill Level Needed: With moderate skill in cooking meats, anyone can master this recipe; basic frying and sautéing techniques are all that’s required.
  • Special Equipment: A heavy skillet or cast-iron pan is essential for searing the steak to perfection and achieving that desirable crust.

Recipe Overview

  • Difficulty Level: This recipe falls under medium difficulty due to the need for timing the cooking of the steak and onions properly to ensure both elements are finished simultaneously.
  • Category: This dish is perfect for a main course and fits well in any elegant dinner or casual family meal setting.
  • Cuisine: Inspired by classic American cuisine, featuring hearty and flavorful meat dishes, this recipe highlights the ribeye steak’s luxury and simplicity.
  • Cost: The cost of this recipe is reasonable, considering ribeye steak offers a quality experience without breaking the bank, enabling you to enjoy fine dining at home.
  • Season: This dish shines in all seasons, comfortably fitting into cozy winter meals or summer barbecues alike.
  • Occasion: Make it for a romantic dinner, family celebration, or a casual get-together with friends; it’s versatile and appeals to many occasions.

Why You’ll Love This Recipe

The taste and texture of this ribeye steak with caramelized onions and crispy French fries are truly delightful. The combination of the juicy, well-marbled beef, and the sweet, tender onions creates a mouthwatering dish. As you take each bite, the flavors meld perfectly, and the satisfying crunch of the fries adds a playful element to the dish.

One of the best aspects of this dish is its convenience. It doesn’t require complex cooking techniques, making it easily accessible for both novice and experienced home cooks. In just 45 minutes, you’re able to prepare a restaurant-grade meal without the stress of intricate instructions or prolonged cooking time.

From a nutritional standpoint, the ribeye steak provides a rich source of protein, essential vitamins, and minerals. Paired with the nutritious onions and potatoes, this meal delivers a balanced option that can be enjoyed in moderation.

This dish is perfect for social gatherings. The hearty portions of steak and fries make it a crowd-pleaser, and it can be easily served with various sides to suit everyone’s palate. Sharing a beautifully plated ribeye steak with family and friends can bring people together, creating memorable moments.

Finally, the cost-effectiveness of this recipe enhances its appeal. Although ribeye steak is considered premium, it can be purchased at a reasonable price, especially when enjoyed at home. You can create an impressive meal without the inflated costs typically found at restaurants.

Historical Background and Cultural Significance

The ribeye steak has its origins in the cattle-ranching culture of North America, where beef became a staple protein source for many communities. Known for its rich flavor and tenderness, the ribeye comes from the rib section of the cow and has long been a favored cut, particularly in the United States.

Culturally, steak dinners have been associated with celebrations, gatherings, and Sunday family dinners in many households. They symbolize prosperity and comfort, signifying special occasions or milestones in one’s life. The act of grilling or pan-searing steaks has fostered communal cooking traditions that celebrate togetherness.

Throughout the years, the way we prepare and serve ribeye steak has evolved. From classic weeknight dinners to elaborate culinary presentations in fine dining restaurants, the versatility of the dish allows it to adapt to various cooking styles while maintaining its delicious essence.

Regional variations of ribeye steak exist, inspired by local traditions and flavor profiles. For example, Mexican cuisine often celebrates beef with bold spices and flavors, while Southern BBQ traditions highlight smoky preparations and rich sauces, showcasing the diverse ways a simple cut of meat can be interpreted.

Ingredient Deep Dive

For the ribeye steak, it’s important to choose a well-marbled cut, as the fat content enhances flavor and tenderness. The history of ribeye dates back to the early days of cattle farming in America, and it has been favored for its robust taste. Nutritionally, ribeye is high in protein, iron, and essential fats. When selecting ribeye, look for a bright red color and well-distributed fat. Store it in the refrigerator and use it within a few days or freeze it for longer shelf life.

Caramelized onions bring a sweet, rich flavor that complements the savory taste of the steak. Onions have a long culinary history, valued for their flavor, and versatility in both sweet and savory dishes. Nutritiously, they offer antioxidants, vitamins, and contribute to heart health. When selecting onions, look for firm, unblemished bulbs, and store them in a cool, dry place. Substitute with shallots or leeks if needed.

French fries are a quintessential side dish that can range from simple to gourmet. The origin of French fries can be traced back to Belgium and France, and they have become an American classic. Nutritionally, fries are high in carbohydrates and can be a source of fiber when made with the skin on. Opt for starchy potatoes like Russets for frying, and store them in a cool, dark place. For alternatives, you can use sweet potatoes or cauliflower.

Common Mistakes to Avoid

  • Overcooking the steak: This can lead to a tough and dry result; use a meat thermometer to check for doneness.
  • Not allowing the steak to rest: Resting helps redistribute juices that keep the steak juicy; let it rest for at least 5 minutes before slicing.
  • Caramelizing onions too quickly: Patience is key; cook onions on medium low heat to allow the natural sugars to develop properly.
  • Using cold oil for frying: Always heat your oil before adding potatoes to ensure they cook evenly and become crispy.
  • Skipping the seasoning: Season the steak generously with salt and pepper before cooking to enhance the flavor.
  • Rushing the frying process: Frying in batches helps maintain oil temperature, creating crispy fries.
  • Not using the right pan: Use a heavy skillet or cast iron for best results in searing the steak.
  • Neglecting to flip the fries: Stir or flip fries to ensure even cooking and browning, achieving that perfect crisp.

Essential Techniques

Searing the ribeye steak is crucial for developing a flavorful crust. It’s important to preheat your skillet and add oil only after the pan is hot. This technique prevents sticking and enhances the Maillard reaction, resulting in delicious caramelization. Watch for the color change and crust formation to judge doneness.

Caramelizing onions requires low and slow cooking. Start with a bit of oil or butter in a hot pan and slice your onions thin. Stir occasionally and allow them to cook for 20-30 minutes until they transform into a rich, golden color, releasing their natural sweetness. Avoid rushing this technique for the best results.

Frying French fries involves several key steps. First, cut your potatoes into uniform pieces to ensure even cooking. Soaking the cut potatoes in cold water before frying helps to remove excess starch and results in crispier fries. Be mindful of the oil temperature, as it should be hot enough to fry without absorbing excess oil.

Pro Tips for Perfect Ribeye Steak with Caramelized Onions and Crispy French Fries

Choosing a quality steak will make all the difference in flavor; look for USDA Prime or Choice ribeye cuts for the best outcome. Always let your steak come to room temperature before cooking to promote even cooking throughout the meat.

Use a meat thermometer to achieve your desired level of doneness. Aim for 130°F for medium-rare, 140°F for medium, and 150°F for medium-well. This ensures a succulent result tailored to your preference each time.

For perfectly caramelized onions, remember to add a pinch of salt to help draw out moisture, speeding up the caramelization process. If desired, a splash of balsamic vinegar or beer can enhance flavor and deglaze the pan for a richer taste.

After frying your French fries, drain them on paper towels to eliminate excess oil and sprinkle with salt immediately for optimum flavor. To keep them crispy longer, consider an oven or warming drawer preheated at a low temperature.

Try different seasonings like garlic powder or smoked paprika on your fries for a twist, or try serving the steak with a compound butter for an extra layer of flavor.

Consider letting your cooked steak rest covered loosely with foil for about 10 minutes; this allows the juices to redistribute, ensuring every bite is moist and tender.

Variations and Adaptations

Regionally, variations of ribeye steak might include regional spices; for example, using a Tex-Mex rub can give a completely different flavor profile. You might also try marinating the steak in soy sauce and ginger for an Asian flair.

Seasonal adaptations could involve adding grilled vegetables as a side during summer or swapping in root vegetables for a hearty winter meal alongside the fries.

For dietary modifications, pescatarians might opt for a grilled salmon fillet in place of beef, while vegetarians could enjoy a trading the meat for portobello mushrooms to replicate a meaty texture.

Flavor variations can be easily introduced through different cooking oils or by finishing with herb-infused oils; consider rosemary or thyme for added depth.

Texture modifications are also possible. For a more health-conscious option, consider oven-baked fries or sweet potato alternatives for the traditional crispy fries.

Lastly, for presentation alternatives, you might serve the steak and onions over a bed of creamy mashed potatoes or polenta, creating an elegant restaurant-style dish from the comforts of home.

Serving and Presentation Guide

To plate this dish beautifully, start with a foundation of crispy French fries. On top, place the ribeye steak, allowing the juices from the steak to mingle with the fries. Spoon the caramelized onions generously over the steak, letting them cascade down the sides for a restaurant-quality effect.

Garnishing ideas might include fresh herbs like parsley or thyme, adding a vibrant pop of color. A sprinkle of coarse sea salt can enhance the visual appeal and flavor profile further.

Traditional accompaniments could include a side salad or homemade aioli for dipping the fries. For modern twists, consider adding pickled vegetables for a sharp contrast to the rich flavors of the steak.

Temperature considerations are crucial; serve the steak slightly warm rather than piping hot to enjoy its full range of flavors. For portion control, consider slicing the steak before serving, making it easy for guests to help themselves while showcasing the beautiful interior.

Lastly, serve with a glass of red wine, such as a Cabernet Sauvignon, which complements the richness of the dish wonderfully.

Wine and Beverage Pairing

For wine pairings, a full-bodied red like Cabernet Sauvignon or Malbec is perfect; these varietals enhance the dish’s richness while balancing the flavors of the steak and onions. A fruity Zinfandel would also work nicely, accentuating the sweetness of the caramelized onions.

For non-alcoholic alternatives, serve sparkling water with a squeeze of lemon or a fruit-infused iced tea that can refresh the palate without overpowering the meal’s flavors.

If considering coffee pairings, opt for a bold roast served black, which can add an interesting contrast to the richness of the beef.

Temperature is essential; ensure your wine is served at the right temperature—red wines should be slightly cooler than room temperature for optimal flavor.

For serving suggestions, consider decanting the wine ahead of time to allow it to breathe, creating a more enjoyable tasting experience alongside your dinner.

Storage and Shelf Life

To store leftover ribeye steak, wrap it tightly in plastic wrap or aluminum foil and refrigerate it for up to 3 days. For longer storage, consider freezing the steak; it will maintain its quality for about 3 months when stored properly.

Caramelized onions can be kept in the refrigerator for up to a week, while crispy fries are best enjoyed fresh. If needed, store them in an airtight container for a day but expect some loss of crispiness.

When it comes to reheating, use an oven instead of a microwave to preserve texture, especially for the fries. Heat them at a low temperature until warmed through.

Signs of spoilage for cooked steak include a foul odor, discoloration, or a slimy texture; these indicate the meat is no longer safe to consume.

Freezing guidelines suggest pre-slicing the steak for easier use in future meals; this allows for quick incorporation into stir-fry or casseroles.

Make Ahead Strategies

To make this dish ahead of time, consider preparing the caramelized onions the day before. They can be made in advance and stored in the refrigerator, ready to reheat when you’re ready to cook the steak.

For steak, try seasoning it in advance and allowing it to marinate for a few hours or overnight, which can enhance tenderness and flavor.

French fries can be prepped by cutting the potatoes several hours in advance and soaking them in cold water to remove excess starch; this improves crispiness when fried.

When it comes to reheating, make sure to refresh the fries in the oven for a few minutes to regain their crunch before serving.

Adding fresh elements, like a simple salad or additional fresh herbs, can elevate the meal and ensure it tastes freshly prepared, even if some components are made ahead of time.

Scaling Instructions

To halve this recipe, simply divide the quantities of each ingredient by two and adjust cooking times as needed, especially for the steak.

If doubling or tripling the recipe, ensure you have a large enough skillet to accommodate all the steak and onions at once. You may need to batch cook or use multiple pans for even cooking.

Equipment adjustments might include using a larger pot or deep fryer if you’re scaling up the French fries to ensure they fry evenly without overcrowding the pan.

Timing modifications will also be necessary; larger batches can take longer to cook, so monitor each component to avoid overcooking.

Storage considerations are simple; ensure you have suitable containers to keep leftovers organized and fresh, especially if you are preparing food for a crowd.

Nutritional Deep Dive

In terms of macro breakdown, each serving of ribeye steak offers a significant protein boost, typically around 30-35 grams per serving, which is key for muscle repair and growth.

Micronutrient analysis reveals that ribeye is rich in iron and B vitamins, supporting energy levels and red blood cell production. The caramelized onions contribute a healthy dose of fiber and antioxidants.

Health benefits of this meal include not only a novel culinary experience but also a protein-rich option that can aid in weight management when balanced with vegetables and controlled portion sizes.

Dietary considerations should take into account individual nutritional needs; while the steak itself is nutrient-dense, it may be high in saturated fats, thus should be enjoyed in moderation.

For portion analysis, aim for a balanced plate with half dedicated to vegetables or similar sides, ensuring a comprehensive and satisfying meal without over-indulgence.

Lastly, consider ways to manage high-calorie dishes by serving smaller portions of steak alongside ample vegetables or other low-calorie sides, enabling celebration of flavors without excess.

Dietary Adaptations

For a gluten-free option, simply ensure any seasoning used is free of gluten; this recipe is inherently gluten-free since it relies on natural ingredients.

For dairy-free adaptations, the ingredients can be adjusted to exclude any butter used in cooking without significantly affecting taste, or one could use a dairy-free butter substitute.

For those following a vegan diet, replacing ribeye with a hearty vegetable such as grilled portobello mushrooms or grilled eggplant can provide a similar satisfying experience.

Low-carb diets may consider serving the ribeye with roasted veggies instead of traditional fries. Zucchini or cauliflower mash can be an excellent alternative.

For keto dieters, the ribeye fits perfectly due to its high protein and fat content, and you can prepare the onions with minimal sugar to stay within dietary guidelines.

Paleo enthusiasts can also enjoy this recipe, provided they stick to whole, unprocessed ingredients and avoid any added sugars in the caramelization process.

Other specific diets, such as low-FODMAP, can enjoy this dish by using the right types of onions or choosing appropriate substitutes to ensure digestibility.

Troubleshooting Guide

Texture issues can arise if the steak is overcooked, leading to a tough texture. Always monitor cooking time closely and use a meat thermometer for best results.

Flavor balance might be off if too much salt is added to the steak; this can make the dish overly salty. Start with less and adjust to taste after cooking.

Temperature problems can manifest if the steak is placed in a pan that’s not hot enough. Ensure your skillet is hot enough to sear properly, enhancing flavor and texture.

Equipment challenges might occur if using the wrong type of pan. Opt for cast iron for optimal heat retention and non-stick properties while searing meat.

Ingredient substitutions can affect the overall flavor; be cautious when replacing key components like steak or specific spices, as they can drastically change the dish.

Timing concerns can lead to mismatched finishes; plan ahead to ensure the steak, onions, and fries are all done simultaneously for the best dining experience.

Recipe Success Stories

Community feedback has been overwhelmingly positive; many readers praise the recipe for its simplicity and elegant presentation, making it a go-to for special occasions.

Variation successes include a reader substituting the fries with sweet potatoes and receiving rave reviews for the delightful sweetness and added nutrition.

Adaptation stories provide inspiration; others have shared about using herbs in their steak seasoning, leading to incredibly flavorful results that wowed their guests.

Reader suggestions highlight the importance of proper resting time for the steak, leading to perfectly juicy servings that satisfy those craving a luxurious meal.

Photography tips often mention capturing the beautiful crust of the steak and the vibrant colors of the onions and fries, producing mouthwatering images perfect for sharing.

Frequently Asked Questions

Can I make this recipe ahead of time?

Yes, you can prepare the caramelized onions ahead of time and store them in the refrigerator for up to a week. Seasoning the steak the night before can also enhance flavor.

What is the best way to store leftovers?

Wrap leftover steak tightly and store it in the refrigerator for up to 3 days. Be sure to store fries separately to maintain their crunch.

Can I use a different cut of meat?

While ribeye is recommended for its flavor, other cuts like sirloin or filet mignon could be substituted, keeping in mind the change in cooking times and flavors.

Do I need a special pan for this recipe?

A heavy skillet or cast iron pan is ideal for searing, as it retains heat well, allowing for an even crust on the steak.

What wine pairs best with ribeye steak?

Full-bodied red wines like Cabernet Sauvignon or Malbec are perfect choices; they complement the rich flavors of the steak beautifully.

What is the secret to perfect caramelized onions?

The key is to cook them slowly on low heat with a touch of salt, allowing the natural sugars to develop a rich, golden color over time.

Can I make this dish vegetarian?

Yes! Substitute the ribeye with hearty vegetables like portobello mushrooms or eggplant to still enjoy a satisfying, filling meal.

How do I know when my steak is done?

Using a meat thermometer is the best way to check for doneness; aim for 130°F for medium-rare, 140°F for medium, and 150°F for medium-well.

What can I serve with this meal?

Add a fresh salad or grilled vegetables as a side to brighten the meal and complement the richness of the steak.

Can I freeze the cooked steak and fries?

Yes, both can be frozen; however, the fries may lose crispiness when reheated. Be sure to wrap them well to prevent freezer burn.

Additional Resources

For those inspired by this recipe, consider exploring related articles about the best cuts of beef, further techniques on steak cooking, and more tips for perfect caramelization of onions. You may also find guides on equipment recommendations for home-cooked meals or seasonal variations to incorporate into your meals.

Join the Conversation

We encourage you to share your experiences with this recipe on social media! Posting your cooking photos can inspire others and showcases the creative ways you’ve personalized this dish. We love seeing how our community adapts recipes, so feel free to offer your suggestions or modifications.

The Recipe

Ribeye Steak with Caramelized Onions and Crispy French Fries

Serves: 2

Prep Time: 15 mins

Cook Time: 30 mins

Total Time: 45 mins

Kitchen Equipment Needed

  • Heavy skillet or cast iron pan
  • Spatula
  • Cutting board
  • Knife
  • Meat thermometer

Ingredients

  • 2 ribeye steaks (about 1 inch thick)
  • 2 large onions, sliced
  • 2 medium potatoes, cut into fries
  • 2 tablespoons olive oil
  • Salt and pepper, to taste
  • Butter, for cooking onions (optional)

Directions

  1. Prepare the fries by soaking the cut potatoes in cold water for at least 30 minutes, then drain and pat dry.
  2. Heat 2 tablespoons of olive oil in a heavy skillet over medium heat. Add the sliced onions, along with a pinch of salt. Cook slowly, stirring occasionally, until caramelized, about 20-30 minutes.
  3. While the onions are cooking, heat another skillet over high heat. Season the ribeye steaks generously with salt and pepper. Place steaks in the hot skillet and sear for 4-5 minutes per side for medium-rare, depending on thickness.
  4. Once the steaks are cooked to your liking, remove them from the skillet and allow to rest for 5-10 minutes.
  5. In the same skillet, add the fries and fry until golden and crispy, about 5-7 minutes. Remove and drain on paper towels, seasoning with salt immediately.
  6. To serve, plate the fries, top with sliced ribeye steak, and finish with a generous spoonful of caramelized onions. Enjoy!

Recipe Notes

  • Marinate the ribeye overnight for extra flavor if desired.
  • Feel free to experiment with different seasonings or marinades for the steak.
  • For a healthier version, consider baking the fries instead of frying.