Delicious Garlic Cilantro Sauce Recipe for Flavorful Dishes

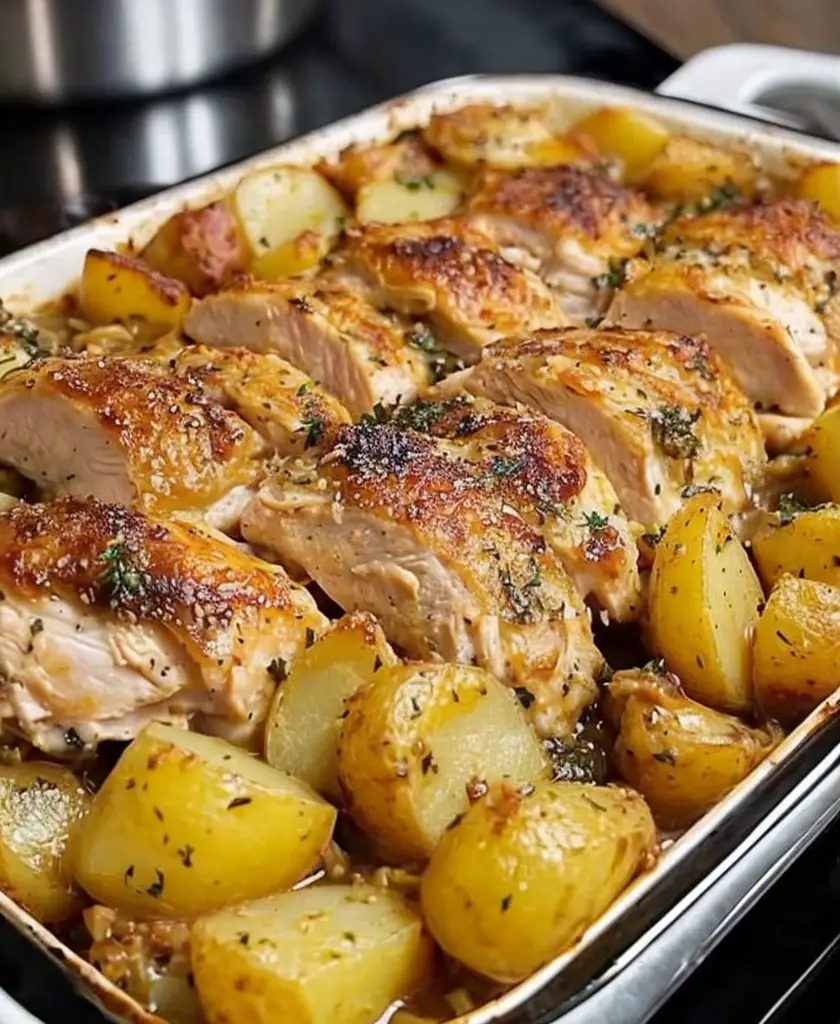
Garlic Cilantro Chicken: A Flavorful Delight

⚖️
Difficulty
Easy

⏲️
Prep Time
15 mins

🕒
Cook Time
30 mins

⏱️
Total Time
45 mins

🍽️
Servings
4

Welcome to the world of flavor-packed goodness with our Garlic Cilantro Chicken! This dish brings forth a delightful blend of aromatic garlic and fresh cilantro that enhances the succulent chicken, making it a family favorite. With its vibrant flavors and captivating aroma, Garlic Cilantro Chicken is not only easy to make but also presents beautifully on the plate, making it perfect for weeknight dinners or special occasions.

The key to this recipe lies in its marinade, allowing the chicken to soak up the essence of fresh garlic and cilantro. Each bite is a burst of flavor that dances on your taste buds, paired with a touch of citrus that brightens the dish. Serve it alongside a fresh garden salad or your favorite grain for a complete meal that will impress everyone at the table.

Quick Recipe Highlights

  • Flavor Profile: This dish features a harmonious combination of savory garlic and bright cilantro, complemented by zesty citrus notes for depth.
  • Texture: Expect tender, juicy chicken with a slightly crispy exterior, providing a satisfying mouthfeel that captivates.
  • Aroma: The fragrant aroma of garlic and herbs wafts through your kitchen, enticing everyone to gather around the table.
  • Visual Appeal: The vibrant green cilantro against the golden-brown chicken creates an attractive and appetizing presentation.
  • Skill Level Needed: Perfect for novice cooks, this recipe requires basic cooking skills with straightforward steps.
  • Special Equipment: You’ll need a mixing bowl, a frying pan, and optionally a meat thermometer for perfect doneness.

Recipe Overview

  • Difficulty Level: This Garlic Cilantro Chicken recipe is classified as easy, ideal for beginners looking to build their cooking confidence.
  • Category: This dish is perfect for dinner and fits well with prepare-ahead meal options.
  • Cuisine: Blending Mexican and American influences, this recipe showcases the versatility of cilantro in savory dishes.
  • Cost: Appropriately budget-friendly, this meal can be made at home without breaking the bank, using accessible ingredients.
  • Season: Best enjoyed during summer months when fresh herbs are abundant, although it’s delightful year-round.
  • Occasion: Ideal for family dinners, casual gatherings, or meal prep, this dish suits various occasions perfectly.

Why You’ll Love This Recipe

Garlic Cilantro Chicken is a culinary masterpiece that perfectly balances taste and texture. The combination of tender chicken marinated in fresh garlic and vibrant cilantro creates a dish that is bursting with flavor. Each bite is a delightful explosion of richness intertwined with the refreshing notes of herbs. This harmony of flavors makes it a standout option for any meal, whether it’s a weeknight dinner or a weekend gathering.

Besides its incredible taste, the convenience of Garlic Cilantro Chicken is a game-changer. With minimal prep time and straightforward cooking steps, it’s an approachable recipe for all skill levels. You can marinate the chicken in advance to enhance the flavors, making it a breeze to whip up a delicious meal even on busy weeknights. Plus, it can easily be paired with a variety of sides to create a well-rounded dinner plate.

Nutritionally, this dish is packed with protein and essential vitamins from cilantro and garlic, making it a healthy choice for dinner. Garlic is known for its immune-boosting properties, while cilantro adds freshness and contributes beneficial nutrients. This Garlic Cilantro Chicken respects both your taste buds and well-being, ensuring you enjoy a delicious meal that supports a wholesome diet.

When it comes to social occasions, Garlic Cilantro Chicken truly shines. Its appealing presentation and delightful flavor profile make it a hit at gatherings, and it’s effortless to prepare in larger batches for sharing. Serve it with a selection of sides, like rice or grilled veggies, and watch your guests rave about this delectable dish.

Cost-effective and accessible, Garlic Cilantro Chicken allows you to enjoy gourmet flavors without the restaurant price tag. Made with everyday ingredients, it’s easy to incorporate into your weekly meal plans, ensuring that delicious and satisfying meals are within reach of any home cook.

Historical Background and Cultural Significance

Garlic has a long and storied history, dating back thousands of years as both a culinary and medicinal herb. Ancient civilizations, from Egyptians to Romans, valued garlic for its robust flavor and health benefits. Over time, garlic has been incorporated into various cuisines worldwide, including Mexican cuisine, where fresh herbs like cilantro are also staples due to their flavor and vibrancy.

Cilantro, known as coriander in many parts of the world, is a quintessential herb in many culinary traditions. Its origins trace back to regions of Asia and the Mediterranean, finding its place as a beloved ingredient in dishes ranging from salsas to stir-fries. The marriage of cilantro and garlic in this Garlic Cilantro Chicken recipe is a beautiful representation of how culinary traditions evolve, blending unique flavor profiles into harmonious dishes.

Throughout the ages, Garlic Cilantro Chicken has evolved from simple home-cooked meals to a popular choice at restaurants, showcasing its adaptability and widespread appeal. This dish not only honors traditional flavors but also encourages creativity in the kitchen, inspiring home cooks to experiment with fresh ingredients and bold profiles.

Regional variations of Garlic Cilantro Chicken can be found across the globe, influenced by local herbs, spices, and styles of preparation. This highlights the dish’s versatility and ability to cross culinary boundaries, making it a beloved choice for many.

Ingredient Deep Dive

Garlic is the heroic star of this dish, known for its distinct flavor and numerous health benefits. With its robust profile, garlic serves as a foundation for the savory taste that permeates Garlic Cilantro Chicken. Historically, garlic has been prized not just for flavor but also for its health properties, attributed to its antioxidant and anti-inflammatory qualities. When selecting garlic, choose firm bulbs without any soft spots or mold, and store it in a cool, dark place to maximize shelf life.

Cilantro is the vibrant green herb that adds freshness and brightness to the dish. This herb is packed with vitamins A, C, and K, making it nutritionally valuable. Enjoying cilantro helps detoxify the body and can also enhance digestion. Look for cilantro with crisp leaves, and store it in the refrigerator wrapped in a damp paper towel to retain freshness. For a twist, consider substituting with parsley if desired.

Chicken serves as the main protein source in this dish, providing a substantial and nutritious base. Lean and versatile, chicken is high in protein while being relatively low in fat. Opt for organic or free-range chicken whenever possible to ensure high-quality meat. Storage is simple: raw chicken should be kept in the refrigerator and cooked chicken can be stored for a few days in an airtight container.

Common Mistakes to Avoid

  • Over-marinating the chicken can lead to a mushy texture, as acidic ingredients in the marinade break down proteins too much. Aim for a marinating time of no more than two hours.
  • Not letting the chicken rest after cooking can result in dry meat. Allow the chicken to rest for at least five minutes before slicing to retain its juices.
  • Using dried herbs instead of fresh can diminish the intended flavor profile. Always opt for fresh garlic and cilantro for the best results.
  • Failing to preheat the pan properly can prevent a good sear. Ensure your pan is hot before adding chicken to achieve that desirable golden-brown crust.
  • Cooking chicken at too high or too low of a temperature can lead to uneven cooking. Maintain a medium heat for thorough and even cooking.
  • Skipping the seasoning can result in bland chicken. Salt and pepper are essential, so don’t overlook them during the preparation stage.
  • Using insufficient cooking oil can lead to sticking, so make sure to coat your pan well for best results.
  • Not checking the doneness of the chicken can lead to undercooked meat. Use a meat thermometer to ensure it reaches an internal temperature of 165°F (75°C).
  • Ignoring leftover storage guidelines can cause food waste. Store leftover chicken in airtight containers and consume within a few days for safety.
  • Neglecting to balance flavors with acidity could yield a flat taste. A splash of citrus juice can elevate the flavor profile significantly.

Essential Techniques

Marinating is key to infusing flavors into the chicken. This technique allows the chicken to absorb the savory and aromatic components of the garlic and cilantro, enhancing the overall taste. To master marinating, ensure the chicken is coated evenly and let it sit for the appropriate time before cooking. A common pitfall is marinating too long, which can affect texture.

Searing is an essential technique for achieving a beautiful golden-brown color and locking in moisture. Heat your pan until it’s hot enough to cook the chicken but not so hot that it burns. A visual cue for success is when the edges of the chicken begin to turn golden and crisp before flipping.

Pro Tips for Perfect Garlic Cilantro Chicken

To achieve juicy and flavorful Garlic Cilantro Chicken, consider these pro tips. First, always use fresh ingredients; their vibrant flavors will significantly enhance the dish.

Ensure your chicken is at room temperature before cooking; this helps it cook evenly throughout. For an added kick of flavor, consider adding a pinch of cayenne to your marinade for those who enjoy a bit of heat.

If you’re grilling, use indirect heat to prevent burning while still achieving that smoky flavor. To elevate the dish further, serve it with a side of avocado salsa for added freshness and creaminess.

Experiment with different types of citrus; lime juice pairs beautifully with garlic and cilantro. Lastly, don’t be afraid to drizzle some extra cilantro oil for a burst of flavor before serving.

Variations and Adaptations

Garlic Cilantro Chicken is highly adaptable to suit various tastes. Regional variations can include the addition of spices like cumin for a more Southwestern flavor profile.

For seasonal adaptations, consider adding grilled summer vegetables like zucchini or cherry tomatoes to the dish, which makes it vibrant and colorful. Dietary modifications can easily be made; for instance, substitute chicken with tofu or tempeh for a vegan option without sacrificing flavor.

Flavor variations could include a tropical touch by adding mango to the marinade for a unique twist. For texture modifications, bake the chicken instead of pan-frying for a different mouthfeel. Lastly, presentation alternatives include serving it over a bed of greens or in wraps, adding visual appeal to your meal.

Serving and Presentation Guide

Plating techniques can elevate your Garlic Cilantro Chicken’s presentation to next-level sophistication. Use a large, flat plate to create a base, arranging the chicken neatly in the center, garnished with chopped cilantro and lime wedges.

Garnishing ideas can include slicing avocado or serving with colorful edible flowers for an Instagram-worthy finish. Traditional accompaniments, like rice or freshly made tortillas, provide a delightful contrast to the juicy chicken.

Modern serving suggestions could feature “deconstructed” plates, where each component of the dish is served separately, allowing guests to build their own bites. Temperature considerations are essential; serve the dish warm, as cold chicken can detract from its juicy appeal.

Portion control tips suggest serving around 4-6 ounces of chicken per person, paired with a side or salad as a complete meal.

Wine and Beverage Pairing

When it comes to pairing beverages with Garlic Cilantro Chicken, consider a crisp white wine like Sauvignon Blanc, which complements the fresh herby flavors beautifully. The wine’s acidity balances the richness of the chicken and enhances the dish’s brightness.

For those who prefer non-alcoholic options, a refreshing limeade or iced herbal tea can provide the perfect match, adding a cool contrast to the warm chicken.

If coffee is your beverage of choice, a light roast with citrus notes can create an interesting harmony with the dish’s cilantro and garlic.

Serving the wine chilled is essential; the cool temperature helps maintain a refreshing experience with the meal.

Storage and Shelf Life

Proper storage of Garlic Cilantro Chicken ensures that you can enjoy leftovers safely. After cooking, cool the chicken to room temperature and transfer it to an airtight container. Store it in the refrigerator for up to 3-4 days.

When it comes to freezing, make sure the chicken is in a freezer-safe container or heavy-duty freezer bag to prevent freezer burn. Thawed chicken should be consumed within 1-2 days for best quality.

Signs of spoilage include an off-smell or slimy texture, which indicates it’s time to discard the leftovers.

When reheating, ensure the chicken reaches an internal temperature of 165°F (75°C) to ensure food safety.

Make Ahead Strategies

To save time during busy weeknights, consider prepping Garlic Cilantro Chicken ahead of time. Marinate the chicken the night before and store it in the refrigerator; this will enhance its flavor and save cooking time when you’re ready to eat.

If you prepare chicken in bulk, portion out individual servings. This allows for flexibility in your meals throughout the week.

While cooking, you can also prepare your sides ahead, ensuring a seamless assembly during dinner. If you plan to reheat leftovers, ensure they are heated thoroughly so the quality is maintained.

For the freshest taste, add elements like avocado or lime just before serving to enhance the vibrant flavors in your meal.

Scaling Instructions

Scaling the Garlic Cilantro Chicken recipe is straightforward. If halving the recipe, simply reduce all ingredients accordingly, and ensure to keep cooking times similar, checking for doneness as needed.

Doubling or tripling the recipe can require larger cooking vessels, so utilize a bigger pan or multiple pots. Timing modifications may be necessary; larger quantities could take slightly longer to cook evenly.

Another consideration when scaling recipes is to ensure you have ample counter space for prep; a crowded workspace can lead to mistakes in ingredient measurements.

Always taste as you go when scaling so you can adjust seasonings effectively to maintain the flavor integrity of the dish.

Nutritional Deep Dive

A nutritious choice, Garlic Cilantro Chicken is packed with quality protein, essential for muscle health and overall well-being. Each serving contains approximately 30 grams of protein, making it an excellent candidate for post-workout recovery meals.

The dish also offers a range of micronutrients from ingredients like garlic and cilantro, including vitamin C, which supports immune function, and vitamin K, important for bone health.

Including a variety of sides can enhance the meal’s nutritional profile, adding fiber from vegetables and whole grains, which aids in digestion and overall dietary balance.

Portion analysis indicates that serving 4 ounces of chicken is ideal for a balanced plate, complementing with healthy sides that promote satiety and energy.

For those interested in weight management, the light seasoning and added vegetables can help keep calories in check while still enjoying a flavorful meal.

Dietary Adaptations

Garlic Cilantro Chicken is highly versatile and can easily be adapted for various dietary needs. For gluten-free diets, ensure your marinades and sauces are certified gluten-free to prevent cross-contamination.

For those following a dairy-free lifestyle, this recipe is naturally dairy-free, allowing for broader consumption without modification.

Vegan options abound as well, as you can easily substitute chicken with plant-based proteins like tofu, tempeh, or even chickpeas, maintaining the delicious flavor profile.

Low-carb diets can benefit from serving the dish with non-starchy vegetables, like sautéed greens, rather than traditional carbs like rice or pasta.

Keto fans can adapt the recipe by ensuring minimal carbs in the marinade and sides, focusing on healthy fats. For paleo diets, consider using freshly sourced meats and avoiding processed ingredients entirely, keeping it whole-food based.

Troubleshooting Guide

If your Garlic Cilantro Chicken turns out dry, it’s likely due to overcooking. To ensure the chicken remains juicy, use a meat thermometer to check for doneness—165°F (75°C) is your target internal temperature.

Should the flavor be unbalanced, particularly bland, consider adding a pinch of salt and an extra splash of citrus juice based on personal preference.

Temperature problems can arise; if the pan is too hot, the chicken may burn on the outside but remain raw on the inside. Adjusting the heat as you cook can help create an even, perfect cook.

For equipment challenges, if you find your pan is sticking, be sure to coat it well with oil before cooking and allow it to heat adequately before adding the chicken.

Ingredient substitutions might lead to unexpected results; always taste as you modify to ensure the flavor remains balanced.

Timing concerns can often leave a cook flustered, so making notes on what took longer than expected during cooking can help for future meal prep.

Recipe Success Stories

Community feedback plays a crucial role in refining recipes, and Garlic Cilantro Chicken has received rave reviews from those who have tried it. Many readers appreciate its simplicity coupled with impressive flavor, which makes it a staple in their homes.

Variation successes, such as those incorporating seasonal vegetables or different protein sources, have turned this recipe into a versatile dish that fits numerous contexts, allowing for creativity in the kitchen.

Adaptation stories often revolve around added herbs or spices that elevate the chicken uniquely. Sharing photos and experiences can inspire others to try the recipe and make it their own.

Photography tips are key for social media sharing, and presenting the dish with vibrant garnishes can significantly enhance visual appeal and encourage more users to engage with the recipe.

Frequently Asked Questions

Can I use frozen chicken for this recipe?

Yes, you can use frozen chicken, but it is crucial to thaw it properly before marinating or cooking to ensure even flavor absorption. The best method is to place it in the refrigerator overnight to thaw safely.

Can I make this dish ahead of time?

Absolutely! You can prepare the marinade and let the chicken soak in it for a few hours or overnight. Cooking the chicken ahead of time is also an option; just reheat before serving.

What should I serve with Garlic Cilantro Chicken?

This dish pairs beautifully with a variety of sides; consider serving it with cilantro lime rice, grilled vegetables, or a fresh green salad for a well-rounded meal.

Is this recipe spicy?

The original recipe is not spicy, but you can add cayenne pepper or red pepper flakes for some heat if you prefer to spice things up.

Can I substitute chicken for another protein?

Yes, you can easily swap chicken for tofu, tempeh, or shrimp, allowing you to cater this recipe to various dietary preferences while keeping flavor intact.

How long can I store leftovers?

Leftovers can be stored in an airtight container in the refrigerator for up to 3-4 days. Make sure to reheat thoroughly before enjoying it again!

What can I do if my chicken turns out bland?

Adding a little more salt or some fresh lime juice before serving can help elevate the overall flavor. Don’t hesitate to taste as you go for the best results.

Can I use dried herbs instead of fresh?

While dried herbs can be used in a pinch, fresh herbs provide vibrancy and depth that greatly enhance the dish. If you need to use dried, reduce the amount as they are more potent.

Can children enjoy this dish?

Yes! Garlic Cilantro Chicken is generally kid-friendly. However, consider reducing any additional spicy elements to suit young palates.

How can I make it gluten-free?

This recipe is naturally gluten-free as it doesn’t contain any gluten-based ingredients. Always check your marinades and sauces if needed for extra assurance.

What type of chicken is best for this recipe?

Boneless, skinless chicken breasts or thighs work best for this Garlic Cilantro Chicken recipe, offering tenderness and flavor that complements the marinade.

Additional Resources

Explore our related recipes for more incredible meal ideas. Check out our technique guides for grilling tips or maximizing flavor through marinades.

Learn more about ingredient information to understand the health benefits of fresh produce, and browse our equipment recommendations if you’re looking to upgrade your kitchen tools for better cooking experiences.

Seasonal variations can help you stay inspired throughout the year, so be on the lookout for ways to utilize seasonal vegetables to accentuate this versatile dish further.

Join the Conversation

We’d love for you to engage with us! Share your creations on social media using our hashtag and connect with fellow food enthusiasts.

Photography tips can help you capture your delicious Garlic Cilantro Chicken, making it irresistible to your followers. We encourage you to leave your reviews and feedback – your input helps us improve and adapt our recipes.

Lastly, your recipe variations are always welcome; inspire us and others with your take on Garlic Cilantro Chicken!

The Recipe

Garlic Cilantro Chicken

Serves: 4

Prep Time: 15 mins

Cook Time: 30 mins

Total Time: 45 mins

Kitchen Equipment Needed

  • Mixing bowl
  • Frying pan
  • Meat thermometer (optional)
  • Whisk
  • Cutting board
  • Knife

Ingredients

  • 4 boneless, skinless chicken breasts
  • 1/4 cup fresh cilantro, chopped
  • 4 cloves garlic, minced
  • Juice of 2 limes
  • 2 tablespoons olive oil
  • Salt and pepper to taste

Directions

  1. In a mixing bowl, combine minced garlic, chopped cilantro, lime juice, olive oil, salt, and pepper to create the marinade.
  2. Add the chicken breasts to the marinade, ensuring they are evenly coated. Let it marinate in the refrigerator for 30 minutes or up to 2 hours for more flavor.
  3. Heat a frying pan over medium heat and add a drizzle of oil. Once hot, place the marinated chicken breasts in the pan.
  4. Cook the chicken for about 5-7 minutes on each side or until it reaches an internal temperature of 165°F (75°C).
  5. Once cooked, remove the chicken from the pan and let it rest for a few minutes before slicing.
  6. Serve warm, garnished with fresh cilantro and lime wedges.

Recipe Notes

  • Feel free to adjust the marinade ingredients according to personal taste.
  • For extra flavor, consider adding jalapeños to the marinade for a spicy kick.
  • This dish can easily be doubled for larger gatherings. Adjust cooking times as needed.
  • Leftovers can be stored in the fridge for up to four days; perfect for meal prep!

Indulge in Decadent German Chocolate Pecan Pound Cake Bliss

Decadent German Chocolate Pecan Pound Cake: A Sweet Indulgence for Every Occasion

⚖️
Difficulty
Medium

⏲️
Prep Time
25 mins

🕒
Cook Time
60 mins

⏱️
Total Time
85 mins

🍽️
Servings
12 slices

Are you ready to indulge in a dessert that embodies rich flavors and delightful textures? This Decadent German Chocolate Pecan Pound Cake is a true celebration of sweet culinary art, combining the deep, nutty flavors of German chocolate with crunchy pecans to create a treat that will captivate your taste buds. Every bite offers a blend of chocolatey sweetness and buttery richness that makes it perfect for gatherings or simply as a delightful afternoon treat. You’ll find that this cake doesn’t just satisfy your sweet tooth but also provides a luxurious experience that you won’t forget anytime soon!

This irresistible pound cake, with its moist and dense crumb, strikes the perfect balance between rich cocoa flavors and the crunch of toasted pecans. The deeply aromatic scent of freshly baked chocolate envelops your kitchen, enhancing the atmosphere with warmth and inviting memories of family gatherings. Whether enjoyed with a cup of coffee or served as a stunning centerpiece for an occasion, this cake is sure to win hearts and palates alike.

Quick Recipe Highlights

  • Flavor Profile: A harmonious mix of sweet chocolate, toasted pecans, and a touch of vanilla.
  • Texture: Moist and dense with a rich crumb, complemented by the crunch of pecans.
  • Aroma: The inviting scent of chocolate and butter fills the air as it bakes.
  • Visual Appeal: Beautifully garnished with chocolate curls and toasted pecans, it’s a sight to behold.
  • Skill Level Needed: While labeled as medium difficulty, it is achievable for novice bakers willing to follow instructions.
  • Special Equipment: Standard baking equipment plus a good quality bundt pan for the best result.

Recipe Overview

  • Difficulty Level: This recipe is considered medium due to the need for proper mixing techniques and baking times to achieve the desired texture.
  • Category: This cake fits perfectly as a dessert that can stand out at any celebration, from birthdays to holiday gatherings.
  • Cuisine: Rooted in German traditions but adapted by American bakers, it showcases the love for chocolate and nuts in baking.
  • Cost: With ingredients like German chocolate and pecans, the approximate cost for this recipe is moderate, yet worth every penny for a special treat.
  • Season: This cake shines year-round, but it feels particularly fitting during festive seasons when chocolate desserts are in high demand.
  • Occasion: Ideal for family celebrations, office parties, or as a comforting dessert at home to share with loved ones.

Why You’ll Love This Recipe

This Decadent German Chocolate Pecan Pound Cake is designed to please both the palate and the eye. The interplay of textures, with the velvety softness of the cake complemented by the crunchy pecans, creates a delightful experience with every bite. The rich chocolate flavor, characteristic of German chocolate, invites a touch of indulgence, making it a standout dessert for any occasion. Each slice serves as a reminder of the joy found in baking and sharing delicious treats with those you care about.

Convenience is another reason to love this recipe. It requires standard kitchen tools and ingredients that can easily be found at your local grocery store. The preparation is straightforward, making it a fantastic choice for both novice and seasoned bakers. Additionally, the cake stays fresh for days when stored properly, allowing you to enjoy it over time.

From a nutritional perspective, this cake features quality chocolate and pecans, which provide beneficial nutrients, including healthy fats, antioxidants, and minerals. While indulgent, it can be a part of a balanced diet when enjoyed in moderation, allowing you to savor the sweetness without guilt.

Social gatherings are made sweeter with this cake at the center. It sparks conversations, brings smiles, and invites nostalgia as people share memories connected to chocolate desserts. Whether you are hosting a birthday party or a casual get-together, this cake is a showstopper that enhances the overall atmosphere.

Cost-effectiveness is evident since this recipe yields multiple servings, making it a great value. Preparing a homemade pound cake is often more economical compared to purchasing elaborate desserts from bakeries. Plus, you’ll have the satisfaction of creating a dessert that is both delicious and memorable.

Historical Background and Cultural Significance

The origins of German chocolate cake can be traced back to a recipe developed by a British expat named Samuel German in 1852. His dark-baking chocolate, known as “Baker’s German’s Sweet Chocolate,” laid the groundwork for what would evolve into the German chocolate cake we know today. While the original recipe was intended for a layered cake, American bakers eventually adapted it into various forms, including the timeless pound cake.

Culturally, German chocolate cake holds a special place in American dessert traditions, especially in the Southern states. It has been a beloved treat at family gatherings and celebrations for generations. The combination of chocolate and pecans echoes the rich agricultural heritage of the South where both ingredients thrive. It symbolizes comfort and indulgence, often evoking feelings of nostalgia among those who grew up enjoying it.

Over the years, the recipe has transformed, giving rise to numerous interpretations. From elaborate layer cakes to simpler pound cakes, bakers have embraced creativity while respecting the origins of German chocolate. Each variation offers a unique taste while paying homage to the original concept of this iconic dessert.

Regional variations can be found, showcasing local ingredients and baking traditions. For instance, some recipes incorporate coconut, adding an additional layer of texture and flavor. Others might replace pecans with local nuts, making it a delightful reflection of the community it originates from.

Ingredient Deep Dive

German Chocolate: This unique chocolate is sweeter than standard dark chocolate, offering distinct flavors derived from the beans used. It has a rich history that dates back to 19th century America and is known for adding moisture and softness to baked goods. When selecting German chocolate, aim for high-quality brands for the best flavor. Store it in a cool dry place, and consider using it in other baked goods for a delicious twist.

Pecans: Pecans have long been celebrated in Southern cuisine and stand out not only for their flavor but also for their nutritional profile, which includes healthy fats, fiber, and essential vitamins. When choosing pecans, ensure they are fresh and ideally, lightly toasted to enhance their nutty taste. Storing them in airtight containers in a cool environment can prolong their freshness, and they can easily be swapped with other nuts if you’re looking for variety.

Common Mistakes to Avoid

  • Overmixing the batter can lead to a dense texture; mix just until combined.
  • Not properly measuring ingredients may alter the cake’s overall balance; use a kitchen scale for accuracy.
  • Skipping the step of greasing and flouring the pan can result in sticking; take this step seriously.
  • Underbaking or overbaking can affect texture; ensure you do the toothpick test to confirm doneness.
  • Not allowing the cake to cool before removing it from the pan can cause breakage; patience is key.
  • Using room temperature ingredients improperly can lead to an uneven batter; always follow temperature recommendations.
  • Neglecting to toast the pecans may result in a lack of depth in flavor; toasting enhances their nutty essence.
  • Inconsistent oven temperatures may skew baking time; use an oven thermometer to maintain correct baking conditions.
  • Not following the recipe step-by-step can lead to unexpected results; adhere to the method for best outcomes.
  • Using old baking soda or powder may compromise the rise; always check the freshness of your leavening agents.

Essential Techniques

Proper Creaming of Butter and Sugar: This technique is critical for achieving the right texture. Begin with room temperature butter and sugar and cream them together until light and fluffy. This process incorporates air, which helps to create a soft and tender cake. Avoid overcreaming, as it can lead to too much air incorporation, resulting in collapse during baking.

Layering Ingredients: When adding dry ingredients to the wet mixture, do so gradually. This method allows for uniform incorporation and minimizes clumping. Begin by alternating between flour and liquid additions, starting and ending with flour. Mixing gently after each addition promotes a tender crumb without overdeveloping gluten.

Pro Tips for Perfect Decadent German Chocolate Pecan Pound Cake

1. **Always Preheat Your Oven:** Make sure your oven is preheated to the proper temperature to ensure even baking throughout.
2. **Use Quality Ingredients:** Invest in high-quality chocolate and fresh pecans for a richer flavor in your cake.
3. **Opt for Room Temperature Ingredients:** Allow butter, eggs, and milk to come to room temperature to achieve better emulsion and texture.
4. **Do Not Rush Cooling:** Let the cake cool completely in the pan before inverting; this helps preserve its shape.
5. **Experiment with Flavors:** Feel free to add a dash of espresso powder to intensify the chocolate flavor in the cake.
6. **Try Different Nuts:** While pecans create a delightful texture, consider using walnuts or hazelnuts for a different taste experience.
7. **Add a Glaze:** Drizzle the cooled cake with a chocolate or caramel glaze for an extra layer of sweetness.
8. **Garnish Thoughtfully:** Use shaved chocolate or additional toasted nuts to elevate presentation and texture.

Variations and Adaptations

If you’re looking to switch things up, consider adding seasonal flavors such as fresh citrus zest for a light, bright contrast in the rich cake. You can also adapt the recipe to include different nuts or even dried fruits like cherries or cranberries for a unique twist. For vegan adaptations, substitute the eggs with flax eggs and use plant-based butter and milk for a delicious dairy-free version.

For texture modifications, try adding a layer of cream cheese frosting between the layers if you choose to make a layered version of this cake for added creaminess. The overall presentation can also be enhanced with fresh fruit arrangements or edible flowers, making it look as delightful as it tastes.

Serving and Presentation Guide

Plating your Decadent German Chocolate Pecan Pound Cake can be as simple or elaborate as you wish. For a rustic look, serve it directly from the bundt pan with a light dusting of powdered sugar. For a more elegant feel, slice the cake on a decorative platter and garnish with fresh berries or a chocolate ganache drizzle. To enhance visual appeal, consider adding candied pecans around the base or top of the cake.

Temperature plays a crucial role in enjoying your cake; serve slightly warm or at room temperature for optimal flavor release. Portioning can be done with a serrated knife for clean, even slices, ensuring guests receive equal servings of this indulgent treat.

Wine and Beverage Pairing

When it comes to pairing beverages with this decadent dessert, a rich red wine like Cabernet Sauvignon complements the chocolate flavors beautifully. Alternatively, a sweet dessert wine such as Port can amplify the sweetness, making it a fitting choice for special occasions.

For non-alcoholic options, a robust coffee or creamy chai tea can enhance the flavors of the cake. If choosing to serve with tea, opt for a black tea with hints of spice to balance the richness of the chocolate.

Storage and Shelf Life

To store your Decadent German Chocolate Pecan Pound Cake, wrap it tightly in plastic wrap or aluminum foil to keep it fresh for up to a week at room temperature. If you need to store it longer, consider freezing the cake; wrapped securely, it can last up to three months in the freezer.

For thawing, simply remove it from the freezer and let it sit at room temperature for several hours. Be mindful of signs of spoilage, such as off smells or visible mold, which indicate that it’s best to discard rather than consume.

Make Ahead Strategies

If entertaining, consider baking the cake a day or two in advance. It stores well, and some find that the flavors deepen over time. You can prepare the cake, let it cool completely, and then wrap it tightly in plastic wrap to keep it fresh until the day of serving.

When baking in advance, it’s helpful to keep frosting or ganache separate until just before serving to maintain texture. Always revisit the cake before serving to check if extra garnishes or accompaniments are desired.

Scaling Instructions

Scaling this Decadent German Chocolate Pecan Pound Cake is straightforward. If halving the recipe, a smaller bundt pan may be required, and the baking time will likely decrease. Conversely, if you decide to double or triple the recipe, ensure that you have the correct size of baking pans to accommodate the batter.

Watch the baking time closely and perform a toothpick test to ensure that the cake is baked through without being dry. Adjust storage accordingly if planning to make larger quantities as they may need more space in your refrigerator or freezer.

Nutritional Deep Dive

Examine the macros of this Decadent German Chocolate Pecan Pound Cake to help manage portion sizes effectively. A single slice offers a satisfying balance of carbohydrates from the sugar and flour base, with healthy fats coming from the pecans and butter.

In terms of micronutrients, this cake provides beneficial vitamins and minerals, including magnesium, phosphorus, and antioxidants from the cocoa and nuts. When enjoying this treat, consider its caloric content versus nutritional benefits, indulging in moderation for an enjoyable experience.

Dietary Adaptations

There are several adaptations available for this recipe to cater to different dietary needs. For a gluten-free option, substitute all-purpose flour with a gluten-free blend, ensuring other ingredients are also free from gluten.

For a vegan twist, replace eggs with flaxseed meal or commercial egg replacers and opt for dairy-free alternatives for butter and milk. Low-carb lifestyles may benefit from using almond flour and erythritol instead of traditional sugars. Meanwhile, those on a paleo diet can enjoy similar adaptations with natural sweeteners and nut-based flours.

Troubleshooting Guide

If your cake comes out dense, it may be due to overmixing or incorrect ingredient temperatures. Ensure that you follow the creaming process carefully and use room temp ingredients for optimal texture. If your cake is too dry, check your baking time; the toothpick test is key to ensuring perfection.

Should you find an uneven rise, consider the placement of the cake in the oven; it should not be too close to the heating elements. For flavor imbalances, try adding a pinch of sea salt or additional vanilla to enhance the cake’s overall profile.

Recipe Success Stories

Our readers have shared glowing feedback about their experiences making this Decadent German Chocolate Pecan Pound Cake. Community members have noted the ease of following the recipe, often remarking on the cake’s perfect balance of sweetness and richness that makes it a guest favorite.

Variations have come into play, with some readers incorporating their favorite ingredients like coconut or caramel, creating unique adaptations that remain true to the original concept. Photography has also been a highlight, with many showcasing their beautifully decorated cakes on social media, inspiring others to bake.

Frequently Asked Questions

Can I use dark chocolate instead of German chocolate?

While dark chocolate can be substituted, it will change the overall sweetness and flavor profile. German chocolate’s unique qualities add a sweetness that complements the cake well.

What is the best way to store leftovers?

Wrap the cake tightly in plastic wrap or store it in an airtight container to keep it fresh. It can be stored at room temperature or in the refrigerator for several days.

Can this cake be frozen?

Yes, this cake freezes well. Wrap it securely in plastic wrap and aluminum foil. It can be frozen for up to three months.

How do I enhance the chocolate flavor?

Add a teaspoon of instant espresso powder to the batter for an enriched chocolate flavor without making the cake taste like coffee.

Is it necessary to toast the pecans?

Toasting pecans enhances their flavor and adds a delightful crunch to the cake, making it a recommended step.

What can be used in place of eggs for a vegan version?

For each egg, you can use one tablespoon of flaxseed meal mixed with three tablespoons of water as a substitute for a vegan cake.

Can I make this cake as a layered cake?

Absolutely! You can bake the batter in multiple round pans to create layers and frost it with your choice of frosting.

What do I do if my cake sinks in the middle?

A sinking cake often results from underbaking or overmixing. Ensure the cake is fully baked before removal and avoid excessive mixing after adding dry ingredients.

Can I add chocolate chips to the batter?

Yes! Adding chocolate chips can enhance the chocolate flavor and provide delightful bursts of chocolate in every slice.

What’s the ideal temperature to serve the cake?

This cake is best served at room temperature, which allows the flavors to fully develop and the texture to shine.

Additional Resources

If you’re inspired by this Decadent German Chocolate Pecan Pound Cake, consider exploring related recipes like classic chocolate cake, pecan pie, or even nut-filled brownies. Deepen your baking knowledge with technique guides on creaming butter or mastering oil-based cakes.

For more insight, look into ingredient specifics such as a deep dive on types of chocolate or the health benefits of various nuts. Equipment recommendations can help refine your baking tools for future successes, making your baking journey even more rewarding.

Join the Conversation

We love hearing your thoughts on this Decadent German Chocolate Pecan Pound Cake! Share your own experiences, suggest variations, and engage with fellow bakers on our social media platforms. Don’t forget to tag us in your photos showcasing your creations. Your feedback and suggestions help build a community of enthusiastic bakers eager to share their culinary adventures.

The Recipe

Decadent German Chocolate Pecan Pound Cake

Serves: 12 slices

Prep Time: 25 mins

Cook Time: 60 mins

Total Time: 85 mins

Kitchen Equipment Needed

  • Bundt pan
  • Mixing bowls
  • Electric mixer
  • Measuring cups and spoons
  • Rubber spatula
  • Cooling rack

Ingredients

  • 2 cups all-purpose flour
  • 1 teaspoon baking powder
  • 1/2 teaspoon baking soda
  • 1/4 teaspoon salt
  • 1 cup unsalted butter, softened
  • 2 cups granulated sugar
  • 4 large eggs
  • 1 teaspoon vanilla extract
  • 1 cup German chocolate, melted
  • 1 cup pecans, chopped and toasted
  • 1/2 cup buttermilk

Directions

  1. Preheat your oven to 350°F (175°C). Grease and flour a bundt pan.
  2. In a medium bowl, whisk together flour, baking powder, baking soda, and salt; set aside.
  3. In a large mixing bowl, cream together softened butter and sugar until light and fluffy.
  4. Add eggs one at a time, mixing well after each addition. Stir in vanilla and melted chocolate.
  5. Gradually add dry ingredients to the wet mixture, alternating with buttermilk; stir in pecans.
  6. Pour the batter into the prepared bundt pan and smooth the top.
  7. Bake in the preheated oven for 60-65 minutes, or until a toothpick inserted comes out clean.
  8. Allow to cool in the pan for 10 minutes, then invert onto a wire rack to cool completely.

Recipe Notes

  • For an extra treat, drizzle chocolate ganache over the cooled cake.
  • This cake can be made ahead and freezes well for future enjoyment.
  • Feel free to substitute walnuts for pecans if desired.

Delicious Spaghetti and Spinach in Sun-Dried Tomato Cream Sauce

Spaghetti & Spinach with Sun-Dried Tomato Cream Sauce: A Creamy Delight

⚖️
Difficulty
Medium

⏲️
Prep Time
15 mins

🕒
Cook Time
20 mins

⏱️
Total Time
35 mins

🍽️
Servings
4

Indulge in the rich flavors of Spaghetti & Spinach with Sun-Dried Tomato Cream Sauce, a dish that combines the hearty goodness of spaghetti with the vibrant colors and nutrition of fresh spinach. The luscious sun-dried tomato cream sauce adds a savory depth that elevates this meal, making it an instant favorite at the dinner table. Whether you are preparing a weeknight family meal or hosting a special gathering, this creamy pasta will tantalize taste buds and leave everyone asking for seconds.

This recipe is not only delicious but also brings convenience to the kitchen. With a preparation time of just 15 minutes and a cook time of 20 minutes, you can whip up a satisfying dish in no time. It’s the perfect option for busy weekday dinners or cozy weekend meals with friends and family, balancing flavor and simplicity effortlessly.

Quick Recipe Highlights

  • Flavor Profile: The sweetness of sun-dried tomatoes complements the creamy sauce, while fresh spinach provides an earthy note.
  • Texture: Creamy and smooth sauce clings beautifully to the al dente spaghetti, creating a delightful mouthfeel.
  • Aroma: The dish is perfectly aromatic, with hints of garlic and fresh herbs mingling with the rich creaminess.
  • Visual Appeal: Vibrant greens from the spinach contrast with the rich red of the sun-dried tomatoes, making this dish a feast for the eyes.
  • Skill Level Needed: It’s a moderate recipe that requires basic cooking skills but delivers impressive results.
  • Special Equipment: A good quality skillet and a pot for boiling pasta are all you need.

Recipe Overview

  • Difficulty Level: This dish offers a medium difficulty due to the coordination of cooking pasta and preparing the sauce simultaneously. However, it’s accessible for most home cooks.
  • Category: Perfect for dinner or lunch, this comforting pasta dish fits both casual and special occasions.
  • Cuisine: Influenced by Italian cooking traditions, this recipe highlights the use of fresh ingredients and comfort food principles.
  • Cost: The ingredients are budget-friendly, with an approximate total cost of $12, making it an economical meal.
  • Season: Enjoy this dish year-round, but it’s especially delightful in the spring when spinach is at its freshest.
  • Occasion: Ideal for family dinners, date nights, or when entertaining guests with a crowd-pleasing, gourmet touch.

Why You’ll Love This Recipe

The taste and texture of Spaghetti & Spinach with Sun-Dried Tomato Cream Sauce create an unforgettable experience. The rich creaminess of the sauce coats every strand of spaghetti, while the fresh spinach adds a slight crunch and vibrant color. Each bite is a perfect combination of flavors and textures, appealing to pasta lovers and those seeking something a bit different.

Convenience and preparation benefits make this recipe a go-to for many busy home cooks. With just a few simple steps, you can have a nutritious and flavorful meal ready in under 40 minutes. It’s an easy meal prep option for those looking to include more homemade meals into their busy lifestyles without the fuss.

The nutritional advantages of this dish cannot be overlooked. Spinach provides essential vitamins and minerals, while the sun-dried tomatoes offer antioxidants. The recipe balances carbohydrates, healthy fats, and proteins, making it suitable for a well-rounded diet.

Spaghetti & Spinach with Sun-Dried Tomato Cream Sauce serves not only as a delightful meal but also as a perfect dish for social gatherings. Its creamy and rich flavor profile impresses guests, making it a popular choice for potlucks and parties. The ease of preparation allows you to spend less time in the kitchen and more time enjoying the company of friends.

Finally, the cost-effectiveness of this dish is a significant advantage. With inexpensive yet high-quality ingredients like pasta, spinach, and tomatoes, you can serve a satisfying meal without breaking the bank. This recipe showcases that delicious meals can be both affordable and gourmet.

Historical Background and Cultural Significance

Spaghetti has a rich history that traces back to ancient times. Its origins are often debated, with various regions claiming to be the first to produce this beloved pasta. While some say it originated in China, the widely held belief is that Italians perfected it, and today it serves as a staple in Italian cuisine.

The cultural importance of spaghetti in Italy cannot be underestimated. Known for its versatility, pasta dishes feature prominently in traditional meals and represent both family gatherings and celebrations. Spaghetti with various sauces has regional variations that highlight local flavors, but none are as beloved as the combination with creamy sauces and fresh vegetables.

The evolution of this recipe showcases the adaptation of classic Italian cooking to incorporate various ingredients. With the rise of sun-dried tomatoes in Mediterranean cuisine, they became a signature element in many dishes, including pasta, enhancing richness and flavor. This recipe exemplifies how traditional flavors can be modernized while still honoring their roots.

Regional variations can be noted across Italy, with different areas using varying ingredients for sauce preparation. For instance, while some regions may incorporate capers or olives for added flavor, others might rely solely on fresh herbs and cream to create a lighter version. This flexibility allows the dish to maintain its relevance in contemporary cuisine.

Ingredient Deep Dive

Spaghetti

Pasta like spaghetti has its roots in Italy, where it symbolizes comfort and tradition. This popular noodle is made from durum wheat semolina, offering a firm texture when cooked. Nutritionally, spaghetti is a source of carbohydrates, providing energy for the body. When selecting spaghetti, look for high-quality brands that are made from durum wheat for the best texture and taste.

Sun-dried tomatoes bring a burst of intense flavor to the dish. Traditionally, these tomatoes are dehydrated in the sun, concentrating their sweetness and acidity. Packaged sun-dried tomatoes often contain health benefits, such as high levels of antioxidants. When purchasing, choose sun-dried tomatoes packed in oil for added flavor, and store them in an airtight container to maintain freshness.

Fresh spinach brightens this dish and enhances its nutritional value. This leafy green is rich in vitamins A, C, and K, as well as iron and calcium. When selecting spinach, look for vibrant green leaves without any yellowing. Store fresh spinach in a damp paper towel and a perforated bag in the refrigerator to keep it crisp.

Heavy cream provides the base for the sun-dried tomato sauce, delivering luxurious creaminess. Opt for high-quality heavy cream for the best flavor and texture. It is a source of fat, which adds richness to the dish. Be mindful of the serving size, as heavy cream is calorie-dense. Substitute with half-and-half or plant-based creams if desired for a lighter version.

Garlic adds depth and aroma to the dish, a staple in cooking that enhances flavor profiles across cuisines. Choose fresh garlic bulbs that feel firm and free of soft spots. Garlic also has numerous health benefits, including anti-inflammatory properties. When using, slice or mince garlic for full flavor release.

Italian seasoning blends combine various dried herbs to give the dish its aromatic essence. This blend typically includes basil, oregano, marjoram, and thyme. Look for organic versions to ensure quality. You can also create a custom blend based on your personal taste by adjusting the proportions of each herb.

Common Mistakes to Avoid

  • Overcooking the Pasta: Always al dente is the way to go! Cooking pasta for too long can result in a mushy texture. Make sure to check the package for cooking times and taste it a minute or two before the time is up.
  • Using Low-Quality Ingredients: The quality of your sun-dried tomatoes and cream can make or break the sauce. Invest in high-quality ingredients for superior flavor and freshness.
  • Not Salting the Pasta Water: This is crucial! Salting your pasta water enhances the pasta’s flavor. Don’t skip this step, as it sets the foundation for seasoning in the dish.
  • Adding Ingredients in the Wrong Order: To achieve the best flavor, follow the order in which ingredients should be added, allowing for each to meld properly before moving on to the next step.
  • Using Cold Ingredients: Cold cream can curdle when added to a hot pan. Always allow your ingredients to reach room temperature before cooking.
  • Skipping the Garnish: Don’t underestimate the importance of fresh herbs or grated cheese as a garnish. They not only enhance the dish’s appearance but also elevate the flavor!
  • Overcrowding the Pan: When sautéing, give your spinach enough room to wilt properly. Overcrowding can steam rather than sauté your vegetables.
  • Neglecting to Taste: Taste your sauce as you go! Adjust seasoning accordingly, as it is crucial for a balanced flavor profile.

Essential Techniques

Cooking Pasta Correctly

Cooking pasta al dente is essential for retaining texture. Make sure to boil water with enough salt before adding the pasta. Stir occasionally and taste a minute before the suggested cooking time to achieve the right consistency.

Sautéing Spinach

Sautéing spinach quickly adds depth without overcooking it. Use medium heat and add olive oil, allowing it to shine while maintaining its nutrients. Look for vibrant green leaves as a visual cue for perfect sautéing.

Making the Cream Sauce

To make a perfect cream sauce, warm the heavy cream gently, then add sun-dried tomatoes and seasoning. Stir continuously to avoid burning and achieve a creamy consistency without curdling.

Flavor Balancing

When cooking, always taste and adjust the seasoning levels. Adding salt, pepper, or spice plays a vital role in enhancing the overall flavor. A little at a time goes a long way – balance is key!

Plating the Dish

Presentation matters! Plate the dish by twirling spaghetti with tongs to create an elegant mound. Top with spinach and drizzle the cream sauce for an aesthetically pleasing serving that entices the appetite.

Garnishing

Don’t forget to garnish! A sprinkle of fresh herbs like basil or a dusting of parmesan not only enhances the dish’s visual appeal but also adds fresher flavors and aroma.

Pro Tips for Perfect Spaghetti & Spinach with Sun-Dried Tomato Cream Sauce

– Prepare all ingredients before cooking to streamline the process. This way, you avoid delays that can lead to overcooked pasta or wilted spinach.
– Use high-quality pasta for the best bite. Fresh or artisanal pasta can significantly improve the dish’s overall texture and flavor.
– A splash of white wine can add another layer of flavor to your sauce. Simply deglaze your pan after sautéing the garlic before adding the cream.
– Add a pinch of red pepper flakes for a subtle heat that balances well with the creaminess of the sauce.
– Remember to reserve a cup of pasta water before draining. It’s great for adjusting the sauce’s consistency if you want to thin it out.
– Experiment with homemade pesto as a base before adding the creamy sauce for an extra flavor dimension.
– Freshly grated parmesan on top can amplify the umami taste, enhancing the dish overall.
– Pair your meal with a crusty loaf of bread to savor every bit of that delicious sauce!

Variations and Adaptations

This recipe can be easily adapted to cater to different tastes and dietary needs. Regional variations might include adding spicy Italian sausage or sautéed mushrooms for a more robust flavor.

Seasonal adaptations could involve incorporating fresh asparagus or peas in spring for a brighter, crisp finish, or roasted butternut squash in the fall for a sweet touch.

For dietary modifications, consider replacing spaghetti with gluten-free pasta or zucchini noodles for a lighter, lower-carb option. For a vegan alternative, use a plant-based cream substitute and nutritional yeast instead of parmesan cheese.

Flavors can be varied by adding more garlic, sun-dried tomatoes, or fresh herbs for brightness. For different textures, experiment with roasted nuts or breadcrumbs added during finishing for exciting crunch and flavor layers.

In terms of presentation, serve in a shallow bowl to showcase the sauce and garnish differently with a drizzle of balsamic reduction for a striking visual and palate contrast.

Serving and Presentation Guide

Plating techniques are crucial for making this dish shine. Use tongs to twirl the spaghetti into a nest and place it in the center of a shallow bowl. Drizzle with the sun-dried tomato cream sauce, allowing it to fill the crevices of the pasta.

Garnishing ideas include a light sprinkle of freshly chopped basil or parsley, a dash of crushed red pepper, and a generous grating of parmesan cheese. Freshly cracked black pepper on top can enhance the dish’s overall look and flavor.

For traditional accompaniments, serve alongside garlic bread or a simple arugula salad with lemon vinaigrette. Modern serving suggestions can also include pairing the pasta with a light white wine or sparkling water to accentuate the creamy flavors.

Consider temperature when serving; always serve hot to enjoy the full depth and richness of the flavors. Portion control tips might include serving 1 to 2 cups per person, depending on the accompanying side dishes.

Wine and Beverage Pairing

For wine pairings, a crisp Pinot Grigio enhances the tomato’s sweetness and cuts through the creaminess of the sauce. Alternatively, a light Chianti offers great balance and complements the richness beautifully.

If you prefer non-alcoholic alternatives, consider sparkling water infused with citrus or a herbal iced tea for a refreshing complement. For coffee lovers, a light roast helps cleanse the palate after the creamy pasta coat.

Temperature considerations are essential; always serve white wines chilled while allowing red wines to breathe at room temperature. Rustic serving suggestions include using large wine glasses that lend an elegant touch.

Storage and Shelf Life

To store leftovers, transfer to an airtight container and refrigerate for up to 3 days. Make sure the pasta has cooled down completely to maintain texture. For longer storage, consider freezing in a freezer-safe container for up to a month.

Signs of spoilage include off-smells or a change in texture, particularly in the spinach or sauce. If reheating, ensure the dish reaches an even temperature to avoid cold spots; gently reheat on the stove or in a microwave.

Freezing guidelines suggest separating the sauce from the pasta before storing to retain the best quality. Reheat sauce gently and add fresh pasta once warmed through to maintain the dish’s integrity.

Make Ahead Strategies

Prep timeline is essential for efficient cooking; chop and store vegetables in advance, and measure out sauce ingredients to save time when cooking. Consider cooking the pasta al dente and cooling it quickly before storing it in the fridge to prevent clumping.

Storage between steps can also enhance quality; you can prepare the cream sauce and spinach a few hours in advance. Store them separately until ready to combine for the final assembly.

Assessing quality impacts, ensure the freshness of ingredients for maximum flavor. Always taste and adjust seasoning before serving, as ingredients can lose their punch when stored.

Assembly tips include reheating the sauce gently before combining with fresh pasta, ensuring everything stays creamy and delightful. Freshly added ingredients just before serving can also elevate the final dish.

Reheating guidelines stipulate not to exceed moderate heat, especially with cream-based sauces that can separate if overheated. Aim for even heating for the best experience.

Scaling Instructions

For halving the recipe, simply divide all ingredient amounts. Adjust cooking time slightly, as smaller portions might cook quicker, but keep an eye on the texture of the pasta and sauce.

Doubling or tripling may require larger pots and pans, but the process remains similar. Ensure not to overcrowd your cooking space and work in batches if necessary.

Equipment adjustments may include larger mixing bowls or baking dishes for larger servings; the same goes for the skillet when preparing the sauce.

Timing modifications depend on the quantities you’re preparing, so consider checking for doneness earlier than you would with smaller batches, especially for the pasta.

When storing larger quantities, consider using several containers for easier portioning later.

Nutritional Deep Dive

Analyze macros by assessing the carbohydrates in spaghetti, the healthy fats in heavy cream, and the vitamins found in spinach. This balance offers not only taste but also nutritional value, making it a well-rounded meal.

Micronutrient analysis highlights the vitamin K content in spinach, essential for bone health, while sun-dried tomatoes contribute to your overall antioxidant intake, making this dish both indulgent and beneficial.

Health benefits can include enhancing cardiovascular health due to the nutritious nature of the ingredients, while portion analysis guides appropriate serving sizes for maintaining balance in dietary habits.

Weight management tips suggest enjoying larger portions of nutrient-dense vegetables like spinach while moderating pasta to control caloric intake without sacrificing satisfaction.

Dietary Adaptations

For gluten-free situations, consider using gluten-free pasta options that closely match the traditional texture without sacrificing flavor. Always check ingredient labels to ensure complete compliance.

Dairy-free alternatives can include coconut milk or cashew cream in place of heavy cream for a similar creamy texture, along with nutritional yeast for a cheesy flavor profile.

Vegans can substitute all animal products with plant-based ingredients, making it accessible without losing the essence of the dish.

Low-carb options could involve using spiralized vegetables like zucchini or a strict low-carb pasta substitute, providing a healthier balance without sacrificing flavor.

For keto diets, stick to high-fat, low-carb ingredients while increasing the amount of spinach to satisfy nutrient needs while keeping carbohydate levels low.

Paleo diets can also adjust this recipe by focusing on whole, unprocessed ingredients while avoiding grains entirely, using alternatives for pasta where necessary.

Consider low-FODMAP adaptations if you’re sensitive to certain ingredients, such as opting for garlic oil instead of fresh garlic to enhance flavors without digestive issues.

Troubleshooting Guide

Texture issues often arise if pasta is too overcooked or the sauce is too thick. Always ensure that you follow cooking times closely and adjust with reserved pasta water for a smooth finish.

Flavor balance could be off if too much salt or spice is added. Adjust by introducing sweetness with a touch of sugar or balancing it out with a splash of vinegar to achieve harmony.

Temperature problems might indicate that reheating was insufficient. Always make sure dishes are heated evenly, checking internal temperatures when using a microwave or frying pan.

Equipment challenges can occur if you don’t have the right pans. It’s better to have a larger, shallow pan for sauces that encourages even cooking and prevents burning.

Ingredient substitutions may alter your overall flavor profile, so always taste as you go and adjust herbs and spices accordingly to remain faithful to the intended taste.

Lastly, timing concerns can happen if tasks overlap during preparation; hence, preparation strategy established beforehand ensures a smooth cooking experience.

Recipe Success Stories

Readers rave about how Spaghetti & Spinach with Sun-Dried Tomato Cream Sauce has become a household favorite! The combination of flavors captures the hearts of families, prompting many to share their experiences on social media.

Variation successes highlight how adding roasted vegetables or grilled chicken can experiment with the dish while maintaining its essence, creating a masterful crowd-pleaser any day of the week.

Adaptation stories also surface with allergy-friendly versions, taking the core idea of the recipe and modifying it for diverse dietary restrictions without losing the magic of the original.

Photography tips from community members help enhance online engagement and inspire others to recreate this beloved dish at home, showcasing how appealing food photography can elevate the recipe’s popularity.

Encouraging reader suggestions showcases creativity, encouraging individuals to share their twists on the recipe, making it a vibrant community-driven dish enjoyed by many.

Frequently Asked Questions

Can I use frozen spinach instead of fresh?

Yes, you can use frozen spinach! Just be sure to thaw and drain it thoroughly before adding it to the sauce to avoid excess moisture. This is a great time-saver, and the flavor will still be delightful!

Can I make this recipe dairy-free?

Absolutely! You can substitute the heavy cream with coconut cream or a plant-based cream alternative. Add nutritional yeast for a cheesy flavor while keeping it dairy-free.

How do I store leftovers?

To store leftovers, transfer them to an airtight container and refrigerate for up to 3 days. Reheat gently on the stove or in the microwave before consuming.

Is there a vegan version of this dish?

Yes! A vegan version can be prepared by using whole wheat spaghetti or zucchini noodles, and substituting the cream with cashew cream or coconut milk along with nutritional yeast for a cheesy flavor.

What kind of tomatoes should I use?

Sun-dried tomatoes are recommended for this dish. You can use either dry-packed or those preserved in oil for added flavor. Be sure to chop them before adding to your sauce for even distribution!

How can I make the sauce spicier?

For a spicy kick, add red pepper flakes or freshly ground black pepper to the cream sauce. You can also toss in some sliced jalapeños for extra heat!

Can I use other vegetables in this dish?

Definitely! Feel free to add vegetables like bell peppers, mushrooms, or asparagus to enhance your dish. Just sauté them before adding to the sauce for a varied flavor.

Can I use this sauce for something other than spaghetti?

Yes, this sun-dried tomato cream sauce is versatile! You can use it with farfalle, penne, or even drizzle it over grilled chicken or fish for a delicious meal!

Is this dish suitable for meal prep?

Yes! This dish is great for meal prep. Cook the pasta and sauce together, portion them out in containers, and refrigerate for convenient meals during the week!

What wine pairs best with this dish?

A crisp Pinot Grigio or a light-bodied red like Chianti is a fantastic pairing! Both wines complement the creamy sauce and enhance the flavors of the dish.

Additional Resources

If you’re interested in more recipes like Spaghetti & Spinach with Sun-Dried Tomato Cream Sauce, discover our collection of creamy pasta recipes that offer similar delights.

For technique guides, be sure to check out our cooking classes focused on mastering homemade sauces, which can elevate any meal to gourmet status.

Ingredient information is essential as you learn more about pasta and alternative grains. Understanding different options can inspire creativity in the kitchen.

Don’t underestimate the role of equipment recommendations! High-quality cookware is vital, so invest in good pots and pans that enhance the cooking experience.

Finally, seasonal variations can inspire you to adapt this recipe to suit your local harvest produce, encouraging creativity and freshness in every meal.

Join the Conversation

We would love to hear your thoughts! Share your experiences with this recipe on social media by tagging us, and don’t forget to include your wonderful photos for inspiration!

Photography tips will help you capture the essence of your culinary creations, making that dish pop on your feed.

Recipe reviews invite engagement from the community and can help guide new cooks in the kitchen, allowing you to share what you love about this delicious pasta dish.

Engaging with the community brings about recipe variations – we encourage readers to share modifications they’ve made to help inspire and increase creativity in the kitchen.

Don’t hesitate to reach out with your unique twists or suggestions for this recipe. Community input enriches the cooking experience, making it a delightful journey for everyone involved.

The Recipe

Spaghetti & Spinach with Sun-Dried Tomato Cream Sauce

Serves: 4

Prep Time: 15 mins

Cook Time: 20 mins

Total Time: 35 mins

Kitchen Equipment Needed

  • Large pot for boiling pasta
  • Skillet
  • Colander
  • Measuring cups and spoons
  • Wooden spoon or spatula

Ingredients

  • 12 oz spaghetti
  • 2 cups fresh spinach
  • 1 cup sun-dried tomatoes, chopped
  • 1 cup heavy cream
  • 2 cloves garlic, minced
  • 1 tsp Italian seasoning
  • Salt and pepper to taste
  • 2 tbsp olive oil
  • Fresh basil or parsley for garnish
  • Parmesan cheese for serving (optional)

Directions

  1. Cook spaghetti according to package directions in a large pot of salted boiling water until al dente. Drain and set aside.
  2. In a skillet, heat olive oil over medium heat. Add minced garlic and sauté until fragrant, about 1 minute.
  3. Stir in sun-dried tomatoes and Italian seasoning; cook for another 2 minutes.
  4. Pour in heavy cream, stirring frequently, until heated through and slightly thickened, about 3-4 minutes.
  5. Add fresh spinach to the skillet, stirring until wilted, approximately 2-3 minutes.
  6. Toss cooked spaghetti with the cream sauce until fully coated. Season with salt and pepper, adjusting to taste.
  7. Plate the dish, garnishing with freshly chopped basil or parsley and parmesan cheese if desired.

Recipe Notes

  • Store leftovers in an airtight container in the refrigerator for up to 3 days.
  • For a vegetarian version, feel free to skip the cheese for a lighter approach.
  • Substitute cream with half-and-half or a plant-based alternative for lighter options.
  • Add chicken or shrimp for additional protein options if desired.

Easy Chicken and Potato Bake Recipe for Comforting Dinners

Delicious Chicken and Potato Bake: A Comforting Family Favorite

⚖️
Difficulty
Easy

⏲️
Prep Time
15 mins

🕒
Cook Time
45 mins

⏱️
Total Time
60 mins

🍽️
Servings
4

Chicken and Potato Bake is a quintessential comfort dish that brings the family together around the dinner table. This recipe combines succulent chicken pieces with tender potatoes, all enveloped in a creamy, savory sauce. As it bakes, the aromas waft through the house, inviting everyone to indulge in a cozy meal. The crispy top layer melds beautifully with the creamy filling underneath, creating a dish that satisfies both the palate and the soul.

This chicken and potato bake is not only delightful to taste but also simple to prepare. With minimal effort and a few pantry staples, you can whip up this hearty casserole that’s perfect for weeknight dinners or special occasions. The combination of flavors—savory chicken, buttery potatoes, and rich, creamy sauce—creates a balanced dish that everyone will love. Get ready to enjoy hearty bites that warm you from the inside out.

Quick Recipe Highlights

  • Flavor Profile: The chicken is seasoned perfectly, enhancing its natural juiciness while the potatoes absorb the delicious flavors of the sauce, providing a satisfying experience.
  • Texture: Expect a delightful contrast between the crispy top layer and the creamy interior filled with tender chicken and velvety potatoes.
  • Aroma: As it bakes, the rich scent of roasted chicken mingles with buttery potatoes and savory herbs, creating a mouthwatering aroma.
  • Visual Appeal: The golden brown crust topped with herbs and inviting creaminess beneath makes this dish visually appealing on any table.
  • Skill Level Needed: This recipe is perfect for both novice cooks and seasoned chefs, as it involves straightforward techniques and minimal steps.
  • Special Equipment: A large baking dish and simple kitchen utensils are all you need to create this comforting bake.

Recipe Overview

  • Difficulty Level: This chicken and potato bake is categorized as easy, making it accessible for beginners who want to impress family and friends.
  • Category: It falls under the main dish category, ideal for hearty dinners or gatherings.
  • Cuisine: With influences from classic comfort food recipes, this dish brings a cozy, home-cooked feel to your dining experience.
  • Cost: The ingredients are budget-friendly, making it a fantastic option for feeding a crowd without breaking the bank.
  • Season: Perfect for all seasons, especially comforting during colder months when warm meals are a heartwarming necessity.
  • Occasion: Ideal for family dinners, potlucks, and gatherings, as it feeds multiple people and offers delightful leftovers.

Why You’ll Love This Recipe

This chicken and potato bake offers an irresistible taste and texture ensemble. The tender chicken, combined with creamy potatoes, brings comfort to every bite, making it a favorite among all ages. The flavor depth provided through the addition of herbs and spices elevates this dish, creating a memorable meal that resonates with warm emotions and fond memories.

Convenience is another key advantage of this recipe. Preparation requires just a few minutes of chopping and mixing, then it’s placed in the oven to do the work for you. This means less stress in the kitchen, allowing you to spend time with family and friends instead of slaving away over the stove.

Nutritionally, this dish covers your bases. Rich in protein from the chicken and providing valuable carbohydrates from the potatoes, it serves as a balanced meal. Adding vegetables can further enhance its nutritional profile, making it not only tasty but healthy.

Serving this comforting dish can also serve a social purpose, inviting conversation around hearty helpings that draw people in. It encourages sharing and bonding over simple, delicious food, making it an ideal meal for gatherings or family nights.

Financially, it’s a winner. Utilizing economical ingredients and yielding plenty of servings, this chicken and potato bake stands out as an inexpensive meal option that doesn’t compromise on taste or satisfaction.

Historical Background and Cultural Significance

The origins of baked chicken and potatoes can be traced back to traditional home-cooked meals prevalent across numerous cultures, symbolizing comfort and family. In many households, these ingredients are commonplace, making them accessible to families of all economic backgrounds. This homely dish has warmed hearts for generations, representing shared meals and treasured family moments.

Culturally, chicken and potatoes feature prominently in various cuisines, with each version boasting unique flavors and techniques reflective of regional traditions. The marriage of these two ingredients creates a harmony that resonates in family gatherings and celebrations, from rustic kitchens to festive feasts.

Over time, this recipe has evolved, with cooks experimenting with flavors, techniques, and textures, leading to variations that incorporate regional spices or alternative cooking methods. Each adaptation adds layers of flavor, showcasing how deeply ingrained this dish has become across culinary cultures.

Variations of this recipe often reflect regional preferences, with some opting for creamy sauces, others choosing tomato-based versions, and many including an array of vegetables. This evolution showcases the versatility of chicken and potatoes as a staple and their enduring popularity in kitchens worldwide.

Ingredient Deep Dive

Chicken
The chicken is the star ingredient in this bake, providing essential protein and a range of vitamins and minerals, including B vitamins and selenium. Historically, chicken has been a staple in many diets due to its versatility and nutrient density. When choosing chicken, look for cuts that are fresh, with no visible discoloration, and firm to the touch. Store chicken in the refrigerator for up to two days or freeze for later use.

For substitutions, you could opt for turkey or plant-based options if desired, ensuring to adjust cooking times accordingly.

Potatoes
Potatoes are not just a side dish; they’re a culinary cornerstone. With roots tracing back to South America, they’ve become a global staple, praised for their carbohydrate content and adaptability in dishes. For health benefits, potatoes are rich in potassium and fiber. When selecting potatoes, look for those that are firm and free from blemishes. Store them in a cool, dark place to extend their shelf life.

For alternatives, you can explore sweet potatoes, which provide a different flavor and nutritional profile, or other root vegetables like carrots or parsnips for variety in your dish.

Common Mistakes to Avoid

  • Overcrowding the baking dish can result in uneven cooking. Make sure to arrange the ingredients with enough space for heat circulation.
  • Using frozen chicken instead of thawed may impact cooking time and texture. Always ensure the chicken is defrosted properly prior to cooking.
  • Neglecting to season adequately can lead to blandness. Don’t skimp on herbs and spices; they are critical for enhancing flavor.
  • Ignoring the resting time after baking can result in a messy serving. Allow the dish to set for a few minutes for better slicing.
  • Using insufficient liquid may result in a dry dish. Ensure the sauce is adequate to maintain moisture throughout the cooking process.
  • Overcooking the potatoes can lead to mushiness. Keep an eye on them and test for doneness periodically.
  • Failing to preheat the oven can result in inconsistent cooking. Always ensure your oven reaches the desired temperature before baking.
  • Using the wrong baking dish can affect cooking time and texture. A glass or ceramic dish is recommended for the best results.
  • Not adjusting cooking times for different ovens can lead to overcooked or undercooked dishes. Always test for doneness using a meat thermometer.
  • Skimping on garnishes can leave the dish looking dull. Fresh herbs will not only improve the appearance but also enhance flavor.

Essential Techniques

Baking chicken and potatoes together requires an understanding of timing and temperature. Start by preheating your oven to ensure even cooking. Mastering the right temperature allows the chicken to cook through without drying out, while also giving the potatoes a beautiful golden color. A good visual cue for success includes a nice brown top and bubbling sauce.

Chopping vegetables to uniform sizes is key to consistent cooking. This technique ensures all pieces cook evenly. Pay attention to your knife skills and invest in a good chef’s knife for precision.

Creating a flavorful sauce blends well with the ingredients to enhance the dish. Sautéing aromatic vegetables in olive oil before adding cream boosts flavor complexity.

Finally, layering ingredients thoughtfully allows for proper heat exposure. Begin with potatoes at the bottom, followed by chicken and sauce. This technique ensures the chicken remains tender and juicy while the potatoes soak up robust flavors.

Pro Tips for Perfect Chicken and Potato Bake

1. Marinate the chicken for at least an hour to infuse additional flavor and tenderness; citrus or yogurt works wonders.
2. Pre-cook the potatoes partially to cut down baking time and achieve perfect doneness.
3. Add fresh herbs like rosemary or thyme for an aromatic touch that brightens flavors significantly.
4. Consider adding cheese towards the end of baking for a crispy, golden-brown topping that adds richness.
5. Keep a close eye on the baking progress to avoid over-browning. Use aluminum foil if needed to shield the top.
6. Allow leftovers to sit for a moment before serving; the flavors meld beautifully during resting.
7. Elevate the dish by adding seasonal vegetables like carrots or green beans for added color and nutrition.
8. For more crunch, top with breadcrumbs mixed with melted butter or olive oil in the last 10 minutes of baking.

Variations and Adaptations

When experimenting, consider exploring various regional variations of this dish. For instance, adding southwestern spices and black beans can give a Mexican twist, while incorporating Mediterranean herbs like oregano and olives can provide a unique flavor profile.

Seasonal adaptations can enhance this dish as well. During fall, adding butternut squash can offer a warm sweetness, while spring vegetables like asparagus can lighten the dish further.

Dietary modifications are also simple; substitute the heavy cream with coconut milk for a dairy-free version, or cauliflower instead of potatoes for a low-carb alternative.

For flavor variations, think outside the box! Experiment with spices, using curry powder or garam masala for an Indian flair, or chili flakes for some heat.

Texture modifications include roasting the chicken separately earlier for an even crispier result; then combine it with the potatoes towards the end of cooking.

For presentation alternatives, consider serving in individual ramekins to create a rustic, personal feel or layering in a cast-iron skillet for beautiful visibility.

Serving and Presentation Guide

Plating this chicken and potato bake can be as simple or fancy as you wish. A rustic presentation in the baking dish allows for a homey look, perfect for family style dining. For more formal occasions, serve individual portions in ramekins or on stylish plates.

To garnish, sprinkle fresh parsley or chives on top just before serving. This bright pop of color enhances visual appeal while providing fresh flavor.

Traditional accompaniments like a simple green salad or steamed vegetables can complement the richness of the bake beautifully. Modern serving suggestions might include artisan bread for sopping up the creamy sauce.

Temperature considerations are crucial; serve this dish hot out of the oven for the best flavor experience. Portion control can also enhance the presentation—if serving buffet-style, ensure uniform portions to maintain appeal.

Wine and Beverage Pairing

Wine pairings with this dish can enhance the dining experience significantly. A chilled Chardonnay or a light Pinot Grigio complements the flavors exquisitely while balancing the richness of the cream sauce.

For red wine enthusiasts, opt for a Pinot Noir, which offers soft tannins and complements chicken without overpowering it.

If you’re looking for non-alcoholic alternatives, consider serving sparkling water infused with lemon, which refreshes the palate between bites.

For those who enjoy coffee or tea, a herbal tea such as chamomile or peppermint pairs well, aiding digestion and providing a gentle finish to the meal.

Serving temperature is important; wines should be at optimal temperatures to enhance both their flavors and the overall dining experience.

Storage and Shelf Life

Proper storage methods are key to prolonging leftovers from this chicken and potato bake. Store any uneaten portions in airtight containers in the refrigerator for up to three days.

For longer shelf life, consider freezing the bake. Ensure it is cooled completely before transferring to freezer-safe containers; it can last up to three months in the freezer.

Temperature requirements are essential; the dish should not be left out at room temperature for more than two hours to prevent spoilage.

Signs of spoilage include off-odors or mold. Always check these signs before reheating.

Reheating instructions involve using an oven to ensure even warming; a 350°F oven for about 20 minutes is ideal. Cover with foil to retain moisture.

Guidelines for freezing include portioning before freezing, which makes for easier reheating and maintaining quality.

Make Ahead Strategies

Planning ahead for this chicken and potato bake makes mealtime easier. Prep your ingredients the night before, chopping vegetables and marinating chicken in advance for maximum flavor.

Storage between steps is beneficial; store prepped ingredients separately in the refrigerator to keep everything fresh until you’re ready to assemble.

Quality impact assessment is important; while partially cooking the potatoes can enhance flavor, avoid fully cooking them to maintain texture during baking.

Assembly tips involve layering ingredients in the dish the night before and covering it tightly to store appropriately in the fridge.

Reheating guidelines suggest bringing the dish to room temperature before baking it, which ensures even cooking throughout.

For fresh element additions, consider tossing in some fresh herbs or greens just before serving to elevate the dish.

Scaling Instructions

Scaling this chicken and potato bake is a straightforward process. If halving the recipe, you may need to adjust the cooking time to avoid over-baking.

Doubling or tripling the recipe is possible, but be mindful of your baking equipment capacity; use larger baking dishes to accommodate increased portions.

Equipment adjustments could involve using extra racks in the oven to cook more than one dish at a time for efficiency.

Timing modifications are necessary; larger portions may require longer cooking times, so regularly check for doneness with a meat thermometer.

Consider storage considerations if preparing in bulk, ensuring you have enough containers for leftovers without overcrowding them.

Nutritional Deep Dive

Analyzing the nutritional components of this dish reveals a balance of macros. Each serving provides a hearty portion of protein from the chicken and carbohydrates from the potatoes, fueling your body for the day ahead.

Micronutrient analysis indicates that white potatoes offer potassium, vitamin C, and fiber, while the chicken brings a wealth of B vitamins and iron to the table.

Health benefits are notable here; the combination of protein and fiber keeps you satiated longer, aiding in weight management. Coupled with a vegetable side dish, it encourages a nutritious, well-rounded meal.

Dietary considerations should focus on portions; understanding serving sizes will help in managing caloric intake while still enjoying the dish’s richness.

An analysis of portion sizes reveals that adhering to a recommended serving of approximately one-quarter of the bake can optimize both satisfaction and energy levels.

Dietary Adaptations

For those following a gluten-free diet, this chicken and potato bake can be easily adapted by using gluten-free breadcrumbs if desired. Ensure all sauces and seasonings used are certified gluten-free.

For dairy-free modifications, swap out regular cream for coconut milk or almond cream, which will still provide a creamy texture while accommodating dietary needs.

Vegan adaptations can be explored by replacing the chicken with jackfruit or tofu and using plant-based cream alternatives, ensuring that all other ingredients align with a vegan diet.

Low-carb followers might consider utilizing cauliflower or zucchini instead of potatoes, transforming the dish into a vegetable-packed bake that adheres to their dietary guidelines.

For a keto version, focus on using high-fat cheeses and reducing the starchy elements while incorporating healthy fats to maintain ketogenic benefits.

Paleo enthusiasts can enjoy this dish with sweet potatoes and by avoiding processed ingredients, allowing for a clean, healthy meal.

Low-FODMAP adaptations would include using suitable layering and avoiding common triggers, ensuring that everyone can enjoy this flavorful recipe.

Troubleshooting Guide

If you encounter texture issues, be sure to check your cooking times. If the dish turns out watery, this could be caused by overcooking, which can lead to excess moisture.

Flavor balance can sometimes be tricky to achieve; make sure to compensate with adequate seasoning and herbs to enhance the overall taste. When in doubt, taste before serving.

Temperature problems often arise from an inconsistent oven; it’s wise to use an oven thermometer to ensure accurate baking temperatures.

Equipment challenges may happen if your bakeware is not oven-safe; always check your tools before placing them in the oven.

Ingredient substitutions can lead to alterations in texture. If using alternative vegetables or proteins, adjust cooking times to ensure everything cooks evenly.

Timing concerns can be alleviated by prepping ingredients ahead of time and monitoring the baking process closely to avoid over or undercooking.

Recipe Success Stories

Our community’s feedback on this chicken and potato bake has been overwhelmingly positive. Readers have expressed excitement for its rich flavors and comforting qualities, often sharing it during family dinners.

Many have tried variations, incorporating different vegetables or spices, and contributing their success stories, declaring this dish a new family favorite.

Adaptation stories add layers of creativity; some have swapped chicken for turkey or added fresh herbs they had on hand, achieving their own take on the classic.

Readers also pass along photography tips, noting how a sprinkle of fresh herbs enhances the dish’s aesthetic for social media presentations.

This recipe continues to evolve within the community, showcasing its versatility and ability to foster creativity in approachable cooking.

Frequently Asked Questions

Can I prepare this dish in advance?

Absolutely! You can assemble the dish a day before and store it in the fridge. Just add a few extra minutes to the cooking time if baking straight from the refrigerator.

What can I substitute for chicken?

For a vegetarian option, use chickpeas or tofu. If you want a turkey variant, feel free to substitute with similar cooking times for ground turkey or turkey fillets.

Can this recipe be made gluten-free?

Yes! Just ensure your broth and any sauces used are gluten-free, and you can swap breadcrumbs for a gluten-free alternative if desired.

How do I make it spicy?

Add red pepper flakes or diced jalapeños to the sauce for a kick. You can also use spicy mustard for additional heat.

Can I freeze leftovers?

Yes! Store the cooled dish in an airtight container, and it can last in the freezer for about three months. Thaw in the refrigerator overnight before reheating.

What should I serve with the bake?

It pairs beautifully with a simple green salad, steamed broccoli, or garlic bread for dipping in the creamy sauce.

Can I use sweet potatoes instead?

Absolutely! Sweet potatoes will add a lovely sweetness and a hint of color to your bake, enhancing the flavor profile.

How can I make this dish healthier?

Add in extra veggies like spinach, kale, or carrots to boost the nutritional content. You can also use low-fat dairy options for the sauce.

What if my bake is too dry?

If your bake turns out dry, make sure you’ve added sufficient liquid initially or cover the dish for the first half of baking to retain moisture.

Is this dish suitable for meal prepping?

Absolutely! This dish holds well in the fridge and is easy to reheat, making it a perfect meal prep option.

Additional Resources

To further enhance your cooking journey, explore our related recipes like creamy casseroles, hearty baked dishes, and comforting one-pot meals.

Dive into technique guides focused on mastering casseroles and enhancing your kitchen skills. Ingredient information will also help you learn about nutritional benefits, seasonal availability, and preparation methods.

For anyone considering equipment recommendations, ensure you have proper baking dishes, measuring tools, and knives for the best results. Always explore seasonal variations to incorporate fresh ingredients, elevating the dish to new culinary heights.

Join the Conversation

We love hearing about your experiences with this chicken and potato bake! Share your adaptations and variations on social media, and don’t forget to tag us to highlight your kitchen success!

Photography tips for capturing the beauty of your finished dish can engage others and inspire creativity among the cooking community.

Track your recipe reviews to inspire others to try out this delicious comfort dish; your feedback is invaluable. With every share and comment, we grow together as a food-loving community.

The Recipe

Chicken and Potato Bake

Serves: 4

Prep Time: 15 mins

Cook Time: 45 mins

Total Time: 60 mins

Kitchen Equipment Needed

  • Large baking dish
  • Mixing bowl
  • Sharp knife
  • Cutting board
  • Measuring cups and spoons
  • Oven mitts

Ingredients

  • 4 chicken breasts, boneless and skinless
  • 4 medium potatoes, peeled and cubed
  • 1 cup heavy cream
  • 1 cup chicken broth
  • 2 cloves garlic, minced
  • 1 teaspoon salt
  • 1 teaspoon pepper
  • 1 teaspoon paprika
  • Fresh herbs (parsley or thyme) for garnish

Directions

  1. Preheat the oven to 375°F (190°C).
  2. In a large mixing bowl, combine cream, chicken broth, garlic, salt, pepper, and paprika.
  3. Layer the cubed potatoes in the baking dish, followed by the chicken breasts on top.
  4. Pour the cream mixture over the chicken and potatoes, ensuring everything is well-coated.
  5. Bake in the preheated oven for 45 minutes, or until chicken is cooked through and potatoes are tender.
  6. Let the dish sit for a few minutes before serving, then garnish with fresh herbs.

Recipe Notes

  • For added flavor, consider marinating the chicken in the cream mixture for a few hours before cooking.
  • Feel free to add vegetables like broccoli or carrots for an added nutritional boost.
  • This dish works wonderfully with sweet potatoes for a unique twist.
  • Leftovers can be refrigerated and enjoyed within 3 days, or frozen for longer storage.

Deliciously Gooey Pecan Pie Cookies: A Sweet Twist on Tradition

Gooey Pecan Pie Cookies Recipe: A Sweet Treat for Any Occasion!

⚖️
Difficulty
Medium

⏲️
Prep Time
15 mins

🕒
Cook Time
20 mins

⏱️
Total Time
35 mins

🍽️
Servings
24 cookies

Pecan Pie Cookies are a delightful twist on the classic dessert, merging the rich, gooey filling of traditional pecan pie with the convenience of bite-sized cookies. These treats are perfect for holiday gatherings or anytime you’re craving something sweet and comforting. Imagine sinking your teeth into a soft, buttery cookie that oozes with a luscious pecan pie filling. The combination of sweet caramel notes from the filling and the nutty crunch of pecans creates an indulgent experience that will leave everyone reaching for more.

Not only are these Gooey Pecan Pie Cookies simple to make, but they also offer a wonderful flavor profile that highlights the warmth of cinnamon and nutmeg, paired beautifully with toasty pecans. The smell of baking cookies will waft through your kitchen, inviting family and friends to indulge in these tasty bites. Their beautiful golden color, glistening with syrupy sweet goodness, makes them a stunning addition to any dessert platter.

Quick Recipe Highlights

  • Flavor Profile: These cookies combine sweet and savory elements, creating a delightful harmony of caramel, nutty pecans, and a hint of warmth from spices.
  • Texture: Each bite offers a soft cookie base with a gooey and chewy pecan filling, providing a satisfying contrast that is utterly delicious.
  • Aroma: The inviting scent of baked dough mixed with warm pecan and caramel notes will fill your home, making it hard to resist.
  • Visual Appeal: With their golden-brown edges and glossy pecan topping, these cookies are as pleasing to the eyes as they are to the palate.
  • Skill Level Needed: These cookies are medium-level in difficulty, requiring basic baking skills but rewarding you with impressive results.
  • Special Equipment: You will need standard baking tools such as a mixing bowl, baking sheets, and measuring cups for best results.

Recipe Overview

  • Difficulty Level: The medium difficulty arises from preparing the cookie dough and filling, but with clear instructions, anyone can master these treats.
  • Category: These cookies make a great dessert and are suitable for both casual snacks and formal events.
  • Cuisine: Rooted in Southern cuisine, pecan pie has been an American tradition, and this recipe puts a fun twist on its classic appeal.
  • Cost: This recipe uses budget-friendly ingredients, making it cost-effective for families and gatherings.
  • Season: Ideal for fall and winter, these cookies are perfect during Thanksgiving and Christmas when pecans are in season and holiday baking is in full swing.
  • Occasion: Perfect for holiday parties, potlucks, or as a sweet gift to impress your friends and family.

Why You’ll Love This Recipe

Cooking these Gooey Pecan Pie Cookies allows you to enjoy a nostalgic dessert in an easy-to-manage format. Each bite highlights the creamy gooeyness of the filling along with the crunch of the pecans, ensuring that every mouthful is packed with flavor. They’re not overly sweet and strike a perfect balance, making them irresistible and a go-to treat for anyone who loves pecan pie.

The convenience of these cookies can’t be overlooked. They can be prepared in under an hour and can easily be made ahead of time for parties or gatherings. Once made, these cookies can be stored away, allowing for easy snacking or dessert offerings without much fuss. This makes them a fantastic choice for busy bakers who still want to impress.

Nutritionally, pecans are a source of healthy fats and are loaded with antioxidants, which makes these cookies not just a treat but also a guilt-free option when consumed in moderation. You get to enjoy a delightful dessert without compromising on health, as the natural ingredients bring a wholesome aspect to this sweet delight.

Socially, these cookies are bound to be a hit at any gathering. Whether you serve them at a family reunion or share them with friends over coffee, they are the kind of treat that sparks conversation and brings joy. The combination of flavor, aroma, and presentation creates a joyous experience that everyone will appreciate.

Lastly, their cost-effectiveness makes these cookies accessible to everyone. Most of the ingredients are pantry staples, permitting anyone to whip up a batch regardless of their cooking budget. This accessibility makes them a beloved recipe that can be adapted to various occasions without breaking the bank.

Historical Background and Cultural Significance

Pecan pie’s origins can be traced back to early Native American tribes, who utilized the pecan nut in their diets. The beloved nut became a staple in Southern cooking, evolving into the iconic pecan pie that many cherish today. The Gooey Pecan Pie Cookies are a modern adaptation that reflects today’s busy lifestyles, allowing fans of pecan pie to enjoy its taste without the lengthy preparation that traditional pies require.

Culturally, pecans are more than just a delicious nut; they’re symbolic in Southern heritage. Pecan trees were first cultivated in the U.S. in the 18th century, and the tree has become synonymous with Southern hospitality. Serving pecan pie and now, cookies, is a way to express love and generosity, tying them closely to family gatherings and celebrations.

As recipes have evolved over the years, so too has the pecan pie. From local variations to twists on traditional recipes, each region has put its flair into creating pies, and now cookies. The transition from pie slices to bite-sized cookies has made this dessert much more shareable and approachable.

Various regional adaptations of the pecan pie influenced the creation of these cookies. Some variations incorporate chocolate chips or bourbon, which adds a dynamic twist to the deep-rooted flavors that many associate with pecan desserts, demonstrating the flexibility of this beloved culinary tradition.

Ingredient Deep Dive

Pecans

Pecans are a quintessential ingredient in this recipe, bringing a nutty flavor that perfectly complements the sweetness of the filling. Historically, pecans have been celebrated in Southern cuisine and feature prominently in various desserts. Nutritionally, they offer healthy fats, proteins, and a variety of vitamins and minerals, making them a powerhouse ingredient.

When selecting pecans, look for ones that are firm and plump with a rich aroma. Store them in a cool, dry place, or in the refrigerator for extended freshness. A great substitute for pecans in this recipe could be walnuts or hazelnuts, although they will impart a different flavor profile.

Butter

Butter provides the fat content necessary for tender cookies, imparting a rich flavor. Its significance in American baking cannot be overstated, as it binds the cookie dough and enhances overall texture. Using high-quality unsalted butter ensures a balanced flavor without excess sodium, which is crucial for this recipe.

To select butter, freshness is key. Choose blocks instead of pre-packaged options when available, and store them in the refrigerator or freezer for longer shelf life. Margarine can serve as a suitable substitute if necessary, although it may alter the taste slightly.

Brown Sugar

Brown sugar is instrumental in achieving the gooey, caramel-like texture and sweetness of the cookie filling. The molasses content in brown sugar adds depth and richness to the flavor, making these cookies incredibly appealing. Its history is tied closely to American sweets, evolving from cane sugar production.

When using brown sugar, make sure it is packed firmly in your measuring cup for accurate results. Store it in an airtight container to prevent it from hardening. If you need a substitute, a mix of white sugar and molasses can replicate brown sugar fairly closely.

Flour

Flour is the backbone of any cookie, providing structure and stability. All-purpose flour is ideal for this recipe as it absorbs moisture and creates a desirable crumb. Its popularity in baking stems from its versatility across various recipes and baking traditions.

Look for flour that is finely milled for the best texture, and store it in a cool, dry place to prevent spoilage. If gluten is a concern for you, consider using a gluten-free blend designed for cookie recipes which will allow you to enjoy these delicious treats without compromise.

Common Mistakes to Avoid

  • Overmixing the Dough: When you overmix cookie dough, you risk creating tough cookies instead of a tender crumb. Mix just until the ingredients are combined to avoid this issue.
  • Not Preheating the Oven: Skipping the preheating step can cause cookies to bake unevenly. Always ensure your oven is at the correct temperature before baking your cookies for best results.
  • Using Cold Ingredients: Using cold butter or eggs can affect the mixing process and the integrity of the final cookie. Make sure your ingredients are at room temperature for optimal incorporation.
  • Improperly Measuring Ingredients: Accurate measuring is crucial in baking. Use the spoon-and-level method for flour and always use a kitchen scale for precision when required.
  • Neglecting to Chill the Dough: If your cookie dough is too warm when baked, it can spread excessively. Chill the dough in the refrigerator for at least 30 minutes before baking.
  • Not Allowing Cookies to Cool: Letting cookies cool on the baking sheet can lead to a soggy bottom. Transfer cookies to a wire rack for uniform cooling to maintain their texture.
  • Using Old Nuts: Stale nuts can ruin the overall flavor of your cookies. Always check the freshness of your pecans before using them in this recipe.
  • Skipping the Pecan Topping: The pecan topping is not just for decoration; it adds essential texture and flavor to the cookies. Don’t skip this step!
  • Underbaking: For optimal gooeyness, make sure to bake the cookies until they are just golden around the edges. Undercooked cookies will result in a doughy center that lacks proper texture.
  • Ignoring Home Environment: Environmental factors like humidity can affect cookie dough consistency. Be ready to make minor adjustments based on how the dough feels during preparation.

Essential Techniques

Proper Mixing Techniques

It’s important to mix cookie dough correctly to achieve the right texture. Using an electric mixer can help fully incorporate ingredients without overmixing. Start at a low speed to prevent flour from flying out and gradually increase to blend until just combined.

Visual cues for success include a smooth, cohesive dough that doesn’t stick to the sides of the bowl. If the dough appears crumbly, a little milk can bring it together, but be careful not to make it too wet.

Chilling the Dough

Chilling cookie dough is crucial for the final result. It helps solidify the fats, leading to a thicker, chewier cookie that holds its shape during baking. Wrap the dough in plastic wrap and refrigerate for at least 30 minutes.

You’ll know the dough is ready when it feels firm to the touch. Chilling for too long can make it difficult to work with, so don’t let it sit for longer than recommended.

Cooling the Cookies

Allowing cookies to cool properly ensures they maintain their structure. After baking, let them set on the cookie sheet for a few minutes before transferring them to a cooling rack. This step allows the residual heat to finish cooking the cookies without overbaking.

The perfect cooling cue is to see the edges firm up while the centers remain slightly soft; this ensures gooeyness without being raw.

Pro Tips for Perfect Gooey Pecan Pie Cookies

1. Use fresh pecans for enhanced flavor; lightly toasting them can amplify their nutty richness even more.
2. Consider adding a pinch of sea salt on top after baking for a delightful sweet-salty contrast.
3. For an extra indulgent treat, drizzle melted chocolate over the cooled cookies for a decadent finish.
4. Store leftover cookies in an airtight container at room temperature for up to a week for the best freshness.
5. Experiment with different spices like espresso powder or vanilla extract to give your filling an added depth of flavor.
6. Try substituting some of the flour with oat flour for a unique flavor and added texture.
7. Don’t skip the chill time; it truly makes a difference in the final texture of your cookies.
8. Make a double batch and freeze half the dough for a quick treat anytime!

Variations and Adaptations

For a regional variation, try incorporating maple syrup in place of some brown sugar for a hint of subtle warmth and sweetness. Additionally, during the spring and summer, introducing citrus zest, like lemon or orange, can brighten the flavors and provide a refreshing twist.

Seasonal adaptations can also be made by adding cranberries or white chocolate chips for a festive touch during the holidays. For those on a diet, consider substituting brown sugar with coconut sugar for a lower glycemic index alternative without sacrificing sweetness.

Texturally, if you prefer a crunchier cookie, add shredded coconut or replace half of the pecans with crispy rice cereal for a satisfying bite. To enhance presentation, consider serving cookies with dollops of whipped cream or vanilla ice cream alongside.

Serving and Presentation Guide

Presentation is key when serving your Gooey Pecan Pie Cookies. Arrange cookies on a tiered serving platter or cake stand to create an impressive display. For a personal touch, sprinkle powdered sugar over the top for a beautiful dusting.

Garnishing with chocolate shavings, crushed nuts, or caramel drizzle can elevate the visual appeal and add an extra layer of flavor. For a modern serving suggestion, stack three cookies high and serve them with a scoop of ice cream, turning them into an indulgent dessert.

When considering temperature, these cookies are best served slightly warm, fresh from the oven. However, they are also delightful at room temperature, making them versatile for any gathering. Portion control is essential; consider serving them alongside glasses of milk or coffee for an enjoyable afternoon snack.

Wine and Beverage Pairing

Pair these Gooey Pecan Pie Cookies with dessert wines such as a late-harvest Riesling or a sweet Muscat for a delightful balance. The fruity notes in these wines complement the rich pecan filling beautifully, enhancing your tasting experience.

For non-alcoholic options, consider serving them with freshly brewed coffee or a spiced chai latte that pairs well with the warm spices in the cookies. A cool glass of milk also works wonderfully to bring out residual sweetness.

When serving wine, ensure it is chilled appropriately to enhance flavors, and for coffee, serve hot but not so that it overshadows the delicate taste of the pecan pie cookies.

Storage and Shelf Life

For optimal freshness, store your Gooey Pecan Pie Cookies in an airtight container at room temperature. They can typically last up to a week if kept sealed; however, for peak quality, it’s best to consume them within the first few days.

If you need to store them longer, you can place the cookies in the freezer. Wrap them tightly in plastic wrap, followed by foil, to prevent freezer burn, where they can last up to three months. To thaw, leave them at room temperature or pop them in the microwave for a few seconds.

Signs of spoilage include any visible mold or an off smell. If you notice either, it’s best to discard the cookies. Reheating can breathe new life into older cookies; place them in a preheated oven for a couple of minutes to regain their chewy texture.

Make Ahead Strategies

If you’re planning for a gathering, preparing the cookie dough a day in advance can save time. Simply wrap the dough tightly in plastic wrap and refrigerate. This allows the flavors to meld, creating an even tastier cookie.

Consider baking half the batch and reserving the rest of the dough in the freezer for later use. You can thaw it overnight in the fridge before baking on the same day you plan to enjoy them. This is a great way to have fresh cookies on hand without the extra effort.

When baking ahead, feel free to add a finishing touch of whipped cream or a drizzle of chocolate just before serving for an impressive presentation. Keep in mind that cooking times may differ for chilled or frozen dough and adjust accordingly for perfect results.

Scaling Instructions

If you need to halve the recipe for a smaller gathering, all measurements can be easily adjusted by simply dividing amounts by two. Remember to keep an eye on baking times, as smaller batches may require less time in the oven for perfect results.

For larger gatherings, doubling or even tripling the recipe is straightforward. Just ensure you have sufficient baking sheets and oven space. You may need to bake batches separately if your oven cannot accommodate all trays at once.

Consider the size of your mixing bowl and adjust your technique if scaling considerably. Utilize larger bowls or mixing vessels, and be mindful of how the dough texture may change with larger quantities.

Also, factor in the storage needs for larger batches, ensuring you have adequate containers to keep each batch fresh between uses.

Nutritional Deep Dive

The nutritional profile of Gooey Pecan Pie Cookies includes a balance of macronutrients: carbohydrates from flour and sugars, fats from butter and nuts, and some protein from pecans. Each cookie is a sweet indulgence but can be enjoyed in moderation as part of a balanced diet.

Micronutrient content varies depending on added ingredients, but pecans are rich in vitamin E and minerals such as magnesium, offering heart-health benefits. Each serving contributes to essential nutrient intake while satisfying dessert cravings.

For those monitoring dietary needs, consider the portion size; each cookie, while delicious, should be enjoyed with mindfulness due to its calorie density. Balancing cookies with other healthy options like fruits or nuts can help manage overall calorie consumption.

Dietary Adaptations

Gluten-free adaptations can be made by substituting wheat flour with a 1:1 gluten-free blend, maintaining the desired structure while allowing those with gluten sensitivities to enjoy these cookies.

Dairy-free options can also be achieved by replacing butter with coconut oil or a vegan butter substitute, ensuring everyone in your circle can enjoy the delicious flavors without concern.

For a vegan rendition, use flax eggs instead of regular eggs and follow the dairy substitutions mentioned. Coconut or almond milk can serve as a delightful addition to enhance the texture without compromising flavor.

Keto dieters can swap the brown sugar for erythritol or another suitable sweetener, and use almond flour instead of traditional flour, creating a low-carb version of these cookies while keeping them a tasty treat.

Troubleshooting Guide

If your cookies end up too dry, it could be due to overbaking or using too much flour. Always check your cookies a minute or two before the suggested baking time to prevent this issue.

For an unbalanced flavor, consider adjusting the amount of sugar or spices in your filling; a pinch of salt can often enhance overall flavor if sweetness becomes overpowering.

Temperature inconsistencies in baking can arise from incorrect oven calibration; investing in an oven thermometer can help ensure your oven heats correctly for precision baking.

If your cookies spread excessively during baking, ensure your dough is sufficiently chilled, and avoid overmixing ingredients, which can lead to a loss of structure.

If you find your filled cookies are not gooey enough, consider increasing cooking time slightly while keeping a close eye on them to maintain that desired texture.

Recipe Success Stories

Many bakers have shared their successful twists on the Gooey Pecan Pie Cookies, adding everything from chocolate chips to extra spices, demonstrating the versatility of this delightful recipe.

Community feedback has been overwhelmingly positive, with readers praising the simple instructions and impressive flavor; several have noted how these cookies have become a staple at their family gatherings.

Some readers have encouraged adaptations like substituting maple syrup for brown sugar to create a unique flavor twist, showcasing the recipe’s flexibility.

Photography tips shared by readers indicate that showcasing the gooey center can draw in eager bakers, encouraging more trials in perfecting this beloved recipe.

Overall, the sense of community amongst bakers trying out these recipes contributes to a growing love for sweets that bring nostalgia and joy.

Frequently Asked Questions

1. Can I make these cookies gluten-free?

Yes! You can substitute the all-purpose flour with a gluten-free flour blend. Make sure it is designed for baking to achieve the best results.

2. How should I store leftover cookies?

Store leftover cookies in an airtight container at room temperature. If you need to keep them longer, consider freezing them for up to three months.

3. Can I use different nuts?

Absolutely! While pecans are traditional, walnuts or even hazelnuts can be used as alternatives for a different flavor profile.

4. How do I know when my cookies are done baking?

Your cookies are finished when the edges are golden, but the centers remain slightly soft. They will continue to set as they cool.

5. Can these cookies be made ahead of time?

Yes! You can prepare the dough a day in advance or freeze dough balls for baking fresh cookies whenever you’d like.

6. Do I need to chill the dough?

Chilling the dough is recommended to help maintain shape and ensure the cookies don’t spread too much while baking.

7. What can I substitute for eggs?

You can use flaxseed meal mixed with water as a vegan substitute for eggs. Typically, 1 tablespoon of flaxseed meal mixed with 2.5 tablespoons of water equals one egg.

8. Can I add chocolate to my cookies?

Yes! Adding chocolate chips or chunks can complement the nutty flavor perfectly while adding an indulgent twist to the cookies.

9. How long do these cookies keep their freshness?

These cookies are best enjoyed within the first week for optimum freshness, but they can last much longer if stored properly in an airtight container.

10. Can I make these cookies bite-sized?

Sure! You can adjust the size of the scoops to create smaller cookies. Just be mindful of adjusting the baking time accordingly.

11. What drinks pair well with these cookies?

Dessert wines, coffee, or hot chocolate all pair beautifully with Gooey Pecan Pie Cookies, enhancing their sweet flavor profile.

12. Is it okay to overmix the dough?

Overmixing can lead to tough cookies. Mix the dough only until the ingredients are combined for a tender result.

Additional Resources

For those looking to expand their baking skills, consider checking out additional recipes that highlight pecans, such as traditional pecan pie or pecan pralines, for a full range of pecan-flavored treats.

You may also want to explore technique guides focused on mixing methods, baking temperatures, and ingredient substitutions for more successful baking outcomes.

Learning about ingredient specifics can help you choose the best options for your recipes, allowing you to optimize flavor and nutrition in your baking projects.

Lastly, seasonal variations to your favorites can keep your baking fresh and exciting, especially for those who love to try new takes on classic dishes throughout the year.

Join the Conversation

We invite you to share your experiences and variations with Gooey Pecan Pie Cookies on social media! Use hashtags to connect with fellow bakers and showcase your delicious creations.

Photography plays a big role in sharing food experiences; don’t be shy about posting your cookie pictures! Sharing tips and tricks with the community not only helps others but can also provide inspiration for your next baking project.

Community engagement is key; participate in recipe reviews or discussions to enhance your baking skills and connect with others who enjoy making and sharing sweet treats.

Scroll up to the recipe section and try these delightful cookies today!

The Recipe

Gooey Pecan Pie Cookies

Serves: 24 cookies

Prep Time: 15 mins

Cook Time: 20 mins

Total Time: 35 mins

Kitchen Equipment Needed

  • Baking sheets
  • Mixing bowls
  • Measuring cups and spoons
  • Electric mixer
  • Cooling rack

Ingredients

  • 1 cup unsalted butter, softened
  • 2 cups brown sugar, packed
  • 3 cups all-purpose flour
  • 3 large eggs
  • 2 cups pecans, chopped
  • 1 teaspoon vanilla extract
  • 1/2 teaspoon cinnamon
  • 1/2 teaspoon nutmeg
  • 1/4 teaspoon salt

Directions

  1. Preheat the oven to 350°F (175°C) and line baking sheets with parchment paper.
  2. In a mixing bowl, cream together softened butter and brown sugar until light and fluffy.
  3. Add eggs one at a time, mixing well after each addition, then stir in vanilla extract.
  4. In another bowl, whisk together flour, cinnamon, nutmeg, and salt.
  5. Gradually beat the flour mixture into the butter mixture until just combined.
  6. Fold in chopped pecans until evenly distributed throughout the dough.
  7. Drop dough by tablespoonfuls onto the prepared baking sheets, spacing them about 2 inches apart.
  8. Bake for 15-20 minutes, or until the edges are golden brown and the centers are set.
  9. Remove from the oven and let cookies cool on the sheets for 5 minutes before transferring to a wire rack to cool completely.

Recipe Notes

  • For extra gooey cookies, try adding a bit of corn syrup into the filling mixture.
  • These cookies can also be frozen before baking; just scoop them onto a tray and freeze until solid, then transfer them to a freezer bag.
  • Add chocolate chips for a double treat if you’re looking for something even more indulgent.