Ribeye Steak with Caramelized Onions and Crispy Fries Recipe

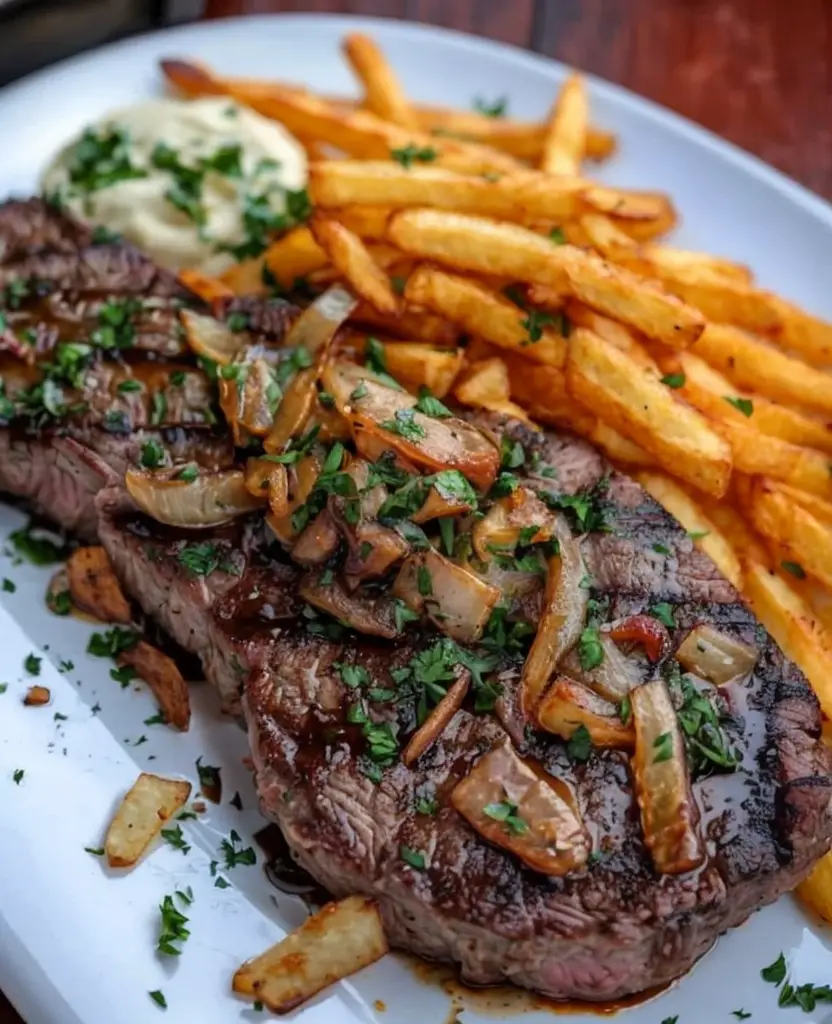
Ribeye Steak with Caramelized Onions and Crispy Fries: A Perfect Meal!

⚖️
Difficulty
Medium

⏲️
Prep Time
15 mins

🕒
Cook Time
30 mins

⏱️
Total Time
45 mins

🍽️
Servings
4

Ribeye Steak with Caramelized Onions and Crispy Fries is not just a recipe; it’s a celebration of flavors and textures that promises to delight your taste buds and warm your heart. The rich marbling of the ribeye steak provides a succulent and juicy bite, while the sweet, slowly caramelized onions add depth and complexity to the overall dish. Accompanied by perfectly crispy fries, this meal creates an indulgent experience that is equal parts satisfying and comforting.

Imagine savoring a perfectly cooked ribeye steak, its savory juices bursting forth with each mouthful, complemented by the mellow sweetness of onions that have transformed through the caramelization process. As you take a bite of the crispy fries, their crunchy exterior gives way to a fluffy interior, enhancing the meal’s overall indulgence. This recipe invites gatherings and makes every dining moment an occasion to remember.

Quick Recipe Highlights

  • Flavor Profile: The contrast of savory, sweet, and umami flavors makes this dish memorable.
  • Texture: Juicy steak with tender onions and crispy fries create a delightful mouthfeel.
  • Aroma: The enticing aroma of seared steak and caramelized onions fills the kitchen, inviting everyone to join.
  • Visual Appeal: A beautifully plated steak topped with golden onions and golden fries is a feast for the eyes.
  • Skill Level Needed: Intermediate cooking skills are required to master the steak cooking technique and onion caramelization.
  • Special Equipment: A cast-iron skillet or grill, and a heavy pan for frying are recommended for optimal results.

Recipe Overview

  • Difficulty Level: Medium due to the need for timing and technique in cooking the steak and onions perfectly.
  • Category: This dish fits perfectly within the dinner or main meal category.
  • Cuisine: Inspired by American cuisine, it reflects hearty, comfort food traditions.
  • Cost: Expect the cost to be moderate, primarily due to the quality of steak and other fresh ingredients.
  • Season: Best enjoyed in cooler months, but can be made year-round as an indulgent treat.
  • Occasion: Perfect for family dinners, special occasions, or a cozy date night at home.

Why You’ll Love This Recipe

The taste and texture appeal of Ribeye Steak with Caramelized Onions and Crispy Fries is unmatched. The oily, rich ribeye melds beautifully with the sweet and tender onions, creating a dish that delights the palate. Each bite harmonizes flavors, making it feel both luxurious and satisfying. The contrast between the crispy fries and juicy steak brings an exciting element to every mouthful.

Convenience is key with this recipe; with just a few simple ingredients and minimal prep, you can create a restaurant-quality meal at home. In about 45 minutes, you can start from scratch and end up with a stunning plate of food that will impress even the most discerning guests. The straightforward cooking techniques allow for ease while still providing an elegant meal.

Nutritionally, beef is a great source of protein, essential for muscle repair and health, while the onions add fiber and antioxidants. This meal strikes a good balance, making it both indulgent and nourishing, suitable for those mindful of their health and dietary requirements.

On the social side, serving Ribeye Steak with Caramelized Onions and Crispy Fries at your next gathering is a sure way to create shared moments of joy. The aroma wafting through the air as you cook will have everyone gathering in the kitchen, eager to indulge in your delicious creation. It fosters connection and great conversations as you share a meal together.

Finally, this recipe offers cost-effectiveness because it uses quality ingredients that yield satisfying and filling portions. By preparing this dish at home instead of dining out, you save money while enjoying a sumptuous meal that rivals restaurant offerings. You can indulge without breaking the bank.

Historical Background and Cultural Significance

The ribeye steak derives its name from the rib section of the cow, which has been a prized cut for many generations. This cut’s popularity surged in the 20th century as more people discovered its flavor and tenderness, establishing it as a staple in American steak houses. Understanding its history brings appreciation for this beloved dish.

Culturally, beef has been central to many cuisines around the world, particularly in the United States. It symbolizes a hearty meal suitable for gatherings and celebrations. Dining on a great ribeye steak is often associated with significant social experiences, from family dinners to romantic celebrations, highlighting its importance.

Over the years, recipes for ribeye steak have evolved, with culinary techniques and flavors adapting to suit contemporary tastes. From simple salt and pepper preparations to gourmet versions with various sauces and sides, there is a ribeye steak recipe for everyone, catering to diverse palates while honoring its roots.

Regionally, variations exist in how the ribeye is prepared and served. In the American South, it’s common to pair it with barbecue flavors, while in other areas, it might be served with savory sauces or sides that highlight local ingredients. These regional adaptations reflect the versatility of the ribeye and the individual touch of various culinary traditions.

Ingredient Deep Dive

For the ribeye steak, its cultural significance is immense, often considered the crème de la crème of steak cuts. High marbling translates to a rich flavor, and as a source of protein, iron, and B vitamins, it supports a balanced diet. When selecting ribeye, look for bright red color and ample marbling for the best flavor. Store in the refrigerator and use it within a few days or freeze for longer preservation. If you’re in need of a substitute, sirloin or tenderloin can work, but adjust cooking times accordingly.

Caramelized onions are another star of this dish. Historically used to enhance many recipes, their sweetness is unlocked through low-and-slow cooking, making them a celebrated ingredient in various cuisines. Nutritionally, onions offer antioxidants and may help support heart health. Select fresh, firm onions with shiny skins, and for storage, keep them in a cool, dark place. If needed, shallots or leeks can offer similar flavor profiles as substitutions.

Crispy fries are the perfect companion to steak. Originating in Belgium or France, they have become a beloved side dish in various cultures. Rich in carbohydrates, they provide energy but should be enjoyed in moderation. When selecting potatoes for frying, opt for starchy varieties like Russets. To store, keep in a cool, dark place and avoid the fridge. Sweet potatoes can be used as a healthier alternative for a twist on traditional fries.

Common Mistakes to Avoid

  • Overcooking the steak: It’s essential to use a meat thermometer for perfect doneness.
  • Not resting the steak: Allow the steak to rest after cooking to retain juices.
  • Rush caramelizing onions: Patience is key; low and slow yields the best results.
  • Using cold ingredients: Start with steak at room temperature for even cooking.
  • Inadequate seasoning: Don’t shy away from salt; it enhances the flavors tremendously.
  • Frying at too low a temperature: This can lead to greasy fries instead of crispy ones.
  • Ignoring oil temperature: A cooking thermometer can help achieve that perfect fry.
  • Overcrowding the pan: Frying in batches can help maintain consistent heat.
  • Not using enough oil: Sufficient oil ensures fries are submerged and cook evenly.
  • Neglecting to pair flavors: Balance the richness of ribeye with lighter sides or sauces.

Essential Techniques

Searing the steak is essential for achieving that flavorful crust. This technique involves cooking the meat at high heat for a short duration and helps to lock in moisture. To master it, preheat your skillet adequately and use a bit of oil to prevent sticking. Look for visual cues of browning edges and reduce the heat after flipping for even cooking.

Caramelizing the onions requires patience and low heat. This method transforms their natural sugars into sweet, flavorful goodness. Start with a bit of oil and thinly sliced onions, stirring them occasionally as they soften and brown. Watch for a golden color, indicating readiness, and avoid rushing the process to develop flavor fully.

Frying the fries involves cutting potatoes evenly to ensure consistent cooking. Soaking them beforehand helps to remove excess starch, leading to crispiness. Fry in batches, keeping an eye on them as they turn golden and crispy. Drain on paper towels and season them immediately for the best results.

Pro Tips for Perfect Ribeye Steak with Caramelized Onions and Crispy Fries

1. Always let the ribeye come to room temperature before cooking to ensure even doneness.
2. Use a cast iron skillet or grill for optimal heat retention and distribution.
3. Season the steak generously with salt and pepper on both sides to enhance flavor.
4. Opt for a meat thermometer to achieve your desired level of doneness accurately.
5. Caramelize onions slowly, giving them the time they need to develop deep flavors.
6. Cut potatoes evenly for fries to ensure they all cook at the same rate.
7. Oil temperature is crucial; around 350°F is ideal for frying crispy fries.
8. Serve immediately for the best texture and warmth; fried foods taste best fresh!

Variations and Adaptations

Regional variations often showcase local flavors, such as adding spices from different cuisines or trying different cuts of beef. Seasonal adaptations can include using heavier root vegetables or different seasonal greens as sides.

For dietary modifications, consider a gluten-free approach by ensuring your fries are cooked in a gluten-free oil and avoid using flour coatings. Flavor variations can be made by marinating the steak in different herbs, spices, or sauces that reflect your culinary likes.

Texture modifications are also possible; for example, try baked fries instead of fried fries for a healthier alternative. Presentation alternatives might include platters with garnishes using fresh herbs or colorful vegetables to elevate the visual appeal of the dish.

Serving and Presentation Guide

Plating techniques can elevate the meal’s presentation; stack fries neatly alongside the steak for a dynamic display. Use garnishes like fresh parsley or thyme to add color and interest. Traditional accompaniments might include a simple salad or dipping sauces for the fries.

Modern serving suggestions could involve crafting a small plate of steak bites with a side of fries for entertaining or casual dining experiences. Focus on temperature considerations—serve steak slightly warm and ensure fries are served crispy and hot.

Portion control tips suggest cutting steaks into portions for sharing, allowing everyone to enjoy a taste while keeping the meal balanced. This also creates a communal experience.

Wine and Beverage Pairing

For wine pairings, consider a full-bodied red wine like Cabernet Sauvignon or Malbec, which complement the richness of the ribeye. These wines enhance the flavor profile and balance the dish’s savory elements profoundly.

If you prefer non-alcoholic alternatives, a sparkling water with lemon can refresh the palate beautifully without overpowering the meal. For coffee lovers, a robust cup of coffee can serve as a wonderful finale to the meal, especially when enjoyed after dessert.

Temperature considerations for serving beverages are vital; ensure red wines are slightly below room temperature for optimal flavor, while sparkling options should be chilled for refreshment.

Storage and Shelf Life

To store leftovers, keep the ribeye steak in an airtight container in the fridge for up to 3 days. For fries, it’s best to consume them fresh, but if needed, they can be stored in a sealed container for about 2 days.

Reheating should be done with caution; steak is best reheated slowly on a skillet over low heat to avoid drying out. Fries can be revived in the oven or air fryer for a crispy finish.

Freezing guidelines suggest that steak can be frozen for about 3 months. Wrap it tightly in foil or freezer-safe bags to prevent freezer burn. However, fries are best enjoyed fresh due to texture changes when thawed.

Make Ahead Strategies

Prep strategies include slicing onions ahead of time to save on cooking day. You can caramelize onions and store them in the fridge for up to a week, enhancing the dish’s depth anytime you want to prepare it.

For storage between steps, you can season ribeye a day beforehand, allowing flavors to mingle and deepen. Quality impact assessments reveal that while some steps can be prepped ahead, it’s best to cook the steak and fries fresh for the best texture and flavor.

Assembly tips suggest preparing all the elements before starting to cook; this technique streamlines cooking and helps in avoiding stressful timing conflicts. Always add fresh components, like herbs or greens, right before serving for the best flavor.

Scaling Instructions

To halve the recipe, simply reduce the quantities of each ingredient accordingly. This method works well for small gatherings without compromising flavor or cooking techniques.

Doubling or tripling the recipe involves ensuring you have enough skillet or grill space to cook everything efficiently. You may need to adjust cooking times depending on the equipment used.

Equipment adjustments might include cooking in batches if you lack space. Timing modifications ensure that thicker steaks require a bit more time to cook through.

Consider storage options if preparing in larger quantities; invest in suitable containers to accommodate increased amounts without compromising freshness.

Nutritional Deep Dive

This recipe offers a robust macro breakdown, with protein from ribeye steak being the star. Each serving provides a satisfying amount of protein, essential for muscle building and repair.

Micronutrient analysis shows ribeye steak is rich in iron, which supports energy production, alongside Vitamin B12 for red blood cell formation. These essential nutrients make the dish both indulgent and beneficial for health.

Health benefits highlight ribeye’s role in supporting overall vitality, while the fiber from onions aids in digestion. In moderation, this meal fits nicely into a balanced diet.

Dietary considerations suggest mindful portions, especially for those managing weight. A serving of steak alongside a hearty portion of fries allows satisfaction without excessive calories when done carefully.

Dietary Adaptations

For gluten-free adaptations, ensure no gluten-containing products are used in preparing the fries. They can be enjoyed without worry by focusing on fresh and natural ingredients.

Dairy-free options work well with this recipe; simply skip any buttery oils or cream sauces traditionally paired with steak.

Vegan adaptations can be achieved by substituting the steak for plant-based protein like portobello mushrooms or tofu, seasoned similarly for maximum flavor.

Low-carb and keto diets can benefit from the focus on ribeye; serve it with leafy greens instead of fries for a satisfying meal rich in healthy fats.

Finally, for those on paleo or low-FODMAP diets, consider using specific ingredients and spices that align with dietary restrictions, allowing everyone to enjoy a variant of this fantastic recipe.

Troubleshooting Guide

Texture issues often arise from overcooking the steak; if you find it tough, try cooking for shorter periods at high heat. Resting allows juices to redistribute, resulting in a tender bite.

Flavor balance can be fine-tuned by adjusting the seasoning. Use taste as your guide; a little more salt or acid might be needed to elevate the overall experience.

Temperature problems often lead to undercooked centers or burnt outsides; mastering heat levels and using a meat thermometer can help you avoid these pitfalls.

A cluttered kitchen can create equipment challenges. Organize ingredients beforehand, and ensure your frying oil is at the correct temperature to help fries cook smoothly.

Timing concerns can throw off your cooking rhythm. Create a timeline for each component, allowing for simultaneous cooking, so you can serve everything hot and fresh.

Recipe Success Stories

Reader feedback highlights the versatility of this ribeye steak recipe—many have experimented with different toppings or marinating techniques, sharing their delightful experiences.

Several adaptations from the community have included creative side dishes, with one reader particularly fond of pairing it with herb-infused mashed potatoes that complemented the steak beautifully.

Photography tips often suggest capturing the dish before slicing for the best presentation, showcasing the juicy steak artfully plated with its crispy fries.

Sharing cooking experiences has inspired others to try their hand at mastering the art of caramelization, leading to proud successes in home kitchens, reinforcing the powerful connection through shared cooking adventures.

Frequently Asked Questions

What is the best doneness for ribeye steak?
Ribeye steak is best enjoyed medium-rare to medium. This provides a juicy and tender bite while still showcasing the rich flavors of the marbled beef.

Can I use frozen ribeye for this recipe?
Yes, but make sure to fully thaw it before cooking for an even cook. Frozen meat can retain moisture, leading to a potential loss of flavor.

What types of potatoes are best for making fries?
Starchy potatoes like Russets are ideal for crispy fries due to their high starch content, yielding a fluffy interior and crispy exterior.

How do I know when the caramelized onions are ready?
They should be deep golden brown and have a sweet aroma. This process can take around 20-30 minutes on low heat when done correctly.

Is it necessary to use cast iron for cooking the steak?
While not mandatory, cast iron skillets retain heat beautifully, providing an excellent sear. A heavy-bottomed pan will also work but may require more attention.

Can I prepare the entire meal ahead of time?
You can caramelize onions and cut fries ahead of time, but it’s best to cook the steak fresh to lock in flavor and texture.

What sauces pair well with this dish?
A simple chimichurri or garlic butter sauce complements the steak wonderfully, enhancing its flavor without overpowering it.

Can I air fry the fries?
Yes! Air frying is a healthier alternative; cook at 400°F for about 15-20 minutes, shaking halfway through for even cooking.

What should I serve with ribeye steak if I’m on a diet?
Consider replacing fries with a fresh salad or steamed vegetables for a lighter meal while still enjoying the rich flavors of ribeye.

How do I store leftovers?
Store the steak in an airtight container in the fridge for up to 3 days, and try to consume the fries within 2 days for the best quality.

Additional Resources

For related recipes, check out hearty dishes like Beef Wellington, Stuffed Bell Peppers, or Chicken Marsala that will complement any celebratory meal.

Technique guides on mastering steak cooking, including information on sous-vide or reverse-searing methods, can expand your culinary skills.

Understanding ingredient information can enhance your cooking repertoire, especially tips on the best cuts of meat or quality products to use.

Equipment recommendations can help streamline your cooking process; consider investing in a good quality cast-iron skillet or a high-temperature cooking oil for frying.

Seasonal variations often lead to fresh ideas for sides; consider pairing seasonal vegetables with your ribeye for a lighter, refreshing balance to the meal.

Join the Conversation

Social media sharing encourages community engagement, inviting you to showcase your delicious creations and inspire others.

Photography tips can guide you in capturing the beauty of your cooked dishes, leading to wonderful engagement on platforms like Instagram or Pinterest.

Recipe reviews allow others to learn from your experiences, helping to refine the dish for future cooks aiming for perfection.

Community engagement fosters a sense of connection through shared cooking experiences and stories, uniting food lovers everywhere in their passion for great meals.

The Recipe

Ribeye Steak with Caramelized Onions and Crispy Fries

Serves: 4

Prep Time: 15 mins

Cook Time: 30 mins

Total Time: 45 mins

Kitchen Equipment Needed

  • Cast iron skillet or grill
  • Heavy frying pan
  • Meat thermometer
  • Cutting board and knife
  • Spatula
  • Serving plates

Ingredients

  • 2 Ribeye steaks (approx. 1 inch thick)
  • 2 large onions, sliced
  • 4 medium potatoes, cut into fries
  • 2 tablespoons olive oil
  • Salt and pepper to taste
  • Butter for frying (optional)

Directions

  1. Preheat your skillet or grill over high heat.
  2. Season the ribeye steaks generously with salt and pepper.
  3. Add olive oil to the pan and sear the steaks for 4-5 minutes on each side to achieve a perfect crust.
  4. Check doneness with a thermometer (135°F for medium-rare).
  5. Remove the steaks and let them rest while you caramelize the onions in the same skillet.
  6. Add sliced onions and a pinch of salt to the skillet, cooking on medium-low heat until golden brown, about 20 minutes.
  7. For the fries, cut potatoes, soak in water for 30 minutes, then dry, and deep-fry in hot oil until golden and crispy.
  8. Assemble the dish: place steak on the plate, top with caramelized onions, and serve with crispy fries.

Recipe Notes

  • For extra flavor, consider marinating the ribeye beforehand.
  • Feel free to experiment with seasonings for the steak, such as garlic or herbs.
  • For healthier fries, consider baking them instead of frying.

Delicious Ricotta Meatballs Recipe for Ultimate Comfort Food Lovers

Ricotta Meatballs: Juicy and Flavorful Italian Delights

⚖️
Difficulty
Easy

⏲️
Prep Time
15 mins

🕒
Cook Time
25 mins

⏱️
Total Time
40 mins

🍽️
Servings
4 servings

Ricotta meatballs are a delightful and hearty dish that brings together the richness of ricotta cheese with the tender juiciness of ground meat. These meatballs are not only easy to prepare but also explode with flavor, making them a favorite for family dinners or meal prep. Each bite reveals a creamy texture mixed with herbs and spices, offering a perfect blend of Italian flavors that everyone will love. Whether paired with a vibrant marinara sauce or enjoyed on their own, ricotta meatballs are sure to become a go-to recipe in your kitchen.

The alluring aroma of garlic, basil, and freshly grated cheese fills the air as these meatballs cook, creating an inviting environment that warms the heart and stirs the appetite. Visually, they present beautifully – a golden brown crust cradling a soft and succulent interior. With minimal effort, you can create a dish that not only satisfies taste buds but also looks fantastic on the plate, making it ideal for casual gatherings and special occasions alike.

Quick Recipe Highlights

  • Flavor Profile: The ricotta meatballs burst with savory goodness, enhanced by garlic, parsley, and Italian herbs. Each meatball is rich and creamy, with a subtle tang from the cheese that perfectly complements the seasonings.
  • Texture: Expect a delightful contrast between a crispy outer layer and a soft, melt-in-your-mouth interior. The ricotta adds moisture, making these meatballs incredibly tender.
  • Aroma: Your kitchen will be filled with the mouthwatering scent of fresh herbs, garlic, and simmering tomato sauce, enticing everyone to gather around the table.
  • Visual Appeal: Garnished with fresh parsley and a sprinkle of cheese, the meatballs are inviting and colorful, making them an impressive dish for any dinner table.
  • Skill Level Needed: This recipe is suitable for all skill levels, including novice cooks eager to try their hands at homemade meatballs.
  • Special Equipment: A baking sheet and mixing bowls are all that’s required, making this a fuss-free recipe to execute.

Recipe Overview

  • Difficulty Level: This recipe is straightforward and beginner-friendly, aiming to guide you through each step to achieve perfectly cooked ricotta meatballs.
  • Category: Ricotta meatballs fall under main dishes and can be served as an appetizer or with pasta for a heartier meal.
  • Cuisine: Rooted in Italian cuisine, these meatballs reflect the use of fresh ingredients like ricotta, which adds to the authentic flavor profile.
  • Cost: Ingredients for this recipe are typically budget-friendly, making it a practical choice for family meals without sacrificing flavor.
  • Season: Ricotta meatballs can be enjoyed year-round, offering comfort during colder months and a delightful option for summer gatherings when served with fresh salads.
  • Occasion: Perfect for weeknight dinners, holiday gatherings, or potlucks, these meatballs fit a variety of occasions and will impress your guests.

Why You’ll Love This Recipe

Ricotta meatballs are not only a treat for the taste buds but also an enjoyable cooking experience. The combination of ground meat and ricotta creates a unique flavor profile that stands out. The subtle creaminess of ricotta balances the robust spices and herbs, making these meatballs a comforting and satisfying meal. The ease of preparation means you can whip up a batch quickly, perfect for busy weeknights or spontaneous gatherings.

Beyond their marvelous taste, these meatballs offer nutritional advantages. Ricotta cheese provides a source of protein and calcium, contributing to a balanced diet, especially for those seeking lighter yet fulfilling meals. Additionally, incorporating lean ground meat and fresh herbs enhances the nutritional value, making these meatballs a wholesome choice.

Another reason to love ricotta meatballs is their versatility. They can be enjoyed in various ways—served with marinara sauce over spaghetti, as a filling in subs, or even as bite-sized appetizers for parties. This adaptability allows for creativity in the kitchen, catering to different tastes and preferences, ensuring that everyone can enjoy this delightful dish.

Cost-effectiveness is a crucial element in any recipe, and ricotta meatballs fit the bill perfectly. The ingredients are easily accessible at most grocery stores and won’t break the bank. By making these meatballs at home, you save money without compromising on quality or taste, making it an excellent choice for families on a budget.

Finally, ricotta meatballs are an ideal dish for entertaining. Their shared nature fosters a communal dining experience and engages conversation. Preparing them with loved ones adds to the social aspect, turning cooking into a shared activity. With every satisfying bite, you’ll create lasting memories around the table.

Historical Background and Cultural Significance

The origin of meatballs dates back to ancient Rome, where dishes of ground meat formed the foundation of many traditional recipes. Over the centuries, variations emerged across different regions, each adding unique ingredients and techniques. The addition of ricotta to meatballs symbolizes the Italian tradition of incorporating local cheeses into everyday meals, showcasing the country’s rich culinary heritage.

Culturally, meatballs represent comfort and togetherness. In Italy, these dishes are often shared among family, emphasizing gathering and celebrating over good food. They are frequently served during special occasions and holidays, signifying warmth and hospitality unique to Italian culture. The communal aspect of sharing a hearty plate encourages connection and cherished moments among loved ones.

As the recipe evolved, ricotta meatballs became popular not just in Italy but also among Italian-American communities. This adaptation reflects the blending of culinary traditions, where classic recipes were adapted to local ingredients and tastes, further enriching the cultural narrative surrounding these delightful bites.

Regional variations of meatballs abound, reflecting the diverse ingredients and culinary influences found throughout Italy. Each region offers its twist, from the addition of different herbs and spices to varying sauces and cooking methods, highlighting the versatility and enduring popularity of meatballs in Italian cuisine.

Ingredient Deep Dive

Ricotta Cheese
Ricotta cheese holds a significant place in Italian cooking, with a history stretching back to ancient times. Traditionally made from the whey leftover from cheese production, it embodies the Italian philosophy of minimizing waste by utilizing all food resources. Nutritionally, ricotta is packed with protein, calcium, and vital vitamins, making it a fantastic addition to a balanced diet. When selecting ricotta, opt for fresh, high-quality cheese. Look for a smooth texture and avoid overly watery varieties. Store ricotta in the refrigerator and use it within a week for the best flavor and quality. If necessary, you can substitute ricotta with cottage cheese or make a dairy-free alternative using blended tofu for a similar texture.

Ground Meat
Ground meat, varying from beef, pork, turkey, or chicken, is the core ingredient of any meatball recipe. It provides the primary protein source and introduces contrasting flavors, depending on the meat type used. Nutritionally, lean ground meats offer high protein content while being lower in fat, making them a healthier choice for meat lovers. When buying ground meat, look for fresh, high-quality options from trustworthy sources. Store it in the refrigerator for 1-2 days or freeze it for long-term usage. If you wish to make a lighter version, use ground turkey or chicken, which will yield equally tender meatballs.

Common Mistakes to Avoid

  • Using dry ricotta: Ensure that your ricotta cheese is fresh and creamy; old or dry ricotta can lead to dry meatballs.
  • Overmixing the meat: Too much mixing can create dense meatballs; mix just until combined for a light texture.
  • Skipping the resting time: Letting the meatballs rest before cooking allows flavors to meld and enhances the overall taste.
  • Inadequate seasoning: Don’t be shy with the herbs, spices, and salt; these are critical to enhancing flavor.
  • Not sealing the meatballs: Properly shape and seal meatballs to prevent them from falling apart during cooking.
  • Cooking at too high heat: Cooking meatballs at high temperatures can scorch the outside while leaving them raw inside; moderate heat is key.
  • Overcrowding the pan: Give meatballs space when cooking to allow them to brown evenly; overcrowding can cause steaming instead of searing.
  • Underestimating cook time: Always ensure meatballs are cooked through; use a meat thermometer for accuracy (internal temperature should reach 165°F).
  • Not letting them cool before storage: Meatballs should cool before storing to prevent moisture buildup in the container.

Essential Techniques

Mixing: Properly mixing your meatball ingredients ensures an even distribution of flavors. Don’t overmix, as this will lead to a tough texture. Combine ingredients just until moist and cohesive, allowing for tender, airy meatballs.

Shaping: Shaping meatballs requires gentle pressure to create uniform size and consistency. Use your palms and lightly roll them into balls, ensuring they are packed enough to hold together without being overly dense. A consistent size ensures even cooking.

Cooking: Aim to sear meatballs in a hot skillet before simmering them in sauce. This locks in flavors and creates a desirable crust. Monitor the heat closely; too high can lead to burning, while too low can cause them to dry out.

Resting: Allow cooked meatballs to rest briefly after cooking. This time lets juices redistribute throughout the meat, ensuring a succulent bite when served.

Pro Tips for Perfect Ricotta Meatballs

1. For extra flavor, incorporate grated parmesan cheese into the meat mixture for a cheesy kick that complements the ricotta.
2. Consider using a mix of ground meats—beef and pork blend well together for a richer flavor and texture.
3. If you have fresh herbs on hand, use them instead of dried for an amplified flavor profile.
4. For an added moisture boost, a splash of milk mixed into the meat combination enhances tenderness.
5. Browning the meatballs in small batches ensures they retain heat and color uniformly, elevating their look and taste.
6. Experiment with spices such as red pepper flakes or smoked paprika for a personal twist that elevates the overall flavor.
7. Always use a meat thermometer! Cooking meatballs to the right internal temperature will ensure food safety and perfect doneness.
8. For meal prep, bake the meatballs instead of frying—this creates a less greasy option while keeping the flavor intact.

Variations and Adaptations

For a delicious twist, consider adding chopped spinach or kale to the meat mixture for a nutritious boost and a vibrant green color. On the other hand, a spicy kick can be introduced by incorporating diced jalapeños or crushed red pepper flakes into the mix. If you’re looking for a lighter seasonal option, swap half of the ground meat for grated zucchini or sautéed mushrooms, enhancing the veggie content without compromising taste.

For special dietary needs, you might adapt this recipe to fit a gluten-free diet by ensuring that breadcrumbs and sauces are gluten-free. If you’re interested in a vegan variation, try using plant-based ground meats or finely chopped vegetables mixed with chickpea flour and nutritional yeast for a satisfying meatball substitute.

You can also explore different regional variations. For example, making Sicilian-style meatballs by adding raisins and pine nuts delivers a unique flavor profile that reflects traditional Italian cuisine.

Serving and Presentation Guide

When plating ricotta meatballs, consider serving them atop a bed of spaghetti or fresh zoodles for a vibrant and colorful display. A drizzle of marinara or a sprinkle of freshly grated parmesan can enhance both appearance and flavor. Opt for garnishing with fresh basil leaves or parsley for a pop of color and freshness.

Create an appealing presentation by using rustic serving dishes that bring out the Italian heritage of the dish. Serve with crusty garlic bread on the side, which is perfect for scooping up the meatballs and sauce. Be mindful of portion control, serving a set number of meatballs per plate, such as three to four, to keep your dish well-balanced.

Wine and Beverage Pairing

For wine enthusiasts, a medium-bodied red wine like Chianti or Sangiovese pairs beautifully with the bold flavors of ricotta meatballs. The vibrant cherry notes and moderate tannins of these wines enhance the dish while providing a pleasant contrast. If you prefer white wine, try a crisp Pinot Grigio to bring a refreshing element to the meal.

If you’re looking for non-alcoholic options, sparkling water with a hint of lemon provides a wonderful cleansing effect that complements the richness of the meatballs. For a unique pairing, consider serving an Italian soda for a sweet and fizzy contrast.

Temperature is key—serve both the meatballs and the wine at optimal temperatures for the best experience. While the meatballs should be hot and fresh, wine is best served slightly chilled to balance the flavors.

Storage and Shelf Life

Ricotta meatballs can be stored effectively to maintain their flavor and integrity. Once cooled, transfer them to an airtight container and refrigerate for up to three days. Always label the storage container with the date to keep track of when they were made.

If you plan to keep them longer, consider freezing the meatballs. They can be frozen for up to three months. To do so, spread them in a single layer on a baking sheet to freeze individually before transferring them to a resealable freezer bag for easy portioning later.

To reheat frozen meatballs, allow them to thaw in the fridge overnight before reheating them in a skillet or directly in sauce on medium heat until heated through. If reheating from frozen, be sure to adjust the heating time and check for a minimum internal temperature of 165°F.

Make Ahead Strategies

To save time, consider preparing your ricotta meatballs in advance. You can mix the meatball ingredients a day before and refrigerate the mixture to allow the flavors to meld. Shape the meatballs as needed and store them in an airtight container until you’re ready to cook.

Alternatively, you can fully cook the meatballs in advance and store them in the refrigerator or freezer for later use. This allows for a quick meal option when you’re pressed for time.

If reheating baked meatballs, do so in the oven to retain their texture. Add a little sauce during reheating to keep them moist.

Scaling Instructions

Scaling your ricotta meatballs recipe can easily adapt to your needs. If halving the recipe, ensure that all ingredients, including spices and herbs, are proportioned accurately. Make sure to adjust your cooking time accordingly, as smaller batches may require less time to cook.

When doubling the recipe, consider your mixing and cooking equipment. Ensure you have a sizable bowl for mixing and enough baking sheets or baking dishes for cooking. There is often no need to adjust cooking temperatures, but keep an eye on the time as larger batches may take a bit longer.

For any significant scaling, be mindful of ingredient freshness; some herbs and spices might lose potency over time. Store excess meatballs in portioned freezer bags to make future meals effortless.

Nutritional Deep Dive

Nutritionally, ricotta meatballs offer a balance of macronutrients, providing a hearty protein source through the ground meat and ricotta cheese. On average, each serving contains a well-rounded ratio of protein, fat, and carbohydrates, depending on the specific ingredients used.

Micronutrient analysis reveals that ricotta is an excellent source of calcium and vitamin A, while herbs lend antioxidants and essential vitamins. Adding vegetables not only heightens the nutritional content but also brings in fiber, which aids digestion.

For those keeping an eye on their dietary needs, understanding portion sizes is crucial. Typically, two to three meatballs make a satisfying serving that aligns well with a balanced meal plan.

Weight management is also supported by incorporating these meatballs into a meal surrounded by vegetables or whole grains, achieving satisfaction and nutrition without excess calories.

Dietary Adaptations

For a gluten-free option, substitute traditional breadcrumbs with gluten-free alternatives such as almond flour or crushed gluten-free crackers. This will maintain the binding quality without compromising dietary needs.

Dairy-free adaptations can use almond or coconut milk-based ricotta. The rich texture of these alternatives still allows for delicious meatballs without the creaminess of traditional cheese.

For a vegan version, consider using lentils or crumbled tofu mixed with nutritional yeast for a cheesy flavor, along with vegetables for moisture and texture.

Low-carb diets can benefit from using ground turkey or chicken paired with vegetables instead of breadcrumbs, ensuring a fulfilling, low-carb meal without losing flavor.

Keto enthusiasts can also recreate the recipe using cheese-based binders and additional low-carb vegetables, tailoring it to fit dietary guidelines while still providing delicious results.

Troubleshooting Guide

If your ricotta meatballs turn out too dry, the primary reason could be under-seasoning or using lean meats that don’t have enough fat content. To rectify this in future batches, include richness through additional cheese or a little olive oil into the mixture.

If flavor balances seem off, consider reassessing your spice quantities. Sometimes, particularly fresh herbs, might lessen over time; fresh is always better when possible, and adjusting seasoning post-cooking can help reach desired tastes.

Temperature issues can arise if the meatballs are overcrowded in the pan while cooking; always leave enough space for even cooking and browning. Proper heat control is essential to avoid burning the outsides while ensuring the insides are cooked thoroughly.

Should you find your meatballs fall apart during cooking, the most likely culprits are excess moisture in the mixture or lack of adequate binding agents. If future issues arise, adding an egg as a binder can reinforce the structural integrity needed for the perfect meatball.

Recipe Success Stories

Many home cooks have shared their joyful experiences with ricotta meatballs, often highlighting their unique texture and flavor as standout elements. Some have creatively adapted the recipe, introducing local spices or whole grains tailored to their dietary restrictions, which has fostered excitement and community.

Readers have recommended using the meatball mix as a filling for stuffed peppers or baked in savory sauces for a personal twist, ensuring versatility in meal planning. Others enjoy photography tips shared within communities that encourage picturesque spreads of beautifully plated meatballs, emphasizing the importance of presentation.

Collectively, the feedback illustrates a sense of shared achievement and connection, showcasing how simple a recipe can bring people together while allowing culinary exploration and adaptation within homes and communal spaces.

Frequently Asked Questions

Can I make ricotta meatballs ahead of time? Yes, you can prepare and shape the meatballs ahead. They can be stored in the refrigerator for up to 24 hours before cooking. Alternatively, cook the meatballs and refrigerate or freeze them for later use.

What type of meat is best for meatballs? Commonly used ground meats include beef, pork, turkey, and chicken. A mix of ground beef and pork often yields moist and flavorful meatballs.

Can I bake the meatballs instead of frying? Absolutely! Baking is a healthier alternative that still produces delicious meatballs. Bake them until golden brown and cooked through, usually around 20-25 minutes at 400°F.

Why do my meatballs fall apart? Meatballs may fall apart if the mixture is too wet or there’s not enough binding agent like breadcrumbs or egg. Ensure the mixture is properly balanced and allow them to rest before cooking.

What can I serve with ricotta meatballs? Ricotta meatballs pair beautifully with pasta, on subs, or alongside fresh salads and roasted vegetables. They also work well as appetizers on party platters.

Can I freeze meatballs? Definitely! After cooking, allow them to cool completely, then freeze in an airtight container or freezer bag for up to three months. Reheat directly from frozen or thaw in the fridge.

How can I enhance the flavor of my meatballs? Enhance flavor by adding grated cheese, different herbs, or a splash of your favorite sauce. Feel free to experiment with spices to hit your personal taste preferences.

Can I substitute ricotta in the recipe? While ricotta is unique, alternatives like cottage cheese or dairy-free spreads can work in a pinch, although texture may slightly change.

What is the best way to reheat meatballs? Reheat in a skillet with a touch of sauce to maintain moisture, or microwave gently, ensuring they are heated through without drying out.

Are ricotta meatballs healthy? Ricotta meatballs can be part of a healthy diet, especially if balanced with vegetables and served in moderation. The nutritional benefits of ricotta and lean meat contribute to a wholesome meal.

Additional Resources

For those interested in exploring more flavors, check out related recipes such as classic spaghetti and meatballs or zucchini noodle bowls for a healthy twist. Enhancing your cooking techniques through guided cooking classes or tutorial videos can also elevate your culinary skills.

Supplementing your pantry with fresh herbs and spices can transform simple meatballs into flavorful masterpieces. Investing in quality kitchen tools like a good meat thermometer or high-quality cooking pans will ensure consistent results every time.

Stay inspired by seasonal variations of ingredients for your meatballs; local produce can greatly enhance the freshness and flavor throughout the changing seasons.

Join the Conversation

We love hearing from you! Share your experiences making ricotta meatballs and any variations you’ve tried or discovered. Posting photos on social media using our dedicated hashtag brings our community together and encourages creative exchanges.

Engage in the conversation by sharing your review and tips for perfecting the recipe. Everyone’s feedback contributes to an ever-growing dialogue about mastering this Italian classic, encouraging connections over delightful homemade meals.

The Recipe

Ricotta Meatballs

Serves: 4 servings

Prep Time: 15 mins

Cook Time: 25 mins

Total Time: 40 mins

Kitchen Equipment Needed

  • Mixing bowl
  • Baking sheet
  • Skillet
  • Meat thermometer

Ingredients

  • 1 cup ricotta cheese
  • 1 pound ground meat (beef, pork, or turkey)
  • 1/2 cup breadcrumbs
  • 1/4 cup grated parmesan cheese
  • 1 large egg
  • 2 cloves garlic, minced
  • 1 tablespoon chopped parsley
  • 1 teaspoon dried oregano
  • Salt and pepper to taste
  • Marinara sauce, for serving

Directions

  1. In a large mixing bowl, combine ricotta cheese, ground meat, breadcrumbs, parmesan, egg, garlic, parsley, oregano, salt, and pepper.
  2. Gently mix until all ingredients are well combined, being careful not to overmix.
  3. Shape mixture into meatballs, approximately 1-2 inches in diameter.
  4. Preheat a skillet over medium heat and add a bit of oil.
  5. Brown meatballs in the skillet until each side is golden, about 5 minutes.
  6. Add marinara sauce to the skillet and cover, letting meatballs simmer for an additional 15-20 minutes until cooked through.
  7. Serve hot with additional cheese and herbs if desired.

Recipe Notes

  • These meatballs can be made in advance and stored for up to three days in the fridge or frozen.
  • Feel free to experiment with different ground meats or add chopped vegetables to the mix for an extra twist.
  • Adjust the spice levels to your preference by adding chili flakes or using different herbs.

Irresistible Spanakopita Triangles: Easy Bite-Sized Appetizer Recipe

Spanakopita Triangles: A Delicious, Bite-Sized Appetizer

⚖️
Difficulty
Moderate

⏲️
Prep Time
30 mins

🕒
Cook Time
20 mins

⏱️
Total Time
50 mins

🍽️
Servings
24 triangles

Spanakopita triangles are a delightful, bite-sized appetizer that combine flaky phyllo pastry with a rich and savory spinach filling. Each triangle is packed with the flavors of fresh spinach, aromatic herbs, and creamy feta cheese, resulting in a perfect balance of taste and texture. These appetizers are often a staple at parties and gatherings, pleasing a crowd with their crunchy exterior and deliciously creamy interior.

Making spanakopita triangles can seem daunting, but this recipe breaks it down into manageable steps, ensuring that you can create restaurant-quality bites right in your kitchen. Whether you’re hosting a special event or simply looking for a delightful snack, these triangles will impress your family and friends.

Quick Recipe Highlights

  • Flavor Profile: The combination of earthy spinach, tart feta cheese, and aromatic herbs creates a delightful balance of flavors that is both satisfying and light.
  • Texture: The contrast between the crispy, golden phyllo pastry and creamy filling makes every bite a delightful experience.
  • Aroma: As they bake, the intoxicating aroma of buttered phyllo and sautéed garlic will fill your kitchen, inviting everyone to the table.
  • Visual Appeal: Golden brown triangles with visible green spinach peeking through create an enticing presentation that’s perfect for any occasion.
  • Skill Level Needed: This recipe is moderate in difficulty, requiring basic pastry skills but rewarding with delicious results.
  • Special Equipment: A baking sheet, parchment paper, and a sharp knife or pizza cutter make the process smooth and easy.

Recipe Overview

  • Difficulty Level: Moderate. While working with phyllo dough might seem challenging, it’s manageable, and with practice, you can perfect it.
  • Category: Appetizer. Spanakopita triangles are perfect as a starter or snack, ideal for parties or gatherings.
  • Cuisine: Greek. This dish reflects the rich culinary traditions of Greece, where spinach and cheese are common ingredients.
  • Cost: Approximate cost per serving is low since most ingredients, such as spinach and feta, are affordable, making this a budget-friendly recipe.
  • Season: Best enjoyed throughout the year, particularly in spring when fresh spinach is abundant.
  • Occasion: Ideal for entertaining, these triangles shine at potlucks, holiday gatherings, and casual dinner parties.

Why You’ll Love This Recipe

Spanakopita triangles offer a unique combination of taste and texture that delights the palate. The savory spinach, combined with the creaminess of feta, creates a filling that is both satisfying and light. This perfect blend, wrapped in crispy phyllo, makes each bite an irresistible experience.

Another reason to love this recipe is its convenience. These triangles can be prepped ahead of time and frozen before baking. When it’s time to enjoy them, simply bake straight from the freezer for a hot, fresh snack without the last-minute stress.

Nutritionally, spanakopita is a winner. Spinach is loaded with vitamins and minerals, providing a healthy boost. With feta cheese adding calcium and protein, this appetizer satisfies both cravings and nutrition.

Spanakopita triangles are also excellent for social settings. Picture a buffet table filled with these golden bites; they encourage sharing and conversation. Guests often enjoy trying out different dips, making the experience more engaging.

Finally, this dish is incredibly cost-effective. The ingredients are straightforward, and it yields a substantial amount for the effort required, making it a great option for feeding a crowd without breaking the bank.

Historical Background and Cultural Significance

Spanakopita has a rich history in Greek cuisine, believed to date back to ancient times. Its origins are tied to the Mediterranean tradition of using local, seasonal vegetables, making it a staple in Greek households.

Culturally, spanakopita symbolizes hospitality in Greece. It is often served at celebrations and gatherings, reflecting the family-oriented nature of Greek culture. Sharing food like spanakopita promotes togetherness and community.

The recipe has evolved over the years, with different regions of Greece adding their flair. Variations may include additional ingredients such as leeks or different types of cheese, showcasing local tastes and preferences.

Regional variations also exist outside Greece, particularly in Middle Eastern and Balkan cuisines, where similar pastries are made with diverse fillings and spices, further enriching the culinary landscape.

Ingredient Deep Dive

Spinach:
Spinach has been a dietary staple in many cultures for centuries, valued for its nutritional benefits. It is rich in iron, vitamins A and K, and antioxidants, making it a healthful addition to any diet. When selecting spinach, look for vibrant green leaves without wilting. Fresh spinach should be stored in the refrigerator and consumed within a few days to ensure quality.

Feta Cheese:
Feta cheese has historic roots in Greek cuisine, known for its tangy flavor and crumbly texture. Made from sheep’s or goat’s milk, feta is lower in calories compared to many other cheeses. To choose quality feta, select cheese that is firm rather than overly soft, avoiding those that are overly salty. Feta should be stored in its brine or wrapped in a damp paper towel to maintain moisture.

Common Mistakes to Avoid

  • Overhandling the phyllo: Working with phyllo dough can be delicate; overhandling can lead to tears. Handle gently to maintain layers.
  • Not using enough butter: Buttering each layer of phyllo ensures crispness. Skimping can result in soggy pastry.
  • Skipping the cooling step: Filling should cool before wrapping to prevent steam from making the pastry soggy.
  • Using too much filling: Overstuffing can lead to tearing; aim for a balanced filling within each triangle.
  • Not preheating the oven: Ensure your oven is preheated for an even, golden bake.
  • Using old phyllo dough: Check expiration dates; stale phyllo can be challenging to work with and won’t crisp properly.
  • Ignoring the broth: For added flavor, consider brushing a light broth over the triangles when they come out of the oven.
  • Not checking for doneness: Keep an eye on them towards the end of baking; they can brown quickly.

Essential Techniques

Mastering the art of handling phyllo dough is key; it requires taking your time. Keep unused sheets covered to prevent drying. Practice makes perfect, and you’ll soon get the hang of layering with butter.

Additionally, proper filling techniques enhance flavor. Make sure the filling is well-mixed and seasoned before placing it in the triangles. Tasting the filling ensures a balanced flavor profile that will shine through once baked.

Pro Tips for Perfect Spanakopita Triangles

Start by warming your butter; this makes it easier to spread across the phyllo layers. Use a pastry brush for even coverage.

Consider freezing unbaked triangles for quick appetizers. When unexpected guests arrive, bake straight from the freezer for a delightful surprise.

Experiment with flavor by adding herbs like dill or mint to the filling. They complement the spinach beautifully, offering additional depth.

Don’t forget to score the top of the triangles before baking. This helps steam escape and promotes even browning.

Check internal temperature; ideally, they should reach about 165°F to ensure the filling is heated through.

Plan your serving time wisely; they taste best straight out of the oven but can be reheated if needed.

Lastly, always have a dipping sauce nearby. Tzatziki or a yogurt-garlic blend pairs perfectly with every bite.

Variations and Adaptations

Regional variations of spanakopita abound; try adding different greens like kale or Swiss chard. Each green brings its unique flavor profile while maintaining the traditional essence.

Seasonal adaptations can also be fun. In the fall, consider incorporating roasted butternut squash and nutmeg for a seasonal twist. This variation can deliver a sweet and savory contrast.

For dietary modifications, use almond or soy-based cheese for a dairy-free option. This keeps the recipe inclusive without sacrificing taste.

Herbs also offer flavor variations; replace dill with basil or parsley for a fresh take. Each herb imparts its essence and can redefine your filling’s taste.

Presenting the triangles differently can create a new experience. Try plating them on skewers or in a stacked formation to elevate their appearance for special occasions.

Serving and Presentation Guide

To plate spanakopita triangles beautifully, arrange them in a circular pattern, highlighting their golden crunch. Garnish with a sprinkle of fresh herbs for a vibrant touch.

Serve alongside traditional accompaniments like tzatziki, which pairs well and enhances their flavors. Consider adding olives or a Greek salad for a complete spread.

When serving, keep in mind temperature preferences. These triangles are best served warm, offering that crispy bite that contrasts perfectly with the creamy filling.

For portion control, aim for two to three triangles per person, alongside other bites at your gathering, ensuring guests enjoy without overindulging.

Wine and Beverage Pairing

When pairing wine with spanakopita triangles, consider a crisp white wine like Sauvignon Blanc. Its acidity balances the richness of the filling beautifully.

If you prefer non-alcoholic options, consider serving sparkling water with a splash of lemon. This refreshing drink complements the flavors and enhances the overall experience.

For coffee or tea enthusiasts, a mild herbal tea can be a delightful companion, providing a warm finish that enhances the dish’s richness.

Ensure drinks are served chilled, particularly white wines. Having a well-corked bottle nearby can make for seamless refills throughout your gathering.

Storage and Shelf Life

For storage, keep any leftover spanakopita triangles in an airtight container in the refrigerator for up to three days. Reheat them in the oven for the best texture.

If you have unbaked triangles, they can be frozen. Wrap them individually and store in a freezer-safe container for up to two months, ready for popping into the oven.

Signs of spoilage include a strange odor or an excessive change in texture. If they become overly soggy, it’s best to discard them.

For reheating, an oven set to 350°F for about 10-15 minutes ensures they regain their crispness without drying out.

If you’re freezing, use wax paper between layers to avoid sticking, which preserves their quality until ready to bake.

Make Ahead Strategies

Prepping spanakopita triangles ahead of time is straightforward. Assemble them and freeze prior to baking for maximum freshness when guests arrive.

For storage between steps, keep fillings refrigerated until ready to use. Phyllo should remain covered with a damp towel to prevent drying out.

Quality may slightly impact if frozen for an extended period, so aim to consume the frozen triangles within two months for optimal flavor.

Before baking from frozen, there’s no need to thaw; simply increase cooking time by about 5-10 minutes, ensuring a hot, crispy result.

Add fresh elements, such as a drizzle of lemon juice or a sprinkle of herbs, just before serving to enhance flavors that may diminish during freezing.

Scaling Instructions

If halving the recipe, reduce phyllo and filling quantities accordingly. Be mindful to keep the butter layering consistent for the remaining sheets.

When doubling or tripling, focus on even cooking; you may need to bake in batches, and adjust the timing based on your oven’s specifications.

Consider using two baking sheets to ensure that your triangles don’t overcrowd each other for even cooking and browning.

Ensure larger pans or sheets are used if scaling significantly, as larger batches may affect overall baking time and texture.

Finally, adjust storage considerations; larger quantities may require larger containers, or consider freezing in smaller portions for easy access later.

Nutritional Deep Dive

Each spanakopita triangle contains a balance of macro and micronutrients that make them a satisfying choice for any gathering. They are primarily composed of carbohydrates from the phyllo pastry and healthy fats from the butter used.

Spinach contributes significant vitamins A and K, enhancing nutritional value while providing a delicious flavor. Feta cheese contributes calcium and protein, making them filling.

Portion control is essential; enjoy them as a small appetizer to avoid overindulging. Eating in moderation allows you to savor the flavors without compromising dietary goals.

Weight management becomes more manageable with such versatile options; the fillings can be adjusted to incorporate more vegetables while reducing calorie-dense ingredients, making them a healthy treat.

Lastly, consider dietary considerations for those with specific health goals; these treats can be adapted to fit various lifestyles with simple ingredient swaps.

Dietary Adaptations

For gluten-free needs, opt for gluten-free phyllo or a different pastry wrapper. This can reinvent the classic while maintaining the essence of spanakopita.

Dairy-free enthusiasts can choose nutritional yeast instead of feta or explore plant-based cheeses for a similar texture and taste without the dairy.

Vegan adaptations can incorporate chickpea or lentil-based fillings, providing protein and flavor while eliminating all animal products.

Low-carb versions can play with cauliflower rice as a base instead of traditional fillings, giving a lighter option while retaining that beloved crunch.

Keto dieters may also enjoy making phyllo alternatives from almond flour-based recipes, providing texture without compromised goals.

If you follow the Paleo diet, consider swapping in nut-based creams or cashew cheese as a filling, aligning with whole-food principles.

Finally, for Low-FODMAP followers, using lactose-free feta cheese and avoiding certain spices can keep the flavors intact while respecting digestion sensitivities.

Troubleshooting Guide

If you find your phyllo pastry is too dry, ensure it is covered properly during prep. Dry layers can lead to cracking and affect texture.

For flavor balance, taste the filling before assembly. If it’s bland, add spices or herbs to enhance the overall flavor profile.

Overcooked triangles can become too brown or burnt; check frequently during the final stages for optimal color without charring.

If your oven temperature seems off, use an oven thermometer for accuracy. This prevents undercooking or overcooking your delicious appetizers.

If the filling leaks during baking, it’s often due to overstuffing. Ensure a balanced amount for each triangle to avoid spillage.

When substituting ingredients, be mindful of moisture content; wet ingredients can throw off the balance, so adjust as necessary.

Finally, if assembling proves tricky, practice your folding technique ahead of time to streamline the assembly process.

Recipe Success Stories

Community feedback on spanakopita triangles has been overwhelmingly positive, with many sharing their variations and personal touches that elevate this classic recipe.

Readers have suggested using a blend of cheeses, including goat cheese, which adds tang and creativity to the traditional filling, making it a hit at gatherings.

Adaptation stories highlight how different herbs or vegetables can enhance flavors without straying too far from the essence of the dish.

Many have shared photography tips for capturing the golden crust in all its glory, emphasizing the importance of good lighting in food presentation.

Recipe reviews consistently praise the balance of flavors and ease of preparation, establishing spanakopita triangles as a go-to party appetizer in many homes.

Frequently Asked Questions

Can I freeze spanakopita triangles?
Yes, unbaked triangles can be frozen. Just wrap them individually and bake straight from the freezer when ready.

How do I prevent the phyllo dough from drying out?
Always keep unused phyllo covered with a damp towel while you work to retain moisture and prevent cracking.

Can I use other greens besides spinach?
Absolutely! Kale, Swiss chard, or mixed spring greens work beautifully as alternatives to spinach in the filling.

What’s the best way to serve spanakopita?
Serve them warm directly from the oven, garnished with fresh herbs and accompanied by a yogurt-based dip.

How long do spanakopita triangles last in the fridge?
They can be stored in an airtight container for up to three days. Reheat in the oven for best results.

Can I make them vegan?
Yes! Replace the feta with a plant-based cheese or a mixture of blended nuts for a delicious vegan filling.

What’s the ideal temperature for baking?
Preheat your oven to 375°F (190°C), which is perfect for ensuring a crispy, golden result without burning.

How do I know when they’re done?
They should be a crisp, golden brown on the outside and heated through. You can also check the internal temperature.

Are spanakopita triangles gluten-free?
Traditional phyllo is not gluten-free, but you can find gluten-free phyllo options in specialty stores or make alternatives.

Can I add other ingredients to the filling?
Yes! Ingredients such as artichokes, leeks, or even sun-dried tomatoes can be delicious additions to the filling.

Is there a healthier version of spanakopita?
To make it healthier, reduce the amount of butter used or try baking instead of frying to lower the calorie count.

How do I store leftover filling?
Store any leftover filling in the refrigerator for up to two days; you can use it for other dishes like omelets or salads.

Additional Resources

If you enjoyed this spanakopita triangle recipe, consider exploring related recipes like Greek salad for a refreshing side or tzatziki for dipping.

For technique guides, look into mastering phyllo pastry, as understanding its nuances can elevate many other recipes as well.

Further ingredient information about spinach and feta can also offer insights into their health benefits and culinary uses.

If you’re looking to invest in kitchen equipment, a good quality knife and pastry brush can ensure successful preparation of many dishes.

For seasonal variations, consider showcasing pies or pastries using in-season vegetables for efforts that celebrate the best produce throughout the year.

Join the Conversation

We’d love to connect with you! Share your spanakopita triangle experiences on social media, tagging us in your culinary creations. Your photography tips can inspire fellow food enthusiasts as they prepare this delicious appetizer.

If you’ve modified the recipe, share your variations in the comments. Engaging with our community enriches the whole experience and offers new perspectives on classic dishes.

We encourage recipe reviews and stories of personal successes that can help others master their own spanakopita triangles. Together, our culinary journey can flourish!

The Recipe

Spanakopita Triangles

Serves: 24 triangles

Prep Time: 30 mins

Cook Time: 20 mins

Total Time: 50 mins

Kitchen Equipment Needed

  • Baking sheet
  • Parchment paper
  • Sharp knife or pizza cutter
  • Pastry brush

Ingredients

  • 1 package of phyllo dough
  • 1 lb fresh spinach, chopped
  • 1 cup feta cheese, crumbled
  • 1/2 cup ricotta cheese
  • 1/4 cup fresh dill, chopped
  • 1/4 cup green onions, chopped
  • 1/2 cup melted butter
  • Salt and pepper to taste

Directions

  1. Preheat your oven to 375°F (190°C) and line a baking sheet with parchment paper.
  2. In a large bowl, combine spinach, feta cheese, ricotta, dill, green onions, salt, and pepper.
  3. Prepare the phyllo dough, keeping it covered with a damp towel to prevent drying.
  4. Layer sheet of phyllo, brushing with melted butter, and fold it in half lengthwise.
  5. Cut the phyllo into strips about 3 inches wide, then place a tablespoon of filling at the bottom of each strip.
  6. Fold the phyllo over the filling diagonally to form a triangle. Continue folding until you reach the end of the strip.
  7. Arrange the triangles on the baking sheet and brush the tops lightly with butter.
  8. Bake for 20 minutes or until golden brown and crispy.

Recipe Notes

  • Feel free to experiment with the filling ingredients for a custom taste.
  • For extra flavor, add crushed garlic or nutmeg to the filling mixture.
  • Leftover triangles can be stored in the fridge and reheated.

Deliciously Easy No-Bake Lemon Tart Recipe for Everyone

Velvety No-Bake Lemon Tart Recipe: A Refreshing Delight for Any Occasion

⚖️
Difficulty
Easy

⏲️
Prep Time
20 mins

🕒
Cook Time
0 mins

⏱️
Total Time
20 mins

🍽️
Servings
8-10

Indulge in the delicious and refreshing taste of our Velvety No-Bake Lemon Tart, perfect for any occasion. This tart captures the essence of zesty lemons combined with a creamy filling to create a delightful dessert that will impress your family and friends. Not only is it easy to make, but it also requires no baking, making it a perfect choice for warm weather or when you want a sweet treat without turning on the oven.

The bright, citrus notes of lemon provide an invigorating flavor that dances on your palate, while the sweet, buttery crust adds a satisfying crunch. Each bite of this no-bake lemon tart brings a beautiful balance of flavors, ensuring that every forkful is a treat. With its eye-catching presentation and delightful taste, this dessert is sure to become a favorite that you’ll return to time and again.

Quick Recipe Highlights

  • Flavor Profile: A vibrant combination of sweet and tangy lemon that refreshes the senses.
  • Texture: The creamy filling melts in your mouth, complemented by a crunchy, buttery crust.
  • Aroma: Imagine the fragrant scent of fresh lemons wafting through your kitchen, bringing a sunny brightness.
  • Visual Appeal: This tart showcases a stunning golden-yellow filling that looks inviting atop a crisp, golden crust.
  • Skill Level Needed: Suitable for beginners and those looking for a quick yet impressive dessert to whip up.
  • Special Equipment: A tart pan or pie dish and a mixing bowl are all you need to achieve this delightful dessert.

Recipe Overview

  • Difficulty Level: This Velvety No-Bake Lemon Tart is classified as easy, making it accessible for anyone from novice cooks to experienced bakers.
  • Category: It falls under the dessert category and is an excellent choice for summer picnics, holiday gatherings, or casual weeknight treats.
  • Cuisine: Inspired by classic French desserts, this tart embodies a blend of culinary traditions with its rich, creamy filling and buttery crust.
  • Cost: The ingredients for this tart are generally affordable, making it a budget-friendly dessert option.
  • Season: Lemon tart is best enjoyed during spring and summer when fresh citrus is abundant, though it can be made year-round.
  • Occasion: Perfect for everything from birthday celebrations to casual dinners, this tart is a versatile dessert for any gathering.

Why You’ll Love This Recipe

This Velvety No-Bake Lemon Tart is more than just a dessert; it’s a celebration of flavors and a treat for all senses. The delightful tartness of fresh lemons creates a bright and invigorating flavor, while the creamy filling offers a smooth contrast to the crunchy crust. Together, they make a harmonious pairing that leaves everyone wanting more.

Not only is this recipe easy to prepare, but it also allows for minimal kitchen cleanup. Simply combine the ingredients, pour them into the crust, and let it set in the fridge. With no baking required, you can whip this up even on the warmest days, leaving your kitchen cool and comfortable.

Nutritionally speaking, incorporating fresh lemons adds a boost of Vitamin C, which supports your immune system while also providing a refreshing taste. Additionally, the ingredients in this tart are generally simple and wholesome, allowing for a satisfying indulgence that doesn’t weigh you down.

Serving this lemon tart is also a wonderful way to impress your guests. Imagine a gathering where you unveil this stunning dessert, and watch as your friends and family are charmed by its beauty and taste. It’s a perfect centerpiece for any table, lending an air of elegance to casual or festive occasions.

Cost-effectiveness is a huge plus; with just a few staple ingredients, you can create a dessert that looks and tastes gourmet. Whether it’s a cozy dinner at home or a larger celebration, this Velvety No-Bake Lemon Tart will not only satisfy sweet cravings but also keep your budget in check.

Historical Background and Cultural Significance

The origins of lemon tart can be traced back to French culinary traditions, where the balance of tart and sweet flavors was highly celebrated. Over the centuries, the classic lemon tart evolved, becoming a favorite across various cultures. Many regions have their own variations, adding local ingredients to create unique interpretations.

In France, lemon tart is known as “tarte au citron,” commonly enjoyed in patisseries. This dessert is a symbol of French culinary artistry, showcasing the importance of fresh, high-quality ingredients. Its popularity has led to numerous adaptations, each carrying its own cultural touch while keeping the beloved lemon flavor intact.

As time passed, the no-bake version of lemon tart gained traction, appealing to those desiring a quicker, more accessible dessert option. Its rise in popularity reflects a shift towards simpler cooking methods without sacrificing taste and presentation. Today, it’s celebrated not only in casual home kitchens but also on the menus of fine dining establishments.

Regional variations abound, with some cultures combining local fruits, herbs, or spices into the basic lemon tart recipe, enhancing its appeal and adding depth to the flavor profile. This adaptability has helped the lemon tart maintain its status as a timeless dessert enjoyed all over the world.

Ingredient Deep Dive

Lemon is the star of this Velvety No-Bake Lemon Tart. This vibrant fruit is not only famous for its refreshing flavor but also packed with health benefits. Rich in Vitamin C and antioxidants, lemons support immune health and promote skin vitality. When selecting lemons, look for ones that are bright yellow and firm, indicating freshness.

The crust of this tart typically features graham crackers or digestive biscuits. These ingredients provide a sweet, crunchy texture that complements the creamy filling. Whole-grain versions can also be used for a healthier option, offering more fiber and nutrients. Store any leftover crust in an airtight container to maintain its crispness for future use.

Cream cheese is another key ingredient, contributing to the rich and velvety texture of the filling. This surface pleaser can be found in low-fat versions too, offering a great alternative without compromising flavor. For those with lactose intolerance, dairy-free cream cheese can also serve as a suitable substitute, allowing everyone to enjoy this delightful dessert.

Lastly, sweetened condensed milk plays a crucial role in achieving the tart’s delicious sweetness while also aiding in setting the filling. This pantry staple is economical and can be kept for long periods. It can also be substituted with coconut cream for a dairy-free option that enhances the tropical notes of the tart.

Common Mistakes to Avoid

  • Overmixing the filling can lead to a runny consistency. Mix just until combined for a perfect texture.
  • Using old or out-of-season lemons can result in a less vibrant flavor; always opt for fresh, juicy lemons.
  • Not chilling the tart long enough can prevent it from setting properly. Make sure to refrigerate for at least a few hours.
  • Forgetting to line the tart pan can make removing the tart difficult; always use parchment paper for easy extraction.
  • Rushing the crust assembly can lead to crumbliness; ensure the butter is evenly distributed for a cohesive texture.
  • Ignoring the need for a taste test can result in an unbalanced flavor; always adjust the sweetness or tartness to your preference.
  • Baking the crust instead of refrigerating can cause it to become too hard; follow the no-bake instructions for the right texture.
  • Neglecting to garnish or decorate can lead to a less appealing presentation; use slices of lemon or whipped cream for an elegant touch.
  • Using too much liquid can make the filling too runny; measure carefully to ensure the right consistency.
  • Skipping the rest time after mixing the filling can prevent flavors from melding; let it sit before pouring it into the cooled crust.

Essential Techniques

Achieving the perfect crust requires mastering the technique of combining dry ingredients with melted butter. This process is crucial for ensuring that the crust holds together well once chilled. To master it, start by finely crushing the biscuits to avoid large chunks and mix evenly with melted butter until you achieve a sandy consistency before pressing it firmly into the pan.

The filling needs to be well-mixed but not overwhipped. Start by blending the cream cheese until smooth before gradually adding the sweetened condensed milk and lemon juice. This gradual mixing helps achieve a creamy texture without incorporating too much air, which would lead to fluffiness rather than the desired velvety consistency.

Setting the tart properly is another important step. After pouring the filling into the crust, cover it with plastic wrap and place it in the fridge. This chilling period ensures that the filling firms up, creating a tangy yet smooth tart that holds its shape when sliced.

Lastly, proper garnishing can elevate the presentation of the tart. Delicately arranged lemon slices or a dollop of whipped cream can greatly enhance the visual appeal. Learning how to arrange garnishes attractively can make a significant difference in how inviting your dessert appears to guests.

Pro Tips for Perfect Velvety No-Bake Lemon Tart

1. Always use room temperature cream cheese to ensure an easier and smoother blending process, avoiding lumps in your filling.
2. For added flavor, consider zesting the lemons before juicing them; this will enhance the lemony aroma and taste in the tart.
3. Experiment with flavored extracts, such as vanilla or almond, to provide an interesting twist to the traditional lemon flavor.
4. To prevent soggy crust, let the crust set in the fridge for about 30 minutes before adding the filling.
5. When slicing the tart, use a warm knife to create clean cuts; simply run the knife under hot water and wipe it dry before cutting.
6. If you want a lighter tart, substitute half of the cream cheese with Greek yogurt for added protein and tanginess.
7. Don’t hesitate to decorate the top with fruits or edible flowers, making the presentation even more stunning.
8. Be sure to check the tart after chilling for the first couple of hours; if it’s too soft, let it chill for an additional hour or so.

Variations and Adaptations

For those looking to mix it up, consider adding different flavor variations to this classic recipe. A berry-infused lemon tart could incorporate raspberry or blueberry purée swirled into the filling for a pop of color and flavor. Seasonal adaptations, like incorporating fresh strawberries in the summer or spiced pumpkin for fall gatherings, keep this tart relevant year-round.

Dietary modifications offer additional opportunities for creativity. Vegan substitutes can be made using cashew cream instead of cream cheese and maple syrup for sweetness. Gluten-free versions can easily be achieved by using gluten-free biscuits for the crust, allowing everyone to enjoy a slice.

For a textural twist, consider adding crushed nuts or toasted coconut to the base for a richer, more complex flavor profile. Presentation alternatives include serving the tart in individual cups rather than a pie dish for a fun and modern take. Each of these variations can be tailored to specific tastes or dietary needs, making this no-bake lemon tart a deliciously flexible recipe.

Serving and Presentation Guide

For an elegant presentation, slice the Velvety No-Bake Lemon Tart into even portions using a warm knife. Place each slice on a chilled dessert plate for an inviting display. Garnish with a sprig of mint or thinly sliced lemon for a pop of color that enhances the tart’s visual appeal.

Consider serving the tart alongside a dollop of freshly whipped cream or a scoop of lemon sorbet for added texture and flavor contrast. These accompaniments not only elevate the dish but also allow guests to customize their dessert experience.

Temperature is essential; ensure the tart is served chilled to maintain the creaminess of the filling while being refreshing. For portion control, consider cutting smaller slices, especially if serving at a buffet or a large gathering, allowing guests to sample various desserts.

Lastly, consider beautiful garnishing ideas, such as creating a light dusting of powdered sugar over the top for a frosted appearance, or drizzle with a raspberry coulis that provides a vibrant color contrast to the yellow tart.

Wine and Beverage Pairing

Pairing your Velvety No-Bake Lemon Tart with the right beverages can enhance the overall dining experience. A crisp, refreshing white wine, such as Sauvignon Blanc, complements the tart’s citrus flavors perfectly. The acidity of the wine mirrors the tartness of the lemons, creating a harmonious balance on the palate.

For non-alcoholic options, consider serving the tart with a zesty iced tea, perhaps infused with fresh mint and lemon slices to tie in with the dessert’s flavors. A sparkling lemonade, either homemade or store-bought, also makes for an excellent pairing that enhances the lemony notes of the tart.

For coffee lovers, a smooth espresso or a lightly flavored latte can provide a lovely contrast to the sweetness of the tart. The bitterness of the coffee pairs beautifully with the creamy filling, creating a delightful after-dinner experience.

Serving temperature is also key; be sure to chill the tart well and serve the beverages cold to create a refreshing contrast.

Storage and Shelf Life

To maximize the freshness of your Velvety No-Bake Lemon Tart, store it in an airtight container in the refrigerator. Make sure to consume it within 3-5 days for the best quality and flavor. Keeping it properly covered will also prevent it from absorbing any unwanted odors from other foods in your fridge.

If you’re looking to prepare the tart in advance, you can also freeze it. For freezing, wrap the tart well in plastic wrap followed by aluminum foil to prevent freezer burn. Enjoy it within 1-2 months for optimal taste.

When it comes to signs of spoilage, be vigilant about any off odors or changes in texture. If the filling appears watery or has separated, it may be best to discard it. For leftovers, if the tart looks and smells fresh, you can consider reheating or thawing it based on your preference for serving.

Freezing individual slices can also be an effective way to preserve the tart, allowing for easy grab-and-go dessert options whenever cravings strike!

Make Ahead Strategies

One of the most delightful aspects of the Velvety No-Bake Lemon Tart is its ability to be prepared ahead of time. Start by making the crust and filling a day in advance, allowing the tart to chill overnight. This not only enhances the flavor but also ensures that the filling sets perfectly for a slice that holds its shape.

Storing individual components can also be beneficial; prepare the crust in advance and keep it in the fridge before adding the filling. This strategy allows you to combine things without fear of damaging the texture of the crust.

For the best quality, avoid adding any fresh garnish until just before serving. This will preserve the appearance of the tart and ensure that any herbs or fruits remain fresh and vibrant.

Lastly, consider assembling mini tarts in individual cups ahead of time for gatherings—this way, you can entertain guests without the last-minute rush. By organizing your prep, you’ll enjoy a stress-free and delightful dessert experience.

Scaling Instructions

Scaling your Velvety No-Bake Lemon Tart recipe can be simple and rewarding, especially when catering to larger groups. Halving the recipe is straightforward; just adjust the ingredient measurements accordingly, making sure to use proportions to match the crust and filling ratio.

Doubling or tripling the recipe is equally easy; ensure you have a sufficiently large pan to accommodate the increased filling. You may also consider using multiple smaller pans for easy serving and to present an assortment of flavors.

Timing adjustments are key when scaling. Keep in mind that larger tarts may need a bit more chilling time to set thoroughly. Similarly, if you’re baking multiple smaller tarts simultaneously, monitor them closely since smaller portions often require less time to chill.

Finally, always consider storage options. Large batches can take up significant fridge space, so plan ahead on how to store and serve them effectively once made.

Nutritional Deep Dive

The nutritional profile of the Velvety No-Bake Lemon Tart can vary depending on ingredient choices, but generally, its macros consist of carbohydrates primarily from the crust and sugars, alongside fats from the cream cheese. A standard slice may contain approximately 250-300 calories, which is typical for desserts.

Micronutrient analysis shows that the tart is rich in Vitamin C thanks to the lemons, offering immune support and antioxidant effects. Cream cheese also contributes calcium and protein, providing some nutritional benefits, though moderation is key due to its fat content.

For health-conscious individuals, consider using low-fat cream cheese and reducing sugar to lessen calorie intake. Keeping an eye on portion sizes is essential, especially if you’re indulging in richer variations of the tart.

Lastly, weight management becomes manageable with this dessert when consumed in moderation. Pairing it with seasonal fruit or light beverages can create a balanced plate.

Dietary Adaptations

For guests requiring gluten-free options, simply swap out traditional graham crackers with gluten-free biscuits to create an equally delicious crust. Ensure that all additional ingredients are also verified gluten-free to avoid any cross-contamination.

If you’re catering to vegan guests, replace cream cheese with a plant-based alternative and use coconut cream to ensure that the filling maintains its rich, creamy texture. Using agave or maple syrup can also substitute for sweetened condensed milk, offering a delightful flavor without dairy.

Low-carb adaptations can easily be achieved with a sugar substitute and by using almond flour for the crust. This modification allows those following keto or paleo diets to indulge in the tart without the carb overload.

Lastly, consider creating a low-FODMAP version by replacing standard sweeteners with those regarded as low-FODMAP-friendly, ensuring that everyone can enjoy this tasty treat, no matter their dietary needs.

Troubleshooting Guide

If your Velvety No-Bake Lemon Tart’s filling turns out too runny, this is often the result of not allowing it enough time to chill. Ensure to refrigerate it for a minimum of 4 hours to allow it to set properly before serving.

Should the crust crumble when slicing, it’s likely that it wasn’t pressed firmly enough into the pan or used overly dry biscuits. To remedy this, ensure a consistent mixture of butter and biscuit crumbs, pressing it down securely before filling.

For an overly tart flavor, balance it by blending in a little more sweetened condensed milk or consider adding a drizzle of honey or simple syrup over individual slices before serving.

If the tart appears browning or too soft on the edges after being chilled, excessive mixing or using old ingredients may be culprits. Ensure to troubleshoot with fresh ingredients, and reduce mixing time for cream cheese.

Lastly, for crackling while cutting, using a warm knife as mentioned before can help achieve smooth, clean slices without compromising the tart’s aesthetics.

Recipe Success Stories

Readers have shared numerous success stories after trying our Velvety No-Bake Lemon Tart recipe. Many have praised its simplicity, noting how it became a family favorite within just a few servings. Adaptations made by fellow cooks, such as adding fresh berries to the filling, have sparked delightful conversations around tables lined with sweet treats.

One home cook shared how they brought this lemon tart to a gathering, receiving rave reviews for its refreshing flavor that was especially appreciated on a warm day. Others have explored using local fruits in combination with lemon, creating a unique twist that matched their regional ingredients.

Photography tips have also been shared among the community, with users showcasing stunning images of their garnished lemon tarts—where sprigs of mint and edible flowers added that extra touch of elegance.

Feedback often emphasizes the ease of preparing the tart, encouraging others to try their hand at creating this delicious dessert, proving that its charm lies in its accessibility to all skill levels.

Frequently Asked Questions

Can I make this lemon tart in advance?

Absolutely! This tart is perfect for making ahead. Prepare it a day in advance and store it in the fridge until you’re ready to serve. This allows the flavors to meld beautifully and ensures it’s perfectly set.

What can I use as a substitute for sweetened condensed milk?

You can replace sweetened condensed milk with a mixture of coconut cream and a sweetener like maple syrup or honey. This alternative keeps the richness while offering a different flavor profile.

What if I can’t find fresh lemons?

If fresh lemons are unavailable, consider using bottled lemon juice. However, fresh lemons provide a much brighter flavor, so it’s best to use fresh when possible. You may also explore using other citrus like limes or oranges as substitutes.

Can I freeze the Velvety No-Bake Lemon Tart?

Yes, this tart freezes well. Just wrap it tightly in plastic wrap and aluminum foil, and store it in the freezer. Thaw it in the refrigerator overnight before serving for the best texture.

How long does the lemon tart stay good in the fridge?

This tart can be kept in the fridge for up to 3-5 days. Make sure to store it in an airtight container to preserve its freshness and avoid absorbing other smells.

Can I use a different crust for the tart?

Definitely! While a graham cracker crust is traditional, you can use other types of cookies or make a nut-based crust for a gluten-free option. Experiment with what you enjoy!

What’s the best way to serve the lemon tart?

Serve the lemon tart chilled, topped with whipped cream, fresh fruit, or a light dusting of powdered sugar for an elegant presentation. You could also accompany it with iced tea or a refreshing cocktail.

How can I adjust the sweetness of the tart?

After blending your ingredients, taste the filling before pouring it into the crust. You can always add more sweetened condensed milk, honey, or your preferred sweetener to achieve your desired sweetness.

Is there a vegan version of this recipe?

Yes! You can easily make a vegan version of the Velvety No-Bake Lemon Tart using plant-based cream cheese and coconut cream. Substitute sweetened condensed milk with a blend of coconut cream and a vegan sweetener.

What other flavor variations can I try?

Feel free to experiment with different flavors! Adding berries, chocolate, or even herbs like rosemary can create exciting flavor combinations. Mixing in lemon zest can also enhance the lemony flavor while adding texture.

Additional Resources

If you’re eager to dive deeper into the world of no-bake desserts, consider exploring related recipes that highlight other flavors. Additionally, technique guides outlining pastry skills and dessert presentations can be helpful resources.

Ingredient guides detailing the benefits of wholesome components, such as the nutritional value of citrus, can enhance your understanding of what goes into your dishes. Finally, recommendations for equipment that makes dessert preparation easier can elevate your cooking experience, ensuring you’re well-equipped to handle delicious recipes.

Join the Conversation

We’d love to hear about your experiences with the Velvety No-Bake Lemon Tart! Please share your thoughts and review the recipe on social media. Engaging with fellow dessert enthusiasts can offer new insights, tips, and even friendly competition in the kitchen.

Encouragement to share photographs of your brightly-colored tarts adds a personal touch to the community that surrounds this recipe. From flavor variations to presentation ideas, your contributions can inspire others to embark on their baking adventures, continuing the tradition of sharing delicious culinary experiences.

The Recipe

Velvety No-Bake Lemon Tart

Serves: 8-10

Prep Time: 20 mins

Cook Time: 0 mins

Total Time: 20 mins

Kitchen Equipment Needed

  • Tart pan or pie dish
  • Mixing bowl
  • Whisk
  • Spatula
  • Measuring cups and spoons

Ingredients

  • 1 ½ cups graham cracker crumbs
  • ½ cup unsalted butter, melted
  • 8 oz cream cheese, softened
  • 1 cup sweetened condensed milk
  • ½ cup fresh lemon juice
  • 2 teaspoons lemon zest

Directions

  1. In a mixing bowl, combine graham cracker crumbs and melted butter. Press firmly into the base of the tart pan to form the crust. Chill in the refrigerator for 30 minutes.
  2. In another bowl, beat cream cheese until smooth. Gradually mix in sweetened condensed milk until well blended.
  3. Add fresh lemon juice and zest to the mixture, stirring until smooth and fully combined.
  4. Pour the filling into the chilled crust and smooth the top with a spatula.
  5. Cover the tart and refrigerate for at least 4 hours or until fully set.
  6. Once set, garnish with sliced lemons or whipped cream before serving. Cut into slices and enjoy!

Recipe Notes

  • Substitute graham crackers with gluten-free options for a gluten-free crust.
  • Swap sweetened condensed milk with coconut cream for a dairy-free version.
  • Add fresh berries for a twist on the traditional filling.
  • Let the tart set longer if the filling is too soft for your liking.

Indulge in Filet Mignon with Creamy Parmesan Mustard Sauce

Delicious Filet Mignon with Creamy Parmesan Mustard Sauce

⚖️
Difficulty
Intermediate

⏲️
Prep Time
15 mins

🕒
Cook Time
20 mins

⏱️
Total Time
35 mins

🍽️
Servings
2

Indulge in a luxurious culinary experience with our exquisite Filet Mignon with Creamy Parmesan Mustard Sauce. This tender cut of steak, known for its great flavor and buttery texture, is complemented beautifully by a rich sauce that combines the nutty taste of parmesan and the zesty bite of mustard. Perfect for impressing guests or enjoying a special evening at home, this dish delivers an unforgettable dining experience.

With just the right blend of spices and ingredients, this filet mignon is not only visually stunning but also enticing to the palate. Imagine slicing into the perfectly cooked meat, releasing its savory juices, and drenching it in a creamy sauce that enhances each bite.

Quick Recipe Highlights

  • Flavor Profile: The filet mignon is succulent and flavorful, enriched by the creamy mustard sauce’s tangy and nutty notes.
  • Texture: The steak’s melt-in-your-mouth tenderness pairs wonderfully with the smoothness of the sauce, creating a delightful contrast.
  • Aroma: The enticing aroma of searing steak combines with the rich scent of parmesan and herbs, making this dish irresistible.
  • Visual Appeal: The dish is beautifully presented with golden sauce drizzled over the juicy steak, garnished with fresh herbs for added color.
  • Skill Level Needed: This intermediate level recipe requires basic cooking techniques and a little finesse, making it achievable for home cooks looking to impress.
  • Special Equipment: A well-seasoned cast iron skillet or a heavy-bottomed pan is ideal for searing the steak to perfection.

Recipe Overview

  • Difficulty Level: This recipe is rated intermediate due to the precise cooking method needed for the filet mignon and the timing involved in preparing the sauce.
  • Category: This meal fits perfectly into the dinner category, ideal for a romantic night or special occasion.
  • Cuisine: Drawing from classic French techniques and ingredients, this dish showcases a culinary tradition that emphasizes refinement and rich flavors.
  • Cost: While filet mignon is one of the more expensive cuts of meat, the overall cost for the entire dish remains reasonable when considering its delicious outcome.
  • Season: This dish shines in cooler months, making it perfect for cozy dinners in the fall and winter seasons.
  • Occasion: Ideal for anniversaries, holiday dinners, or intimate gatherings, the presentation and flavors make it a gift to your guests.

Why You’ll Love This Recipe

The taste and texture of Filet Mignon with Creamy Parmesan Mustard Sauce make it a standout dish for any occasion. The filet mignon is known for its melt-in-your-mouth tenderness, which gets a delightful uplift from the creamy sauce, resulting in a symphony of flavors on your palate. The combination of parmesan and mustard brings together a spicy, tangy component that perfectly complements the rich and buttery nature of the steak.

Convenience is another reason to adore this recipe. With a prep time of just 15 minutes and a cook time of 20, this elegant dish can quickly be a part of your weekly meal rotation. The straightforward steps ensure that you spend more time enjoying your meal rather than being buried in the kitchen.

The nutritional advantages of filet mignon cannot be overlooked. High in protein and rich in iron, it makes for not only a delicious option but one that’s beneficial for energy and muscle health. Coupled with the vitamins in the sauce ingredients, this dish comes together to create a balanced meal.

Socially, it’s a talking point at the dinner table, bringing together family and friends over a shared love for gourmet food. The richness of the filet mignon stimulates conversation and creates a warm atmosphere, making it an ideal dish for gatherings.

Cost-effectiveness comes into play when you consider the ingredients used. While filet mignon may be thought of as a luxury item, the sauce elevates the meal without requiring a full range of costly sides or ingredients. This means you can impress your guests and family without breaking the bank.

Historical Background and Cultural Significance

The filet mignon has a storied history that traces back to the French culinary tradition. Highly prized and often associated with fine dining, this tender cut is derived from the smaller end of the tenderloin, making it one of the most sought-after steaks. Traditionally, it has been served at grand meals and special occasions throughout Europe, investing it with a sense of luxury and exclusivity.

Culturally, filet mignon is symbolic of gourmet cuisine, often representing a celebration of fine ingredients and skilled cooking techniques. The dish is typically enjoyed in upscale restaurants but has successfully made its way into home kitchens across the globe, democratizing this luxury meat.

As recipes evolve, so too does the preparation of filet mignon. The addition of sauces, such as the creamy parmesan mustard featured here, enhances its appeal and integrates other flavor profiles, ensuring the dish remains relevant to modern palates. Adaptations seen around the world reflect local tastes and traditions, making it a versatile centerpiece for many culinary explorations.

Regional variations also tell a compelling history of this dish. While France presents the classic take, variations can be found in higher-end American steakhouses, where the steak might be served with barbecue or house-made sauces. Such adaptations illustrate the global love for this particular cut, blending ingredients native to diverse cultures.

Ingredient Deep Dive

Filet mignon: This elegant cut of beef is beloved for its natural tenderness and buttery texture. Originating from the short loin, it is often regarded as a luxury ingredient. Nutritionally, filet mignon is rich in proteins and offers essential amino acids, making it vital for muscle building. When selecting, look for bright red color and good marbling. Store it refrigerated and consume within a few days of purchase or freeze for longer storage.

Cream: A staple in making the creamy sauce, cream adds a rich texture and mouthfeel. Dairy products are known to be a good source of calcium and vitamins. Look for fresh, high-fat cream for the best results, and ensure it’s stored in a cool, airtight container. As a substitute, non-dairy alternatives can be used, although they may alter the sauce’s richness.

Parmesan cheese: This Italian cheese is celebrated for its nutty flavor and granular texture, integral to giving depth to the sauce. Parmesan is also a good source of protein and calcium, contributing to a balanced diet. Always choose aged parmesan for the best flavor. It should be stored carefully to prevent spoilage and can often be substituted with pecorino cheese or nutritional yeast for a dairy-free version.

Mustard: Offering a zesty kick, mustard can heighten the flavor profile of the sauce. Its health benefits include being low in calories and high in antioxidants. When selecting mustard for the sauce, choose quality brands, and store them in a cool place. You can use any variety, from Dijon to whole grain, depending on your desired flavor nuances.

Garlic: This aromatic is crucial for elevating flavors in many recipes. Garlic is enriched with antioxidants and has numerous health benefits, including improving heart health. Fresh garlic cloves should be chosen as they provide the best flavor; store them in a cool, dark place. When substitutions are necessary, garlic powder can work, though fresh garlic is always preferred.

Common Mistakes to Avoid

  • Cooking at the wrong temperature: Ensure the skillet is properly heated to achieve a good sear on the filet, sealing in juices.
  • Overcooking the steak: Use a meat thermometer to check doneness and remove it slightly before it reaches your desired temperature, as it will continue to cook off the heat.
  • Skipping the resting period: Allow the filet to rest after cooking so the juices redistribute for a more tender bite.
  • Neglecting seasoning: Seasoning should not be an afterthought; a good amount of salt and pepper enhances the beef’s natural flavors.
  • Using low-quality ingredients: Premium cuts of meat and fresh, quality ingredients are essential for the best flavor and texture.
  • Forgetting about sauce reduction: Allowing the sauce to simmer properly helps to meld the flavors and thicken, resulting in a richer sauce.
  • Not preparing in advance: Gathering all ingredients and pre-measuring them can streamline the cooking process and ensure nothing is forgotten.
  • Ignoring aromatics: Using fresh herbs and spices can heighten flavor; don’t skip them, as they bring complexity to simple dishes.
  • Incorrectly combining ingredients: Be mindful when adding cream to avoid curdling; always temper it by adding it gradually and stirring.
  • Skipping garnish: A simple fresh herb garnish can elevate the presentation and flavor profile significantly; don’t skip this final touch.

Essential Techniques

Searing: This key technique is vital for developing a flavorful crust on the filet mignon. For best results, preheat your skillet until it’s smoking before adding the meat. Ensure the steak is at room temperature and dry; this will help it sear and not steam. Watch for a deep golden-brown color as your cue for flipping.

Sauce-making: Knowing how to create a creamy sauce is an essential culinary skill. Start with a roux or simply reduce the cream to thicken it. Use low heat to prevent burning, and constantly stir to avoid sticking to the bottom. Incorporating your flavors gradually ensures a harmonious balance that enhances the entire dish.

Resting: Resting meat is just as essential as cooking it. Once cooked, let your filet mignon rest for a minimum of five minutes to ensure juices are redistributed. This simple step will make your meat more succulent and enjoyable to eat.

Garnishing: Proper garnishing techniques can elevate a meal significantly. Use fresh herbs to highlight colors and flavors throughout the dish. Consider offsetting rich dishes with bright, fresh elements for balance—like a sprinkle of parsley or chives.

Pro Tips for Perfect Filet Mignon with Creamy Parmesan Mustard Sauce

Start with high-quality filet mignon for the best flavor and tenderness; look for well-marbled cuts when purchasing. Use a cast iron skillet for an even sear and better heat retention, which will help achieve that coveted crust. Allow your steak to come to room temperature before cooking for more even results and to reduce cooking time.

Use a meat thermometer to ensure the steak reaches your desired level of doneness—145°F for medium rare yields the best taste and texture. Always rest the steak post-cooking to maximize juiciness. Whisk the sauce gently while it’s heating but avoid boiling, as boiling will reduce the creaminess and alter the flavors.

Experiment with the mustard flavors; try Dijon or honey mustard to see which blends best with the parmesan for your personal taste preferences. Finally, surprise your guests with seasonal vegetables as a side, enhancing both the color on the plate and the meal’s freshness.

Variations and Adaptations

For regional variations, consider a chimichurri sauce made with herbs from Latin recipes, adding an aromatic twist to the filet. Seasonal adaptations can include adding roasted vegetables in the winter or a fresh salad in warmer months to complement the dish’s richness. If dietary modifications are necessary, swap out filet mignon for lean cuts like sirloin, though this will slightly change the texture.

For flavor variations, consider adding a splash of balsamic vinegar to the sauce for a sweet and tangy note. Texture modifications, such as incorporating toasted nuts into the sauce, can provide a delightful crunch. Presentation alternatives could involve serving the steak atop a bed of pureed cauliflower for a picturesque and lower-carb option that also adds depth to the dish.

Serving and Presentation Guide

To ensure your filet mignon with creamy parmesan mustard sauce is presented beautifully, consider employing simple plating techniques. Use a large, white plate, allowing the colors of the dish to pop. Slice the filet before serving to showcase its juicy interior, and pour the sauce over the top just before placing it on the table.

Garnish with fresh herbs, such as parsley or chives, for a touch of color and freshness. Traditional accompaniments include roasted vegetables or a simple side salad, which can provide a delightful contrast to the rich steak. For modern serving suggestions, consider placing the filet on a bed of sautéed spinach or served alongside a grain salad.

Temperature considerations are crucial; serve the filet mignon warm for maximum enjoyment. Portion control is important as well, particularly when serving guests, allowing each person to enjoy a substantial serving without overwhelming their plates.

Wine and Beverage Pairing

Pairing your filet mignon with the right wine elevates the culinary experience. A bold red wine, such as Cabernet Sauvignon or Merlot, complements the richness of the steak beautifully. Specifically, a Napa Valley Cabernet is often recommended due to its robust flavor profile.

For white wine lovers, a full-bodied Chardonnay can also work well, particularly when served alongside the creamy sauce. Consider non-alcoholic alternatives, such as sparkling grape juice, which can provide a celebratory touch without the alcohol.

If coffee or tea pairs are appropriate for your meal, a rich espresso can enhance the savory flavors, acting as a delightful closing note to the meal. Be sure to serve all beverages at their optimal temperatures to fully appreciate their profiles.

Storage and Shelf Life

Proper storage methods are essential for maximizing the freshness of leftover filet mignon. Store the cooked steak in an airtight container in the refrigerator, where it can last for around 3-4 days. If freezing leftovers, wrap the steak tightly in plastic wrap and foil, ensuring no air gets in, which will prevent freezer burn.

Temperature requirements for reheating should always be mindful of food safety; ensure that the internal temperature reaches at least 165°F. Signs of spoilage to watch for include an off smell or slimy texture. When reheating, consider using an oven or skillet rather than a microwave, which can dry out the steak.

For sauce storage, keep it separated from the steak until you’re ready to reheat, as the cream may separate when stored. Consider frozen sauce, as freezing can preserve flavors well, but be sure to label the container with the date it was made.

Make Ahead Strategies

Planning ahead is a great way to enhance the enjoyment of your filet mignon. Preparing the creamy parmesan mustard sauce a day in advance allows flavors to meld beautifully; simply reheat before serving. You can also season the filet mignon and allow it to marinate in the fridge for extra flavor, giving the spices time to soak in.

For a prep timeline, aim to gather all your ingredients and tools the day before to streamline your cooking process. Store ingredients like garlic and herbs separately to maintain their potency. Make sure to assess the quality of ingredients over time; fresh herbs should be used first to prevent spoilage.

For reheating, gently warm the filet in an oven at a low temperature, which will help keep the meat tender against quick, high-heat methods. Consider adding fresh elements like herbs or lemon zest just before serving to enliven the dish after storage.

Scaling Instructions

Scaling your filet mignon recipe can be easily achieved. To halve the recipe, simply divide all ingredient quantities by two while maintaining the same cooking times. Doubling or tripling the recipe requires more than just multiplying ingredients; ensure you have adequate pan space and avoid overcrowding the skillet to achieve that perfect sear.

Equipment adjustments should be made depending on the number of servings; consider using larger skillets or multiple pans to maintain even cooking. Timing modifications can include cooking batches separately to ensure each filet receives the attention it needs.

Lastly, consider storage considerations based on increased quantities; having additional containers ready will make storing leftovers much easier after serving guests.

Nutritional Deep Dive

In understanding nutrition, it is essential to note that filet mignon provides a high protein content, about 23 grams per serving, making it an excellent choice for muscle maintenance and repair. The steak is also rich in essential vitamins and minerals, such as B vitamins, iron, and zinc, contributing to energy production and overall body health.

Micronutrient analysis reveals the presence of selenium, which plays a crucial role in thyroid function and immune health. Balancing your portions can help in weight management—serving sizes should be monitored to prevent excessive caloric intake that could detract from a healthy diet.

Nutritional benefits are best maximized when paired with vegetables or other high-fiber sides, which can help create a well-rounded meal with a balance of macronutrients. For those tracking dietary considerations, it’s advisable to be mindful of sodium content from any added sauces or seasonings to develop a harmonious and health-conscious meal option.

Dietary Adaptations

Making this recipe accessible for various dietary needs is certainly achievable. For a gluten-free version, ensure any sauces or condiments used do not contain gluten-based ingredients, opting for certified gluten-free options instead. Dairy-free adaptations can be achieved by substituting creamy sauces with coconut cream, which offers a slightly different flavor yet remains delicious.

For vegan modifications, while replacing filet mignon directly may not be feasible, consider preparing portobello mushrooms, marinated and grilled, serving them with the creamy sauce for a hearty alternative. Low-carb options fit seamlessly with the base recipe; serve alongside non-starchy vegetables or salads for a perfect dish that keeps carbs at bay.

If following Keto or Paleo diets, simply ensure sauces are free from added sugars or excessive carbohydrates, focusing on high-quality fats for flavor. Lastly, Low-FODMAP adaptations could involve adjusting the garlic and onion elements—both of which can be plentiful in dressings—replacing them with suitable alternatives to maintain flavor integrity.

Troubleshooting Guide

In tackling texture issues, ensure your meat is well-rested post-cooking to keep it tender. If the sauce appears too thin, consider thickening it by simmering longer or adding a bit of cornstarch to your cream. For flavor balance, adding a pinch of salt or sugar can often help elevate underwhelming flavor profiles.

Temperature problems can be addressed by investing in a good meat thermometer to prevent undercooking or over-cooking. Equipment challenges may arise, particularly with pans; using a nonstick skillet is not recommended for searing, maintaining the right type of cookware is essential.

Ingredient substitutions should be made cautiously; while trying to replace mustard or cheese, ensure the flavors complement each other to prevent a jarring experience. Timing concerns can be addressed with stacking your prep work; adhere to the times needed for resting or cooling to fit everything smoothly into your cooking plan.

Recipe Success Stories

Community feedback highlighting the success of this recipe has brought many home cooks joy, with several noting its dramatic impact on dinner parties. Variations shared by readers, such as seasoning tweaks and sauce enhancements, have led to unique adaptations that have helped personalize the dish.

Adaptation stories showcasing the use of alternative cuts of meat while keeping the sauce intact also demonstrate creativity while retaining the essence of this wonderful dish. Photography tips shared by the community include taking care to plate the food neatly for Instagram-worthy results that invite appetites!

Reader suggestions continuously flow in about additional pairings and side dishes that compliment the filet mignon, further illustrating the dish’s versatility. Encouraging user-generated content fosters engagement and brings a richness to the recipe that showcases varied culinary experiences.

Frequently Asked Questions

What is the best way to cook filet mignon?

The best way to cook filet mignon involves searing it in a hot skillet to create a caramelized crust while achieving your preferred level of doneness with care. A meat thermometer will ensure accuracy, and resting the steak afterward is crucial for juiciness.

Can I substitute filet mignon with another cut of meat?

Yes, while filet mignon is ideal, you can substitute it with other tender cuts like ribeye or sirloin. Just adjust your cooking times slightly to accommodate different fat contents and tenderness levels.

How do I know when my filet mignon is done?

Using a meat thermometer is the most reliable method; for medium-rare, aim for an internal temperature of 130°F–135°F. Remember that the steak will continue cooking slightly after being removed from heat.

What if I don’t have fresh parmesan cheese?

If fresh parmesan isn’t available, shelf-stable grated parmesan can be used but may result in a slightly different flavor profile; ensure it’s kept in a cool, dry place to maintain freshness. Alternatively, use pecorino cheese for a flavorful swap.

Is this recipe suitable for special dietary needs?

This recipe can be adapted for various dietary needs, including gluten-free and dairy-free diets. Explore alternatives that do not compromise the dish’s integrity for those with specific health considerations.

How long can I store leftovers?

Leftovers will keep in the refrigerator for about 3-4 days if stored properly in an airtight container. You can freeze them for longer storage, up to around 3 months, but note that the texture may change slightly after reheating.

Can I make the sauce in advance?

Yes, the creamy parmesan mustard sauce can be made in advance and stored in the refrigerator. Just reheat it gently, adding a splash of cream if it gets too thick during storage.

What sides pair well with filet mignon?

Filet mignon pairs beautifully with side dishes such as roasted vegetables, garlic mashed potatoes, or a fresh garden salad. Each brings additional layers of flavor and texture to complement the richness of the steak.

Is there a vegetarian option for this dish?

While filet mignon is a meat dish, you can create a vegetarian experience by using portobello mushrooms marinated and grilled as the main protein, topped with the same creamy sauce for an earthy flavor.

How important are the resting times for the steak?

Resting times after cooking are crucial, allowing the juices within the steak to redistribute evenly, resulting in a tender and flavorful eating experience. A minimum of 5 minutes is recommended before slicing.

Additional Resources

If you’re looking to explore more recipes, consider checking out our collection of steak dishes that highlight various cooking techniques and flavors. For deep dives into culinary techniques, valuable guides on sauce-making and grilling can enhance your cooking skills immensely.

Ingredient information can provide insights into seasonal produce to pair with your meals and elevate flavors. Equipment recommendations are beneficial for finding the best kitchen tools to utilize for this and other gourmet recipes.

Lastly, engagement with seasonal variations will encourage you to make the most of fresh produce and flavors available throughout the year, providing an endless source of inspiration for your culinary endeavors.

Join the Conversation

Engagement through social media sharing allows you to connect with others who share your passion for cooking and flavorful recipes. Share elements of your cooking experience, including any photography tips that could help enhance the visual appeal of your finished dishes.

We encourage you to leave recipe reviews, sharing your experiences and any personal adaptations you might have made. Discussing variations with fellow home chefs enhances community engagement and fosters creativity in the kitchen.

The culinary journey can be further enriched by swapping ideas, exploring flavors you’ve discovered, and enjoying the camaraderie that comes from food shared with loved ones.

The Recipe

Filet Mignon with Creamy Parmesan Mustard Sauce

Serves: 2

Prep Time: 15 mins

Cook Time: 20 mins

Total Time: 35 mins

Kitchen Equipment Needed

  • Cast iron skillet or heavy-bottomed pan
  • Meat thermometer
  • Whisk
  • Cutting board
  • Chef’s knife
  • Airtight container for storage

Ingredients

  • 2 filet mignon steaks (about 6 oz each)
  • 1 tablespoon olive oil
  • Salt and pepper to taste
  • 1 cup heavy cream
  • 1/2 cup grated parmesan cheese
  • 2 tablespoons Dijon mustard
  • 2 cloves garlic, minced
  • Fresh herbs for garnish (optional)

Directions

  1. Remove filet mignon from the refrigerator, allowing them to come to room temperature for about 30 minutes.
  2. Season both sides with salt and pepper generously.
  3. In a cast iron skillet, heat olive oil over medium-high heat.
  4. Sear the filet mignon for about 4-5 minutes on each side for medium-rare, using a meat thermometer to reach 130°F-135°F.
  5. Once cooked, transfer the steaks to a plate and let them rest.
  6. In the same skillet, reduce the heat to medium and add minced garlic, cooking until fragrant.
  7. Add heavy cream, stirring well and letting it simmer gently, incorporating the mustard and parmesan cheese until the sauce thickens.
  8. Slice the steaks and serve them with the creamy sauce poured generously on top.
  9. Garnish with fresh herbs, if desired.

Recipe Notes

  • Feel free to adjust the amount of parmesan cheese based on your preference for richness.
  • The sauce can be made in advance and reheated gently before serving.
  • Experiment with different types of mustard for varied flavors.