Delicious Grilled Beef Skewers with Homemade Chimichurri Sauce

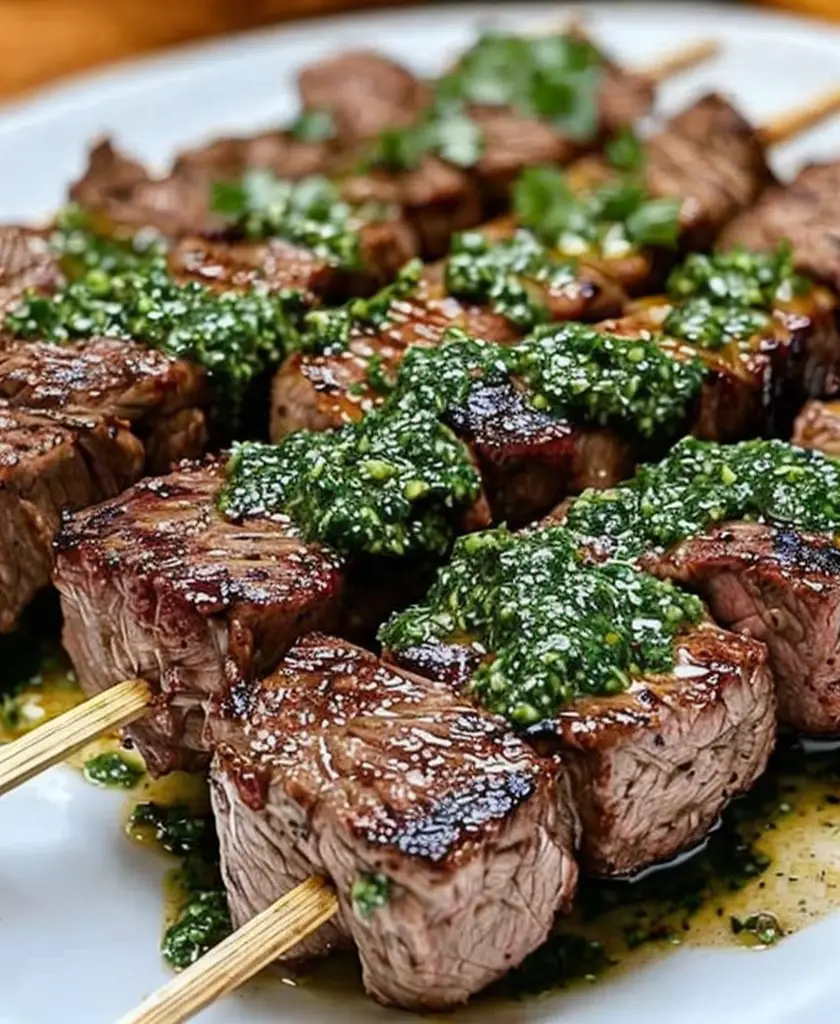
Grilled Beef Skewers with Chimichurri Sauce: A Flavorful Summer Delight

⚖️
Difficulty
Medium

⏲️
Prep Time
15 mins

🕒
Cook Time
10 mins

⏱️
Total Time
25 mins

🍽️
Servings
4

Grilled beef skewers with chimichurri sauce are a delicious and satisfying dish perfect for summer gatherings or weeknight dinners. The tenderness of the marinated beef paired with the vibrant and herby chimichurri sauce creates an explosion of flavor that will impress your family and friends. These skewers are not only simple to prepare but also visually appealing, making them a great centerpiece for any outdoor feast.

The secret to these grilled beef skewers lies in the marinade and chimichurri sauce. The marinade ensures that the beef remains juicy and full of flavor while grilling enhances its natural richness. Meanwhile, the chimichurri, with its combination of fresh herbs, garlic, and olive oil, offers a bright and zesty contrast to the grilled meat, elevating the entire dish to gourmet levels.

Quick Recipe Highlights

  • Flavor Profile: The skewers boast a smoky, savory flavor from the grilled beef and a refreshing, herbal kick from the chimichurri sauce.
  • Texture: Perfectly charred beef offers a tender and juicy bite, while the chimichurri adds a lovely silkiness.
  • Aroma: Expect an inviting aroma from the grilled meat, combined with the fragrant herbs and garlic in the chimichurri.
  • Visual Appeal: Colorful skewers of beef accented by the bright green chimichurri make for an attractive presentation.
  • Skill Level Needed: While the recipe is straightforward, some grilling technique is beneficial to avoid overcooking the meat.
  • Special Equipment: A grill or grill pan, skewers, and a blender for the sauce are essential for this recipe.

Recipe Overview

  • Difficulty Level: This recipe is categorized as medium difficulty due to the need for marinating and grilling but is achievable for home cooks with some experience.
  • Category: These skewers can be classified under summer barbecues, appetizers, or main courses depending on the serving style.
  • Cuisine: Originating from Argentina, chimichurri brings a South American flair to this dish that is beloved worldwide.
  • Cost: The ingredients are relatively inexpensive, making this a budget-friendly option for gatherings.
  • Season: Ideal for warm months when outdoor grilling is popular, but can also be enjoyed year-round.
  • Occasion: Perfect for barbecues, picnics, family gatherings, or any casual dining experience.

Why You’ll Love This Recipe

The taste and texture of grilled beef skewers with chimichurri sauce are utterly irresistible. The charred exterior of the beef creates a depth of flavor that is so satisfying, complemented by the fresh and herbaceous notes of the chimichurri. Each bite delivers a delightful combination of savory meatiness and bright acidity, making it a dish you’ll crave again and again.

In terms of convenience, this recipe shines with its quick preparation and cooking time. The skewers can be prepped in advance and marinated for several hours or overnight, which allows the flavors to develop beautifully. When it’s time to cook, they grill up in less than 15 minutes, giving you more time to enjoy your day with friends and family.

From a nutritional standpoint, this dish is a great source of protein from the beef, while the chimichurri sauce introduces a wealth of vitamins and antioxidants thanks to its fresh herbs. The balance of nutrients makes this a wholesome choice for health-conscious diners.

The social aspect of grilling beef skewers cannot be understated. They are fun to cook and share, fostering a sense of community and excitement around the grill. This recipe easily serves a crowd, making it an excellent choice for parties and celebrations.

Cost-effectiveness is another significant reason to love this recipe. The ingredients are reasonably priced, and the yield provides ample servings, making it a fantastic option while keeping your budget in check.

Historical Background and Cultural Significance

Grilled beef skewers have their origins steeped in the rich culinary traditions of Argentina, where asado (barbecue) is a beloved cooking method. The culture of grilling meat over fire dates back to indigenous practices and has evolved among the country’s gauchos, or cowboys, who would grill beef over open flames.

Chimichurri, the traditional sauce that accompanies these skewers, adds a unique flavor that reflects Argentina’s diverse culinary influences. With roots in Spanish and Italian cuisine, this herb-based sauce has become an essential condiment in Argentinian meals, especially when paired with grilled meats.

As recipes have been passed down through generations, variations of grilled beef skewers have spread across Latin America and other regions. Each culture adapts the dish to its local flavors and ingredients, showcasing the global love for grilled meats.

Today, grilled beef skewers with chimichurri sauce represent not just a meal but a gathering around the grill, embodying communal sharing and celebration found in many cultures. They provide a perfect balance of flavors and a display of culinary skill that resonates with food lovers everywhere.

Ingredient Deep Dive

Beef:
Beef has been a staple in many cuisines worldwide; considered a source of nutrition and luxury. High in protein, beef contains essential amino acids necessary for muscle growth and repair. When selecting beef for skewers, look for cuts such as sirloin or flank steak for their tenderness and flavor. Proper storage at refrigerated temperatures is vital to maintaining freshness, and vacuum-sealed packages can extend shelf life. For those looking for variety, chicken or pork can be excellent substitutions in this recipe.

Chimichurri Ingredients (Parsley, Garlic, Olive Oil):
Fresh parsley is the cornerstone of chimichurri, bringing color and flavor. This herb is high in vitamins K and C, contributing to overall health. Incorporating garlic provides not only a pungent flavor but also many health benefits, including heart health and anti-inflammatory properties. The use of good-quality olive oil enhances the sauce’s richness and texture. When making chimichurri, ensure that the herbs are as fresh as possible for optimal flavor; store leftovers in an airtight container in the fridge.

Common Mistakes to Avoid

  • Using tough cuts of meat: Always select tender cuts such as flank or sirloin for skewers to ensure a juicy bite.
  • Overcrowding the skewers: Allow space between pieces to ensure even cooking and proper charring.
  • Skipping the marinating step: Marinating the beef enhances flavor; don’t rush this step.
  • Not preheating the grill: A hot grill is crucial for creating a good sear on the meat.
  • Using dried herbs in chimichurri: Fresh herbs are key to achieving the bright flavor characteristic of real chimichurri.
  • Overcooking the beef: Keep an eye on cooking times; aim for medium rare for better flavor and tenderness.
  • Inconsistent skewer sizes or shapes: Cut uniform-sized beef pieces to ensure even cooking.
  • Neglecting chimichurri seasoning adjustments: Taste your sauce and adjust the acidity or seasoning as needed before serving.

Essential Techniques

Marinating: This is an essential step in achieving flavorful skewers. To master marinating, ensure the meat is soaked in the marinade for an adequate time to allow flavors to penetrate. Keep in mind that different meats require varying marinating times; avoid marinating it for too long as it can affect texture. Look for changes in color and fragrance as cues that it’s ready to be grilled.

Grilling: Grilling beef skewers requires skill in heat management. Preheat the grill to high heat for a good sear and then adjust to medium heat for thorough cooking. Ensure to flip skewers frequently to prevent burning. Look for charred edges and a warm pink center as signs of perfectly grilled skewers.

Pro Tips for Perfect Grilled Beef Skewers

1. Soak wooden skewers in water for at least 30 minutes before grilling to prevent burning.
2. Ensure your grill is properly preheated to achieve a beautiful sear on the beef.
3. Don’t overcrowd the skewers; this ensures that each piece cooks evenly and gets charred effectively.
4. Use a meat thermometer to check for doneness; aim for 130°F for medium-rare to enjoy optimal tenderness.
5. Let the skewers rest for a few minutes after grilling; this allows the juices to redistribute, resulting in juicy meat.
6. Adjust chimichurri flavors based on personal preference—add more garlic or chili flakes for a bolder taste.
7. Experiment with different meats or vegetables on the skewers for a varied presentation and flavor profile.
8. Serve chimichurri on top of the skewers just before serving to keep the flavors fresh and vibrant.

Variations and Adaptations

Regional variations can be explored by using different marinades from various cuisines, such as teriyaki or Caribbean jerk. Seasonal adaptations might include adding seasonal vegetables like bell peppers, zucchini, or cherry tomatoes to your skewers for added flavor and nutrition. For dietary modifications, lean proteins like tofu or chicken can replace beef for a lighter version. If you prefer smoky flavors, consider using smoked paprika in your marinade.

For flavor variations, try adding citrus zest to the chimichurri for a fresh twist. Texture modifications can include adding crushed nuts for a slight crunch in the sauce. Play with presentation alternatives by serving skewers on a bed of grains, adding a colorful salad or garnishing with edible flowers.

Serving and Presentation Guide

For an elegant touch, consider using wooden boards for serving grilled beef skewers. You can create a rustic look by interspersing skewers with lemon wedges and fresh herbs. Garnishing with chopped parsley or microgreens adds both flavor and visual appeal. For a modern twist, serve skewers on a colorful plate drizzled with chimichurri for an eye-catching presentation.

Consider the serving temperature; skewers should be served hot off the grill for the best experience. To maintain the juiciness of the beef, serve with small portions accompanied by chimichurri for dipping or drizzling. This way, guests can enjoy the tenderness and flavor in every bite, contributing to overall meal success.

Wine and Beverage Pairing

Grilled beef skewers pair beautifully with red wines, such as Malbec or Cabernet Sauvignon, whose bold flavors complement the savory richness of the meat. For a lighter option, a crisp Pinot Noir or a fruity Zinfandel can work well.

Non-alcoholic alternatives could include iced tea or sparkling water with a twist of lemon or lime, which refreshes the palate between bites. Should you opt for coffee, a rich espresso can balance the meal nicely without overpowering the flavors.

Storage and Shelf Life

To store grilled beef skewers, place them in an airtight container in the refrigerator within two hours of cooking. They can be stored for up to three days. Ensure they’re properly cooled before sealing to prevent condensation. If you have leftover chimichurri, it can be kept in the refrigerator for up to a week.

For reheating, place skewers on a grill or in an oven until warmed through to maintain flavor and moisture. If you want to extend their shelf life, consider freezing the skewers. Wrap them tightly to prevent freezer burn and consume within three months for the best quality.

Make Ahead Strategies

For optimal flavor, marinate the beef skewers one day in advance and store them in the refrigerator. This allows all the spices and herbs to infuse deeply. Alternatively, you can also prepare the chimichurri sauce ahead of time and let it sit to enhance the flavors.

Assembling the skewers is a quick task, so aim to do it just before grilling for best results. If you’re hosting, consider having all grilling equipment and ingredients ready to go, making the cooking process smoother. You may choose to prepare additional fresh elements, like salads or side dishes, that can be made a day prior as well.

Scaling Instructions

Scaling this recipe up can be done easily by proportionally increasing the beef and marinade ingredients. For large gatherings, consider doubling or tripling the recipe, ensuring ample skewer space on the grill.

When halving the recipe, keep an eye on the grilling time as smaller quantities may cook faster. Adjust your equipment if necessary—use a larger grill for big batches to avoid overcrowding.

Ensure to maintain the same flavor intensity by monitoring your seasoning adjustments, as larger or smaller quantities can affect the balance of flavors in the marinade and chimichurri sauce.

Nutritional Deep Dive

Grilled beef skewers are a marvelous source of protein, fueling muscle repair and growth while providing essential amino acids. Each serving is rich in iron and zinc, important for energy and immune function. While beef may have higher fat content, choosing lean cuts can lower saturated fat intake.

Chimichurri contributes health benefits as well; packed with antioxidants from herbs and healthy fats from olive oil, it’s nutritious and heart-friendly. When planning portion sizes, aim for balanced meals with a variety of colors on your plate, promoting overall health.

Incorporating more vegetables into the skewers offers fiber, vitamins, and minerals, making it easier to meet dietary needs. Adjust servings based on individual dietary requirements while maintaining a fulfilling meal.

Dietary Adaptations

For gluten-free options, ensure all marinades and ingredients are certified gluten-free. To make the recipe dairy-free, simply avoid using dairy products in any accompaniment or side dish.

Vegetarians can enjoy a delicious meal by substituting beef with veggies such as mushrooms, bell peppers, or marinated tofu, which absorbs flavors beautifully. For dietary plans like Keto or Paleo, use protein alternatives in skewers, maintaining a focus on healthy fats and fresh vegetables.

Make sure to consider low-carb options by using alternative marinades that boost flavor without dependent on sugar. Choosing seasonally appropriate vegetables adds variety and keeps the recipe fresh and exciting throughout the year.

Troubleshooting Guide

Texture issues can arise if the meat is overcooked; always monitor grilling times closely and use a meat thermometer for accuracy. If the skewers are too dry, consider marinating for longer periods, enhancing both moisture and flavor.

Flavor balance is crucial; if skewers taste bland, double-check seasoning levels in both beef and sauce. If temperatures seem inconsistent, ensure even heat distribution on the grill, adjusting for hotspots accordingly.

Equipment challenges may include uneven grilling; if this happens, rotate skewers frequently for even cooking. For ingredient substitutions, make sure you’re aware of any flavor differences, adjusting seasoning in the final dish accordingly.

Timing concerns such as having cold or undercooked skewers can be rectified by letting them rest for a few minutes post-grilling, allowing heat to distribute evenly. Always ensure meat is cooked through for optimal safety.

Recipe Success Stories

Community feedback on grilled beef skewers with chimichurri sauce has been overwhelmingly positive, with many praising the flavor combinations and ease of preparation. Several home cooks have shared their experiences of adapting the recipe to suit personal preferences, such as adding spice or using different meats.

Readers have delighted in showcasing their own variations, using seasonal vegetables to apply a fresh touch. Photography tips provided by users often highlight vibrant colors and successful grilling techniques that capture the dish beautifully.

Stories of gatherings and barbecues utilizing this recipe have emerged, emphasizing the sense of connection and celebration that food brings, giving testament to the enduring popularity of grilled beef skewers with chimichurri.

Frequently Asked Questions

Can I use chicken instead of beef? Yes, chicken can be a great alternative; just ensure to adjust cooking times. Chicken should reach an internal temperature of 165°F.

How long should I marinate the beef? For optimal flavor, marinate the beef for 2-4 hours, but overnight is ideal to allow deeper penetration of flavors.

What can I serve with skewers? A fresh salad, rice, or grilled vegetables make great accompaniments, complementing the flavors of the beef and chimichurri.

Can I freeze the skewers? Yes, you can freeze them before cooking for up to three months; make sure to wrap them tightly to prevent freezer burn.

What if I don’t have a grill? A grill pan or broiler can work effectively to mimic grilling conditions, maintaining flavor and texture.

How do I know when the skewers are done? Use a meat thermometer to check for doneness; 130°F indicates medium-rare for beef skewers.

Can I make chimichurri sauce ahead of time? Absolutely; chimichurri can be made 1-2 days in advance and stored in the refrigerator.

Is chimichurri sauce spicy? Traditional chimichurri is not inherently spicy, but you can add chili flakes or jalapeños for heat if desired.

What if my chimichurri is too thick? Add a little more olive oil or vinegar to adjust the consistency to your liking.

How do I store leftovers? Store leftover skewers and chimichurri in airtight containers in the refrigerator for up to three days.

Additional Resources

Explore related recipes that feature rich and robust flavors, such as barbecue chicken or grilled vegetables. Additionally, consider guides on perfecting grilling techniques to enhance your overall cooking skills.

Information on selecting high-quality ingredients, particularly fresh herbs and vegetables, can elevate your dishes. Recommendations for essential grilling tools will ensure you are well-equipped for future culinary adventures. Finally, look into how seasonal variations can inspire new dishes that capture freshness and flavor effectively.

Join the Conversation

Sharing your grilling experiences and successes with the community is encouraged! Post photos of your skewers, and don’t hesitate to exchange tips and recipe variations. Reader feedback is invaluable, contributing to the continuous evolution of flavorful dishes.

Consider engaging on social media platforms by reviewing the recipe and sharing your unique adaptations. Your culinary experiences and photography can inspire others, making the world of cooking a vibrant community of skilled food enthusiasts.

The Recipe

Grilled Beef Skewers with Chimichurri Sauce

Serves: 4

Prep Time: 15 mins

Cook Time: 10 mins

Total Time: 25 mins

Kitchen Equipment Needed

  • Grill or Grill Pan
  • Skewers (metal or soaked wooden)
  • Mixing Bowl
  • Blender or Food Processor for Chimichurri

Ingredients

  • 1 lb beef sirloin, cut into 1-inch cubes
  • 2 tbsp olive oil
  • 2 cloves garlic, minced
  • 1 tsp salt
  • 1 tsp black pepper
  • 1 tbsp balsamic vinegar
  • 1 cup fresh parsley, chopped
  • 1/2 cup olive oil (for chimichurri)
  • 2 cloves garlic, minced (for chimichurri)
  • 1/4 cup red wine vinegar
  • 1/2 tsp red pepper flakes (optional)

Directions

  1. In a mixing bowl, combine olive oil, minced garlic, salt, pepper, and balsamic vinegar. Add beef cubes, ensuring they’re well coated. Allow to marinate for 2-4 hours in the refrigerator.
  2. While beef marinates, prepare chimichurri by blending parsley, olive oil, garlic, red wine vinegar, and red pepper flakes until smooth. Adjust seasoning as needed.
  3. Preheat the grill over medium-high heat. Thread marinated beef onto skewers, leaving space between pieces.
  4. Grill skewers for 8-10 minutes, turning occasionally until desired doneness is reached.
  5. Remove from grill and let rest for a few minutes. Serve drizzled with chimichurri sauce.

Recipe Notes

  • For extra flavor, add vegetables like bell peppers or mushrooms to the skewers.
  • Adjust the heat of chimichurri by increasing or decreasing the red pepper flakes.
  • Make extra chimichurri for dipping or drizzling on other grilled meats and vegetables.

Deliciously Gooey Caramel Chocolate Crunch Bars Recipe You’ll Love

Gooey Caramel Chocolate Crunch Bars: A Sweet Delight for Every Occasion

⚖️
Difficulty
Easy

⏲️
Prep Time
15 mins

🕒
Cook Time
25 mins

⏱️
Total Time
40 mins

🍽️
Servings
12 bars

These Gooey Caramel Chocolate Crunch Bars are a treat that brings a perfect balance of flavors and textures, making them an irresistible dessert choice. Imagine biting into a crunchy bar that gives way to a rich, gooey caramel center surrounded by luscious chocolate. The combination of sweet and salty brings out the best in each ingredient, making every bite a delightful experience. Whether you are baking for a family gathering, a potluck, or simply satisfying a personal craving, these bars will not disappoint.

The layers of chocolate and caramel create not only a mouthwatering taste but also a beautiful visual contrast. The shiny surface of the chocolate is inviting, while the golden caramel oozing from within promises a decadent indulgence. What truly sets these bars apart is their delightful crunch, enhancing the overall experience and giving them a unique personality. These bars are not just a dessert; they are an experience meant to be savored with every bite.

Quick Recipe Highlights

  • Flavor Profile: Rich chocolate and sweet caramel with a hint of saltiness bring an explosion of flavors that meld delightfully.
  • Texture: The combination of a crunchy base, gooey caramel filling, and smooth chocolate creates an enticing mouthfeel that everyone loves.
  • Aroma: A warm, sweet aroma wafting from the oven will fill your kitchen and awaken your senses.
  • Visual Appeal: The glossy chocolate coating and translucent caramel make these bars aesthetically pleasing.
  • Skill Level Needed: Basic baking skills are all you need; this recipe is perfect for both beginners and seasoned bakers.
  • Special Equipment: A baking dish, mixing bowls, and an electric mixer are all you need to get started.

Recipe Overview

  • Difficulty Level: This recipe is categorized as easy, making it perfect for novice bakers or anyone looking for a quick treat to whip up.
  • Category: These bars fall under the dessert category, ideal for satisfying sweet cravings.
  • Cuisine: Desserts like these bars can be seen in various cuisines, influenced by the playful use of chocolate and caramel common in many cultures.
  • Cost: The ingredients are mostly pantry staples, making this a budget-friendly dessert option.
  • Season: Perfect for any time of year, but they are particularly delightful during holidays and special occasions.
  • Occasion: Serve these bars at birthday parties, family gatherings, or seasonal celebrations for a guaranteed hit.

Why You’ll Love This Recipe

The taste of these Gooey Caramel Chocolate Crunch Bars is nothing short of heavenly. The combination of sweet chocolate and rich caramel creates a delightful explosion of flavor in your mouth. The crunchiness of the base adds a satisfying texture that contrasts beautifully with the smooth, gooey caramel. Each bite delivers an indulgent experience that will leave you craving more.

Convenience is another appealing aspect of this recipe. With minimal prep time and straightforward steps, you’ll find yourself ready to indulge in no time. Both the prep and bake times make this recipe ideal for busy days or spontaneous dessert cravings, making it a go-to treat for any occasion.

Nutritionally, while these bars are primarily a dessert indulgence, you can consider them a more beneficial choice compared to heavily processed options. They can provide a boost of energy, especially when shared among loved ones, turning an indulgent snack into a moment of togetherness.

Socially, these bars shine as perfect for sharing. Whether you’re bringing them to a gathering or simply handing them out at home, they spark conversation and delight among friends and family. The joy of sharing a homemade dessert elevates any occasion, making it memorable for everyone involved.

Lastly, these Gooey Caramel Chocolate Crunch Bars are cost-effective without sacrificing quality or taste. The ingredients are often found in your kitchen, and you won’t have to splurge on gourmet treats, making this recipe accessible for all.

Historical Background and Cultural Significance

The exact origin of caramel-filled desserts is difficult to pinpoint, as the combination of chocolate and caramel has been embraced globally. However, sweet confections featuring caramel have roots in early candy-making history dating back to ancient cultures that developed methods to create sweet treats from sugar. Through the years, the love for sweets transcended borders, inspiring variations across cultures.

In many cultures, dessert serves a primary role during celebrations or communal gatherings. The importance of sharing food reflects the broader values of connection and community. Gooey caramel desserts, and in particular bars similar to this recipe, found their way into holiday celebrations, signifying joy and sweetness in life.

The evolution of recipes incorporating caramel began with simple techniques and has transformed into a culinary art. Today, cooks invent endless adaptations to accommodate various tastes, dietary restrictions, and cultural preferences, while still maintaining that cherished sweet core.

Regional variations abound, as local ingredients influence the style and flavor of caramel chocolate bars. Ingredients like sea salt, nuts, or spices create unique creations that reflect the local palate. This fusion of tradition with modern culinary trends helps keep the love for these bars alive today.

Ingredient Deep Dive

Chocolate:
Chocolate has ancient roots, dating back to Mesoamerican cultures that revered this treat for its rich flavor and energizing properties. Nutritionally, chocolate, particularly dark varieties, can offer antioxidants known for their health benefits, including reducing inflammation. When choosing chocolate for this recipe, opt for high-quality varieties with a high cocoa content to elevate the flavor. Storage is simple; keep it in a cool, dry place, away from light. If you’re looking for substitutions, consider carob or dairy-free chocolate for variations.

Caramel:
Caramel, derived from the late Middle Ages caramelization of sugar, holds a special place in desserts globally. Its flavor adds richness and complexity to sweets. Caramel is naturally enjoyable but can be modified with the addition of salts, nuts, or fruit. When selecting, look for simple recipes with minimal additives. Store homemade caramel in an airtight container, and if you want to switch things up, experiment with flavored extracts like vanilla or even a sprinkle of sea salt.

Common Mistakes to Avoid

  • Not measuring ingredients accurately can lead to a fail; baking requires precision.
  • Using low-quality ingredients may affect flavor; always choose high-grade chocolate and natural ingredients.
  • Overcooking chocolate can burn it. Monitor carefully during melting for the best results.
  • Skipping the refrigeration step can result in overly soft bars that don’t hold their shape.
  • Not allowing the bars to cool completely before slicing could lead to messy cutting.
  • Neglecting to finely chop chocolate or nuts can create uneven textures in the bars.
  • Using too much caramel can make the bars too sticky; balance is key!
  • Failing to line your baking dish with parchment paper can cause sticking, complicating removal.
  • Rushing the cooling process can lead to crumbly bars; patience is important here.
  • Not storing bars in an airtight container can lead to hardening or loss of freshness over time.

Essential Techniques

Melting chocolate is crucial for achieving a smooth, velvety texture. The best way to master this is to use a double boiler or a microwave in short intervals, stirring frequently. Avoid high heat; chocolate should melt slowly to prevent burning. Look for visual cues – it should be glossy and free of lumps.

Making caramel requires precise temperature control. Start with granulated sugar in a heavy saucepan, stirring gently. As the sugar melts, watch for a change in color; when it turns a deep amber, remove it from the heat immediately to avoid burning. Use a candy thermometer for accuracy, targeting around 350°F (175°C) as your guide.

Pro Tips for Perfect Gooey Caramel Chocolate Crunch Bars

1. Use fresh ingredients for the best flavor; old chocolate or stale nuts can ruin the bars.
2. Try adding a pinch of espresso powder to the chocolate for a deeper flavor profile.
3. Allow the caramel to cool slightly before drizzling it over the chocolate for better consistency.
4. Experiment with toppings such as flaky sea salt or crushed nuts to enhance texture and flavor.
5. For variations, consider adding peppermint extract for a holiday twist or coconut flakes for added texture.
6. Store the bars in the refrigerator to keep them firm and gooey.
7. Cut the bars with a warm knife for clean edges and beautiful presentation.
8. Pair the bars with a scoop of vanilla ice cream for an indulgent dessert.

Variations and Adaptations

Consider creating seasonal variations by incorporating flavors like pumpkin spice for fall, or peppermint for winter holidays. For a unique twist, experiment with a nutty crunch by adding toasted almonds or walnuts directly in the base.

If you want to adapt this recipe for dietary needs, making it gluten-free is simple—just use gluten-free graham crackers or a corresponding alternative. For a dairy-free version, substitute chocolate and butter with coconut oil and dairy-free chocolate chips.

Flavor variations can also enhance this recipe. Incorporating different types of chocolate, such as dark or milk chocolate, can create a completely new flavor profile. Alternatively, add a layer of fruit preserves for an exciting twist on traditional flavors.

Presentation can be altered to suit the occasion; cut bars into fun shapes for themed parties, or serve them in decorative wrappers for gifting.

Serving and Presentation Guide

When plating your Gooey Caramel Chocolate Crunch Bars, consider stacking them in a layered fashion to showcase their beautiful textures. Garnish with a drizzle of extra caramel or chocolate for added flair. For an added touch, sprinkle with flaked sea salt or crushed nuts on top to elevate your dessert visually.

Traditional accompaniments like fresh berries can provide a refreshing contrast to the rich flavors. Alternatively, serve with crispy biscotti for an unexpected flavor pairing. Temperature is crucial; serve these bars at room temperature to allow their gooey nature to shine through.

For portion control, consider cutting smaller squares for parties; this makes them easier to share without overwhelming guests.

Wine and Beverage Pairing

When pairing wines with these bars, a rich red wine, such as a Cabernet Sauvignon, enhances the deep chocolate flavors. If you prefer something sweeter, a dessert wine like Port complements the caramel beautifully.

For non-alcoholic alternatives, consider pairing these bars with a rich hot chocolate or a cold brew coffee. Both drinks enhance the bar’s chocolate flavors while adding a lovely depth.

For tea lovers, chai tea complements the sweet and salty elements, making for a delightful pairing that offers warmth and spice.

Opt to serve the selected beverages at appropriate temperatures—hot drinks should be steaming but not scalding, while chilled options should be served with plenty of ice.

Storage and Shelf Life

To maintain freshness, store your Gooey Caramel Chocolate Crunch Bars in an airtight container at room temperature for 3-5 days. If you’d like to extend shelf life, refrigeration is an option; however, this may affect the texture, making the bars firmer.

Check for signs of spoilage, such as a change in color and unusual smells, which indicate that the bars should not be consumed. If you want to preserve the bars for longer, freeze them for up to three months. Wrap them securely in plastic wrap and place them in a freezer-safe container.

When reheating, allow the bars to come back to room temperature naturally for the best texture. If frozen, let them thaw in the refrigerator overnight before serving.

Make Ahead Strategies

If planning to serve these bars at an event, consider making the caramel and base one day ahead. Store components separately in airtight containers, refrigerating as necessary, until you are ready to assemble.

Quality of the bars will be preserved by following a timeline. Bake the base, let it cool, and prepare the caramel on the same day or the next. After assembly, allow the bars to set before cutting; this step is crucial for optimal texture.

You can also increase convenience by cutting the bars in advance and individually wrapping them for easy handling. Consider incorporating fresh elements like a scoop of ice cream when serving rather than including them during storage.

Scaling Instructions

If you find yourself needing more bars, this recipe can easily be doubled. Ensure you use a larger baking dish and adjust cooking times as needed. Keep an eye out for doneness, as larger portions may require a few additional minutes in the oven.

To scale down the recipe, halving the ingredient amounts works well if you want a small batch. Just remember to adjust your baking dish size accordingly to ensure even cooking.

When modifying the volume, always aim for consistent baking to maintain quality and texture across the bars. Keep in mind that changing quantities may impact cooking time, so consider using a toothpick test for doneness.

Nutritional Deep Dive

A standard serving of Gooey Caramel Chocolate Crunch Bars is rich in macro-nutrients. On average, each serving contains carbohydrates for quick energy, proteins that help in muscle repair, and fats primarily from chocolate and butter that provide satiety. The precise breakdown may vary based on specific ingredient choices.

Additionally, the bars offer micronutrients like calcium from dairy and iron from chocolate, enhancing the nutritional value above typical desserts. Incorporating nuts can add an array of vitamins and minerals, boosting the health benefits of this indulgent treat.

For those watching their caloric intake, consider slicing the bars smaller to enjoy in moderation, and balance with lighter meals throughout the day. This helps integrate sweets into a healthy diet without guilt.

Dietary Adaptations

For gluten-free variations, use gluten-free graham crackers or oats in lieu of their traditional counterparts. The recipe adapts well, providing the same crunchy texture without gluten.

Dairy-free options include substituting regular butter with plant-based butter and using dairy-free chocolate. This ensures a similarly rich flavor while accommodating lactose intolerance or vegan preferences.

For those following low-carb diets like keto, consider revising the ingredients to include low-carb sweeteners and nut flours for the base. This will help create a healthier version without compromising the original intent of the dessert.

Vegans can enjoy this recipe by replacing all animal-derived ingredients with plant-based alternatives; the result is still decadently delicious with a sticky, sweet interior.

Troubleshooting Guide

If your bars come out too crumbly, it could be due to over-baking. Aim for slightly undercooked bars, as they will firm up while cooling. If they remain too gooey, a longer cooling time may be required to allow the caramel to set properly.

If your chocolate does not melt smoothly, check for overheating. Use low heat or methodically heat in short increments, stirring to achieve a glossy finish.

If you find your caramel is too hard upon cooling, reduce the cooking time on the stove or add a touch more cream, depending on the recipe specifics. For overly sweet bars, adding a pinch of salt in the caramel or chocolate can help balance flavors.

For ingredient substitution challenges, consult reputable sources for similar replacement options, ensuring to maintain the correct ratios for success.

Recipe Success Stories

Community feedback reveals that these Gooey Caramel Chocolate Crunch Bars quickly become a favorite among friends and family. Many readers report how they’ve successfully adapted the recipe to incorporate personal touches such as flavored extracts or additional crunch elements like pretzels or seeds.

Variations of the recipe have also inspired home bakers to share their stories. For example, adapting the bars to local tastes with nuts native to their region has led to unique iterations that reflect personal heritage and family traditions.

Several readers have noted the ease of making these bars ahead of time, emphasizing how they remain fresh and delicious even a few days after preparation. This practicality makes them an ideal choice for busy bakers looking for a crowd-pleasing dessert.

Photography tips shared by the community enhance the visual appeal of the bars, encouraging readers to showcase their creations on social media, leading to greater engagement with the recipe.

Frequently Asked Questions

Can I store these bars in the freezer?

Yes, you can freeze these bars to extend their shelf life. Just wrap them tightly in plastic wrap and store them in an airtight container or freezer bag. They should stay good for up to three months.

What kind of chocolate should I use?

High-quality chocolate with at least 60% cocoa is recommended for the best flavor. Dark chocolate is a popular choice, but you can also use milk or semi-sweet chocolate based on your taste preference.

Can I make these bars vegan?

Absolutely! You can use plant-based butter and dairy-free chocolate for a vegan adaptation of this recipe. Follow the same instructions for preparation, and you’ll have delicious vegan bars!

What if my caramel crystallizes?

If your caramel crystallizes, it’s usually due to sugar interfering with the cooking process. To avoid this, make sure you don’t stir the caramel once the sugar has started to melt, and use a clean pan to prevent contaminants.

How long do they last?

When stored properly in an airtight container at room temperature, these bars can last 3-5 days. For longer storage, consider refrigerating or freezing them as mentioned earlier.

Can I add nuts to this recipe?

Yes, adding nuts like pecans or almonds can enhance both flavor and texture. Just fold them into the crust or sprinkle on top of the caramel layer before adding the chocolate.

What can I do if my bars are too hard?

If your bars are too hard, it’s likely due to overcooking the caramel or chocolate. Next time, be mindful of cooking times and allow cooling before cutting to keep them soft.

Are these bars gluten-free?

The original recipe is not gluten-free, but you can easily make them gluten-free by using gluten-free graham crackers or oats instead of regular ones.

How should I cut the bars for serving?

To achieve clean cuts, consider using a hot knife. Run the knife under hot water, dry it off and then slice through the bars for neat edges.

What flavors can I add for different varieties?

Experimenting with flavors is encouraged! Adding extracts like vanilla or almond, or toppings like coconut flakes or sea salt can give a unique twist to the bars.

Additional Resources

If you’re looking for more delicious dessert ideas, explore other recipes like rich brownies or chewy cookies that incorporate similar techniques. Check out guides on chocolate tempering or caramel making to enhance your culinary skills further.

Learning about ingredients can greatly improve your baking efficiency. Familiarize yourself with different types of chocolate and their melting properties, or find out about alternative sweeteners for healthier adaptations.

Investing in quality kitchen equipment is key; a good set of mixing bowls or an efficient electric mixer will significantly ease the preparation of these bars and more.

Additionally, exploring seasonal variations of this recipe can keep things fresh and exciting, providing ways to celebrate the flavors of each season with unique adaptations.

Join the Conversation

We’d love for you to share your experiences with these Gooey Caramel Chocolate Crunch Bars! Tag us on social media with photos of your creations, tips for adaptations, or any variations you’ve tried. Your ingenuity can inspire others to create their versions of this delicious treat!

Feel free to engage by leaving comments or suggestions. Your feedback is invaluable, and you can help foster a community of passionate bakers eager to explore their culinary narrative through homemade delights!

The Recipe

Gooey Caramel Chocolate Crunch Bars

Serves: 12 bars

Prep Time: 15 mins

Cook Time: 25 mins

Total Time: 40 mins

Kitchen Equipment Needed

  • Baking dish
  • Mixing bowls
  • Electric mixer
  • Spatula
  • Measuring cups and spoons

Ingredients

  • 1 ½ cups crushed graham crackers
  • ½ cup unsalted butter, melted
  • 1 ½ cups chocolate chips
  • 1 can sweetened condensed milk
  • 1 cup caramel sauce
  • ½ teaspoon vanilla extract
  • Pinch of salt

Directions

  1. Preheat the oven to 350°F (175°C) and grease a baking dish.
  2. In a bowl, combine crushed graham crackers with melted butter until blended.
  3. Press graham cracker mixture into the bottom of the prepared dish and bake for 10 minutes.
  4. In a saucepan over medium heat, melt chocolate chips with sweetened condensed milk, stirring until smooth.
  5. Remove from heat and add vanilla extract and a pinch of salt.
  6. Spread the chocolate mixture over the baked crust evenly.
  7. Drizzle caramel sauce over the chocolate layer, swirling with a knife to create a marbled effect.
  8. Bake for an additional 15 minutes until bubbly.
  9. Allow to cool completely before slicing into bars.
  10. Enjoy your gooey caramel chocolate crunch bars!

Recipe Notes

  • You can add a sprinkle of sea salt on top for enhanced flavor.
  • Store leftover bars in an airtight container for up to a week.
  • Feel free to get creative with flavors by adding nuts or dried fruits.

Deliciously Easy Vanilla Pecan Pralines Candy Recipe You’ll Love

Easy Vanilla Pecan Pralines Candy Recipe: Sweet and Nutty Delight

⚖️
Difficulty
Easy

⏲️
Prep Time
10 mins

🕒
Cook Time
15 mins

⏱️
Total Time
25 mins

🍽️
Servings
24 pieces

Indulge yourself in the delightful world of candy making with this Easy Vanilla Pecan Pralines Candy Recipe! These delectable treats combine the rich, buttery flavors of caramel with the crunchy texture of pecans, creating a sweet confection that’s perfect for any occasion. Whether you’re looking to impress guests at a gathering, surprise loved ones with a homemade gift, or simply satisfy your own sweet tooth, these pralines will not disappoint.

What makes these vanilla pecan pralines especially appealing is their simplicity. With just a handful of ingredients, you can whip up a batch in no time. The smell of vanilla wafting through your kitchen as the sugar caramelizes is enough to set the perfect mood for your candy making adventure. Plus, the end result is a beautiful glossy finish that hints at the delicious flavor waiting to be enjoyed.

Quick Recipe Highlights

  • Flavor Profile: Rich and buttery with a hint of vanilla, complemented by the nutty crunch of pecans.
  • Texture: Smooth and creamy center encased in a crispy shell, providing the perfect bite.
  • Aroma: Sweet vanilla combined with the nutty warmth of toasted pecans creates a heavenly scent.
  • Visual Appeal: Golden-brown candy pieces that shine with a lovely glaze, making them visually stunning.
  • Skill Level Needed: Beginner-friendly, no special skills required beyond basic stovetop cooking.
  • Special Equipment: A heavy-bottomed pot and a candy thermometer for precision cooking.

Recipe Overview

  • Difficulty Level: This recipe is classified as easy, ideal for newcomers to candy making as it requires minimal techniques.
  • Category: Pralines fall into the dessert category, specifically as candy, making them a perfect sweet treat.
  • Cuisine: Rooted in Southern cuisine, these pralines have a rich history steeped in Southern hospitality and tradition.
  • Cost: This recipe is budget-friendly, with ingredients that are often staples in most kitchens.
  • Season: Perfect for year-round treats, especially around the holidays when sweet confections are in high demand.
  • Occasion: Ideal for parties, holidays, or as a delightful addition to gift baskets.

Why You’ll Love This Recipe

You will adore the delightful taste and sinful texture of these Easy Vanilla Pecan Pralines. Each bite delivers an explosion of sweet creaminess paired with the satisfying crunch of pecans. The combination of caramelized sugar and nuts is not only delicious but also reminiscent of classic Southern desserts that comfort and satisfy.

The convenience of this recipe is remarkable. With just 25 minutes from start to finish, you can have fresh homemade candy ready to enjoy. Perfect for a last-minute gift or snack cravings, you’ll find yourself reaching for this recipe time and time again. Additionally, it’s a great opportunity to involve family or friends in a fun kitchen activity.

Nutritionally, while pralines are definitely a treat, pecans provide healthy fats and beneficial nutrients that enhance the overall profile of this candy. This means you can indulge with a little less guilt!

These pralines are fantastic for entertaining, bringing a homemade touch that store-bought candies can’t match. There’s something special about sharing a sweet that you created yourself, making them a great conversation starter at gatherings.

Cost-effectiveness is another highlight. With simple ingredients that are affordable and widely available, you can whip up a generous batch without breaking the bank.

Historical Background and Cultural Significance

The origins of pralines can be traced back to 17th century France, where they were created by a chef for the Duke of Plessis-Praslin, hence the name. Over time, this sweet treat made its way to Louisiana, where it evolved into the Southern staple we know today. Southern pralines typically contain pecans and have a distinctive creamy texture, often associated with warm and welcoming gatherings.

Southern culture is rich with food history, and pralines hold a special place in that tradition. They are often made during the holidays or for special occasions, symbolizing hospitality and generosity. It’s not uncommon to see these sweet treats being passed around during family gatherings or celebrations, reinforcing connections among loved ones.

Through the years, the recipe has undergone several transformations, with adaptations incorporating various nuts and flavors, but the classic pecan praline remains a beloved favorite. Regions across the Southern United States put their own twist on it, making for delightful variations in taste and texture.

Today, pralines are more than just a candy; they are a beloved cultural icon that represents the warmth of Southern hospitality. They are often handmade and given as gifts, showcasing the love and care that goes into confectionery crafting.

Ingredient Deep Dive

Pecans: Pecans are a staple in Southern cooking, known for their buttery flavor and crunchy texture. These nuts not only enhance the taste of pralines, but they provide numerous health benefits, including heart-healthy fats, vitamins, and minerals. When selecting pecans, look for fresh, unshelled nuts to ensure maximum flavor. Store them in an airtight container in a cool place to maintain freshness.

Vanilla Extract: This essential ingredient brings depth and aroma to the pralines. Vanilla has a rich history, being prized for its unique flavor profile. It serves not only as a flavor enhancer but also holds potential health benefits due to its antioxidant properties. Opt for pure vanilla extract rather than imitation for the best flavor, and store it in a cool, dark place to preserve its potency.

Sugar: Sugar is the key component that allows pralines to develop their signature caramel taste. While it offers little in terms of nutrition, its role in candy making is irreplaceable. Choose granulated sugar for this recipe and store it in an airtight container in a dry area to avoid clumping.

Butter: The use of butter in praline recipes adds a creamy richness essential to their flavor. Unsalted butter is typically recommended for better control over the saltiness of your treat. It should be kept refrigerated and used before its expiration to ensure your pralines have the best texture and taste.

Common Mistakes to Avoid

  • Not measuring ingredients accurately can lead to inconsistencies in texture and flavor; always use a reliable scale or measuring cups.
  • Cooking sugar too quickly can cause it to burn; use medium heat and be patient for the best caramelization.
  • Not stirring often enough can create hot spots, leading to uneven cooking; continuous stirring helps create a smooth consistency.
  • Using old nuts can ruin the flavor; always check for freshness before use.
  • Not preparing your workspace ahead can lead to mistakes; gather all tools and ingredients before you start cooking.
  • Underestimating cooling time can result in a sticky mess; allow your pralines to set completely before moving them.
  • Overcrowding the pan can affect how pralines cool and set; make sure there is enough space between each candy.
  • Ignoring the visual cues can lead to failure; watch for the color change in the sugar to know when to stop cooking.

Essential Techniques

Temperature Control: Mastering sugar’s temperature is crucial for proper caramelization. Use a candy thermometer to monitor the sugar as it cooks, aiming for the soft-ball stage (around 240°F) for ideal results. Watch for bubble size to change, signaling it’s nearing the correct temperature.

Stirring Technique: Stir the mixture continuously and gently while the sugar dissolves to ensure even heat distribution, avoiding any burnt areas. Use a wooden spoon or heat-resistant spatula to carefully scrape the bottom of the pot to prevent sticking.

Cooling Properly: Allow the pralines to cool undisturbed so they can firm up properly. If you rush this step, the pralines may not achieve the right texture and may remain too sticky.

Pro Tips for Perfect Easy Vanilla Pecan Pralines

1. For a richer flavor, toast the pecans beforehand to enhance their nuttiness before adding them to the mixture.
2. Consider using a silicone baking mat or parchment paper for easy removal and cleanup when cooling the pralines.
3. If you prefer a sweeter touch, add a pinch of sea salt on top of the pralines before they harden.
4. Experiment with different flavored extracts like almond or maple for unique twists on the classic recipe.
5. Work quickly once the mixture is ready to ensure it doesn’t start to set before you form the pralines.
6. If your pralines are a bit too soft after cooling, simply pop them in the fridge for a short period to firm up.
7. When storing, place parchment paper between layers to prevent the pralines from sticking to each other.
8. Use a cookie scoop for uniformity when forming the pralines to ensure even cooking and presentation.

Variations and Adaptations

You can give this Easy Vanilla Pecan Pralines a twist by exploring regional variations, such as incorporating different nuts like almonds or walnuts for unique flavor profiles. Seasonally, consider adding dried fruits or festive spices like cinnamon during the winter holidays to embrace the festive spirit.

Dietary modifications can also be made for special diets. If you need gluten-free options, these pralines are naturally gluten-free. For a vegan version, substitute the butter with coconut oil and ensure all other ingredients comply with vegan standards.

If you’re interested in flavor variations, try adding a splash of bourbon or rum for a boozy kick that pairs well with the sweetness of the candy. Texture modifications such as adding crispy rice cereal can give your pralines a fun crunch and enhance the overall mouthfeel.

Presentation alternatives abound as well. Consider drizzling melted chocolate over the cooled pralines for an elevated look that’s sure to impress guests, or serve them on a decorative platter garnished with fresh fruits and herbs.

Serving and Presentation Guide

Plating your Easy Vanilla Pecan Pralines can elevate their appeal. Consider arranging them on a colorful platter or in decorative candy cups to create an inviting display. For gatherings, give a modern touch by serving them alongside a selection of cheeses that complement their sweetness.

Garnishing ideas include using edible flowers or fresh mint leaves for a burst of color and freshness. Traditional accompaniments like coffee or tea provide a warm pairing that enhances the pralines’ flavors.

Temperature considerations are important; serve the pralines at room temperature to maintain their perfect texture. For portion control, consider cutting larger pralines into bite-sized pieces, making them great for sharing and enjoying without overwhelming guests.

Wine and Beverage Pairing

When it comes to wine pairings, consider a sweet dessert wine, such as a late-harvest Riesling or a Tawny Port, which can beautifully complement the flavors of pecans and caramel. If you prefer non-alcoholic alternatives, a rich hot chocolate could work wonders alongside these pralines.

For coffee or tea pairings, a medium-bodied roast coffee provides a delightful balance to the sweetness. Chai tea adds warmth with its spices, which contrasts perfectly with the rich pralines, creating a harmonious flavor experience.

Serving suggestions include having these drinks prepped in advance to create a fully enjoyed experience for your guests, ensuring each bite of praline is paired with just the right sip.

Storage and Shelf Life

To store your Easy Vanilla Pecan Pralines, keep them in an airtight container at room temperature. They can last for about 1-2 weeks when stored properly. Avoid storing them in a humid environment as this can affect their texture and cause them to sticky.

For extended shelf life, consider refrigerating the pralines, which should ideally last up to a month. When freezing, ensure they are placed in an airtight bag with as little air as possible, allowing them to be preserved for up to 3 months.

Signs of spoilage include a change in texture or off smells; always check your sweets before indulging. If reheating is necessary, do so briefly in the microwave to slightly soften them without compromising the texture.

Make Ahead Strategies

For optimal planning, prepare your Easy Vanilla Pecan Pralines a day or two before you need them. Simply store them in a cool, dry place in an airtight container. This will not only save time but also allow flavors to meld beautifully.

If you have several steps in mind, like toasting nuts or making the syrup, you can do these in advance and store the components separately in the refrigerator until you are ready to mix and set them.

Assess the impact on quality when making ahead; pralines generally maintain their flavor and texture well when made in advance. For assembly, ensure to prepare your workspace and tools ahead of time to streamline the final steps of making these delightful treats.

Scaling Instructions

When halving the Easy Vanilla Pecan Pralines recipe, simply divide all ingredients by two. Cooking time might be slightly shorter, so monitor closely as you approach the target temperature.

Doubling or tripling the recipe requires a larger pot than you might use for smaller batches. Be sure to adjust cooking times accordingly, as larger quantities may take longer to reach the desired temperature.

Proper storage considerations are crucial for large batches; have enough containers ready to avoid overcrowding them, which can affect their shape and firmness.

Nutritional Deep Dive

In terms of macros, a serving of these Easy Vanilla Pecan Pralines contains a nice balance of fats, carbs, and a moderate amount of protein from the pecans. This classic candy can be enjoyed as an occasional treat without derailing healthy eating habits.

Micronutrient analysis shows that pecans are rich in Vitamin E, magnesium, and antioxidants, offering various health benefits, including heart health support. While indulgent, moderate consumption can allow you to enjoy sweet treats while still focusing on overall wellness.

Consideration of portion sizes is essential; enjoying a couple of pralines is sufficient to satisfy cravings without overindulging. Tips for weight management include enjoying these candies mindfully and balancing them with healthy meals.

Dietary Adaptations

For gluten-free adaptations, this Easy Vanilla Pecan Pralines recipe is naturally gluten-free as all primary ingredients are safe. To accommodate dairy concerns, replace butter with coconut oil, while ensuring other ingredients comply with specific dietary requirements.

Vegan versions can be made using maple syrup as a sweetener along with nut-based butter. For those following keto, consider using sugar substitutes like erythritol to reduce the carbohydrate content without sacrificing flavor.

Paleo enthusiasts will appreciate how easy it is to substitute traditional sugar with raw honey or coconut sugar, maintaining the essence of pralines while adhering to paleo-friendly guidelines.

Troubleshooting Guide

In the case of texture issues, if pralines become too soft, they likely didn’t cook long enough. Simply allow them to cook slightly longer next time to achieve that perfect set. If they become too hard, decrease the cooking time until you find the ideal balance.

Flavor balance can often be fixed by adjusting sweetener levels next time. If they turn out too sweet, ensure to add a pinch of salt next time to counteract excessive sweetness.

Temperature problems can be resolved by using a candy thermometer; when the correct soft-ball stage is reached, you’ll achieve a favorable consistency.

Equipment challenges can arise if you don’t have a heavy-bottomed pan; make sure to use the proper cookware to prevent sugar from burning or sticking. Always check your tools before starting to ensure you are set up for success.

Ingredient substitutions might alter the recipe slightly; if introducing alternatives, test in smaller batches to gauge the overall effect on flavor and texture.

Timing concerns often relate to cooling times; ensure you allow adequate time for cooling and setting to retain the original texture of your pralines.

Recipe Success Stories

Readers have shared their experiences making Easy Vanilla Pecan Pralines, noting the sheer joy of creating them as gifts. Many have remarked on variations, such as integrating chocolate, yielding a delightful surprise for recipients.

Success stories often highlight how these pralines have become firm holiday favorites among family and friends. Adaptations inspired by readers’ suggestions added unique flavors, showcasing the versatility of this recipe.

Photography tips shared by the community also inspire others to capture their cooking journeys, documenting each step to engage with other home cooks.

Many community members emphasize the joy of sharing a homemade treat; this recipe has brought people together, fostering a sense of community and love through the art of candy making.

Frequently Asked Questions

Can I make these pralines nut-free?

Removing the nuts entirely from this Easy Vanilla Pecan Pralines recipe would alter the overall texture and flavor. However, you could consider substitutions like crispy rice or sunflower seeds for a unique twist without nuts.

How do I store leftover pralines?

Store any leftover pralines in an airtight container at room temperature. If you want them to last longer, refrigerate or freeze them with parchment paper between layers to prevent sticking.

Can I use other nuts instead of pecans?

Absolutely! This recipe can work with other nuts like almonds, walnuts, or hazelnuts. Just keep in mind that each nut might impart a different flavor profile and texture.

How long do these pralines last?

When stored in an airtight container, they can last up to 1-2 weeks at room temperature, and longer in the refrigerator. Freezing can extend their shelf life up to 3 months.

Is it necessary to use a candy thermometer?

While not strictly necessary, using a candy thermometer ensures precise cooking temperatures, greatly improving the chances of achieving the perfect praline consistency. Without it, the sugar may burn or not develop the proper texture.

Can I flavor the pralines differently?

Yes! Along with vanilla, try flavoring your pralines with almond extract, coconut, or even a splash of bourbon for a twist on the classic recipe.

What if my pralines don’t set?

If your pralines remain too soft after cooling, it’s usually a sign they didn’t cook long enough. Try cooking them slightly longer next time to reach the right temperature and texture.

Can I double the recipe?

Yes, you can easily double the recipe. Just ensure you use a larger pot to accommodate the increased volume, and keep an eye on cooking times, which may vary slightly.

Are these pralines gluten-free?

The Easy Vanilla Pecan Pralines recipe is naturally gluten-free, making them suitable for those with gluten sensitivities or celiac disease. Just ensure all ingredients used comply with gluten-free standards.

What’s the best way to serve pralines?

Serve your pralines on a beautiful platter or in candy cups, possibly with a selection of beverages that complement the sweet, nutty flavors. Consider garnishing to enhance visual appeal!

Additional Resources

For those who enjoyed this Easy Vanilla Pecan Pralines recipe, consider exploring related dessert recipes that feature nuts or caramel, such as pecan pie or almond roca.

Technique guides focusing on candy making can help you master various confections, while ingredient information assists in choosing the best nuts or sweeteners for your needs.

Equipment recommendations might include investing in a reliable candy thermometer or silicone baking mats, which can greatly enhance your candy-making experience.

Furthermore, seasonal variations such as holiday-themed recipes can inspire delightful adaptations, ensuring you have the sweetest treats year-round.

Join the Conversation

We invite you to share your experience with this Easy Vanilla Pecan Pralines recipe on social media! Engage with others by posting photos and variations that you’ve tried.

Join the community by leaving reviews and comments, helping fellow home cooks learn from your successes and unique experiences in crafting this sweet treat.

Share your photography tips, as beautiful visuals can inspire more people to appreciate the art of candy making. Don’t forget to share your stories and variations as you embark on your culinary adventure with these delightful pralines!

The Recipe

Easy Vanilla Pecan Pralines

Serves: 24 pieces

Prep Time: 10 mins

Cook Time: 15 mins

Total Time: 25 mins

Kitchen Equipment Needed

  • Heavy-bottomed pot
  • Candy thermometer
  • Wooden spoon
  • Silicone spatula
  • Parchment paper or silicone baking mat

Ingredients

  • 1 cup granulated sugar
  • 1/2 cup heavy cream
  • 1/4 cup unsalted butter
  • 1 tsp pure vanilla extract
  • 2 cups pecans, chopped

Directions

  1. In a heavy-bottomed pot, combine sugar, heavy cream, and butter over medium heat. Stir constantly until the mixture boils.
  2. Continue to cook, without stirring, until the mixture reaches 240°F on a candy thermometer.
  3. Remove from heat and quickly stir in vanilla extract and chopped pecans.
  4. Using a spoon or scoop, drop spoonfuls of the mixture onto a parchment-lined baking sheet.
  5. Let the pralines cool completely at room temperature before serving or storing.

Recipe Notes

  • To make vegan, substitute butter with coconut oil and ensure all other ingredients are compliant.
  • Add a pinch of salt to balance sweetness if desired.
  • Store leftovers in an airtight container, separated by layers of parchment paper.

Delicious Boston Cream Pie Cupcakes for Every Occasion

Irresistible Boston Cream Pie Cupcakes: A Decadent Treat for Any Celebration

⚖️
Difficulty
Medium

⏲️
Prep Time
30 mins

🕒
Cook Time
20 mins

⏱️
Total Time
50 mins

🍽️
Servings
12 Cupcakes

Boston Cream Pie Cupcakes are a delightful twist on a classic dessert that takes the flavors of traditional Boston Cream Pie and reimagines them into individual cupcakes. The moist vanilla cupcake base is filled with a velvety custard, topped with a rich chocolate ganache, creating a perfect balance of flavors that will tantalize your taste buds. These irresistible treats are perfect for any celebration—birthdays, picnics, or simply a sweet indulgence after a long day.

Imagine biting into a soft, fluffy cupcake, discovering the smooth, creamy filling inside that melts in your mouth as the chocolate glaze adds a luscious finish. This visually appealing dessert not only satisfies your cravings but also brings joy to your gatherings. With a bit of patience and precision, you can create these show-stopping cupcakes that will leave a lasting impression.

Quick Recipe Highlights

  • Flavor Profile: A harmonious blend of sweet vanilla, rich custard, and indulgent chocolate.
  • Texture: Light and fluffy cupcakes with a creamy filling and a glossy chocolate layer.
  • Aroma: A divine scent of freshly baked vanilla combined with sweet chocolate notes.
  • Visual Appeal: Beautifully topped with glossy chocolate ganache, these cupcakes are a feast for the eyes.
  • Skill Level Needed: A moderate skill level is needed, mainly for the filling and ganache preparation.
  • Special Equipment: You will need a cupcake tin, piping bags, and a whisk to achieve the best results.

Recipe Overview

  • Difficulty Level: These cupcakes require a moderate skill level, making them suitable for home bakers who enjoy a challenge but are not yet professionals.
  • Category: This recipe falls under desserts and sweet treats, perfect for any occasion.
  • Cuisine: Originating from American cuisine, Boston Cream Pie has roots in New England and reflects the rich culinary history of the region.
  • Cost: The approximate cost for this recipe ranges from $10 to $15, depending on ingredient quality.
  • Season: These cupcakes are perfect year-round but are especially enjoyed during warmer months when fresh gatherings occur.
  • Occasion: Ideal for birthdays, celebrations, or as a delightful treat for any sweet tooth craving.

Why You’ll Love This Recipe

Taste and texture appeal: The combination of rich chocolate, creamy custard, and fluffy vanilla cake creates an unforgettable taste experience. Each bite delivers a burst of flavor, making these cupcakes a favorite among dessert lovers. The contrast between the soft cake and the creamy filling satisfies all your cravings for sweetness.

Convenience and preparation benefits: These cupcakes are surprisingly easy to make compared to their impressive results. You can prepare the components ahead of time, making them convenient for party planning, and they also transport well, making them perfect for picnics and gatherings.

Nutritional advantages: While these cupcakes are a treat, they can be part of a balanced diet when enjoyed in moderation. They provide satisfaction and energy, allowing you to enjoy life’s sweet moments without guilt.

Social and entertaining value: Boston Cream Pie Cupcakes are a statement dessert that can elevate any occasion. Their fun and unique presentation encourages sharing and conversation, making them perfect for celebrations or casual get-togethers with friends.

Cost-effectiveness and accessibility: With simple ingredients available at most grocery stores, this recipe is not only affordable but also accessible to many home bakers. Plus, the ability to make a dozen cupcakes in one batch means you can feed a crowd without breaking the bank.

Historical Background and Cultural Significance

The origin of Boston Cream Pie dates back to the 19th century, believed to have been created at the Parker House Hotel in Boston. Although the name suggests it’s a pie, it is actually a cake filled with custard and topped with chocolate. Its creation represents the city’s rich culinary heritage and its vibrant food scene that draws from various cultures.

Boston Cream Pie holds cultural importance as it reflects the American spirit of innovation in confections. Over time, it has evolved into a symbol of dessert elegance, often served at special occasions and celebrations. This unique dessert represents a blend of simplicity and sophistication, mirroring the characteristics of Boston itself.

As culinary traditions evolved, so did the interpretations of the Boston Cream Pie, leading to variations such as the current cupcake version. This evolution demonstrates how comfort food can adapt and grow while still retaining its core flavors, keeping the dessert relevant and loved by generations.

Regionally, Boston Cream Pie has inspired countless adaptations, with each region putting its unique twist on the flavors and presentation. Variations found across the United States have made it a treat enjoyed far beyond its Bostonian roots.

Ingredient Deep Dive

Vanilla extract, a key ingredient in this recipe, has a long history in baking, often used to enhance other flavors. Vital for many baked goods, it adds warmth and depth. Nutrition-wise, vanilla is known for its anti-inflammatory properties and can improve mood. When selecting, choose pure vanilla extract over synthetic options for the best flavor; store in a cool, dark place to preserve potency.

Chocolate plays a crucial role in this recipe. A staple in desserts, it has a rich history dating back to ancient Mesoamerican cultures. High-quality dark chocolate offers antioxidants and may promote heart health. Opt for chocolate with at least 60% cocoa for the ganache; keep it in a cool area to maintain its texture and flavor. Consider alternatives like carob for different flavor profiles.

Common Mistakes to Avoid

  • Overmixing the batter: This can lead to dense cupcakes, so mix just until combined to keep them light and fluffy.
  • Not filling the cupcakes enough: Make sure to leave enough space for custard filling, or they may overflow during baking.
  • Using cold ingredients: Bring eggs and milk to room temperature for a smoother batter and better rise.
  • Skipping the cooling step: Allowing cupcakes to cool completely before filling is crucial to prevent the filling from melting.
  • Using too much ganache: Overdoing the chocolate can overshadow the vanilla flavor; balance is key.
  • Improper storage: Keep the filled cupcakes in the fridge for freshness, but allow them to come to room temp before serving for the best flavor.
  • Not tasting the custard: Always taste and adjust the sweetness of the custard for a balanced filling.
  • Ignoring baking time: Each oven is different, so start checking for doneness a few minutes early.

Essential Techniques

Whipping cream: This technique is important for achieving a light and airy texture for your frosting or filling. To master it, ensure your cream and bowl are chilled, and whip until soft peaks form without over-whipping, which can lead to a buttery texture. Look for peaks that hold their shape but still have body for the best results.

Filling cupcakes: A simple yet crucial step where precision matters. Use a piping bag to fill the cupcakes with custard after they’re cooled. The tip of the bag should be inserted into the cupcake to avoid making a mess and to control the filling amount, ensuring a well-balanced treat. When done correctly, the filling should slightly mound at the top without spilling over.

Pro Tips for Perfect Boston Cream Pie Cupcakes

1. Use fresh ingredients for the best flavor. Fresh eggs and top-quality vanilla extract enhance the taste of your cupcakes.

2. Preheat your oven for accurate baking times; an oven thermometer can help ensure your cakes bake evenly.

3. Pipe the ganache on quickly to prevent it from hardening too much; it should still be pourable when applied.

4. Allow ganache to set at room temperature, which firms it up beautifully without refrigeration.

5. Decorate with chocolate shavings or a light dusting of powdered sugar for an elegant finish.

6. Experiment with different fillings such as fruit preserves for a refreshing twist on the classic.

7. Batch your recipes for parties or gatherings to ensure everyone gets to experience this delightful treat.

8. To save time, consider making the custard and ganache a day ahead; this allows the flavors to meld beautifully.

Variations and Adaptations

Try different flavors of cupcakes like chocolate or even lemon for a seasonal twist. Adapt the filling by infusing the custard with spices like cardamom or flavors such as orange zest. You can also create a gluten-free version by substituting all-purpose flour with gluten-free flour blends, ensuring all baking powder is gluten-free as well.

Seasonal adaptations can include pumpkin spice flavors in the fall or peppermint extract in the winter for a festive touch. Moreover, for a healthier option, consider using a sugar substitute in the filling and frosting to cut down calories without sacrificing sweetness.

For an extra crunch, consider adding chopped nuts or toffee bits to the ganache. This variation offers a delightful textural contrast alongside the soft cupcake and creamy filling.

Serving and Presentation Guide

Plating can enhance the appeal of your Boston Cream Pie Cupcakes. Use a simple white plate to make the chocolate ganache pop, or arrange them on a tiered stand for a beautiful display at events. Garnish with fresh berries or edible flowers to add a splash of color and elevate the cupcake’s visual appeal.

When serving, consider presenting them alongside a dollop of whipped cream or a scoop of vanilla ice cream for extra indulgence. Ensure the cupcakes are at room temperature when served to maximize their flavors and textures.

Wine and Beverage Pairing

Pair these delightful cupcakes with a rich dessert wine like a late harvest Riesling or Sauternes to complement the sweet chocolate and creamy filling. For a non-alcoholic option, consider a cold brew coffee with a splash of cream to balance the sweetness.

If you’re a tea lover, a strong black tea steeped with a hint of vanilla can enhance the cupcake experience beautifully. Make sure to serve all beverages at the appropriate temperature to enjoy an optimal pairing.

Storage and Shelf Life

Store your Boston Cream Pie Cupcakes in an airtight container in the refrigerator to keep them fresh for up to 4-5 days. If you want to freeze them, do so before filling; wrap tightly individually to avoid freezer burn. Thaw them in the refrigerator overnight for optimal quality.

Signs of spoilage include any change in smell or visible mold. Reheat filled cupcakes in the microwave for a few seconds if they seem too cold; just be cautious to avoid overheating the custard.

Make Ahead Strategies

Plan ahead by making the cupcake base and custard filling a day in advance. Store the cupcakes at room temperature and the custard in the fridge. Assemble them the day of your event to keep them fresh and maintain the best taste and texture.

Consider preparing ganache the day before as well; this will not only save you time but also fuller flavor as it sets. When assembling, ensure that both cupcakes and filling are at similar temperatures to avoid sogginess.

Scaling Instructions

If you need more cupcakes, doubling or tripling this recipe is straightforward. Just be mindful of your mixing bowl size and baking time, as larger batches may require adjusting baking times slightly. Ensure all your ingredients are proportionately measured for consistent results.

If you only need to make half the batch, simply divide the ingredients evenly. Saving the batter or already filled cupcakes for later can be effective with correct storage techniques, just remember that baking time may decrease slightly as the size of your batch changes.

Nutritional Deep Dive

A typical Boston Cream Pie Cupcake contains a balanced mix of macronutrients from flour, sugar, and butter, making them a treat best enjoyed in moderation. They provide approximately 200 calories per cupcake depending on the portion size and ingredients used, making them a delightful sweet indulgence.

Micronutrient analysis shows that ingredients like eggs and milk provide valuable vitamins and minerals, contributing to overall daily nutritional needs. When considering health benefits, it’s important to enjoy these cupcakes as an occasional treat, ensuring that portions are controlled while indulging your sweet cravings.

Dietary Adaptations

For a gluten-free version, simply replace all-purpose flour with gluten-free flour blends available in stores. Ensure to use gluten-free baking powder as well for the best results.

Dairy-free options can be achieved by substituting butter with coconut oil and using almond or soy milk in the custard filling, ensuring that chocolate and vanilla extracts are also dairy-free. For those following a vegan diet, try using flaxseed meal instead of eggs and aquafaba for whipping to achieve the best volume in the cupcakes.

Troubleshooting Guide

If your cupcakes turn out too dry or dense, you may be overmixing the batter. Remember to mix until just combined and always check for doneness a couple of minutes early to avoid overbaking.

Should your ganache separate, try whisking in a little hot cream or water to bring it back together. For flaky frosting, under-whipped cream is often the cause, so ensure to achieve the right peaks while whipping.

Recipe Success Stories

Countless bakers share their experiences of making Boston Cream Pie Cupcakes, praising the luscious flavors and delightful textural contrast. Readers have successfully adapted the recipe to include seasonal ingredients like pumpkin, making it a festive treat.

Many family gatherings have been brightened by this dessert, with guests frequently asking for the recipe. The easy-to-follow instructions and delicious results keep enthusiasts inspired to experiment and share their own variations in topping and filling.

Frequently Asked Questions

Can I use boxed cake mix for this recipe? Yes, you can absolutely use a boxed cake mix for quick preparation. Just follow the package instructions for baking cupcakes and then fill them with the custard.

What’s the best way to store leftovers? Store leftover cupcakes in an airtight container in the fridge for up to 4-5 days. Allow them to come to room temperature before serving.

Can I freeze these cupcakes? Yes, before filling them, you can freeze the cupcakes. Just wrap them individually and freeze for up to three months.

How do I make the custard thicker? To make a thicker custard, increase the cornstarch slightly in the recipe or cook it longer until it reaches your desired consistency.

Is there a non-dairy alternative for the ganache? Yes, you can use coconut cream and dairy-free chocolate for a delicious non-dairy ganache alternative.

How do I prepare the chocolate ganache? Simply heat cream until it just begins to bubble, then pour over chopped chocolate and let it sit for a few moments before stirring until smooth.

Can I add flavors to the custard? Absolutely! You can infuse your custard with different flavors, such as vanilla bean, coffee, or citrus zest for a fun twist.

What if I don’t have a piping bag? You can use a zip-top bag with the corner snipped off as a makeshift piping bag to fill the cupcakes.

Can I substitute the filling with something else? Yes, feel free to try other fillings like whipped cream, fruit preserves, or flavored curds to customize your cupcakes.

What type of flour should I use for best results? All-purpose flour is recommended for a classic texture, but you can also experiment with cake flour for a lighter cupcake.

Additional Resources

Explore related recipes that incorporate similar flavors, such as chocolate mousse or vanilla pudding. For bakers looking to refine their technique, consider guides on making custards or mastering ganache.

Keep an eye out for ingredient information on baking essentials that can improve your overall baking experience. Don’t forget to check out seasonal variations that highlight fresh, local produce to inspire your baking throughout the year.

Join the Conversation

We invite you to share your Boston Cream Pie Cupcake experiences on social media. Tag us in your photos, and let us know how you’ve made this recipe your own. Your feedback and suggestions help our community grow stronger as we share in the love of baking.

Consider leaving a review or comment on this post if you’ve tried the recipe, as your insights may inspire others to dive into their cupcake-making adventure.

The Recipe

Irresistible Boston Cream Pie Cupcakes

Serves: 12 Cupcakes

Prep Time: 30 mins

Cook Time: 20 mins

Total Time: 50 mins

Kitchen Equipment Needed

  • Cupcake tin
  • Cupcake liners
  • Mixing bowls
  • Whisk
  • Piping bags
  • Small saucepan
  • Measuring cups and spoons
  • Cooling rack

Ingredients

  • 1 ½ cups all-purpose flour
  • 1 cup granulated sugar
  • ½ cup unsalted butter, softened
  • 3 large eggs
  • ½ cup whole milk
  • 2 tsp baking powder
  • 1 tsp vanilla extract
  • ¼ tsp salt
  • 1 cup vanilla pudding mix (instant)
  • 2 cups heavy cream
  • 8 oz dark chocolate, chopped
  • ½ cup heavy cream (for ganache)

Directions

  1. Preheat your oven to 350°F (175°C) and line the cupcake tin with liners.
  2. In a large bowl, beat together the butter and sugar until fluffy. Add the eggs one at a time, mixing well after each addition.
  3. In a separate bowl, whisk together the flour, baking powder, and salt. Gradually add this dry mixture to the wet ingredients, alternating with milk and vanilla until just combined.
  4. Fill each cupcake liner 2/3 full with batter. Bake for 20 minutes or until a toothpick comes out clean. Allow to cool completely.
  5. For the filling, prepare the vanilla pudding according to package instructions, and let it cool.
  6. Once the cupcakes are cooled, use a piping bag to fill each cupcake with the pudding.
  7. To make the ganache, heat ½ cup of heavy cream in a saucepan until simmering, then pour over the chopped chocolate. Let sit for a few minutes before stirring until smooth.
  8. Dip the top of each filled cupcake in the ganache and allow it to set on a cooling rack.
  9. Serve at room temperature and enjoy your delightful Boston Cream Pie Cupcakes!

Recipe Notes

  • For a chocolate ganache, use milk chocolate for a sweeter flavor.
  • Consider adding berry compote for a fruity spin on the filling!
  • Make sure to adjust the sweetness of the custard to your preference.
  • Store any leftovers in the fridge for up to 4-5 days.

Spicy Mexican Corn Bites: A Flavorful Appetizer for Any Occasion

Mexican street corn bites, mini elote bites, spicy corn fritters, Mexican corn appetizers, roasted corn bites, cheesy corn snacks, crispy Mexican bites

Spicy Mexican Corn Bites: A Flavor-Packed Appetizer

Spicy Mexican Corn Bites are the ultimate crowd-pleaser, combining the bold flavors of Mexican street corn (elote) with a bite-sized, party-friendly format. Perfect as appetizers or snacks, these corn bites bring together creamy textures, spicy notes, and fresh toppings in every bite.


Why You’ll Love Spicy Mexican Corn Bites

Making these corn bites at home offers the perfect blend of convenience and customization. You can tailor the spice levels, experiment with flavors, and even make healthier versions by baking instead of frying.

For more on perfecting roasted corn, visit Perfect Roasted Corn Techniques. For tips on using Mexican cheeses like Cotija, check out How to Use Cotija Cheese in Recipes.


Ingredients You’ll Need

Essential Ingredients

  • Corn: Fresh, frozen, or canned corn works well.
  • Creamy Base: A combination of mayonnaise, cream cheese, or sour cream.
  • Seasonings: Chili powder, cayenne pepper, cumin, garlic powder, and lime juice.
  • Toppings: Crumbled Cotija cheese, chopped cilantro, and hot sauce.

Optional Add-Ins

  • Diced jalapeños for an extra kick.
  • Crumbled bacon for added smokiness.

Step-by-Step Recipe

1. Prepping the Corn

  • Grill or roast fresh corn for a smoky flavor. If using frozen or canned corn, ensure it’s drained and dry.

2. Making the Mixture

  • Combine corn with mayonnaise, cream cheese, Cotija cheese, and spices.
  • Mix until the ingredients are well incorporated.

3. Shaping the Bites

  • Scoop spoonfuls of the mixture and shape into small, round bites.
  • Coat with breadcrumbs or crushed tortilla chips for a crispy texture.

4. Cooking Methods

  • Baking: Preheat the oven to 375°F and bake the bites until golden brown.
  • Frying: Heat oil to 350°F and fry until crisp and golden.

Creative Variations

  • Healthy Option: Use Greek yogurt as a base and bake instead of frying.
  • Vegan-Friendly: Substitute mayonnaise and cheese with plant-based alternatives.
  • Cheesy Upgrade: Add shredded Monterey Jack or cheddar for a melty center.

Serving Suggestions

Pair your Spicy Mexican Corn Bites with:

  • Creamy guacamole or salsa as dipping sauces.
  • Lime wedges for an extra burst of freshness.
  • Margaritas or aguas frescas for a complete Mexican-inspired spread.

Explore related recipes like Cheesy Bacon Jalapeño Corn Dip for more inspiration.


FAQs About Spicy Mexican Corn Bites

1. Can I make these bites ahead of time?
Yes, prepare and shape the bites, then refrigerate them. Cook just before serving.

2. Can I freeze the bites?
Absolutely! Freeze uncooked bites on a tray, then transfer them to a freezer-safe bag.

3. How do I adjust the spice level?
Reduce chili powder and cayenne for a milder flavor, or add jalapeños for extra heat.

4. What can I use instead of Cotija cheese?
Feta or Parmesan are great substitutes.

5. Are these bites gluten-free?
Yes, use gluten-free breadcrumbs or crushed tortilla chips for coating.


Internal Linking Opportunities

Link to relevant recipes on Exo Recipes for enhanced reader experience:


Conclusion

Spicy Mexican Corn Bites are a versatile, flavorful appetizer that’s sure to be a hit at any gathering. Whether baked or fried, these bites deliver a satisfying crunch and bold taste in every bite. Experiment with flavors, adjust the spice level, and serve them alongside your favorite dips for a snack everyone will rave about.