Delicious Steak with Roasted Baby Potatoes and Refreshing Cucumber Salad

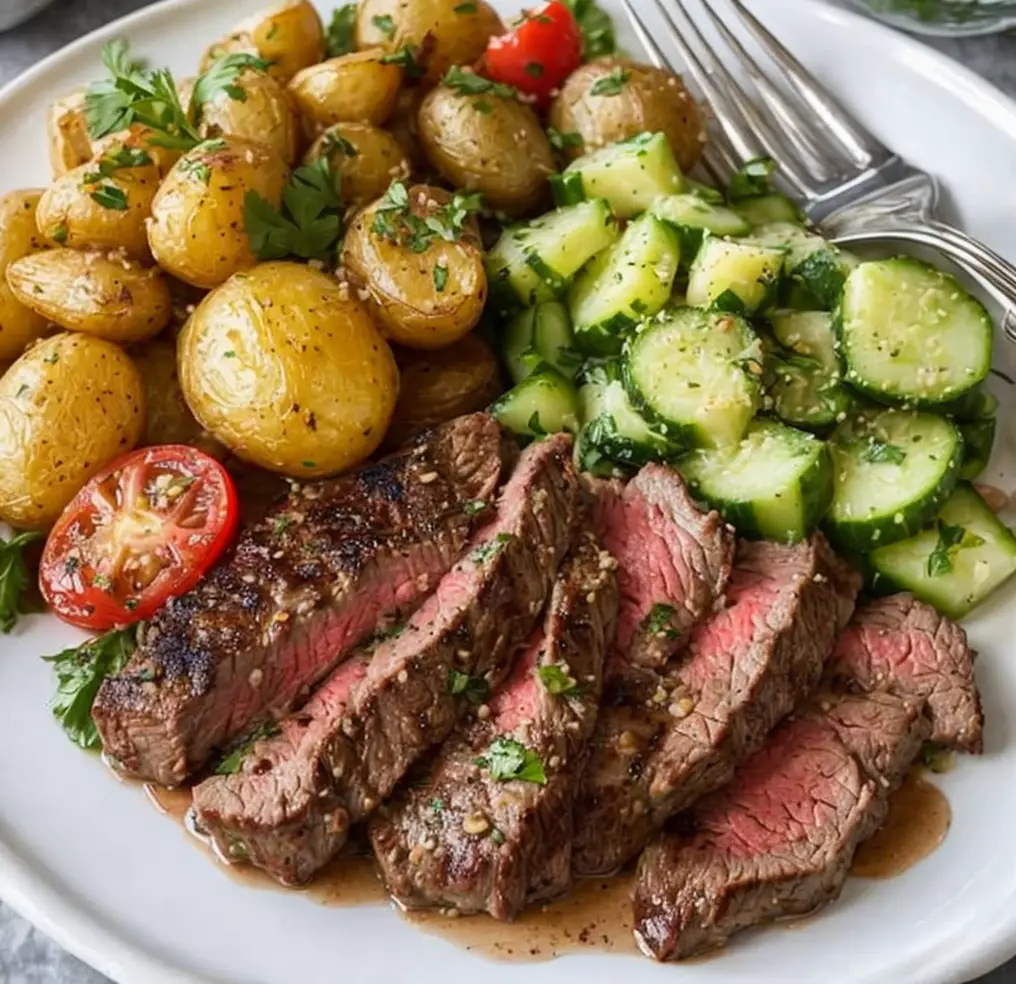
Steak with Roasted Baby Potatoes and Cucumber Salad: A Perfect Summer Meal

⚖️
Difficulty
Medium

⏲️
Prep Time
15 mins

🕒
Cook Time
30 mins

⏱️
Total Time
45 mins

🍽️
Servings
4

Steak with Roasted Baby Potatoes and Cucumber Salad is not just a meal; it’s an experience that encapsulates the joys of summer dining. Imagine juicy, perfectly cooked steak paired with crispy, golden baby potatoes that offer a delightful contrast in texture. On the side, the refreshing cucumber salad adds a bright note, balancing the richness of the steak with its crispness and zest. This well-rounded dish brings together flavors and textures that make it ideal for a family dinner or a casual barbecue with friends.

As the steak sizzles on the grill, the aroma fills the air, signaling a feast that’s both satisfying and exciting. Bite into a tender piece of steak, followed by the crunch of roasted potatoes, and then the freshness of cucumbers dressed in tangy vinaigrette. Each mouthful is a celebration of summer flavors that evoke memories of sunny days and good company. This recipe showcases culinary simplicity, allowing the quality of each ingredient to shine through while making the cooking process feel effortless.

Quick Recipe Highlights

  • Flavor Profile: Savory steak with a hint of garlic combined with earthy, roasted potatoes and zesty cucumber.
  • Texture: Tender steak, crunchy potatoes, and crisp salad create a satisfying mouthfeel.
  • Aroma: Grilled steak with smoky hints and roasted potatoes with fragrant herbs fill the air.
  • Visual Appeal: The vibrant green of the salad contrasts beautifully with the golden potatoes and rich steak.
  • Skill Level Needed: Suitable for cooks with basic grilling skills; perfect for all levels of home cooks.
  • Special Equipment: A grill or grill pan for cooking the steak and oven-safe dish for roasting potatoes.

Recipe Overview

  • Difficulty Level: This recipe falls under medium difficulty as it combines grilling and roasting techniques but is achievable for beginners.
  • Category: Ideal for main courses, this dish is perfect for lunch or dinner and can be a highlight at gatherings.
  • Cuisine: Influenced by American BBQ traditions, infusing flavors from classic summer cookouts.
  • Cost: The ingredients are budget-friendly, making this both a delicious and economical dinner option.
  • Season: Best enjoyed in summer when fresh cucumbers and new potatoes are in season for peak flavor.
  • Occasion: Perfect for a family meal, informal get-together, or outdoor grilling party.

Why You’ll Love This Recipe

This Steak with Roasted Baby Potatoes and Cucumber Salad delivers a taste and texture combination that is truly delightful. The succulent, grilled steak offers rich, meaty flavors infused with just the right amount of seasoning, while the roasted baby potatoes provide a satisfying crunch with a buttery interior. The fresh cucumber salad rounds out the dish, providing a refreshing contrast that enhances the overall experience. This vibrant combination of flavors makes it a dish that everyone will love.

The convenience of this recipe is another significant advantage. It’s easy to prepare and requires minimal cooking techniques, making it perfect for busy weeknights or leisurely weekend lunches. The hands-on time is limited to just 15 minutes, allowing you to enjoy quality time with family or friends while your dish cooks to perfection. With just one grilling surface and an oven, cleanup remains hassle-free, adding another layer of appeal to the preparation process.

Nutritionally, this recipe is packed with beneficial ingredients. The steak provides essential protein and iron, while baby potatoes offer potassium and vitamins, and cucumbers are low in calories yet high in hydration. Together, they create a well-balanced meal that supports a healthy diet. Whether you’re looking to fuel up after a workout or enjoy a lighter meal, this dish caters to various dietary needs without compromising flavor.

Socially, serving this dish makes for a perfect centerpiece for sharing stories and joys around the table. Its hearty yet fresh nature encourages an atmosphere of comfort and togetherness, making it an excellent choice for gatherings or celebrations. The flavorful steak and savory potatoes create an inviting ambiance that beckons guests for seconds, providing lasting memories over a delicious meal shared with loved ones.

Cost-effectiveness is another significant factor that contributes to the allure of this recipe. With easily accessible ingredients and minimal waste, this dish ensures that you can enjoy a gourmet experience without breaking the bank. All you need are fresh vegetables and high-quality steak, making it a practical choice for budget-minded cooks looking to impress on a plate without overspending.

Historical Background and Cultural Significance

The origins of steak grilled to perfection can be traced back to countless cultures that have celebrated meat and fire for centuries. In America, the classic summer BBQ embodies a tradition where families and friends gather around grills to enjoy hearty meals together, reflecting the cultural significance of outdoor cooking in fostering community connections. Steaks over the grill have been a staple meal, often highlighted during social events and special occasions.

Over time, the grilling techniques and flavor profiles have evolved, influenced by various regions and culinary innovations. From the charcoal grills of the South to gas grills featuring more modern approaches, each method has its charm and flavor nuances. This evolution speaks to the enduring love for steak and hearty sides in American cuisine, embodying the spirit of seasonal cooking during long summer days.

The recipe for steak and potatoes has stood the test of time, adapting to the growing availability of ingredient varieties and nutritional knowledge. Health-conscious adaptations have emerged, with more emphasis on using seasonal vegetables and swapping heavier sauces for lighter dressings. This recipe highlights how traditional dishes can evolve while still paying homage to their roots, making it relevant in today’s culinary conversations.

Regional variations add depth to the culture surrounding this dish. For instance, in Texas, steak might be seasoned with a dry rub, whereas in Italy, a light drizzle of olive oil and fresh herbs could enhance the flavors differently. These adaptations showcase the incredible versatility of steak, allowing it to be enjoyed worldwide in numerous exciting ways tailored to local preferences.

Ingredient Deep Dive

Steak

Steak is a beloved protein with deep cultural roots in various cuisines around the world. Each cut of steak has its history, and the preferences for specific cuts often reflect regional farming practices and culinary traditions. In addition to being a high-quality protein source, steak also contains essential vitamins like B12 and minerals such as zinc and iron, crucial for proper body function.

When selecting steak, consider purchasing from local butchers who can provide fresher options or grass-fed variations that are typically leaner and richer in flavor. Look for cuts with good marbling, which indicates tenderness and juiciness upon cooking. Always store steak in the refrigerator for short periods or freeze it for longer shelf life, and let it thaw thoroughly before cooking to ensure even cooking.

Baby Potatoes

Baby potatoes, also known as new potatoes, have a special place in culinary traditions across the globe. Their smooth skin and waxy texture make them perfect for roasting, resulting in a crispy exterior and fluffy interior. Nutritionally, they offer a good source of carbohydrates and contain vitamins C and B6, which provide energy and support brain health.

When choosing baby potatoes, look for firm, small ones with no blemishes. Storage should be in a cool, dark place to prevent sprouting. If needed, you can substitute them with other varieties such as fingerling potatoes, but keep in mind that different textures may yield varied results.

Cucumbers

Cucumbers have been cultivated for thousands of years, celebrated for their refreshing taste and crisp texture. They are low in calories, making them an excellent addition to weight-loss diets while being high in water content, promoting hydration. With health benefits like antioxidants and anti-inflammatory properties, cucumbers complement the richness of the steak beautifully.

When selecting cucumbers, choose fresh ones with smooth skin that feel firm to the touch. Store them in the fridge and consume within a week for the best texture and flavor. For variations, consider substituting cucumbers with zucchini or radishes for a twist on the classic salad.

Common Mistakes to Avoid

  • Not letting the steak rest: This can cause juices to run out, leading to dry meat. Always rest your steak for at least 5-10 minutes after cooking.
  • Skipping seasoning: A lack of seasoning on your steak can result in bland flavors. Season generously with salt and pepper before grilling.
  • Overcrowding the roasting pan: When roasting baby potatoes, make sure they have enough space to brown evenly; otherwise, they will steam instead of roast.
  • Using cold ingredients: Cooking meat straight from the refrigerator can lead to uneven cooking. Allow the steak to come to room temperature before grilling.
  • Not preheating the grill: A cold grill can result in sticking or uneven cooking. Preheat your grill to achieve perfect searing.
  • Overcooking the steak: Use a meat thermometer for accuracy; overdone steak loses its tenderness and juiciness.
  • Not balancing flavors: Ensure your salad dressing complements the steak; a tangy vinaigrette adds a perfect contrast.
  • Ignoring the texture: Choose cooking methods that highlight the crispiness of ingredients like baby potatoes and cucumbers.
  • Using unripe cucumbers for salad: Ripe, fresh cucumbers yield the best flavor and texture in salads.
  • Not cleaning your grill: Cooked-on residue can impact the flavor of your steak, so ensure your grill is clean before use.

Essential Techniques

Grilling Steak

Grilling steak is all about achieving the perfect sear while locking in juicy flavors. To master this technique, begin with a well-preheated grill and make sure to bring your steak to room temperature. A good visual cue to look for is when you see grill marks forming; this indicates the meat has developed a crust that enhances flavor. Avoid moving the steak too often to allow a good sear to happen.

Roasting Potatoes

Roasting potatoes is a straightforward process that highlights their natural sweetness. Cut the potatoes uniformly to ensure even cooking time and coat them with oil and seasonings before roasting. Visual cues include crispy exteriors and a fork-tender interior, indicating that your potatoes are perfectly roasted. Stir occasionally for even browning, avoiding common pitfalls like overcrowding the pan.

Making Cucumber Salad

Preparing a cucumber salad is about balancing textures and enhancing flavors. Start by slicing cucumbers evenly for consistent crunch and visual appeal. A homemade vinaigrette adds zest; drizzle it over the salad just before serving to maintain freshness. The result should be a salad that is bright in color and refreshing, complementing the richer flavors of the steak and potatoes.

Pro Tips for Perfect Steak with Roasted Baby Potatoes and Cucumber Salad

  • Use a meat thermometer to check the doneness of steak accurately; aim for 130-135°F for medium rare.
  • For extra flavorful steak, marinate it in olive oil, garlic, and herbs a few hours before cooking.
  • Parboil the baby potatoes for a few minutes before roasting to ensure they cook evenly and become fluffy inside.
  • Add fresh herbs like rosemary or thyme to your potato roasting dish for aromatic flavors.
  • Opt for a mix of colorful cucumbers like Persian and English cucumbers for a vibrant salad.
  • Drizzle a leak of balsamic glaze over the salad for an elegant finish and enhanced flavor.
  • Set out sauces like chimichurri or a garlic yogurt dip to elevate the meal further.
  • Use a cast-iron skillet to grill the steak if you lack an outdoor grill; it can yield similar results.

Variations and Adaptations

Steak with Roasted Baby Potatoes and Cucumber Salad lends itself well to regional variations that can elevate your dining experience. For instance, consider using a different cut of meat like flank steak or skirt steak to suit your taste. If you prefer a leaner option, grilled chicken or tofu can create a delightful alternative while still preserving the core flavors.

Seasonal adaptations are also perfect for this recipe; swapping out cucumbers for zucchini or even bell peppers during peak summer months can infuse additional flavor. Add grilled corn for a sweet touch, and incorporate seasonal herbs like basil during the summer to enhance freshness.

Dietary modifications can easily be made to suit various preferences. For a gluten-free version, ensure that your dressing ingredients are free from gluten-containing products. Vegans can replace the steak with marinated portobello mushrooms, providing heartiness without compromising on taste.

Flair can be added through flavor variations; consider marinating the steak in teriyaki or hoisin sauce for an Asian-inspired twist. Additionally, spice blends like Cajun seasoning or harissa can bring exciting flair to roasted potatoes.

Lastly, presentation alternatives can enhance your dish’s visual appeal. Using a large platter to arrange your roasted potatoes and steak accompanied by a vibrant cucumber salad adds a rustic element. Garnish with fresh herbs and lemon wedges for a stunning finish.

Serving and Presentation Guide

When serving Steak with Roasted Baby Potatoes and Cucumber Salad, plating techniques can be essential in elevating the meal’s overall appeal. Begin by placing the steak at the center of each plate; fan it out slightly to showcase the juiciness. Next, artfully arrange the roasted baby potatoes around the steak, allowing their crispy edges to be seen, which adds to the visual contrast.

Garnishing is crucial for adding the finishing touch. Fresh chopped herbs like parsley or dill can add a pop of color, along with a sprinkle of sea salt. For an elegant addition, consider drizzling a high-quality olive or herb-infused oil around the plate, enhancing both aroma and presentation.

Traditional accompaniments such as crusty bread and herbed butter can take this meal to another level, allowing guests to savor every aspect of the dish. For modern serving suggestions, consider using wooden boards or slate platters to create an inviting rustic look, encouraging family-style dining.

Temperature considerations are also essential; serve the steak hot off the grill and the potatoes piping hot to ensure satisfying warmth. Lastly, portion control is vital, with appropriate serving sizes for each component, promoting both satisfaction and balance on the plate.

Wine and Beverage Pairing

When seeking the right wine pairing for Steak with Roasted Baby Potatoes and Cucumber Salad, consider robust reds like Cabernet Sauvignon or Malbec. The full-bodied characteristics of these wines complement the richness of the steak beautifully while refreshing the palate. A Pinot Noir can also work well, providing a lighter option that harmonizes with the meal’s flavors.

For non-alcoholic alternatives, a refreshing sparkling water with a twist of lime or mint can cleanse the palate effectively and resonate with the meal’s bright flavors. If desired, consider pairing with iced herbal tea to introduce subtle flavors that don’t overshadow the dish.

For coffee enthusiasts, a well-brewed dark roast can serve as an excellent end to the meal, pairing particularly well if enjoyed as an after-dinner drink. Consider presenting it at a slightly warm temperature to match the meal’s essence while keeping the experience enjoyable.

Storage and Shelf Life

When it comes to storing leftover Steak with Roasted Baby Potatoes and Cucumber Salad, the key is to ensure each component is stored separately. Steaks should be wrapped in foil or sealed in an airtight container in the refrigerator, where they will keep for 3-4 days. For longer storage, consider freezing the steak, which can last for up to three months; just be sure to let it thaw in the fridge before reheating.

The roasted baby potatoes also store well in an airtight container in the refrigerator for up to three days. If you have leftovers, reheat them in the oven to maintain their crispy texture; avoid microwaving to prevent them from becoming soggy.

Cucumber salad is best enjoyed fresh, but any leftovers can last up to two days in the fridge if stored in a sealed container. However, delay adding dressing until serving to maintain its crispness.

Signs of spoilage include off smells, discoloration, and textures that have become slimy or mushy. Always check the food before consuming, and when in doubt, discard it. Reheating should be done carefully, with steak warmed to at least 145°F for safe consumption, and potatoes reheated until hot.

Freezing guidelines suggest allowing all components to cool completely before sealing them in freezer-safe bags or containers. Label them with dates to keep track and ensure they are consumed within a reasonable timeframe.

Make Ahead Strategies

To streamline your preparation for Steak with Roasted Baby Potatoes and Cucumber Salad, consider a well-planned make-ahead strategy. Up to a day prior, marinate your steak to infuse robust flavors; simply store it covered in the fridge until you are ready to grill it. Baby potatoes can be parboiled in advance; once cool, toss them in olive oil and seasonings, then refrigerate. When it’s time to roast, simply place them in the oven to finish cooking.

For the cucumber salad, chop the vegetables and mix the dressing ahead of time, keeping both stored in separate containers. Combine just before serving to maintain freshness and crunch, ensuring all ingredients stay vibrant. This approach allows for maximum convenience on the day you plan to serve the dish.

Assessing the quality impact is essential, as marinating enhances flavor depth, and parboiling potatoes results in superior texture when roasted. The salad’s freshness remains intact while allowing you to focus on other meal components, creating an exciting balance in preparation.

Assembly tips: set out all components when ready to serve, and allow guests to create their plates, fostering interaction and community during the meal. For optimal enjoyment, add any last-minute ingredients, such as fresh herbs or croutons, to enhance presentation and taste.

Scaling Instructions

When considering scaling the recipe for Steak with Roasted Baby Potatoes and Cucumber Salad, it’s essential to maintain balance to ensure flavor continuity. If halving the recipe, simply divide the ingredients equally; however, adjust cook times as needed to avoid overcooking.

For doubling or tripling, ensure you have sufficient grill space and oven capacity to accommodate extra steak and potatoes. Depending on the size of the steak, consider cooking in batches so all portions can be served hot. Adjust seasoning amounts accordingly, as flavors intensify, and you may need to tweak the dressing for cucumber salad to maintain brightness.

Adapt your kitchen equipment as needed; a larger roasting pan allows for more potatoes to roast without overcrowding, maintaining their texture. Balancing overall cooking times is crucial, so double-check recommended times for steak doneness and potato tenderness.

Storage considerations should include ensuring you have enough fridge space to handle the overflow of extra components without compromising freshness. Label containers effectively to avoid confusion and maintain an organized kitchen throughout the cooking process.

Nutritional Deep Dive

In examining the nutritional information of Steak with Roasted Baby Potatoes and Cucumber Salad, let’s break down each component. One serving of steak provides a significant source of protein, essential for muscle health, contributing to a balanced diet. The iron content is beneficial for transporting oxygen within the bloodstream, crucial for overall vitality.

Baby potatoes contribute healthy carbohydrates to the meal, which serve as the body’s primary energy source. They’re also rich in potassium, promoting heart health and good bodily function, while vitamin C supports immune function and tissue repair.

Cucumbers, light and crisp, offer almost negligible calories, making them ideal for filling yet low-calorie meals. They provide hydration benefits along with antioxidants, making them a flavorful choice to round out the meal nutritionally.

Dietary considerations should also be made; for those counting macronutrients, this dish provides a well-rounded profile catering to varied diets, from low-carb enthusiasts to balanced eaters searching for whole food options. The combination encourages moderation; portion control is advised for maintaining caloric balance, especially if consumed as part of a larger meal spread.

Lastly, weight management tips may include balancing this meal with more plant-based options throughout the week, allowing room for protein-heavy meals like this delicious steak dish while staying aligned with dietary goals.

Dietary Adaptations

This recipe for Steak with Roasted Baby Potatoes and Cucumber Salad can be easily adapted to various dietary needs. For a gluten-free version, ensure that the dressing and any additional condiments are free from gluten-containing ingredients. Most of the meal components are naturally gluten-free, making this an easy adaptation.

For those adhering to dairy-free diets, there are no dairy ingredients in this recipe. A dairy-free alternative can be introduced with a vegan dressing made from avocado or tahini, adding creaminess without compromising health goals.

Vegans can replace the steak with marinated and grilled tofu or tempeh, which soak up flavors beautifully, creating a satisfying plant-based alternative. Pair the tofu with the same roasted potatoes and cucumber salad for a complete meal that maintains taste and texture.

Low-carb and keto dieters can enjoy the protein from the steak while replacing the baby potatoes with cauliflower florets roasted until golden; this maintains a satisfying texture while reducing carbs significantly.

For those on a paleo diet, simply remove any added sugars from dressings and seasonings, ensuring the meal retains wholesome ingredients. The dish’s reliance on fresh produce and lean protein aligns well with paleo principles.

Finally, low-FODMAP adaptations can be made by skipping the garlic in the marinade and opting for suitable substitutes in the dressing, allowing for varied dietary needs without sacrificing flavor.

Troubleshooting Guide

If you encounter texture issues with your steak, it likely stems from overcooking or not allowing it to rest. Correct this by using a meat thermometer to achieve the desired doneness, and always let your steak relax post-cooking for tender results.

For flavor balance problems, such as too much salt or bitterness, consider adding a citrus element like lemon juice or vinegar in the dressing to brighten and cut through heavy flavors. Taste as you mix to ensure a well-rounded profile.

Temperature issues can also arise; if steak is overdone, it tends to dry out, making it challenging to salvage. Cooking at a lower heat can also have benefits; slow-roasting steak allows for moments of perfect doneness consistency.

Equipment challenges can also arise; if a grill lacks heat, the steak will struggle to sear properly. Ensure your grill is preheated, and clean to avoid burning flavors that can affect the final dish.

For ingredient substitutions, if you don’t have baby potatoes, consider sweet potatoes or another waxy variety that holds up well in roasting, keeping the texture changes minimal.

Timing concerns can result from multitasking. Always ensure to set timers for each cooking step, and prep ingredients in advance to avoid the last-minute rush that could compromise the dish’s overall quality.

Recipe Success Stories

Readers have shared their glowing feedback on Steak with Roasted Baby Potatoes and Cucumber Salad, highlighting its ease of preparation and incredible flavors. Many have commented on the dish’s versatility, enjoying it for various occasions, from casual family dinners to summer-themed parties.

Community members have also experimented with variations, such as swapping the steak for marinated grilled vegetables or using different potatoes, leading to successes that align with personal dietary needs while staying true to the core recipe.

Adaptation stories feature those who’ve shared their experiences of experimenting with different cooking techniques or dressings to reinvent the dish for modern tastes, often asking for tips about flavors and ingredient pairings that work well.

Readers particularly enjoy photographing their versions of Steak with Roasted Baby Potatoes and Cucumber Salad, showcasing appealing plating and vibrant colors. Sharing these snapshots on social media has garnered much attention, encouraging others to give this dish a try.

Photography tips typically emphasize using natural lighting and focusing on layering to capture the dish’s textures and colors beautifully, enhancing the overall appeal of its presentation.

Frequently Asked Questions

1. Can I use a different cut of steak for this recipe?

Yes, you can use various cuts such as ribeye, sirloin, or flank steak. Each cut offers a different texture and flavor profile. Just be mindful of cooking times, as some cuts may require different approaches.

2. How should I store leftovers?

Store leftover steak, potatoes, and salad separately in airtight containers in the refrigerator. Steak should be consumed within 3-4 days, while potatoes can last about the same time, and salads should generally be eaten within two days.

3. Can I make this recipe ahead of time?

Absolutely! Consider marinating the steak and parboiling the potatoes a day in advance. The salad can be prepared just before serving to keep its freshness. This makes mealtime faster and more convenient.

4. What’s a good side dish to serve with this meal?

Garlic bread or a simple green salad can complement the meal nicely. A light dessert such as sorbet or fresh fruit can also provide a refreshing finish.

5. What beverage pairs well with steak?

A robust red wine like Cabernet Sauvignon or a refreshing iced tea goes well with steak. The wine’s tannins complement the richness of the meat, while tea offers a lighter contrast.

6. How do I know when the steak is done?

Using a meat thermometer is the best way to check doneness. For medium-rare, aim for an internal temperature of 130-135°F. If you don’t have a thermometer, touch tests can also help gauge its readiness.

7. Is this dish suitable for a low-carb diet?

Yes, by replacing baby potatoes with roasted cauliflower or opting for additional non-starchy vegetables, you can easily adapt this dish for a low-carb diet without losing flavor.

8. Can I grill the potatoes as well?

Yes! You can grill baby potatoes if you parboil them first and then thread them onto skewers or use a grill basket to achieve a deliciously smoky flavor.

9. What can I use instead of cucumbers in the salad?

Consider using zucchini, bell peppers, or even radishes. These alternatives provide a crunchy texture and fresh flavor while offering a fun twist on the salad.

10. How can I make the dish more flavorful?

Experimenting with marinades on the steak and adding fresh herbs and spices to your salad can enhance flavors. Additionally, squeeze fresh lemon juice over the salad right before serving for a burst of brightness.

Additional Resources

If you enjoyed this recipe, you may find these related resources beneficial:
– Explore techniques for perfect grilling and roasting for further guidance in the kitchen.
– Discover ingredient information focusing on various cuts of steak and how they differ in flavor and texture.
– Browse other seasonal summer recipes that celebrate the bounty of farmers’ markets.
– Go through equipment recommendations to ensure you have the best tools for successful outdoor cooking.
– Find seasonal variations that allow you to take advantage of fresh produce available throughout the year.

Join the Conversation

We’d love to hear your thoughts! Share your experiences with Steak with Roasted Baby Potatoes and Cucumber Salad through social media. Post your versions of the dish, tagging us, and let us know how you added your personal twist! Recipe reviews are a great way for the community to learn about each other’s adaptations and suggestions.

Engaging with photos is another fun way to showcase your culinary creations and inspire others to try this dish. Feel free to drop comments or questions about any uncertainties; we encourage an engaging cookery conversation that brings everyone closer through a shared love for great food!

The Recipe

Steak with Roasted Baby Potatoes and Cucumber Salad

Serves: 4

Prep Time: 15 mins

Cook Time: 30 mins

Total Time: 45 mins

Kitchen Equipment Needed

  • Grill or grill pan
  • Oven-safe roasting pan
  • Meat thermometer
  • Knife and cutting board
  • Mixing bowl

Ingredients

  • 4 ribeye steaks (about 1 inch thick)
  • 2 lbs baby potatoes, halved
  • 1 large cucumber, sliced
  • 3 tbsp olive oil, divided
  • 2 garlic cloves, minced
  • 1 tsp dried oregano
  • Salt and pepper, to taste
  • Juice of 1 lemon
  • Fresh parsley for garnish

Directions

  1. Preheat your grill to medium-high heat and the oven to 425°F.
  2. In a bowl, toss halved baby potatoes with 2 tbsp olive oil, minced garlic, oregano, and season with salt and pepper.
  3. Spread potatoes on a baking sheet and roast for 25-30 minutes until golden and crisp.
  4. While the potatoes are roasting, season the steaks with salt and pepper. Optionally, marinate them for extra flavor.
  5. Grill the steaks for about 4-5 minutes per side for medium rare.
  6. While the steak grills, prepare the cucumber salad by mixing sliced cucumbers with remaining olive oil, lemon juice, salt, and pepper.
  7. Once cooked, let the steak rest for 5-10 minutes before slicing.
  8. Serve sliced steak alongside roasted baby potatoes and cucumber salad topped with fresh parsley.

Recipe Notes

  • For extra flavor, let the steak marinate in the refrigerator for a few hours before cooking.
  • Feel free to adjust seasoning based on personal taste preferences.
  • Use seasonal herbs to enhance the freshness of the salad.

Blackberry Lime Cheesecake Cupcakes: A Perfect Tangy-Sweet Dessert

blackberry lime dessert, lime cheesecake cupcakes, blackberry cheesecake bites, tangy lime cupcakes, sweet blackberry lime treats, mini cheesecake cupcakes

Blackberry Lime Cheesecake Cupcakes: A Fruity and Tangy Delight


Introduction

There’s something magical about combining the sweetness of blackberries with the zestiness of lime in a dessert like Blackberry Lime Cheesecake Cupcakes. These bite-sized treats are perfect for parties, afternoon tea, or as an indulgent snack. With a creamy cheesecake base and a fruity topping, this dessert is sure to impress.

Pair this recipe with other fruity delights such as Raspberry Cheesecake Brownie Bites or Mini Pineapple Coconut Cheesecakes for a dessert spread that wows.


Why Blackberry Lime Cheesecake Cupcakes?

  • Perfect Flavor Pairing: Tangy lime enhances the natural sweetness of blackberries.
  • Mini and Elegant: Great for individual servings.
  • Versatile and Easy to Make: Customizable to dietary needs and taste preferences.

Ingredients for the Recipe

For the Crust

  • 1 cup of graham cracker crumbs
  • 3 tablespoons of sugar
  • 5 tablespoons of melted butter

For the Cheesecake Filling

  • 16 ounces of cream cheese (softened)
  • 2/3 cup granulated sugar
  • 2 large eggs
  • 2 tablespoons lime juice
  • 1 tablespoon lime zest
  • 1 teaspoon vanilla extract

For the Blackberry Topping

  • 1 cup fresh or frozen blackberries
  • 2 tablespoons sugar
  • 1 tablespoon cornstarch
  • 1/4 cup water

Step-by-Step Recipe

Preparation

  1. Preheat the oven to 325°F.
  2. Line a muffin tin with cupcake liners.

Making the Crust

  • Mix graham cracker crumbs, sugar, and melted butter.
  • Press about a tablespoon of the mixture into the bottom of each liner.

Preparing the Cheesecake Filling

  • Beat cream cheese until smooth.
  • Gradually add sugar, eggs, lime juice, zest, and vanilla.
  • Pour the mixture over the crust, filling each liner about three-quarters full.

Creating the Blackberry Topping

  • Heat blackberries, sugar, and water in a saucepan.
  • Simmer until the berries break down and the sauce thickens.

Baking and Cooling

  • Bake for 18–20 minutes or until the cheesecakes are just set.
  • Cool at room temperature, then chill in the fridge for at least 2 hours.

Explore additional topping tips at Creative Fruit Dessert Toppings.


Tips for Perfect Cupcakes

  • Use room-temperature cream cheese for a smooth texture.
  • Avoid overbaking, which can cause cracks.
  • Garnish with fresh blackberries or lime zest for added visual appeal.

Internal Linking Opportunities

To enhance SEO and user engagement, consider linking to related recipes on Exorecipes:


FAQs About Blackberry Lime Cheesecake Cupcakes

1. Can I substitute lime with lemon?
Yes, lemon can be used for a slightly sweeter and less tangy flavor.

2. Can I use frozen blackberries?
Yes, just thaw and drain them before making the topping.

3. How do I prevent cracks in the cheesecake?
Ensure the batter isn’t overmixed and bake at a low temperature.

4. Can I make these cupcakes ahead of time?
Yes, they taste even better after being chilled overnight.

5. How do I store these cupcakes?
Refrigerate in an airtight container for up to 5 days or freeze for up to 3 months.


Serving and Storage Tips

  • Serving Suggestions: Serve chilled with a dollop of whipped cream or a drizzle of blackberry sauce.
  • Storage: Refrigerate leftovers or freeze individually wrapped cupcakes for future enjoyment.

Conclusion

Blackberry Lime Cheesecake Cupcakes are the perfect fusion of tangy and sweet, making them a standout dessert for any occasion. Try pairing them with other fruity or creamy desserts for a complete menu.

Homemade Lemon Crumble Bars: A Tangy and Sweet Dessert Delight

lemon crumble dessert, tangy lemon bars, lemon dessert recipe, easy crumble bars, sweet lemon crumble squares, homemade lemon dessert ideas

Homemade Lemon Crumble Bars: Tangy and Buttery Perfection

Introduction

Imagine a dessert that combines the tang of fresh lemons, the creaminess of butter, and the crunch of crumble topping — that’s what makes Homemade Lemon Crumble Bars an irresistible treat. These bars are a versatile dessert perfect for any occasion, from picnics to family gatherings.

Pair this recipe with other citrus-inspired creations, such as Meyer Lemon Shortbread Bars or elevate dessert spreads with Easy Lemon Buttermilk Sheet Cake.


Why Lemon Crumble Bars Are Special

  • Flavor-packed: A perfect balance of sweet and tangy.
  • Versatile: Enjoy them as a snack, dessert, or party centerpiece.
  • Simple ingredients: No need for fancy items; basic pantry staples do the trick.

Ingredients for Lemon Crumble Bars

Core Ingredients

  • Crumble Base and Topping:
    • All-purpose flour
    • Granulated sugar
    • Unsalted butter
    • A pinch of salt
  • Lemon Filling:
    • Fresh lemon juice
    • Lemon zest
    • Eggs
    • Sweetened condensed milk or sugar

Optional Add-ons

  • Chopped almonds or shredded coconut for added texture.
  • A dash of vanilla extract to deepen the flavor.

Essential Tools

  • A square baking pan (8×8 or 9×9).
  • Zester and juicer for fresh lemon prep.
  • Parchment paper for easy removal.

For detailed tips on baking with lemons, visit How to Zest and Juice Lemons Properly.


Step-by-Step Recipe

Preparation

  1. Preheat your oven to 350°F.
  2. Line your baking pan with parchment paper.
  3. Gather and measure all your ingredients.

Making the Crumble

  • Mix flour, sugar, salt, and cold butter until crumbly.
  • Press half the mixture into the baking pan to form the base.

Creating the Lemon Filling

  • Whisk together lemon juice, zest, eggs, and sweetened condensed milk until smooth.
  • Pour the filling evenly over the base.

Adding the Crumble Topping

  • Sprinkle the remaining crumble mixture on top of the lemon layer.

Baking and Cooling

  • Bake for 25–30 minutes or until the top is golden brown.
  • Let the bars cool completely before slicing for clean edges.

For crumble inspiration, check out Creative Crumble Topping Recipes.


Tips for the Best Lemon Crumble Bars

  • Use Fresh Lemons: Bottled juice lacks the brightness of fresh lemons.
  • Chill the Bars Before Cutting: This helps maintain their shape.
  • Enhance the Crust: Add a pinch of cinnamon for warmth.

Internal Linking Opportunities


FAQs About Lemon Crumble Bars

1. Can I use gluten-free flour?
Yes, replace all-purpose flour with a gluten-free mix.

2. How do I store these bars?
Refrigerate in an airtight container for up to 5 days or freeze for 3 months.

3. Can I make the bars less sweet?
Reduce the sugar in the filling or use tart lemons like Eureka or Lisbon.

4. What’s the best way to get even slices?
Use a sharp knife and wipe it clean between cuts.

5. Can I substitute lime for lemon?
Absolutely! Lime provides a tropical twist.


Serving and Storage

  • How to Serve Lemon Crumble Bars:
    • With tea, coffee, or lemonade.
    • Topped with whipped cream or a drizzle of icing.
  • Storage Tips:
    • Refrigerate to maintain freshness.
    • Freeze individually wrapped bars for quick snacks.

Conclusion

With their perfect balance of tangy and sweet flavors, Homemade Lemon Crumble Bars are a versatile dessert that will impress your family and friends. Pair them with other comforting treats, and don’t forget to explore creative variations.

Delicious No Bake Pineapple Coconut Bars for Easy Summer Snacking

No Bake Pineapple Coconut Bars: A Tropical Delight

⚖️
Difficulty
Easy

⏲️
Prep Time
15 mins

🕒
Cook Time
0 mins

⏱️
Total Time
15 mins

🍽️
Servings
16 bars

Indulge in the tropical flavors of our No Bake Pineapple Coconut Bars! This delightful treat perfectly marries the sweetness of fresh pineapple with the creamy richness of coconut, creating a symphony of delightful flavors in every bite. Ideal for warm days, these bars make for a perfect snack or dessert that doesn’t require an oven—allowing the delicious taste of summer to come alive any day of the year.

These No Bake Pineapple Coconut Bars are not just delicious; they are also easy to whip up and require minimal preparation. With just a handful of ingredients, you can create a dessert that’s refreshing, satisfying, and utterly irresistible. Picture yourself at a sunny beach, savoring these bars, and with each mouthful, you’ll be whisked away to paradise. Let’s dive right into the recipe to enjoy these tropical treats!

Quick Recipe Highlights

  • Flavor Profile: The vibrant sweetness of ripe pineapples blends beautifully with the creamy, nutty notes of coconut, giving these bars a well-rounded tropical flavor.
  • Texture: The bars have a chewy yet crumbly texture that holds together beautifully, enhanced by the crunchiness of shredded coconut.
  • Aroma: A delightful tropical aroma wafts from these bars as you slice into them, making them incredibly enticing for both your taste buds and your senses.
  • Visual Appeal: With their bright yellow color from pineapple and the speckled white of coconut, these bars look as delightful as they taste, making them perfect for any occasion.
  • Skill Level Needed: This recipe is beginner-friendly, requiring no baking skills, making it a great choice for novice bakers.
  • Special Equipment: You only need a mixing bowl and a baking dish to prepare these delicious no-bake bars.

Recipe Overview

  • Difficulty Level: This recipe is incredibly easy, making it accessible to anyone, regardless of cooking experience.
  • Category: These bars are perfect as a snack, dessert, or even as a light breakfast option on busy mornings.
  • Cuisine: This recipe is inspired by tropical cuisine, commonly associated with warm, sunny locales, and embodies the essence of island living.
  • Cost: The ingredients are affordable, with an approximate cost of around $10 to make a generous batch of bars.
  • Season: Best enjoyed in the spring and summer months when tropical fruits are at their peak, but they can be savored year-round.
  • Occasion: Perfect for picnics, potlucks, or just as a delightful treat for family gatherings.

Why You’ll Love This Recipe

The No Bake Pineapple Coconut Bars are not only delicious but provide a wonderful taste and texture appeal. The sweetness of the pineapple hits your palate immediately, followed by the rich and creamy flavor of coconut, making for a harmonious blend that leaves you wanting more. The chewiness from the oats gives a satisfying bite while the coconut adds a delightful crunch, providing a unique mouthfeel designed for pleasure.

One of the biggest advantages of this recipe is its convenience. With just a mix-and-press method, you can have these bars ready to chill in mere minutes. There’s no scorching stove, no complicated techniques, just simple preparation that allows you to focus on flavor rather than fussiness. This ease of preparation means you can enjoy these bars even on your busiest days!

Nutritionally, the combination of coconut and pineapple offers a wealth of benefits. Pineapple is rich in vitamins, particularly vitamin C, which boosts your immune system while helping your body absorb iron. Coconut contributes healthy fats and fiber, promoting digestion and providing sustained energy. Together, they form a wholesome treat that’s both flavorful and healthy.

When it comes to entertaining, these No Bake Pineapple Coconut Bars are a hit! They’re easy to serve, look stunning on a platter, and can please a crowd without the need for elaborate preparation. Just cut them into bars, and you have an eye-catching, delicious treat that your guests will love.

Cost-effectiveness is another significant factor, as this recipe is quite budget-friendly. The ingredients are common pantry items and tropical fruits that are often on sale during their peak seasons. Enjoy a scrumptious, healthy dessert without breaking the bank!

Historical Background and Cultural Significance

The origin of pineapple and coconut desserts dates back centuries to tropical regions where these fruits thrive. Coconuts have long held cultural significance in many Pacific Island societies, where they symbolize sustenance and wealth. Pineapples, often regarded as a sign of hospitality, have been a key ingredient in traditional tropical desserts.

In many cultures, these fruits are celebrated in festivals and gatherings, representing abundance and joy. The combination of pineapple and coconut in desserts often symbolizes the fun and relaxation associated with beach life, bringing with it the essence of summer regardless of the actual season.

Over time, the recipe for No Bake Pineapple Coconut Bars has evolved from traditional preparations into modern variations suited for quick and easy preparation. While classic desserts may have involved complicated processes, today’s recipes encourage creativity and simplicity.

Different regions have introduced their unique twists to the basic recipe, showcasing local ingredients and preferences. For instance, some cultures might incorporate additional tropical fruits, while others may experiment with nuts and other flavorings to enhance the bars’ taste even further.

Ingredient Deep Dive

Pineapple: Pineapples are not only a delicious tropical fruit but are also culturally significant, often symbolizing hospitality and welcome. Nutritionally, they are packed with vitamin C and bromelain, an enzyme that aids in digestion. When selecting a pineapple, look for a fragrant scent and firm skin, indicating ripeness. Store whole pineapples at room temperature, and once cut, refrigerate in an airtight container.

Coconut: The coconut is a remarkable fruit with a rich history in tropical regions worldwide. Coconut is an excellent source of healthy fats, fiber, and several essential minerals. When buying shredded coconut, check for freshness and unsweetened varieties if you’re looking to control sugar intake. Store in an airtight container in a cool, dark place to maintain its flavor, and consider using fresh coconut for a more vibrant taste in your bars.

Common Mistakes to Avoid

  • Using overly ripe pineapple can make the bars too watery, compromising the texture. Always select solid pineapples.
  • Not chilling the bars long enough may result in a crumbly texture. Allow ample time for them to set in the fridge.
  • Overmixing the ingredients can lead to a dense consistency. Mix just until combined for the best results.
  • Substituting unsweetened coconut for sweetened can alter the flavor profile significantly, so be cautious with your substitutions.
  • Forgetting to line the baking dish with parchment paper can make removing the bars difficult, so always prepare your pan before starting.
  • Not cutting the bars with a sharp knife may result in uneven shapes; use a warm knife for clean edges.
  • Storing the bars at room temperature can lead to a mushy texture; be sure to keep them refrigerated.
  • Using too much liquid sweetener can result in overly sticky bars, so balance it well with dry ingredients.
  • Skipping the oat layer could make the bars less filling, so don’t skip important ingredients.
  • Not allowing the bars to rest before serving can impact the overall flavor; patience is key!

Essential Techniques

Mixing: Proper mixing is crucial to ensure all ingredients are evenly distributed, leading to balanced flavor and texture in your No Bake Pineapple Coconut Bars. To master this, use a spatula to fold the ingredients gently without overmixing. The goal is just to combine them until no dry ingredients remain visible. Common pitfalls include mixing too aggressively, leading to a dense final product. A gentle folding technique will prevent this and help maintain a light texture.

Pressing the Mixture: Pressing the mixture firmly is essential for ensuring your bars hold their shape once cut. Use the back of a measuring cup or your fingers to compact the mixture evenly into the pan. Visual cues such as slight compression and a flat surface will indicate success. A common mistake is not applying enough pressure, resulting in crumbly bars that fall apart. Take your time with this step for the best outcome!

Pro Tips for Perfect No Bake Pineapple Coconut Bars

– Ensure your ingredients are at room temperature for better mixing and flavor integration.
– Use fresh pineapple for a more vibrant and lush flavor that is worth the effort.
– Consider adding a pinch of salt to balance the sweetness of the bars and enhance the flavors.
– Swap regular oats for gluten-free oats to cater to dietary needs without sacrificing taste.
– For a touch of indulgence, drizzle melted dark chocolate over the bars before serving.
– Experiment with a scoop of vanilla or coconut yogurt on the side for added creaminess and flavor.
– Always allow the bars to chill for at least 2 hours to fully set before slicing.
– Use a pizza cutter for quick and efficient slicing of your cooled bars.

Variations and Adaptations

Try experimenting with different flavor profiles by incorporating various fruits like mango or kiwi for a unique twist. Seasonal adaptations could include using pumpkin puree in the fall or citrus zest during winter for a refreshing contrast.

For dietary modifications, consider making these bars vegan by using maple syrup instead of honey. Low-carb variations can be achieved by substituting granola with nut flour. If you enjoy different textures, add chopped nuts or seeds to create a delightful crunch. Presentation can also be varied by layering the bars with alternative fruit purees for a striking visual effect.

Serving and Presentation Guide

Plating your No Bake Pineapple Coconut Bars can enhance their appeal. For an elegant presentation, cut the bars into neat squares and arrange them on a colorful platter. Garnish with fresh pineapple slices, shredded coconut, or mint leaves for a burst of color. Serve them chilled alongside a dollop of whipped cream or coconut yogurt for a delightful pairing.

Consider temperature when serving; these bars are best served cold, which keeps them firm and refreshing. For portion control, cut small, bite-sized portions, making them perfect for sharing at gatherings.

Wine and Beverage Pairing

Pair your No Bake Pineapple Coconut Bars with a chilled glass of Moscato or Riesling for a fruity complement that enhances the tropical flavors. If you prefer non-alcoholic options, a sparkling coconut water or a pineapple-based smoothie would pair beautifully. If you’re a coffee lover, try a light iced coffee or vanilla latte to balance the sweetness of the bars.

Storage and Shelf Life

To maintain the freshness of your No Bake Pineapple Coconut Bars, store them in an airtight container in the refrigerator. They typically last up to one week, but quality is best within the first few days when they’re most flavorful. Ensure they are kept chilled, as they can become mushy if left at room temperature for extended periods.

For longer storage, consider freezing the bars. Wrap them tightly in plastic wrap and aluminum foil to prevent freezer burn. Thaw them in the refrigerator before serving.

Make Ahead Strategies

To streamline preparation, consider making your No Bake Pineapple Coconut Bars a day in advance. This allows the flavors to meld and the bars to set perfectly. Assemble the mixture and store it in the refrigerator until you’re ready to press it into the pan.

If you’re preparing other elements for your gathering, store the bars between steps in the fridge to maintain quality. For optimal freshness, look to add any toppings or garnishes just before serving.

Scaling Instructions

This recipe can be easily scaled to meet your needs. To halve it, adjust the quantities of each ingredient accordingly, and you may also want to use a smaller dish for pressing. If wanting to double or triple the recipe, ensure you have a large enough mixing bowl and consider using multiple pans to accommodate the quantity.

When scaling, keep an eye on the setting time—the larger the batch, the longer it may require in the refrigerator. Always store leftovers according to the storage guidelines provided.

Nutritional Deep Dive

The No Bake Pineapple Coconut Bars are balanced in macros, delivering around 150 calories per serving. They are a wholesome treat with proteins from the nuts and healthy fats from the coconut, contributing to a filling snack. Additionally, they provide significant vitamins from the fresh pineapple, pairing well with the overall nutritious profile.

For those mindful of their dietary goals, controlling portion sizes becomes essential. These bars offer a satisfying sweetness that can curb sugar cravings without compromising health.

Dietary Adaptations

Making these No Bake Pineapple Coconut Bars gluten-free is straightforward; simply use gluten-free oats. For a dairy-free version, ensure the coconut or additional ingredients used do not contain dairy.

Vegan adaptations can include replacing honey with maple syrup or agave nectar. Low-carb or keto options may involve substituting traditional sweeteners with stevia or erythritol while using nut flours instead of oats.

For those following a paleo diet, omit any processed sweeteners and focus on using clean, whole ingredients. This flexibility makes the bars accessible for a variety of dietary preferences and needs.

Troubleshooting Guide

Common texture issues may arise if the bars feel too soft upon slicing. This often results from insufficient chilling time; ensure they rest in the fridge long enough to set completely.

Flavor balance can be adjusted if the bars taste overly sweet; one way to enhance flavor without additional sweetness is by adding a pinch of salt or a splash of citrus juice to brighten up the taste.

If you face temperature problems, always ensure your ingredients are fused at room temperature before mixing; cold ingredients can cause clumping.

Equipment challenges arise if you don’t have a proper baking dish; substitute any loaf or square pan according to your preferred shape.

When swapping ingredients due to availability, be cautious with ratios to avoid altering the desired outcome dramatically. Timing concerns can affect setting; ensure you’re mindful of the time allocated for chilling in the fridge.

Recipe Success Stories

Community feedback has consistently praised the No Bake Pineapple Coconut Bars for their irresistible taste and simple preparation method. Many readers have celebrated the versatility of this recipe, sharing adaptations that led to unique flavor profiles, such as adding chocolate or nut butters.

Adaptation stories from the community have highlighted successful substitutions, where individuals crafted nut-free or lower-sugar versions without sacrificing flavor. Others have shared stunning photographs of their finished bars, showcasing how visually appealing these treats can be.

Recipe reviews often note the rave-worthy responses received from guests at gatherings, reinforcing the bars’ success among family and friends. Readers repeatedly comment on the joy of making these bars, turning a simple recipe into a beloved family tradition.

Frequently Asked Questions

Can I use canned pineapple for this recipe?
Yes, you can use canned pineapple, but be sure to drain it well to avoid excess moisture that could make the bars soggy. Fresh pineapple is typically preferred for the best flavor.

How long will these bars last in the refrigerator?
When stored properly in an airtight container, the bars will last for about one week in the refrigerator. Their texture is best within the first few days.

Can I substitute the coconut in this recipe?
Absolutely! While coconut adds a unique flavor, you can substitute it with nuts or seeds. Simply adjust the quantities to maintain texture.

Is there a way to make these bars gluten-free?
Yes, to make these bars gluten-free, use gluten-free oats instead of regular oats. This adjustment ensures that you can still enjoy these treats without gluten.

What can I do if the bars are too sticky?
If the mixture is too sticky, try adding a little more oats or coconut to absorb the excess moisture. Chilling them longer can also help firm them up.

Can I freeze these bars?
Yes, you can freeze the bars for up to two months. Ensure they are wrapped tightly in plastic wrap and aluminum foil to prevent freezer burn.

How do I know when the bars are set?
The bars should feel firm to the touch and hold their shape when cut. If they’re too soft, give them more time in the fridge to set properly.

Can I use alternative sweeteners in this recipe?
Definitely! You can substitute honey with maple syrup, agave nectar, or stevia, just be mindful of adjusting the quantities as needed.

What should I do if I don’t have a mixing bowl?
If you don’t have a mixing bowl, a large pot or any container suitable for mixing can be used. Just ensure it has enough space to stir the ingredients well.

Can I make these bars without oats?
While oats are a crucial part of the texture, you can experiment with using nut flour or ground almonds to create a base, though this alters the flavor and consistency.

Additional Resources

If you loved these No Bake Pineapple Coconut Bars, check out other tropical-inspired recipes on our blog for a variety of delicious treats. We also offer technique guides on making the best no-bake desserts and ingredient information focusing on tropical fruits. For those interested, our equipment recommendations section has everything you need for easy and successful baking, ensuring you’re prepared for any recipe.

Join the Conversation

We’d love to hear your thoughts on this No Bake Pineapple Coconut Bars recipe! Share your photos, variations, and feedback on social media, and connect with fellow food enthusiasts. Feel free to leave reviews or engage in discussions about your favorite tropical recipes, exchanging tips and experiences in the kitchen.

The Recipe

No Bake Pineapple Coconut Bars

Serves: 16 bars

Prep Time: 15 mins

Cook Time: 0 mins

Total Time: 15 mins

Kitchen Equipment Needed

  • Mixing bowl
  • Baking dish (8×8 inch)
  • Spatula or spoon
  • Knife for slicing
  • Parchment paper

Ingredients

  • 1 cup finely chopped fresh pineapple
  • 1 cup shredded unsweetened coconut
  • 1 cup rolled oats
  • 1/3 cup honey or maple syrup
  • 1/4 cup coconut oil melted
  • 1 tsp vanilla extract

Directions

  1. In a mixing bowl, combine finely chopped pineapple, shredded coconut, rolled oats, honey (or maple syrup), melted coconut oil, and vanilla extract.
  2. Mix until fully combined and the mixture holds together when pressed.
  3. Prepare an 8×8 inch baking dish by lining it with parchment paper.
  4. Transfer the mixture into the dish, pressing it evenly into all corners using a spatula.
  5. Cover the dish and refrigerate for at least 2 hours until set.
  6. Remove from refrigerator, lift out of the dish using the parchment paper, and slice into bars.
  7. Enjoy immediately or store in an airtight container in the refrigerator.

Recipe Notes

  • For added texture, consider mixing in some chopped nuts or seeds.
  • Feel free to drizzle melted chocolate on top for an indulgent touch.
  • Bars can be frozen if you’re looking to enjoy them later; just ensure they are well-wrapped.

Luscious Strawberry Cream Cheese Crumble Cookies: A Perfect Dessert Treat

strawberry crumble cookies, cream cheese cookies with strawberry, strawberry cookies recipe, crumble topping cookies, strawberry cream cheese dessert

Luscious Strawberry Cream Cheese Crumble Cookies: The Ultimate Dessert Treat

Introduction

Delicious, soft, and with a delightful crumble topping, Strawberry Cream Cheese Crumble Cookies are an irresistible treat. Combining the tang of strawberries with creamy cheese, these cookies are perfect for any occasion.

To enhance your dessert repertoire, pair these cookies with Cinnamon Roll Cake with Cream Cheese Glaze or Strawberry Shortcake Sushi.


Why You’ll Love These Cookies

  • Unique Flavor Combination: Tangy strawberries and rich cream cheese.
  • Perfect Texture: Soft cookies topped with a crunchy crumble.
  • Easy to Customize: Add your personal twist to the recipe.

Ingredients for Strawberry Cream Cheese Crumble Cookies

Core Ingredients

  • Cookie Dough Base: Butter, sugar, eggs, and all-purpose flour.
  • Cream Cheese Filling: Cream cheese, powdered sugar, and vanilla.
  • Strawberry Flavor: Freeze-dried strawberries or jam.
  • Crumble Topping: Butter, sugar, and flour.

Optional Ingredients

  • Chopped nuts for added texture.
  • White chocolate chips for sweetness.

For baking tips, visit Creative Crumble Topping Ideas.


How to Make These Cookies

Preparation

  1. Preheat your oven to 350°F and prepare your baking sheets with parchment paper.
  2. Soften the butter and cream cheese for easier mixing.

Making the Dough

  • Cream together butter and sugar until fluffy.
  • Add eggs and vanilla extract, followed by dry ingredients.

Filling and Assembly

  • Form dough into balls, make an indentation, and fill with cream cheese mixture.
  • Sprinkle crumble topping over each cookie.

Baking

  • Bake for 12–15 minutes or until golden brown.
  • Cool completely to set the cream cheese center.

Internal Linking Opportunities


Tips for Perfect Strawberry Cream Cheese Crumble Cookies

  • Get the Best Crumble: Use cold butter to maintain texture.
  • Avoid Overbaking: This keeps the cookies soft and creamy.
  • Enhance the Strawberry Flavor: Add a splash of strawberry extract or a bit of lemon zest.

For more ideas, check out Tips for Baking with Freeze-Dried Fruits.


FAQs About Strawberry Cream Cheese Crumble Cookies

1. Can I use fresh strawberries?
Yes, but chop them finely to avoid extra moisture.

2. How should I store these cookies?
Store in an airtight container for up to 3 days. Refrigerate for longer freshness.

3. Can I freeze the cookies?
Yes, freeze the dough or baked cookies for up to 2 months.

4. What if I don’t have freeze-dried strawberries?
Substitute with fresh or jam, adjusting for moisture.

5. Can I make these cookies vegan?
Yes, replace butter with plant-based alternatives and cream cheese with a vegan version.


Conclusion

Strawberry Cream Cheese Crumble Cookies are a delicious, easy-to-make treat that combines fruity and creamy flavors with a crunchy texture. Whether for a party or a casual snack, these cookies are guaranteed to impress.