Delicious Spinach and Crab Stuffed Salmon with Lemon Cream Sauce

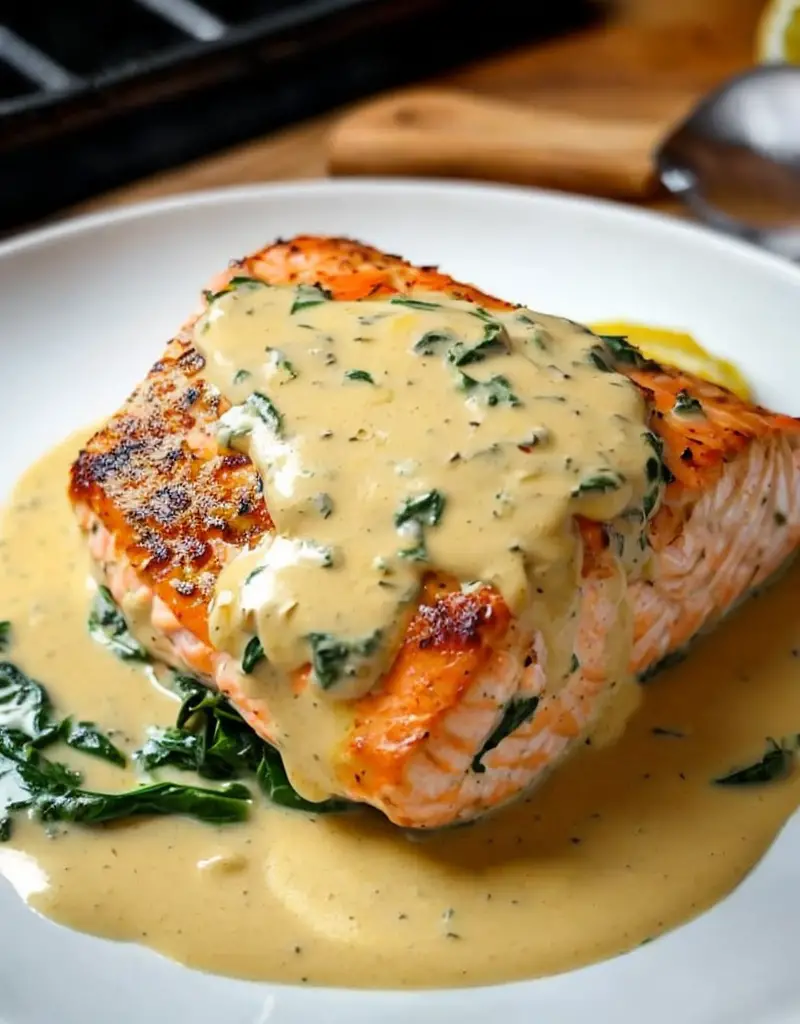
Spinach and Crab Stuffed Salmon with Lemon Cream Sauce: A Luscious Delight

⚖️
Difficulty
Medium

⏲️
Prep Time
20 mins

🕒
Cook Time
30 mins

⏱️
Total Time
50 mins

🍽️
Servings
4

Enjoy a seafood masterpiece with this Spinach and Crab Stuffed Salmon with Lemon Cream Sauce. This recipe combines tender salmon, filled with a savory mixture of creamy crab meat and fresh spinach, finished with a citrusy lemon cream sauce that elevates the dish to new culinary heights. Perfectly balanced flavors, complemented by the richness of the crab and the freshness of spinach, make this dish an elegant choice for family dinners or special occasions.

The salmon fillets, when roasted, lend themselves beautifully to the stuffing, providing a moist and flavorful element to the dish. The lemon cream sauce adds a refreshing zing, brightening the palate with each bite. This delectable recipe is not only a treat for the taste buds but also a feast for the eyes, making it an outstanding centerpiece for any meal.

Quick Recipe Highlights

  • Flavor Profile: The interplay of buttery salmon, succulent crab, and tangy lemon creates a harmonious taste experience that tantalizes the senses.
  • Texture: Each bite offers a delightful contrast between the flaky salmon, creamy filling, and the smooth lemon sauce.
  • Aroma: The aroma of freshly baked salmon mingling with the zesty notes of lemon and savory crab filling fills the kitchen with an irresistible scent.
  • Visual Appeal: The vibrant colors of the spinach against the pink salmon and the creamy white sauce come together for an eye-catching presentation.
  • Skill Level Needed: This recipe is suitable for intermediate cooks who are comfortable with basic cooking techniques.
  • Special Equipment: A baking dish and a mixing bowl are essential for preparing this recipe.

Recipe Overview

  • Difficulty Level: The complexity lies in the preparation of the filling and ensuring the salmon is cooked to perfection without drying out.
  • Category: This dish makes for an elegant main course, fitting for both casual family dinners and upscale gatherings.
  • Cuisine: This recipe has a distinct coastal flair, rooted in culinary traditions celebrating seafood.
  • Cost: The approximate cost is moderate, featuring fresh seafood and seasonal ingredients that elevate its value.
  • Season: Best enjoyed year-round, although fresh spinach and crab are particularly delightful in spring and summer.
  • Occasion: Perfect for special celebrations, anniversaries, or romantic dinners, adding a touch of sophistication to any table.

Why You’ll Love This Recipe

Indulge in the incredible taste and texture of the Spinach and Crab Stuffed Salmon. With its blend of fresh ingredients, this dish offers an unforgettable experience on your plate. The buttery richness of salmon pairs flawlessly with the sweet, crab filling, where the creamy texture brings comfort and satisfaction to every bite. The refreshing lemon cream sauce ties everything together, offering a crisp finish that leaves you wanting more.

Not only is this dish an excellent culinary experience, but it’s also incredibly convenient to prepare. With just a few steps and easily accessible ingredients, you can create this impressive meal in under an hour. This makes it an ideal choice for busy weeknights when you want something healthy without sacrificing flavor or sophistication.

The nutritional benefits of this recipe are significant as well. Salmon is rich in omega-3 fatty acids, which are essential for heart health, while crab meat adds a lean protein component high in vitamins. The spinach provides a punch of iron and fiber, contributing to a well-balanced meal that’s as good for you as it is delicious.

When it comes to socializing, this stuffed salmon is sure to impress your guests. The sophisticated flavors and visually stunning presentation make it a standout dish at any gathering. Whether it’s a dinner party or a romantic evening, serving this meal will create memorable moments around the table.

Lastly, this recipe delivers great cost-effectiveness. While seafood can sometimes be pricey, this dish stretches quality ingredients into a delightful feast for four, making it accessible without breaking the bank. Sourcing the ingredients fresh at your local market can further ensure you keep costs manageable while maximizing taste.

Historical Background and Cultural Significance

The origin of stuffed salmon dates back to the culinary practices of coastal communities, where fresh fish was a staple. Traditionally, these communities would enhance their catch with locally sourced herbs and proteins, leading to various stuffing techniques. The combination of crab and spinach reflects a trend of incredible resourcefulness, allowing cooks to utilize what was available in their environment.

Salmon holds a particular place in some cultures, symbolizing abundance and prosperity. In many Native American traditions, salmon is celebrated and respected, often portrayed as a life-sustaining food source. Crab, similarly, evokes images of seaside gatherings and community feasts, bringing friends and family together through shared meals.

Over the years, the technique of stuffing salmon has evolved, embracing various flavors and styles. From Mediterranean herbs to Asian-inspired sauces, cooks have adapted their recipes to suit regional tastes. The Spinach and Crab Stuffed Salmon with Lemon Cream Sauce stands as an elegant modern reinterpretation of this age-old tradition.

Regional variations abound, with different coastal cultures putting their spin on this beloved dish. For instance, adding local seafood or typical spices can yield unique flavors and fragrance, highlighting the versatility of the stuffed salmon concept across different cuisines.

Ingredient Deep Dive

  • Salmon: This key ingredient is celebrated for its rich flavor and fatty texture. Known for its omega-3 fatty acids, salmon is not only delicious but also enhances heart health. When selecting salmon, look for vibrant color and firm texture. Store it in the coldest part of your fridge and consume it within two days for maximum freshness. Consider sticking to wild-caught varieties for an environmentally friendly choice.
  • Crab Meat: A delicacy in many cultures, crab adds sweetness and a luxurious texture to the dish. It’s an excellent source of lean protein packed with essential minerals. When purchasing crab meat, ensure it’s sourced sustainably, and check for freshness by smelling it for any off odors. Store in an airtight container and consume within one day if fresh or follow packaging instructions if canned. If crab meat isn’t available, consider shrimp or scallops as substitutes.
  • Spinach: A nutrient powerhouse, spinach brings a nutritious green element to the dish. Loaded with vitamins A, C, K, and iron, this leafy green boosts the overall health value. Always choose fresh spinach with vibrant leaves and avoid any wilting or discoloration. Properly wash, and wrap in a damp paper towel before sealing in a bag to prolong freshness. For substitutions, kale or Swiss chard can also work, though cooking times may adjust.
  • Lemon: Adding brightness and acidity, lemon is essential for balancing flavors. It’s rich in vitamin C and antioxidants, beneficial for immune support. Select firm lemons with a bright yellow skin for maximum juice content. Store them at room temperature for short durations or refrigerate for extended storage. If you don’t have lemons, lime or vinegar can work as great alternatives in a pinch.

Common Mistakes to Avoid

  • Overcooking the salmon can lead to a dry and unpalatable meal. Always check for doneness using a meat thermometer; it should read 145°F (63°C).
  • Failing to season the crab and spinach mixture properly leads to bland flavor. Season generously with salt, pepper, and spices before stuffing.
  • Not letting the salmon rest after cooking might cause it to dry out. Allow it to rest for about 5 minutes before slicing into it.
  • Using low-quality crab meat can compromise the dish’s integrity. Opt for fresh or high-quality canned crab.
  • Skipping the lemon sauce diminishes the dish’s overall flavor complexity. The cream sauce is vital in enriching the salmon’s taste; don’t omit it!
  • Forgetting to prep ingredients ahead of time can lead to chaotic cooking. Organize everything to avoid feeling rushed during preparation.
  • Not checking for bones in the salmon fillet can lead to unpleasant surprises. Always inspect closely before using it in your dish.
  • Using too much stuffing can cause the salmon to break during cooking. Use just enough to fill without overstuffing.
  • Ignoring visual cues for doneness can lead to undercooked fish. The salmon should appear opaque and slightly flaky.
  • Not serving immediately after cooking can affect texture and flavor. Consume while fresh and warm for the best experience.

Essential Techniques

Mastering the art of stuffing salmon is crucial for achieving a delightful result. Start by filleting the salmon properly. Hold the knife at a slight angle and glide it along the spine to get clean, even fillets without losing too much meat. This technique ensures the stuffing is embraced by tender fish, preventing it from drying. Always practice with a fresh piece of salmon to gain confidence.

The stuffing process is where the technique shines. A common pitfall is overstuffing, leading to spillage during cooking. Aim for a moderate amount of the crab and spinach filling. After placing the stuffing, gently fold the top over to encase it securely without breaking the salmon. This visual check will enhance your presentation and help retain moisture during baking.

Pro Tips for Perfect Spinach and Crab Stuffed Salmon

1. Always select high-quality, fresh ingredients for the best flavor and health benefits; seafood loses flavor rapidly when not fresh.
2. Preparing the lemon cream sauce while the salmon bakes saves time and ensures everything is served hot.
3. Use a food processor for a smoother stuffing mixture, making it easier to spread on the salmon.
4. To enhance the flavor profile, add minced garlic and chopped dill to the stuffing mixture.
5. Test the stuffing mixture for seasoning before using it; adjust to taste for optimal flavor.
6. After baking, a squeeze of fresh lemon juice on top helps elevate the citrus notes even further.
7. Serve with complementary sides such as garlic roasted asparagus or a light salad to balance the meal.
8. For more crunch and texture, add breadcrumbs to the crab filling.

Variations and Adaptations

For those looking to explore regional variations, consider introducing fresh herbs like dill, parsley, or tarragon to the stuffing for a distinctly Mediterranean twist. Alternatively, using smoked salmon enhances the dish’s flavor profile while catering to those who prefer a more intensely flavored fish.

In summer, replace the crab with seasonal seafood like shrimp or scallops for a delightful twist, while still adhering to the original spinach base. During cooler months, try adding winter herbs, such as thyme or rosemary, to provide warmth and earthiness to the dishes.

If dietary modifications are necessary, you can prepare a vegetarian version by omitting the crab and using roasted red peppers and ricotta for stuffing. This approach provides the filling richness without any animal products and is a perfect alternative for plant-based diets.

In terms of presentation, consider serving the salmon on a bed of lemon-infused quinoa for a vibrant contrast. A sprinkle of microgreens or edible flowers adds an exquisite finishing touch, enhancing your dish’s visual appeal.

Serving and Presentation Guide

The key to an impressive plating of your Spinach and Crab Stuffed Salmon is all about balance. Begin by placing the salmon fillet artfully on a white or dark-colored plate to create a striking contrast. Pour the lemon cream sauce over the top, allowing it to cascade slightly down the sides for visual appeal.

For garnish, fresh herbs like parsley or dill can be finely chopped and sprinkled around the plate, contributing to the dish’s elegance and echoing flavors used in the salmon. An additional suggestion is to serve with thin lemon wedges to provide an interactive element for guests to enjoy.

Incorporating sides such as roasted vegetables or a mixed salad adds color and texture contrast to the plate. Make sure to keep portion sizes in mind; aim for one salmon fillet per person on the plate, paired with a generous serving of side dishes to complete the meal.

Temperature is important; serve the salmon warm, as this enhances both the taste and texture, allowing flavors to shine. Lastly, use a large serving fork to facilitate easy portioning, ensuring guests can enjoy the salmon without difficulty.

Wine and Beverage Pairing

Pairing wine with Spinach and Crab Stuffed Salmon can elevate the overall dining experience. A well-chosen Sauvignon Blanc brings out the fresh lemon notes while complementing the richness of the crab meat with its lively acidity. Additionally, consider a light Chardonnay for a creamier pairing that resonates with the creamy lemon sauce.

For non-alcoholic options, a zesty sparkling water with a hint of lime makes a refreshing accompaniment, counterbalancing the flavors of the meal effectively. If you prefer a heartier beverage, a light herbal tea, such as chamomile or mint, provides a balanced finish.

Serve the wines chilled, ideally between 45°F to 50°F, as this will enhance the refreshing qualities while keeping the meal beautifully presented. Don’t forget to encourage your guests to sample both wine and meal together for an unforgettable flavor journey.

Storage and Shelf Life

When it comes to storing leftover Spinach and Crab Stuffed Salmon, ensure to keep it in an airtight container in the refrigerator. It is best to consume the leftovers within 2-3 days to maintain quality and safety. Always allow the salmon to cool to room temperature before sealing it to prevent moisture build-up.

Reheating should be done gently to retain texture and flavor. Aim to reheat in the oven or air fryer at a low temperature (about 300°F) for 10-15 minutes, covered with foil to prevent drying out. Microwaving can be done but may affect the texture.

If you have leftovers that you do not plan to eat within the recommended time, freezing is a viable option. Wrap the salmon tightly in plastic wrap and place it in a freezer-safe container or bag. Properly stored, it can last up to 2 months in the freezer. Thaw in the refrigerator overnight before reheating for best results.

Make Ahead Strategies

Consider prepping the filling a day ahead to save time on busy cooking days. Store the crab and spinach mixture in an airtight container in the refrigerator, allowing flavors to meld together. When you are ready to cook, simply stuff the salmon and proceed with baking.

Additionally, you can assemble the stuffed salmon in advance and refrigerate it before baking. Ensure to cover it well with plastic wrap or foil to avoid drying out; this can be a lifesaver when hosting dinner parties.

If making the lemon cream sauce ahead of time, store it separately to maintain its freshness. Reheat gently on the stove or in the microwave when ready to serve, adding a splash of cream if it thickens too much.

This make-ahead approach not only maintains flavor but also reduces last-minute stress, allowing you to enjoy your time with guests instead of feeling overwhelmed in the kitchen.

Scaling Instructions

Should you need to scale the recipe, consider what portion adjustments work best for your audience. Halving the recipe is straightforward and keeps cooking times roughly the same. Depending on the available size of salmon fillets, each piece can be slightly smaller but requires careful monitoring of cooking times to ensure they are perfectly baked.

Doubling or tripling requires space in the oven; ensure all salmon fillets can fit without overcrowding. Adjust the cooking time as needed to suit larger quantities—utilizing an instant-read thermometer will help ensure all fillets are cooked through but don’t overdo it.

Be mindful of how much filling you produce; adjust the amount based on the size of the salmon used. Feeling confident with one large piece can offer another opportunity to delight guests, as a presentation of a giant stuffed salmon often steals the show.

Nutritional Deep Dive

The Spinach and Crab Stuffed Salmon offers a wholesome array of nutrients largely contributed by each component. Salmon comprises high-quality protein, which is essential for muscle health and can contribute to weight management. Each serving also provides beneficial omega-3 fatty acids that are well-regarded for promoting heart and brain health.

The inclusion of crab adds lean protein while offering significant vitamins like B12, known for its role in energy production and neurological function. Meanwhile, spinach contributes essential minerals like iron and calcium, resulting in a dish rich in necessary nutrients for various bodily functions.

When portion analysis is conducted, a balanced meal can be achieved, especially when paired with vegetables or grains. This combination sustains energy while monitoring caloric intake, making it suitable for individuals focused on maintaining a nutritious diet.

For those planning a balanced meal, watch portion sizes carefully. While healthy, the rich ingredients can lead to significant caloric content, which needs moderation for those keeping track of daily intake.

Dietary Adaptations

If gluten-free options are necessary, the Spinach and Crab Stuffed Salmon fits perfectly into this category. No wheat-based products are required for this dish, ensuring that everyone at your table can enjoy it without worry.

A dairy-free version is possible by replacing traditional cream with coconut cream in the lemon sauce. This maintains a rich texture while catering to those sensitive to lactose. Carefully check all ingredient labels for hidden dairy components while keeping the recipe adaptable.

For a vegan alternative, consider using a mix of black beans and artichokes blended with similar seasonings and vegetables. This offers an appealing dish that shares many flavors of the original recipe without using animal products.

Those following a low-carb or keto lifestyle will find this dish naturally compatible, as salmon, crab, and spinach are all low in carbohydrates but high in healthy fats and protein. Incorporating a low-carb sauce made from cream and lemon juice would work remarkably well.

Troubleshooting Guide

If your salmon results in a rubbery texture, it’s likely due to overcooking. Always monitor cooking time closely and utilize a meat thermometer to ensure optimal doneness.

When flavors seem unbalanced, it may be due to insufficient seasoning in the filling. Don’t hesitate to adjust with more salt, pepper, or even extra lemon juice to lift flavors.

If the filling tends to leak out, try securing the salmon fillets with toothpicks or kitchen twine, creating a tighter seal before baking.

Should the lemon cream sauce turn out too thick, simply whisk in a little additional broth or cream to achieve your desired consistency. Taste as you go to maintain flavor balance.

Lastly, if the salmon shows signs of dryness, utilize a brine in future preparations, adding moistness and flavor to the fish, setting you up for success next time.

Recipe Success Stories

The Spinach and Crab Stuffed Salmon has garnered numerous enthusiastic testimonials from our community of home chefs. One reader shared that they successfully substituted shrimp for crab and added fresh dill, creating a flavorful alternative that their guests raved about.

Another fan praised how well the recipe held up during a large family gathering, effectively doubling the quantity and receiving accolades from diverse age groups present. The clean flavors and elegantly presented dish were a hit amongst everyone, inspiring requests for the recipe.

Photography enthusiasts have expressed enjoyment documenting their culinary journey, sharing beautiful images of their lovely dishes on social media. Highlighting the vibrant colors of the dish paired with ambient lighting resulted in striking visuals that attracted many likes and comments.

Ultimately, readers have noted this dish’s flexibility for variations while maintaining its core flavors, inspiring many cooks to make it their own. The sense of accomplishment felt after successfully preparing such a sophisticated dish has undoubtedly spurred more kitchen adventures.

Frequently Asked Questions

Can I use frozen salmon for this recipe?
Yes, you can use frozen salmon. Just make sure to thaw it properly in the refrigerator before cooking to ensure even cooking.

What can I substitute for crab meat?
Shrimp, scallops, or even a hearty vegetable like hearts of palm can work well for a different texture and flavor profile.

How can I tell when the salmon is cooked through?
A meat thermometer should read 145°F (63°C), or you can check that it flakes easily with a fork.

Is it necessary to remove the skin from the salmon?
Removing the skin is optional. Cooking with skin can help keep the salmon moist, but you can remove it before serving if you prefer a presentation without the skin.

Can I prepare this ahead of time?
Yes, you can prep the filling and assemble the salmon in advance. Cover and refrigerate until you’re ready to bake it.

What are some good side dishes to serve with the stuffed salmon?
Light salads, quinoa, or roasted seasonal vegetables pair nicely and complement the flavors of the stuffed salmon excellently.

How do I store leftovers?
Refrigerate leftovers in an airtight container and consume them within 2-3 days for the best quality.

Can the lemon cream sauce be made ahead of time?
Yes, you can prepare the sauce in advance; just reheat it gently before serving.

What is the best way to reheat leftovers?
Reheat the salmon gently in a 300°F oven to retain moisture, or in a microwave at low power in short bursts.

What are some other sauces I can use with this dish?
Besides lemon cream sauce, a garlic butter sauce or a dill cream sauce can also enhance the flavors beautifully.

Additional Resources

For those wanting to explore beyond the Spinach and Crab Stuffed Salmon, check out other seafood-centric recipes that incorporate seasonal veggies. Explore recipe guides focusing on various cooking techniques that can enhance your culinary skills in the kitchen. Additionally, investigate seafood sustainability resources to ensure you are making responsible choices while shopping for ingredients.

Consider trying seasonal variations of this dish by swapping the stuffing ingredients based on what’s fresh at your local market, allowing for delightful surprises in flavor and nutrition. Lastly, dive into community forums or cooking classes that focus on elevating your skills and confidence in seafood preparation.

Join the Conversation

We love hearing from you! Share your experiences and photos of your Spinach and Crab Stuffed Salmon creations on social media. Don’t forget to tag us and inspire others in the cooking community. Engaging with fellow recipe enthusiasts can lead to further exploration of variations and exciting culinary discussions.

Take part in our recipe reviews and be a storyteller of your successful kitchen endeavors. Eager to hear about your adaptations and creations, whether you’ve tried a new ingredient or perfected the cooking technique. Together, let’s celebrate the art of cooking and the joy it brings to our tables.

The Recipe

Spinach and Crab Stuffed Salmon

Serves: 4

Prep Time: 20 mins

Cook Time: 30 mins

Total Time: 50 mins

Kitchen Equipment Needed

  • Oven
  • Baking dish
  • Mixing bowl
  • Meat thermometer
  • Knife
  • Cutting board

Ingredients

  • 4 salmon fillets
  • 1 cup crab meat
  • 1 cup fresh spinach, chopped
  • 1/2 cup cream cheese, softened
  • 1/4 cup grated Parmesan cheese
  • 1 clove garlic, minced
  • 1/4 teaspoon salt
  • 1/4 teaspoon black pepper
  • Juice of 1 lemon
  • 1 cup heavy cream (for lemon sauce)

Directions

  1. Preheat your oven to 375°F (190°C).
  2. In a mixing bowl, combine crab meat, spinach, cream cheese, Parmesan, garlic, salt, pepper, and lemon juice. Mix well.
  3. Slice a pocket in each salmon fillet and stuff with the crab mixture, securing with toothpicks if necessary.
  4. Arrange the stuffed fillets in a baking dish and bake for about 20-25 minutes or until cooked through.
  5. While salmon is baking, heat heavy cream in a saucepan over low heat until warm. Add seasoning to taste and whisk until well combined.
  6. Serve baked salmon with a drizzle of lemon cream sauce on top.

Recipe Notes

  • For added flavor, consider incorporating herbs like dill or parsley into the stuffing.
  • Adjust the cream sauce consistency by adding more broth or cream as needed.
  • If using larger salmon fillets, increase the baking time slightly.

Creamy Cheddar Broccoli Soup Recipe for Chilly January Nights

Cheddar Broccoli Soup: A Creamy Delight for Chilly Days

⚖️
Difficulty
Easy

⏲️
Prep Time
10 mins

🕒
Cook Time
20 mins

⏱️
Total Time
30 mins

🍽️
Servings
4

Creamy, comforting, and utterly delicious, this Cheddar Broccoli Soup is sure to warm your soul during chilly January days. The rich flavors of sharp cheddar cheese meld perfectly with the tender bits of broccoli, creating a satisfying blend that’s better than any restaurant takeout. With the vibrant green of the broccoli juxtaposed against the creamy golden cheese, this soup isn’t just pleasing to the palate; it’s a feast for the eyes as well.

Picture this: a warm bowl of Cheddar Broccoli Soup, steam curling up into the air, the aroma of melted cheese and fresh broccoli inviting you to indulge. It’s a quick and easy recipe, making it perfect for busy weeknights when you still want something wholesome and hearty. Your senses will awaken with the first spoonful, and soon you’ll find yourself reaching for seconds.

Quick Recipe Highlights

  • Flavor Profile: This soup features a perfect balance of savory cheddar and fresh, slightly sweet broccoli, with a hint of garlic and onion.
  • Texture: Expect a smooth and creamy base with tender chunks of broccoli, providing delightful bites throughout.
  • Aroma: The inviting scents of melted cheese, fresh vegetables, and herbs will envelop your kitchen.
  • Visual Appeal: The vibrant green of the broccoli contrasts beautifully with the creamy, golden soup, making it a stunning dish.
  • Skill Level Needed: This recipe is beginner-friendly and requires just simple cooking techniques.
  • Special Equipment: A large pot or Dutch oven is ideal, along with an immersion blender for a silky soup.

Recipe Overview

  • Difficulty Level: This Cheddar Broccoli Soup is easy to prepare, making it accessible for cooks of all skill levels, from novices to seasoned chefs.
  • Category: It’s a perfect choice for lunch or dinner, especially when served with crusty bread or a crisp salad.
  • Cuisine: This recipe draws inspiration from traditional American comfort food, combining classic flavors to create a beloved classic.
  • Cost: Ingredients for this soup are budget-friendly, with fresh broccoli and cheddar cheese being the main components, making it an economical choice for families.
  • Season: Cold January days call for hot soup, and this recipe shines during the winter months when fresh broccoli is in season.
  • Occasion: Ideal for family gatherings, cozy dinners, or meal prep for the week ahead.

Why You’ll Love This Recipe

Indulging in this Cheddar Broccoli Soup is an experience for your taste buds. The richness of the cheddar complements the earthy flavors of broccoli, resulting in a taste that is not only hearty but also very comforting. The velvety texture comes from the creamy base and well-cooked broccoli, creating a delightful mouthfeel that you will crave on cold days.

This soup is incredibly convenient. In just 30 minutes, you can whip up a pot of this deliciousness, making it a fantastic option for quick weeknight dinners or as a warm, satisfying treat after a long day. Plus, it’s perfect for meal prep; simply store it in the fridge and reheat when you need a comforting bowl of soup.

From a nutritional standpoint, this Cheddar Broccoli Soup offers wholesome benefits. Broccoli is known for its high vitamin C, fiber, and antioxidants, making this soup not only a delicious option but also a healthy one. The cheddar adds protein and rich flavor, making each bowl a nourishing choice.

Socially, this recipe shines during gatherings. Imagine sharing a warm bowl of Cheddar Broccoli Soup with friends and family, fostering conversations and creating cherished memories around the table. It’s a perfect dish for comfort food lovers and a great way to showcase the simple pleasures of home-cooked meals.

Lastly, the cost-effectiveness of this soup makes it a clear winner in the kitchen. With a relatively short ingredient list, your grocery bill will remain low without sacrificing taste or quality. It promotes accessibility while ensuring no one has to miss out on delicious, hearty meals.

Historical Background and Cultural Significance

The origins of creamy broccoli cheese soup can be traced back to classic American cooking, where simplicity and comfort are cherished. This dish became popular in the mid-20th century, coinciding with advances in food processing and cheese-making, allowing ingredients like cheddar to become staples in household pantries.

Culturally, this soup embodies the spirit of comfort food, taking center stage in many families’ dining traditions. It evokes feelings of warmth, often associated with home-cooked meals shared with loved ones during the cold months.

Over time, variations have emerged, embracing local ingredients and individual tastes, leading to many interpretations. From adding carrots for sweetness to spices for heat, each adaptation tells a story of personalization while remaining true to its comforting roots.

Regional variations also exist, particularly in areas where broccoli is abundant. Coastal states may include seafood adaptations, while southern versions might add spices for a more robust flavor profile, showcasing how versatile and beloved this soup truly is.

Ingredient Deep Dive

Broccoli is the star ingredient, valued not just for its nutritional benefits, which include high levels of vitamins K and C, but also for its versatility. It’s crucial to select fresh, firm heads with vibrant green color for the best flavor. Proper storage in the refrigerator can extend freshness, while freezing is an option for preservation when broccoli is abundant.

Cheddar cheese adds richness and depth to the soup. Look for sharp cheddar for a stronger flavor that complements the vegetables beautifully. When selecting cheese, opt for blocks over pre-shredded varieties, as it melts better. Storing cheese properly in parchment paper can extend its shelf life.

Lastly, the broth serves as the soup’s foundation. Homemade broth vastly improves flavor, but low-sodium store-bought options work in a pinch. Selecting quality broth can make a significant difference, so consider organic varieties or those made from roasted vegetables for enhanced taste.

Common Mistakes to Avoid

  • Using pre-shredded cheese: It contains anti-caking agents that can affect the melting quality and taste.
  • Cooking broccoli too long: Overcooking can lead to mushy broccoli, which loses texture and flavor.
  • Not seasoning properly: Insufficient salt or seasoning can leave the soup bland; taste and adjust as you go.
  • Blending too much: A smooth puree might sound appealing, but retaining some broccoli texture adds to the overall experience.
  • Skipping the aromatics: Onions and garlic are crucial for flavor; omitting them can lead to a dull-tasting soup.
  • Choosing the wrong broth: Low-quality broth can impact the overall flavor; aim for good quality broth for the best results.
  • Rushing the cooking process: Taking your time to develop flavors through slow cooking is key to a rich taste.
  • Neglecting proper storage: Allow the soup to cool completely before refrigerating to prevent spoilage.

Essential Techniques

There are several essential techniques to master when making Cheddar Broccoli Soup. First, sautéing aromatics like onions and garlic is crucial as it builds a flavor foundation. Cook them just until they’re translucent, as this enhances the overall depth of your soup.

Another essential technique is blending. By using an immersion blender, you can achieve your desired consistency without transferring hot soup to a traditional blender, which can be dangerous. Blend until creamy but leave some chunks for texture. Use visual cues, like color and thickness, to gauge when it’s ready.

Finally, tempering the cheese is vital to prevent clumping. Slowly add the shredded cheese to the hot soup off the heat, stirring continuously to allow it to melt evenly. Look for a smooth and creamy texture, which indicates successful melting.

Pro Tips for Perfect Cheddar Broccoli Soup

1. For an extra flavor burst, consider adding a splash of white wine to the broth before simmering to deepen the flavors.
2. Use fresh broccoli instead of frozen for a brighter color and better texture in the soup.
3. Experiment with different types of cheese; Gruyère or Fontina can add unique flavors to your soup.
4. Blend the soup in batches to ensure an even consistency and to prevent overflow.
5. If you’re short on time, preparing the broccoli in advance can speed up the cooking process without sacrificing quality.
6. Adjust thickness by incorporating more or less broth, based on your personal preference for creaminess.
7. Incorporate a pinch of nutmeg for a warm and inviting aroma that complements the cheese and broccoli beautifully.
8. Serve with crusty bread or a side salad for a complete meal that’s both nutritious and comforting.

Variations and Adaptations

Regional variations of this Cheddar Broccoli Soup can include the addition of local ingredients such as kale or cauliflower, offering a subtle twist while maintaining the core flavors. Seasonal adaptations are also popular; for instance, using sweet potatoes or butternut squash in the fall can enhance sweetness and add richness.

Dietary modifications can easily be made by using plant-based cheese and almond milk for a vegan version that retains creaminess. For those on low-carbohydrate diets, consider substituting the broth with coconut cream for an added richness and depth.

Flavor variations are endless; add spices such as cumin or cayenne for a bit of heat or fresh herbs for aromatic undertones. Alternatively, consider topping the soup with cooked bacon bits or croutons for extra crunch.

As for presentation alternatives, serve in bread bowls for a rustic touch, or garnish with freshly chopped chives or a drizzle of olive oil for visual appeal.

Serving and Presentation Guide

When serving Cheddar Broccoli Soup, consider plating techniques that highlight its creamy texture and vibrant color. A garnish of fresh herbs adds an inviting finish. For more sophistication, consider a swirl of heavy cream or olive oil to create an artistic presentation.

Traditional accompaniments such as crusty bread or grilled cheese sandwiches pair beautifully with this soup, enhancing the comforting experience. When served, ensure the soup is piping hot, as it significantly enhances flavor and enjoyment.

Modern serving suggestions include presenting the soup in mason jars for a casual, rustic look, or using elegant bowls for a more refined dining experience. Temperature plays a key role; always ensure it’s served hot and fresh, while larger portions can be tempting, remember to serve in moderation to avoid waste.

Wine and Beverage Pairing

The rich flavors of Cheddar Broccoli Soup pair wonderfully with white wines. A crisp Sauvignon Blanc or a light Chardonnay complements the creamy texture and balances the dish’s richness. For red wine lovers, a light Pinot Noir can also work, offering refreshing acidity.

Non-alcoholic beverage alternatives include sparkling water with a hint of lemon, which can cut through the richness and cleanse the palate. Additionally, a herbal iced tea can serve as a refreshing accompaniment while enhancing the flavors of the soup.

For coffee lovers, consider pairing with a light roast brewed with nutty or fruity notes, which can create an interesting contrast to the creamy and cheesy soup.

Storage and Shelf Life

To ensure your Cheddar Broccoli Soup maintains its flavor and quality, store it in an airtight container after it cools completely. It can be refrigerated for about 3-4 days. Ensure it’s reheated thoroughly, as incomplete reheating can lead to spoilage.

For longer storage, consider freezing the soup in individual portions. Use freezer-safe containers or bags, allowing for easy meal prep later. The soup can last in the freezer for about 2-3 months.

Take note of signs of spoilage, such as off smells or changes in texture. When reheating, do so on low heat to preserve the smooth texture; avoid boiling to prevent the cheese from separating. If frozen, defrost in the refrigerator overnight before reheating.

Make Ahead Strategies

Planning ahead can make your kitchen time more efficient. You can prep ingredients, such as chopping broccoli and onions, a day in advance. Store them in containers in the refrigerator to save time on cooking day.

Another strategy is to cook the soup fully and allow it to cool before storing it. This method not only saves cooking time but allows flavors to develop overnight, giving you an even richer taste.

When reheating, you can add additional ingredients like fresh herbs or a splash of cream to rejuvenate the flavors. Remember to only add dairy like cream or cheese after reheating to keep the texture smooth.

Incorporate freshly chopped elements just before serving, as they can enhance the overall dish and ensure it feels fresh, even after storage.

Scaling Instructions

If you wish to scale the Cheddar Broccoli Soup recipe, halving the ingredients is simple for a lighter meal. Adjust the broth to maintain the same consistency, and take care to keep the same cooking times.

Doubling or tripling the recipe is perfect for meal prep or gatherings. Just ensure you have a large enough pot, as larger quantities can require longer cooking times depending on the heat distribution. When increasing batch sizes, monitor the texture and flavors to ensure consistency, making adjustments as needed.

Pay attention to storage considerations; larger batches may require more containers for proper cooling and storage. To save time, prepare it as a big batch and freeze portions for future meals.

Nutritional Deep Dive

In every serving of Cheddar Broccoli Soup, you get a robust macro breakdown that includes healthy fats, protein, and carbs. Broccoli provides a hearty dose of fiber and essential vitamins and minerals, which contribute to overall well-being.

Micronutrient analysis reveals key vitamins, particularly vitamin C, which is essential for immune function, and vitamin K, important for bone health. The addition of cheese offers calcium, aiding in maintaining healthy bones.

This soup also presents numerous health benefits. Broccoli is linked to anti-inflammatory properties, while cheddar cheese can support muscle repair due to its protein content. Mindfully consuming these nutritious ingredients offers tremendous value in a healthy diet.

Dietary considerations may include portion analysis; it is easy to indulge in comfort food. However, mindful consumption can help manage caloric intake while still enjoying flavor-rich dishes, such as this one. Balance is vital for weight management and health.

Dietary Adaptations

For gluten-free options, this Cheddar Broccoli Soup is naturally gluten-free, making it suitable for those with gluten sensitivities. However, always check that the ingredients, especially packaged broth, are gluten-free.

Creating a dairy-free or vegan version involves substituting cheddar cheese with plant-based cheese and using coconut milk for creaminess. Nutritional yeast can also add a savory, cheesy flavor while keeping it plant-based.

For low-carb dieters, consider using a cauliflower base instead of broccoli, while maintaining the cheesy elements for a delicious, satisfying dish. For those following keto or paleo diets, coconut milk and almond milk can replace traditional dairy for a rich, creaminess.

Lastly, for individuals following a low-FODMAP diet, keep portions of broccoli small, or substitute with zucchini for a similar texture without triggering digestive concerns.

Troubleshooting Guide

If your soup turns out too thick, gradually add more broth or water while stirring, until the desired consistency is achieved. Be cautious not to over dilute the flavors; taste and adjust.

If the flavor is lacking, consider boosting it with more salt, fresh herbs, or a splash of vinegar to add depth. It’s essential to taste frequently while cooking to ensure that the soup develops before serving.

When facing time challenges, using frozen broccoli instead of fresh can be a lifesaver, though it may alter the texture slightly. Cook it in the broth for a shorter time to minimize mushiness.

If you notice separation or curdling after refrigeration, gently reheat while stirring and adding a little more broth or cream. This can help maintain a creamy texture upon reheating.

Timing concerns, like cooking on high heat, can lead to uneven cooking. Always simmer on low heat to ensure even texture and flavor development, enhancing the overall quality of your soup.

Recipe Success Stories

Community feedback on this Cheddar Broccoli Soup recipe has been overwhelmingly positive, with many praising its ease and delicious flavor. Adaptations and variations shared in comments highlight the versatility of this dish, showing how others incorporate their custom touches while staying true to the fundamental recipe.

Readers have shared fantastic success stories, particularly around family gatherings, where this soup has become a staple. The warm, comforting nature of the dish has prompted repeated requests for recipe cards to share with friends and loved ones.

Photography tips provided by users have made showcasing this soup even more delightful. Many have emphasized how garnishing with fresh herbs makes for Instagram-worthy presentations, inviting others to replicate the success of their culinary masterpiece.

Moreover, showcasing adaptations made by readers who have experimented with different cheeses and additional veggies reflects the spirit of community around this recipe. It’s inspiring to see how one dish can bring so many together through shared experiences.

Frequently Asked Questions

Can I make Cheddar Broccoli Soup in advance?

Yes! This soup actually tastes better the next day as the flavors meld together. You can store it in the refrigerator for 3-4 days or freeze it for up to 2-3 months.

Can I substitute other vegetables in this recipe?

Absolutely! While broccoli is the star, you can add vegetables such as cauliflower, carrots, or even spinach for additional nutrition and different flavors.

Is this soup gluten-free?

Yes, this Cheddar Broccoli Soup is naturally gluten-free, but always check your broth and cheese labels to ensure no gluten-containing ingredients are used.

Can I use frozen broccoli instead of fresh?

Yes, frozen broccoli works well in this recipe. Just be sure to adjust your cooking time slightly, as frozen broccoli may become tender more quickly than fresh.

How can I store leftover soup?

Let the soup cool completely, then store it in an airtight container in the refrigerator for up to 4 days. You can also freeze portions for longer storage.

What if my soup is too thick?

If your soup is too thick, gradually stir in more broth or water until you reach your desired consistency. Taste and adjust seasoning as necessary.

Can I make this soup vegan?

Yes! Simply replace cheddar cheese with plant-based cheese and use almond or coconut milk for creaminess. Nutritional yeast can also add that cheesy flavor you’re looking for!

What broth should I use?

You can use vegetable or chicken broth, whichever suits your taste. Choose low-sodium options for better control over the overall saltiness of the dish.

Can I add protein to this soup?

Yes, adding cooked shredded chicken or even some beans can boost the protein content of your soup while making it even more filling.

How do I reheat the soup without losing creaminess?

Reheat the soup on low heat, gently stirring and adding a touch more broth or cream if it looks like it might separate. Avoid boiling, which can cause it to curdle.

What pairs well with Cheddar Broccoli Soup for a full meal?

This soup is great with crusty bread, grilled cheese sandwiches, or a light salad. Pairing it with any of these will make a comforting meal!

Additional Resources

For those interested in expanding their culinary repertoire, consider exploring related recipes tailored to comfort food, such as Tomato Basil Soup or Potato Leek Soup. Additionally, techniques like sautéing or blending can be practiced through various guides available on our blog.

Ingredient information is also key; understanding the best practices for selecting and storing fresh produce like broccoli can elevate your cooking. Equipment recommendations include investing in a high-quality immersion blender, which is not only useful for this recipe but several others involving pureeing.

Lastly, exploring seasonal variations of the recipe keeps your meal planning fresh and exciting. Incorporating seasonal ingredients can lead to delightful twists while staying within the theme of comfort cuisine.

Join the Conversation

We encourage you to share your experiences with our Cheddar Broccoli Soup on social media! Use our designated hashtags and tag us to showcase your culinary creations.

If you’re capturing photographs of your soup, remember that good natural lighting can make all the difference in highlighting your dish’s vibrant colors.

Additionally, we invite you to leave detailed feedback after making the recipe. Reader reviews and suggestions help others decide how to tailor the dish to their tastes and preferences.

Your experiences not only foster community engagement but inspire future recipe iterations that we can collectively enjoy. Let’s create a warm, culinary community focused on sharing love through delicious food!

The Recipe

Cheddar Broccoli Soup

Serves: 4

Prep Time: 10 mins

Cook Time: 20 mins

Total Time: 30 mins

Kitchen Equipment Needed

  • Large pot or Dutch oven
  • Immersion blender
  • Cutting board
  • Sharp knife
  • Measuring cups and spoons

Ingredients

  • 2 cups fresh broccoli florets
  • 1 cup chopped onions
  • 2 cloves garlic, minced
  • 4 cups vegetable broth
  • 1 cup shredded cheddar cheese
  • 1 cup heavy cream
  • Salt and pepper to taste
  • 2 tablespoons olive oil

Directions

  1. In a large pot, heat olive oil over medium heat. Add onions and garlic, cooking until translucent.
  2. Add broccoli florets and vegetable broth. Bring to a boil, then reduce heat and simmer for about 10 minutes, until broccoli is tender.
  3. Using an immersion blender, puree the mixture until smooth, leaving some chunks for texture if desired.
  4. Return the pot to low heat, slowly stir in heavy cream and shredded cheddar cheese until melted and combined.
  5. Season with salt and pepper to taste. Serve hot and enjoy!

Recipe Notes

  • For a vegan version, substitute cheese with plant-based cheese and use almond milk in place of cream.
  • You can add other vegetables like carrots or cauliflower for added nutrition.
  • Feel free to adjust the thickness of the soup by adding more broth as needed.

Deliciously Decadent German Chocolate Cupcakes You Must Try

Irresistible German Chocolate Cupcakes: A Decadent Treat

⚖️
Difficulty
Medium

⏲️
Prep Time
20 mins

🕒
Cook Time
20 mins

⏱️
Total Time
40 mins

🍽️
Servings
12 cupcakes

The Irresistible German Chocolate Cupcakes encapsulate the rich and complex flavor profile that is celebrated in traditional German chocolate cake. Each cupcake is a delicate balance of velvety chocolate cake topped with a heavenly coconut-pecan frosting that brings an inviting sweetness, making them the perfect indulgence for special occasions or everyday treats. The cupcakes’ luscious appearance is sure to entice anyone who lays eyes on them, promising a decadent experience with every bite.

These delightful cupcakes honor the original German chocolate cake’s heritage, infusing it with a modern twist that appeals to chocolate lovers everywhere. Imagine the aroma of fresh chocolate intertwined with the nutty scent of toasted pecans and the sweetness of coconut wafting through your kitchen, creating an atmosphere of warmth and comfort. Each bite reveals a soft, moist cake layered with a creamy topping that is both distinguished and comforting.

Quick Recipe Highlights

  • Flavor Profile: These cupcakes offer a rich, chocolatey base contrasted with a sweet, nutty topping.
  • Texture: The cupcakes are moist and fluffy, complemented by a crunchy, creamy frosting.
  • Aroma: A delightful blend of dark chocolate, toasted coconut, and buttery pecans fills the air.
  • Visual Appeal: The rich brown cupcake with a light-colored frosting makes for an eye-catching dessert.
  • Skill Level Needed: Requires basic baking skills, making it accessible to beginner bakers.
  • Special Equipment: You’ll need a cupcake pan and muffin liners to achieve the perfect shape.

Recipe Overview

  • Difficulty Level: This recipe is categorized as medium, perfect for those looking to enhance their baking skills without being overwhelming.
  • Category: These cupcakes fit well within dessert or snack categories, making them suitable for any time of day.
  • Cuisine: Originating from the German chocolate cake tradition, these cupcakes have a unique place in American baking culture.
  • Cost: The cost is relatively moderate, with common ingredients available at most grocery stores.
  • Season: While these cupcakes can be enjoyed year-round, they’re particularly popular during holidays and celebrations.
  • Occasion: Ideal for birthday parties, gatherings, or just a special treat for yourself at home.

Why You’ll Love This Recipe

Making Irresistible German Chocolate Cupcakes means indulging in rich chocolate flavor paired with the sweetness of coconut and the crunch of pecans, delivering an unforgettable dessert experience. Each bite reveals the perfect harmony between the moist, chocolate cake and the creamy frosting, reminiscent of classic German chocolate cake but in a convenient cupcake form. These delightful treats promise to satisfy anyone’s sweet tooth, making them an excellent choice for dessert lovers of all ages.

In terms of convenience, these cupcakes are relatively easy to prepare. They require standard baking techniques such as mixing, baking, and frosting, making them a perfect project for budding bakers. You can whip them up in under an hour, allowing for an immediate celebration of flavor and texture. The preparation is straightforward, with clear steps and minimal equipment required, ensuring a pleasant baking experience.

Nutritionally, you’ll find that these cupcakes can be part of a balanced diet when enjoyed in moderation. The ingredients include coconut, which provides healthy fats, and pecans, rich in nutrients like magnesium and antioxidants. While they do contain sugar, serving sizes can be adjusted to keep indulgence in check without sacrificing flavor.

The social aspect of this cupcake recipe is significant as well. They are an excellent conversation starter at gatherings, with everyone eager to enjoy these delightful treats. Their elegance and rich flavor ensure they can be served at formal and casual events, making them a versatile dessert suitable for any occasion.

Cost-effectiveness is another highlight of this recipe. With affordable ingredients and the ability to yield multiple servings, these cupcakes can cater to large groups without breaking the bank. Plus, making them at home can often be healthier and tastier than purchasing store-bought alternatives.

Historical Background and Cultural Significance

The origin of German chocolate cake can be traced back to a recipe published in 1852 by a man named Samuel German, who developed a dark-baking chocolate for a Dallas-based company. Over time, this chocolate became the cornerstone of what we now recognize as German chocolate cake, a creation that later evolved into the beloved dessert we know today. The unique pairing of ingredients represents a fusion of American and German culinary traditions.

Culturally, German chocolate cake has grown in prominence across the United States, becoming a staple dessert especially at celebrations such as birthdays and holidays. Its emergence in the post-war era allowed it to take its place on American dining tables, symbolizing home baking and comfort food. As such, these Irresistible German Chocolate Cupcakes embody the nostalgia and warmth that comes with family gatherings, bringing people together through shared enjoyment of delicious food.

The evolution of the recipe emphasizes not just the richness of the original cake but also the adaptability of desserts in contemporary baking. The transition to cupcake form allows for easy portioning, making it accessible for casual dining and parties. These cupcakes have thus emerged as a popular option for modern baking enthusiasts as they combine the classic charm of their predecessor with the convenience of cupcakes.

Regional variations of German chocolate cake include differing frostings and flavor profiles that different areas often adopt, reflecting local tastes and traditions. However, the quintessential combination of chocolate, coconut, and pecans remains the heart of the recipe, making these cupcakes a delightful tribute to its roots.

Ingredient Deep Dive

Flour plays a vital role in baking as it provides structure to the cupcakes. All-purpose flour is commonly used due to its versatility. Opt for freshly milled flour for the best results, as it enhances the overall texture of the cake. Store flour in an airtight container in a cool, dry place to maintain its freshness, and consider substituting with whole wheat or gluten-free blends to cater to dietary needs.

Cocoa powder is essential for achieving that rich chocolate flavor. Dutch-process cocoa offers a smoother taste, while natural cocoa provides a more intense chocolate kick. When selecting cocoa powder, look for high-quality brands that specify the type of processing, and store it in a cool, dry place to prevent clumping.

Coconut, used in the frosting, provides sweetness and texture. There are variations of coconut, including sweetened and unsweetened, both of which can be used depending on your preference. By choosing organic coconut, you can ensure a more pronounced natural flavor. Store coconut in a cool environment, and it can typically last up to six months in the pantry.

Pecans, the nutty star of the frosting, add crunch and richness. Purchasing raw pecans and toasting them at home brings out their natural oils and flavors, enhancing the overall taste of the cupcakes. Ensure pecans are fresh and smell nutty, as stale nuts can adversely affect your baked goods. Properly store them in the refrigerator or freezer to prolong their shelf life.

Common Mistakes to Avoid

  • Overmixing the batter can lead to dense cupcakes; mix just until combined for a light texture.
  • Not measuring ingredients accurately can impact the final product; always use a kitchen scale for precision.
  • Skipping the preheat step can result in uneven baking; make sure your oven is at the correct temperature before placing the cupcakes in.
  • Using cold ingredients straight from the fridge can change the texture; ensure eggs and dairy are at room temperature.
  • Not allowing the cupcakes to cool completely before frosting can cause the frosting to melt, ruining presentation.
  • Using too much frosting can overpower the cupcakes; aim for a balanced ratio between cake and frosting.
  • Forgetting to line the cupcake pan with liners can lead to sticking; use good-quality liners for easy removal.
  • Choosing low-quality chocolate can result in a less appealing taste; opt for high-quality chocolate to achieve rich flavors.
  • Not tasting the frosting before applying it can lead to imbalance; ensure the sweetness and flavors are to your liking.
  • Ignoring the need to adjust baking times for different ovens can lead to dry cupcakes; keep an eye on them as they bake.

Essential Techniques

Mastering the art of cupcake baking starts with the creaming method, which involves beating softened butter with sugar to incorporate air for a light texture. This technique is essential as it affects the rise and overall density of your cupcakes. To master it, mix on medium speed until the mixture is fluffy and pale, ensuring to scrape down the sides of the bowl for uniform mixing.

Another crucial technique is the proper folding of dry ingredients into the wet mixture. This should be done gently to prevent overdeveloping the gluten, which can lead to tough cupcakes. Look for visible pockets of flour as you fold and stop mixing as soon as there are no dry streaks left, maintaining that light, tender crumb.

Pro Tips for Perfect Irresistible German Chocolate Cupcakes

– Ensure your ingredients are at room temperature for optimal mixing.
– Experiment with adding a pinch of espresso powder to enhance the chocolate flavor.
– Top with additional toasted pecans after frosting for added crunch and visual appeal.
– Use a piping bag to frost for a professional look.
– Cool cupcakes in the pan for a few minutes before transferring to a wire rack.
– Don’t skip the cooling time before frosting; it prevents melting.
– Make extra frosting for decoration or to serve on the side.
– Store cupcakes in an airtight container for maximum freshness.

Variations and Adaptations

You might consider regional variations of these cupcakes, such as adding a layer of raspberry or cherry filling to enhance the flavor profile. Seasonal adaptations could involve swapping out the frosting for a pumpkin spice or peppermint variation during the holidays. For dietary modifications, you can create gluten-free cupcakes with a gluten-free baking blend or use dairy-free butter for a vegan-friendly version.

Explore flavor variations by adding spices like cinnamon or cardamom to the batter for a unique twist, or try infusing the frosting with liqueurs for an adult version. For texture modifications, consider adding chocolate chips or chunks into the batter for added richness, while presentation alternatives can include different frosting designs or edible glitter for festive occasions.

Serving and Presentation Guide

Plating techniques for these cupcakes involve placing them on a decorative stand or tiered platter to create an inviting display. Garnishing with a sprinkle of grated chocolate, coconut flakes, or extra chopped pecans can enhance the visual appeal. Traditional accompaniments could include coffee or tea, providing a comforting beverage choice to accompany the sweetness.

Modern serving suggestions might include pairing with a scoop of vanilla ice cream or whipped cream to balance the richness of the cupcake. Temperature considerations are key; serve cupcakes at room temperature for the best texture. For portion control, consider using mini liners to create smaller bites or adjust the size of the cupcakes according to your gathering.

Wine and Beverage Pairing

For wine pairings, consider serving these cupcakes with a nice port or a sweet Riesling that can complement the rich chocolate flavors. Sparkling water with a splash of lime can offer a refreshing contrast without the sweetness. Coffee, particularly an espresso or dark roast, pairs wonderfully with the chocolate and enhances the overall experience.

When serving tea, opt for rich black tea varieties such as Earl Grey, which can balance the sweetness of the frosting. Make sure all beverages are served at appropriate temperatures; chilled wines and warm beverages bring out the best in both flavors and aromas.

Storage and Shelf Life

To preserve these delightful cupcakes, store them in an airtight container at room temperature for up to three days. If you need to keep them longer, refrigerate them for up to a week, ensuring they are well-sealed to avoid drying out. For extended storage, consider freezing the un-frosted cupcakes for up to three months.

When reheating, allow cupcakes to come to room temperature naturally. Frosted cupcakes can be frozen, but it’s recommended to frost them after thawing for the best texture. Additionally, always check for signs of spoilage, such as an off smell or unusual texture, before serving.

Make Ahead Strategies

For a stress-free baking experience, consider preparing the cupcake batter a day in advance and refrigerating it. You can also make the frosting ahead of time and keep it in the fridge, allowing for easy assembly on the day of serving. The cupcakes can be baked and cooled, then frozen, ready for frosting later.

To assess quality impact, ensure cupcakes are wrapped tightly to prevent freezer burn. When assembling, bring all components to room temperature for optimal freshness and flavor. Focus on adding fresh elements, like a sprinkle of toasted coconut, right before serving to maintain their appeal.

Scaling Instructions

If you need to adjust serving sizes, halving the recipe can easily yield a smaller batch while keeping the flavor intact. When doubling or tripling, ensure you have adequate space and equipment, such as larger mixing bowls and pans, to handle increased volumes. Be mindful of timing, as larger batches may require additional baking time.

When scaling, consider any adjustments in ingredient ratios, particularly for baking powder or baking soda to ensure proper leavening. Store additional cupcakes in a sealed container and follow proper storage guidelines to maximize flavor and texture.

Nutritional Deep Dive

Examining the nutritional content, these cupcakes are relatively high in calories due to the sugar and butter, but when enjoyed in moderation, they can be part of a balanced diet. A typical cupcake contains essential macronutrients, including carbohydrates for energy and proteins from eggs and nuts.

Micronutrient analysis reveals beneficial elements from the pecans and coconut, including vitamins E and B, magnesium, and fiber. Balancing indulgence with nutritional awareness helps maintain a healthy lifestyle, particularly when considering appropriate portion sizes—cutting each cupcake into two for smaller servings can create a lighter treat.

In terms of weight management tips, consider practicing mindful eating while savoring the flavor and texture of each bite. This can make a single cupcake feel more satisfying, allowing you to enjoy treats without overindulgence.

Dietary Adaptations

For gluten-free options, substitute regular flour with a gluten-free mix that includes xanthan gum to achieve the right texture. Dairy-free versions can easily replace butter with coconut or avocado oil while using non-dairy milk for moistness. Vegan adaptations could involve using flax eggs as a binder instead of traditional eggs.

Low-carb enthusiasts might also explore using almond flour with sugar alternatives to suit dietary preferences. The keto version would reduce sugar while introducing sugar substitutes, making it possible to enjoy without guilt. Other specific diets can adapt ingredients based on their parameters, ensuring that everyone can indulge in these delicious cupcakes.

Troubleshooting Guide

For texture issues, ensure that you’re correctly measuring your ingredients; too much flour can lead to dense cupcakes. If your cupcakes don’t rise as expected, check that your baking powder is fresh and active, as expired leavening agents can affect performance.

Flavor balance often comes from not tasting your frosting before applying it. Adjusting sugar levels in the frosting is key; always test a small amount first. If you experience temperature problems in your oven, it might be beneficial to use an oven thermometer to ensure accurate readings.

Handling equipment challenges may require adjustments based on the type of cupcake pan you use; some conduct heat differently. For ingredient substitutions, stick to similar ratios for accurate results; this will prevent discrepancies in texture or flavor. Lastly, timing concerns during baking can quickly turn perfect cupcakes into dry ones; always keep an eye on the clock.

Recipe Success Stories

Throughout the community, there have been numerous rave reviews from bakers who have recreated these Irresistible German Chocolate Cupcakes. Many have noted the balanced flavors and delightful textures, with several readers sharing their photos showcasing the cupcakes at different events.

Adaptation stories indicate successful variations using fruit fillings or alternative frostings, leading to unique flavors that have also become cherished recipes. Photography tips shared by readers emphasize capturing the rich textures and colors for social media, increasing engagement and inspiring others to try the recipe.

Engagement within the community has proliferated as bakers swap tips and personal touches, creating a sense of camaraderie through shared experiences in the kitchen. These successes underline the adaptability and joy these cupcakes bring to home bakers across all skill levels.

Frequently Asked Questions

Can I make the cupcakes in advance?

Absolutely! You can bake the cupcakes ahead of time and freeze them without frosting. Just allow them to cool completely, wrap in plastic, and store in an airtight container for up to three months. Frost and serve when you’re ready!

How do I store leftover cupcakes?

Store leftover cupcakes in an airtight container at room temperature for 2-3 days. If you need to keep them longer, refrigerate them for up to a week.

Can I substitute coconut in the frosting?

Yes, if you’re not a fan of coconut, you can use other toppings like crushed nuts, chocolate shavings, or a parchment paper piping technique for a different flavor while maintaining the traditional look.

What can I use instead of pecans?

You can substitute pecans with walnuts or almonds if you’re looking for a different nut flavor or texture. Each alternative will offer its unique taste and crunch.

Is there a vegan version of this recipe?

Yes, you can create a vegan version by using flax eggs, coconut oil, and non-dairy milk instead of traditional ingredients. Enjoying the rich flavors without animal products is entirely possible!

How do I make the frosting perfectly creamy?

Ensure your butter is at room temperature before mixing, and beat it with the sugar until light and fluffy. Gradually add the coconut and pecans, mixing well for a smooth consistency.

Can I make these cupcakes gluten-free?

Yes! Simply replace the all-purpose flour with a gluten-free blend. Ensure it’s a blend that includes xanthan gum for proper structure and texture.

How can I make smaller batch sizes?

You can halve the recipe to achieve a smaller batch size. Adjusting the measurements proportionally will ensure the same delicious results.

What’s the best way to frost the cupcakes?

Using a piping bag fitted with a star tip is ideal for an elegant look. You can also spread frosting using a knife for a rustic presentation. Don’t forget to add your favorite garnishes!

How can I enhance the chocolate flavor?

For a richer chocolate taste, add espresso powder to the batter—it amplifies the chocolate without adding a coffee flavor. Using high-quality cocoa powder also enhances overall flavor.

Additional Resources

To further explore your baking adventures, check out related recipes such as classic chocolate cupcakes, vanilla buttercream frosting, and German chocolate cake for variations. Dive into technique guides emphasizing frosting, cake decorating, and using high-quality ingredients that can elevate your baked goods.

If you’re interested in diving deeper into specific ingredients, consider researching proper flour types, cocoa quality, and sweeteners. Investing in kitchen equipment that supports your baking, like silicone mats for even baking or piping tools, can also benefit your creations. Don’t forget to explore seasonal variations and recipes that highlight fresh ingredients for specific times of the year.

Join the Conversation

Engaging with social media platforms can help you share your baking successes with friends and family while connecting with a broader community of baking enthusiasts. Use hashtags related to cupcakes and share your photographs and variations.

Participate in recipe reviews and provide feedback on your experiences to help others. Collaborate on community blogs that celebrate recipe variations, and take part in local baking challenges to inspire your culinary creativity. Each interaction can lead to new ideas and unforgettable baking experiences, enriching your journey in the kitchen.

The Recipe

Irresistible German Chocolate Cupcakes

Serves: 12 cupcakes

Prep Time: 20 mins

Cook Time: 20 mins

Total Time: 40 mins

Kitchen Equipment Needed

  • Cupcake pan
  • Muffin liners
  • Mixing bowls
  • Electric mixer
  • Piping bag (optional)

Ingredients

  • 1 3/4 cups all-purpose flour
  • 3/4 cup cocoa powder
  • 1 cup sugar
  • 1/2 cup brown sugar
  • 1 tsp baking powder
  • 1 tsp baking soda
  • 1/2 tsp salt
  • 1 cup buttermilk
  • 1/2 cup vegetable oil
  • 2 large eggs
  • 2 tsp vanilla extract
  • 1 cup shredded coconut
  • 1 cup chopped pecans
  • 1/2 cup butter (for frosting)
  • 2 cups powdered sugar (for frosting)

Directions

  1. Preheat your oven to 350°F (175°C) and line a cupcake pan with liners.
  2. In a mixing bowl, combine flour, cocoa powder, sugar, brown sugar, baking powder, baking soda, and salt.
  3. In another bowl, whisk together buttermilk, vegetable oil, eggs, and vanilla extract until smooth.
  4. Gradually add the wet ingredients to the dry ingredients, stirring until just combined.
  5. Fill the cupcake liners about two-thirds full with batter and bake for 20 minutes or until a toothpick inserted comes out clean.
  6. In a separate bowl, cream the butter with powdered sugar until smooth.
  7. Fold in coconut and pecans to create the frosting.
  8. Let the cupcakes cool completely before frosting them with the coconut-pecan frosting.
  9. Top with additional nuts if desired and serve!

Recipe Notes

  • Store cupcakes in an airtight container for freshness.
  • If desired, substitute the frosting with chocolate buttercream for a different flavor.

Savor the Flavor: Lemon Garlic Butter Lamb Chops Recipe

Lemon Garlic Butter Lamb Chops: A Flavorful Delight

⚖️
Difficulty
Medium

⏲️
Prep Time
15 mins

🕒
Cook Time
20 mins

⏱️
Total Time
35 mins

🍽️
Servings
4

Lemon Garlic Butter Lamb Chops are the ideal dish for a special occasion or a delightful weeknight meal. The combination of juicy lamb with the tangy brightness of lemon and the rich, savory flavor of garlic butter makes each bite a mouthwatering experience. This recipe features tender lamb chops that are seared to perfection, enhanced with fresh herbs and bold flavors. A beautifully plated portion served with your choice of sides creates an inviting meal that is sure to impress family and friends.

In this recipe, you’ll discover how to create succulent lamb chops that are infused with zesty lemon and aromatic garlic, making them not just a meal, but a culinary adventure. The vibrant aroma of garlic wafting through your kitchen as the lamb cooks sets the stage for a wonderful dining experience that everyone will enjoy. Perfectly paired with roasted vegetables or a fresh salad, these lamb chops offer a complete meal bursting with flavor.

Quick Recipe Highlights

  • Flavor Profile: The delightful contrast of savory lamb and zesty lemon creates a remarkable flavor balance, enriched further by the rich notes of garlic butter.
  • Texture: Each chop is juicy and tender, with a satisfying crust that adds a pleasing crunch in every bite.
  • Aroma: The irresistible scent of garlic and lemon perfuming the kitchen will have everyone anticipating dinner.
  • Visual Appeal: Vibrantly colored fresh herbs and the golden hue of the garlic butter elevate the presentation, making it visually stunning.
  • Skill Level Needed: This recipe is approachable for medium skill levels, requiring basic cooking techniques but rewarding with restaurant-quality results.
  • Special Equipment: A heavy skillet or grill, and a meat thermometer for precise cooking.

Recipe Overview

  • Difficulty Level: This recipe is rated medium, making it a fantastic option for those looking to elevate their cooking without getting overwhelmed.
  • Category: Perfect for a main course, it fits well into both everyday dining and special occasion menus.
  • Cuisine: This dish draws inspiration from Mediterranean flavors, showcasing the vibrant ingredients typical of that region.
  • Cost: Approximately $25-$30 for a serving of four, making it a luxurious yet accessible meal choice.
  • Season: Ideal for any season, but particularly delightful in spring, when lamb is at its peak.
  • Occasion: Excellent for dinner parties, family gatherings, or to impress a date.

Why You’ll Love This Recipe

The taste and texture of Lemon Garlic Butter Lamb Chops will leave you craving more. The lamb’s tender meat combined with the rich garlic butter creates a decadent flavor experience that is hard to resist. It’s a dish that speaks to both the senses and the heart, making every meal feel special and luxurious.

Convenience is another strength of this recipe. With only a few simple ingredients and a straightforward preparation process, you can whip up an impressive meal that minimizes time spent in the kitchen while maximizing flavor. In just 35 minutes, you’ll have a delicious dinner ready to serve, allowing for more time to enjoy with your guests or family.

Nutritionally, lamb is an excellent source of protein and essential nutrients such as iron and zinc, making these lamb chops not only tasty but beneficial for your diet. The addition of fresh herbs and spices enhances the health aspect of the dish, providing antioxidants that contribute to overall well-being.

Socially, this recipe shines as a centerpiece for gatherings. The stunning presentation and delightful flavors create a conversation starter, making mealtime an engaging experience filled with shared enjoyment. Whether it’s a celebration or simply a chance to gather, these lamb chops are sure to elevate the occasion.

Finally, considering cost-effectiveness, this recipe strikes a great balance between luxury and affordability. With fresh ingredients and easy preparation, you won’t have to break the bank to serve a dish that feels worthy of a fine restaurant, allowing you to entertain on a budget without sacrificing quality or flavor.

Historical Background and Cultural Significance

The origins of lamb as a culinary favorite trace back thousands of years across various cultures, particularly in Mediterranean regions. Lamb has long been prized for its tender meat and rich flavor, naturally complementing the bright flavors of herbs and citrus. This enduring popularity has resulted in many traditional recipes featuring lamb in diverse culinary traditions.

Culturally, lamb is often associated with celebrations and significant gatherings, symbolizing abundance and hospitality. Many cultures have traditional dishes that utilize lamb, especially during festive occasions like Easter. Celebratory meals are enhanced with the inclusion of lamb, which elevates the dining experience and adds to the atmosphere of warmth and togetherness.

Over the years, the recipe for lamb chops has evolved, showcasing regional influences and personal adaptations. The addition of ingredients like garlic and lemon reflects the move towards fresher, more vibrant cooking methods that highlight the meat’s intrinsic flavors.

Regional variations also exist, with different cultures adapting the basic lamb chop recipe to incorporate distinct spices and herbs. For instance, Mediterranean cultures may lean towards rosemary and olive oil, while others might introduce cumin or paprika for an entirely different flavor experience.

Ingredient Deep Dive

Lamb: Lamb has significant cultural importance as a traditional meat source in numerous culinary heritages. Historically raised in pastoral communities, it symbolizes sustenance and community. Nutritionally, lamb is rich in protein and B vitamins, especially B12, which supports energy levels. When selecting lamb, look for bright red meat with firm texture; impactful flavor comes from high-quality cuts. Store in the refrigerator, ideally wrapped tightly for up to three days, and consider freezing for longer-term use.

Garlic: This aromatic ingredient is steeped in cultural significance within cuisines worldwide. Revered for its medicinal properties, garlic has been used for ages not only as a flavor enhancer but also to promote health. Its rich nutritional profile includes vitamin C, vitamin B6, and manganese. Choose firm, smooth heads of garlic, and store in a cool, dark place to maintain freshness. Substitute with garlic powder or roasted garlic when fresh is unavailable, though the depth of flavor will vary.

Lemon: Lemons are essential in Mediterranean cooking, known for their bright acidity and invigorating flavor. Historically, they were used to preserve food and enhance dishes. Rich in vitamin C, they offer health benefits such as boosting immune function. Select lemons that feel heavy for their size with smooth skin. Store at room temperature or in the fridge for a longer shelf life. Lime can be a suitable substitute in many recipes, though taste will differ.

Butter: A staple in many cuisines, butter enriches dishes by providing a smooth, creamy texture and flavor. While not as steeped in cultural history as other ingredients, it plays a vital role in French cooking. Nutritionally, butter contains fat-soluble vitamins A and D. Opt for unsalted butter for cooking to better control salt levels in your dish. Butter can be stored in the refrigerator for up to a month but can also be frozen for extended use.

Common Mistakes to Avoid

  • Overcooking the lamb can result in a dry texture. Always use a meat thermometer to check the internal temperature.
  • Using cold meat straight from the fridge can cause uneven cooking. Allow lamb to come to room temperature before cooking.
  • Not seasoning the meat in advance can lead to bland flavors. For best results, season overnight or at least an hour before cooking.
  • Skipping the resting period can make the meat less juicy. Allowing it to rest after cooking helps redistribute juices.
  • Neglecting to allow the pan to heat sufficiently can prevent a proper sear. Ensure the cooking surface is hot before adding the meat.
  • Using the wrong type of pan can affect temperature control. A heavy-bottom skillet is preferred to distribute heat evenly.
  • Lemon juice should be added carefully; too much can overwhelm other flavors. Start with less and adjust to taste.
  • Ignoring the importance of fresh herbs can diminish the dish’s flavor profile. Always opt for fresh when possible for the best taste.
  • Skipping the garlic can lead to a less flavorful dish. Incorporating garlic enhances both seasoning and aroma.
  • Not tasting as you cook might result in unbalanced seasoning. Always sample your dish to adjust herbs, salt, or acidity before serving.

Essential Techniques

Searing: Searing is a key technique for achieving a beautiful, golden-brown crust on your lamb chops. This not only enhances flavor through the Maillard reaction but helps lock in moisture. To master searing, preheat your skillet before adding any fat, so the meat sizzles immediately upon contact. Watch for bubbling and smoke — when those appear, it’s time to flip. Avoid overcrowding the pan to maintain high heat.

Resting: Resting cooked meat allows juices to redistribute, preventing dryness when slicing. After removing lamb chops from the heat, let them sit covered for at least five minutes. Look for a slight reduction in temperature when gently pressed; this indicates they’re ready to slice for serving. Skipping this step can lead to a dry bite.

Pro Tips for Perfect Lemon Garlic Butter Lamb Chops

Select high-quality lamb chops; freshness impacts flavor significantly.
Marinate for a minimum of an hour; it greatly enhances the depth of flavor.
Use fresh herbs like thyme or rosemary for enhanced aroma and taste balance.
Sear over medium-high heat to caramelize the outside while keeping the inside juicy.
Serve with a side of roasted vegetables to complement the richness of the meat.
Pair with a citrusy salad to refresh the palate between bites.

Variations and Adaptations

Explore regional variations by integrating different herbs; try mint for a unique twist. Seasonal adaptations can include marinating with cranberry juice in the fall for a festive flavor. Adjust dietary needs by substituting traditional butter for a vegan alternative like olive oil. For a richer taste, consider adding a touch of smoked paprika to the marinade. Change the texture by using a grill instead of a skillet for beautiful grill marks. Experiment with plating by serving the chops on a bed of mashed potatoes for a comfort-food approach.

Serving and Presentation Guide

For plating, consider stacking lamb chops in a circular fashion for an elegant visual display. Garnish with fresh herbs or lemon wedges to add color and vibrancy. Traditional accompaniments like garlic mashed potatoes or grilled asparagus pair beautifully with the dish. Modern serving suggestions might include open-faced sandwiches using chopped lamb on artisan bread. Ensure lamb is served warm but not hot, allowing flavors to blossom. Control portions to three chops per serving for a balanced meal presentation.

Wine and Beverage Pairing

When it comes to wine pairings, consider a robust red like Cabernet Sauvignon that complements the lamb’s richness. For white wine lovers, a crisp Sauvignon Blanc works wonderfully, especially if citrus is prominent in the dish. Non-alcoholic alternatives include sparkling water with a splash of lemon for a refreshing match. If tea is more your style, a light herbal tea can enhance digestive comfort post-meal. Be mindful of serving temperatures; red wines should be at room temp while whites are best chilled.

Storage and Shelf Life

Store leftover lamb chops in an airtight container in the refrigerator for up to three days. Ensure they are cooled down to room temperature before sealing. Freezing is an option for longer storage, allowing for up to three months in the freezer. Always label containers with the date to maintain freshness awareness. Pay attention to signs of spoilage, such as off smells or color changes. When reheating, ensure an internal temperature of 165°F is reached for food safety and palatability.

Make Ahead Strategies

To streamline preparation, consider marinating the lamb chops the night before. This enhances flavor while saving time on the day of cooking. Alternatively, pre-chop herbs and prepare your garlic butter in advance; simply combine before cooking for freshness. Store cooked chops in the fridge for ease of reheating later. For added variety, assemble a fresh salad on the day of serving to provide a bright, crisp side that doesn’t lose texture over time.

Scaling Instructions

If you wish to halve the recipe, choose the smallest lamb chops available to maintain cooking times. Doubling or tripling the recipe requires a larger cooking vessel or multiple pans to ensure even cooking. Adjust your cooking times accordingly; larger quantities may take longer to heat through. Always check the internal temperature for doneness in larger batches. For storage, remember that doubling the batch will increase the amount of leftover, so plan accordingly.

Nutritional Deep Dive

When analyzing the macros, expect each serving to provide a robust protein content essential for muscle repair and growth. Micronutrient analysis often reveals high levels of vitamins and minerals, especially iron. The inclusion of lemon and garlic also contributes additional health benefits, including immune support. Regular moderate portions support a balanced diet while indulging in tasty meals. For those managing weight, consider pairing with lighter sides for a fulfilling yet healthy experience.

Dietary Adaptations

For gluten-free preferences, ensure all ingredients are verified gluten-free. For a dairy-free option, substitute butter with olive oil or coconut oil. Vegans might explore creating a similar marinade for vegetable grilling, focusing on robust flavors. Low-carb adaptations can utilize cauliflower instead of potatoes, while kar or paleo dieters can skip marinades entirely for a simple seasoning approach. When considering low-FODMAP diets, limit garlic and opt for green onion or chives as alternatives.

Troubleshooting Guide

If your lamb comes out tough, it may be due to overcooking; always use a thermometer to ensure perfect doneness. Flavor can be too strong or unbalanced if not tasting along the way. Adjust through seasoning additions as needed before finishing. For drier than expected chops, consider basting with broth during the cooking process to maintain moisture. If using fresh herbs, ensure they are neither too dried out nor overpowering — balance is key. Small adjustments can make a substantial impact on final flavors.

Recipe Success Stories

Community feedback surrounding Lemon Garlic Butter Lamb Chops has been overwhelmingly positive, with many praising its ease alongside impressive flavor results. Variations shared by readers include incorporating different marinades that highlight seasonal ingredients, showcasing the adaptability of the recipe. Suggestions for plating have produced stunning visuals shared via social media, turning family dinners into memorable events. Photography tips from fellow cooks emphasize capturing the vibrant colors and textures of the finished dish for visual appeal.

Frequently Asked Questions

Q: Can I use a different cut of lamb for this recipe?

A: Absolutely! While lamb chops are preferred for their tenderness and flavor, you can also use lamb leg or shoulder. Just adjust the cooking time to accommodate larger cuts.

Q: What internal temperature should the lamb reach?

A: The ideal internal temperature for medium-rare lamb is 145°F (63°C). Use a meat thermometer to ensure accurate cooking.

Q: How can I ensure the lamb doesn’t dry out?

A: To prevent dryness, marinate the lamb beforehand, and do not overcook. Allowing the meat to rest before cutting is also crucial for juiciness.

Q: Can I prepare this dish in advance?

A: Yes, you can marinate the lamb ahead of time and cook it when ready. Leftovers reheat well in the oven or microwave, but enjoy fresh for the best results.

Q: Which sides pair well with this dish?

A: Great side options include a tangy salad, roasted vegetables, or garlic mashed potatoes. These complement the rich flavors of the lamb beautifully.

Q: Is it possible to make this dish low-carb?

A: Yes! To make it low-carb, simply omit starchy sides and replace them with green vegetables or cauliflower mash.

Q: How should I store leftovers?

A: Store leftover lamb chops in an airtight container in the refrigerator for up to three days. They can also be frozen for longer storage.

Q: Can I use dried herbs instead of fresh?

A: While fresh herbs provide superior flavor, you can use dried herbs in a lower quantity as substitutes if fresh are not available.

Q: What’s the best way to reheat leftover lamb?

A: Reheat leftover lamb in the microwave or in a preheated oven at 350°F (175°C) until warmed through while trying to minimize additional cooking time to prevent dryness.

Q: Is there a vegetarian option for this recipe?

A: While the original recipe features lamb, you can create a similar marinade and use grilled vegetables or plant-based proteins for a vegetarian version.

Additional Resources

For those interested in related recipes, explore options like grilled steak or chicken marinated in a zesty garlic and herb mix. Technique guides on proper meat searing or marinating can elevate your kitchen skills. Ingredient information about lamb, including cooking tips and historical context, adds depth to your understanding. Recommendations for equipment such as suitable pans and meat thermometers can streamline the cooking process while ensuring consistent quality results. Seasonal variations like using fall root vegetables also provide exciting twists on classic pairings.

Join the Conversation

Engaging with the community can enhance your cooking journey. Share your culinary experiences on social media, including photography tips for capturing your delicious creations. Encourage feedback and recipe reviews to foster a supportive atmosphere for fellow cooks. Recipe variations and personal touches shared can inspire others to try new things while enriching the discussion around this delightful dish.

The Recipe

Lemon Garlic Butter Lamb Chops

Serves: 4

Prep Time: 15 mins

Cook Time: 20 mins

Total Time: 35 mins

Kitchen Equipment Needed

  • Heavy skillet or grill
  • Meat thermometer
  • Cutting board
  • Sharp knife
  • Mixing bowl

Ingredients

  • 4 lamb chops
  • 1 lemon, juiced and zested
  • 4 cloves garlic, minced
  • 1/2 cup unsalted butter, softened
  • 2 tablespoons fresh thyme, chopped
  • Salt and pepper to taste
  • 2 tablespoons olive oil for cooking

Directions

  1. In a mixing bowl, combine softened butter, lemon juice and zest, minced garlic, thyme, salt, and pepper. Mix until well combined.
  2. Spread half of the garlic butter mixture over the lamb chops. Allow to marinate for at least one hour.
  3. Heat olive oil in a heavy skillet over medium-high heat.
  4. Once hot, add marinated lamb chops and sear for about 3-4 minutes on each side until golden brown and cooked to desired doneness.
  5. Remove from heat and let rest for 5 minutes before serving.
  6. Top with remaining garlic butter mixture before plating, allowing it to melt over the warm chops.

Recipe Notes

  • For added flavor, try marinating chops overnight.
  • Leftover garlic butter can be stored in the fridge for up to a week.
  • This recipe easily doubles for larger gatherings.
  • Consider adding a splash of white wine to the pan for deglazing before serving for an added flavor boost.

Irresistible Sweet Cinnamon Banana Bread with Snickerdoodle Twist

Sweet Cinnamon Banana Bread with a Snickerdoodle Twist: A Deliciously Unique Treat

⚖️
Difficulty
Easy

⏲️
Prep Time
15 mins

🕒
Cook Time
60 mins

⏱️
Total Time
75 mins

🍽️
Servings
8 servings

Sweet Cinnamon Banana Bread with a Snickerdoodle Twist is a delightful twist on a classic favorite. Imagine thick slices of moist banana bread enriched with warm cinnamon and topped with a delightful snickerdoodle-inspired coating. This mouthwatering banana bread is perfect for breakfast, snacks, or dessert, and its comforting aroma fills the kitchen, inviting family and friends to gather around.

This recipe combines the familiar sweetness of ripe bananas with the cozy spice of cinnamon and a sugary crust that takes it to the next level of deliciousness. The Snickerdoodle twist adds a crunchy texture and an unforgettable flavor that elevates your ordinary banana bread into something truly spectacular. Each bite is a warm hug, making it an ideal treat to share during the cooler months or at festive gatherings.

Quick Recipe Highlights

  • Flavor Profile: This banana bread balances the natural sweetness of bananas with the warmth of cinnamon and sugar, creating a flavor sensation that’s both comforting and satisfying.
  • Texture: The inside is soft and moist, while the outside boasts a slightly crispy and crumbly layer, reminiscent of classic snickerdoodle cookies.
  • Aroma: The smell of cinnamon mixed with baked bananas fills the air, creating an inviting atmosphere that’s hard to resist.
  • Visual Appeal: With a golden-brown crust and cinnamon-sugar dusting, this banana bread is as beautiful as it is delicious.
  • Skill Level Needed: This recipe is perfect for beginner bakers, providing an easy yet rewarding baking experience.
  • Special Equipment: You will need a mixing bowl, a loaf pan, and an oven to create this tasty treat.

Recipe Overview

  • Difficulty Level: The Sweet Cinnamon Banana Bread with a Snickerdoodle Twist is categorized as easy, making it accessible for all skill levels. The straightforward steps require minimal culinary experience, ensuring that anyone can enjoy baking this delicious loaf.
  • Category: This recipe belongs to the breakfast and dessert categories, as it can be enjoyed during breakfast or as a sweet treat at any time of the day.
  • Cuisine: Banana bread has its roots in American cuisine, but this recipe infuses it with the beloved flavors of snickerdoodle cookies, showcasing a blend of culinary influences.
  • Cost: The ingredients are budget-friendly, making this recipe affordable without compromising on taste.
  • Season: While banana bread can be enjoyed year-round, it truly shines during the fall and winter months, when warm spices are particularly comforting.
  • Occasion: Perfect for family gatherings, brunches, or as a thoughtful gift for friends, this banana bread is versatile for any occasion.

Why You’ll Love This Recipe

The taste and texture appeal of Sweet Cinnamon Banana Bread with a Snickerdoodle Twist will have you coming back for more. The moist banana bread layered with cinnamon sugar offers a delightful chewiness that is simply irresistible. The combination of flavors elevates this treat, ensuring it is not just another loaf of bread but a gourmet experience.

Convenience and preparation benefits are another reason to love this recipe. With only a few simple steps, you can whip this up relatively quickly, making it a fantastic option for last-minute gatherings or cravings. Plus, it remains delicious for several days, allowing you to enjoy it at your leisure.

From a nutritional angle, banana bread provides a source of potassium and other essential nutrients found in ripe bananas. Although this recipe includes added sugars and butter, the presence of bananas contributes to a feeling of satiety, making it a fulfilling snack.

Socially speaking, this banana bread is a crowd-pleaser. Its inviting aroma captivates guests, making it a delightful centerpiece for brunch, coffee get-togethers, or dessert tables. Sharing a slice creates cherished moments with friends and family.

Lastly, the cost-effectiveness and accessibility of the ingredients make this recipe an everyday treat. With items most cooks already have in their pantry, there’s no need for a special shopping trip. Just grab those overripe bananas and transform them into something spectacular!

Historical Background and Cultural Significance

Banana bread originated during the Great Depression as a way to use up overripe bananas, preventing waste while maximizing flavor. This simple recipe quickly gained popularity due to its delicious results and ease of preparation. Over time, banana bread has evolved into a beloved staple in American baking, with countless variations emerging, including the revered snickerdoodle twist.

Culturally, banana bread represents resourcefulness and creativity in the kitchen. Families often pass down their own recipes, each adding personal touches that reflect their unique stories and traditions. This fostering of familial bonds is what makes banana bread a timeless favorite.

The evolution of banana bread encompasses various regional interpretations. From nut-studded varieties to decadent chocolate chip additions, each iteration showcases local tastes and ingredient availability.

Regional variations can be found everywhere, including tropical locales where bakers might add coconut or other fruity elements commonly found in those areas. These adaptations further illustrate how banana bread has transcended borders and embraced diversity.

Ingredient Deep Dive

Ripe Bananas: Rich in potassium and essential vitamins, ripe bananas are the star of this bread. They provide natural sweetness and moisture. When choosing bananas, look for those that are heavily speckled with brown spots; they are at their peak flavor. To store, place them on the counter, and avoid refrigerating them. If overripe, consider freezing them for future baking uses.

All-purpose Flour: This staple ingredient gives the bread its structure. While you can experiment with alternatives like whole wheat or gluten-free flour, it can change the final texture. Store flour in a cool, dry place, and keep it in an airtight container to ensure freshness.

Sugar: Both granulated and brown sugar play crucial roles in flavoring. While granulated sugar adds sweetness, brown sugar introduces moisture and depth. Always choose high-quality sugar and store it away from moisture. For substitutions, coconut sugar or honey can be used, but results may vary slightly.

Cinnamon: This warm spice enhances both flavor and aroma, making it integral to the snickerdoodle essence of this recipe. Fresh ground cinnamon tends to deliver more robust flavor than pre-ground. Keep your spices in a cool, dark place for optimal freshness, and consider experimenting with other spices like nutmeg for a uniquely spiced experience.

Butter: Adds richness and flavor while keeping the bread moist. Ensure your butter is softened for easy mixing, which will improve the texture of the loaf. For storage, keep butter sealed in the fridge or freezer for longer-lasting use.

Egg: Acts as a binder that helps maintain the loaf’s structure. Always use fresh eggs, stored in the refrigerator. For vegan adaptations, consider using flax eggs as a substitute, which can work well in this recipe.

Common Mistakes to Avoid

  • Not using overripe bananas: The sweetness and moisture of ripe bananas are key. Underripe bananas can lead to a denser loaf.
  • Overmixing the batter: This can create a tough texture; mix until just combined for a light banana bread.
  • Incorrect oven temperature: Ensuring accuracy in oven temperature matters for even baking. Use an oven thermometer if unsure.
  • Using cold ingredients: Allow eggs and butter to come to room temperature for better incorporation.
  • Not greasing the pan sufficiently: This can lead to sticking; ensure the pan is well-greased or lined with parchment.
  • Skipping the cinnamon-sugar topping: This critical step adds flavor; don’t leave it out for lackluster results.
  • Blindly following baking durations: Always check for doneness with a toothpick, as oven performance can vary.
  • Storing improperly post-baking: Avoid stale leftovers by wrapping the bread tightly in plastic wrap or foil once cooled.
  • Not tasting and adjusting: Don’t hesitate to tweak sugar levels according to taste—everyone has different preferences!
  • Not letting the bread cool: Waiting allows flavors to set and eases slicing without crumbling.

Essential Techniques

Understanding the importance of mixing the ingredients correctly is crucial in creating the perfect batter. Combine wet and dry ingredients separately before mixing them to ensure consistent texture. Avoiding overmixing is key; this prevents activating too much gluten, which can result in a dense loaf.

Measuring ingredients accurately is essential for success. Use a digital scale for precise measurements of flour and sugar. Avoid scooping flour directly from the container as this can lead to compacting and offer incorrect amounts.

Cooling the loaf after baking is an often-overlooked technique. Allowing the banana bread to cool in the pan for a few minutes before transferring it to a wire rack ensures it remains intact and retains moisture. Proper cooling enhances both texture and flavor.

Monitoring baking time closely is important. Rather than relying solely on a timer, check for a golden-brown exterior and insert a toothpick in the center. If it comes out clean or with a few moist crumbs, it’s done!

Pro Tips for Perfect Sweet Cinnamon Banana Bread with a Snickerdoodle Twist

To ensure your banana bread turns out perfectly every time, consider these pro tips: Always use room temperature eggs and butter to blend seamlessly into the batter, resulting in a lighter loaf. Additionally, try to weigh your bananas after peeling for more accurate measures, as different sizes can vary greatly.

Consider incorporating nuts or chocolate chips for added texture and flavor variety, but avoid overloading the batter as it can disrupt cooking times. Be sure to rotate the loaf halfway through the baking process for even coloration and cooking, especially if your oven has hot spots.

After baking, keep the leftover bread in an airtight container; it maintains moisture and flavor longer. For an extra treat, reheat slices with a pat of butter on top until warm and gooey before serving.

Lastly, allow the banana bread to rest overnight before cutting into it—the flavors improve significantly, resulting in a more balanced taste.

Variations and Adaptations

For those looking to mix things up, try regional variations such as adding pecans or walnuts for crunch or using maple syrup in place of sugar for a unique twist. Seasonal adaptations can also include integrating pumpkin spice during the fall months for a festive version.

Dietary modifications can be easily made for gluten-free or dairy-free options. Substitute all-purpose flour with almond or coconut flour and replace butter with coconut oil. For vegan alternatives, flaxseed mixed with water can replace eggs, maintaining the loaf’s structure without the animal products.

You can also change flavor profiles by adding spices like cardamom or allspice, contributing an aromatic depth to your bread. Lastly, consider new presentation alternatives—slice the loaf and serve it with a dollop of freshly whipped cream or a sprinkle of powdered sugar to delight your guests visually.

Serving and Presentation Guide

When serving your Sweet Cinnamon Banana Bread with a Snickerdoodle Twist, presentation is key. Slice the bread into even, thick pieces to showcase its interior and the beautiful cinnamon-sugar topping. A wooden or decorative cutting board adds rustic charm to the display.

Garnish with fresh seasonal fruits like berries or slices of citrus, which bring a color contrast and freshness to the table. If desired, adding a drizzle of caramel or a light dusting of powdered sugar enhances the visual appeal.

Serving temperature can also elevate the experience; consider warming each slice slightly in the oven or microwave for a deliciously cozy serving moment. Offering whipped cream on the side creates a lovely pairing for those who enjoy creamy toppings, bringing together flavors seamlessly.

Lastly, maintain portion control by presenting individual slices on small dessert plates, allowing guests to serve themselves without overwhelming their appetites.

Wine and Beverage Pairing

Pairing beverages with Sweet Cinnamon Banana Bread can enhance its flavors. For an alcoholic option, consider a light wine such as a Riesling or Moscato. Their sweetness and crispness complement the flavor profile beautifully, enhancing the banana and cinnamon notes.

For non-alcoholic options, a spiced chai tea or a rich hot chocolate brings warmth and complements the cozy spices found in the bread. If you’re a coffee lover, consider serving it alongside a medium roast brewed coffee—the nutty flavors will enhance the bread’s taste.

When serving, temperature balance is essential; ensure the drinks are either served chilled or hot to match the warmth of the banana bread for an ideal pairing.

Storage and Shelf Life

Proper storage of Sweet Cinnamon Banana Bread is vital for maintaining its freshness. Keep the bread at room temperature in an airtight container for up to four days. If you have leftovers that are lingering longer, consider freezing slices, which can last up to three months.

To freeze bread, wrap it tightly in plastic wrap and then foil to protect against freezer burn. For reheating, simply microwave individual slices for several seconds or place them in a preheated oven at 350°F until warmed through.

Always keep an eye out for signs of spoilage—if the bread appears dry, darkening, or has an off smell, it’s best to discard it. Enjoying the bread while it is fresh provides the best taste experience.

Make Ahead Strategies

Make ahead strategies can ease your baking hustle. Prepare dry ingredients ahead and store them together in a zip-top bag. Combine wet ingredients shortly before baking to maintain optimal freshness.

If you’re planning for next-day events, bake an extra loaf and freeze it as mentioned earlier. This allows you to pull it out and have it ready to serve without the hassle the day of.

To keep the flavor intact, avoid frosting or adding toppings until just before serving. This ensures freshness while allowing the bread to shine in its delicious simplicity.

Scaling Instructions

Scaling the Sweet Cinnamon Banana Bread recipe is straightforward. If you want to halve it, simply adjust the ingredient amounts accordingly, maintaining the same baking temperature and time, checking for doneness closer to the end.

For larger gatherings, doubling or tripling the recipe works well, but consider spacing out the loaves on different racks in the oven to prevent uneven cooking. Always monitor baking time, as larger quantities may need a few extra minutes.

Make sure you have appropriately sized pans as well; using larger pans may require additional time to cook through completely.

Nutritional Deep Dive

Sweet Cinnamon Banana Bread provides a hearty balance of macronutrients, primarily coming from healthy fats, carbohydrates, and a moderate protein count. The bananas offer natural sugars and fiber, supporting digestive health and providing sustained energy.

When analyzing micronutrients, bananas contribute essential potassium, vitamin C, and vitamin B6, while cinnamon brings antioxidants and anti-inflammatory properties.

For those concerned about dietary considerations, be mindful of portion sizes. Each slice packs a flavorful punch; moderation is key when enjoying this delightful treat without overindulging.

This banana bread offers a perfect blend to satisfy sweet cravings while maintaining a fulfilling presence in your diet—making it a fantastic option for weight management when enjoyed wisely.

Dietary Adaptations

This recipe allows for various dietary adaptations. If you’re gluten-free, replacing all-purpose flour with almond or gluten-free baking blends can yield delicious results while still delivering on flavor.

For vegan adaptations, follow the earlier suggested flax egg method, replacing butter with coconut oil, and using non-dairy milk for added richness.

Dairy-free individuals can simply swap out dairy for plant-based alternatives while still enjoying the flavors of the beloved banana bread.

Low-carb and keto variations are possible with coconut flour and sugar substitutes, providing a sweet treat without the added carbs.

Lastly, each of these adaptations maintains the core essence of the Sweet Cinnamon Banana Bread while accommodating diverse dietary preferences.

Troubleshooting Guide

If your banana bread turns out too dense, it’s likely due to overmixing; ensure you mix just until combined for best results. If it’s too dry, you may have baked it too long or used overly ripe bananas, which can affect moisture levels.

For a lack of flavor, double-check your spice measurements; fresh spices can make a big difference. If you find the top is browning too quickly, loosely cover it with aluminum foil while baking.

If your bread sinks in the middle, it could be due to overmixing or an incorrect oven temperature. Always check the accuracy of your oven to avoid such issues—an oven thermometer can help!

For unpleasant texture, ensure you’re measuring flour correctly and not ignoring the cooling process post-baking, as it can affect how the bread sets.

Recipe Success Stories

Community feedback for the Sweet Cinnamon Banana Bread with a Snickerdoodle Twist has been overwhelmingly positive, and it’s not uncommon to hear about family recipe adaptations becoming personal favorites. Readers have shared their successes in varying spice blends and incorporating their favorite nuts, praising how these additions enhance the flavors.

Many also describe the joy of baking this recipe with children, turning it into a family tradition. Variations such as adding chocolate chips or substituting flavors have led to intriguing new takes on this classic, igniting the creativity of home bakers everywhere.

Photography tips also describe how capturing the warm, golden ambiance of freshly baked banana bread can lead to mouthwatering posts on social media, inspiring others to try their hand at this simple yet delicious recipe.

Frequently Asked Questions

1. Can I use frozen bananas for this recipe?
Yes! Frozen bananas work well for banana bread. Just be sure to defrost them, drain excess moisture, and mash them before mixing into the batter. This can also add a greater sweetness and moisture to your loaf.

2. How do I know when the banana bread is done?
A toothpick inserted into the center of the bread should come out clean or with just a few moist crumbs. If it comes out wet, give it additional baking time, checking every 5 minutes.

3. Can I convert this into muffins?
Absolutely! Use a muffin tin and reduce the baking time to 20-25 minutes. Keep an eye on them to achieve that perfect fluffy texture.

4. How do I store leftover banana bread?
Wrap it tightly in plastic wrap and store at room temperature for up to four days. For longer storage, freeze individual slices in plastic wrap and foil.

5. Can I add nuts or chocolate chips?
Yes, feel free to add nuts or chocolate chips according to your taste. Just be sure not to overload the batter, as they can affect baking time.

6. What can I use instead of butter?
Coconut oil or applesauce can work as butter substitutes for a healthier option. This change will slightly alter the flavor and texture, but can still yield delicious results.

7. Can I make this bread dairy-free?
Yes, use non-dairy milk and coconut oil in place of butter. This adaptation keeps the bread moist and flavorful.

8. Is there a way to lower the sugar content?
Consider using ripe bananas, which contain natural sugars, or substituting with alternatives like honey or maple syrup. Just be cautious with ratios as they vary in sweetness.

9. How can I make this recipe low-carb?
Swap all-purpose flour for almond flour and replace sugar with erythritol or other low-carb sweeteners for a keto-friendly version.

10. Can this recipe be made ahead of time?
While fresh-baked bread is best, you can prepare the batter in advance and bake it later. Alternatively, fully bake and freeze the bread for later enjoyment.

Additional Resources

For related recipes, consider checking out variations like classic banana bread, chocolate chip banana bread, and healthy banana bread options. Each offers a delicious twist on the core concept while using similar techniques.

Become familiar with technique guides on mixing, measuring, and baking essentials to further enhance your baking skills. Exploring ingredient information for optimal freshness and substitutes ensures you’re always prepared regardless of what you have on hand.

Finally, consider investing in essential kitchen equipment that can streamline your baking efforts and ensure success with this recipe and others.

Join the Conversation

Share your Sweet Cinnamon Banana Bread experiences on social media to connect with fellow baking enthusiasts. Posting photos of your results can inspire others to try their hand at baking—tagging in community groups encourages engagement and feedback.

Offer and explore photography tips and preferences to capture this loaf’s beauty effectively, as well as share valuable recipe reviews that benefit others. Encouraging discussions around this recipe allows for creative adaptation and individual culinary expression, leading to diverse interpretations of a beloved classic.

The Recipe

Sweet Cinnamon Banana Bread with a Snickerdoodle Twist

Serves: 8 servings

Prep Time: 15 mins

Cook Time: 60 mins

Total Time: 75 mins

Kitchen Equipment Needed

  • Mixing bowl
  • Loaf pan
  • Measuring cups and spoons
  • Oven
  • Whisk
  • Rubber spatula

Ingredients

  • 3 large ripe bananas, mashed
  • 1/2 cup unsalted butter, melted
  • 3/4 cup granulated sugar
  • 1/4 cup brown sugar, packed
  • 2 large eggs, room temperature
  • 1 teaspoon vanilla extract
  • 1 1/2 cups all-purpose flour
  • 1 teaspoon baking powder
  • 1/2 teaspoon baking soda
  • 1 teaspoon cinnamon
  • 1/4 teaspoon salt
  • 1/4 cup granulated sugar (for topping)
  • 1 teaspoon cinnamon (for topping)

Directions

  1. Preheat the oven to 350°F (175°C). Grease and flour a 9×5-inch loaf pan.
  2. In a mixing bowl, combine the melted butter, mashed bananas, granulated sugar, brown sugar, eggs, and vanilla extract. Mix until well combined.
  3. In another bowl, whisk together the flour, baking powder, baking soda, cinnamon, and salt.
  4. Gradually add dry ingredients to the banana mixture, stirring until just combined—avoid overmixing.
  5. Pour the batter into the prepared loaf pan.
  6. In a small bowl, mix the sugar and cinnamon for the topping. Sprinkle evenly over the batter.
  7. Bake for 60 minutes, or until a toothpick inserted in the center comes out clean.
  8. Let cool in the pan for 10 minutes, then transfer to a wire rack to cool completely.

Recipe Notes

  • Store leftovers in an airtight container at room temperature for up to four days.
  • This bread can be frozen for up to three months; wrap tightly in plastic wrap followed by foil.
  • For a sweeter loaf, increase the sugar by a couple of tablespoons.
  • Feel free to customize with your favorite add-ins like nuts or chocolate chips.