Ultimate Loaded Baked Potato with Steak, Shrimp, and Broccoli Recipe

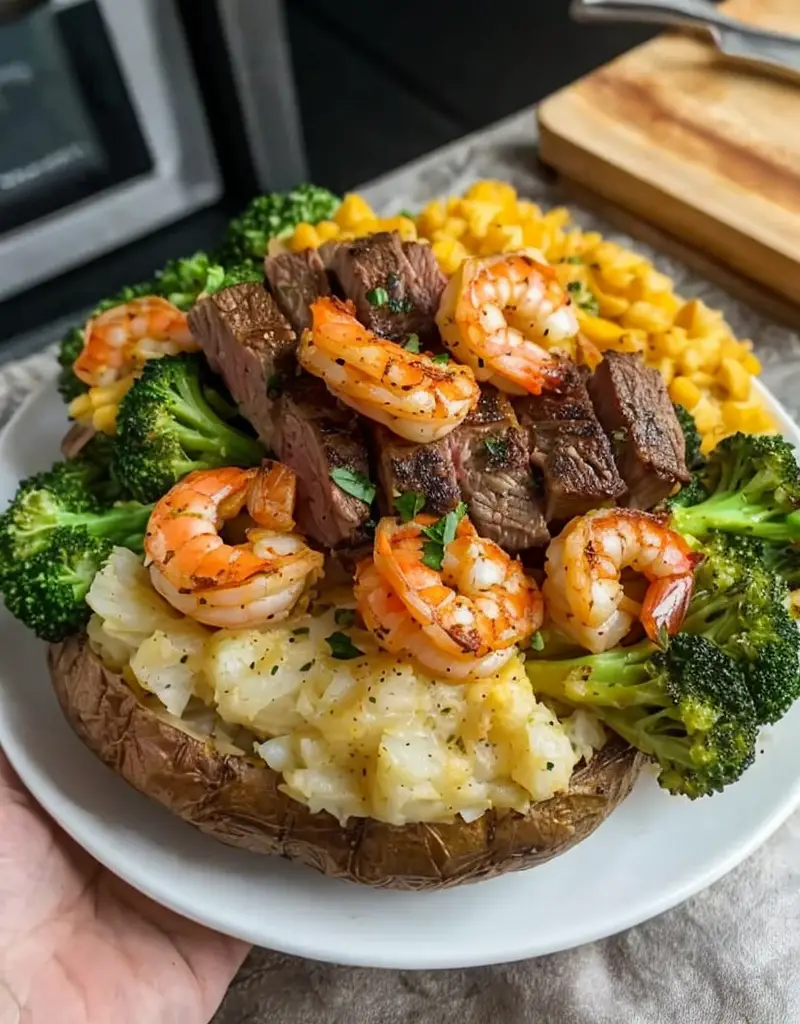
Loaded Baked Potato with Steak, Shrimp, and Broccoli: A Hearty Comfort Dish

⚖️
Difficulty
Medium

⏲️
Prep Time
15 mins

🕒
Cook Time
30 mins

⏱️
Total Time
45 mins

🍽️
Servings
4

Welcome to the ultimate indulgence of comfort food: the Loaded Baked Potato with Steak, Shrimp, and Broccoli! This heartwarming dish combines fluffy baked potatoes with succulent steak and shrimp, crowned with vibrant broccoli for a splash of color and nutrition. Each bite is an explosion of flavors, from the savory richness of the steak to the sweet, briny tones of the shrimp, all enveloped in a creamy, cheesy sauce. It’s a dish that celebrates hearty flavors and cozy gatherings, perfect for a family dinner or a weekend treat!

Loaded baked potatoes have always been a beloved comfort food, but adding steak, shrimp, and broccoli takes this dish to a whole new level. Picture the creamy, buttery texture of the potato melding beautifully with tender chunks of steak and juicy shrimp, all while the bright green broccoli adds a refreshing crunch. It’s a delightful combination that is sure to impress, whether you’re cooking for yourself or hosting a gathering with friends. Let’s dive into this deliciously sophisticated recipe that is surprisingly easy to prepare!

Quick Recipe Highlights

  • Flavor Profile: This loaded baked potato offers a rich combination of flavors—from the umami of the steak to the sweet and juicy shrimp, enhanced further by a mix of seasonings and melting cheese.
  • Texture: Enjoy the contrast of the soft, fluffy potato against the crispy broccoli, tender steak, and succulent shrimp, making every bite a textural delight.
  • Aroma: The aroma of grilled steak combined with the smell of fresh shrimp and distinct notes of melted cheese creates an irresistible scent that fills your kitchen.
  • Visual Appeal: A vibrant medley of colors from the bright green broccoli, golden shrimp, and perfectly baked potato makes for a stunning dish that is as pleasing to the eye as it is to the palate.
  • Skill Level Needed: This recipe is designed for home cooks at a medium skill level, providing a fun challenge that results in a gourmet-style meal.
  • Special Equipment: You will need a baking sheet, a pot for boiling, and a grill or skillet to cook the steak and shrimp.

Recipe Overview

  • Difficulty Level: The medium difficulty stems from the multiple cooking techniques involved, including grilling, boiling, and baking, ensuring a variety of skills are showcased.
  • Category: This recipe falls under the main dish category, making it a fulfilling choice for lunch or dinner.
  • Cuisine: Reflecting elements of American cuisine with a twist of surf and turf, this dish incorporates ingredients commonly found in both land and sea preparations.
  • Cost: The total cost for ingredients may vary, but can generally remain around $30, depending on the quality of steak and shrimp chosen.
  • Season: The best time to enjoy this loaded baked potato is year-round, as potatoes are always available, and the dish can be adjusted to feature seasonal vegetables.
  • Occasion: Perfect for casual family dinners, fun gatherings, or a cozy movie night in!

Why You’ll Love This Recipe

Every bite offers a symphony of flavors that delights your palate—smoky steak, sweet shrimp, and crunchy broccoli, all balanced with creamy cheese. This Loaded Baked Potato with Steak, Shrimp, and Broccoli is not just a meal; it’s a treat for the senses.

The convenience of this recipe makes it a go-to for weeknight dinners. With simple, accessible ingredients and straightforward cooking steps, you can whip up this delicious meal in under an hour, giving you more time to enjoy with family or friends.

Nutritionally, this dish packs quite a punch. With the wholesome benefits of potatoes, the protein in steak and shrimp, and the vitamins from broccoli, it’s a balanced meal that satisfies both your hunger and your well-being.

When entertaining, this dish not only impresses but also brings people together. The act of sharing a loaded baked potato encourages conversation and connection, making it perfect for gatherings where everyone can customize their toppings.

Cost-effectively, this dish uses affordable ingredients that can easily be found at your local grocery store. The versatility allows you to splurge on quality steak or shrimp or save by using other proteins, ensuring budget-friendly options without losing flavor.

Historical Background and Cultural Significance

Loaded baked potatoes have their roots in American cuisine, popularized in diners and restaurants across the country. They symbolize comfort and indulgence, appealing to a wide range of tastes with customizable toppings.

This dish’s cultural significance lies in its adaptability. In a melting pot like America, the concept of taking a simple baked potato and loading it with a variety of ingredients reflects the diversity of culinary influences that shape our dining experiences.

Over the years, the loaded baked potato has evolved from a simple side dish to a full-fledged meal. Chefs have experimented with global flavors, reflecting regional ingredients and preferences, which has led to the variations we see today.

Regional variations exist, with some areas favoring seafood, while others prefer meat-based toppings. These adaptations celebrate local ingredients and culinary traditions that make each version unique.

Ingredient Deep Dive

Potatoes: A staple food in many cultures, potatoes provide a hearty base for this dish. They are rich in vitamins and minerals, making them a healthy option when combined with other nutritious ingredients. When selecting potatoes, look for firm, smooth-skinned varieties. Store them in a cool, dark place and avoid refrigerating, which can change their texture. Substitute with sweet potatoes for added flavor and nutritional benefits.

Steak: Known for its rich flavor and tender texture, steak serves as a hearty protein source in this recipe. It offers essential nutrients like iron and protein. Choose high-quality cuts for optimal taste and tenderness. Store in the refrigerator and use within a few days of purchase to ensure freshness. In place of steak, consider using chicken or pork for a different flavor profile.

Shrimp: These succulent seafood morsels add sweetness and a delightful texture to your potato. Shrimp are low in calories yet high in protein and omega-3 fatty acids, providing health benefits while enhancing your meal. When shopping, opt for fresh or flash-frozen shrimp. They should smell clean and not fishy. Store in the refrigerator and consume within a couple of days, or freeze for long-term storage. Substitute with scallops for an equally luxurious option.

Broccoli: As a nutrient-dense vegetable, broccoli not only complements the dish visually but also amplifies its nutritional profile. Rich in vitamins K and C, broccoli supports overall health. When selecting, choose vibrant green florets that are firm and free from blemishes. Store in the refrigerator for a few days. For a variation, try asparagus or green beans to provide a different flavor and texture.

Common Mistakes to Avoid

  • Under-seasoning the potatoes: Make sure to season well while baking to enhance flavor.
  • Overcooking shrimp: Keep an eye on shrimp to avoid a rubbery texture; they cook quickly!
  • Choosing the wrong potato: Avoid starchier potatoes like russets for this recipe; choose waxy ones that hold shape better.
  • Batch cooking the steak: Cook in smaller batches to ensure each piece gets a nice sear instead of steaming.
  • Not preheating the oven: Always preheat the oven before baking to achieve the perfect potato texture.
  • Forgetting to let cooked meat rest: Allow steak to rest to keep juices intact for a more flavorful bite.
  • Ignoring texture combinations: Balance the soft potato with crunchy toppings to elevate the dish.
  • Rushing the cooking process: Take your time; cooking each component properly makes a significant difference in the final dish.
  • Skipping the toppings: Don’t shy away from creative toppings—explore cheese, sauces, or herbs for added flavor.
  • Neglecting presentation: Take time to arrange your dish beautifully—it enhances the dining experience.

Essential Techniques

Baking Potatoes: Properly baking potatoes is crucial. Wrapping them in foil helps them steam, but for a crispier skin, bake directly on the rack. Cook for an hour at 400°F for perfect fluffiness, checking for doneness by piercing. Avoid baking too long to prevent dryness.

Grilling Shrimp: To achieve perfectly grilled shrimp, skewering them reduces the chance of losing them to the grill. Preheat your grill to high and cook for 2-3 minutes per side. Ensure a nice char without overcooking, as shrimp turn opaque when done. Season generously for added flavor.

Pro Tips for Perfect Loaded Baked Potato with Steak, Shrimp, and Broccoli

1. Opt for russet potatoes for a fluffy interior and delicious skin that crisps up beautifully.

2. Season both the shrimp and steak with a mix of herbs and spices before cooking for maximum flavor.

3. Experiment with different cheeses for topping; sharp cheddar, gouda, or even blue cheese can elevate the dish.

4. Use oil or butter to coat the broccoli before roasting for a tasty char and enhanced flavor.

5. Think outside the box with your sauces; a drizzle of garlic butter can take the dish over the top.

6. Allow the baked potatoes to cool slightly before cutting; this helps the steam escape while maintaining their structure.

7. Always rest cooked meat before serving to retain the juices, keeping your steak tender and tasty.

8. Customize your loaded baked potato by allowing guests to top theirs with their favorite ingredients!

Variations and Adaptations

For regional variations, consider Southern-style toppings like pulled pork or barbecue sauce. Seasonal adaptations can include roasted butternut squash during fall or fresh asparagus in spring. For dietary modifications, substitute shrimp with chickpeas for a plant-based option. Flavor variations can include using teriyaki sauce for an Asian twist or spicy salsa for an added kick. Texture modifications may involve adding crispy bacon bits or crunchy fried onions. Consider presentation alternatives like serving deconstructed, with ingredients plated separately.

Serving and Presentation Guide

For an aesthetically pleasing presentation, start with a base of the fluffy baked potato, then layer the steak, shrimp, and broccoli artfully on top. Garnish with freshly chopped herbs or a sprinkle of cheese. Consider pairing the dish with a side salad with light dressing to complement it. Serve while hot and ensure each plate gets a uniform portion for elegant dining. For a casual setting, serve on wooden boards that give a rustic appeal.

Wine and Beverage Pairing

A good bottle of red wine, such as a Cabernet Sauvignon, will complement the richness of the steak beautifully. For those preferring white, a Sauvignon Blanc will pair nicely with the shrimp. If you prefer non-alcoholic options, consider serving iced tea or a fresh squeezed lemonade to brighten the meal. For coffee lovers, a light roast that enhances rather than overpowers flavors can work wonders.

Storage and Shelf Life

Store leftover loaded baked potatoes in an airtight container in the refrigerator for 3-5 days. Ensure that the potatoes cool to room temperature before sealing to prevent moisture. Reheat in the microwave or oven, covering with foil to retain moisture. Avoid leaving out at room temperature for more than 2 hours to reduce spoilage risk. For longer storage, consider freezing components separately for up to three months while ensuring they are securely sealed.

Make Ahead Strategies

Prepare ingredients in advance by seasoning and marinating the shrimp and steak the day before to enhance flavors. Pre-bake the potatoes a day in advance and warm them up when ready to serve. Chopping vegetables ahead saves preparation time on the day of serving, allowing for quicker assembly. Store the prepped ingredients in the fridge until just before cooking; this ensures everything stays fresh until needed.

Scaling Instructions

For halving the recipe, reduce all ingredients proportionally and keep cooking times similar for potatoes and shrimp. For larger gatherings, double or triple the ingredients as needed. Ensure an ample cooking space by using larger pans or multiple baking sheets. Monitor cooking times, as increased quantities may require adjusted baking durations to ensure even cooking throughout.

Nutritional Deep Dive

This loaded baked potato is a well-rounded dish rich in carbs, protein, and healthy fats. A medium potato offers about 160 calories, while steak and shrimp add an additional 250-300 calories depending on the portion size. Broccoli contributes around 55 calories, enhancing the dish with vitamins and fiber, thus ensuring it’s nutritious while comforting. It’s advisable to watch serving sizes to maintain a balanced calorie intake without sacrificing taste.

Dietary Adaptations

For gluten-free options, this recipe is naturally gluten-free; just ensure that seasoning blends do not contain any gluten cross-contaminants. For dairy-free diets, omit cheese or use lactose-free alternatives. Vegan adaptations can replace steak and shrimp with hearty vegetables or plant-proteins like lentils or mushrooms. Low-carb dieters might consider a cauli-potato mash instead of the traditional baked potato, while those on the keto diet could focus on cheese and protein-heavy toppings for a deliciously satisfying dish.

Troubleshooting Guide

If you find your potatoes are too dry, consider reducing the baking time or wrapping them in foil to retain moisture. For overly salty flavor, try balancing with a squeeze of lemon juice or adding a touch of cream. If the shrimp turn rubbery, reduce cooking time for future attempts, keeping a close eye on them while on the grill. Adjusting grill temperature may also help in cooking evenly without losing textures.

Recipe Success Stories

Many home cooks have celebrated the versatility of this dish, sharing their stories of family gatherings where it became the star feature. Some variations made at home included different proteins or adding spicy sauces, showcasing the recipe’s adaptability. Readers frequently report back on their photography captures that highlight the dish’s vibrant colors and textures, urging others to try their own spin on this classic comfort food.

Frequently Asked Questions

Can I use different types of cheese for this recipe? Absolutely! Feel free to experiment with different cheeses like gouda, mozzarella, or even pepper jack for a spicy kick!

How do I ensure my baked potatoes are fluffy? Make sure to pierce the potatoes with a fork before baking, and don’t forget to sprinkle them with salt for the best texture.

Can I substitute steak or shrimp for other proteins? Yes! Feel free to swap out with chicken, pork, or tofu for a hearty vegetarian version.

What is the best way to store leftovers? Store in an airtight container in the refrigerator for 3-5 days, ensuring that they are cooled to room temperature before sealing.

Can this recipe be made vegan? Yes! Replace shrimp and steak with hearty plant-based ingredients like mushrooms or lentils and skip the cheese or use a dairy-free alternative.

How do I know when the shrimp are done cooking? Shrimp are done when they turn pink and opaque, typically taking about 2-3 minutes per side on high heat.

Is there a way to prepare this dish ahead of time? Yes, you can prep the ingredients the day before and store them until ready to cook, or just bake the potatoes in advance.

What side dishes pair well with this recipe? A light side salad or roasted vegetables can complement this loaded baked potato beautifully!

Can I use frozen shrimp for this dish? Yes, just make sure to thaw them thoroughly before cooking for even results.

What should I do if my broccoli isn’t cooking evenly? You might want to cut the florets smaller to ensure they cook at the same rate as the other ingredients.

Additional Resources

For more delicious loaded potato variations, check out our other recipes featuring baked potatoes with different toppings. Explore technique guides for perfectly grilling shrimp or steaming vegetables for any meal. Discover ingredient information including seasonal choices and health benefits to create balanced dishes year-round. If you’re searching for the best kitchen equipment, we provide recommendations that can enhance your cooking experience and uplift your culinary creations!

Join the Conversation

We want to hear from you! Share your loaded baked potato tips and tricks on social media using our hashtag. Post your delicious photo captures, tag your variations, and connect with fellow food lovers in the community. Leave a recipe review sharing what you loved about this dish and any adaptations you made. Whether you enjoyed the dish solo or with friends, we want to celebrate the joy and creativity that cooking brings to your table!

The Recipe

Loaded Baked Potato with Steak, Shrimp, and Broccoli

Serves: 4

Prep Time: 15 mins

Cook Time: 30 mins

Total Time: 45 mins

Kitchen Equipment Needed

  • Baking sheet
  • Pot for boiling water
  • Skillet or grill for cooking proteins
  • Knife and cutting board
  • Foil (optional)

Ingredients

  • 4 medium russet potatoes
  • 1 pound steak, cubed
  • 1 pound shrimp, peeled and deveined
  • 2 cups broccoli florets
  • ½ cup shredded cheese (cheddar or your choice)
  • 2 tablespoons olive oil
  • 1 tablespoon garlic powder
  • Salt and pepper to taste
  • Fresh herbs for garnishing (optional)

Directions

  1. Preheat the oven to 400°F (200°C). Wash and pierce the potatoes with a fork, sprinkle with salt, and place them directly on the oven rack to bake for 45 minutes, or until tender.
  2. While the potatoes are baking, heat a skillet over medium-high heat. Add olive oil and cook the cubed steak for about 5-7 minutes until browned and cooked to your liking. Season with garlic powder, salt, and pepper. Remove the steak from the skillet and set aside.
  3. In the same skillet, add the shrimp and cook for 3-4 minutes or until they turn pink and opaque. Season with salt and pepper, then remove and set aside with the steak.
  4. Add the broccoli florets to boiling water and blanch for 2-3 minutes, then drain and set aside.
  5. Once the potatoes are cooked, cut them open and fluff the insides with a fork. Top each potato with steak, shrimp, broccoli, and a generous handful of shredded cheese.
  6. Return stuffed potatoes to the oven for an additional 5-7 minutes to melt the cheese. Optionally, garnish with fresh herbs before serving.

Recipe Notes

  • Feel free to substitute the proteins based on your preference or dietary restrictions.
  • Customize your toppings by adding sour cream, chives, or hot sauce.
  • You can prepare the potatoes in advance and warm them up just before adding toppings.
  • Experiment with different seasonings for the meat based on what flavors you enjoy most.
  • For an extra kick, sprinkle red pepper flakes on top before serving.

Delightful Pineapple Mousse Cheesecake Recipe for a Refreshing Treat

Refreshing Pineapple Mousse Cheesecake: A Tropical Delight

⚖️
Difficulty
Medium

⏲️
Prep Time
30 mins

🕒
Cook Time
15 mins

⏱️
Total Time
45 mins

🍽️
Servings
8 servings

If you’re looking for a dessert that captures the essence of summer while bringing tropical bliss to your table, the Refreshing Pineapple Mousse Cheesecake is the perfect choice. This delightful recipe features a rich and creamy mousse layered atop a crisp, buttery crust, all accentuated by the vibrant flavor of fresh pineapples. Each bite transports you to a sunny paradise, making it an ideal treat for picnics, parties, or simply to satisfy your sweet tooth.

The combination of smooth cheesecake with the lightness of pineapple mousse creates an indulgent yet refreshing dessert that appeals to all palates. The use of fresh pineapples not only lends a gorgeous tropical flavor but also adds a beautiful color that makes the cheesecake visually inviting. Whether you’re serving this at a special occasion or enjoying it on a sunny afternoon, this dessert is bound to impress with its sophisticated taste and presentation.

Quick Recipe Highlights

  • Flavor Profile: A delightful harmony of sweet and tart flavors from the fresh pineapple, balanced with the creamy richness of the cheesecake.
  • Texture: The light and airy mousse contrasts beautifully with the dense, buttery base, creating an exciting mouthfeel.
  • Aroma: The sweet aroma of ripened pineapple mingles with the toasted notes of the crust to create an enticing scent.
  • Visual Appeal: A gorgeous golden hue from the pineapple mousse on a crisp, brown crust makes for an eye-catching dessert.
  • Skill Level Needed: Requires some baking skills, but achievable with attention to detail and patience.
  • Special Equipment: A springform pan is essential for easy removal and presentation.

Recipe Overview

  • Difficulty Level: This recipe is rated as medium difficulty and involves making the crust, preparing the mousse, and layering the two. With careful follow-through, it’s easy to master.
  • Category: Dessert—perfect for any meal, this cheesecake provides a sweet finish to lunch or dinner.
  • Cuisine: Drawing on tropical influences, this cheesecake is inspired by classic American desserts with a twist of island flare.
  • Cost: Ingredients like cream cheese, fresh pineapple, and graham crackers are reasonably priced, making this an economical choice for an impressive dessert.
  • Season: Best enjoyed during the warmer months when pineapples are in season, brightening up summer gatherings.
  • Occasion: An excellent choice for birthdays, summer barbecues, or beach-themed parties, adding a festive touch to any menu.

Why You’ll Love This Recipe

The Refreshing Pineapple Mousse Cheesecake presents an extraordinary balance of taste and texture that enchants dessert lovers. The airy mousse blends beautifully with a rich cheesecake base, making it both satisfying and light. The fresh pineapple elevates the whole experience, providing a burst of tropical flavor with every forkful. The dessert’s visual charm will draw guests in, while the special mix of flavors keeps them coming back for more.

Convenience and preparation also play a significant role in the appeal of this cheesecake. Most of the steps can be done ahead of time—allowing the mousse and crust to chill before assembly. You can even prepare the entire cheesecake a day in advance, making it an excellent option for busy hosts. The simplicity of the ingredients promotes accessibility without compromising on taste or presentation.

From a nutritional standpoint, the use of fresh pineapples offers a variety of vitamins and antioxidants, contributing to a more health-conscious dessert option. The creamy texture of the cheese provides calcium and protein, allowing you to enjoy a sweet treat that is both delicious and somewhat wholesome.

Social gatherings become all the more special when you serve this refreshing cheesecake. Its appealing layers and tropical essence make it a star dessert at parties and family functions. The versatility of the recipe means it fits seamlessly into various menus, making it easy to pair with savory dishes.

Ultimately, the cost-effectiveness of this refreshing dessert ensures that you can treat your loved ones without breaking the bank. With common ingredients easily found at your local store, you can whip up this incredible cheesecake and impress family and friends without spending a fortune.

Historical Background and Cultural Significance

The origins of cheesecake date back to Ancient Greece, where it was often served to athletes during the Olympic Games. The delightful blend of cheese, sugar, and eggs provided sustenance and energy. Over the centuries, cheesecakes transformed, and with the arrival of European settlers in America, variations emerged, including the popular New York-style cheesecake. Incorporating pineapple brings a unique twist that showcases the influence of tropical fruits in American cuisine, especially in states like Hawaii.

Pineapple has long been seen as a symbol of hospitality, infusing a sense of warmth and cheer into gatherings. Its use in desserts gained popularity in the mid-20th century, especially in America, where fruit-based desserts became trendy. This cheesecake not only reflects that cultural significance but also adds a modern twist, making it appealing to diverse taste buds.

The recipe has evolved significantly, allowing for various adaptations, including the incorporation of gelatin to achieve that light mousse-like texture. Many bakers experiment with different fruit flavors, but the bright, sweet-sour taste of pineapple remains a perennial favorite that appeals to the masses.

Regional variations can be immense, from traditional baked versions to no-bake recipes that offer ease of preparation. Various toppings and crust options can further modify individual recipes, giving each family their unique take on this classic dessert.

Ingredient Deep Dive

Graham Crackers

Graham crackers are a staple in American baking, primarily known for their use in crusts for desserts. They were originally invented by Sylvester Graham in the early 19th century as part of a health reform movement. Nutritionally, they provide a good source of carbohydrates while being relatively low in fat. When selecting graham crackers, choose those without high fructose corn syrup or artificial flavors for the best results. Store opened packages in a sealed container to maintain freshness, and substitute with crushed cookies or oatmeal if necessary.

Pineapple

Pineapple carries cultural significance as a tropical fruit representing hospitality and warmth, often featured in celebrations. Nutritionally, pineapples are rich in vitamin C and manganese, providing significant health benefits. Fresh pineapples should be fragrant, yielding slightly when pressed. To store, keep them at room temperature until ripe, then refrigerate for up to five days. If you need a substitute, you can use canned pineapple, but ensure it’s packed in juice rather than syrup to maintain a healthier profile.

Common Mistakes to Avoid

  • Overmixing the Cheese Mixture: Overmixing can lead to a dense cheesecake rather than a light, airy texture. Mix until just combined.
  • Pineapple Preparation: Be sure to remove excess moisture from the pineapples; otherwise, it can make the cheesecake soggy.
  • Crust Too Thick: A thick crust may overpower the light mousse. Aim for a balanced layer that supports but doesn’t dominate.
  • Skipping Chilling Time: Allow sufficient chilling time to set the mousse properly; skipping this step will result in a runny texture.
  • Not Adjusting Baking Time: Keep an eye on baking times; different ovens vary and affect how well the cheesecake sets.
  • Using Warm Ingredients: Cold ingredients can lead to grainy textures, so bring cream cheese and other dairy products to room temperature first.
  • Overcomplicated Flavors: While it’s tempting to add lots of toppings, keeping it simple enhances the pineapple flavor.
  • Failure to Grease the Pan: If the springform pan isn’t properly greased, it may result in a difficult removal process.
  • Ingredient Quality: Using low-quality ingredients, like imitation vanilla, can result in poor flavor—always opt for fresh, quality products.
  • Ignoring Visual Cues: Pay attention to the texture of the cheesecake as it bakes; it should jiggle slightly but not be liquid when done.

Essential Techniques

Making a Graham Cracker Crust

Creating a graham cracker crust is essential for cheesecake success, providing a firm and flavorful base. To master this, crush the graham crackers into fine crumbs until they resemble sand. Combine with melted butter and sugar, then press firmly into the bottom of your pan. A common pitfall is not compressing the crust enough; use the bottom of a measuring cup for even results. Bake until slightly golden for added flavor and structure.

Preparing the Pineapple Mousse

The preparation of the mousse is crucial for achieving that light and airy texture. Start by whipping the heavy cream to soft peaks and folding it gently into the pineapple mixture. Be careful not to deflate the whipped cream, as this will affect the final texture. Visual cues include a luscious, fluffy consistency that holds its shape. If the mousse seems too runny, consider incorporating a stabilizer such as gelatin to help it set properly.

Pro Tips for Perfect Refreshing Pineapple Mousse Cheesecake

1. Use fresh, ripe pineapples for the richest flavor and optimal sweetness.
2. Chill the mousse for at least one hour before layering it on the crust for a better texture.
3. Consider adding a splash of rum or coconut extract for a Caribbean twist.
4. Always taste and adjust sweetness; some will prefer it sweeter or less sweet.
5. Garnish with toasted coconut flakes for a lovely texture and additional flavor.
6. Serve well-chilled to ensure the best taste and texture; this dessert is refreshing when cold.
7. If using canned pineapples, ensure they’re well-drained before using them to prevent excess moisture.
8. Experiment with different types of cookies for the crust, like Nilla wafers or shortbread, for unique flavors.

Variations and Adaptations

For lunch gatherings or casual dinners, consider a no-bake variation by blending the cream cheese without baking the crust. For seasonal adaptations, try substituting fresh strawberries or mangoes when pineapples aren’t in season. If dietary restrictions require modifications, a gluten-free crust can be made using almond flour and coconut oil. Flavor variances can be introduced with a layer of passion fruit or raspberry puree for added tartness. Textural changes could include a crispy granola topping instead of a traditional crust or mousse, adding a delightful crunch to the dessert.

Serving and Presentation Guide

When serving the Refreshing Pineapple Mousse Cheesecake, aesthetic presentation is key. Use a clean knife to cut distinct slices, ensuring a polished look. Garnish each slice with slivers of fresh pineapple and a sprig of mint for a refreshing touch. For modern serving suggestions, place individual portions in mason jars for a fun twist. Ensure the cheesecake is well-chilled before serving to enhance the flavors. When portioning, keep in mind that this dessert is rich, so smaller servings may be more satisfying.

Wine and Beverage Pairing

Pair this delightful cheesecake with a crisp white wine like Sauvignon Blanc, which complements the pineapple’s acidity beautifully. If you prefer a non-alcoholic option, a sparkling water infused with lime offers a refreshing balance without overpowering the dish. For coffee lovers, opt for a light roast coffee or iced latte to create a delightful contrast to the sweetness of the cheesecake.

Storage and Shelf Life

To store the Refreshing Pineapple Mousse Cheesecake, cover it tightly with plastic wrap and place it in the refrigerator, where it will last for up to four days. For best results, enjoy the cheesecake within the first 24 to 48 hours for optimal freshness and taste. If you need to freeze leftovers, wrap individual slices in plastic and store them in an airtight container. They will keep for about two months; thaw in the refrigerator before serving.

Make Ahead Strategies

This cheesecake can be made ahead of time, making it ideal for busy schedules. You can prepare the crust and mousse a day or two ahead, allowing them to chill properly. Store the crust at room temperature and the mousse in the refrigerator until you’re ready to assemble. To maintain quality, do not layer the mousse and crust until a few hours before serving, ensuring the best texture and taste when enjoyed fresh.

Scaling Instructions

Scaling this recipe is easy and adaptable to your needs. If you’d like to halve it, reduce the ingredients by 50%, being mindful of the baking time for the crust. When doubling or tripling, confirm that your mixing bowl is large enough and adjust cook times accordingly. If you’re making larger quantities, consider using a larger springform pan or dividing the mix into individual serving dishes for flexibility.

Nutritional Deep Dive

The nutritional breakdown of this dessert is appealing, with a mix of macros that include carbs from the crust and essential fats from the cream cheese. Analyzing micronutrients reveals vitamin C from the pineapple, which boosts the immune system, along with calcium in the cream cheese. Consideration of portions is key, as one slice delivers a rich flavor while remaining moderate in calories compared to more decadent desserts. Weight management becomes achievable with balanced consumption of this refreshing treat.

Dietary Adaptations

For a gluten-free version, use gluten-free graham crackers or almond flour for the crust. If you’re seeking a dairy-free option, use a vegan cream cheese alternative combined with coconut cream for the mousse. For those following a low-carb or keto diet, opt for almond flour and erythritol as substitutes to lower the carbohydrate content while maintaining delicious flavor. Other adaptations may include a vegan approach utilizing soaked cashews for the base or a paleo version by swapping refined sugars for natural sweeteners.

Troubleshooting Guide

If your cheesecake is too runny, this is often due to excess moisture from the pineapple; ensure to strain canned or ripe pineapples. If the crust crumbles when sliced, recheck the butter-to-crumb ratio for proper binding. Flavor balance issues can arise if too much pineapple is added, so tasting throughout the process helps adjust sweetness. If the mousse does not set, revisiting the chilling time should correct this. Timing is crucial, so keep an eye on the clock to avoid overbaking or allowing the mousse to sit too long.

Recipe Success Stories

Community feedback about the Refreshing Pineapple Mousse Cheesecake highlights its reputation as a crowd-pleaser at gatherings. Variations shared by readers include the addition of coconut cream, which enhances tropical notes, while others mention successful adaptations to make it gluten-free. Many have praised the recipe for its ease, often recommending it as a go-to for beginners. The vibrant colors of the dessert often result in stunning photographs shared on social media, inspiring more home bakers to try their hand at this delightful treat.

Frequently Asked Questions

Can I use canned pineapple instead of fresh?

Yes, canned pineapple can be used as a substitute. However, ensure it is packed in juice and drained well to avoid excess moisture in the cheesecake.

How long can I store the cheesecake?

The dessert can be refrigerated for up to four days. For longer storage, wrap and freeze individual slices for up to two months.

What can I substitute for cream cheese?

For a dairy-free alternative, try using vegan cream cheese or blended silken tofu for a similar texture.

Can I make this cheesecake gluten-free?

Absolutely! Use gluten-free graham crackers or almond flour for the crust to make it gluten-free.

Is there a way to reduce the sugar content?

You can lower the sugar by using natural sweeteners, like honey or agave, to taste. Adjusting the amount of added sugar can help maintain flavor balance.

What’s the best way to cut the cheesecake?

For clean cuts, run a sharp knife under hot water before slicing and wipe it clean between cuts for polished presentation.

Do I need to bake the crust?

Yes, baking the crust for a few minutes helps to set it and enhances its flavor. Be sure to let it cool before adding the mousse.

Can I add other fruits to this recipe?

Yes, you can incorporate other fruits like strawberries or mangoes for different flavor profiles. Just remember to adjust sweetness to match the fruit.

How do I know when the cheesecake is done?

The cheesecake should jiggle slightly in the center when done but not look liquid or overcooked. Allow it to set properly in the refrigerator.

Will this cheesecake melt if left out?

Yes, as a mousse cheesecake, it is best served chilled. Avoid leaving it out for long periods in warm environments to prevent melting.

Additional Resources

For those wanting to explore more tropical-inspired dishes, consider checking related recipes such as passion fruit tart or coconut cream pie. Technique guides on making perfect cheesecakes or mastering whipped creams can further enhance your baking skills. Investigate equipment recommendations for springform pans and stand mixers that can simplify the cheesecake-making process. Seasonal variations can also inspire you to incorporate fresh, local fruits into your desserts for every season.

Join the Conversation

We encourage our readers to share their photos and experiences with the Refreshing Pineapple Mousse Cheesecake on social media. Join the community to exchange recipe tips, variations, and insights! Your feedback is invaluable, and we’d love to hear how you made this recipe your own. Don’t hesitate to leave a review and inspire future bakers to enjoy this charming dish!

The Recipe

Refreshing Pineapple Mousse Cheesecake

Serves: 8 servings

Prep Time: 30 mins

Cook Time: 15 mins

Total Time: 45 mins

Kitchen Equipment Needed

  • Springform pan
  • Mixing bowls
  • Electric mixer
  • Measuring cups and spoons
  • Rubber spatula
  • Sharp knife

Ingredients

  • 1 ½ cups graham cracker crumbs
  • ½ cup unsalted butter, melted
  • ¼ cup granulated sugar
  • 2 (8oz) packages cream cheese, softened
  • 1 cup powdered sugar
  • 1 cup fresh pineapple puree
  • 1 teaspoon vanilla extract
  • 1 cup heavy whipping cream
  • Fresh pineapple slices for garnish
  • Mint leaves for garnish

Directions

  1. Preheat the oven to 350°F (175°C).
  2. In a bowl, mix graham cracker crumbs, melted butter, and sugar until evenly combined.
  3. Press the mixture into the bottom of a springform pan and bake for 8-10 minutes until set. Cool completely.
  4. In a separate bowl, beat cream cheese with powdered sugar and vanilla until smooth.
  5. Add pineapple puree and mix until fully combined.
  6. In another bowl, whip the heavy cream to soft peaks, then fold gently into the cream cheese mixture.
  7. Spread the pineapple mousse over the cooled crust and refrigerate for at least 2 hours to set.
  8. Once set, remove from the springform pan and garnish with fresh pineapple slices and mint leaves before serving.

Recipe Notes

  • For an added crunch, consider sprinkling toasted coconut flakes on top before serving.
  • Feel free to experiment with flavors; adding coconut extract can enhance the tropical vibe.
  • Make sure all refrigerator items are at room temperature for smoother mixing.

Delicious Chicken Caesar Croissant Sandwich Recipe for Easy Lunches

Chicken Caesar Croissant Sandwich: A Delicious Twist on Classic Flavors

⚖️
Difficulty
Easy

⏲️
Prep Time
15 mins

🕒
Cook Time
10 mins

⏱️
Total Time
25 mins

🍽️
Servings
4

Looking for a delightful change from your usual sandwich? The Chicken Caesar Croissant Sandwich is perfect for those seeking vibrant flavors and a touch of sophistication in their meals. Imagine biting into a flaky, buttery croissant that gives way to juicy, seasoned chicken, crisp romaine lettuce, and a creamy Caesar dressing. This sandwich combines textures and tastes in an unforgettable way that will impress even the pickiest eaters.

This recipe captures the essence of a classic Chicken Caesar salad, reimagining it within the warm embrace of a tender croissant. The fresh, crunchy greens juxtaposed against the savory chicken provide a satisfying crunch with every bite, while the Caesar dressing ties all the elements together with its rich, umami-packed flavor. Perfect for a quick lunch or an elegant snack, this sandwich is both approachable and indulgent.

Quick Recipe Highlights

  • Flavor Profile: This sandwich features the rich, zesty flavors of Caesar dressing paired with tender, seasoned chicken, creating a burst of savory taste.
  • Texture: The contrast between the soft, flaky croissant and the crisp lettuce elevates the mouthfeel, making it a delight to enjoy.
  • Aroma: The aromatic notes of garlic and Parmesan from the Caesar dressing permeate the air, enticing anyone nearby.
  • Visual Appeal: The vibrant green lettuce, golden croissant, and creamy dressing create an appealing plate that’s as fun to look at as it is to eat.
  • Skill Level Needed: This easy recipe requires basic cooking skills, making it suitable for beginners and experienced cooks alike.
  • Special Equipment: Only a baking sheet and a knife are needed, keeping preparation simple and straightforward.

Recipe Overview

  • Difficulty Level: This Chicken Caesar Croissant Sandwich is rated easy, as it involves no complex techniques and minimal cooking.
  • Category: This recipe falls under lunch or snack, making it a versatile option for any time of the day.
  • Cuisine: Influenced by Italian cuisine through Caesar dressing, this sandwich brings a flavorful twist to classic American lunch fare.
  • Cost: The ingredients are relatively budget-friendly, making it an economical choice for delicious meals without breaking the bank.
  • Season: Perfect for any season, this sandwich shines particularly in spring and summer when fresh ingredients are at their best.
  • Occasion: Ideal for casual gatherings, picnics, or lunch at the office, it suits a variety of occasions perfectly.

Why You’ll Love This Recipe

The Chicken Caesar Croissant Sandwich is not just a meal; it’s an experience that combines rich flavors and delightful textures. The tender chicken, swathed in a creamy dressing, contrasts beautifully with the crunchy romaine lettuce. This delightful juxtaposition makes for a satisfying bite every time. Pair this sandwich with your favorite side, and you’ve turned a simple lunch into a gourmet treat that’s sure to please the palate.

In terms of preparation, this recipe stands out for its simplicity. With minimal cooking involved, anyone can whip it up in no time. It’s perfect for those busy days when you crave something fulfilling without spending hours in the kitchen. The croissant offers a luxuriously flaky exterior, enhancing your sandwich experience without the extra effort typically associated with homemade bread.

The nutritional benefits of this sandwich should not be overlooked either. Lean chicken provides a great source of protein essential for building and repairing tissues, while the fresh lettuce adds vital nutrients. The Caesar dressing, while rich, can be made healthier with yogurt or avocado, ensuring you can indulge without guilt. This sandwich is an excellent choice for balancing taste and nutrition.

On a social front, this sandwich is perfect for entertaining. Its elegant presentation, a result of the beautiful croissant and fresh ingredients, will impress guests at any gathering. Serve them during brunch, and watch as they disappear off the platter, leaving your guests raving about another successful meal together.

Lastly, this recipe is incredibly cost-effective. With just a few ingredients, you can create a delicious, gourmet-quality meal at home. The accessible ingredients make it easy to adapt according to what’s available in your pantry, encouraging culinary creativity on a budget. Who says you can’t be fancy and frugal at the same time?

Historical Background and Cultural Significance

The Chicken Caesar Croissant Sandwich cleverly pulls together various culinary traditions. The original Caesar salad is believed to have been invented in the 1920s by an Italian-American restaurateur named Caesar Cardini in Tijuana, Mexico. Its rich flavor quickly gained popularity, paving the way for variations like this sandwich, marrying classic Italian flavors with American sandwich culture.

This sandwich not only represents the creativity of modern chefs who seek to reinterpret classics but also embodies a fusion of cultures. The flaky, buttery croissant connects to French culinary arts, while the Caesar dressing encases the rich Italian flavors, demonstrating how diverse influences can come together to create something splendid.

Over the years, the Chicken Caesar sandwich has evolved from a mere salad alternative to a sandwich staple across cafés and bistros. Enhancements over time have introduced various ingredients, but the heart of the recipe remains—celebrating the original blend of flavors that garnered such acclaim.

Regional variations of the Chicken Caesar Sandwich exist, with different ingredients reflecting local tastes. From spicy chicken variations in Southern kitchens to vegetarian alternatives in health-conscious cafes, the possibilities are endless, showcasing the flexibility of this dish in bridging culinary gaps.

Ingredient Deep Dive

Chicken: As the main protein in this sandwich, chicken has significant cultural importance worldwide, appearing in cuisines ranging from Asian to Mediterranean. It’s a lean source of protein that aids muscle growth, with tips for selecting fresh chicken including looking for plumpness and a bright color. Store cooked chicken in the refrigerator and consider using leftovers in salads or soups to minimize waste.

Romaine Lettuce: This crisp green is a staple in many salads worldwide. Romaine lettuce is rich in vitamins A and C, contributing to overall health. Look for leaves that are vibrant and perky, and avoid any that appear wilted. Store romaine wrapped in a damp paper towel within a plastic bag, and remember that this delightful vegetable is best when fresh.

Caesar Dressing: The history of Caesar dressing dates to its invention in the 1920s but has expanded to include many variations. Traditional recipes call for anchovies, garlic, eggs, and Parmesan cheese. For a healthier alternative, yogurt or sour cream can be used as substitutes. Store any leftover dressing in an airtight container in the fridge to enjoy over salads or as a dip later.

Croissant: The croissant is more than just a bread item; it symbolizes French pastry artistry. Made from layers of dough and butter, it results in a flaky pastry that perfectly complements rich fillings. When selecting croissants, opt for those that feel light and airy. Store them at room temperature, or freeze for later use, to retain that delicious flakiness.

Common Mistakes to Avoid

  • Skipping the seasoning of chicken: Always ensure your chicken is adequately seasoned; otherwise, the sandwich can taste bland.
  • Overtoasting the croissant: A lightly toasted croissant adds texture, but overdoing it can lead to a hard bite that detracts from the overall experience.
  • Using wilted lettuce: Freshness matters! Using wilted lettuce can ruin the crunch factor that’s essential to this sandwich.
  • Too much dressing: While the dressing is essential for flavor, overdoing it can make the sandwich soggy.
  • Neglecting the pairing of ingredients: Balance your toppings; a good ratio between chicken, lettuce, and dressing elevates the taste.
  • Ignoring storage methods: Improper storage of components can lead to quick spoilage, especially for the croissant and greens.
  • Not letting the chicken rest: Allowing the chicken to rest after cooking helps retain moisture; cutting too soon can lead to dryness.
  • Advancing expiration dates: Always check the freshness of all ingredients to maintain flavor and food safety.

Essential Techniques

Cooking Chicken: Cooking chicken properly is crucial for both flavor and safety. Ensure your chicken is cooked to an internal temperature of 165°F. Master this technique by monitoring the cooking time and using a meat thermometer to prevent dryness.

Building Your Sandwich: Layering ingredients correctly matters for balance and presentation. Start with a base of greens to catch drips from the dressing, followed by the protein. This prevents sogginess and enhances the overall texture. Pay attention to visual symmetry for a pleasing presentation.

Pro Tips for Perfect Chicken Caesar Croissant Sandwich

1. Use fresh ingredients for the best flavor and texture impact; support local vendors when possible.

2. Experiment with flavored chicken variations such as grilled or smoked for added depth.

3. For a twist, add extra toppings like bacon, avocado, or roasted peppers for an upscale touch.

4. Warm the croissant slightly before assembling to enhance the flaky texture.

5. Make the Caesar dressing from scratch; this opens up for healthier adjustments and fresh flavor.

6. Don’t rush the prep; allow ingredients to be at proper temperatures for optimal taste enjoyment.

7. Serve immediately after making for the best combination of crunchy and creamy elements.

8. Use leftovers creatively; chicken can easily become salad or pasta toppings in subsequent meals.

Variations and Adaptations

For those looking to explore regional variations, consider adding south-western flavors by incorporating chipotle mayo or pepper jack cheese. Seasonally, try adding slices of tomato or pesto during summer months for a fresh burst of flavor. Additionally, dietary modifications cater to gluten-free needs by gluten-free croissants or lettuce wrap options, while vegan versions can substitute chicken with marinated tofu or chickpeas. Each adaptation provides an exciting new angle on this classic.

Serving and Presentation Guide

When plating your Chicken Caesar Croissant Sandwich, consider using a fresh plate that complements the colors of your dish. For garnishing, fresh herbs like parsley or basil can add a pop of color. Traditional accompaniments include crispy potato chips or a simple side salad, while modern suggestions may involve sweet potato fries or a fruit salad. Always ensure the sandwich is served at room temperature for the best flavor profiles, and use portion control to craft the perfect serving size.

Wine and Beverage Pairing

For an ideal wine pairing, a crisp Sauvignon Blanc would cut through the richness of the Caesar dressing beautifully. For non-alcoholic options, a refreshing iced tea or lemonade adds a pleasing contrast to the sandwich’s savory flavors. Consider lightly sparkling beverages to keep the palate fresh and engaged. Always serve your drinks chilled to enhance the overall dining experience.

Storage and Shelf Life

Store any unassembled sandwich components separately to preserve freshness. The chicken and dressing can be stored in airtight containers in the refrigerator for up to three days. Croissants should remain wrapped or in a closed bag at room temperature for the best texture, while any leftover lettuce ideally should be placed within a damp paper towel. Signs of spoilage in chicken include foul smells and discoloration, while croissants will start to lose their flaky texture as they dry out. For reheating, use a low-temperature oven to restore texture without overcooking the chicken.

Make Ahead Strategies

Creating a timeline for prep can help ease the cooking day. Consider marinating chicken a day in advance and store it properly until you’re ready to cook. Pre-chop your romaine and other ingredients, storing them in airtight containers in the fridge to preserve freshness until assembly. When fully assembled, the sandwich is best enjoyed immediately, but if serving later, store all parts separately and bring together just before serving. Quality will remain optimal this way, and freshly added elements keep the flavor vibrant.

Scaling Instructions

For halving the Chicken Caesar Croissant Sandwich recipe, simply divide the ingredient amounts. When doubling or tripling the recipe, ensure your equipment can accommodate increased quantities without overcrowding. Adjust cooking times slightly, as larger batches may require more even heat distribution. Store any leftovers properly in the fridge to preserve freshness, but aim to consume within a few days for the best taste experience.

Nutritional Deep Dive

The macro breakdown of this sandwich offers a balance of carbohydrates, proteins, and mildly healthy fats. Chicken provides a robust protein source while croissants deliver carbohydrates for energy. Micronutrient analysis reveals significant vitamins from romaine and dressing ingredients, contributing to overall health benefits. Consideration of portion size is vital; enjoy in moderation for balanced nutrition, especially for those managing weight. Opt for lighter portions during active days to match energy expenditure levels.

Dietary Adaptations

For gluten-free adaptations, substitute croissants with gluten-free alternatives, which are now widely available. Vegetarian options can switch chicken for marinated chickpeas, while vegan swaps can be made by using plant-based dressing and proteins. Low-carb dieters may opt for a lettuce wrap instead of a croissant. Each dietary consideration opens doors for inclusivity while maintaining that satisfying Chicken Caesar flavor profile.

Troubleshooting Guide

If you’re encountering texture issues such as a soggy sandwich, the solution lies in layering techniques and proper ingredient storage. Flavors can balance out through careful seasoning adjustments, and if you notice chicken is overcooked, incorporating additional dressing can help revitalize moisture. Equipment challenges may stem from oven settings that require calibrating or timing adjustments. Learning to adjust based on visual cues over time creates a beneficial learning curve for any home cook.

Recipe Success Stories

Feedback from the community praises the Chicken Caesar Croissant Sandwich for its flavor and ease. Many readers shared variations featuring spicy grilled chicken or a blend of dressings that resulted in uniquely delightful versions. Adaptation stories tell of creative uses for leftovers, transforming ingredients into salads or pasta dishes. Engagement thrives through communal feedback, and shared photography tips light up social media, encouraging more cooks to explore this delicious recipe idea.

Frequently Asked Questions

Can I make the Chicken Caesar Croissant Sandwich ahead of time? Yes, prep the chicken and dressing a day ahead and store them separately. Assemble the croissant sandwiches the day of serving for the best texture.

What are some good side dishes to serve with this sandwich? People love pairing this sandwich with chips, fresh fruit, or a light green salad to balance the meal.

Can I use a different type of bread? Absolutely! Feel free to explore other options like baguettes or even wrap-style breads for new textures.

How long does the sandwich stay fresh? It’s best to enjoy the sandwich fresh; however, individual components can be stored in the fridge for up to three days.

Is it possible to make this recipe vegetarian? Yes, replace chicken with marinated tofu or chickpeas for a hearty vegetarian option.

What’s the best way to reheat chicken for the sandwich? Gently reheat chicken in a microwave or low-heat oven, avoiding dryness through short bursts of heat.

Can I include other toppings? Absolutely! Enhance your sandwich with toppings like avocado, bacon, or roasted red peppers for unique flavors.

How can I make the dressing healthier? You can substitute traditional Caesar dressing ingredients with Greek yogurt or avocado for a creamy base without excess calories.

Do I have to toast the croissant? Toasting is optional! Feel free to enjoy it fresh or slightly warmed based on personal preference.

What should I do if my croissant is stale? Refresh your stale croissant by lightly toasting it or using it in a bread pudding.

Additional Resources

For more delightful recipes, consider exploring a few related ones that utilize similar flavors or techniques. Technique guides on making homemade dressings or baking croissants can deepen your culinary knowledge. Ingredient information can bolster tips on selecting the freshest produce or quality proteins. Finally, consider equipment recommendations for home cooks looking to invest in essential kitchen tools.

Join the Conversation

Engage with us on social media to share your version of the Chicken Caesar Croissant Sandwich! Tag us in your culinary creations and share photos for a chance to be featured. Reader reviews and suggestions are always welcomed, helping us build a vibrant food-loving community. Share variations and tips that work for you and connect with others who also love experimenting in the kitchen.

The Recipe

Chicken Caesar Croissant Sandwich

Serves: 4

Prep Time: 15 mins

Cook Time: 10 mins

Total Time: 25 mins

Kitchen Equipment Needed

  • Baking sheet
  • Knife
  • Meat thermometer
  • Cutting board
  • Mixing bowl

Ingredients

  • 2 cups cooked chicken, shredded
  • 4 croissants
  • 2 cups romaine lettuce, chopped
  • ½ cup Caesar dressing
  • Parmesan cheese for sprinkling, optional

Directions

  1. Preheat the oven to 350°F (175°C).
  2. If desired, toast the croissants lightly in the oven for added warmth and texture.
  3. In a mixing bowl, combine the shredded chicken with Caesar dressing.
  4. Assemble the sandwiches: slice the croissants in half, layer with romaine lettuce, and top with the dressed chicken.
  5. Sprinkle with Parmesan cheese, if using, then close the sandwich and enjoy! Serve fresh.

Recipe Notes

  • Feel free to use any leftover protein for customization—grilled chicken or turkey works well.
  • Make the dressing from scratch for a fresher taste.
  • Try adding extra toppings like avocado or crispy bacon for enhanced flavor.
  • Experiment with other types of greens such as kale or spinach depending on availability.

Delicious Creamy Beef and Shrimp Spaghetti in Cajun Sauce

Creamy Beef and Shrimp Spaghetti in Cajun Sauce: A Spicy and Flavorful Delight

⚖️
Difficulty
Medium

⏲️
Prep Time
15 mins

🕒
Cook Time
30 mins

⏱️
Total Time
45 mins

🍽️
Servings
4

Indulge your taste buds with this Creamy Beef and Shrimp Spaghetti in Cajun Sauce, a dish that perfectly balances the richness of cream with the zest of Cajun spices. The combination of tender beef and succulent shrimp intertwined with spaghetti creates a delightful textural experience. Each bite is packed with flavor, making it a suitable choice for family dinners or entertaining guests. With a hint of spice and a touch of creaminess, this recipe promises to transport you straight to the heart of Cajun country.

There’s something undeniably comforting about pasta, and when you add shrimp and beef, it becomes a standout meal that’s both easy to prepare and stunningly delicious. The robust Cajun seasoning enhances the dish, providing warmth and cheer. Whether you’re a seasoned cook or a kitchen novice, this dish allows for a culinary excursion that brings together diverse elements to create a wholesome, satisfying meal. Get ready to impress your loved ones with this flavorful dish!

Quick Recipe Highlights

  • Flavor Profile: Rich, creamy, and spicily aromatic, this dish tantalizes the palate with hints of garlic, paprika, and cayenne pepper.
  • Texture: The tender beef and perfectly cooked shrimp blend beautifully with the spaghetti, offering a satisfying chew that complements the creamy sauce.
  • Aroma: Combing the enticing smells of sautéed garlic, earthy spices, and fresh seafood, this dish is a feast for the senses from the moment you start cooking.
  • Visual Appeal: The rustic red hue of the Cajun sauce, adorned with vibrant green herbs, creates an inviting and colorful dish that is as eye-catching as it is delicious.
  • Skill Level Needed: With basic sautéing and boiling techniques, anyone can master this dish, making it perfect for chefs of all levels.
  • Special Equipment: A large skillet and pot are all you’ll need to bring this delectable dish to life, keeping your kitchen clean and simple.

Recipe Overview

  • Difficulty Level: This recipe is considered medium level due to the combination of cooking multiple ingredients and managing flavorful seasons effectively.
  • Category: This dish falls under the pasta category as a hearty main course, suitable for lunch or dinner.
  • Cuisine: Drawing from Cajun culinary traditions, this dish incorporates bold flavors that define the American South.
  • Cost: The approximate cost per serving is budget-friendly, making it accessible without sacrificing flavor or quality.
  • Season: Ideal for all seasons but perfect for any occasion that calls for a filling, warm meal.
  • Occasion: Great for family dinners, casual gatherings, or even special occasions where you want to impress with minimal effort.

Why You’ll Love This Recipe

The combination of tender beef and shrimp enveloped in a creamy sauce creates a taste sensation that’s sure to please everyone at the table. The Cajun spices add a mild heat that elevates the flavors without overwhelming the dish, making it a perfect introduction to exciting southern cuisine. Each mouthful is a delightful journey, transitioning from the creamy sauce to the savory bites of meat, leaving you craving more.

Not only is this dish delicious, but it is also incredibly convenient. With a preparation time of just 15 minutes and a cook time of 30 minutes, you can have a homemade gourmet meal on the table in under an hour. This makes it an excellent choice for busy weeknights or impromptu get-togethers.

Nutritionally, pairing beef and shrimp can be a great source of protein, and when combined with pasta, it provides a well-rounded meal. The addition of herbs in the recipe lends freshness and additional nutrients, making this dish as wholesome as it is satisfying.

When it comes to entertaining, this creamy beef and shrimp spaghetti is the kind of meal that sparks conversation and creates lasting memories. The aromatic scents wafting through the kitchen paired with a deliciously adorned table setting will set the tone for an enjoyable evening with family and friends.

Moreover, the cost-effectiveness of this dish allows for flexibility in serving sizes. You can easily double or halve the recipe depending on your needs, so you can share this tasty experience with everyone, whether you’ve got a tiny gathering or a big bash.

Historical Background and Cultural Significance

The origins of Cajun cuisine trace back to the French-speaking Acadian settlers who arrived in Louisiana. They brought with them a variety of culinary techniques and ingredients that evolved into a unique fusion reflective of their diverse surroundings. The rich agricultural landscape complemented by a bounty of seafood set the stage for the birth of bold flavors and distinctive dishes.

Cajun food is known for its robust use of spices and intense flavors, often incorporating local meats and seafood. This particular recipe showcases the creativity of Cajun cooking, where simple ingredients are transformed into flavorful masterpieces that tell stories of resilience and community.

Over time, Cajun cuisine has evolved, influenced by Creole cooking and various regional ingredients. The combination of beef and shrimp in this recipe is a brilliant showcase of these influences, merging land and sea, and highlighting the area’s abundant resources and culinary ingenuity.

Regional variations of this dish can be found not only in Louisiana but also in various interpretations as chefs update flavors or tweak ingredients to suit personal preferences. Whether it’s a heat boost from extra cayenne or the addition of colorful vegetables, each variant respects the essence of the original recipe while adding its unique touch.

Ingredient Deep Dive

For the beef in this recipe, select cuts like sirloin or flank steak, which offer the right amount of tenderness and flavor when cooked. Historically, beef has been a staple in Cajun cooking, adding richness to dishes. Packed with protein and iron, it not only fuels the body but contributes to overall wellness.

When it comes to shrimp, fresh is always best, but frozen can also yield excellent results. These little sea creatures are not just renowned for their delicious, sweet flavor but also their nutritional profile, being low in calories but high in protein and essential nutrients.

The spaghetti pasta itself serves as the perfect canvas for the rich sauce. An ancient Italian staple, pasta has become a global favorite, providing a fulfilling base to diverse meal combinations. Whole grain or gluten-free options are also available in today’s markets, catering to various dietary preferences.

Cajun seasoning is a key player in elevating this dish’s flavors. A blend of paprika, cayenne, garlic powder, and other spices, Cajun seasoning captures the essence of Louisiana’s culinary vibe. It adds that indispensable warmth and depth to meals, making it a must-have in any spice cabinet.

Cream plays a crucial role in achieving that velvety sauce. Celebrated for its richness, cream balances the spiciness of the Cajun seasonings, creating a harmonious dish that can be served with pride. Use heavy cream for a truly indulgent experience, or substitute with alternatives that suit your dietary needs.

Common Mistakes to Avoid

  • Using dried shrimp instead of fresh can lead to a bland flavor; always opt for fresh or high-quality frozen shrimp to ensure the best outcome.
  • Overcooking the beef can result in a tough texture; cook on high heat for a short duration for optimal tenderness.
  • Not seasoning the pasta water can diminish the overall flavor; add salt during cooking for a flavorful base.
  • Skipping the resting period for seasoned meat can cause the juices to leak out, leading to dryness.
  • Ignoring the necessity to stir the sauce can lead to burning; ensure frequent stirring while simmering to incorporate flavors thoroughly.
  • Using too much sauce may overpower the spaghetti; balance by not drowning the pasta in sauce.
  • Rushing the shrimp cooking can lead to a rubbery texture; cook just until they are pink for ideal results.
  • Forgetting to taste and adjust seasoning can result in a dish that lacks depth; continuously adjust for a well-rounded flavor.

Essential Techniques

Sautéing is an essential technique for developing flavor as it allows the natural sugars in the ingredients to caramelize. Master this skill by practicing with various ingredients and adjusting heat levels to prevent burning, focusing on achieving a golden-brown color.

Simmering is critical for melding flavors and ensuring that the sauce thickens properly. To master this technique, adjust the heat to a gentle simmer, allowing the flavors to marry without compromising the freshness of herbs or spices used in the dish.

Cooking pasta properly is crucial for texture; aim for al dente by testing a minute before the package time is up. Drain and toss it with a little olive oil to prevent sticking and keep it flavorful for the sauce.

Pro Tips for Perfect Creamy Beef and Shrimp Spaghetti

– Always prepare your ingredients beforehand to maintain an organized workspace. This will help streamline the cooking process and ensure everything goes smoothly.
– Use a mix of fresh herbs like parsley or chives for garnishing; they not only enhance the flavor but also add a beautiful pop of color.
– Don’t hesitate to add a splash of white wine when deglazing the pan; it heightens the flavor and brings an acidity that balances the creaminess.
– If you prefer a thicker sauce, allow it to simmer uncovered for a few extra minutes, stirring frequently until you reach your desired consistency.
– To elevate the meal further, consider adding sautéed bell peppers or mushrooms into the mix for extra texture and flavor.
– Remember that Cajun seasoning can be adjusted based on personal preference; start with a smaller amount and build up to meet your spicy craving!
– Pair with a simple side salad to refresh the palate between indulgent bites of the creamy spaghetti.
– For leftovers, try it as a filling in wraps or quesadillas; the flavors carry over beautifully into different cuisines.

Variations and Adaptations

Cajun cuisine is all about creativity. Consider swapping out the beef for chicken or using a seafood medley for a richer experience. Seasonal adaptations might include the use of fresh summer vegetables to lighten up the dish, adding zucchini or sweet corn for crunch.

Dietary modifications, such as gluten-free spaghetti, can be used without compromising flavor. Vegan adaptations can be made by substituting cream with plant-based alternatives and opting for seitan or tofu instead of meat. Experimenting with different spices and flavorings can also yield exciting variations.

For a more decadent dish, mix in some cheese, like Parmesan or a sprinkle of smoked Gouda, adding depth to the creamy sauce. Presentation alternatives like serving in hollowed bell peppers or baked in a casserole dish can provide a fun twist while adding visual appeal.

Serving and Presentation Guide

To make a stellar impression, serve the creamy spaghetti in bowls garnished with freshly chopped parsley or a sprinkle of paprika. Consider plating techniques like twirling the pasta using a fork for a visually appealing swirl that showcases the sauce and toppings beautifully.

Garnish with additional shrimp on top and a drizzle of cream to create an enticing presentation. Serve alongside freshly baked garlic bread or a side salad to create a beautiful, balanced plate.

Temperature plays an important role; ensure that the dish is served hot but not too hot to eat, allowing the flavors to bloom without burning the palate. Keeping portion sizes in check can elevate dining experiences, encouraging guests to indulge without feeling overwhelmed.

Wine and Beverage Pairing

A crisp white wine, like a Sauvignon Blanc or a light Pinot Grigio, pairs well with the richness of creamy beef and shrimp spaghetti. The acidity in these wines beautifully complements the spices in the Cajun sauce while refreshing the palate.

For non-alcoholic alternatives, consider serving a flavorful iced tea infused with lemon or mint for a refreshing balance to the dish. If you prefer a delightful warm beverage, herbal teas can also complement the mealtime ambiance.

Serve your beverages chilled to further enhance the dining experience, providing a refreshing reprieve from the warm, hearty spaghetti dish.

Storage and Shelf Life

Proper storage methods will keep your creamy beef and shrimp spaghetti fresh for enjoyable leftovers. Store any unused portions in an airtight container in the refrigerator, where it will last for up to 3-4 days.

If you need to store it longer, consider freezing it. Place the cooled spaghetti in a labeled freezer-safe bag, removing as much air as possible. Frozen portions can last up to 2 months for optimal quality.

To check for signs of spoilage, look for any off-smells or textures indicating mold. To reheat, gently warm in a skillet over low heat or microwave for a few minutes, ensuring it’s heated thoroughly but not overcooked.

Make Ahead Strategies

Prepping this cream dish in advance can save time during busy days. You can cut and season your beef and shrimp the night before, allowing the flavors to infuse more deeply. Cook your pasta and store it in a separate container drizzled with oil to prevent sticking.

For optimal freshness, prepare the sauce later or store it separately until ready to serve. This way, you can combine everything fresh for a delicious taste without losing quality or texture.

When reheating, make sure to refresh the dish with a touch of cream or broth to bring back its original creaminess, and add fresh herbs just before serving for brightness.

Scaling Instructions

If you wish to halve the recipe, simply divide the measurements of all ingredients by two while keeping cooking times relatively the same. For larger gatherings, you can easily double or triple the recipe, adjusting pot sizes and cooking vessels accordingly to accommodate the increased portions.

Keep in mind that cooking times might slightly change with larger quantities; monitor the beef and shrimp’s doneness closely, ensuring they cook evenly without becoming tough.

When preparing larger batches, it’s also wise to consider multiple pan sizes for sautéing to avoid overloading a single pan, ensuring everything cooks evenly while maintaining the desirable flavors and textures.

Nutritional Deep Dive

The creamy beef and shrimp spaghetti is packed with protein, providing a hearty meal that can support muscle growth and repair. A typical serving contains around 30 grams of protein, complemented by essential vitamins and minerals from the shrimp and herbs.

The dish also offers a good balance of macronutrients, with healthy fats from the cream supporting cellular functions while the carbohydrates from the pasta provide necessary energy. This balance can be especially beneficial for those with active lifestyles or during physically demanding days.

When considering portion sizes, aim to fill half your plate with the creamy spaghetti, allowing an indulgent meal that remains mindful of overall nutritional intake. Keep an eye on added ingredients to maintain healthy levels of calories without sacrificing flavor or satisfaction.

Dietary Adaptations

For those on a gluten-free diet, substitute traditional spaghetti with gluten-free pasta options made from rice, chickpeas, or lentils. This way, you can enjoy the same comforting flavors without the gluten.

If you prefer a dairy-free version, consider using coconut cream or almond milk instead of heavy cream. This adaptation can still provide that creamy texture while accommodating various dietary restrictions.

For a keto-friendly meal, swap regular pasta for zucchini noodles or spaghetti squash. This alternative gives a similar feel while reducing carbohydrates significantly.

Vegan adaptations can also be explored by using plant-based protein sources like tempeh or jackfruit instead of beef and opting for a vegan cream alternative to maintain richness without animal products.

Troubleshooting Guide

If the sauce turns out too thick, add a little chicken or vegetable stock to loosen it up, stirring well to incorporate. If it’s too thin, allow it to simmer a bit longer without a lid for evaporation to thicken naturally.

For grainy sauce texture, check the temperature at which you combined cream and sauce; it’s best to add cream off the heat or gently warm it while mixing to create that silky texture.

If the dish tastes bland, don’t hesitate to adjust with salt and pepper or add extra Cajun seasoning to bring depth and flavor back into the dish.

When cooking the shrimp, if you find them rubbery, next time ensure not to overcook them; they should only take a few minutes until they turn pink to retain their tender quality.

If the beef turns out tough, consider thinner cuts of meat and slicing against the grain. This technique helps break down the protein fibers, leading to more tender bites.

Recipe Success Stories

Community feedback has been overwhelmingly positive; many have shared how this recipe quickly became a family favorite, often tying it to family gatherings or holiday celebrations.

Variation successes abound, with users reporting their adjustments of adding additional seafood like crawfish or using zoodles for a lighter version, adding their personal touch to the dish.

Recipe adaptations have inspired several creative culinary interpretations, showcasing its versatility and encouraging casual chefs to explore their kitchen creativity while branching out from traditional pasta dishes.

Photographers enjoy capturing the dish’s vibrancy and rich textures, often sharing mouth-watering images on social media, where this recipe has garnered a growing fan base.

Handwritten notes in cookbooks detailing the joy brought by this dish have made it a cherished recipe in many homes, serving as a source of inspiration for new culinary adventures.

Frequently Asked Questions

Can I substitute the beef with another protein?
Yes! You can use chicken, turkey, or even a seafood blend to suit your personal preference while still enjoying a delicious creamy sauce.

What if I don’t have Cajun seasoning?
You can easily make your own by mixing paprika, cayenne pepper, garlic powder, onion powder, and thyme to replicate that bold taste.

Can this recipe be made ahead of time?
Yes, you can prepare the beef and shrimp separate from the pasta and sauce. Combine them just before serving for the best freshness.

Is this dish freezer-friendly?
Absolutely! Freeze the dish in an airtight container, and it can last up to two months. Thaw in the refrigerator before reheating.

How can I make the dish spicier?
For a spicy kick, increase the amount of cayenne pepper or add freshly chopped jalapeños to the dish while cooking.

Can I use a different type of pasta?
Yes! Any pasta shape you prefer will work well, just ensure to adjust the cooking time as required.

What are good side dishes to serve?
Pair it with a light salad, garlic bread, or roasted vegetables to complement the richness of the creamy spaghetti.

How do I store leftovers?
Store leftovers in an airtight container in the fridge for up to four days and reheat in a skillet or microwave until hot.

Can I add vegetables to this recipe?
Definitely! Bell peppers, spinach, or mushrooms can easily be added for extra flavor and nutrition.

Is this dish suitable for kids?
Yes! Kids often love pasta dishes, and the creamy sauce and tasty proteins make it an appealing choice for younger palates.

Additional Resources

For those interested in expanding their culinary repertoire, check out our collection of related recipes, including classic Cajun jambalaya and shrimp gumbo, which showcase similar flavors and ingredients.

Technique guides on sautéing and simmering can further enhance your cooking skills, helping to ensure that every dish turns out perfectly every time.

Ingredient information about the best brands for Cajun spices and sauces can enrich your cooking experience and ensure you obtain true flavor integrity.

For equipment recommendations, look for high-quality pans and utensils, making it easier to create delicious meals seamlessly.

Lastly, explore seasonal variations of this pasta dish, including light summer versions or heartier winter takes that swap out ingredients to match seasonal availability and taste preferences.

Join the Conversation

We encourage you to share your cooking experiences with this creamy beef and shrimp spaghetti on social media! Tag us in your photos and let us know about your variations, tips, and what you liked most about the recipe.

Engage with fellow home chefs in discussions, share photography tips to capture your delicious creations, and leave feedback to contribute to the recipe’s evolving story.

Your recipe reviews and adaptations inspire others and foster a vibrant community celebrating the joy of cooking, making this dish a beloved staple for many.

The Recipe

Creamy Beef and Shrimp Spaghetti in Cajun Sauce

Serves: 4

Prep Time: 15 mins

Cook Time: 30 mins

Total Time: 45 mins

Kitchen Equipment Needed

  • Large skillet
  • Pot for boiling spaghetti
  • Measuring cups and spoons
  • Knife and cutting board

Ingredients

  • 8 oz spaghetti
  • 8 oz beef sirloin, sliced thin
  • 8 oz shrimp, peeled and deveined
  • 1 cup heavy cream
  • 1 tablespoon Cajun seasoning
  • 2 tablespoons olive oil
  • 1 medium onion, chopped
  • 2 cloves garlic, minced
  • Salt and pepper to taste
  • Fresh parsley for garnish

Directions

  1. Cook spaghetti according to package instructions, drain, and set aside.
  2. In a large skillet, heat olive oil over medium-high heat. Add beef slices and sauté until browned. Remove and set aside.
  3. Add onions and garlic to the skillet, simmering until translucent and fragrant.
  4. Stir in shrimp, cooking until they’re pink, around 3-4 minutes.
  5. Add the beef back to the skillet, followed by Cajun seasoning, and stir well.
  6. Lower the heat, pour in the cream, and allow sauce to simmer for 5-7 minutes.
  7. Combine spaghetti with the sauce, mixing thoroughly to coat. Season with salt and pepper.
  8. Serve hot, garnished with freshly chopped parsley.

Recipe Notes

  • Feel free to customize the spice level by adjusting the amount of Cajun seasoning.
  • Leftovers can be stored in airtight containers and reheated effectively.
  • Experiment with vegetables for added nutrition.

Indulge in a Luxurious German Chocolate Poke Cake Recipe

Luxurious German Chocolate Poke Cake: A Decadent Indulgence

⚖️
Difficulty
Easy

⏲️
Prep Time
20 mins

🕒
Cook Time
30 mins

⏱️
Total Time
50 mins

🍽️
Servings
12

German Chocolate Poke Cake is the perfect dessert for any occasion—immensely rich, sinfully chocolatey, and absolutely delightful. With layers of moist chocolate cake filled with a creamy coconut pecan frosting, this cake dazzles both the eyes and the taste buds. The technique of poking holes into the cake allows the sweet milk and frosting to seep deep inside, ensuring each luscious bite is bursting with flavor.

The contrast of the silky chocolate cake and the crunchy pecans, paired with the sweet, rich coconut, creates an incredible flavor profile that is sure to please any chocolate lover. This cake not only satisfies the sweet tooth but also serves as a showstopper at gatherings, making it an ideal centerpiece for birthdays, anniversaries, and holiday feasts.

Quick Recipe Highlights

  • Flavor Profile: This poke cake features a harmonious blend of rich chocolate cake paired with a sweet coconut-pecan frosting, creating a delightful sweetness balanced by nuttiness.
  • Texture: The cake is incredibly moist, while the frosting adds a velvety creaminess punctuated by the crunch of pecans.
  • Aroma: The aromatic notes of toasted coconut and chocolate waft through the air, inviting everyone to take a bite.
  • Visual Appeal: The cake is visually stunning, with a glossy frosting contrasting beautifully against the deep chocolate tones, garnished with coconut and pecans.
  • Skill Level Needed: Ideal for beginners, this recipe is easy to follow with minimal techniques required.
  • Special Equipment: A standard baking dish and a simple mixing bowl are all you need to whip up this delicious dessert.

Recipe Overview

  • Difficulty Level: This recipe is easy to execute, making it perfect for both novice and experienced bakers. The step-by-step instructions guide you through the process with confidence.
  • Category: This luxurious dessert fits perfectly in the cake category, ideal for celebrations or as a weekend treat.
  • Cuisine: Influenced by German traditions, this cake showcases the love for rich ingredients, particularly chocolate and coconut, which are central to German chocolate cake recipes.
  • Cost: The ingredients for this recipe are reasonably priced, making it accessible for home cooks without breaking the bank.
  • Season: This cake is perfect for any time of the year, especially during festive seasons when indulgence is celebrated.
  • Occasion: Perfect for birthday parties, family gatherings, or potlucks, the German Chocolate Poke Cake brings joy to any occasion.

Why You’ll Love This Recipe

German Chocolate Poke Cake offers an exceptional balance of taste and texture. The rich chocolate flavor combined with the creamy and sweet coconut topping tantalizes the taste buds. Each bite melts in your mouth, delivering a harmony of sweetness and nuttiness. It’s a dessert for the senses that will leave you wanting more.

The convenience of this poke cake lies in its simplicity and minimal preparation time. It requires just a handful of ingredients and can be made ahead of time, giving you more time to enjoy your event or special occasion. With easy step-by-step instructions, even beginner cooks can replicate this cake with success.

Nutritionally, the ingredients like coconut and nuts offer health benefits, including healthy fats and proteins. While this cake is indulgent, it does provide some nutrients compared to other overly sweet options.

When it comes to social gatherings, this cake shines. The irresistible aroma wafting through the home creates an inviting atmosphere. It acts as a conversation starter, and its visual appeal makes it an exciting treat to share with friends and family.

Additionally, the affordability of this recipe makes it accessible to everyone. Utilizing common pantry items and easily found ingredients means that anyone can bask in the luxurious delight of a homemade German Chocolate Poke Cake.

Historical Background and Cultural Significance

The German Chocolate Poke Cake finds its roots in traditional German chocolate cakes, which were not even originating from Germany but rather named after an American named Samuel German, who developed a dark-baking chocolate for the Baker’s Chocolate Company in 1852. Over time, this chocolate became especially popular in dessert recipes.

Culturally, the connection to German chocolate cake represents rich culinary traditions; the love for chocolate and pecans originated in the southern regions of the United States where pecans flourished. These ingredients highlight regional influences, making the cake a beloved choice across America.

This poke cake has evolved from the classic layered cakes, incorporating the poke cake method that became popular in the mid-20th century. The idea of using holes to infuse flavors into a cake adds a unique twist to the original recipes, showcasing creativity in baking.

Regional variations of this recipe have emerged, with some opting to use different frostings or flavors, but the classic combination of chocolate, coconut, and pecans remains the most celebrated.

Ingredient Deep Dive

Chocolate is an essential ingredient in the German Chocolate Poke Cake, offering rich flavor and moisture. Its cultural significance is tied to the history of chocolate making and culinary traditions. Nutritionally, chocolate provides antioxidants and can promote heart health. When selecting chocolate for baking, look for high-quality dark chocolate with a minimum of 60% cocoa for the best flavor. Store it in a cool, dry place for optimal shelf life, and for substitutions, cocoa powder can work well in a pinch.

Coconut is another star player in this recipe. Its sweetness and chewy texture complement the chocolate beautifully. Culturally, coconut is often associated with tropical regions; it adds a unique flavor profile to various desserts. Nutritional benefits include fiber and healthy fats, supporting digestive health. Select unsweetened shredded coconut for the best flavor. Proper storage in an airtight container keeps coconut fresh, while sweetened varieties can be substituted according to taste preferences.

Pecans provide a delightful crunch that rounds out the flavor profile of this cake. They hold cultural significance in Southern cooking, often used in pies and candies. Nutritionally, pecans are rich in healthy fats and vitamins. When buying pecans, choose those that are unbroken and smell fresh. They should be stored in a cool, dark place to prevent rancidity, and you can substitute with walnuts or almonds if desired.

Common Mistakes to Avoid

  • Overmixing the batter: This can lead to a tough cake. Mix just until the dry ingredients are moistened.
  • Not allowing the cake to cool properly: Rushing this step can cause the cake to fall apart when poking holes. Let it cool for at least 30 minutes.
  • Using warm frosting: Ensure your frosting is cool and begins to thicken before applying it on the cake to maximize flavor infusion.
  • Improper measuring: Use a kitchen scale for more accurate measurements, especially for dry ingredients.
  • Skipping the chilling time: Allow the cake to sit in the fridge for several hours after frosting to set the flavors.
  • Using low-quality chocolate: Quality chocolate significantly impacts the flavor. Always opt for good-quality chocolate for the best results.
  • Not poking enough holes: A few gentle pokes won’t extract the full flavor; ensure to distribute holes evenly across the cake.
  • Forgetting to adjust baking time for different oven types: Oven temperatures can vary, so always check for doneness with a toothpick.
  • Using sweetened coconut instead of unsweetened: This can make the frosting overly sweet and alter the flavor balance.
  • Neglecting to rotate the pan while baking: This helps achieve even cooking, especially in ovens with hot spots.

Essential Techniques

When baking a poke cake, understanding the poke method is essential. This technique infuses flavors deeply into the cake, enhancing taste. To master this, use the handle of a wooden spoon or a fork to create evenly spaced holes across the entire cake while it’s still warm. Avoid pushing too hard to maintain the cake’s structure.

Making the frosting is another critical technique. To achieve a creamy texture, start with softened butter and cream it until fluffy, gradually adding other ingredients. Mixing pleasantly results in a smooth icing that blends well with the cake. Keep an eye on consistency; it should be spreadable but not runny.

Pro Tips for Perfect Luxurious German Chocolate Poke Cake

– Always ensure your ingredients are at room temperature for a smoother batter, leading to a more even baking result.
– Consider using buttermilk instead of regular milk for a softer crumb and richer flavor.
– For an extra touch, lightly toast the pecans before adding them to the frosting; this enhances their flavor considerably.
– Refrigerate the cake overnight for the best infusion of flavors from the frosting into the cake.
– Save some pecans and coconut for garnish after frosting the cake; it makes for a stunning presentation.
– Keep a close eye on the baking time, as ovens can vary greatly; a toothpick should come out clean when inserted in the center.
– Explore flavored extracts like almond or vanilla for an added depth to your frosting.
– Use a spatula to spread frosting onto the sides of the cake for a professional finish with an even coating.

Variations and Adaptations

For a regional variation, consider infusing coffee flavor into the cake batter. Coffee complements the chocolate beautifully and adds a depth of flavor. You can also try incorporating almond flavoring or different nuts, such as walnuts or hazelnuts, into the frosting for a unique twist.

Seasonal adaptations might involve adding pumpkin spice or apple-cinnamon flavors in the fall, creating a delightful autumn-themed cake that incorporates seasonal fruits.

Dietary modifications could include using gluten-free flour for those with gluten sensitivities or replacing eggs with flaxseed meal for a vegan version while maintaining the cake’s texture and flavor profile.

When it comes to flavor variations, experiment with different types of chocolate—dark, semi-sweet, or even white chocolate could bring new life to this classic poke cake recipe.

For texture modifications, consider adding a layer of crunchy cookie crumbs to the cake to provide an unexpected pop and a delightful contrast.

Finally, presentation alternatives like serving in individual cups or jars can make this cake a boutique dessert for events, allowing for a more personalized experience for each guest.

Serving and Presentation Guide

To enhance the presentation of your German Chocolate Poke Cake, consider using a cake stand to elevate the dessert and attract attention at the table. When plating, slice the cake into even portions to ensure each piece showcases the beautiful layers of chocolate, coconut, and pecans.

Garnishing with extra toasted coconut and pecan pieces on top will make the cake visually stunning. You can also drizzle some chocolate sauce over the top for an added layer of decadence.

Traditional accompaniments could include a scoop of vanilla ice cream alongside each slice, bringing a creamy balance to the rich flavors of the cake.

For a modern serving suggestion, consider presenting the cake on a marble board, emphasizing a rustic yet elegant aesthetic. Serving the cake slightly chilled can enhance the flavors and provide a refreshing element.

Lastly, practicing portion control is important, especially with such rich desserts; a standard slice is often enough to satisfy a sweet tooth while leaving room for other treats.

Wine and Beverage Pairing

When it comes to wine pairings, a rich Merlot complements the deep chocolate flavors in the cake, enhancing the overall tasting experience. Alternatively, a sweet port wine can also match the sweetness and provide a delightful contrast.

For non-alcoholic options, a rich iced coffee or chocolate milk can serve as a perfect accompaniment, providing a refreshing lift to balance the sweetness of the cake.

If you enjoy a warm beverage, pairing your cake with a cup of freshly brewed chai tea can bring warmth and spice that contrasts beautifully with the cake’s sweet profile.

Always remember to serve these beverages warm or chilled according to their nature; this attention will elevate the entire dining experience with your luxurious German Chocolate Poke Cake.

Storage and Shelf Life

Proper storage is key to maintaining the freshness of your German Chocolate Poke Cake. It can be covered and stored in the refrigerator for up to 5 days. Keep it in an airtight container to prevent it from absorbing other odors in the fridge.

For longer storage, consider freezing the cake. Slice it before freezing for easy servings later; wrap pieces tightly in plastic wrap, then in aluminum foil to maintain freshness. When stored properly, frozen cake can last up to 2 months.

Signs of spoilage to watch out for include an off smell or visible mold growth. When reheating, it’s best to let the slices come to room temperature before warming them slightly in the microwave for 10-15 seconds.

Make Ahead Strategies

To streamline preparation, you can make this poke cake a day in advance. Bake the cake, allow it to cool, and then prepare the frosting to apply right before serving. This ensures that the flavors meld perfectly overnight.

If you plan on making the frosting ahead of time, store it in the refrigerator, and remember to bring it back to room temperature before spreading on the cake for a smooth finish.

Assemble the cake just before your event for the freshest taste. This is particularly important if you’re adding any garnishes like toasted coconut, as they can become soggy if added too early.

To maintain quality, avoid separating layers for more than a day, especially after applying the frosting—keeping everything together helps the cake retain its moisture and flavors.

Scaling Instructions

Scaling your German Chocolate Poke Cake is easy! For halving the recipe, simply divide each ingredient by two, but keep an eye on baking time, as it may decrease slightly.

If doubling or tripling the recipe, ensure that you have a sufficiently large baking dish to accommodate the extra volume. It’s best to bake in batches rather than overloading a single pan, which can lead to uneven cooking.

Timing adjustments are also crucial. Increasing the batch size may require more baking time, so always use a toothpick to test doneness regardless of the recipe quantity.

Additionally, if storing larger portions, ensure that your fridge or freezer can accommodate the expanded batches without overcrowding.

Nutritional Deep Dive

The German Chocolate Poke Cake contains macronutrients, primarily enriched with carbohydrates from the flour and sugars, proteins from the eggs and pecans, and fats sourced from the butter and coconut. This combination makes it a calorie-dense treat.

From a micronutrient perspective, the cake provides several vitamins and minerals, particularly vitamin E from pecans and essential minerals from cocoa. The inclusion of coconut also adds dietary fiber, promoting digestive health.

When considering its health benefits, moderation is essential. The cake can fit into a balanced diet if enjoyed as an occasional treat rather than a daily indulgence. Proper portioning helps enjoy the flavors without exceeding daily caloric limits.

Weight management tips include balancing slices of cake with nutritious meals throughout the day to accommodate occasional indulgence, as well as incorporating physical activity into your routine to offset calorie intake.

Dietary Adaptations

For a gluten-free version, substitute all-purpose flour with a gluten-free blend, ensuring it’s formulated for baking. This allows you to maintain the cake’s structure without compromising flavor.

To make the cake dairy-free, replace butter with coconut oil or vegan margarine and use almond or oat milk instead of regular milk. Ensure the chocolate is dairy-free as well to keep it suitable for vegans.

If you’re following a low-carb or keto diet, opt for almond flour instead of regular flour, and use low- or sugar-free sweeteners to substitute the sugar present in the recipe.

Paleo enthusiasts can make the cake by using coconut flour and honey instead of traditional sugar, promoting natural ingredients while retaining the dessert’s original flavor profile.

Exploring low-FODMAP ingredients can create a suitable version for those with sensitivities by sticking to gluten-free measures and avoiding high-FODMAP syrups in the frosting.

Troubleshooting Guide

Texture issues may arise when the cake is overbaked or too dry, resulting in a crumbly consistency. Always check with a toothpick for doneness, and if overbaked, try drenching the cake with a milk soak to revive moisture.

Flavor balance might lean too sweet or too bland if the right balance of sugars and chocolate is not obtained. Tasting the batter before baking can help you assess sweetness levels, allowing you to adjust accordingly.

If temperature problems occur, such as the cake not baking evenly, verify your oven’s accuracy with a thermometer and rotate the cake halfway through baking for uniform heat distribution.

Equipment challenges, like using a non-stick pan, can sometimes lead to sticking issues. To prevent this, use parchment paper and baking spray to ensure easy removal.

Ingredient substitutions should always be proportionally equal; using different types of flour or sweeteners can drastically change the final product if incorrect measurements are used.

Timing concerns can affect the outcome, especially if cakes are not cooled properly before poking holes. Make sure cooling times are respected to allow the cake to set correctly.

Recipe Success Stories

Community feedback has been overwhelmingly positive, with many praising the easy-to-follow instructions that lead to delectable results. Readers often share how they personalized their cakes, demonstrating creativity and encouraging others to do the same.

Variations such as adding espresso to the cake batter or experimenting with different frostings showcase the recipe’s versatility. Other bakers share how they’ve used this cake as a base for further dessert experiments, leading to exciting outcomes.

Adaptation stories highlight how those with dietary restrictions successfully altered ingredients and created variations of the original recipe without sacrificing flavor, inspiring a broader audience to try their hand at baking.

Photography tips shared by readers emphasize the importance of natural light when capturing the beauty of the cake, encouraging others to take their time to get that perfect shot for social media.

Frequently Asked Questions

Can I make this cake ahead of time? Yes, you can prepare the cake a day in advance. It is actually recommended to allow the flavors to meld overnight in the refrigerator for optimal taste.

What can I use instead of pecans? If you don’t have pecans on hand, walnuts or almonds make great alternatives. You can also omit nuts entirely for a nut-free version.

How can I store leftovers? Store any leftover cake in an airtight container in the refrigerator for up to five days, or freeze for up to two months wrapped tightly in plastic wrap.

Is it possible to make this cake vegan? Yes, you can substitute eggs with flaxseed meal mixed with water, and use dairy-free chocolate and alternative milk to ensure it’s vegan-friendly.

Can I freeze the cake? Yes! Freeze slices wrapped tightly in plastic wrap and foil; it will keep for about two months without loss of quality.

Can I use boxed cake mix for this recipe? Absolutely! You can simplify this by using a chocolate cake mix, and follow the poke method as instructed.

How do I know when the cake is done? A toothpick inserted into the center should come out clean, signaling that the cake is fully baked.

Can I add fruit to the recipe? Incorporating fruits like bananas or raspberries as layers would introduce pleasant acidity that balances the sweetness of the chocolate cake.

What should I do if I mistakenly overbake the cake? If your cake turns out dry, consider drenching it in a simple syrup to add back moisture and enhance flavor.

What is the best way to serve the cake? Serve slices chilled with a dollop of whipped cream or a scoop of vanilla ice cream for the perfect dessert experience.

Additional Resources

To further enhance your baking skills, consider exploring related recipes like classic chocolate cake or coconut cream pie, which share similar traits to the German Chocolate Poke Cake.

Finding technique guides for baking fundamentals can help develop your cooking expertise while providing beneficial insights for cake making, such as creaming techniques and proper mixing methods.

For ingredient information, consulting resources related to chocolate and coconut can deepen your understanding of these crucial ingredients used within this recipe, their origins, and how to select the best available options.

Equipment recommendations can also be valuable—investing in a good quality baking pan and mixing tools will make baking a breeze and enhance your overall results.

Lastly, experimenting with seasonal variations presents an excellent opportunity to introduce new flavors, like pumpkin or peppermint, that could contribute unique touches to this classic recipe.

Join the Conversation

Engage with others who share your passion for baking by sharing your experiences on social media. Post your cake photos and encourage feedback from your community to foster connection.

Photographing your cake is essential; focus on natural lighting to capture the luscious textures and vibrant colors. Don’t forget to tag us with your creations to inspire others to try this delightful recipe.

Reviews and suggestions from fellow bakers contribute to a strong community, promoting discussions on variations or techniques that further enrich the baking experience.

Lastly, invite your friends and family to share their favorite adaptations and personal twists on this recipe, creating a collaborative environment where everyone can enjoy delicious results.

The Recipe

Luxurious German Chocolate Poke Cake

Serves: 12

Prep Time: 20 mins

Cook Time: 30 mins

Total Time: 50 mins

Kitchen Equipment Needed

  • 9×13 inch baking pan
  • Mixing bowls
  • Electric mixer
  • Measuring cups and spoons
  • Toothpick

Ingredients

  • 1 box chocolate cake mix (plus ingredients specified on the box)
  • 1 can sweetened condensed milk
  • 1 cup shredded coconut
  • 1 cup chopped pecans
  • 1 cup heavy cream
  • 1/2 cup cocoa powder
  • 1/2 cup powdered sugar
  • 1 teaspoon vanilla extract

Directions

  1. Preheat your oven according to the instructions on the cake mix box.
  2. Grease the baking pan and prepare the chocolate cake batter according to package instructions.
  3. Bake the cake until a toothpick comes out clean, and allow it to cool for about 30 minutes.
  4. Use a fork or a skewer to poke holes all over the surface of the cooled cake.
  5. For the filling, mix the sweetened condensed milk with cocoa powder in a bowl.
  6. Pour the mixture carefully over the poked cake, allowing it to seep into the holes.
  7. In a separate bowl, whip the heavy cream with powdered sugar and vanilla until soft peaks form.
  8. Fold in the shredded coconut and chopped pecans into the whipped cream mixture.
  9. Spread the coconut-pecan mixture over the top of the cake, covering it evenly.
  10. Chill the cake for at least 2 hours before serving for the best flavor infusion.

Recipe Notes

  • Feel free to adjust sweetness by using less or more sweetened condensed milk based on your preference.
  • You can substitute the heavy cream with coconut cream for a richer coconut flavor.
  • Leftovers can be stored in the refrigerator for up to 5 days.