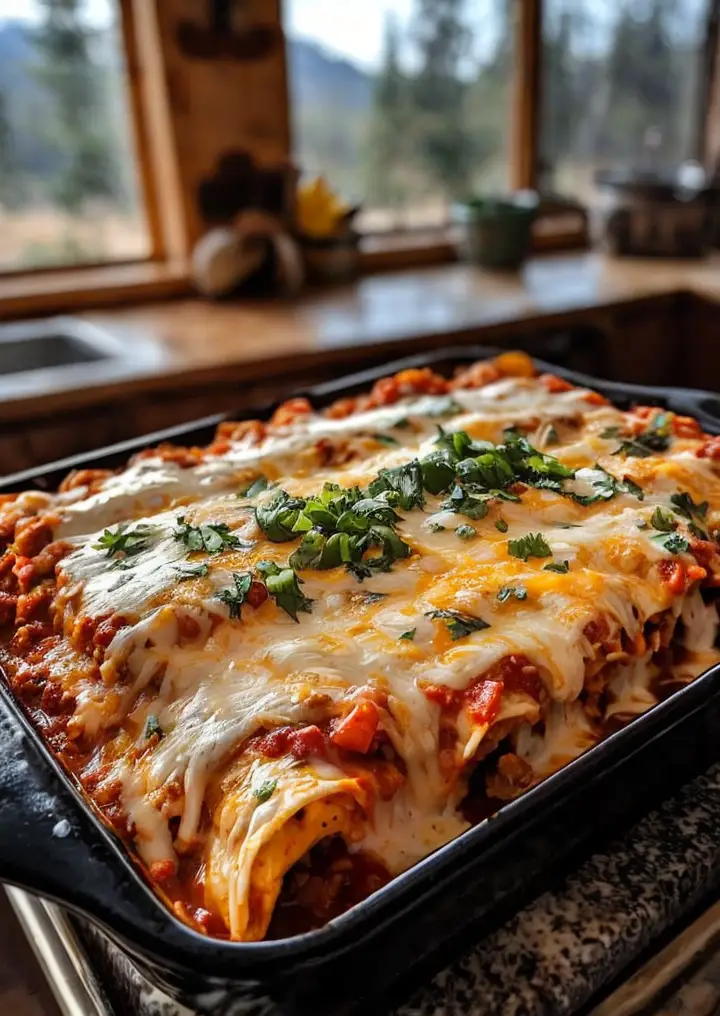
Cranberry Whiskey Sour: A Festive Holiday Cocktail Recipe

holiday whiskey sour, cranberry lemon cocktail, festive whiskey cocktail, Christmas whiskey sour, cranberry bourbon drink, easy cranberry sour

Cranberry Whiskey Sour: A Holiday Cocktail with a Twist

Cranberry Whiskey Sour is a delightful cocktail perfect for holiday parties and cozy winter evenings. This festive drink balances tart cranberry, zesty lemon, and smooth whiskey to create an unforgettable sour experience. Whether you’re a whiskey enthusiast or a cocktail novice, this recipe is simple to make and endlessly customizable.


Why Cranberry Whiskey Sour Is Perfect for the Holidays

The vibrant red hue of the Cranberry Whiskey Sour makes it a standout at any holiday gathering. It’s refreshing yet warming, thanks to the whiskey base. For more festive drink ideas, check out Mistletoe Margarita for another seasonal favorite.

Pair this cocktail with savory appetizers like Taco Pinwheels to create a perfect holiday spread. For a deeper dive into whiskey selection, explore Tips for Choosing the Right Whiskey.


Ingredients for Cranberry Whiskey Sour

To make this festive drink, you’ll need:

  • Whiskey: Bourbon, rye, or Canadian whiskey.
  • Cranberry Juice: For tartness and vibrant color.
  • Lemon Juice: Freshly squeezed for the best flavor.
  • Simple Syrup: Balances the tartness with sweetness.
  • Garnishes:
    • Lemon twists or slices.
    • Fresh cranberries.
    • Rosemary sprigs for a holiday touch.

Optional substitutions include maple syrup instead of simple syrup for a richer sweetness. Explore more creative recipes like Peanut Butter Cheesecake Bites to complement this cocktail.


Step-by-Step Recipe

1. Prepare the Ingredients

  • Squeeze fresh lemons and chill the cranberry juice in advance.

2. Shake and Serve

  • Combine whiskey, cranberry juice, lemon juice, and simple syrup in a shaker.
  • Shake with ice until chilled.
  • Strain into a glass over fresh ice.

3. Add Garnishes

  • Top with cranberries, a rosemary sprig, and a lemon twist for a festive presentation.

Creative Variations

  • Spiced Cranberry Sour: Add a dash of cinnamon or nutmeg for warmth.
  • Pomegranate-Cranberry Sour: Replace half the cranberry juice with pomegranate juice for a richer flavor.
  • Mocktail Version: Substitute whiskey with ginger ale or sparkling water for a non-alcoholic option.
  • Herbal Infusion: Muddle basil or mint leaves into the shaker for a fresh twist.

Tips for the Perfect Cocktail

  • Use Fresh Ingredients: Freshly squeezed lemon juice and high-quality cranberry juice make a significant difference.
  • Adjust Sweetness: Modify the simple syrup to balance tartness.
  • Chill Everything: Keep your ingredients and glassware chilled for the best experience.

FAQs

What’s the best whiskey for this cocktail?

Bourbon is smooth and sweet, while rye whiskey adds a spicy kick.

Can I make this cocktail less tart?

Add more simple syrup or reduce the lemon juice.

Can I batch this cocktail for a party?

Yes, mix the cranberry juice, lemon juice, and simple syrup in advance. Add whiskey just before serving.

Can I use bottled lemon juice?

Fresh lemon juice is highly recommended for its superior flavor.

Can I make a keto-friendly version?

Use sugar-free cranberry juice and a keto-friendly sweetener like erythritol for the simple syrup.


Internal Linking Opportunities

Enhance your holiday menu with these complementary recipes from ExoRecipes:


Conclusion

The Cranberry Whiskey Sour is a festive and flavorful addition to your holiday repertoire. With its balance of tart and sweet flavors, it’s sure to impress your guests. Experiment with variations and enjoy this vibrant cocktail all season long!

Delightful Mini Powdered Sugar Donut Muffins for Any Occasion

Mini Powdered Sugar Donut Muffins: A Delightful Treat for Any Occasion

⚖️
Difficulty
Easy

⏲️
Prep Time
10 mins

🕒
Cook Time
15 mins

⏱️
Total Time
25 mins

🍽️
Servings
12 muffins

Indulge in the airy wonders of Mini Powdered Sugar Donut Muffins, a delightful twist on traditional baked treats that combine the essence of classic donuts with the convenience of muffins. These muffins, with their light and fluffy texture, are generously coated in powdered sugar, making them irresistible for breakfast, snacks, or dessert. Imagine biting into a warm muffin that melts in your mouth, flooding your senses with sweet, crumbly bliss. Whether you’re serving them at a birthday party, holiday gathering, or simply enjoying a quiet morning at home, these mini muffins are sure to impress.

The preparation is swift and simple, ensuring that you can whip up a batch even on your busiest mornings. With pantry staples like flour, sugar, and eggs, these muffins call out to mothers, teachers, and anyone who loves a homemade treat but doesn’t want to spend hours in the kitchen. Their delightful aroma wafts through your home as they bake, reminiscent of warm donuts fresh out of the fryer, making your kitchen a cozy haven.

Quick Recipe Highlights

  • Flavor Profile: These muffins boast a sweet and lightly buttery flavor complemented by the sugary coating that adds a delightful crunch.
  • Texture: Expect a soft and fluffy interior with a slight crispiness on the outside due to the powdered sugar coating.
  • Aroma: The baked muffins fill your space with a warm, sweet scent, reminiscent of fresh pastries.
  • Visual Appeal: These mini muffins are visually charming, with a snowy white coating that sparkles in the light against a golden brown hue.
  • Skill Level Needed: Perfect for beginners, these muffins require minimal baking skills and equipment.
  • Special Equipment: A standard muffin tin and mixing bowls are all you need to create these treats.

Recipe Overview

  • Difficulty Level: This recipe is classified as easy, making it perfect for novice bakers eager to try their hand at muffins.
  • Category: Mini Powdered Sugar Donut Muffins fall under the breakfast and snack category, making them versatile for any time of day.
  • Cuisine: While inspired by classic American donuts, these muffins have gained popularity in various culinary traditions across the globe.
  • Cost: Budget-friendly, the ingredients typically cost under $10 for a full batch.
  • Season: These muffins can be enjoyed year-round but are particularly wonderful during fall and winter gatherings.
  • Occasion: Great for birthday parties, brunch events, or as a delightful afternoon snack.

Why You’ll Love This Recipe

The balance of taste and texture in Mini Powdered Sugar Donut Muffins is a delight. They offer the sweetness of a donut without the fried heaviness, delivering a light, fluffy bite that pairs beautifully with coffee or tea. The powdered sugar adds a pleasing crunch that contrasts wonderfully with the soft interior, creating a mouthful that’s both enjoyable and comforting.

Convenience is another reason to love this recipe. With a prep time of only 10 minutes and a cook time of 15 minutes, you can have fresh muffins ready in less than half an hour. This makes it easy to prepare them for unexpected guests or as a quick breakfast before heading out the door.

Nutritionally, while these mini muffins are a treat, they can also fit into a balanced diet when enjoyed in moderation. They offer a small dose of energy from carbohydrates, and you can customize the recipe by adding healthier ingredients like whole wheat flour or reducing sugar content.

Socially, these muffins are perfect for entertaining. Their bite-sized nature makes them easy to serve and share, whether at a café table with friends or a potluck with family. They are sure to be a hit and provide a delightful addition to any gathering, enticing guests with their sweetness and inviting appearance.

Lastly, the cost-effectiveness of this recipe cannot be overstated. With simple ingredients that you likely already have on hand, making these muffins is not only economical but also a way to bring homemade flavor to your table without overspending.

Historical Background and Cultural Significance

The origins of the donut can be traced back to Dutch settlers in America, who brought with them a recipe for “olykoeks,” or oily cakes. These cakes eventually evolved into the donuts we enjoy today. The transition to muffins, particularly in miniature form, reflects modern baking trends focusing on convenience and portion control.

Mini muffins have gained traction not just for their taste but for their adaptability. They can be catered to various dietary preferences and have become a staple in coffee shops and bakeries across America. The rise of artisanal baking has further enhanced the popularity of these sweet treats, making them a favorite for brunch and catering.

As food culture continues to evolve, the muffin form of donuts represents a shift towards lighter, less indulgent options that still satisfy sweet cravings. Their popularity has led to numerous variations and interpretations, making them a beloved item in kitchens worldwide.

Regional variations of the muffin have emerged, with different locales adopting unique ingredients or flavor profiles reflective of their cultural tastes. From adding spices to incorporating seasonal fruits, each region puts its own spin on this beloved treat.

Ingredient Deep Dive

Flour:
Flour is the foundation of any baked good. Choosing the right type can significantly influence the texture and flavor. All-purpose flour is commonly used, but whole wheat flour provides added nutrients and a nuttier taste. When selecting flour, look for freshness, and store it in a cool, dry place to avoid spoilage.

Sugar:
Sugar not only sweetens the muffins but also contributes to their tenderness and moisture. Granulated sugar is the standard, while confectioners’ sugar is used for the powdered coating. For a healthier twist, explore alternatives like coconut sugar or stevia. Store sugar in an airtight container to maintain its quality.

Milk:
Milk adds moisture and richness to muffins. Whole milk is a popular choice, but alternatives like almond milk, oat milk, or coconut milk can cater to dairy-free diets. When selecting milk, consider whether you want a creamier base or a lighter option depending on dietary needs and recipe goals.

Eggs:
Eggs bring structure and binding to the muffin batter while enriching the flavor. Fresh eggs yield the best results, and for those with egg sensitivities, flax or chia seeds can serve as excellent substitutes. Properly store eggs in the fridge, noting any expiration dates for maximum freshness.

Common Mistakes to Avoid

  • Overmixing the batter: While combining ingredients, it’s essential to mix just until combined. Overmixing can lead to dense, tough muffins.
  • Skipping the preheating step: Always preheat your oven to ensure your muffins bake evenly and rise properly.
  • Incorrect measurements: Baking is a science; using the wrong amounts can result in unforeseen consequences. Use precise measurements for best results.
  • Using stale ingredients: Expired baking powder or old flour can impact the rise and texture of your muffins. Always check freshness before starting.
  • Adjusting baking time: Don’t open the oven door while baking until you’re close to the time indicated; it can cause muffins to sink.
  • Baking in the wrong pan: Ensure you’re using a proper muffin tin, as different sizes can affect baking time and doneness.
  • Not greasing the pan properly: If the pan is not greased well, the muffins may stick and lose their shape.
  • Ignoring cooling time: Letting your muffins cool in the pan for a few minutes before transferring to a wire rack helps maintain their structure.

Essential Techniques

When baking muffins, mastering the technique of mixing is crucial. This involves combining dry ingredients separately from wet ones to create a uniform batter without over-mixing, which ensures fluffy muffins. Use a gentle folding method to incorporate wet and dry ingredients while keeping air pockets intact for optimal rise.

Another key technique is proper baking temperature. Preheating your oven allows for immediate heat exposure, helping the muffins to rise quickly for a light texture. Positioning your muffin tin in the center of the oven ensures even heat distribution, contributing to well-cooked muffins all around.

Pro Tips for Perfect Mini Powdered Sugar Donut Muffins

1. Use room temperature ingredients for the best blend; warm eggs and milk incorporate more easily.
2. Experiment with different flavored extracts like vanilla or almond for varied taste profiles in your muffins.
3. Add a pinch of nutmeg or cinnamon to the batter for a delightful seasonal twist.
4. For an extra indulgent muffin, consider stuffing them with cream cheese or chocolate chips before baking.
5. Keep an eye on the muffins during the last few minutes of baking; they should spring back when lightly pressed.
6. Let muffins cool in the pan briefly before transferring to a wire rack to prevent sogginess.
7. Sprinkle the muffins with a little extra powdered sugar before serving for an appealing presentation.
8. If desired, try a sugar coating or glaze instead of powdered sugar for a different flavor and texture.

Variations and Adaptations

Regional variations of these mini muffins can include additions such as maple syrup for a sweet twist or incorporating spices like pumpkin pie spice in the autumn. Seasonal adaptations allow for fresh fruit like blueberries or raspberries to be folded into the batter, enhancing both flavor and nutrition.

Dietary modifications could include using gluten-free flour or substituting plant-based milk and eggs for a vegan option without losing the flavorful essence of the muffins. Flavor variations may consist of adding cocoa powder for a chocolate version or infusing the batter with citrus zest for a refreshing alternative.

For texture modifications, consider including nuts or seeds for added crunch or swapping out some of the white flour for whole wheat to increase fiber content. Finally, unique presentation alternatives such as mini muffin towers or creative serving platters can elevate your serving style.

Serving and Presentation Guide

When it comes to plating your Mini Powdered Sugar Donut Muffins, consider arranging them in a tiered stand for a visually appealing display that guests will admire. Garnish with fresh berries or mint leaves to add color and vibrancy.

You can serve these muffins warm, straight from the oven or allow them to cool for a few minutes while they’re being dusted with powdered sugar to create a delectable finish. Consider pairing them with whipped cream or a delicious fruit dip for an interactive dessert experience.

For coffee or tea lovers, present a small cup alongside the muffins to enhance the sensory experience. Offering a variety of muffins on a platter can turn them into the highlight of your brunch table, adding an element of choice for your guests.

Keep in mind that portion control is essential; cut them into halves or quarters for smaller bites, perfect for gatherings or parties where guests may want to sample multiple treats.

Wine and Beverage Pairing

When enjoying Mini Powdered Sugar Donut Muffins, a light sparkling wine like Prosecco pairs nicely, as its bubbles balance the sweetness and provide a refreshing contrast. Alternatively, consider a California Chardonnay, which complements the buttery notes of the muffins.

For non-alcoholic options, freshly brewed herbal tea works beautifully, as the warm spices can enhance the muffin flavors. Additionally, a classic pairing with coffee enhances the overall experience, with rich coffee balancing the sweetness beautifully.

When serving, offer beverages at appropriate temperatures, ensuring coffee is served hot and sparkling wine is well-chilled for optimal flavor profiles.

Storage and Shelf Life

To keep your Mini Powdered Sugar Donut Muffins fresh, store them in an airtight container at room temperature for up to 3 days. If you need to store them for a longer period, place them in the refrigerator, which can extend their life up to a week.

When freezing, wrap each muffin in plastic wrap and then place them in a freezer bag; they can last for up to 3 months. To serve, simply defrost the muffins in the fridge overnight and reheat them in the oven to restore their freshness.

Signs of spoilage include a change in texture or appearance, such as excessive dryness or mold growth. Reheating instructions involve warming muffins gently in the oven or microwave, ensuring they retain moisture and warmth.

Make Ahead Strategies

To streamline your baking process, prepare the batter the night before and store it in the refrigerator until you’re ready to bake. This allows the ingredients to meld, enhancing the muffin flavors.

Alternatively, bake the muffins ahead of time, and freeze them in individual portions, ready to defrost and serve. This way, you can enjoy freshly baked muffins even on the busiest of mornings.

For a finishing touch, consider adding any cream fillings or toppings just before serving to maintain texture and presentation. If using fresh fruits, only incorporate them directly into the batter right before baking to prevent excess moisture.

Scaling Instructions

If you want to adjust the recipe for larger gatherings, doubling or tripling the batch is straightforward. However, remember to use multiple muffin pans and rotate them in the oven for even baking.

When halving the recipe, you can use a smaller muffin tin for mini versions, ensuring you adjust the baking time accordingly, as they may cook faster.

Be aware of equipment adjustments as well; larger mixers may be needed if you’re scaling up significantly. Keep a close eye on the muffins while they bake, as timing may vary based on size and oven conditions.

Consider storage requirements after baking larger batches; more containers may be needed for proper cooling and preservation.

Nutritional Deep Dive

Each Mini Powdered Sugar Donut Muffin offers a delightful balance of nutrients, counting roughly 150 calories per muffin, primarily from carbohydrates and fats. The exact macronutrient profile will vary based on the specific ingredients used, especially if substitutions are made.

Additionally, these muffins can provide essential micronutrients, particularly if whole grain flour is used, boosting fiber content significantly. Incorporating fruits can increase vitamin content, thus enhancing the overall health benefits of your sweet treat.

When considering portion analysis, watching serving sizes is crucial for those mindful of caloric intake or attempting weight management. Smaller portions allow for enjoyment without compromising diet goals.

For weight management, considering healthier variations of the recipe or substituting lower-calorie alternatives can help maintain a balance between indulgence and health.

Dietary Adaptations

For gluten-sensitive individuals, using a gluten-free flour blend can make Mini Powdered Sugar Donut Muffins accessible without sacrificing taste or texture. Always check labels to ensure that your ingredients are certified gluten-free.

Dairy-free adaptations can be achieved using almond milk or soy milk in place of regular milk and substituting flax eggs for hen eggs. This accommodates lactose-intolerant individuals while keeping the muffins soft and flavorful.

For vegan versions, a quick swap of ingredients such as using applesauce or mashed bananas instead of eggs adds moisture and keeps the muffins fluffy. The substitution of plant-based milk and oils ensures that the muffins remain delicious and suitable for those following vegan diets.

Other specific diets can be accommodated as well, like Keto or low-carb variations by replacing sugar with erythritol and using almond flour instead of regular flour, adjusting baking times for best results.

Troubleshooting Guide

If your muffins turn out dense, it likely stems from overmixing the batter. Be sure to fold the wet and dry ingredients together only until they are just combined to preserve lightness.

If the flavor is off, checking ingredient quality can help; using old baking powder or sugar can lead to flat-tasting muffins. Always ensure ingredients are fresh and stored properly.

Temperature problems can arise from uneven heating in the oven; ensure that your oven is calibrated correctly and consider rotating pans halfway through baking time for even results.

Ingredient substitutions might lead to unexpected results. Always test a small batch first when trying new flour or sweetener types to understand how they might affect baking.

Timing can also be problematic; if you’re unsure, take the muffins out a minute or two earlier. They continue to cook slightly while cooling, and overbaking is a common issue.

Recipe Success Stories

Many bakers have shared glowing reviews of this Mini Powdered Sugar Donut Muffins’ ability to wow family and friends at gatherings. One reader noted that they made these muffins for a weekend brunch, and every guest asked for the recipe, impressed by their lightness and flavor.

Another baker shared their success with swapping in whole wheat flour and getting rave reviews from their health-conscious friends. This not only made the muffins healthier but also enhanced their taste with a nutty flavor.

Feedback from families reported that these muffins have become a regular breakfast item due to their ease of preparation and time-saving benefits. Children particularly enjoy the fun, mini-sized presentation.

A suggestion from the community included adding chocolate chips into the batter, leading to a chocolate dream variation that many readers now rave about, showcasing the versatility of the recipe.

Frequently Asked Questions

How can I make these muffins gluten-free?

To make Mini Powdered Sugar Donut Muffins gluten-free, simply substitute the all-purpose flour with a gluten-free flour blend. Ensure that any additional ingredients like baking powder are also gluten-free, and enjoy the same soft, fluffy texture!

Can I use almond milk instead of regular milk?

Yes, almond milk can be used as a dairy substitute in this recipe. It will work just as well, providing moisture without compromising the muffins’ taste.

What should I do if my muffins are too dry?

If your muffins turn out dry, consider adding a touch more liquid next time or reducing the baking time slightly. Moisture can also be increased by adding ingredients like applesauce or yogurt.

How to store leftover muffins?

Leftover muffins should be stored in an airtight container at room temperature for up to 3 days. For longer storage, freeze them individually wrapped, and they will remain fresh for up to 3 months.

Can I add chocolate chips or nuts to the batter?

Absolutely! Adding chocolate chips, nuts, or dried fruits can elevate the muffins’ taste and texture. Just fold them into the batter gently to keep the muffins light.

Will using whole wheat flour change the taste?

Whole wheat flour will give your muffins a nuttier flavor and denser texture. It’s a great way to make them healthier while still being delicious!

What is the best way to reheat leftover muffins?

The best way to reheat your muffins is to preheat your oven to 350°F (175°C) and warm them for about 5-10 minutes. This will restore moisture and warmth without overcooking them.

Is it necessary to grease the muffin tin?

Yes, greasing the muffin tin or using muffin liners is crucial to prevent the muffins from sticking and ensure they release easily after baking.

How can I make these muffins more flavorful?

To enhance the flavor, consider adding extracts such as vanilla or almond, spices like cinnamon or nutmeg, and even citrus zest for a refreshing twist.

Are these muffins suitable for kids?

Yes! Mini Powdered Sugar Donut Muffins are kid-friendly, easy to handle, and the sweet taste is sure to be a hit with children of all ages.

Additional Resources

For those looking to expand their baking repertoire, consider exploring related recipes such as classic donuts, banana muffins, or even gluten-free treats. There are numerous technique guides available for muffin making, icing techniques, and incorporating fruits into baked goods.

Keep an eye out for ingredient information to deepen your knowledge about selecting the best flour, sugar alternatives, and dairy options. Equipment recommendations can enhance your baking experience, ensuring you have the right tools for a stress-free baking session.

Seasonal variations will also guide you in creating delicious muffins suitable for every occasion, from festive winter flavors to fresh berry adaptations in summer.

Join the Conversation

Engaging with the baking community is a fun way to share experiences, tips, and variations of the Mini Powdered Sugar Donut Muffins. Social media platforms are perfect for sharing photos of your creations or tagging friends when trying new adaptations.

Consider documenting your baking journey with photography, showcasing the delightful process from mixing to enjoying freshly baked muffins. Community engagement can lead to recipe reviews, inspiring others to give this easy yet satisfying treat a go.

Don’t hesitate to share your unique variations or discoveries that might inspire others. Whether you add nuts, fruits, or different flavored sugars, each twist can lead to an exciting outcome.

The Recipe

Mini Powdered Sugar Donut Muffins

Serves: 12 muffins

Prep Time: 10 mins

Cook Time: 15 mins

Total Time: 25 mins

Kitchen Equipment Needed

  • Muffin tin
  • Mixing bowl
  • Whisk
  • Measuring cups and spoons
  • Cooling rack

Ingredients

  • 1 ½ cups all-purpose flour
  • ½ cup granulated sugar
  • 2 tsp baking powder
  • ½ tsp salt
  • 1 large egg
  • ½ cup milk
  • ¼ cup unsalted butter, melted
  • 1 tsp vanilla extract
  • ½ cup powdered sugar (for dusting)

Directions

  1. Preheat your oven to 350°F (175°C) and grease a muffin tin.
  2. In a large bowl, mix together flour, granulated sugar, baking powder, and salt.
  3. In another bowl, beat the egg and then add in milk, melted butter, and vanilla extract until well combined.
  4. Pour the wet ingredients into the dry ingredients and stir until just combined.
  5. Fill each muffin cup about 2/3 full with the batter.
  6. Bake for 12-15 minutes, or until a toothpick inserted in the center comes out clean.
  7. Let the muffins cool in the pan for a few minutes before transferring to a wire rack.
  8. Once cooled, dust generously with powdered sugar before serving.

Recipe Notes

  • For added flavor, consider folding chocolate chips or nuts into the batter before baking.
  • Store leftover muffins in an airtight container at room temperature for up to three days.
  • Freezing muffins is a great way to preserve them; simply wrap them individually in plastic wrap.

Peanut Butter Cheesecake Bites: Easy, No-Bake Dessert Recipe

cheesecake peanut butter balls, no-bake cheesecake bites, chocolate peanut butter bites, easy cheesecake dessert, mini peanut butter cheesecakes

Peanut Butter Cheesecake Bites: A Rich and Creamy Treat

Peanut Butter Cheesecake Bites are a delectable combination of rich peanut butter and creamy cheesecake, coated in smooth chocolate for a decadent finish. These bite-sized treats are perfect for parties, gifting, or enjoying as a quick indulgence. Easy to make and versatile, they’re bound to be a hit.


Why Peanut Butter Cheesecake Bites Are a Must-Try

The flavor profile of creamy peanut butter paired with tangy cheesecake creates an irresistible dessert. These treats are quick to prepare and require minimal baking, making them perfect for busy schedules. For a similar no-bake delight, explore No-Bake Pumpkin Cheesecake.

Adding your unique touch is simple, from flavored coatings to extra toppings. For expert tips on achieving the perfect chocolate coating, visit How to Melt Chocolate Perfectly.


Ingredients You’ll Need

  • Cream Cheese: For the cheesecake base.
  • Peanut Butter: Adds a nutty richness.
  • Powdered Sugar: Sweetens and thickens the mixture.
  • Vanilla Extract: Enhances the flavor.
  • Chocolate: Use milk, dark, or white chocolate for coating.
  • Optional Toppings:
    • Crushed graham crackers.
    • Sprinkles or sea salt.

For a nut-free option, substitute peanut butter with sunflower seed butter. For more creative dessert recipes, visit Raspberry Cheesecake Brownie Bites.


How to Make Peanut Butter Cheesecake Bites

1. Prepare the Cheesecake Mixture

  • Beat cream cheese and peanut butter until smooth.
  • Gradually mix in powdered sugar and vanilla extract until combined.

2. Shape the Bites

  • Use a cookie scoop to form 1-inch balls.
  • Place on a lined baking sheet and freeze for 15 minutes.

3. Coat with Chocolate

  • Melt chocolate using a microwave or double boiler.
  • Dip each ball into the melted chocolate, allowing excess to drip off.

4. Chill and Serve

  • Refrigerate until the chocolate coating is set.
  • Serve chilled or at room temperature.

Creative Variations

  • Crunchy Coating: Roll the bites in crushed nuts or graham crackers.
  • Stuffed Bites: Add a mini caramel or marshmallow center.
  • Vegan Option: Replace cream cheese with plant-based alternatives.
  • Flavored Coating: Use flavored white chocolate or add a drizzle of caramel.

Tips for Perfect Cheesecake Bites

  • Firm Mixture: Ensure the dough is well-chilled before shaping.
  • Smooth Coating: Use a fork or skewer for even chocolate coverage.
  • Storage: Store in an airtight container to retain freshness.

FAQs

Can I make these gluten-free?

Yes, ensure all ingredients, including chocolate, are certified gluten-free.

What can I use instead of powdered sugar?

Maple syrup or honey can work, but adjust the mixture for consistency.

Can I freeze the bites?

Absolutely! Store in the freezer for up to 3 months and thaw as needed.

How do I prevent chocolate cracking?

Allow bites to warm slightly before dipping, or use tempered chocolate.

Can I make these ahead of time?

Yes, prepare and store in the fridge for up to a week or freeze for longer.


Internal Linking Opportunities

For readers interested in Peanut Butter Cheesecake Bites, consider exploring these related recipes from ExoRecipes:


Conclusion

Peanut Butter Cheesecake Bites are a simple yet indulgent dessert perfect for any occasion. Whether you’re hosting a party or looking for a giftable treat, these bites are sure to impress. Experiment with flavors and toppings to create your signature version of this creamy delight!

Delicious Chicken and Bacon Stromboli Recipe Everyone Will Love

Delicious Chicken and Bacon Stromboli: A Flavorful Twist

⚖️
Difficulty
Medium

⏲️
Prep Time
20 mins

🕒
Cook Time
25 mins

⏱️
Total Time
45 mins

🍽️
Servings
4

Are you in the mood for something delicious and satisfying? Look no further than this Chicken and Bacon Stromboli! With its flaky, golden-brown crust and flavorful filling, this dish is sure to become a favorite in your home. The combination of tender chicken, crispy bacon, and melty cheese wrapped in freshly baked dough creates a symphony of flavors that will tantalize your taste buds. It’s perfect for family dinners, game nights, or even a delightful party treat. Let’s dive into this mouthwatering recipe that promises both comfort and satisfaction!

This Chicken and Bacon Stromboli not only looks appealing but is also irresistibly tasty. The smokiness of the bacon complements the succulent chicken perfectly, while a blend of Italian herbs enhances the overall flavor profile. Every bite is a delightful experience, showcasing a balance of savory and hearty ingredients. As the aroma wafts through your kitchen, expect everyone to gather and ask, “What’s cooking?” Get ready to create a dish that not only fills bellies but also warms hearts!

Quick Recipe Highlights

  • Flavor Profile: This stromboli blends smoky, savory flavors from the bacon and a hint of garlic, paired with the tender chicken and creamy cheese, creating a delightful balance.
  • Texture: The flaky outer crust contrasts beautifully with the juicy filling, providing a satisfying crunch followed by a soft, savory bite.
  • Aroma: Expect a heavenly scent of fresh baked bread mingled with the rich scents of chicken, bacon, and melted cheese, sure to please all in the vicinity.
  • Visual Appeal: Golden-brown crust with hints of melted cheese peeking out, and a beautiful cross-section showcasing the flavorful filling.
  • Skill Level Needed: Moderate skill is required as it involves crafting dough and assembling the filling, but is achievable with some basic kitchen knowledge.
  • Special Equipment: You’ll need a baking sheet, rolling pin, and parchment paper to keep this stromboli perfectly shaped and baked.

Recipe Overview

  • Difficulty Level: This Chicken and Bacon Stromboli falls under the medium difficulty category. While the process involves multiple steps, it mostly requires preparation of ingredients, rolling dough, and baking, making it a manageable dish for home cooks.
  • Category: This dish is a fantastic option for a main course, equally suitable for a casual meal or an impressive dish for guests.
  • Cuisine: Drawing inspiration from Italian cuisine, stromboli is a versatile dish that allows for various adaptations while staying true to its comforting roots.
  • Cost: The approximate cost of this dish is relatively moderate, considering its ingredients like chicken, bacon, and cheese. A delicious meal doesn’t have to break the bank!
  • Season: This dish is perfect year-round but can be especially comforting during colder months when a warm, hearty meal is needed.
  • Occasion: Serve this delightful Chicken and Bacon Stromboli during family gatherings, sports events, or cozy movie nights for an enhanced culinary experience.

Why You’ll Love This Recipe

The Chicken and Bacon Stromboli dazzles with its exceptional taste and texture. Each bite will leave you craving more, thanks to the crispy bacon and juicy chicken melding together in a savory harmony. The addition of melted cheese ensures that each slice is rich and fulfilling, making it hard to resist. Whether you enjoy it alone or with family, this dish promises satisfaction and comfort.

This recipe shines not just for its taste but also for its convenience. It’s an eager make-ahead meal that allows you to prepare the filling and assemble your stromboli ahead of time. With just a few minutes in the oven before serving, you can have a fresh, hot dish ready to enjoy. Perfect for busy weeknights or a relaxed weekend gathering!

Nutritionally, you’ll be pleased to find that this dish incorporates proteins from chicken and bacon, along with the essential nutrients in herbs and spices. It provides a great way to sneak in some greens if you decide to add vegetables to the filling. This dish can easily be tailored to include more nutritious ingredients to cater to your health needs.

Planning a social gathering? This Chicken and Bacon Stromboli is an excellent conversation starter! It’s easy to share and serve, making it the ultimate crowd-pleaser. Guests will be impressed by your culinary skills, and everyone will enjoy the unique combination of flavors, fostering connection and creating lasting memories.

Finally, making this dish is cost-effective and accessible. With common ingredients that are easily found at any grocery store, you can whip up this sumptuous meal without much hassle. Enjoy the benefits of homemade cooking while keeping the budget in check!

Historical Background and Cultural Significance

The origins of stromboli trace back to the United States, specifically created by Italian immigrants in the mid-20th century. Named after the Stromboli volcano, this dish draws on the concept of rolling meats and cheeses inside dough, a prime example of Italian culinary traditions merging with American culture. This delightful dish captures the spirit of comfort food in a portable form.

Stromboli has become a beloved staple in many households, showcasing Italian-American culinary influences, making it a cultural icon among comfort foods. As eateries began to serve it alongside pizza, it quickly gained popularity, transitioning from a street food to a gourmet option served in restaurants.

Over the years, the stromboli recipe has evolved, with various fillings bringing regional and personal twists to the table. From classic pepperoni and cheese to more adventurous vegetable medleys, everyone has their version, contributing to its charm and versatility. Each family often has a recipe passed through generations, adding to the legacy of this dish.

Today, stromboli variations can be found in various regions, often reflecting local tastes and ingredients, showcasing the adaptability of this dish. Its robust flavors continue to capture hearts and palates, ensuring that stromboli remains a cherished comfort food.

Ingredient Deep Dive

Chicken is a cornerstone ingredient in our Chicken and Bacon Stromboli. Having held significant cultural importance, chicken is a versatile protein source found in various global cuisines. Nutritionally, it is high in protein, low in fat, and packs essential vitamins and minerals. When selecting chicken, opt for fresh, high-quality cuts, and store it in the refrigerator for no longer than 2 days or freeze it for later use. If you need substitutions, turkey works as an excellent alternative.

Bacon brings a rich, smoky flavor to the dish. Originating from the herbs and spices of ancient Europe, bacon’s salty crunch is beloved worldwide. It contains fats and proteins, offering energy, but moderation is key to enjoying its benefits. When shopping for bacon, choose quality brands that use fewer artificial preservatives. If you want healthier options, turkey bacon can be a lighter replacement.

Common Mistakes to Avoid

  • Overstuffing the stromboli can result in difficulty sealing it. Keep the filling within reasonable limits for the best results.
  • Not preheating the oven can lead to uneven cooking. Ensure your oven is heated properly before baking to achieve a golden crust.
  • Using cold dough makes it difficult to roll. It’s better to let the dough rest at room temperature for easier handling.
  • Not allowing the stromboli to rest after baking can make it harder to slice. Allow it to cool for a few minutes for cleaner slices.
  • Skipping the egg wash may result in an unappealing color. Brushing with beaten egg gives the crust a beautiful golden finish.
  • Using too many wet ingredients can ruin the dough’s integrity. Drain any excess moisture from vegetables or meats before adding them.
  • Not adjusting the cooking time for different ovens might lead to undercooked or burnt crusts. Always check for doneness regularly.
  • Forgetting to trim excess dough can lead to an overly thick crust that’s not enjoyable. Trim any excess before sealing to maintain the desired texture.

Essential Techniques

Mastering the art of rolling dough is vital for stromboli success. It’s important to achieve a uniform thickness for even cooking. Practice by using a rolling pin and gently stretching the dough with your hands; visual cues include a smooth, even surface. Be cautious not to overly stretch, which could create holes.

Sealing the stromboli properly ensures your filling stays intact during baking. To master this, pinch the edges tightly and fold them under. This process helps to prevent leaks. If using a seam, place it down on the baking sheet as a precaution. Remember, visual cues include a smooth, crimped edge for a professional finish.

Pro Tips for Perfect Chicken and Bacon Stromboli

Choosing high-quality ingredients will amplify flavors. Select fresh chicken, crispy bacon, and robust cheeses to enhance your final dish.

Experiment with complementary herbs and spices for customization. Adding Italian seasoning or red pepper flakes can elevate the flavor profile.

Par-bake your dough for a few minutes before adding filling to avoid a soggy bottom. This technique helps in achieving a crunchy exterior.

Let your stromboli cool down slightly before slicing for clean pieces. It also allows the flavors to settle and enhances the overall eating experience.

Utilize parchment paper on your baking sheet for easy removal. This simple step prevents sticking and makes clean-up a breeze.

Play with the fillings! Add sautéed onions, bell peppers, or spinach for extra flavor and nutrients, making your stromboli unique each time.

Variations and Adaptations

Regional variations of stromboli may include different meats or sauces based on local preferences. Consider creating a barbecue chicken stromboli by incorporating barbecue sauce and smoked cheese for a Western twist.

Seasonal adaptations allow you to enhance your dish with fresh produce. Adding zucchini or roasted bell peppers in the summer brings vibrant colors and flavors, making it a delightful seasonal treat.

Dietary modifications can also make this dish suitable for all. For a gluten-free option, utilize gluten-free dough from your local store, ensuring everyone can enjoy it!

For flavor variations, consider experimenting with cheese types. Swap standard mozzarella for pepper jack or cheddar for a fun, unique twist.

If you’re looking for texture modifications, consider adding nuts or seeds to the filling for a delightful crunch that contrasts beautifully with the soft crust.

Presentation alternatives could involve slicing individual servings and arranging them on a platter with dipping sauces to create an eye-catching appetizer.

Serving and Presentation Guide

Plating techniques can elevate your dish’s visual appeal. Slice the stromboli at an angle to showcase the beautiful filling, and arrange on a long serving platter.

For garnishing ideas, consider fresh herbs like parsley or basil for vibrant color and added flavor contrasts. A sprinkle of grated Parmesan enhances the richness.

Traditional accompaniments could include marinara sauce or ranch dressing for dipping, enriching the dining experience and catering to varied tastes.

Modern serving suggestions often include individual portions served with side salads or home-made fries, bringing a contemporary touch to a classic dish.

Temperature considerations are crucial. Serve warm for the best texture, but not scalding! Allow cooked stromboli to cool slightly to avoid burnt tongues.

Practicing portion control helps maintain a balanced meal. Consider cutting the stromboli into manageable slices, allowing guests to enjoy multiple servings without overindulging.

Wine and Beverage Pairing

For wine pairings, a medium-bodied red like Chianti perfectly complements the richness of the chicken and bacon. Alternatively, a crisp white wine, such as Pinot Grigio, can enhance the dish without overwhelming its flavors.

For non-alcoholic alternatives, try serving with sparkling water infused with lemon or a refreshing iced tea to cleanse the palate and enhance the meal.

If coffee or tea is more your style, a rich roast coffee can provide a lovely contrast to the savory flavors, while a herbal tea may serve as a calming finish.

Temperature in serving your drinks should match the dish. Serve white wines chilled while ensuring red wines remain at a cool room temperature for the best flavor.

For serving suggestions, consider creating a mini bar setup where guests can choose their drink pairing, fostering a fun, interactive dining experience.

Storage and Shelf Life

Proper storage methods involve wrapping any leftover stromboli tightly in plastic wrap or aluminum foil to retain moisture. This ensures your leftovers keep their delightful texture.

Temperature requirements for storage dictate keeping your stromboli in the refrigerator if eaten within a few days. If longer storage is needed, consider freezing portions for later enjoyment.

Recommended containers for storing include airtight plastic containers or resealable bags, making them easily accessible and freezer-friendly.

Signs of spoilage typically manifest as off odors or discoloration of your stromboli. Always err on the side of caution and discard if you have doubts.

Reheating instructions call for using an oven or air fryer to preserve texture, instead of a microwave, which can make the crust soggy. Heat at 350°F for a few minutes until warmed through.

For freezing guidelines, fully cool your stromboli before wrapping and placing in the freezer to lock in freshness without freezer burn.

Make Ahead Strategies

To effectively plan ahead, consider preparing the filling in advance and storing it in the refrigerator for up to 24 hours before assembly. This saves time on busy evenings.

Storage between steps allows the dough to chill while prepping fillings, which can enhance flavors without additional prep time on the day of cooking.

Assessing the impact of quality is crucial. Make sure to prepare dough and fillings fresh, as pre-mixed ingredients may alter flavor profiles from proprietary flavor combinations.

Assembly tips include having all fillings ready and organized before rolling your dough, ensuring a seamless and stress-free process.

Reheating guidelines are straightforward. Store-bought or homemade fillings can be reheated for fresh, warm results, ensuring flavor and texture are preserved.

Fresh element additions, such as herbs and greens, should be added just before serving to enhance freshness and keep dishes vibrant and lively.

Scaling Instructions

For halving the recipe, ensure to adjust cooking time to avoid over or undercooking and maintain flavor. Keep ingredients in proportion for best results.

When doubling or tripling, you may need to use larger baking sheets or multiple trays to ensure even cooking. Adjust bake time as necessary for larger quantities.

Equipment adjustments may involve the use of stand mixers or food processors for making larger batches of dough, ensuring smooth and consistent results.

Timing modifications become crucial, as larger quantities may require longer baking times. Use a food thermometer to confirm doneness when cooking larger portions.

Storage considerations are important if scaling up. Larger quantities may require more extensive refrigeration or freezing strategies to maintain freshness.

Nutritional Deep Dive

Breaking down macros for Chicken and Bacon Stromboli, it generally contains a healthy balance of carbs, protein, and fats. An average serving provides essential nutrients that fuel energetic lifestyles.

The micronutrient analysis shows vitamins and minerals sourced from chicken and vegetables that contribute to a balanced diet. Ensuring an adequate intake of these is crucial for overall health.

The health benefits of this meal involve its protein content that supports muscle recovery and growth while delivering a rich array of flavors for satisfaction.

Dietary considerations are key, especially for those mindful of carbs or fats. Adjustments can be made to create a lighter version without compromising on taste.

When analyzing portions, aim for balanced servings, ensuring you and your guests receive adequate nutrients without overindulgence.

Weight management tips include opting for leaner meats, using whole-wheat dough, and adding more veggies to amplify the nutritional profile without excess calories.

Dietary Adaptations

For gluten-free options, utilize almond flour or pre-made gluten-free dough. This allows individuals on special diets to enjoy the chicken and bacon stromboli without compromising their health.

A dairy-free alternative can be achieved through using cashew or dairy-free cheese, ensuring a rich, creamy texture while catering to lactose intolerant guests.

Creating a vegan version can involve replacing chicken and bacon with jackfruit and smoky tofu, making a flavorful, plant-based dish suitable for a wider audience.

Low-carb versions could substitute dough with cauliflower crust, ensuring those following a keto lifestyle enjoy this recipe without the carbs.

Paleo adaptations might include using natural ingredients such as almond meal for the crust and clean proteins like free-range chicken for a wholesome, nutrient-dense meal.

Low-FODMAP dietary modifications involve choosing specific vegetables and proteins that fit within low-FODMAP guidelines, providing a healthy, satisfying meal.

Troubleshooting Guide

For texture issues, such as a soggy bottom, ensure that fillings are not too moist by draining excess liquids from vegetables and sauces before using them.

Flavor balance problems can arise when not seasoning adequately. Always taste-test your filling and dough before assembling to ensure the flavors meld well.

Temperature problems usually indicate uneven oven temperatures. Invest in an oven thermometer to check for accurate heat levels and adjust rack positions accordingly.

Equipment challenges may involve dough not rising properly; ensure yeast is fresh and your dough is kept in a warm place to encourage proper fermentation.

Ingredient substitutions may alter expected outcomes. Research the chosen substitutes ahead of time for insights on maintaining the flavors and textures of key ingredients.

Timing concerns can result in either overcooked or undercooked elements. Monitor closely when baking multiple batches, as individual times can vary based on oven specifics.

Recipe Success Stories

Community feedback for this Chicken and Bacon Stromboli has been overwhelmingly positive, with families sharing how they have made it their go-to comfort food.

Variation successes involve readers adding unique fillings, like Mediterranean veggies or spicy sausage, illustrating the recipe’s adaptability to personal preferences.

Adaptation stories highlight families who have reinvented this dish for holiday gatherings, making it a memorable centerpiece at festivities.

Recipe reviews consistently mention the ease of preparation and impressive results, advising friends and family to give it a try for any gathering.

Photography tips suggest capturing the golden crust and vibrant filling close-up to showcase its inviting appearance, further enticing readers to whip up their own versions.

Frequently Asked Questions

Can I freeze Chicken and Bacon Stromboli?
If wrapped properly, stromboli can be frozen for up to 3 months. Ensure it cools completely before packaging.

Can I use store-bought dough?
Absolutely! Store-bought dough saves time and yields great results. Just ensure it is thawed properly before use.

How long does leftover stromboli last?
Leftover stromboli should be kept in the refrigerator and consumed within 2-3 days for optimal freshness.

What fillings can I use?
Feel free to experiment! You can use any combination of meats, cheeses, and vegetables, depending on personal preferences.

Can this recipe be made vegetarian?
Yes! Substitute the meat with a variety of your favorite vegetables or plant-based proteins for a delicious vegetarian option.

What type of cheese is best?
Mozzarella is traditional, but you can use any melty cheese you enjoy—cheddar, provolone, or even pepper jack work wonderfully!

How do you know when it’s done baking?
The stromboli should have a golden-brown crust, and an instant-read thermometer should read about 165°F at the center for safety.

Can I make the dough from scratch?
Absolutely! Homemade dough enhances flavors and freshness; just allow it to rise properly for best results.

Is there an easy way to slice it?
Using a serrated knife allows for neat slices without squishing the filling; cool for a few minutes before cutting.

How do I store unused filling?
Store excess filling in an airtight container in the refrigerator for up to 3 days for future use in another recipe!

Additional Resources

Related recipes include classic pizza, calzones, or even breakfast burritos, allowing you to explore different culinary styles while incorporating similar flavors.

Technique guides can help with mastering dough making, whether it’s for stromboli or other types of pastries, and can add depth to your baking skills.

Ingredient information is useful for sourcing fresh, local items and understanding quality indicators when purchasing meats, cheeses, and produce.

Equipment recommendations involve suggestions for essential baking tools, including quality mixing bowls and stand mixers, ensuring a smooth preparation process.

Seasonal variations allow you to utilize products at their peak, adding a fresh twist to your dishes based on seasonal produce availability.

Join the Conversation

Social media sharing is encouraged! Tag your creations and inspire others by sharing your Chicken and Bacon Stromboli experiences on Facebook or Instagram.

Photography tips can provide valuable insights for capturing your dish’s beauty. Showcase your plating skills and entice followers to try the recipe!

Recipe reviews and variations shared within the community can create a lively space for culinary discussions, uniting food lovers everywhere.

Community engagement through comments and testimonials can help bring new ideas and cooking techniques, fostering a warm and welcoming atmosphere.

Get creative by suggesting modifications or twists to the recipe! Your personal touch can spark inspiration for fellow cooks looking to experiment.

The Recipe

Chicken and Bacon Stromboli

Serves: 4

Prep Time: 20 mins

Cook Time: 25 mins

Total Time: 45 mins

Kitchen Equipment Needed

  • Baking sheet
  • Rolling pin
  • Parchment paper
  • Mixing bowls
  • Measuring cups and spoons

Ingredients

  • 1 pound boneless, skinless chicken breast, cooked and shredded
  • 6 slices bacon, cooked and crumbled
  • 1 cup shredded mozzarella cheese
  • 1 teaspoon Italian seasoning
  • 1 tablespoon olive oil
  • 1 package pizza dough
  • 1 egg, beaten (for egg wash)
  • Salt and pepper to taste

Directions

  1. Preheat your oven to 375°F (190°C) and line a baking sheet with parchment paper.
  2. In a bowl, mix the shredded chicken, crumbled bacon, mozzarella cheese, Italian seasoning, olive oil, salt, and pepper.
  3. Roll out the pizza dough on a floured surface into a rectangle about ¼ inch thick.
  4. Spread the chicken and bacon mixture evenly over the dough, leaving about an inch around the edges.
  5. Carefully roll the dough up into a log, sealing the edges as you go, and place it seam side down on the prepared baking sheet.
  6. Brush the top of the stromboli with the beaten egg to create a golden-brown crust.
  7. Bake in the preheated oven for 25-30 minutes or until golden and cooked through.
  8. Let it cool for a few minutes before slicing and serving.

Recipe Notes

  • Feel free to customize the filling with your favorite vegetables or different cheeses.
  • This stromboli can be made ahead of time and stored in the fridge before baking for an easy weeknight dinner.
  • For freezing, wrap tightly and store for up to 3 months; thaw in the fridge before baking.

Delicious Chicken Lo Mein Recipe for a Perfect Dinner Night

Delicious Chicken Lo Mein: A Taste of Comfort

⚖️
Difficulty
Easy

⏲️
Prep Time
15 mins

🕒
Cook Time
15 mins

⏱️
Total Time
30 mins

🍽️
Servings
4

Discover the joy of homemade Chicken Lo Mein, a classic dish that combines tender chicken, vibrant vegetables, and perfectly cooked noodles all tossed in a rich, savory sauce. This meal epitomizes comfort and is a staple in many households for good reason. The combination of flavors and textures creates a satisfying balance that keeps you coming back for more. Perfectly suited for any weekday dinner, this dish not only fills your belly but also warms your heart.

Creating Chicken Lo Mein at home is an incredibly rewarding experience. The aroma of garlic, ginger, and sautéed vegetables fills the kitchen, awakening your senses and drawing everyone to the table. Each bite reveals the delightful interplay of the chewy noodles, tender vegetables, and juicy pieces of chicken, all brilliantly coated in a delicious stir-fry sauce. Whether it’s a family dinner or a special gathering, this Chicken Lo Mein will always impress.

Quick Recipe Highlights

  • Flavor Profile: Chicken Lo Mein boasts a savory blend of soy sauce, sesame oil, and ginger that creates a mouthwatering taste.
  • Texture: The dish features a wonderful combination of tender chicken, crisp vegetables, and soft yet slightly chewy noodles that dance on your palate.
  • Aroma: Expect a rich, comforting aroma dominated by garlic and ginger, blending beautifully with the essence of sautéed vegetables.
  • Visual Appeal: The vibrant colors of bell peppers, carrots, and green onions against the golden noodles make this dish as beautiful as it is delicious.
  • Skill Level Needed: This dish is suitable for cooks of all skill levels, making it perfect for both novice and experienced home chefs.
  • Special Equipment: All you need is a large skillet or wok for optimal cooking and flavor infusion.

Recipe Overview

  • Difficulty Level: This Chicken Lo Mein recipe is categorized as easy, making it accessible for anyone looking to whip up a delicious meal quickly.
  • Category: This dish is perfect for main courses and Asian cuisine nights, ideal for family dinners and casual gatherings.
  • Cuisine: Chicken Lo Mein hails from Chinese culinary traditions, known for their vibrant stir-fried dishes that emphasize fresh ingredients and bold flavors.
  • Cost: The average cost of ingredients is budget-friendly, making this recipe an economical choice for feeding a family.
  • Season: This comforting dish is fantastic all year round, but it shines particularly in colder months when hearty meals are desired.
  • Occasion: Whether it’s a weeknight dinner or a potluck, this Chicken Lo Mein meets the occasion beautifully.

Why You’ll Love This Recipe

The delightful taste and texture of Chicken Lo Mein make it an irresistible option for dinner. With a rich combination of savory flavors and a satisfying blend of vegetables and proteins, each bite transports you to a cozy Chinese restaurant. This dish is a perfect way to enjoy authentic tastes right at home without sacrificing quality or flavor.

Convenience is key in today’s fast-paced world, and this Chicken Lo Mein recipe fits perfectly into that lifestyle. Quick to prepare and cook, you can have a delicious meal ready in just 30 minutes. Plus, it’s a great opportunity to use up leftover vegetables you have on hand, creating a customized dish that suits your preferences while minimizing waste.

Nutritionally, this recipe offers a balanced meal featuring lean protein from chicken, vitamins from colorful vegetables, and carbohydrates from the noodles. It provides a wholesome option that supports a healthy diet without compromising on taste. You’re feeding your body and satisfying your taste buds at the same time.

Gathering around food brings people together, and Chicken Lo Mein is perfect for social occasions. The vibrant colors and enticing aroma of this dish are sure to impress guests, making it an excellent option for entertaining. Serve with crispy spring rolls or fortune cookies to elevate the dining experience.

Lastly, the cost-effectiveness of this dish cannot be overstated. With affordable ingredients and easy preparation, you can feed a family of four without breaking the bank. It’s an excellent go-to recipe that proves deliciousness doesn’t need to come with a hefty price tag.

Historical Background and Cultural Significance

The origins of Chicken Lo Mein can be traced back to China, where noodles have been a staple for centuries. The name “Lo Mein” translates to “stirred noodles,” reflecting the cooking method used to prepare this vibrant dish. The dish gained popularity in Western cuisine as Chinese immigrants introduced it, adapting to local tastes while maintaining essential flavors.

Culturally, Chicken Lo Mein signifies comfort food in many Chinese households, similar to how macaroni and cheese is viewed in Western cultures. It embodies the essence of family meals, often served during gatherings and festivals, representing unity and togetherness. The dish has transcended its origins, becoming a beloved choice for people around the globe who enjoy Asian cuisine.

Over the years, the recipe has evolved with different regions of China adding their unique twists. These variations might include different types of proteins such as shrimp or beef, as well as a diverse array of vegetables. This flexibility has allowed Chicken Lo Mein to adapt to local tastes, making it a versatile and enduring dish.

Regional variations also showcase the diverse culinary traditions within China. For instance, Hong Kong-style Chicken Lo Mein may include richer sauces and different noodles, highlighting the locality’s flair. Similarly, Americanized versions frequently feature added ingredients like broccoli, making it more appealing to wider audiences.

Ingredient Deep Dive

Chicken: Chicken is the star ingredient of this dish. It holds cultural significance as a symbol of prosperity and festivity in Chinese culture. When selecting chicken for your Lo Mein, look for fresh, boneless options. Nutritionally, chicken is a lean source of protein that supports muscle growth and overall health. Store raw chicken in the refrigerator and use it within a couple of days or freeze it for extended use. As a substitution, tofu or tempeh can be used for a plant-based alternative.

Noodles: Lo Mein noodles are typically made from wheat flour and egg, giving them a delightful texture. Noodles have a rich history in Asian cuisine, symbolizing longevity. When choosing noodles, opt for fresh varieties if available; they provide the best texture when cooked. Nutritionally, noodles provide carbohydrates for energy. Store them in a cool, dry place, and they can last for months. For gluten-free options, consider using rice noodles or zucchini noodles as a substitute.

Vegetables: Fresh vegetables like bell peppers, carrots, and bok choy add color, texture, and essential nutrients to Chicken Lo Mein. Vegetables symbolize abundance in Chinese culture and are integral to a balanced meal. For the best flavor and nutrition, choose vibrant, fresh produce. Store vegetables in the refrigerator for longevity while ensuring they are used within a week to maintain freshness. If you’re missing some vegetables, feel free to customize the mix; broccoli or snap peas can be fantastic additions.

Soy Sauce: Soy sauce is the backbone of flavor in this dish, contributing saltiness and umami. Its history stretches back thousands of years in Asian cuisine, where it was developed as a means of preserving food. When selecting soy sauce, opt for low-sodium varieties to reduce salt intake without sacrificing flavor. Nutritionally, soy sauce contains antioxidants and flavor-enhancing amino acids. Store it in a cool, dark place; it lasts quite a long time due to its high salt content. Tamari is a suitable gluten-free alternative that can be used in its place.

Common Mistakes to Avoid

  • Overcooking the Noodles: This is a common mistake that leads to mushy noodles. Always check the packaging for the recommended cooking time and do not exceed it.
  • Using Stale Ingredients: Using old vegetables or expired sauce can ruin the dish. Always check the freshness of produce and expiration dates before cooking.
  • Skipping the Marination: Failing to marinate the chicken can lead to bland flavor. A simple marinade can enhance the dish significantly.
  • Not Preparing Ahead: Ensure all ingredients are prepped before cooking, as stir-frying goes quickly, and you won’t have time to chop later.
  • Too Much Sauce: Adding too much soy sauce can result in an overly salty dish. Start with a small amount and adjust to taste.
  • Underestimating Heat: Cooking on low heat will not give the desired stir-fry effect. Ensure your pan is hot enough before adding ingredients.
  • Crowding the Pan: Cooking too much at once can cause steaming rather than frying. Cook in batches for the best texture.
  • Skipping the Oil: Not using enough oil can lead to sticking. A little oil goes a long way in achieving the perfect stir-fry.
  • Neglecting to Taste: Always taste your food before serving. Adjustments made during cooking can save a bland dish.
  • Piling Too High: When plating, avoid stacking food too high as it may not look appealing. Presentation matters!

Essential Techniques

Stir-Frying: This technique is vital for this recipe, as it creates a quick, high-heat environment that helps to seal in flavors and textures. To master stir-frying, ensure your pan is hot enough before adding any ingredients. A common pitfall is overcrowding the pan, which can cause steaming rather than frying. Visual cues for success include seeing slight browning on your ingredients.

Marination: Marinating chicken prior to cooking enhances flavor and tenderness. To do this, combine soy sauce, garlic, and ginger and let it sit for at least 20 minutes. The key is allowing enough time for the flavors to penetrate the chicken adequately. A common mistake is marinating for too long, which can lead to an overly salty result.

Chopping Vegetables: Properly chopping vegetables ensures even cooking and a pleasing presentation. Always aim for uniformity in size, as this creates a consistent cooking time. A common issue arises when using dull knives—it’s safer and more efficient to use a sharp blade. Look for vibrant colors and a crisp texture as indicators of fresh vegetables.

Prepping Ahead: Preparing all your ingredients before you begin cooking is crucial in stir-frying. This allows for a fluid cooking process without interruptions. Keep your ingredients organized and in bowls to ensure you can move quickly. Forgetting to prep can lead to overcooked ingredients or delays in service.

Pro Tips for Perfect Chicken Lo Mein

One key tip for perfect Chicken Lo Mein is to use a mix of fresh vegetables to enhance both flavor and nutrition. Bell peppers, bok choy, and snap peas can create a colorful and nutritious blend.

Ensure you allow the noodles to cook just until al dente, as they will continue to cook when tossed with the hot chicken and vegetables. This prevents overcooking and maintains a pleasant texture.

Experiment with marinades for added flavor depth; sesame oil, garlic, and ginger can elevate your chicken’s taste profile significantly.

Add a splash of rice wine or sherry to the cooking process to introduce a new layer of depth in flavor.

For a spicier kick, consider adding chili flakes or fresh sliced chilies during cooking, adjusting to your heat preference.

Opt for high-quality soy sauce, as it dramatically affects the dish’s overall taste. Opt for low-sodium varieties if you’re watching your salt intake.

Finish with freshly chopped green onions or sesame seeds before serving for an aromatic and visually appealing touch.

Using cornstarch to coat your chicken before cooking will help it achieve that wonderful crispy texture.

Variations and Adaptations

Chicken Lo Mein is wonderfully adaptable, allowing you to switch up proteins including shrimp, beef, or tofu for a vegetarian version.

Seasonal adaptations can introduce ingredients like asparagus in spring or pumpkin in the fall, ensuring you make the most of what’s fresh.

For dietary modifications, consider using gluten-free noodles and a gluten-free soy sauce alternative for those with dietary restrictions.

Flavor variations could include adding oyster sauce or hoisin sauce to deepen the dish’s savory notes and offer a different taste experience.

Experimenting with texture modifications can elevate the dish; adding crushed peanuts on top can add crunch, while cabbage can contribute a great mouthfeel.

In terms of presentation alternatives, serving in individual bowls topped with fresh herbs or placing them on a colorful platter can make the dish stand out during gatherings.

Serving and Presentation Guide

When plating Chicken Lo Mein, consider using a large, shallow bowl to showcase the vibrant colors of the dish.

Garnishing with fresh cilantro or sliced green onions just before serving can add a splash of color and brightness to the dish.

Traditional accompaniments include spring rolls or dumplings, making for a complete and satisfying meal.

Modern serving suggestions might involve generating a family-style presentation, allowing guests to serve themselves, which encourages community.

Temperature considerations are essential, as this dish is best enjoyed fresh and hot from the skillet.

Portion control tips include offering smaller servings initially, allowing for guests who may want seconds to not overindulge at first.

Wine and Beverage Pairing

For wine pairings, consider a lightly chilled Riesling or Pinot Noir, both of which complement the flavors of Chicken Lo Mein beautifully without overpowering them.

If you’re looking for non-alcoholic alternatives, iced tea with lemon or ginger ale can provide a refreshing contrast to the savory dish.

Coffee or tea pairings are less common with Asian cuisine, but a green tea can enhance the meal, acting as a soothing digestif afterward.

When serving beverages, ensure they are well-chilled to enhance the dining experience, especially with summer gatherings.

Consider serving wines in larger glasses to allow for the aromas to fully develop, enhancing the overall tasting experience.

Storage and Shelf Life

To store Chicken Lo Mein, place it in an airtight container in the refrigerator to keep it fresh, where it can last for 3-4 days.

For best longevity, consume the dish within a day or two for optimal flavor and texture, particularly with the noodles.

Signs of spoilage may include off-smells or discoloration, which indicates it’s time to discard the dish.

When reheating, do so gently on the stove or in the microwave, ensuring it reaches the proper temperature of 165°F to kill any harmful bacteria.

If planning to freeze, separate the ingredients as noodles can become mushy upon thawing; ideally, store the chicken and sauce separately from the noodles.

Make Ahead Strategies

To prep Chicken Lo Mein ahead of time, chop vegetables and marinate chicken the night before. Store them separately in the fridge to ensure freshness.

Setting a prep timeline ensures everything is ready when you need it, making the cooking process swift. Aim for all ingredients to be prepped an hour before cooking.

Store components in clear containers or bags to easily see what’s inside and avoid losing ingredients between steps.

Quality is not compromised when ingredients are prepped ahead, as long as they are stored correctly and consumed within a reasonable timeframe.

Assembling the dish is fast once components are prepped. Just stir-fry in quick succession for a seamless cooking experience.

Consider slicing any fresh herbs or garnishes last minute to add freshness as you serve, enhancing the final appearance of your dish.

Scaling Instructions

When halving the Chicken Lo Mein recipe, maintain the ratio of the ingredients to ensure the balance of flavor remains the same while adjusting cooking times slightly.

Doubling or tripling the recipe is straightforward, but make sure to use a larger pan or wok to maintain proper cooking temperatures.

Equipment adjustments may be necessary when scaling; ensure you have enough storage containers or cooking vessels.

Timing modifications become essential as larger amounts can require slightly longer cooking times and additional attention when stirring.

Be mindful of storage considerations; larger quantities will require more space in your refrigerator or freezer.

Nutritional Deep Dive

A macro breakdown of Chicken Lo Mein reveals a healthy balance of carbohydrates, protein, and fats that make it a satisfying meal choice.

Micronutrient analysis shows the inclusion of vitamins A and C from vegetables, while chicken provides essential B vitamins necessary for energy production.

Health benefits include increased protein intake promoting muscle health and vitality, alongside nutrient-dense vegetables contributing to overall dietary needs.

Dietary considerations should reflect personal health goals; for instance, adjust ingredient choices for lower sodium or added fiber content.

Portion analysis emphasizes that moderation is vital; enjoying this dish paired with fresh greens can round out meals nicely.

Weight management tips suggest serving smaller portions to enjoy its deliciousness without overindulging, particularly with rich dishes like this.

Dietary Adaptations

For gluten-free adaptations, use rice noodles and a gluten-free soy sauce alternative to enjoy Chicken Lo Mein without gluten.

Dairy-free modifications are inherently easy as this recipe contains no dairy; simply stick to the core ingredients for a delightful meal.

Vegan alternatives can involve substituting chicken with tofu or tempeh while enhancing with more vegetables for protein and flavor.

Low-carb adaptations could entail using zucchini noodles in place of traditional noodles, making it suitable for keto diets.

Paleo enthusiasts can enjoy this dish with the same adapted noodles and a focus on fresh ingredients that adhere to paleo guidelines.

Low-FODMAP options are available by avoiding garlic and onion and selecting specific vegetables that suit dietary requirements.

Troubleshooting Guide

If you encounter texture issues with the noodles, ensure they are cooked al dente initially to prevent them from becoming too soft during stir-frying.

For flavor balance, taste as you cook, adjusting soy sauce and seasoning to avoid over-salting or under-seasoning your dish.

Temperature problems can occur if your stove isn’t hot enough; preheat your pan adequately to ensure a good sear on your ingredients.

If you face equipment challenges, such as limited kitchen tools, consider cooking in smaller batches which allows for optimal cooking conditions.

With ingredient substitutions, understanding the flavors and textures of alternatives is key to maintaining the integrity of the dish.

Timing concerns can be managed by having all ingredients prepped beforehand, allowing for a seamless cooking process when everything is ready to go.

Recipe Success Stories

Community feedback often highlights the wonderful combinations of texture and flavor that Chicken Lo Mein offers, with readers sharing their unique adaptations.

Success stories frequently mention the quick preparation timing as a game-changer for busy families seeking fast yet delicious meals.

Adaptive variations shared by readers, like changing protein sources or adding seasonal vegetables, show the flexibility of this recipe.

Photography tips from enthusiasts suggest highlighting vibrant colors and fresh ingredients to make your Chicken Lo Mein look as good as it tastes.

Readers often suggest serving Chicken Lo Mein family-style to engage diners, fostering a communal dining experience that enhances enjoyment.

Frequently Asked Questions

Q: Can I use frozen vegetables in Chicken Lo Mein?
A: Yes, frozen vegetables can be used for convenience, but fresh vegetables provide a better texture and flavor. Look for blends that include bell peppers, peas, and carrots for the best results.

Q: What noodles are best for Chicken Lo Mein?
A: Traditional egg noodles work best, but for gluten-free versions, rice noodles are an excellent alternative. Choose the noodle type based on your dietary needs and preferences.

Q: Can I make Chicken Lo Mein ahead of time?
A: While it’s best enjoyed fresh, you can prep ingredients ahead and store them separately. Cooked Chicken Lo Mein can last in the fridge for 3-4 days.

Q: Is Chicken Lo Mein healthy?
A: Chicken Lo Mein can be healthy, especially when loaded with vegetables and using lean chicken. Adjusting sauce amounts and using whole grain noodles can further enhance its nutritional profile.

Q: What protein can I substitute for chicken?
A: You can easily substitute chicken with shrimp, beef, tofu, or any combination of these proteins to suit your taste preferences or dietary restrictions.

Q: How spicy is Chicken Lo Mein?
A: The spiciness of Chicken Lo Mein can be adjusted to individual tastes. You can add chili oil or fresh chilies for heat, or keep it mild by omitting spicy ingredients.

Q: How can I make it vegetarian?
A: To make Chicken Lo Mein vegetarian, simply omit the chicken and replace it with tofu or tempeh while increasing the vegetable quantity for more flavor.

Q: Can I freeze Chicken Lo Mein?
A: Yes, you can freeze Chicken Lo Mein, but noodles might become mushy when thawed. It’s best to freeze the sauce and protein separately for optimal texture.

Q: What’s a good side dish to serve with Chicken Lo Mein?
A: Spring rolls, dumplings, or a simple side salad work beautifully alongside Chicken Lo Mein, providing a fresh contrast to the meal.

Q: What’s the best way to reheat Chicken Lo Mein?
A: The best way to reheat Chicken Lo Mein is on the stove over low heat, adding a little water or broth to revive moisture, or in the microwave with a damp paper towel.

Additional Resources

Explore related recipes like Beef Chow Mein and Vegetable Stir-Fry for more exciting culinary options.

Technique guides on stir-frying and marinating will bolster your confidence in the kitchen as you explore Asian-inspired cooking.

Ingredient information can deepen your understanding of Asian noodles, sauces, and key spices that elevate your culinary endeavors.

Consider investing in quality kitchen equipment such as a wok or a good knife set to enhance your cooking experience significantly.

Lastly, check out seasonal variations by incorporating fresh, local produce into your Cooking for a unique twist on traditional dishes.

Join the Conversation

Share your Chicken Lo Mein creations on social media for a chance to be featured, fostering a community of culinary enthusiasts striving for deliciousness.

Consider joining forums or cooking classes to engage with fellow food lovers and expand your skills through shared knowledge and experiences.

Share your photography tips with others to help improve their food styling and presentation techniques, enhancing the visual appeal of their dishes.

Invite readers to leave reviews of the recipe and share personal twists or variations they experiment with in their own cooking adventures.

Lastly, encourage community engagement through feedback on your blog or social media platforms, fostering a collaborative environment where culinary dreams thrive.

The Recipe

Chicken Lo Mein

Serves: 4

Prep Time: 15 mins

Cook Time: 15 mins

Total Time: 30 mins

Kitchen Equipment Needed

  • Wok or large skillet
  • Cutting board
  • Sharp knife
  • Measuring cups and spoons
  • Mixing bowl

Ingredients

  • 8 oz egg noodles
  • 1 lb chicken breast, sliced
  • 2 cups mixed vegetables (bell peppers, carrots, bok choy)
  • 3 tablespoons soy sauce
  • 1 tablespoon sesame oil
  • 2 cloves garlic, minced
  • 1 teaspoon ginger, minced
  • Salt and pepper to taste

Directions

  1. Cook the egg noodles according to package instructions, then drain and set aside.
  2. In a bowl, marinate the sliced chicken with soy sauce, garlic, and ginger for 15 minutes.
  3. Heat sesame oil in a wok over medium-high heat. Add marinated chicken and stir-fry until cooked through.
  4. Add the mixed vegetables and stir-fry for an additional 3-4 minutes until tender.
  5. Toss in the cooked noodles, adding more soy sauce if needed, and stir well to combine all ingredients.
  6. Season with salt and pepper to taste, then serve hot, garnished with green onions.

Recipe Notes

  • Feel free to substitute chicken with tofu or shrimp.
  • Add any leftover vegetables you have for variety.
  • Store leftovers in an airtight container in the fridge for up to 3-4 days.