Delicious Keto Chocolate Chip Muffins for Guilt-Free Indulgence

Keto Chocolate Chip Muffins: Indulge in Guilt-Free Bliss

⚖️
Difficulty
Easy

⏲️
Prep Time
10 mins

🕒
Cook Time
20 mins

⏱️
Total Time
30 mins

🍽️
Servings
12 muffins

Welcome to the world of Keto Chocolate Chip Muffins! These scrumptious treats satisfy your sweet tooth while keeping your carb intake low, making them the perfect guilt-free breakfast or snack. Imagine biting into a warm, moist muffin filled with pockets of rich, melty chocolate. The aroma wafting from the oven as they bake is irresistible, drawing everyone into the kitchen. Whether you’re on a ketogenic diet or simply looking to indulge in a healthier option, these muffins will delight your taste buds without the guilt.

What makes our Keto Chocolate Chip Muffins truly special is their combination of wholesome ingredients that provide both flavor and nutrition. We use almond flour for a nutty base that’s low in carbs yet high in healthy fats, blended with sugar-free chocolate chips and natural sweeteners. Each bite offers a delightful balance of sweetness and richness that leaves you wanting more, yet without compromising on your dietary goals.

Quick Recipe Highlights

  • Flavor Profile: These muffins boast a delightful sweetness complemented by the rich taste of dark chocolate, perfect for satisfying cravings.
  • Texture: Expect a soft and fluffy interior that’s pleasantly contrasted by the slight crunch of the chocolate chips.
  • Aroma: The warm scent of vanilla and baked chocolate fills the air, creating an inviting atmosphere.
  • Visual Appeal: Golden brown muffins studded with luscious chocolate chips create a visually tempting treat.
  • Skill Level Needed: This recipe is straightforward and perfect for beginner bakers, requiring minimal skills for maximum deliciousness.
  • Special Equipment: All you need is a muffin tin, mixing bowls, and basic kitchen utensils!

Recipe Overview

  • Difficulty Level: Easy to make, the Keto Chocolate Chip Muffins require basic baking techniques, making them suitable for cooks of all levels.
  • Category: Perfect for breakfast, brunch, or as a snack, these muffins fit seamlessly into various meal times.
  • Cuisine: While inspired by traditional American muffins, this recipe embraces keto principles to cater to modern dietary preferences.
  • Cost: Affordable ingredients make this recipe cost-effective, allowing you to whip up a batch without breaking the bank.
  • Season: Ideal for any season, especially enjoyable during fall when warm, comforting flavors are most appreciated.
  • Occasion: These muffins are fitting for casual gatherings, coffee dates, or even meal prep for the busy week ahead.

Why You’ll Love This Recipe

The taste and texture of these Keto Chocolate Chip Muffins will transport you back to the beloved bakery treats of your childhood. Their moistness and the richness of dark chocolate combined with almond flour’s hearty flavor create a satisfying mouthful that nourishes the soul. This easy recipe allows you to indulge in a delicious snack without derailing your health goals, making it a win-win situation.

Convenience is at the forefront with this recipe; the muffins come together quickly, making them a great choice for busy mornings. Their simple preparation means you can enjoy a freshly baked treat any day of the week, even if time is short. Just mix, pour, and bake, and you’ll have a delightful healthy option ready in about 30 minutes.

Nutritionally, these muffins are a powerhouse. They offer a low-carb option rich in healthy fats from almond flour and sugar-free chocolate chips. Perfect for maintaining energy levels and keeping you full longer, they are a great choice for anyone following a ketogenic lifestyle. You can indulge in these muffins knowing they align with your dietary choices.

Socially, these muffins are an impressive addition to any gathering. Whether at a brunch or potluck, they will surely invite compliments and requests for the recipe. Sharing these muffins can open conversations about healthy eating choices while spreading the joy of delicious treats.

Additionally, the cost effectiveness of this recipe can’t be overlooked. The use of pantry staples results in minimal expense while providing satisfying servings. Grocery lists remain manageable, allowing you to enjoy baking with ease and without financial strain.

Historical Background and Cultural Significance

The history of muffins dates back to the 18th century, evolving from simple bread-like baked goods to what we recognize today. Initially, muffins were more akin to flatbreads cooked on a griddle, a stark contrast to our fluffy modern versions. With the advent of baking powder, where muffins became lighter and fluffier than ever, they gained immense popularity across the United States.

Keto diets, gaining momentum in the last decade, have led to many adaptations of classic recipes traditionally deemed unhealthy. Muffins, often packed with sugar and refined flour, had to evolve. The rise of almond flour and sugar alternatives has allowed for a revived appreciation of these treats, making them accessible to health-conscious individuals while retaining their delightful qualities.

This recipe represents a modern take on a classic favorite, showcasing how culinary traditions can adapt to help promote healthier living without sacrificing flavor. The cultural significance of muffins remains strong, embracing both heritage and modern dietary needs.

Regional variations of muffins exist, from New England’s corn muffins to the sweeter Southern-style versions, demonstrating the versatility of this beloved baked item. The Keto Chocolate Chip Muffins reflect an intersection of these traditions, paving the way for a new cultural signature in healthy baking.

Ingredient Deep Dive

Almond Flour: Almond flour has a long history, frequently used in Mediterranean and Middle Eastern cuisines. Its nutritional benefits are substantial, offering good fats, protein, and fiber while being gluten-free. When selecting, look for finely milled varieties for best results. Store it in a cool place to maintain freshness, and it’s a great substitute for traditional flour in many recipes.

Dark Chocolate Chips: Chocolate has been cherished for centuries, originating from the ancient Mesoamerican cultures. Rich in antioxidants, dark chocolate is known for its health benefits, including improved heart health. When choosing chocolate chips for this recipe, opt for those with at least 70% cocoa content for health benefits. Store them in a cool, dark place to keep them fresh, and feel free to experiment with different levels of sweetness by adjusting the chocolaty content.

Common Mistakes to Avoid

  • Overmixing the batter: This can lead to dense muffins. Mix just until ingredients are combined.
  • Using the wrong flour: Stick to almond or coconut flour; using all-purpose will alter texture and nutrition.
  • Not measuring ingredients properly: Accurate measurements are vital for consistent results. Use a kitchen scale if needed.
  • Skipping the cooling time: Letting muffins cool helps them set properly and enhances flavor.
  • Choosing low-quality chocolate: This can result in an inferior taste. Invest in good quality sugar-free chocolate.
  • Not preheating the oven: Always preheat to ensure even baking and proper texture.
  • Ignoring cooking times: Every oven is different. Check muffins a few minutes before the end of the baking time.
  • Failing to grease the muffin tin: This may result in sticking muffins. Use liners or a good cooking spray.
  • Storing improperly: Store in an airtight container to maintain freshness.
  • Assuming all muffins rise evenly: Oven hot spots can lead to uneven baking, so rotate your muffin tin halfway through if needed.

Essential Techniques

Muffin Mixing Method: This technique involves combining dry and wet ingredients separately before mixing them together. This helps to prevent overworking the batter, which can express gluten and lead to tough muffins. Master this method by ensuring you gently fold the wet and dry mixtures until just combined.

Baking Times: Understanding the importance of monitoring baking time for muffins is crucial. Overbaking can lead to dry, crumbly muffins, while underbaking can result in a gooey center. Use a toothpick to check for doneness; it should come out clean or with a few crumbs clinging to it for perfect results.

Pro Tips for Perfect Keto Chocolate Chip Muffins

1. Ensure all ingredients are at room temperature for better mixing and a more uniform texture.

2. Consider adding nuts or fruit for extra texture and flavor variations.

3. If using homemade almond flour, ensure it’s ground finely to prevent grainy muffins.

4. Experiment with spices like cinnamon or nutmeg for added depth in flavor.

5. For an extra sweet touch, sprinkle a few additional chocolate chips on top before baking.

6. Rotate the muffin tin halfway through baking to ensure even cooking for all the muffins.

7. Tightly wrap leftover muffins in plastic wrap to maintain moisture.

8. Serve slightly warm for a gooey chocolate experience!

Variations and Adaptations

For a seasonal twist, try adding pumpkin puree in the fall for a pumpkin spice version of these Keto Chocolate Chip Muffins. You can also introduce dried cranberries during the holiday season for a festive touch.

For those sensitive to nuts, consider using sunflower seed flour instead of almond flour. It will still yield deliciously moist results while being safe for nut-free diets.

Vegan adaptations can be made by substituting flax eggs for regular eggs, ensuring everyone can enjoy these muffins. Also, low-carb sweeteners can replace traditional ones for those counting carbs.

Texturally, you might experiment with various sweeteners like erythritol or monk fruit for subtle flavor differences without added calories.

When it comes to presentation, consider drizzling melted chocolate over the cooled muffins for a more decadent look, and serve them on a platter garnished with fresh berries.

Serving and Presentation Guide

For plating, arrange the muffins on a beautiful cake stand to heighten their visual appeal. Garnish with a dusting of powdered erythritol for that added touch of elegance. Pair the muffins with an accompaniment of cream cheese frosting for a luxurious experience.

When serving, consider offering spreads like almond butter or sugar-free jam on the side for a delightful pairing. These additions elevate the muffin experience while providing guests with various flavors to enjoy.

Presenting muffins at room temperature ensures optimal flavor, while warm muffins offer gooey chocolatey magic. For gatherings, keep portion sizes in mind; one muffin is usually more than enough, given its rich texture.

Wine and Beverage Pairing

When it comes to wine pairings, a robust red or dessert wine works beautifully, complementing the rich flavors of chocolate. Consider a Pinot Noir or a sweet wine like Ruby Port for an elevated experience.

If you prefer non-alcoholic alternatives, a strong brewed coffee or espresso pairs remarkably well with the muffins, enhancing the chocolate experience.

For tea lovers, a rich black tea or even a chai can add an extra layer of warmth and spice, making for a comforting pairing.

Be mindful of serving temperatures; muffins are best enjoyed slightly warm to maintain their gooeyness, while beverages should be served fresh to enhance flavors.

Storage and Shelf Life

Proper storage is key to maintaining the freshness of your Keto Chocolate Chip Muffins. Store them in an airtight container at room temperature for up to 4 days, or in the fridge for up to a week.

For longer-term storage, consider freezing your muffins. Wrap each muffin tightly and place them in a freezer bag. They can keep for up to 3 months. When you’re ready to enjoy, simply thaw them at room temperature or microwave for a few seconds.

Signs of spoilage include an off smell or visible mold. If a muffin appears to be dry or crumbly, it may simply be overbaked rather than spoiled.

Reheating is easy; just pop them in a microwave for about 15-20 seconds or warm them in an oven for a crisp exterior.

Make Ahead Strategies

If you’re looking to enjoy these muffins throughout the week, consider baking them ahead of time. They freeze exceptionally well, allowing you to prep them in bulk and enjoy them fresh all week long.

While making the batter, you can also portion it out into muffin tins and freeze until solid. Afterward, wrap the filled tins with plastic and freeze them. When you’re ready to bake, simply pop them in the oven from frozen—just add a few extra minutes to the baking time.

Consider adding fresh items like sliced bananas or a dash of coconut whipped topping right before serving to maintain freshness and add a delightful twist.

Scaling Instructions

Scaling this recipe is simple. To halve the recipe, reduce each ingredient’s measures accordingly, keeping track of cooking times for the smaller quantity.

Doubling or tripling the recipe requires ensuring you have enough space in your oven. Adjust the baking time slightly; larger batches may require a bit more time.

When adjusting the quantity, ensure your mixing bowls and baking sheets can accommodate the increased volume. Also, keep in mind that ovens can vary; you may need to check for doneness a little earlier or later than the recommended time.

Nutritional Deep Dive

In terms of macronutritional breakdown, these Keto Chocolate Chip Muffins are excellent for those following a ketogenic diet. Each muffin is low in carbs while high in fat and protein, making them a filling, energizing snack.

Micronutrient analysis shows a healthy dose of vitamin E, magnesium, and antioxidants from the dark chocolate. These nutrients support overall health and wellbeing, showcasing the muffin’s nutritional advantages.

Health benefits include improved blood sugar regulation due to low carbohydrate levels. The almond flour provides necessary nutrients without spiking blood sugar levels, making these muffins a good choice for diabetics and health-conscious individuals alike.

For those managing weight, these muffins’ hearty nature means they keep you satisfied longer, reducing the likelihood of snacking between meals.

Dietary Adaptations

For gluten-free diets, this recipe is already a fantastic choice, as it naturally omits wheat flour by utilizing almond flour.

Dairy-free options are possible by substituting dairy butter with coconut oil or a plant-based butter alternative, allowing those with lactose intolerance to enjoy these treats.

Vegan modifications can be made using egg substitutes like mashed bananas or flaxseed gel instead of regular eggs, ensuring plant-based eaters enjoy delicious muffins too.

Low-carb and keto dieters will delight in how these muffins fit neatly into their meal plans, helping them stay on track without sacrificing taste.

Troubleshooting Guide

Common texture issues like dryness could arise from overbaking or insufficient ingredients like eggs. Be sure to monitor baking time closely and adjust according to your oven.

Flavor balance can sometimes be skewed by the quality of chocolate used. Investing in good-quality sweeteners and chocolate can make all the difference in the final product.

In cases of temperature problems, make sure to preheat your oven properly—a hot oven is crucial for baking success.

If you encounter equipment challenges, like a muffin tin sticking, consider using silicone muffin liners, which can help eliminate this issue.

For ingredient substitutions, adjustments may be necessary in measurements. Always use exact replacements as suggested in the notes to maintain integrity.

Timing concerns also require careful attention; if you’re unsure if the muffins are done, check them with a toothpick as a reliable doneness method.

Recipe Success Stories

Community feedback around these Keto Chocolate Chip Muffins has been overwhelmingly positive. Many readers report their families thoroughly enjoy the taste, delighting even non-keto eaters!

Variation successes come from different substitutions readers have tried, showcasing how adaptable and versatile this muffin recipe can be.

Adaptation stories share how readers have successfully created low-carb muffins for special occasions, ensuring no one feels deprived during family gatherings.

Photography tips often garner attention, with readers sharing tips on how to capture the muffins’ appetizing appearance in images that showcase their texture and richness.

Frequently Asked Questions

Can these muffins be made in advance? Absolutely! The muffins can be made ahead of time and stored in an airtight container for up to a week or frozen for future enjoyment.

Are there substitutes for almond flour? Yes, you can use coconut flour, but remember to adjust the amount as coconut flour is more absorbent. Typically, you’d use about one-quarter of the amount of almond flour.

How do I store leftover muffins? Place them in an airtight container at room temperature for up to four days or refrigerate them for up to a week.

Can I freeze these muffins? Certainly! Wrap each muffin tightly and freeze them in a freezer bag, where they will keep well for up to three months.

What chocolate chips should I use? Look for high-quality, sugar-free chocolate chips that are keto-friendly, with at least 70% cocoa content for the best flavor.

Can I use regular sugar instead of a sugar substitute? Yes, you can, but it will affect the overall carb count and may negate the benefits of a keto diet.

Why are my muffins dense? Dense muffins can result from overmixing the batter or adding too many liquid ingredients, so be mindful when mixing.

What can I add for flavor variations? You can add nuts, cinnamon, or even a dash of espresso powder for a myriad of flavors to explore.

Are these muffins suitable for children? Yes! These muffins are a healthier alternative to traditional muffins, appealing to kids and parents alike.

How do I know when they are done? Use a toothpick; it should come out clean or with a few crumbs when the muffins are fully baked.

Additional Resources

Explore related recipes on our blog, featuring other keto-friendly baked goods that will complement your healthy eating journey.

Technique guides offer insights into perfecting your baking skills, providing you with the know-how to create more delightful treats.

Ingredient information helps you understand the benefits of each component used in your recipes, promoting informed cooking decisions.

Your kitchen arsenal can be enriched with our equipment recommendations, ensuring you have all the tools needed for successful baking.

Keep an eye on seasonal variations in produce to inspire your flavors and keep your baking fresh and exciting!

Join the Conversation

We encourage you to share your creations on social media with the hashtag #KetoMuffinMagic! Your photography tips and reviews not only inspire fellow bakers but also create a community of keto enthusiasts eager to swap stories and variations.

Don’t hesitate to engage in our community forums where you can share feedback and suggestions to improve this recipe or other ones alike.

Prompt discussion on how you’ve adapted this recipe to suit your taste can provide valuable insights to others looking to embark on their baking journey.

We love seeing your unique takes on our recipes and encourage readers to share their thoughts and variations for everyone to enjoy!

The Recipe

Keto Chocolate Chip Muffins

Serves: 12 muffins

Prep Time: 10 mins

Cook Time: 20 mins

Total Time: 30 mins

Kitchen Equipment Needed

  • Muffin tin
  • Mixing bowls
  • Whisk
  • Measuring cups and spoons
  • Spatula

Ingredients

  • 2 cups almond flour
  • 1/2 cup sugar-free chocolate chips
  • 1/4 cup erythritol or another low-carb sweetener
  • 1 teaspoon baking powder
  • 1/2 teaspoon baking soda
  • 1/2 teaspoon salt
  • 3 large eggs
  • 1/2 cup unsweetened almond milk
  • 1/4 cup melted coconut oil or butter
  • 1 teaspoon vanilla extract

Directions

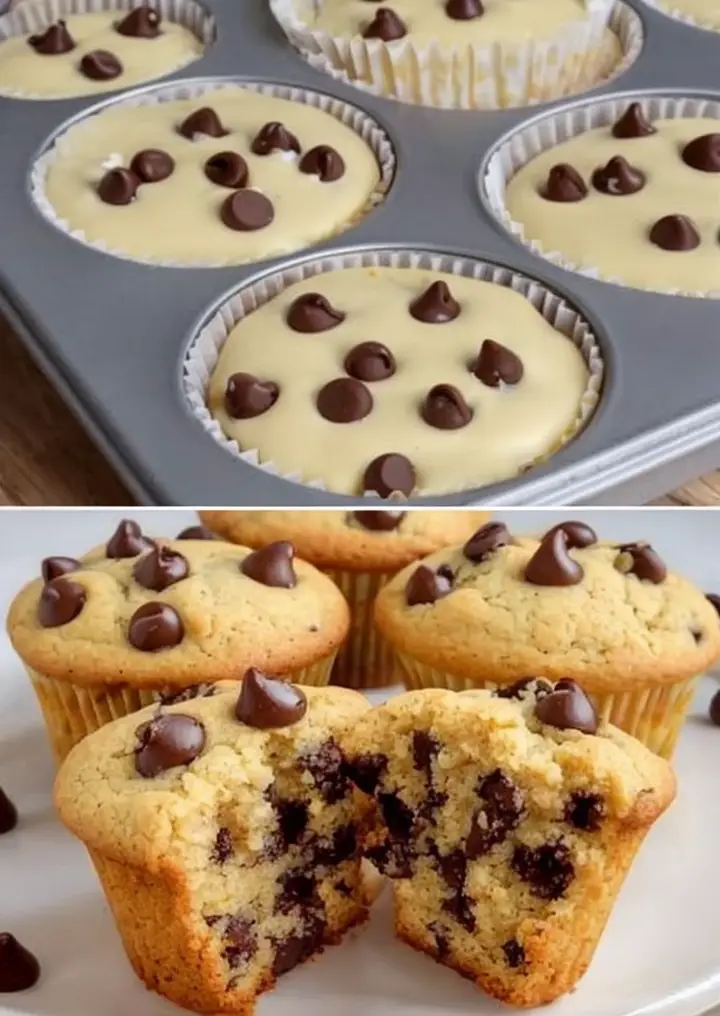
  1. Preheat your oven to 350°F (175°C) and grease the muffin tin or place liners.
  2. In a mixing bowl, combine the dry ingredients: almond flour, erythritol, chocolate chips, baking powder, baking soda, and salt.
  3. In another bowl, whisk together the eggs, almond milk, melted coconut oil, and vanilla extract until smooth.
  4. Pour the wet ingredients into the dry ingredients and mix until just combined. Be careful not to overmix.
  5. Evenly distribute the batter into the muffin tin, filling each cup about 3/4 full.
  6. Bake for 18-20 minutes or until a toothpick inserted comes out clean. Allow muffins to cool in the tin for 5 minutes before transferring to a wire rack.

Recipe Notes

  • For a sweeter muffin, feel free to add more sweetener to taste.
  • Store any leftovers in an airtight container for up to 4 days or freeze for longer storage.

Savor the Delight of Keto Pepper Recipes Today!

Keto Pepper Delight: A Flavorful Low-Carb Recipe

⚖️
Difficulty
Easy

⏲️
Prep Time
15 mins

🕒
Cook Time
25 mins

⏱️
Total Time
40 mins

🍽️
Servings
4 servings

Indulge in the enticing flavors of our Keto Pepper Delight, a low-carb recipe that combines fresh peppers, flavorful spices, and protein-rich ingredients to create a dish that is both satisfying and nutritious. Perfect for those following a ketogenic diet, this recipe not only delights your taste buds but helps you stay on the healthy track. The vibrant colors and aromas of this dish will make it a star at any dining table, whether for a casual weeknight meal or a festive gathering.

Imagine sinking your teeth into roasted peppers, caramelized onions, and juicy chicken or sausage, all infused with fragrant herbs and spices. The balance of sweet, savory, and mild heat harmonizes perfectly, making each bite an experience to remember. Keto Pepper Delight is a great way to incorporate more vegetables into your diet while keeping your carb intake low, making it an excellent choice for health-conscious eaters.

Quick Recipe Highlights

  • Flavor Profile: The combination of sweet bell peppers, smoky spices, and succulent protein offers a satisfying punch of flavor.
  • Texture: Roasted peppers provide a tender, juicy bite, contrasted with the satisfying crunch of fresh herbs and spices.
  • Aroma: The rich aroma of roasted peppers mingled with garlic and onions fills your kitchen with a warm, inviting scent.
  • Visual Appeal: This dish showcases a colorful palette of red, yellow, and green peppers, topped with a sprinkle of fresh herbs.
  • Skill Level Needed: This recipe is perfect for novice cooks and requires minimal culinary skills, making it accessible for everyone.
  • Special Equipment: You’ll need a baking dish and basic cooking utensils to whip up this delicious recipe.

Recipe Overview

  • Difficulty Level: This Keto Pepper Delight is classified as easy, making it an ideal choice for beginners looking to create impressive meals.
  • Category: This dish fits perfectly into the dinner category, suitable for family meals or dinner parties.
  • Cuisine: It draws inspiration from Mediterranean and American cuisines, known for their bold flavors and healthy ingredients.
  • Cost: The approximate cost for this recipe is budget-friendly, thanks to the use of seasonal vegetables and easily accessible proteins.
  • Season: Best enjoyed year-round, especially during summer when peppers are at their freshest and most flavorful.
  • Occasion: Perfect for weeknight dinners, meal prep, and outdoor gatherings, this dish is versatile enough to suit any occasion.

Why You’ll Love This Recipe

The Keto Pepper Delight recipe is a feast for the senses, combining taste and texture in a way that is deeply satisfying. Each ingredient plays a vital role, from the crispness of the peppers to the savory notes of the seasoned protein. The dish’s convenience makes it an excellent option for those busy weeknights, providing a wholesome meal that can be made in under an hour.

Nutritionally, Keto Pepper Delight offers a wealth of health benefits, rich in vitamins, minerals, and healthy fats. For those watching their carbohydrate intake, this dish fits seamlessly into a low-carb lifestyle, ensuring you can enjoy delicious meals without guilt. Socially, it’s a great dish to share, enhancing your dinner gatherings and making for fantastic leftovers.

Cost-effectiveness adds to the appeal of this recipe, yielding ample servings from affordable ingredients. The ability to scale the recipe up or down based on your needs means you’re never short on delicious dinner options. This dish encourages creativity in the kitchen, allowing for personal twists and adaptations to cater to varying tastes.

Historical Background and Cultural Significance

Keto Pepper Delight has roots intertwined with Mediterranean cooking, where fresh, vibrant ingredients take center stage. The use of peppers is widespread in various culinary traditions, becoming a staple in many households. Over the years, the appeal of peppers has led to substantial variations, making them a beloved ingredient in many cultures.

This dish, while modern in its low-carb approach, bears the essence of traditional cooking that prioritizes flavor and nutrition. With the increasing popularity of ketogenic diets, recipes like Keto Pepper Delight pay homage to wholesome, ingredient-driven meals that have sustained families for generations.

As diets evolve, so do the methods of preparing and appreciating this classic dish. The regional variations in flavors and ingredients showcase how adaptable and significant peppers can be in culinary practices worldwide.

Ingredient Deep Dive

Bell Peppers: These colorful vegetables not only make any dish visually appealing but are also incredibly nutritious. Loaded with vitamins C and A, bell peppers provide antioxidants that support overall health. Look for firm, shiny peppers with no blemishes for the best quality. Store them in a cool place and consume them within a week for optimal freshness. Substitutions for bell peppers can include zucchini or eggplant for a different texture.

Protein (Chicken/Sausage): Chicken breast offers lean protein crucial for muscle health, while sausage adds richness and flavor. When selecting meats, opt for organic, free-range options when possible for better welfare standards. Store fresh meat in the refrigerator and consume it within a few days or freeze for longer storage.

Common Mistakes to Avoid

  • Using overripe or damaged peppers can affect the overall flavor and texture of your dish.
  • Not preheating the oven may lead to uneven cooking; ensure you allow it to reach the desired temperature before baking.
  • Overcrowding the baking dish can result in steaming instead of roasting, leading to less desirable textures.
  • Ignoring the importance of seasoning can leave your dish bland; always taste and adjust seasoning appropriately.
  • Not allowing the dish to rest before serving can impact the flavors; giving it a few minutes enhances the taste.
  • Using low-quality ingredients can compromise the overall outcome; always choose the freshest options available.
  • Skipping the resting period for meats can lead to dryness; let them rest for a few minutes after cooking before slicing.
  • Not varying the cooking time based on oven temperature can yield inconsistent results; follow specific recommendations and adjust as needed.
  • Failing to prepare the ingredients beforehand can disrupt the cooking flow; ensure everything is ready to go before starting.
  • Not serving with an appropriate garnish can detract from the dish’s visual appeal; a few herbs can elevate the presentation significantly.

Essential Techniques

Roasting: Roasting peppers enhances their natural sweetness and adds depth to the flavor. To master this technique, preheat your oven adequately and arrange the peppers in a single layer to ensure even cooking. Look for a charred, blistered skin as the visual cue for success.

Seasoning: Properly seasoning your dish is crucial for flavor development. To get it right, start with a gentle hand and taste as you go; the goal is to enhance the natural flavors of the ingredients. A well-seasoned dish will balance and elevate all aspects of the flavor profile.

Pro Tips for Perfect Keto Pepper Delight

1. For a smoky flavor, consider adding paprika or smoked salt to the mix; this enhances the depth.

2. Using a mix of colored peppers will not only give a beautiful presentation but also provide a range of tastes.

3. Don’t skip the fresh herbs; fresh basil or cilantro adds a burst of freshness to the dish.

4. Cooking the protein separately before mixing helps retain moisture and ensures it’s cooked properly.

5. Experiment with cheese; adding a sprinkle of goat cheese or feta can elevate flavor and creaminess.

6. For extra crunch, consider topping off with pumpkin seeds just before serving for texture.

7. Adjust the spiciness according to your preference; add red pepper flakes for a kick or omit for a milder taste.

8. Always serve hot; this enhances the flavors and pleasant aromas, creating a perfect dining experience.

Variations and Adaptations

Explore delicious regional variations by incorporating local spices that reflect your culture while preparing Keto Pepper Delight. Seasonal adaptations can include adding fresh summer tomatoes or zucchini in the summer months, enhancing the dish’s freshness and vibrancy. Dietary modifications are also easily achievable; for a vegan option, substitute the proteins with plant-based alternatives such as lentils or chickpeas, and for a gluten-free option, ensure you check all packaged ingredients.

Serving and Presentation Guide

For an enticing presentation, plate your Keto Pepper Delight in vibrant bowls to contrast with the dish’s colors. Consider garnishing with fresh herbs such as parsley or cilantro to enhance the visual appeal. Traditional accompaniments include a refreshing side salad, while modern takes may introduce avocado slices or a drizzle of lime juice. Serve warm to maximize flavor and consider portioning out for easy serving, ensuring your guests enjoy a delightful experience.

Wine and Beverage Pairing

For an amazing complement to Keto Pepper Delight, a light-bodied white wine such as Sauvignon Blanc pairs beautifully with the dish’s richness. If you prefer non-alcoholic options, iced herbal tea or sparkling water with a splash of citrus can enhance the meal. For coffee lovers, a lightly roasted brew can offer a pleasant finish, balancing the meal’s flavors with its own natural sweetness.

Storage and Shelf Life

To store leftovers of your Keto Pepper Delight, allow the dish to cool completely and transfer it to an airtight container. Keep it in the refrigerator for up to three days. Reheating it gently in the oven helps maintain the texture and flavors, but you may also microwave it if you’re short on time. For longer storage, consider freezing portions in freezer-safe containers; they can last up to three months. Always label your containers with dates for better tracking.

Make Ahead Strategies

Prepare your Keto Pepper Delight components ahead of time to cut down on last-minute preparation. Chop the vegetables and protein, then store them in the refrigerator within a day of cooking. You can also cook the protein a day early, allowing flavors to meld and develop over time. When ready to serve, simply assemble and cook as directed, ensuring the dish remains fresh and delightful without added stress.

Scaling Instructions

If you’re looking to halve or double the recipe, adjust the ingredient amounts accordingly and keep an eye on cooking times, which may fluctuate depending on your oven’s size and the volume of ingredients. For larger gatherings, consider using two baking dishes to allow even cooking without overcrowding. Always ensure all your equipment, like pots and pans, can accommodate the larger capacities needed for doubling or tripling the recipe. Storing adjustments are vital to preserve quality and flavor, so keep that in mind while scaling.

Nutritional Deep Dive

A nutritional breakdown of Keto Pepper Delight reveals a balanced dish rich in healthy fats, moderate protein, and low carbohydrates, making it perfect for those on a low-carb diet. Each serving offers a good source of fiber from the peppers, essential for digestive health, while providing necessary vitamins and minerals. If you’re managing your weight, portion analysis becomes crucial; enjoying smaller portions may help keep your overall calorie intake in check while still indulging in this delicious dish.

Dietary Adaptations

Creating a gluten-free version of Keto Pepper Delight is straightforward; simply verify that all your ingredients, particularly sauces or broths, are gluten-free. For a dairy-free option, explore using non-dairy alternatives, like cashew cheese or nutritional yeast to maintain that cheesy flavor. Vegan adaptations can include substituting proteins with tofu or tempeh, ensuring they are seasoned well. For those on a paleo diet, simply omit cheese and replace any processed items with whole, natural foods that align with paleo principles.

Troubleshooting Guide

If you encounter texture issues, such as mushy peppers, check the cooking time and double-check that the oven temperature is as specified. For flavor balance problems, add a squeeze of fresh lemon or a hint of vinegar to enhance the dish’s overall profile. If the ingredient substitutions don’t turn out as envisioned, be sure to taste throughout cooking to adjust seasonings, balancing flavors as you go. For timing concerns, always remember that each stove and oven can differ, so keep an eye on cooking progress for optimal results.

Recipe Success Stories

Readers from our community have shared incredibly positive feedback about their experiences with Keto Pepper Delight, often mentioning the ease of preparation and delightful flavors. Some have reported success stories with adapting the recipe to their personal tastes, including spicy variations or vegetarian versions. For photography enthusiasts, tips on capturing the vibrant colors and textures of the dish have led to stunning social media posts that showcase everyone’s culinary achievements.

Frequently Asked Questions

Can I make this recipe vegetarian? Absolutely! Simply replace the meat with plant-based protein, such as lentils or chickpeas, to suit dietary preferences.

How can I store leftovers? Allow the dish to cool completely, then transfer it into an airtight container. It will last in the fridge for up to three days and can be frozen for up to three months.

Is this recipe suitable for meal prep? Yes! Keto Pepper Delight is perfect for meal prepping and can be portioned for convenient lunches or dinners throughout the week.

What can I substitute for bell peppers? Zucchini or eggplant are good alternatives that will hold up well in the recipe and provide a different flavor profile.

Can I freeze Keto Pepper Delight? Yes, you can! Just ensure it’s stored in a freezer-safe container to maintain freshness.

What wine pairs well with this dish? A light-bodied white wine such as Sauvignon Blanc complements the rich flavors of the peppers beautifully.

How can I increase the heat level? Add red pepper flakes or diced jalapeños during cooking to boost the spice factor of your dish.

Can I use frozen peppers instead of fresh ones? Yes, frozen peppers work well, but they may have a slightly different texture once cooked.

Should I adjust cooking times if I double the recipe? Likely, yes. Keep an eye on the dish as it cooks, as larger quantities may need additional time to cook through evenly.

Is this recipe gluten-free? Yes! As long as you ensure all ingredients are gluten-free, you can enjoy this dish without worry.

Additional Resources

Check out our related keto recipes for more low-carb inspiration, including dishes featuring zoodles, cauliflower rice, and other delicious, healthy alternatives. Explore technique guides to enhance your cooking skills, such as how to roast vegetables perfectly or the best knife skills for chopping. You can also find ingredient information detailing the benefits and uses of various spices and vegetables in our extensive library, ensuring you’re well-equipped in the kitchen for all dietary needs and preferences.

Join the Conversation

We invite you to share your experience with Keto Pepper Delight on social media! Post your pictures, reviews, and any unique adaptations you’ve made to the recipe. Engage with our community and get inspired by others’ creations, contributing to a supportive network of fellow culinary enthusiasts. We’d love to see how you’ve personalized this dish to fit your tasty adventures in the kitchen!

The Recipe

Keto Pepper Delight

Serves: 4

Prep Time: 15 mins

Cook Time: 25 mins

Total Time: 40 mins

Kitchen Equipment Needed

  • Baking dish
  • Cutting board
  • Knife
  • Mixing bowl
  • Measuring cups and spoons

Ingredients

  • 3 medium bell peppers (red, yellow, green), chopped
  • 1 medium onion, sliced
  • 1 pound chicken breast or sausage, diced
  • 3 cloves garlic, minced
  • 2 tablespoons olive oil
  • 1 teaspoon paprika
  • Salt and pepper to taste
  • Fresh herbs (basil or parsley) for garnish

Directions

  1. Preheat your oven to 400°F (200°C).
  2. In a large mixing bowl, combine the diced chicken or sausage with olive oil, garlic, paprika, salt, and pepper. Mix well.
  3. Add the chopped bell peppers and onion to the bowl and toss to coat with the seasoning.
  4. Transfer the mixture into a baking dish, spreading it evenly.
  5. Bake in the preheated oven for about 25 minutes, or until the chicken is cooked through and the vegetables are tender.
  6. Once cooked, remove from the oven and let rest for a few minutes; then, garnish with fresh herbs before serving.

Recipe Notes

  • Feel free to substitute the chicken with turkey or tofu for a variation.
  • Adjust the spice level according to your preference; add more paprika for smokiness.
  • Leftovers can be refrigerated for up to three days and reheated gently.

Keto Deep Dish Lasagna: Your Ultimate Low-Carb Delight

Keto Ultimate Low-Carb Deep Dish Lasagna: A Flavorful Twist on a Classic Favorite

⚖️
Difficulty
Medium

⏲️
Prep Time
30 mins

🕒
Cook Time
45 mins

⏱️
Total Time
75 mins

🍽️
Servings
6 servings

Keto Ultimate Low-Carb Deep Dish Lasagna is the perfect solution for pasta lovers who are also passionate about maintaining a low-carb lifestyle. This indulgent yet healthy twist on a classic lasagna will leave your taste buds tingling and your cravings satisfied. Layered with rich flavors from marinara sauce, creamy ricotta, and melty mozzarella, this dish is both comforting and nutritious. Plus, it boasts an innovative low-carb crust that holds all the ingredients together, providing a delightful texture with every bite.

Imagine savoring a hearty slice of lasagna that is not only low in carbs but also brimming with Italian flavors that transport you straight to a cozy trattoria. Each serving is packed with protein, healthy fats, and vibrant veggies, making it a wholesome choice for any meal. Perfect for family dinners, meal prepping, or even hosting a friendly gathering, this Keto Ultimate Low-Carb Deep Dish Lasagna is sure to impress while adhering to your dietary goals.

Quick Recipe Highlights

  • Flavor Profile: A harmonious blend of savory meats, rich tomato sauce, and creamy cheeses, delivering a mouthwatering taste without the carbs.
  • Texture: Enjoy a satisfying combination of creaminess from the cheeses and a hearty, rustic bite from the meat layered within.
  • Aroma: Infused with aromatic herbs such as basil and oregano, the scent of this lasagna wafts through the kitchen, inviting everyone to dive in.
  • Visual Appeal: Layers of vibrant red sauce and gooey cheese topped with a sprinkle of fresh herbs create an enticing presentation.
  • Skill Level Needed: Intermediate; requires some basic cooking skills and familiarity with ingredient layering.
  • Special Equipment: A deep dish baking pan or a springform pan is recommended for optimal results.

Recipe Overview

  • Difficulty Level: This recipe falls under the medium category, as it involves multiple steps but is straightforward with a little dedication.
  • Category: A perfect fit for dinner and meal prepping, this hearty low-carb dish can easily replace traditional pasta-based meals.
  • Cuisine: Inspired by traditional Italian gastronomy, this lasagna retains the essence of classic recipes while adhering to low-carb principles.
  • Cost: An estimated cost of $15-20, making it budget-friendly for a filling meal that serves several.
  • Season: Perfect for any season, this recipe shines particularly during cooler months when comfort food is in high demand.
  • Occasion: Ideal for family gatherings, potlucks, or a special dinner at home, serving this dish will elevate any mealtime experience.

Why You’ll Love This Recipe

Indulging in the Keto Ultimate Low-Carb Deep Dish Lasagna will feel like a guilty pleasure without the carbs. The rich, savory flavors from the combination of ground meat, luscious cheeses, and a homemade sauce create a taste experience that is both satisfying and nutritious. Each bite melts in your mouth, providing a delightful contrast between the smooth ricotta and the hearty beef. The wholesome ingredients not only nourish the body but also keep you feeling full longer, making it a fantastic addition to your low-carb meal rotation.

Preparation of this lasagna is surprisingly simple, allowing you to enjoy cooking without excessive time and effort. The process involves layers, but once everything is prepped, assembling takes just a few moments. You can even make it ahead of time, letting all the flavors meld together in the fridge overnight. On busy weeknights, this is an absolute lifesaver that will still impress your family and friends.

One of the significant advantages of this recipe is its nutritional profile. Packed with protein and healthy fats, it supports your weight loss goals while providing essential nutrients. The use of fresh vegetables ensures you soak up added vitamins and minerals, contributing to overall health benefits. Overall, this lasagna is a dish that won’t derail your low-carb lifestyle and is a much healthier alternative to classic pasta dishes.

When it comes to hosting friends or family, this dish is a showstopper. The Keto Ultimate Low-Carb Deep Dish Lasagna invites social interaction as everyone digs in, sharing memories and laughter. Presenting a dish that meets dietary preferences while still being explosive in flavor creates an enjoyable dining experience that guests will remember.

Finally, serving this lasagna is cost-effective. Utilizing affordable ingredients means you won’t break the bank while enjoying a homestyle meal. Its ability to serve up to six people ensures that you’re feeding a crowd without having to spend a fortune on dining out. Keto living doesn’t have to be expensive, and this lasagna is the perfect embodiment of that philosophy.

Historical Background and Cultural Significance

The origins of lasagna can be traced back to ancient Greece, where layers of pasta were made from wheat flour and water. This simple concept migrated throughout Europe and took on various forms, with Italy renowned for creating the lasagna we know and love today. While traditional recipes utilize wheat lasagna sheets, our Keto Ultimate Low-Carb Deep Dish Lasagna pays homage to this classic dish but gives it a modern, health-oriented twist.

In Italy, lasagna is more than just a meal; it signifies family, celebrations, and the comfort of home-cooked food shared among loved ones. Over the centuries, the components of lasagna have evolved, incorporating regionally available ingredients and cultural influences, marking it as a dish celebrated globally. A deep dish style of lasagna offers a new dimension to this iconic dish, emphasizing comforting layers while providing depth of flavor.

As culinary practices have evolved, many adaptations have appeared, embracing dietary changes and preferences. The Keto variant maintains the essence of lasagna while excluding noodles, making it suitable for those with gluten intolerance or those following low-carb diets. This versatility showcases the adaptability of lasagna as it transforms to meet the needs of modern eaters while remaining a beloved comfort food.

Furthermore, regionally, lasagna can vary significantly from North to South Italy. Southern Italian variants often feature vegetarian ingredients like eggplant, while Northern styles might include creamy béchamel sauce. The Keto Ultimate Low-Carb Deep Dish Lasagna bridges these regional differences by allowing for unique ingredient choices, appealing to a wide range of palates while honoring its rich heritage.

Ingredient Deep Dive

  • Ground Beef: Ground beef is a staple ingredient in many lasagna recipes, offering a robust flavor and protein content essential for a hearty dish. It’s versatile, easily accessible, and can be substituted with turkey or chicken for lighter options. When purchasing, aim for lean cuts to reduce excess fat. Store in the refrigerator or freezer, and remember to cook it thoroughly before adding it to your lasagna layers.
  • Ricotta Cheese: Ricotta adds creaminess and richness to lasagna, creating a delightful contrast to the robustness of the beef. This cheese is often synonymous with Italian cooking, stemming from the need to utilize leftover whey from cheese-making. For a lighter alternative, cottage cheese can serve as a great substitution. Store ricotta in an airtight container in the fridge to maintain freshness.
  • Marinara Sauce: A staple in Italian cuisine, marinara sauce brings bright acidity and rich flavor to the dish. It’s often made from ripe tomatoes, garlic, and herbs, forming the perfect base for any Italian meal. Opt for low-sugar varieties to stay in line with your keto diet. Homemade marinara can also be made in batches and stored for future use.
  • Mozzarella Cheese: This cheese is beloved for its melting properties and creamy flavor, making it the ideal topping for lasagna. Fresh mozzarella gives a delightful texture, while shredded mozzarella offers convenience. It’s essential for adding that gooey finish to baked dishes. Store mozzarella in its liquid solution or wrap it tightly to avoid drying out.
  • Zucchini: A fantastic low-carb substitute for traditional pasta, zucchini adds moisture and a slight crunch to your lasagna. Rich in vitamins and minerals, it supports health while keeping the dish light. Look for firm, unblemished zucchinis for the best results, and avoid overcooking to maintain their texture. Leftover zucchini can be used in salads or stir-fries.
  • Eggs: Used in the ricotta mixture, eggs work as a binder, keeping all layers together while adding protein. They are fundamental to countless recipes in diverse cuisines due to their versatility. When selecting eggs, choose fresh, organic options whenever possible, and store them in the refrigerator. Leftover egg whites can be used for fluffy egg white omelets.

Common Mistakes to Avoid

  • Not draining excess moisture from vegetables like zucchini can lead to a watery lasagna. Make sure to salt and drain them before assembling your dish.
  • Skipping the proper layering technique may cause uneven cooking. Make sure to alternate your ingredients carefully for the best flavor and texture.
  • Using too much sauce could overwhelm the dish, so be sure to balance your sauce and cheese proportions well to achieve harmony in flavor.
  • Underseasoning is a common pitfall; be generous with spices and herbs to ensure the dish is full of flavor.
  • Cooking the lasagna too quickly or at too high a temperature can lead to burned edges and undercooked centers, so keep the heat moderate and allow for thorough cooking time.
  • Using low-quality ingredients may compromise flavor; always opt for fresh, high-quality components to elevate the dish.
  • Allowing the lasagna to cool for an insufficient amount of time before cutting can result in a messy presentation. Waiting helps the layers settle.
  • Not covering the lasagna with foil initially can lead to burnt cheese. Cover it for the first half of baking and uncover for the last part to achieve a golden crust.
  • Neglecting to taste-test your sauce before assembling can make for an unbalanced dish—always sample and adjust seasoning to your preference.
  • Not preheating the oven can lead to an uneven bake; don’t skip this crucial step!

Essential Techniques

– **Layering:** Mastering the layering technique is crucial, as it affects the final taste and presentation of the lasagna. Start with a base of sauce, followed by vegetables, cheese, and meat in a repeating pattern. Common pitfalls include overcrowding or uneven layering, resulting in a lack of balance in flavors and textures. Look for visible layers when cutting, indicating proper assembly.

– **Draining Vegetables:** Properly draining excess moisture from ingredients like zucchini is essential. It prevents watery lasagna and maintains the desired consistency. Use paper towels or a colander, and salt the vegetables to expedite the moisture extraction. Overlooking this can lead to less-than-stellar results; observe if the zucchini looks too wet before adding it to your layers.

– **Cooking the Meat:** Browning the ground meat adds depth of flavor through the Maillard reaction, which enhances the overall taste of the dish. Cook until it is thoroughly browned, ensuring no remaining pink, and break it up into small pieces for even layering. A common error is undercooking, which can lead to food safety issues; always ensure proper cooking temperatures are reached.

– **Making Homemade Sauce:** Crafting your marinara sauce allows for control over seasoning and sugar content. Start with quality canned tomatoes, garlic, and fresh herbs, allowing them to simmer and meld together. Mistakes often include too much sugar to balance acidity; avoid this by taste-testing and adjusting with herbs instead.

– **Baking Covered and Uncovered:** Baking the lasagna covered with foil initially traps steam, cooking it evenly and preventing dryness. Remove the foil towards the end for a golden-brown topping. Many miss this step, leading to uneven results; watch for a bubbly top as a sign of doneness.

– **Resting Period:** Allowing the lasagna to rest after baking is crucial. It helps the flavors meld and makes it easier to cut. Common pitfalls include cutting too soon, causing messy and uneven serving. Aim for at least 15-20 minutes of resting time before slicing for best results.

Pro Tips for Perfect Keto Ultimate Low-Carb Deep Dish Lasagna

– Use fresh herbs like basil and parsley for a brighter flavor profile; fresh ingredients can elevate the dish significantly compared to dried herbs.
– Consider adding vegetables like spinach or bell peppers for extra nutrients and flavor; it can enhance the overall health benefits while keeping the dish vibrant.
– To optimize meal prep, double the recipe and freeze half for an easy future meal—layers freeze exceptionally well.
– Experiment with cheese blends: adding provolone or fontina can create a unique flavor twist; don’t be afraid to mix up traditional mozzarella!
– For added moisture, consider a drizzle of olive oil before baking; this contributes to a rich undercurrent of flavor.
– Using a springform pan can aid in easy serving, especially for layered dishes, creating an impressive presentation.
– Utilize parchment paper in your baking dish for easy cleanup; it prevents sticking and makes serving smoother.
– Monitor your cooking time closely towards the end; ovens can vary, and you want to achieve perfectly melted cheese without burning.

Variations and Adaptations

– **Regional Variations:** Explore different ingredient combinations, such as using sausage or mushrooms for richer flavors and varied textures. Adapting to local tastes can turn this dish into something uniquely yours.
– **Seasonal Adaptations:** During summer, mix in fresh tomatoes and basil for a lighter version, while in fall, butternut squash can add a sweet, hearty note.
– **Dietary Modifications:** If looking to keep it dairy-free, substitutes like cashew cheese or nutritional yeast can still create a deliciously satisfying lasagna without compromising flavor.
– **Flavor Variations:** Incorporate different types of sauces, such as arrabbiata for a spicier kick or a lower-sugar barbecue sauce for a sweet and tangy twist.
– **Texture Modifications:** For extra crunch, consider layering almond flour or crushed pork rinds as a topping for added texture; this also enhances the low-carb aspect.
– **Presentation Alternatives:** Serve individual portions in small cast iron skillets or ramekins for a trendy touch at dinner parties, making for easy serving and a fun presentation.

Serving and Presentation Guide

To serve Keto Ultimate Low-Carb Deep Dish Lasagna beautifully, consider using a deep dish or a large cast-iron pan for a rustic look. For an elegant twist, individual serving dishes can add novelty to your meal. Top each serving with a sprig of fresh basil or chopped parsley for a splash of color and freshness.

Garnishing with drizzles of balsamic reduction creates a visually appealing contrast against the warm lasagna. When plating, ensure each slice has defined layers, showcasing the vibrant colors established by the ingredients. As for traditional accompaniments, consider a fresh arugula salad dressed with lemon vinaigrette to balance the dish’s richness.

Temperature is vital when serving. Ideally, serve the lasagna warm, but not boiling hot—allow it to settle a bit after baking to achieve perfect serving temperatures. Keep portion control in mind; the filling nature of this dish allows you to serve smaller portions, keeping your overall carb intake in check. Pairing it with low-carb garlic bread or a crisp salad completes the meal and enhances the dining experience.

Wine and Beverage Pairing

For the Keto Ultimate Low-Carb Deep Dish Lasagna, pairing with a robust red wine like Chianti or a dry Zinfandel adds depth to the meal. The wine’s acidity beautifully cuts through the richness of the cheese and meat while echoing the dish’s Italian roots. When selecting a wine, opt for those with lower sugar content to align with your keto lifestyle.

If you prefer non-alcoholic options, a sparkling water with a splash of lemon or a herbal iced tea complements the dish nicely without overshadowing the flavors. For coffee enthusiasts, a rich espresso served after the meal can provide a delightful end, enhancing the Italian theme. Serve all beverages chilled to provide a refreshing contrast to the warm, hearty lasagna.

Storage and Shelf Life

To maximize the lasting quality of your Keto Ultimate Low-Carb Deep Dish Lasagna, proper storage is crucial. Once cooled, store leftovers in an airtight container in the refrigerator, where they can last about 3-4 days. For longer preservation, consider freezing individual portions—wrap them tightly in plastic wrap followed by foil to prevent freezer burn.

Signs of spoilage include an off odor, unexpected colors, or a buildup of moisture in the storage container. When reheating, the oven is preferred to restore the dish’s original texture; bake at 350°F (175°C) until heated through. Avoid the microwave where possible, as it may result in a soggy texture. For best quality, consume frozen leftovers within 2-3 months.

Make Ahead Strategies

To facilitate preparation, consider assembling the Keto Ultimate Low-Carb Deep Dish Lasagna the night before. Once layered, cover it with plastic wrap and store it in the fridge. This not only enhances flavors but also allows for quick baking on busy weeknights. If you’re making multiple layers, prep the ingredients separately and store them until you’re ready to assemble.

Quality is generally not impacted by short-term refrigeration, but allow the assembly to rest at room temperature before baking for even cooking. Simple additions, such as fresh herbs or quick garden salad components, can be prepared ahead as well, reducing the time required when hosting casual gatherings.

For reheating, there’s no rush; you can allow leftovers to come to temperature naturally as they benefit from a slow reheating process that generally improves the flavor. Any added elements should be fresh to maintain vibrancy.

Scaling Instructions

Scaling the Keto Ultimate Low-Carb Deep Dish Lasagna for larger gatherings involves straightforward multiplication of the recipe’s ingredients. For halving, simply divide all components by two and use a smaller baking dish. When doubling or tripling, ensure you have a large enough pan to accommodate the increased volume, as this dish is quite hearty.

Adjust timing accordingly—larger lasagnas often require additional cooking time. It can be helpful to monitor doneness; visual cues include bubbling edges and a golden top. For efficient storage of the larger batch, consider splitting baked lasagna into several smaller containers for convenience.

Also, if you freeze portions, always label them with dates for better tracking. This way, you can enjoy this delightful dish at a moment’s notice without losing quality or flavor.

Nutritional Deep Dive

In terms of macros, a serving of Keto Ultimate Low-Carb Deep Dish Lasagna typically contains about 30g of protein, owing to the high-quality meat and cheese used. The healthy fats present make it a filling option while keeping carbohydrates as low as 5-6g per serving, ideal for maintaining ketosis. This balance makes it not only satisfying but also supportive of weight management.

Micronutrient analysis reveals an abundance of vitamins associated with fresh vegetables, including vitamin A from zucchini and essential minerals from cheese. Health benefits are prominent through its protein density, which aids muscle maintenance and overall vitality while the low-carb composition encourages fat oxidation.

Lastly, portion analysis indicates that while this is a rich, filling dish, portion control can help manage caloric intake. It allows indulgence while adhering to dietary goals, especially attractive for those committed to ketosis. Serving this dish alongside a vibrant salad enhances nutrient intake further.

Dietary Adaptations

For those following a gluten-free lifestyle, this Keto Ultimate Low-Carb Deep Dish Lasagna checks the box as it avoids traditional pasta. Ensuring all ingredients are certified gluten-free will keep this dish safe for celiac individuals and those with gluten sensitivities.

To accommodate dairy-free eaters, consider refining the ricotta with blended cashews and coconut cream for creaminess without the dairy. Use nutritional yeast as a cheesy flavor alternative, making this a vegan-friendly dish as well.

In terms of low-carb and keto adaptations, focus on maintaining low sugar content in sauces and selecting vegetables wisely. Avoid starchy ingredients like carrots or corn, opting for zucchini and spinach instead.

Paleo followers can enjoy this recipe by swapping the cheese with nut-based alternatives while retaining the flavorful beef and vegetables. Adapting a dish to suit various dietary needs showcases its versatility, allowing everyone a taste of this delicious lasagna.

Troubleshooting Guide

If your lasagna turns out too watery, typically, this stems from insufficient draining of vegetables. Always ensure excess moisture is eliminated, especially from zucchini, to avoid sogginess.

Flavor balance can be problematic, often due to unseasoned meat or tomato sauce. Make a habit of taste-testing sauce mixtures as you go, adjusting with herbs and salt for cohesive flavor.

Cook temperature discrepancies can lead to issues like burnt edges or undercooked centers. Always use a food thermometer if unsure and take care to adjust the baking temperature and time accordingly.

Another common issue may arise from ingredient substitutions leading to altered textures. For instance, replacing ricotta with a water-heavy alternative might yield undesirable consistency; always opt for suitable substitutes that maintain texture.

Lastly, timing challenges often lead to crises during assembly or baking; having all ingredients prepped and ready can mitigate this, ensuring a smooth process.

Recipe Success Stories

Community feedback shows that the Keto Ultimate Low-Carb Deep Dish Lasagna has delighted many, with numerous families sharing their success stories. From health transformations to new culinary adventures, readers have embraced this dish as a favorite in their weekly meal rotations.

Many have described how this lasagna provides comfort and nutrition, making their keto journey more enjoyable and manageable. Adaptation stories include creative ingredient swaps, leading to variations that maintain flavors while catering to personal preferences and dietary restrictions.

Photography tips shared by readers have showcased the dish’s appealing layers and vibrant colors, encouraging others to replicate the recipe at home. The community spirit thrives, as individuals come together, sharing their tips and variations to inspire even more twists on a beloved comfort food.

Frequently Asked Questions

Can I use other types of meat for this lasagna?

Absolutely! Ground turkey, chicken, or even plant-based meat alternatives can be used as substitutes, depending on dietary preferences while maintaining the dish’s integrity.

How can I lower the calories in this recipe?

To reduce calories, opt for leaner meat cuts, reduce the amount of cheese, or slightly lower portion sizes while serving alongside a hearty salad.

Can I prep this ahead and bake later?

Yes! You can assemble the lasagna and refrigerate it for a day before baking. This allows the flavors to meld together beautifully.

Is this dish suitable for meal prepping?

Definitely! It stores well, making it easy to prepare ahead for the week. Just portion it into individual containers for grab-and-go lunches!

Can I freeze leftover lasagna?

Yes! It freezes excellently. Wrap single-serving pieces in plastic wrap and foil before placing them in the freezer.

What should I serve with my lasagna?

A fresh green salad or some keto-friendly low-carb garlic bread pairs wonderfully with lasagna for a well-rounded meal experience.

How long does it take to bake from frozen?

Baking a frozen lasagna typically takes about 1.5 to 2 hours at 350°F (175°C). Be sure to check for thorough heating before serving.

Can I use store-bought sauce?

Of course! Just ensure the sauce is low in sugar and aligns with your dietary guidelines to keep the dish keto-friendly.

What’s the best way to reheat leftovers?

Reheating in the oven for 20-25 minutes at 350°F (175°C) is best. This method helps restore texture while keeping the dish warm and delicious.

Can I add more vegetables?

Feel free! Incorporating vegetables such as spinach, mushrooms, or bell peppers enriches the dish with flavor and nutrients while aligning with keto principles.

Additional Resources

For those intrigued by the Keto Ultimate Low-Carb Deep Dish Lasagna, you might also explore related recipes like Keto Pizza or Zucchini Noodles with Meat Sauce as delightful alternatives to traditional comfort foods. Additionally, familiarize yourself with essential cooking techniques through guides on layering and preparing homemade sauces for varied and exciting meals.

Investing in quality kitchen equipment, from a reliable deep baking dish to high-quality knives for slicing vegetables ensures ease in preparation. Always keep seasonal ingredient ideas in mind as well—fresh produce can enhance any recipe significantly while maintaining diet integrity.

Join the Conversation

Engagement through social media platforms fosters community and connection around cooking, allowing readers to share their experiences and variations on the Keto Ultimate Low-Carb Deep Dish Lasagna. Use social channels to upload your lasagna photos, share personal anecdotes, and suggest unique ingredient swaps that made your version shine.

Photography tips can inspire fellow home cooks to capture the beauty of their dishes, igniting creativity in plating and presentation. Engage with other enthusiasts by discussing favorite track changes or intriguing sides, fostering an inclusive cooking community where everyone can thrive and have fun together.

The Recipe

Keto Ultimate Low-Carb Deep Dish Lasagna

Serves: 6 servings

Prep Time: 30 mins

Cook Time: 45 mins

Total Time: 75 mins

Kitchen Equipment Needed

  • Deep dish baking pan or springform pan
  • Large skillet
  • Colander
  • Mixing bowls
  • Measuring cups and spoons
  • Sharp knife
  • Oven mitts

Ingredients

  • 1 lb ground beef
  • 1 cup ricotta cheese
  • 2 cups shredded mozzarella cheese
  • 2 cups marinara sauce (low-sugar)
  • 2 medium zucchinis, sliced thinly
  • 2 eggs
  • 1 teaspoon Italian seasoning
  • Salt and pepper to taste
  • Fresh basil for garnish

Directions

  1. Preheat the oven to 375°F (190°C).
  2. In a large skillet, cook the ground beef over medium heat until browned. Drain excess fat and add marinara sauce; simmer for 10 minutes.
  3. While the meat cooks, prepare the zucchini by salting the slices and letting them sit in a colander to remove excess moisture.
  4. In a mixing bowl, combine ricotta cheese, eggs, Italian seasoning, salt, and pepper until well blended.
  5. In your baking dish, begin layering: start with a thin layer of meat sauce, followed by zucchini slices, ricotta mixture, and mozzarella. Repeat layers until all ingredients are used, finishing with mozzarella on top.
  6. Cover with aluminum foil and bake for 30 minutes. Remove the foil and bake for an additional 15 minutes until the cheese is golden and bubbly.
  7. Allow to cool for at least 15 minutes before slicing. Garnish with fresh basil before serving.

Recipe Notes

  • Feel free to experiment with different cheeses for added flavor.
  • If the zucchini is too watery, consider using a different type of low-carb vegetable such as eggplant.
  • This dish can also be frozen; be sure to label and date your containers.

Create Delicious Moments with This Unique Recipe Today!

Delicious Spaghetti Aglio e Olio: A Simple Classic

⚖️
Difficulty
Easy

⏲️
Prep Time
10 mins

🕒
Cook Time
15 mins

⏱️
Total Time
25 mins

🍽️
Servings
4

Spaghetti Aglio e Olio is a timeless Italian dish that shines with minimal ingredients yet delivers outstanding flavor. The simplicity of this classic pasta recipe, made with just garlic, olive oil, and chili flakes, speaks to the magic of Italian home cooking. Each bite is a delightful experience, where al dente spaghetti twirls with fragrant garlic oil, infusing your palate with warmth and inviting aromas.

Perfect for a quick weeknight dinner or an elegant gathering, Spaghetti Aglio e Olio is a crowd-pleaser. Its golden, glossy appearance is as appealing as its savory taste. Whether you’re cooking for loved ones or enjoying a meal for one, this recipe allows you to indulge in comfort food without the fuss. Join me as we explore this beloved dish that has become a staple on tables around the world.

Quick Recipe Highlights

  • Flavor Profile: The dish features a harmonious blend of garlic’s savory essence with a vibrant kick from red pepper flakes, making it both comforting and exciting.
  • Texture: The pasta offers a delightful chewiness with a smooth, oily coating that enhances each mouthful.
  • Aroma: The heady aroma of sautéed garlic, enlivened by fresh parsley and chili, fills the air as you prepare this dish.
  • Visual Appeal: Aglio e Olio is a feast for the eyes with its golden olive oil glistening on a bed of spaghetti, garnished with vibrant green parsley.
  • Skill Level Needed: This recipe is perfect for beginners, as it requires only basic cooking skills and minimal equipment.
  • Special Equipment: You won’t need much more than a pot for boiling pasta and a skillet for the sauce.

Recipe Overview

  • Difficulty Level: Rated as easy due to its straightforward steps, even novice cooks can master this dish quickly.
  • Category: Ideal for lunch or dinner, Spaghetti Aglio e Olio falls under both pasta and Italian cuisine.
  • Cuisine: Rooted in Southern Italy, this dish showcases true Italian culinary traditions that focus on fresh, simple ingredients.
  • Cost: Inexpensive to prepare, with many components commonly found in households, making it economical and accessible.
  • Season: Best enjoyed year-round, though its lightness makes it particularly refreshing in warmer months.
  • Occasion: Perfect for casual dinners, potlucks, or even romantic date nights, providing versatility for different settings.

Why You’ll Love This Recipe

Spaghetti Aglio e Olio offers a perfect balance of taste and texture. The garlic, slightly golden and softened, creates a rich yet subtle flavor that envelops the pasta beautifully. With red pepper flakes adding just the right spice, it creates unlimited appeal for all palates, whether you prefer intricate meals or simple, hearty dishes.

This recipe’s convenience lies in its minimal preparation and cooking time. Ready in under 30 minutes, it allows you to whip up an impressive dish when unexpected guests arrive or after a long day at work. You won’t need to spend hours in the kitchen; just sauté garlic, boil pasta, and mix!

Beyond being easy to prepare, Spaghetti Aglio e Olio also brings several nutritional benefits to the table. Using quality olive oil contributes healthy fats, while garlic is known for its antioxidant properties and potential health benefits, supporting heart health and immune function.

Serving this delightful dish also enhances social gatherings and brings people together. Share it with friends and family; it encourages conversations and compliments. Its straightforward nature allows everyone at the table to enjoy a nostalgic Italian experience while fostering an inviting atmosphere.

From an economical standpoint, Spaghetti Aglio e Olio is budget-friendly. The ingredients are typically found in most pantries, cutting down on shopping trips and unnecessary expenses. Plus, it’s perfect for those nights when you need to make a meal out of what’s on hand.

Historical Background and Cultural Significance

The origins of Spaghetti Aglio e Olio can be traced back to Naples, a city known for its rich culinary traditions. This humble dish reflects the creativity of Italian peasants, who utilized their available resources to create a fulfilling meal. Over time, the dish has retained its authenticity and essence, making it a staple in Italian cuisine.

Culturally, Spaghetti Aglio e Olio holds a special place in Italian families. It embodies the principles of “cucina povera,” where recipes arise from practicality and simplicity. This cultural importance enhances the experience of cooking and sharing, as families often pass down recipes through generations.

As the popularity of Italian cuisine spread globally, Spaghetti Aglio e Olio saw its evolution. Variations began to sprout, as home cooks started adding ingredients like vegetables or proteins to adapt to their tastes and dietary preferences. Yet, the classic version remains beloved for its simplicity and comfort.

Regional variations can be observed, with some chefs incorporating local ingredients or personal touches while maintaining the heart of this iconic dish. In Italy, Aglio e Olio is not just food; it represents a slower pace of life, emphasizing quality over quantity in both cooking and dining.

Ingredient Deep Dive

Spaghetti

The heart of this recipe, spaghetti, has a history dating back to the 12th century in Italy. Traditionally made from durum wheat, its versatility allows for countless preparations. Nutritionally, it is a good source of carbohydrates, providing energy. When selecting spaghetti, opt for brands that use high-quality wheat for superior texture and taste. Store it in a cool, dry place, and it can last for years. If you’re looking for alternatives, you can use whole grain or gluten-free options to fit different diets.

Olive Oil

A staple in Mediterranean cooking, olive oil has significant cultural and culinary importance in Italy. Rich in monounsaturated fats, it’s known for its health benefits, particularly for heart health. The best quality oil will have a robust olive flavor. Look for cold-pressed, extra virgin options for optimal taste and nutrition. Store it away from light and heat, and be mindful of its shelf life. Should you need substitutions, avocado oil is a great alternative that offers a similar richness.

Garlic

Garlic is revered in many cultures for its flavor and health properties. It’s said to ward off illness while adding a rich depth of flavor to dishes. When selecting garlic, choose firm, dry bulbs without sprouting. For storage, keep garlic in a cool, dark place to prolong its freshness. If you need alternatives, shallots can be used, but the flavor will differ. Garlic powder can also work in a pinch, though it lacks the freshness of raw garlic.

Red Pepper Flakes

Adding a punch to each bite, red pepper flakes have a strong hot and spicy flavor profile. They have roots in Italian cuisine and can elevate your dish with minimal effort. Choose flakes that are vibrant in color for the best quality, and store them in an airtight container away from heat sources. These flakes can be substituted with fresh chili peppers for a distinct flavor, or omitted for a milder dish.

Parsley

Fresh parsley adds a burst of color and freshness to Aglio e Olio. The herb has been celebrated for its culinary versatility and nutritional benefits, including vitamins A, C, and K. When selecting parsley, look for bright green leaves without wilting. Store it in the refrigerator, either in a jar with water or wrapped in a damp paper towel. If fresh parsley isn’t available, dried parsley can work as a substitution although it won’t provide the same freshness.

Common Mistakes to Avoid

  • Overcooking the garlic: Sautéing garlic too long can lead to a bitter taste. Keep an eye on it and only cook until golden.
  • Cooking pasta in insufficient water: Ensure the pasta has enough room to cook evenly. Insufficient water can yield gummy noodles.
  • Not salting the pasta water: Salting the water enhances the flavor of the pasta. Without it, your dish may taste bland.
  • Using low-quality olive oil: Many think any oil will do, but high-quality olive oil makes a significant difference in flavor.
  • Forgetting to reserve pasta water: Pasta water is starchy and helps bind the sauce to the noodles; always set some aside before draining.
  • Skipping the parsley: While optional, fresh parsley adds brightness and balances the oil and garlic richness.
  • Making it too spicy: Adjust red pepper flakes to your taste preference to maintain a harmonious flavor balance.
  • Not tasting as you cook: Taste the pasta and sauce as you go. Adjust seasoning for a perfectly balanced dish.
  • Using cold pasta: If you are preparing leftovers, ensure to reheat pasta gently to avoid toughening.
  • Neglecting portion control: This dish can be rich; consider serving smaller portions for a balanced meal.

Essential Techniques

Sautéing Garlic

Sautéing garlic is crucial to develop its flavor profile. Begin by heating olive oil over medium heat, then add minced garlic, stirring continuously. To master this technique, pay attention to the garlic color. It should be golden, not brown. Brown garlic can taste bitter, ruining your dish. Look for a fragrant aroma and a slight color change indicating it’s ready.

Cooking Pasta Al Dente

Cooking pasta al dente is essential for the best texture. Follow the package instructions but taste a minute or two before the recommended time to check doneness. Perfectly cooked pasta should still have bite, meaning it is firm when bitten. If cooked too long, it will become mushy. Drain and immediately toss it with your sauce to maintain the desired texture.

Emulsifying Sauce

Emulsifying your sauce with reserved pasta water is key for a luscious meal. To do this, combine pasta, sauce, and a bit of reserved water in your pan over low heat. Stir well to create a silky sauce that clings to each strand of spaghetti. If your sauce feels too thick, gradually add more pasta water until you achieve a desirable consistency.

Pro Tips for Perfect Spaghetti Aglio e Olio

– Use a high-quality extra virgin olive oil for unmatched flavor. The oil is the backbone of your dish, so don’t skimp.
– Choose fresh garlic for the best punch of flavor; pre-peeled or jarred may lack in taste.
– Always add the red pepper flakes while oil is hot to release their aroma and flavor; timing can significantly affect taste.
– If you prefer a milder dish, add the chili flakes gradually, tasting as you go to suit your preference.
– Toss the pasta in the sauce over low heat to allow flavors to marry and ensure every strand is well-coated.
– Use a large skillet to prevent overcrowding, allowing the garlic to cook evenly without burning.
– For an additional depth of flavor, consider adding a squeeze of lemon juice before serving to brighten up the dish.
– Don’t forget the garnishing! Finish with freshly chopped parsley for color and freshness.

Variations and Adaptations

– Regional variations include adding anchovies for a salty, umami flavor or other seafood if you’re feeling adventurous.
– For seasonal adaptations, consider adding sautéed seasonal vegetables like spinach or asparagus to incorporate freshness.
– Dietary modifications can be made by substituting gluten-free pasta or using whole-grain spaghetti for added fiber.
– Flavor variations include incorporating grated lemon zest or a splash of lemon juice for brightness.
– Texture modifications, such as adding crispy breadcrumbs, can provide a delightful crunch alongside the soft pasta.
– Presentation alternatives may include serving in twirls or a nest shape, garnished with additional parsley or cheese.

Serving and Presentation Guide

Serving Spaghetti Aglio e Olio is all about simplicity and elegance. To plate, gently twirl the pasta onto the plate, creating a pleasing nest shape. This not only looks visually appealing but elevates the dining experience. Garnish generously with freshly chopped parsley and ensure to drizzle any remaining olive oil for a glossy finish. To enhance flavors, provide freshly grated Parmesan on the side for those who wish to add a cheesy note.

Consider serving your Aglio e Olio alongside a light salad for balance and color or with crusty bread to scoop up any leftover oil. Temperature is crucial; this dish is best served immediately when the pasta is warm and the oil is aromatic. For portion control, aim for a generous serving of the pasta while being mindful of calories consumed.

Wine and Beverage Pairing

Pairing wine with Spaghetti Aglio e Olio enhances the overall dining experience. A crisp Pinot Grigio or a light Sauvignon Blanc complements the garlic and olive oil flavors without overpowering them. These wines have vibrant acidity that matches the richness of the dish.

If you prefer a non-alcoholic alternative, consider a sparkling water with a lemon wedge to refresh your palate between bites. Herbal teas like chamomile can be an interesting warm pairing as well, adding unique flavors to the meal.

When serving coffee or tea, ensure they are brewed at appropriate temperatures to avoid overriding your meal’s flavors. The light-bodied nature of the pasta dishes allows for flexibility with beverages, making it easy to create a delightful dining experience.

Storage and Shelf Life

Proper storage of Spaghetti Aglio e Olio is key to maintaining its flavor and freshness. Store leftovers in an airtight container in the refrigerator for up to 3 days. For best results, reheat gently on the stove with a splash of olive oil or a bit of reserved pasta water to revive texture.

Signs of spoilage to watch for include off-smells or changes in color. If you have extra sauce, consider freezing it in an airtight container. When freezing, be sure to leave some space for expansion as liquids will change consistency when frozen.

To reheat frozen Aglio e Olio, allow it to thaw overnight in the refrigerator and then heat on low until warmed through, adding more oil or water if necessary to maintain the sauce’s luscious quality.

Make Ahead Strategies

For those who thrive on planning ahead, Spaghetti Aglio e Olio can be prepared with strategic timing. Cook the spaghetti and let it cool before storing it, allowing you to mix it with the sauce right before serving. Prepare the sauce ingredients in advance—chop the garlic, measure the chili flakes, and keep them ready for cooking, streamlining the process.

Fresh elements like parsley should always be added just before serving for the best flavor. Make ahead by timing the cooking process while considering quality impacts; sauces can be intensified by cooking them longer, so balance ideal flavors with timing to keep taste vibrant.

On the day you plan to serve, assemble your dish, mixing the pre-cooked pasta with your fantastic sauce, heating it together to meld flavors wonderfully.

Scaling Instructions

Scaling this Spaghetti Aglio e Olio recipe is simple. For halving, adjust your ingredients proportionately, and taste frequently to maintain flavor consistency. Doubling or tripling the recipe requires extra attention to pot size and cooking time; you may need to cook pasta in batches to avoid overcrowding which may affect texture.

Adjust cooking equipment as needed, perhaps using a large pot for boiling and a greater skillet for the sauce if making larger quantities. If scaling up, remember that the sauce can be made in advance and reheated to ensure the pasta is served al dente and fresh.

When timing modifications are necessary, increase the boil time for larger batches, monitoring until done. Lastly, consider storage for leftovers; large quantities can be bulk packed while keeping pasta and sauce separate until reheating.

Nutritional Deep Dive

The nutritional breakdown of Spaghetti Aglio e Olio reveals a hearty dish rich in complex carbohydrates coming directly from the spaghetti. Each serving supplies energy for a busy day, making it great for fueling an active lifestyle.

Micronutrient analysis highlights garlic as a source of manganese and vitamin B6, while health benefits abound in the olive oil used, including vitamins E and K. These elements promote heart health and provide antioxidant properties.

Portion analysis is essential; moderate servings keep calories in check without compromising on flavors. When approaching your dish for weight management, balance it with fresh salads or crusty bread for additional nutrients without overindulgence.

Dietary considerations are important, especially for those targeting low-calorie meals. Adjustments can include using whole grain pasta for added fiber or lightening the olive oil content without sacrificing flavor.

Dietary Adaptations

Spaghetti Aglio e Olio can easily fit into various dietary restrictions. For gluten-free needs, utilize gluten-free pasta options that mimic traditional textures effectively without sacrificing the recipe’s heartiness.

Dairy-free diets can enjoy this dish without cheese, focusing on the olive oil and garlic. By increasing seasoning components, one can retain flavor while making it accessible for all.

Vegan considerations are inherent, allowing the dish to shine with plant-based ingredients. Low-carb or keto enthusiasts can choose zucchini noodles as an alternative, keeping flavor profiles intact while lowering carbs.

Paleo variations can feature sweet potato noodles or even spaghetti squash to keep it aligned with diet preferences. Each adaptation maintains the core elements of Aglio e Olio, making it versatile and desirable for all eaters.

Troubleshooting Guide

For texture issues in your Spaghetti Aglio e Olio, observe the al dente cooking rule. If overcooked, the starches will release too much moisture, yielding a mushy texture. Keep taste in check to ensure balanced flavors, adjusting spice levels if necessary.

Flavor balance can be achieved by adjusting the amounts of garlic or red pepper flakes, ensuring your dish reflects a harmonious profile. In cases of temperature problems, reheating gently can be a remedy; if it’s inadequately warm, a quick stovetop reheat can bring it back.

If equipment challenges arise, working with a large enough pot or skillet helps with monitoring, allowing garlic to sauté properly and preventing any burning. Resourceful substitutions can be utilized for red pepper flakes either by adjusting quantities used or swapping in fresh chilis.

Timing concerns, especially regarding pasta cooking, can be coordinated by setting a timer to prevent over-cooking or under-cooking. This involves tasting frequently and monitoring while engaging in multitasking across the remainder of your tasks.

Recipe Success Stories

Many readers have expressed delight in their Spaghetti Aglio e Olio experiences, highlighting how this simple dish has successfully earned rave reviews at gatherings. Community feedback reflects how replicating the recipe brings flavors reminiscent of Italian holidays and family dinners.

Adaptation stories illustrate sustainability, especially for people using seasonal ingredients, demonstrating how fruits or herbs can enhance the simple recipe while maintaining its essence. These creative alternatives provide fresh spins without straying too far from tradition.

Photography tips shared by readers showcase vibrant presentation techniques, using natural light to highlight oil glistening on pasta and contrasting colors of parsley and red flakes, serving to elevate the visual experience and inspire others.

Readers often suggest this dish for beginners yearning to build confidence in the kitchen, noting the immediate satisfaction it yields. The success stories reveal a versatile and cherished recipe that resonates with cooks of all levels.

Frequently Asked Questions

Can I use different types of pasta for Aglio e Olio?

Yes, while spaghetti is traditional, any long pasta like linguine or fettuccine can be used. Short pasta like penne may not hold the sauce as well but is acceptable if preferred.

What’s the best olive oil to use?

Extra virgin olive oil is recommended for its rich flavor and health benefits. Look for a high-quality, cold-pressed option for the best results.

How spicy is Spaghetti Aglio e Olio?

The spiciness comes from red pepper flakes, which can be adjusted based on your heat preference. Start slow and taste to find the right balance.

Can I make Aglio e Olio ahead of time?

While fresh pasta is best, you can prepare the garlic oil in advance and combine it with pasta just before serving to preserve flavor and texture.

Is it possible to add protein to this dish?

Definitely! Adding grilled chicken, shrimp, or even chickpeas can enrich the dish while providing additional nutrients.

What are some good sides to serve with Spaghetti Aglio e Olio?

A light salad, bruschetta, or garlic bread complements Aglio e Olio nicely. Pairing with a side of roasted vegetables can also provide balance.

How do I store leftovers?

Store leftovers in an airtight container in the fridge for up to 3 days. To reheat, add a splash of olive oil or reserved pasta water to revive the dish.

Can I use dried herbs instead of fresh parsley?

While fresh herbs provide the best flavor, dried parsley can be substituted in a pinch. However, it won’t offer the same vibrancy or taste.

Is Spaghetti Aglio e Olio suitable for vegetarians?

Yes, this dish is naturally vegetarian and can easily accommodate vegan diets by ensuring no cheese is added.

What are some common mistakes people make when preparing this dish?

Common mistakes include overcooking garlic, neglecting to salt the pasta water, or using low-quality olive oil, all of which affect flavor.

Additional Resources

Explore related recipes that celebrate Italian cuisine, such as classic marinara sauce or creamy alfredo pasta. Technique guides can provide deeper insights into perfecting pasta cooking and sauce emulsification. Ingredient information notes the significance of selecting quality items to enhance each meal, while equipment recommendations aid in efficient cooking. Additionally, look for seasonal variations that explore fresh herbs or vegetables used throughout the year.

Join the Conversation

Engage with our community by sharing your Spaghetti Aglio e Olio photos or modifications on social media. Join conversations in the comments section and inspire others with your version of this classic dish. Exchanges about family traditions surrounding pasta dishes can create camaraderie and enhance everyone’s cooking journey. Engaging actively with reviews can unlock insights and help others perfect their experience.

The Recipe

Spaghetti Aglio e Olio

Serves: 4

Prep Time: 10 mins

Cook Time: 15 mins

Total Time: 25 mins

Kitchen Equipment Needed

  • Large pot for boiling pasta
  • Skillet or frying pan
  • Colander for draining
  • Wooden spoon for stirring
  • Measuring spoons for spices

Ingredients

  • 400g (14 oz) spaghetti
  • 6 cloves garlic, minced
  • 100ml (1/2 cup) extra virgin olive oil
  • 1 teaspoon red pepper flakes (or to taste)
  • Salt, to taste
  • Fresh parsley, chopped, for garnish

Directions

  1. Bring a large pot of salted water to a boil. Add the spaghetti and cook according to package instructions until al dente.
  2. While the pasta is cooking, heat the olive oil in a skillet over medium heat. Add minced garlic and sauté until fragrant and lightly golden, about 1-2 minutes.
  3. Add the red pepper flakes into the skillet and sauté for another minute, stirring continuously to avoid burning.
  4. Once the pasta is cooked, reserve 1 cup of pasta water, then drain the spaghetti in a colander.
  5. Add the drained spaghetti to the skillet with garlic and oil. Toss to coat the pasta evenly.
  6. If the pasta seems dry, gradually add reserved pasta water until desired consistency is achieved.
  7. Season with salt and toss in fresh parsley before serving.
  8. Serve immediately, drizzling a bit more olive oil on top if desired.

Recipe Notes

  • For extra depth of flavor, consider adding lemon zest or a splash of lemon juice.
  • If desired, incorporate grated Parmesan cheese on top for additional richness.
  • Feel free to substitute gluten-free pasta for a gluten intolerance.
  • Customize the spice level by adjusting red pepper flakes to taste.

Delicious Chicken and Rice Bowls with Creamy Garlic Sauce Recipe

Delicious Chicken & Rice Bowls with Creamy Garlic Sauce – Your New Favorite Weeknight Meal

⚖️
Difficulty
Easy

⏲️
Prep Time
15 mins

🕒
Cook Time
30 mins

⏱️
Total Time
45 mins

🍽️
Servings
4

Are you looking for a simple yet delicious weeknight dinner? Look no further! Our Chicken & Rice Bowls with Creamy Garlic Sauce deliver mouthwatering flavors and textures that will leave your taste buds dancing. Juicy chicken breast, fluffy rice, and a luscious garlic sauce all come together to create a bowl that’s quick to prepare and deeply satisfying. Perfect for busy families or meal prep, this recipe is sure to become part of your regular dinner rotation.

The best part about these Chicken & Rice Bowls is how versatile they are. Savor the creamy garlic sauce that’s rich and full of flavor, yet surprisingly simple to make. You can easily customize this dish with your favorite vegetables or pair it with a side salad for extra freshness. In no time, you’ll have a wholesome and hearty meal that everyone will love!

Quick Recipe Highlights

  • Flavor Profile: The Chicken & Rice Bowls feature a delightful balance of savory chicken and a rich creamy garlic sauce that tantalizes the palate.
  • Texture: Enjoy the contrast of tender sautéed chicken, fluffy rice, and the smooth creaminess of the garlic sauce.
  • Aroma: The aroma of garlic and chicken simmering together fills your kitchen, creating a warm and inviting atmosphere.
  • Visual Appeal: The finished dish looks vibrant and appealing with contrasting colors of white rice, golden chicken, and creamy sauce.
  • Skill Level Needed: This recipe is easy for beginners yet satisfying for experienced cooks, making it the perfect choice for everyone.
  • Special Equipment: You will need a skillet and a saucepan to prepare this tasty meal.

Recipe Overview

  • Difficulty Level: The straightforward preparation makes this recipe accessible to all skill levels, allowing you to enjoy a delicious meal without stress.
  • Category: This dish falls into the category of comfort food, delivering warmth and satisfaction in every bite.
  • Cuisine: Inspired by home-cooked meals, this Chicken & Rice Bowl brings together elements from various culinary traditions emphasizing fresh ingredients.
  • Cost: Affordable ingredients make this recipe highly cost-effective, allowing family-style dining without breaking the bank.
  • Season: This meal is ideal for any season, providing hearty comfort in the colder months and a fresh option in summer.
  • Occasion: Perfect for casual weeknight dinners, family gatherings, or meal prep for the week.

Why You’ll Love This Recipe

The taste and texture of these Chicken & Rice Bowls with Creamy Garlic Sauce are simply unbeatable. Perfectly cooked chicken paired with fluffy rice creates a heartwarming combination that is deeply satisfying. The creamy garlic sauce adds an extra layer of flavor that elevates the dish, making it a delightful experience in every bite. Whether you serve it for a family dinner or as a meal prep option, you’ll love the effortless enjoyment it brings.

This recipe is incredibly convenient, minimizing kitchen time while maximizing flavor. With just a few simple steps, you can whip up a wholesome meal that everyone will adore in no time. Ideal for busy weeknights, this recipe takes the stress out of cooking, allowing you to focus on enjoying dinner with loved ones.

From a nutritional standpoint, this bowl is packed with lean protein from the chicken and carbohydrates from the rice, making it a balanced meal option. Incorporating fresh vegetables can further enhance its nutritional value, providing essential vitamins and minerals. Whether you are looking to maintain a healthy lifestyle or simply satisfy your hunger, this recipe has you covered.

Socially, these Chicken & Rice Bowls are a great option for entertaining. They can be made in larger quantities to serve multiple guests, and everyone can personalize their bowl with toppings like crispy greens or extra garlic sauce. This communal way of dining promotes sharing and interacting at the table.

Finally, the cost-effectiveness of this recipe cannot be overlooked. Utilizing budget-friendly ingredients without compromising on taste ensures that you can enjoy a delicious meal without splurging. Plus, leftovers make for delightful lunches the next day!

Historical Background and Cultural Significance

Chicken and rice dishes have a rich history in various culinary traditions around the globe. Originating from many different cultures, this combination represents comfort, nourishment, and a staple food source for families. Common in Asian, Latin American, and Mediterranean cuisines, each culture offers unique twists that highlight local flavors.

In many societies, rice has long been a symbol of sustenance and prosperity. When paired with chicken, this hearty dish is often associated with family gatherings and communal meals, celebrating hospitality and shared experiences. It reflects the universal theme of food as a unifying force in communities.

The evolution of the Chicken & Rice Bowl has seen various adaptations over time, from simple home-cooked meals to gourmet restaurant versions featuring exotic spices and gourmet sauces. As it adapts through time and cultures, this dish remains a beloved mainstay in kitchens across the world.

Regional variations of this recipe showcase local ingredients and cooking methods, incorporating regional spices and flavors that provide distinct tastes. From Thai coconut curry chicken and rice to the comfort of a Southern chicken and rice casserole, the versatility of this dish is evident in its global reach.

Ingredient Deep Dive

Chicken: As the star of this dish, chicken offers not only flavor but also an essential source of protein. Historically, chicken has been a fundamental part of diets worldwide. When selecting chicken, opt for free-range or organic options for higher quality. Fresh chicken can be stored in the refrigerator for 1-2 days, and when freezing, ensure it’s well-wrapped to avoid freezer burn. If needed, substitute with turkey or tofu for a different option.

Rice: Rice acts as the base for our bowls, providing the essential carbs needed for energy. Different regions have unique rice varieties; for instance, jasmine rice is common in Southeast Asian cooking, whereas basmati is favored in Indian cuisine. When choosing rice, always consider freshness and storage in a cool, dry place. For those needing gluten-free options, brown rice or quinoa is an excellent alternative.

Common Mistakes to Avoid

  • Not seasoning the chicken adequately – Seasoning is key to enhancing flavor, so do not skimp on herbs and spices.
  • Overcooking the rice – Always monitor cooking time and check for doneness to avoid mushy texture.
  • Using pre-made garlic sauce – Making the sauce from scratch guarantees maximum flavor and freshness.
  • Cooking the chicken at too high a temperature – This can lead to a dry result; a moderate heat allows for even cooking.
  • Skipping the resting period – Letting chicken rest afterward retains moisture and improves juiciness when sliced.
  • Not using a sharp knife – A dull knife can make cutting challenging; a sharp one ensures clean slices.
  • Ignoring portion sizing – It’s easy to overestimate how much to serve; keep portion control in mind.
  • Not prepping ingredients beforehand – Prepped ingredients streamline cooking and minimize chaos.
  • Forgetting about garnishes – Fresh herbs or toppings elevate the dish visually and in flavor.
  • Neglecting kitchen hygiene – Ensure all surfaces and utensils are clean to prevent contamination.

Essential Techniques

Cooking Rice Perfectly: Mastering rice cooking is crucial to achieving fluffy grains. Rinse the rice to remove excess starch and use the right water-to-rice ratio. A visual cue for doneness is when all water has evaporated, and the grains are tender yet firm.

Creating a Creamy Sauce: To master a creamy garlic sauce, focus on the balance of ingredients like cream and broth. Gradually whisk in room temperature liquids to avoid curdling. The necessary texture is reached when the sauce coats the back of a spoon.

Pro Tips for Perfect Chicken & Rice Bowls

Ensure your chicken is at room temperature before cooking to promote even cooking. Marinating the chicken in advance enhances flavor, making each bite delightful. Incorporating seasonal vegetables during cooking boosts nutrition and color. Don’t rush the garlic sauce; simmer it low and slow for richer flavors. Consider garnishing with fresh parsley or chives for added freshness and texture. For meal prep, divide the chicken and rice into individual containers for easy reheating options throughout the week.

Variations and Adaptations

Regional variations of Chicken & Rice Bowls are abundant and delicious. In Latin America, add cumin and chili powder for a spicy twist. Seasonal adaptations could include adding spring vegetables like asparagus or summer zucchini for freshness. For dietary modifications, try using cauliflower rice for a low-carb version while still enjoying the flavors of the sauce. Depending on your palate, feel free to adjust spices, such as adding lemon for brightness or using smoked paprika for depth.

Serving and Presentation Guide

For a beautiful presentation, layer the rice neatly in bowls before adding the chicken slices on top. Drizzle the creamy garlic sauce generously over the chicken while garnishing with fresh herbs. Consider serving with a side of sautéed greens or a colorful salad for added contrast. Make sure to serve the dish warm, as temperature greatly impacts the overall experience. Use various bowls and decorations to cater to the occasion, whether it’s an elegant dinner or casual family dining.

Wine and Beverage Pairing

Pair your Chicken & Rice Bowls with a crisp white wine such as Sauvignon Blanc or a light-bodied red like Pinot Noir that won’t overpower the meal but will complement the richness of the sauce. Non-alcoholic alternatives like iced tea or sparkling water with citrus slices offer refreshing counterpoints. If you’re a coffee lover, serving a mild roast coffee post-meal can enhance the rich flavors, especially if you add a hint of cream.

Storage and Shelf Life

Store leftovers in airtight containers in the fridge for up to 4 days. For longer storage, chicken and rice can be frozen in portion-sized bags for up to three months. Ensure to cool dishes completely before freezing to retain texture. Signs of spoilage include off smells, discoloration, and an unusual texture when reheated. To reheat, microwave or warm on the stovetop, adding a splash of water for moisture if necessary.

Make Ahead Strategies

For an efficient meal prep, cook the chicken and prepare the creamy garlic sauce ahead of time. Store each component separately for up to 3 days. Assemble the bowls right before serving to keep the rice fluffy and the chicken fresh. Quality is key; opt to add fresh elements like greens just before serving to maintain crunch and flavor. If reheating, avoid high heat to preserve texture.

Scaling Instructions

To halve the recipe, use smaller chicken breasts and adjust rice portions accordingly. To double the recipe, consider using two pans for cooking chicken and ensure there’s ample space for the rice to cook. Timing may vary slightly depending on quantity, so keep an eye on rice doneness. If scaling becomes frequent, invest in larger storage containers for efficient batch cooking.

Nutritional Deep Dive

This Chicken & Rice Bowl is balanced in macros, providing protein, carbs, and healthy fats. The chicken offers about 30g of protein per serving, essential for muscle repair. Brown rice contributes fiber, promoting digestive health. Vitamins derived from additional veggies add to the nutritional profile, making this bowl a wholesome option.

Dietary Adaptations

For gluten-free diners, this recipe is inherently gluten-free. For dairy-free options, substitute cream with coconut milk or almond milk and use dairy alternatives for a healthier twist. Vegan adaptations can include chickpeas or grilled tofu instead of chicken, creating a satisfying plant-based bowl. Low-carb followers can swap rice for cauliflower rice, while keto enthusiasts can focus on increasing fat content with a richer sauce base.

Troubleshooting Guide

If your rice turns out mushy, it likely absorbed too much water or was overcooked. Drain excess liquid and let it rest to firm up. If the flavor is lacking, try adjusting seasonings, combining herbs and spices to enhance taste. Should your chicken seem overcooked, consider using a meat thermometer to ensure proper cooking without dryness. When reheating, if the sauce separates, whisk in a splash of broth or cream to restore consistency.

Recipe Success Stories

Community feedback has been overwhelmingly positive for this Chicken & Rice Bowl. Many readers praise the simplicity and flavor, perfect for busy weeknights. Success stories highlight personal touches like adding different spices or vegetables, showcasing the dish’s versatility. Photography tips from followers emphasize capturing the vibrant colors and creamy texture to entice viewers.

Frequently Asked Questions

Can I use brown rice instead of white rice? Yes, brown rice is a nutritious alternative, providing more fiber. However, adjust the cooking time as brown rice usually takes longer to cook.

Can I make this recipe vegan? Absolutely! Substitute chicken with chickpeas or tofu and use plant-based cream alternatives for the sauce.

How can I add more vegetables to the dish? You can include veggies like broccoli, bell peppers, or peas. Stir-fry them lightly before mixing with rice.

Can I store leftovers? Yes, leftovers can be stored in the fridge for up to 4 days or frozen for up to 3 months.

What can I use if I don’t have garlic? If you don’t have garlic, you can use garlic powder or nutritional yeast as a substitute for a hint of flavor.

Is the garlic sauce spicy? No, it is not spicy. If you prefer a kick, consider adding chili flakes to the sauce.

Can I use other proteins than chicken? Yes, feel free to use turkey, shrimp, or even grilled vegetables for a delightful variation.

How long does it take to prepare the recipe? The total prep and cook time is approximately 45 minutes, making it perfect for busy weeknights.

Is the recipe good for meal prep? Yes! This recipe holds well in the refrigerator and can be easily reheated for future meals.

Can I double the recipe for a larger gathering? Definitely! Just be sure to adjust cooking time accordingly, as larger quantities may require more time to cook properly.

Additional Resources

For those interested in expanding their culinary skills, explore related recipes such as Chicken Fried Rice or Garlic Butter Shrimp. Technique guides can provide insights into perfecting rice cooking or creating homemade sauces. Learn more about ingredient benefits through dedicated articles on chicken, rice, and spices. Make sure to explore seasonal variations of the recipe to keep your meals fresh and exciting all year round.

Join the Conversation

We’d love to hear your thoughts! Share your experience with these Chicken & Rice Bowls in the comments or on social media. Snap a photo of your dish and tag us—your creativity might inspire others! Engage with the community by sharing variations or asking for tips. Feedback on techniques or meal prep should also be exchanged as it enriches everyone’s cooking journey!

The Recipe

Chicken & Rice Bowls with Creamy Garlic Sauce

Serves: 4

Prep Time: 15 mins

Cook Time: 30 mins

Total Time: 45 mins

Kitchen Equipment Needed

  • Skillet
  • Medium saucepan
  • Cutting board
  • Sharp knife
  • Measuring cups & spoons
  • Wooden spoon or spatula

Ingredients

  • 2 cups cooked rice
  • 1 lb chicken breast, diced
  • 4 cloves garlic, minced
  • 1 cup heavy cream
  • 1 cup chicken broth
  • 2 tablespoons olive oil
  • 1 teaspoon salt
  • 1/2 teaspoon pepper
  • Fresh parsley, chopped for garnish

Directions

  1. In a skillet, heat olive oil over medium heat. Add diced chicken and season with salt and pepper. Cook until golden brown, about 7-8 minutes.
  2. Stir in minced garlic and cook for an additional 1-2 minutes until fragrant, but not burnt.
  3. Pour in chicken broth and bring to a simmer. Let reduce slightly.
  4. Stir in heavy cream and simmer for about 5-7 minutes, until sauce thickens to desired consistency.
  5. Serve the chicken over cooked rice and drizzle with creamy garlic sauce. Garnish with chopped parsley before serving.

Recipe Notes

  • Feel free to add vegetables like steamed broccoli or bell peppers for extra nutrition.
  • For a spicier kick, add chili flakes or a dash of hot sauce to the sauce.
  • This dish is great for meal prep and can be stored in the fridge for up to 4 days.
  • For a dairy-free version, use coconut cream or almond milk in place of heavy cream.