Delicious Low-Carb Keto Chicken Nuggets Recipe for Everyone

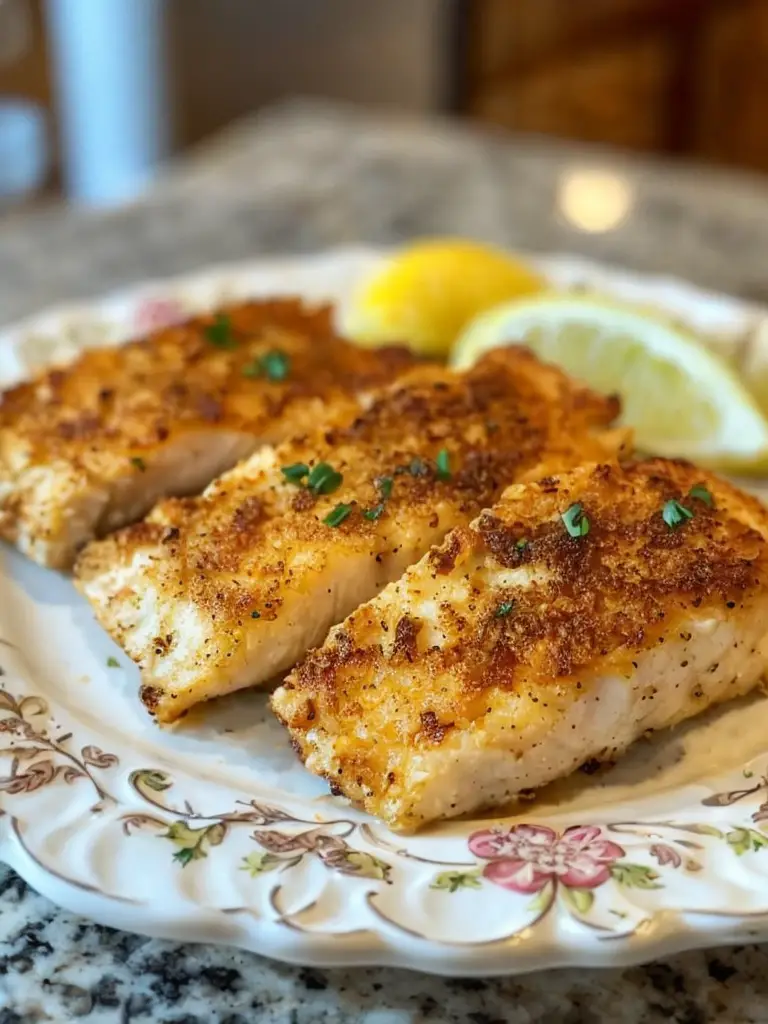
Delicious Low-Carb Keto Chicken Nuggets: A Crispy Delight!

⚖️
Difficulty
Easy

⏲️
Prep Time
15 mins

🕒
Cook Time
20 mins

⏱️
Total Time
35 mins

🍽️
Servings
4 servings

Low-carb Keto chicken nuggets are not just a tasty treat but also a healthy twist on a classic snack. These crispy delights are coated in a light, crunchy crust that provides satisfying texture while keeping the carb count low. Perfect for those following a keto lifestyle, these homemade chicken nuggets are made with healthy ingredients, ensuring no unnecessary fillers or preservatives. You can indulge guilt-free, knowing they are both wholesome and delicious.

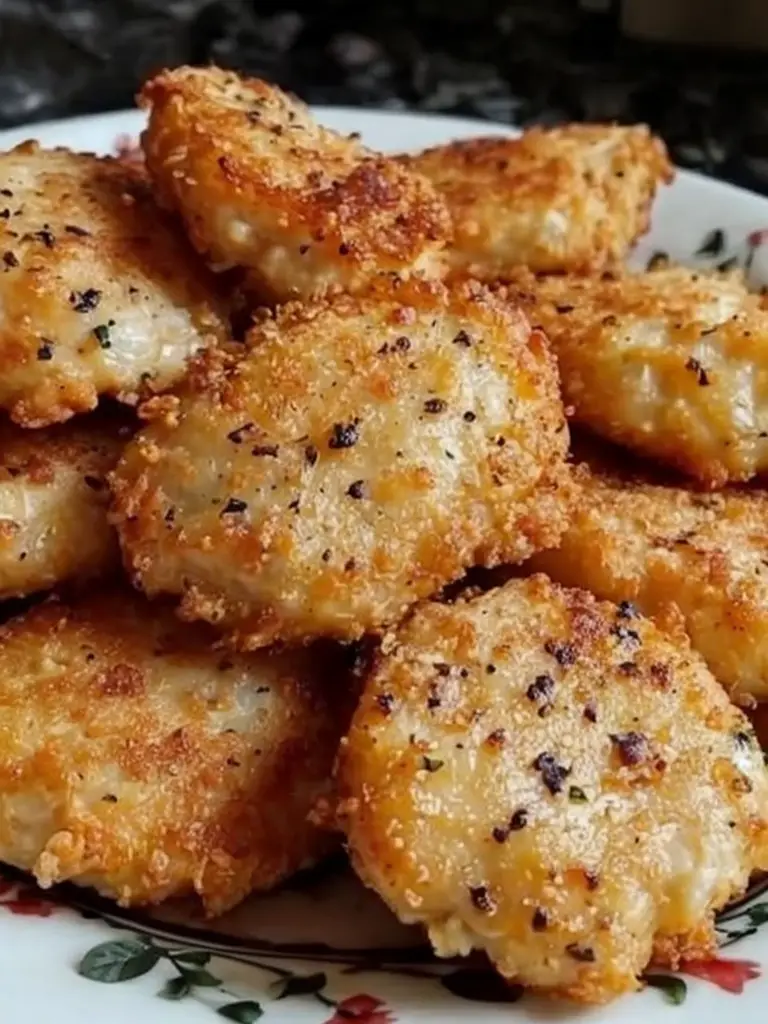
Imagine biting into a perfectly cooked chicken nugget, its outer layer golden brown and crisp, with tender, juicy chicken inside. The aroma of freshly seasoned chicken wafts through the kitchen, making it a culinary experience for the entire family. Dipping them in your favorite sauce can be a delightful addition, enhancing the flavor even further.

Quick Recipe Highlights

  • Flavor Profile: Each nugget bursts with savory, herbal notes, ideal for satisfying your taste buds.
  • Texture: Crispy on the outside while remaining moist and tender inside, creating a perfect contrast.
  • Aroma: A tantalizing blend of garlic powder and optional spices that fill your kitchen with mouthwatering scents.
  • Visual Appeal: Naturally golden brown nuggets that look both appetizing and homemade, great for any gathering.
  • Skill Level Needed: Simple preparation techniques make this recipe accessible to all cooking skill levels, even beginners.
  • Special Equipment: A baking sheet lined with parchment paper is all you need for a fuss-free cooking experience.

Recipe Overview

  • Difficulty Level: This low-carb Keto chicken nuggets recipe is classified as easy. It doesn’t require specialized techniques, making it perfect for quick weeknight dinners.
  • Category: These nuggets fit perfectly into the appetizer or snack category, ideal for parties or as a meal companion.
  • Cuisine: While reminiscent of classic American cuisine, they contain European influences with herb seasonings and savory nuances.
  • Cost: Ingredients are affordable, typically within the range of $10-$15 for a main dish serving four.
  • Season: All year round! These chicken nuggets can be a family favorite regardless of the season.
  • Occasion: Perfect for family meals, parties, and even as game day snacks!

Why You’ll Love This Recipe

These low-carb Keto chicken nuggets provide an explosion of taste and texture that you won’t be able to resist. Imagine fresh, juicy pieces of chicken enveloped in a seasoned crust that enhances every bite. The crunchiness of the exterior harmonizes beautifully with the moist inside, creating a delightful eating experience that’s satisfying and nourishing.

The convenience of this recipe is also a significant advantage. In just 35 minutes, you can whip up these delicious nuggets, perfect for a quick lunch or dinner. The preparation involves minimal effort, with the chicken pieces coated and ready to bake in under 20 minutes. It’s simple enough to whip together on a busy weeknight without compromising on flavor.

From a nutritional standpoint, these chicken nuggets shine, especially for those following low-carb or keto diets. Made primarily from chicken breast and almond flour, they offer a high protein content with low carbs, keeping you full longer without the extra calories.

Socially, these nuggets are ultimate crowd-pleasers, making them excellent options for gatherings. Serve them at parties, and you’re sure to have guests asking for the recipe. Their versatility and flavor make them enjoyable for both adults and children alike.

Lastly, consider the cost-effectiveness of this recipe. Using simple ingredients that are often already in your pantry ensures that you can create a delightful dish without breaking the bank. Buying pre-made versions can be twice as expensive, making homemade alternatives like these nuggets a smart, accessible choice.

Historical Background and Cultural Significance

Chicken nuggets have an interesting origin story. They were first created by Robert C. Baker, a food scientist, in the 1950s as a way to capitalize on the growing fast-food industry. He introduced a molded chicken tender that later became popularized as the chicken nugget.

Culturally, chicken nuggets have become a staple in American fast food and home cooking alike. Their evolution has seen the introduction of various sauces and cooking styles, which have led to regional favorites, such as Buffalo-style nuggets or spicy iterations. This dish encapsulates aspects of American dining culture, which values convenience and comfort food.

Over the years, the chicken nugget recipe has transformed, adapting to dietary preferences and health trends. The introduction of low-carb and Keto alternatives reflects modern culinary shifts that prioritize healthier eating while still enjoying beloved comfort foods.

Regional variations may include different breading techniques, flavors, and serving styles, showcasing how versatile this humble nugget can be. As the world increasingly embraces dietary preferences, reinterpretations of chicken nuggets are sure to continue evolving.

Ingredient Deep Dive

Chicken Breast: Chicken breast is the star of this recipe. Known for its versatility, it’s a lean source of protein vital for muscle maintenance and repair. When choosing chicken, look for fresh, organic options to ensure you get the best flavor and nutrients.

In terms of storage, raw chicken should always be stored in the refrigerator and should be consumed within two days. Cooked chicken can be kept in an airtight container for up to four days. Alternatives like turkey or pork can be substituted if a different flavor is desired.

Almond Flour: Almond flour is a popular low-carb substitute for traditional breadcrumbs. Rich in healthy fats and vitamin E, it adds a nutty flavor to dishes. When selecting almond flour, ensure it’s finely ground for a smoother texture.

Store almond flour in a cool, dry place to maintain freshness. It can also be refrigerated or frozen in airtight containers to prolong its shelf life. Alternatives like coconut flour can be used, but they absorb moisture differently, so adjustments to the liquid in the recipe may be needed.

Common Mistakes to Avoid

  • Not Preheating the Oven: Failing to preheat can lead to uneven cooking, resulting in soggy nuggets. Always ensure your oven is at the correct temperature before baking.
  • Using Old Oil: Oil that has been used multiple times can impart off-flavors. Always use fresh oil for frying or baking to maintain the intended taste.
  • Skipping the Breading Process: Breading is crucial for that classic nugget crunch. Omitting this step will result in a mushy texture.
  • Incorrect Cooking Time: Overcooking can dry out the nuggets. Use a meat thermometer to check that chicken reaches an internal temperature of 165°F.
  • Not Seasoning Enough: The flavor comes from seasoning. Don’t be shy with salt and pepper, and consider adding herbs for enhanced taste.
  • Overcrowding the Baking Sheet: Too many nuggets on one tray can lead to steaming instead of crisping. Bake in batches to maintain that crispy texture.
  • Using Whole Chicken Breast: For uniform cooking, cut the chicken into even-sized pieces. Uneven sizes can lead to some pieces being overcooked while others are undercooked.
  • Discarding Leftovers: Leftover nuggets can be reheated for a quick meal. They store well in the fridge and are great for next-day lunches.

Essential Techniques

1. Proper Breading: The efficiency of the breading process is essential for crispy nuggets. Ensure that the chicken is fully coated in almond flour, shaking off any excess to create a light crust. A common pitfall is using too much flour, which can lead to clumping and an uneven texture.

2. Monitoring Cooking Temperature: Baking at the right temperature is key to achieving a perfect texture. Start with a preheated oven, aiming for around 400°F. Look for a golden brown color as a visual cue for doneness.

3. Essential Flavoring: Properly seasoning the chicken before coating ensures flavor penetration. Mix spices into the almond flour to infuse more depth into every bite. A common mistake is neglecting this step, leading to bland finished nuggets.

4. Utilizing a Meat Thermometer: This tool is valuable for achieving perfect doneness without guessing. When the chicken reaches 165°F, it’s safe and perfectly cooked. Relying on color alone can be misleading, as it may appear done while still being raw internally.

Pro Tips for Perfect Low-Carb Keto Chicken Nuggets

1. Experiment with Seasonings: Feel free to mix different herbs and spices into the almond flour for unique flavor variations. Italian seasoning or smoked paprika can transform the taste profile dramatically.

2. Try Different Dipping Sauces: Pair these nuggets with low-carb alternatives like avocado dip or homemade ranch for added fun and flavor at the table.

3. Use Parchment Paper: Lining your baking sheet with parchment paper helps prevent sticking and aids in cleanup, ensuring your nuggets bake evenly.

4. Freeze for Later: Prepare a double batch and freeze the uncooked nuggets. This allows you to have a quick snack or meal ready anytime!

5. Cook in Batches: If you’re making a larger quantity, cook in smaller batches to ensure each piece gets the right amount of heat and avoids steaming.

6. Let Them Rest: After baking, allow the nuggets to sit for a few minutes before serving. This helps maintain crispiness and allows the juices to redistribute.

Variations and Adaptations

Consider experimenting with variations like buffalo-style chicken nuggets. Simply toss the cooked nuggets in a mix of hot sauce and melted butter for an extra kick. Seasonal adaptations can also be incorporated, such as adding pumpkin or zucchini spice in fall.

For dietary modifications, using shredded coconut or crushed pork rinds can create grain-free alternatives, making them suitable for paleo eaters. If looking for flavor variations, adding cheese to the almond flour mix or spices can change the flavor profile to match different cuisines.

Different textures can be achieved by baking versus shallow frying; each method offers a unique final product. If seeking presentation alternatives, serve these chicken nuggets skewered with colorful veggie accompaniments for an appealing platter at gatherings.

Serving and Presentation Guide

Plating techniques can elevate the presentation of your low-carb Keto chicken nuggets. Consider arranging them in a circle on a large platter. Garnish with fresh herbs or a sprinkle of paprika to enhance visual appeal.

Traditional accompaniments like celery sticks and dipping sauces work wonderfully alongside the nuggets. For modern serving suggestions, consider presenting them in mini bowls with a variety of dipping options to encourage sharing and engagement.

When serving, consider temperature; serving warm nuggets ensures optimal enjoyment of their crispy texture. Portion control is also essential—serving in small bowls allows guests to take as many as they desire without overindulging.

Wine and Beverage Pairing

Pair these chicken nuggets with a light white wine, such as Sauvignon Blanc, that complements the savory flavors without overpowering them. Non-alcoholic alternatives like sparkling water with a splash of lemon also pair wonderfully.

If you enjoy coffee, consider a smooth cold brew coffee, balancing well with the richness of the chicken. For tea lovers, unsweetened iced tea with a hint of lemon is a refreshing choice to accompany this dish.

Serving temperature matters too; chilled wines enhance the dining experience, especially on warm days, so keep your beverage of choice in the fridge before serving.

Storage and Shelf Life

Once cooked, these chicken nuggets can be stored in an airtight container in the refrigerator for up to four days. For longer shelf life, consider freezing them. Ensure they are fully cooled before placing them in freezer-safe bags or containers to avoid freezer burn.

Signs of spoilage include off smells or a slimy texture. Reheat gently in the oven to maintain texture, ideally at 350°F for 10-15 minutes. Avoid microwave reheating, which can lead to a chewy texture.

If you do freeze, place parchment paper between layers to prevent sticking and ease removal when you’re ready to enjoy them again.

Make-Ahead Strategies

To make this recipe ahead of time, you can prepare the chicken nuggets up to the baking stage. Store them in the refrigerator for up to a day before baking.

Regarding freezing, after assembly, the uncooked nuggets can be frozen on a tray before transferring them into sealed bags. This method helps maintain quality without altering the texture during cooking.

Ensure you reheat from frozen in the oven, as this will preserve their crispy quality. When ready to serve, you can add fresh elements, such as a squeeze of lemon or freshly chopped herbs, to enhance flavor right before serving.

Scaling Instructions

If you need to halve or double the recipe, simply adjust the ingredient quantities accordingly. For optimal cooking, keep the same cooking times, but monitor for doneness closely; larger batches may take slightly longer but shouldn’t differ drastically.

While larger quantities might require additional cooking sheets, ensure not to overcrowd them to keep each piece crisp. When planning to scale, keep in mind the additional resources needed for an expansion, including space in your oven and containers.

After scaling, leftovers also offer wonderful opportunities for meal prep; you can easily store or freeze any extra nuggets for future enjoyment.

Nutritional Deep Dive

Each serving of these low-carb Keto chicken nuggets generally contains a healthy macro breakdown. With high-protein content from chicken and healthy fats from almond flour, you gain satiation without unnecessary carbs.

These nuggets also serve significant micronutrients, including vitamin E and B vitamins, crucial for energy metabolism and overall wellness. The nutritional benefits are apparent, supporting muscle growth and repairing body tissues, thus making them beneficial for both active and sedentary lifestyles.

In portion analysis, keeping an eye on serving sizes ensures weight management and dietary adherence. The low-calorie count proves advantageous for those monitoring their intake while still enjoying delicious meals.

Dietary Adaptations

For gluten-free options, using almond flour as shown in the recipe easily meets dietary restrictions, ensuring everyone can enjoy. Dairy-free options can be achieved by omitting any cheese, while the clean flavors of the chicken remain satisfying.

For those following vegan diets, consider using vegetable proteins, like chickpea nuggets, as a hearty alternative. The low-carb version is already suitable for Keto, while Paleo adaptations can be made using nut flours with no grains at all.

Each adaptation maintains a focus on flavor and texture, ensuring that dietary needs are met without sacrificing what makes chicken nuggets a beloved favorite.

Troubleshooting Guide

If your nuggets turn out too dry, it’s likely due to overcooking. To avoid this in the future, use a meat thermometer for accuracy. If you feel your nuggets lack flavor, revisit your seasoning before baking to enhance taste.

In cases where nuggets appear soggy, ensure your cooking sheet is not overcrowded. This allows heat to circulate and create a crispy texture. If you’re having difficulty with a sticking coating, try refrigerating the breaded nuggets for about 15 minutes before baking.

For ingredient substitutions leading to texture problems, understand that different flours react uniquely; adherence to the recipe benchmarks will lead to consistent results.

Recipe Success Stories

Community feedback reflects widespread enjoyment of these low-carb Keto chicken nuggets, with readers frequently adjusting flavors and sharing tips. Success stories often reveal delicious family-friendly adaptations, where kids especially enjoy getting involved in the preparation.

Multiple readers have experimented with different dipping sauces, creating a buzz around their unique flavor combinations, showcasing how versatile this recipe truly is. Additionally, many have shared tips on meal prepping these nuggets, emphasizing their convenience as busy weeknight meals.

Photography tips for serving or sharing successful dishes have also emerged, encouraging the community to share their scrumptious efforts on social media, building an engaged follower base around the recipe.

Frequently Asked Questions

Can I use chicken thighs instead of breasts? Yes, chicken thighs will work beautifully, providing a richer flavor and juicier texture. Just adjust cooking time slightly as they may require a bit longer to cook through.

How can I make these nuggets spicier? You can easily incorporate cayenne pepper or crushed red pepper flakes into the almond flour for a spicy kick. Alternatively, try marinating the chicken in hot sauce before breading.

Can I bake these instead of frying? Absolutely! Baking is the method used in this recipe, ensuring they remain low-carb and healthy. Place them on a lined baking sheet for best results.

Are these nuggets freezer friendly? Yes! Cooked and uncooked nuggets freeze well. For uncooked nuggets, lay them out on a tray before freezing to prevent sticking.

What dipping sauces pair well with these nuggets? Low-carb options like guacamole, homemade ranch, or sugar-free BBQ sauce can elevate your dining experience.

Can I make these nuggets in an air fryer? Yes! Air fryers can produce wonderfully crispy nuggets. Cook them at 400°F for around 10-12 minutes, flipping halfway through.

What is the best way to reheat these chicken nuggets? Oven reheat to 350°F for about 10-15 minutes to regain their crispy texture. Microwaving them may make them rubbery.

Can I customize the breading ingredients? Yes! Try using a mix of seeds or other nut flours, but be aware it may alter the flavor and texture slightly.

How do I know when my nuggets are done cooking? The best way to check is by using a meat thermometer to ensure they reach 165°F internally for safety and perfect cooking.

Are these suitable for meal prep? Yes, they make an excellent option for meal prep! Store in airtight containers and enjoy throughout the week.

Additional Resources

Expand your culinary repertoire with related recipes for sauces like homemade ranch or sugar-free ketchup that pair beautifully with these nuggets.

Explore technique guides that cover frying and baking, offering insights into optimizing your cooking methods. Ingredient information, like the benefits of using almond flour versus traditional breading, lends additional culinary knowledge.

Don’t forget to look into equipment recommendations for kitchen tools that can make your cooking experience seamless, such as quality baking sheets and measuring utensils, to ensure you have everything you need on hand.

Join the Conversation

We encourage you to share your thoughts and experiences with this low-carb Keto chicken nuggets recipe! Engage with us on social media platforms and share your photography of the dishes you’ve created.

Your reviews and suggestions are invaluable for the recipe’s growing community, inspiring others to attempt their variations. Let’s create a hub for delicious, healthy eating where everyone can join in the conversation and enjoy these chicken nuggets together!

The Recipe

Low-Carb Keto Chicken Nuggets

Serves: 4 servings

Prep Time: 15 mins

Cook Time: 20 mins

Total Time: 35 mins

Kitchen Equipment Needed

  • Baking sheet
  • Parchment paper
  • Mixing bowls
  • Meat thermometer

Ingredients

  • 1 lb chicken breast, cubed
  • 1 cup almond flour
  • 1 tsp garlic powder
  • 1 tsp onion powder
  • 1/2 tsp paprika
  • Salt and pepper to taste
  • 1 egg, beaten

Directions

  1. Preheat your oven to 400°F (200°C) and line a baking sheet with parchment paper.
  2. In a bowl, mix almond flour, garlic powder, onion powder, paprika, salt, and pepper.
  3. Dip each piece of chicken first in the beaten egg, then coat in the almond flour mixture.
  4. Place the coated chicken nuggets on the prepared baking sheet in a single layer.
  5. Bake for 20 minutes or until nuggets are golden brown and cooked through, flipping halfway.
  6. Check that the internal temperature has reached 165°F before serving.

Recipe Notes

  • Feel free to adjust seasonings according to your taste preferences.
  • Uncooked nuggets can be frozen and baked later for a quick meal option.
  • For additional crunch, consider shallow frying the nuggets instead of baking.

Keto Cauliflower Mac and Cheese: A Low-Carb Comfort Food

Keto Cauliflower Mac and Cheese: Creamy, Cheesy Comfort Without the Carbs

⚖️
Difficulty
Easy

⏲️
Prep Time
10 mins

🕒
Cook Time
25 mins

⏱️
Total Time
35 mins

🍽️
Servings
4 servings

If you’re craving a comforting dish but want to keep your carb intake low, this Keto Cauliflower Mac and Cheese is the perfect solution! This delightful recipe brings together the rich, creamy goodness of traditional mac and cheese but substitutes pasta with tender cauliflower. The result is a hearty, delicious meal that feels indulgent without straying from your keto lifestyle. You’ll love how three types of cheese blend beautifully with garlic and spices, creating a dish that’s not only satisfying but absolutely flavorful.

Imagine slicing into a steaming bowl of this mac and cheese, the rich scent of melted cheese wafting up to greet you. As you dig in, the creamy texture envelops the cauliflower, and you get that familiar cheese burst with every bite. This dish is not only about the amazing taste but also the comfort it brings — it’s perfect for weeknight dinners, family gatherings, or as a satisfying side dish during holidays. Plus, it’s a fantastic way to sneak in some veggies into your diet!

Quick Recipe Highlights

  • Flavor Profile: This Keto Cauliflower Mac and Cheese features a mix of sharp cheddar, creamy mozzarella, and tangy cream cheese, creating a beautifully balanced flavor that’s savory and comforting.
  • Texture: The tender cauliflower mimics the chewy bite of pasta while enveloped in a lush cheese sauce that is both creamy and smooth.
  • Aroma: The inviting aroma of melted cheese combined with garlic and fresh herbs makes this dish not just a meal, but an experience.
  • Visual Appeal: With a golden-brown topping and vibrant white cauliflower, this dish is as pleasing to the eyes as it is to the palate.
  • Skill Level Needed: This recipe is easy to make and requires minimal cooking knowledge, making it ideal for beginner cooks.
  • Special Equipment: All you need is a baking dish, a stovetop saucepan, and an oven to create this delicious meal.

Recipe Overview

  • Difficulty Level: The dish is straightforward, requiring just a few key cooking techniques, making it accessible even for novice cooks.
  • Category: This recipe falls under the categories of comfort food, gluten-free, and low-carb meals.
  • Cuisine: Influenced by American comfort food traditions, this dish showcases the versatility of cauliflower while keeping it keto-friendly.
  • Cost: This Keto Cauliflower Mac and Cheese is budget-friendly, with common ingredients that are inexpensive and easy to find.
  • Season: Enjoy this dish year-round, as it’s comforting in winter and can be a lighter option in the warmer months.
  • Occasion: Perfect for casual weeknight dinners, potlucks, or any gathering that calls for delightful comfort food.

Why You’ll Love This Recipe

This Keto Cauliflower Mac and Cheese is a spectacular collision of taste and texture. When you take your first bite, the creaminess of the cheese sauce wraps around the tender cauliflower, delivering comfort and satisfaction in every spoonful. There’s an exuberance that comes from knowing you’re indulging in a dish that stays true to your dietary goals while satisfying your palate completely.

The convenience of this dish is another reason to love it. It can be prepared quickly, making it an ideal choice for busy evenings when you still want a home-cooked meal. Each step is simple, meaning you can enjoy a delicious homemade dish without spending hours in the kitchen. This will become a go-to recipe for when you want to throw something tasty together with minimal fuss!

Health-wise, this mac and cheese packs a punch in nutritional benefits. Cauliflower is an excellent source of vitamins and fiber, making this dish a smart choice for those looking to boost their veggie intake. Coupled with the richness of cheese, you’ve got a delicious meal that offers not just comfort but also nourishment.

When hosting a gathering, this Keto Cauliflower Mac and Cheese truly shines. It’s a crowd-pleaser that can be served as a side or a main dish. Guests who may not typically enjoy keto meals will find themselves savoring each bite. It invites conversation and warm feelings, making it the star of any dinner table.

Lastly, its cost-effectiveness cannot be ignored. With just a few inexpensive ingredients, you can serve multiple people without breaking the bank. This dish allows you to enjoy gourmet flavors and textures without the hefty price tag, making it truly accessible for anyone looking to indulge in healthy yet comforting food.

Historical Background and Cultural Significance

The origins of mac and cheese can be traced back to ancient times, dating back to recipes recorded in Italy and later brought to the United States. While traditional mac and cheese often features pasta, the rise of low-carb and gluten-free cooking has opened the door for alternatives like cauliflower, which is not only lower in carbs but packed with nutrients. The adjustment to using cauliflower also reflects a broader shift towards healthy eating in contemporary cuisine.

Mac and cheese has long been embedded in American culture as a symbol of comfort food, often associated with family gatherings and celebrations. The embrace of cauliflower as a substitute showcases how cultural dishes can evolve to meet dietary needs while still honoring their roots. This modern twist offers a way to keep tradition alive while adapting to contemporary lifestyles.

Over the years, variations of mac and cheese have emerged, especially in the USA. From southern baked versions to gourmet adaptations featuring lobster or truffle oil, the flexibility of the dish has allowed chefs and home cooks alike to experiment. The Keto Cauliflower Mac and Cheese represents a significant shift towards healthier versions, especially as dietary trends gain popularity.

Regional variations of mac and cheese also add depth to its cultural significance. Whether it’s the creamy textures of the south or the sharp flavors of New England, this dish holds a special place in hearts and kitchens across the country. Its evolution reflects the changing culinary landscape, making it a dish that truly resonates with people everywhere.

Ingredient Deep Dive

Cauliflower: Traditionally part of the cruciferous vegetable family, cauliflower has gained fame as a low-carb alternative to grains and starchy vegetables. Its subtle flavor allows it to adapt to various recipes, making it versatile. Rich in vitamins C and K, cauliflower promotes overall health and well-being. When selecting cauliflower, look for firm, dense heads with tightly packed florets. Store it in the fridge in a plastic bag to maintain freshness. You can substitute it with broccoli or zucchini for a different twist.

Cheddar Cheese: A staple in many kitchens, cheddar cheese adds sharpness and depth to dishes. Its cultural significance is particularly highlighted in American cooking, where it’s often paired with comfort foods. Cheddar is rich in calcium and protein; it’s best to choose aged varieties for a stronger flavor. When storing, keep it wrapped tightly in wax paper before placing it in an airtight container. If you’re looking for alternatives, gouda or Monterey jack work wonderfully.

Mozzarella Cheese: Known for its melting qualities, mozzarella cheese brings a gooey texture to the mix. Historically, mozzarella hails from Italy, often produced from water buffalo’s milk. It’s lower in calories than many other cheeses and offers a fresh, mild taste. To store mozzarella, keep it in its liquid or wrap it in plastic wrap to maintain moisture. You might want to substitute it with provolone or burrata for variety.

Cream Cheese: Cream cheese softens and enriches dishes with its creamy texture and tangy flavor. It has its roots in American cuisine, where it’s frequently used in both savory and sweet dishes. This cheese is an excellent source of fat, perfect for keto diets. Make sure to keep it refrigerated and tightly sealed to avoid drying out. In a pinch, mascarpone can serve as a worthy replacement.

Common Mistakes to Avoid

  • Not draining the cauliflower properly after steaming can result in a watery dish. Make sure all moisture is removed before mixing in the cheese sauce.
  • Using pre-shredded cheese can lead to a grainy texture. It’s best to grate cheese yourself for optimal melting results.
  • Overcooking the cauliflower may make it mushy and lose its texture. Aim for al dente to maintain a slight bite.
  • Forgetting to season the dish adequately will lead to bland flavors. Salt, pepper, and garlic powder are essential for a tasty result.
  • Baking at too high a temperature will burn the cheese on top before the insides heat through. Stick to moderate temperatures for a fully cooked meal.
  • Skipping the baking stage can result in a less cohesive dish. Baking helps meld flavors together and create a beautiful golden crust.
  • Using low-fat cheese can diminish the creamy nature of the dish; full-fat options yield the best results.
  • Neglecting to let the dish cool before serving may cause it to fall apart. Allow it to sit for a few minutes for better serving.

Essential Techniques

Steaming cauliflower: This technique is crucial for achieving the right texture. Steaming helps to soften the cauliflower without losing nutrients or flavor. To master this, ensure you have even-sized florets, and do not overcook them. You’ll know they’re done when they’re tender yet still hold their shape, ensuring a perfect base for your mac and cheese.

Making a cheese sauce: The cheese sauce should be creamy and smooth. Begin by melting butter and adding flour to create a roux. Gradually whisk in milk until thickened, and then stir in your cheese. Watch for lumps, which means the cheese is cooking too quickly; use low heat for optimal melting. The sauce should be velvety, clinging beautifully to the cauliflower.

Pro Tips for Perfect Keto Cauliflower Mac and Cheese

1. For added flavor, feel free to incorporate spices like paprika, cayenne, or mustard powder into your cheese sauce.

2. Mixing different types of cheese can elevate the flavor; consider using gouda or feta alongside cheddar and mozzarella.

3. Bake it covered for the first 15 minutes to avoid over-browning before ensuring it’s heated through.

4. For a crispy topping, mix breadcrumbs or crushed pork rinds with melted butter and sprinkle them on top before baking.

5. If you want a little more zest, add chopped jalapeños or cooked bacon for an unexpected kick!

6. Experiment with herbs like thyme, oregano, or parsley to introduce more complexity to your dish.

7. Allow the dish to sit for a while after baking before serving; this allows it to set up and makes for easier serving.

8. Utilize a cast-iron skillet for baking; it gives the mac and cheese a rustic look and helps with even cooking.

Variations and Adaptations

For a regional twist, you can incorporate New Orleans-style sausage and Cajun spices for a bold flavor. For those looking to make it seasonal, consider adding cooked squash or pumpkin during the fall months to give it a luxurious texture. Additionally, vegans can swap cheese for almond or coconut “cheese” and the cream cheese for cashew cream to achieve a dairy-free version.

If you’re looking for flavor enhancements, consider adding caramelized onions or spinach for added depth. For a texture contrast, toss in some cooked bacon or chopped nuts before baking. Presentation can also vary; consider layering the mac and cheese in a clear dish to showcase the beautiful cheesy layers, or serve it in individual ramekins for a stunning table display.

Serving and Presentation Guide

Present your Keto Cauliflower Mac and Cheese with flair by scooping it into serving bowls with a sprinkle of fresh herbs on top. For a touch of elegance, use a garnish of microgreens or edible flowers. Consider pairing it with a fresh side salad to balance the richness of the cheese, adding a pop of color and nutrition.

Another fun idea for serving is to place the dish on a wooden cutting board, allowing guests to help themselves. When plating, ensure you have a nice crusty top to showcase the golden layer that everyone loves. Maintain warm serving temperatures by preheating plates if you’re serving it family-style.

Wine and Beverage Pairing

A delightful wine pairing would be a crisp Chardonnay, which complements the creaminess of the cheese without overwhelming it. If you prefer red, a light Pinot Noir can work beautifully with the dish’s richness. For a non-alcoholic option, consider a sparkling water served with a slice of lemon to refresh the palate between bites. If you enjoy coffee, a smooth cold brew pairs nicely due to its juxtaposition of flavors.

Storage and Shelf Life

Store any leftovers in an airtight container in the fridge for up to 3 days. To maintain freshness, you can also freeze portions, but be aware that the texture may slightly change upon reheating. When reheating, use the oven for best results, covering it with foil to prevent it from drying out. Microwave reheating is convenient but may yield a less appealing texture overall.

Make Ahead Strategies

You can prepare the dish a day in advance, simply assembling the ingredients and storing it in the refrigerator before the baking step. Before serving, remember to allow the dish to sit at room temperature for about half an hour and then bake as directed. This approach not only saves you time but enhances the flavors as they meld overnight.

Scaling Instructions

If you need to serve more guests, this recipe can easily be doubled or tripled. Just ensure that your baking dish is large enough to accommodate the increased volume, and adjust your cooking time accordingly. For smaller portions, cut the ingredient amounts in half, but be mindful that baking times might need to be slightly reduced.

Nutritional Deep Dive

This Keto Cauliflower Mac and Cheese provides an excellent balance of macronutrients. With lower carbs compared to traditional recipes, it supports a ketogenic lifestyle, helping maintain energy levels while aiding in weight management. The fiber content from cauliflower promotes digestive health, while the rich cheese supply essential fats that are crucial for a balanced diet.

Dietary Adaptations

This recipe is not only low-carb but can also be adapted for several dietary needs. For those avoiding gluten, it’s naturally gluten-free due to the lack of traditional pasta. A dairy-free version can be achieved through the use of plant-based cheeses and coconut cream instead of cream cheese. The recipe can also fit vegan diets by substituting all dairy ingredients with alternatives derived from nuts or soy.

Troubleshooting Guide

If your dish ends up too dry, pay attention to your baking time, as overbaking can dehydrate it. For too much moisture, ensure proper drainage of the cauliflower. A grainy cheese sauce typically indicates overheating; be patient and allow the cheese to melt gently while stirring consistently. If your cheese sauce isn’t thickening, a little cornstarch mixed with water can work as an emergency thickener.

Recipe Success Stories

Countless home cooks have fallen in love with this Keto Cauliflower Mac and Cheese, with many sharing their success on social media. They have praised its creamy texture and rich flavor, often adding personal touches like extra spices or unique cheeses. Adaptation stories have emerged as well, with readers successfully creating variations that cater to their individual tastes.

Frequently Asked Questions

Can I use frozen cauliflower?

Yes, frozen cauliflower works well in this recipe. Just be sure to thaw and drain it thoroughly before mixing it with the cheese sauce to avoid excess moisture.

Can I make this dish ahead of time?

Absolutely! You can prepare it the day before, just skip the baking step and cover it in the fridge. When you’re ready to eat, simply bake it as directed.

What can I serve with Keto Cauliflower Mac and Cheese?

This dish pairs beautifully with grilled meats, a fresh salad, or roasted vegetables, making it a versatile side or main course.

How can I store leftovers?

Leftovers should be stored in an airtight container in the fridge for up to 3 days. You can also freeze portions for later use.

Can I add more vegetables to the recipe?

Yes! Feel free to add in veggies like spinach, mushrooms, or zucchini. Just be sure to sauté them first to reduce extra moisture.

What type of cheese works best?

Sharp cheddar is a great choice, but feel free to experiment with others like mozzarella, gouda, or pepper jack for a kick!

Is it suitable for kids?

Definitely! The creamy, cheesy flavor is usually a hit with kids, and they may not even notice the cauliflower!

What if my cheese sauce is too thick?

If your sauce is too thick, gradually whisk in a little more milk until it reaches the desired consistency.

Can I make it spicy?

Yes! For those who love heat, consider adding jalapeños, or a dash of cayenne pepper to spice things up.

What can I use instead of cream cheese?

Mascarpone or even Greek yogurt can be used in place of cream cheese for a different twist.

Additional Resources

To enhance your cooking repertoire, check out other low-carb recipes like zucchini noodles, keto pizza, or almond flour pancakes. You can also explore guides on how to cook with cauliflower, its many variations, and even get tips on how to maximize flavors in keto cooking.

Join the Conversation

Engage with our community by sharing your Keto Cauliflower Mac and Cheese creations on social media! We love to see your unique twists on the recipe. Share your success stories, helpful tips, and your favorite pairings, and don’t forget to tag us so we can feature you!

The Recipe

Keto Cauliflower Mac and Cheese

Serves: 4 servings

Prep Time: 10 mins

Cook Time: 25 mins

Total Time: 35 mins

Kitchen Equipment Needed

  • Baking dish
  • Stovetop saucepan
  • Whisk
  • Steamer basket or microwave-safe bowl

Ingredients

  • 1 large head of cauliflower, cut into florets
  • 1 cup sharp cheddar cheese, shredded
  • 1 cup mozzarella cheese, shredded
  • 4 oz cream cheese, softened
  • 1/2 cup heavy cream
  • 2 cloves garlic, minced
  • Salt and black pepper to taste
  • 1/2 teaspoon paprika (optional)
  • 1/4 teaspoon cayenne pepper (optional)
  • 1/4 cup grated Parmesan cheese for topping

Directions

  1. Preheat the oven to 350°F (175°C) and grease a baking dish.
  2. Steam the cauliflower for about 10 minutes, until tender but still firm. Drain well.
  3. In a saucepan over low heat, combine heavy cream and cream cheese, stirring until smooth. Add in the garlic, salt, pepper, and spices.
  4. Slowly mix in the shredded cheddar and mozzarella until fully melted and creamy.
  5. In a large bowl, combine the steamed cauliflower with the cheese sauce, mixing well to coat all the florets.
  6. Pour the mixture into the prepared baking dish and sprinkle with Parmesan cheese.
  7. Bake for 20-25 minutes, until bubbly and golden on top.
  8. Let it cool for a few minutes before serving.

Recipe Notes

  • Feel free to add cooked bacon or other vegetables to enhance flavor.
  • Try substituting different cheeses according to your preference.
  • This meal can easily be made nut-free by ensuring all ingredients are suitable for your diet.

Delicious Super Easy Cream Pie: A No-Fuss Recipe You’ll Love

Super Easy Cream Pie: A Delightful Dessert for Everyone

⚖️
Difficulty
Easy

⏲️
Prep Time
15 mins

🕒
Cook Time
5 mins

⏱️
Total Time
20 mins

🍽️
Servings
8

Looking for a crowd-pleaser that doesn’t require hours in the kitchen? Look no further! This Super Easy Cream Pie is the perfect solution for your dessert cravings. The creamy filling combined with a buttery crust creates a harmonious blend of flavors, making it an irresistible treat for family gatherings, potlucks, or any special occasion. Imagine the delight of cutting into a pie, revealing a silky, smooth filling that beckons to be enjoyed with each slice—this is what this dessert offers.

This recipe is designed for everyone, whether you’re an experienced baker or a novice in the kitchen. Its simplicity and quick preparation time mean that you can have a delicious homemade dessert ready in no time. The flavor profile of the cream pie is rich yet balanced, offering a taste that is reminiscent of classic desserts while still being modern and approachable. With just a few ingredients, this dessert showcases the wonderful harmony of sweetness and creaminess that will leave your guests wanting more.

Quick Recipe Highlights

  • Flavor Profile: A delightful combination of sweet and creamy with hints of vanilla that dance on your palate.
  • Texture: A smooth and silky filling set in a crisp, flaky crust that creates a satisfying bite.
  • Aroma: Inviting and warm notes of vanilla and buttery goodness fill the kitchen as the pie sets.
  • Visual Appeal: The creamy filling topped with a dollop of whipped cream presents beautifully, drawing guests in.
  • Skill Level Needed: Perfect for beginners, with minimal techniques required making for a stress-free experience.
  • Special Equipment: You’ll need a mixing bowl, pie dish, and whisks to whip the filling to perfection.

Recipe Overview

  • Difficulty Level: This recipe is classified as easy, making it perfect for beginners or those short on time. Simply mix, pour, and chill—no complicated steps to worry about!
  • Category: As a dessert, this pie is versatile enough to fit into various meal categories, whether served after dinner or at a festive gathering.
  • Cuisine: This cream pie embodies classic American comfort food, beloved across the nation for its luscious flavor and simplicity.
  • Cost: This recipe is budget-friendly, with common ingredients that won’t break the bank—ideal for those planning gatherings without sacrificing taste.
  • Season: Enjoyed year-round, the creamy textures and flavors of this pie make it welcome on any table, be it summer BBQs or cozy winter evenings.
  • Occasion: Perfect for birthdays, holiday celebrations, or casual family dinners, this pie takes any occasion to the next level.

Why You’ll Love This Recipe

First and foremost, the taste and texture appeal of this Super Easy Cream Pie will leave a lasting impression. The creamy filling is delightful on your tongue, contrasted beautifully by the crunch of a freshly baked pie crust. You won’t just taste the love that goes into making it; you’ll also enjoy the satisfaction of creating a dessert that’s sure to impress.

Convenience and preparation are another notable feature. With just a few steps and simple ingredients, anyone can whip it up and store it in the refrigerator until serving time. This ease of preparation makes it a go-to option for those entertained on a whim, providing a homemade feel without sourcing complicated ingredients or techniques.

Nutritionally, this pie also offers some benefits. While it’s certainly a treat, using quality ingredients can help maximize flavor while keeping things balanced. You can opt for fresh dairy products and even incorporate light versions of your ingredients to yield a lighter dessert experience.

As a social and entertaining dish, it’s perfect for gatherings. The pie serves beautifully, allowing everyone to enjoy their piece while complimenting you on its taste. Sharing food brings people together, and this pie is just the thing to spark conversations and happy memories.

Finally, this recipe’s budget-friendly approach ensures that you can create a delicious dessert without overspending, which is a win for everyone. You buy standard pantry items and can easily source fresh ingredients locally.

Historical Background and Cultural Significance

The origin of cream pies can be traced back to 19th-century America, evolving as home bakers experimented with custards and various fillings. The simplicity of creating a cream pie made it a popular choice for families wanting to showcase their baking skills.

Culturally, cream pies represent comfort in many American households, often gracing tables during festive occasions. Generations have handed down variations and techniques, making it a cherished part of communal recipes across the nation.

This recipe has evolved over the years, initially showcasing flavors like coconut or chocolate, giving rise to a plethora of cream pie varieties that are staples in bakeries today. Each iteration tells a story of its creator and highlights personal tastes.

Regionally, cream pies may show preference for particular flavors based on availability of ingredients. For instance, chocolate cream pies are a classic, but many households may boast their unique fruit-based cream variations influenced by local produce.

Ingredient Deep Dive

First, let’s talk about the pie crust. Traditionally made from flour, butter, and a touch of salt, the pie crust is fundamental to achieving that flaky texture that complements the creamy filling. Its significance is rooted in its versatility—a well-made crust can elevate any filling.

When selecting a crust, look for those made with natural ingredients. Homemade pie crusts can often be stored in the freezer, providing freshness. If you’re short on time, pre-made options work well but may lack the rich flavor and texture of homemade.

Another main ingredient is heavy cream, foundational in creating that luscious filling. It brings richness and body to the pie, providing a creamy mouthfeel that everyone loves. It’s also a versatile ingredient that can be used in various culinary applications.

When buying heavy cream, opt for organic if possible for the purest taste. Ensure to store it in the coldest part of your refrigerator for maximum freshness, as its quality can significantly affect the final dish.

Common Mistakes to Avoid

  • Not chilling the filling properly: It’s essential to chill your filling before pouring it into the crust; otherwise, it may not set properly.
  • Using room temperature ingredients in the filling: Start with chilled heavy cream to achieve maximum volume and fluffiness when whipped.
  • Overmixing the filling: Mixing too aggressively can lead to a dense filling. Gently fold in your ingredients for best results.
  • Skipping ingredient measurements: Accuracy is crucial in baking, so following measurements will give you the best outcome.
  • Not blind baking the crust: Ensure your crust is pre-baked to prevent a soggy bottom, which can ruin your beautifully creamy filling.
  • Forgetting to let the pie cool: Allow the pie to chill for a few hours before slicing for the best texture and flavor.
  • Not using vanilla extract: Skimping on flavoring ingredients can lead to a bland filling. Use pure vanilla extract for the best taste.
  • Ignoring food safety: Be cautious with dairy and egg products, always checking expiration dates and ensuring proper storage.
  • Overcrowding the pie with toppings: While toppings can enhance flavor, too much can overwhelm the delicate filling.
  • Not preparing extra ingredients: Always have additional whipped cream or garnishes ready to elevate presentation.

Essential Techniques

First, mastering the art of pie crust is vital. A good crust is what separates an average dessert from an excellent one. The key is to keep your butter cold and to work the dough minimally; overworking can lead to a tough crust instead of a flaky one.

Another essential technique is whipping cream. Start with chilled equipment—the bowl and beaters must be cold to ensure the cream whips effectively. Gradually add sugar and vanilla while whipping to get to soft peaks, avoiding overwhipped, grainy textures.

Pro Tips for Perfect Super Easy Cream Pie

1. Use high-quality ingredients for the best flavor; organic heavy cream makes a noticeable difference.

2. Chill your utensils and bowls when whipping cream to achieve better volume and texture.

3. Experiment with different flavorings in the filling, such as almond or citrus zest, to add depth.

4. For a special touch, consider drizzling melted chocolate or caramel sauce atop the pie before serving.

5. Use a food processor for the pie crust to achieve a finer texture more easily.

6. Always cover the pie with plastic wrap when refrigerating to prevent it from absorbing odors.

7. If in a hurry, consider using store-bought whipped topping instead of homemade whipped cream.

8. Always let your pie sit for several hours before slicing; this helps in achieving cleaner cuts.

Variations and Adaptations

Regional variations of the cream pie can include flavored custards—like key lime or coconut—that add a unique twist to the traditional recipe. Adding fruits such as berries can enhance both flavor and presentation.

Seasonal adaptations allow you to swap ingredients based on what’s fresh or available. Consider the addition of pumpkin puree for a fall-themed version of your cream pie.

Dietary modifications could involve replacing heavy cream with coconut cream for a dairy-free option. You can also experiment with gluten-free crusts to accommodate dietary restrictions while preserving flavor.

Flavor variations can include adding extracts like root beer or peppermint to the filling or incorporating spices for unique tastes. This versatility ensures that everyone can enjoy a slice that suits their preferences.

Texture modifications, such as incorporating layers of chocolate ganache or fruit preserves between filling and crust, can elevate your pie into a gourmet creation without a great deal of additional effort.

Finally, consider presentation alternatives, such as single-serving jars, for an attractive twist to serving your cream pie, making it perfect for parties or gatherings.

Serving and Presentation Guide

For plating, aim for clean cuts that showcase the layers of pie. Use a serrated knife and serve slices on chilled plates to maintain the pie’s temperature. Consider using spatulas for lifting out slices without disrupting the pie’s structure.

Garnishing ideas might include freshly whipped cream, chocolate shavings, or fruit slices, which can add not only flavor but visual appeal to each serving. Chocolate or fruit sauces can also be drizzled on the plate for artistic effects.

Traditional accompaniments: Cream pie pairs well with a scoop of vanilla ice cream or a cup of freshly brewed coffee, enhancing the dessert experience.

Modern serving suggestions can feature mini pies or tartlets for personal portions, adding a delightful touch to a buffet or casual gathering. This gives each guest their own slice of heaven!

Temperature considerations are vital; serve cream pie chilled, as warm filling can cause the crust to become soggy. Allow for a short softening period after being in the refrigerator to enhance the flavor.

Portion control tips include using a ruler to mark portions before cutting; this is especially useful for large gatherings where uniformity matters.

Wine and Beverage Pairing

When it comes to wine pairings, a sweet dessert wine like Moscato complements the creaminess of the pie beautifully, while the acidity helps balance the richness.

For non-alcoholic alternatives, fresh lemonade with a hint of mint can provide a refreshing counterbalance to the pie’s sweet flavors.

If coffee or tea is preferred, consider serving it alongside a slice of pie for warmth and flavor contrast. A lightly roasted coffee can enhance the creamy pie experience.

Ensure beverages are served at appropriate temperatures, with wines chilled and hot drinks brewed fresh, enhancing the overall dining experience.

Storage and Shelf Life

Store your cream pie in the refrigerator, covered to maintain freshness and prevent odor absorption, up to 3 days after making. Avoid keeping it at room temperature for more than two hours to ensure safety.

For freezing, it’s best to freeze the crust and filling separately, then assemble when ready to serve. A well-wrapped pie can be stored in the freezer for up to one month but is recommended to enjoy within two weeks for best quality.

Signs of spoilage include an off smell, discoloration of filling, or a gummy texture in the crust. Always inspect before serving to avoid food safety concerns.

When reheating, if necessary, a quick thaw in the refrigerator will ensure the pie maintains its texture and flavor profile. Avoid microwaving directly, as it could affect the crust quality adversely.

Make Ahead Strategies

Prepare the crust one day in advance; wrap it well and store it in the fridge. This simple strategy saves time and ensures your crust is ready for filling. The same can be done for the filling, which can be made the day before to allow flavors to meld.

Storage between steps is key; keep the pie covered during the chilling phase to maintain its integrity and hygiene. Be mindful of how long each component is stored; the fresher your ingredients, the better your final pie.

Perform a quality impact assessment when you prepare ingredients ahead of time; for instance, make sure the cream is still fresh for the best outcome.

During assembly, layer in the whipped cream and any toppings that may wilt or spoil; add these elements just before serving for a fresh touch.

Fresh element additions can bring vibrancy to your pie—consider adding zest or fruits right before serving, enhancing the flavor and appearance.

Scaling Instructions

For halving the recipe, simply divide each ingredient’s measurements by two while keeping the same cooking times and temperatures, ensuring even distribution of flavors in your cream pie.

Doubling or tripling the recipe is equally straightforward. Just ensure that your mixing bowls are large enough to accommodate increased quantities and adjust baking time as necessary. Adjust the chilling time accordingly as more volume may take longer to set.

Equipment adjustments, such as using larger pie tins or multiple smaller tins, can make production easier when preparing for larger gatherings.

Timing modifications should incorporate additional resting time for larger recorded servings, ensuring all elements have developed their full flavor profile.

Storage considerations will likewise adapt based on volume; multiple pies will require clearing out refrigerator space ahead of time to keep things organized and manageable.

Nutritional Deep Dive

Understanding the macro breakdown of each serving is essential for those tracking nutritional intake. A slice of this cream pie typically contains carbohydrates primarily derived from the crust and sugar, with healthy fats from the cream contributing to its richness.

A micronutrient analysis reveals modest contributions from the ingredients; while this pie is predominantly a dessert, it contains calcium from dairy that could support bone health when consumed in moderation.

As for health benefits, enjoying dessert in moderation can provide joy and enhance the overall experience of meals. A slice of cream pie isn’t just sustenance; it provides comfort and pleasure.

Dietary considerations come into play for those with restrictions; adjusting components where needed can still allow the enjoyment of this dessert without compromising dietary needs.

Portion analysis helps in understanding serving sizes, allowing for responsible enjoyment. Consider cutting smaller slices to share or try alongside healthier snacks.

Weight management tips advocate for savoring a smaller piece paired with fruits or nuts to balance indulgence with wholesome choices, ensuring one enjoys life and maintains dietary goals.

Dietary Adaptations

For gluten-free adaptations, consider using almond flour or gluten-free flour blends to create the crust; this will cater to those with sensitivities while maintaining flavor.

To make the pie dairy-free, substitute heavy cream with coconut cream or cashew cream, allowing for a rich texture without traditional dairy products.

The recipe can also be modified for a vegan diet by using plant-based whipped toppings and replacing eggs with flaxseed or chia seeds as binding agents.

Low-carb variations could involve using almond flour for the crust and incorporating sugar substitutes in the filling to minimize carbohydrates.

Keto modifications would also benefit from similar changes; consider using a combination of almond and coconut flour for a sturdier crust without excessive carbs.

Paleo adaptations focus on whole food ingredients, eliminating refined sugars and flours to create a wholesome dessert experience.

If you’re considering low-FODMAP options, ensure to pick low-lactose dairy or plant-based alternatives to align with dietary restrictions.

Other specific diets can also be accommodated by exploring ingredient substitutions that suit individual health needs while preserving the essence of delicious dessert.

Troubleshooting Guide

Common texture issues can arise if the filling is over-whipped, leading to a grainy mouthfeel instead of the desired smoothness. Always beat until soft peaks form for a light finish.

If flavor balance is off, consider adjusting sugar levels; too much can overwhelm sweetness. A touch of acidity, like a squeeze of lemon, can elevate the overall flavor.

Temperature problems like a warm pie can lead to a soggy crust. Ensure pie is well-chilled before serving to maximize crispness and flavor.

Equipment challenges may arise if your bowl isn’t chilled when whipping the cream; keep your mixing bowl in the fridge for best results.

Ingredient substitutions could lead to unexpected results if ratios are off; follow guidelines carefully and utilize trusted substitutions for similar flavor profiles.

Timing concerns often stem from under-chilling. Always allow ample time for the pie to set properly, preventing a runny filling during serving.

Recipe Success Stories

Community feedback has overwhelmingly praised this Super Easy Cream Pie for its consistent results and delightful flavors. Many bakers have shared images showcasing their own versions, highlighting the pie’s versatility.

Variation successes detail how easy it is to add personalized touches. Readers often report creating variations with pumpkin pie spice or fruit fillings to cater to audience preferences.

Adaptation stories come from home cooks who have scaled the recipe for larger gatherings, appreciating its reliability and ease, ensuring that every guest leaves satisfied.

Reader suggestions often entail simple yet effective tweaks to the original recipe, enhancing less common flavors that still fit within the essence of the cream pie.

Photography tips shared by readers illustrate the visual attractiveness of this pie, encouraging others to present their culinary creations in appealing ways.

Frequently Asked Questions

Q: Can I use a different flavor for the filling?

A: Absolutely! Feel free to experiment with different flavors like chocolate, banana, or even seasonal fruit purees to personalize your cream pie.

Q: How can I prevent a soggy crust?

A: Blind baking the crust—pre-baking it before filling—is crucial to keeping the crust flaky and crisp. Ensure it’s fully cooled before adding the filling.

Q: Is this recipe suitable for freezing?

A: Yes, it can be frozen after being firmly set. It’s best to freeze the filling and crust separately and then assemble before serving.

Q: How long will the pie last in the refrigerator?

A: The pie can last up to 3 days in the refrigerator when properly stored. Cover it to prevent it from absorbing odors from the fridge.

Q: What should I do if my cream doesn’t whip?

A: Ensure your cream and equipment are cold and that you’re using heavy cream. If it still doesn’t whip, it may be past its use-by date.

Q: Can I make this pie dairy-free?

A: Yes! Substitute heavy cream with coconut cream or any nondairy cream to make delicious non-dairy versions of your cream pie.

Q: Can I add fruit to the filling?

A: Certainly! Fresh fruit purees or slices can elevate your pie. Just be mindful of the added moisture that can affect the set.

Q: What’s the best way to garnish this pie?

A: Classic whipped cream and chocolate curls are a perfect finish. Fresh berries add a lovely touch of color and flavor too!

Q: What can I do if my filling is runny?

A: If your filling doesn’t set, return it to the stove to thicken together with a touch of cornstarch or ensure you use heavy cream right from cold.

Q: Can I make this in advance?

A: Yes! You can prepare the pie ahead of time, simply store it in the refrigerator to let the flavors meld overnight.

Q: How do I avoid over-mixing the filling?

A: Take care to fold in the whipped cream gently until just incorporated; this tender handling will maintain volume and texture.

Additional Resources

Explore related recipes on the site that highlight various pie styles—like fruit pies and savory options. These recipes complement the creamy texture of pie and offer balanced menus.

Consult technique guides for mastering pie-making, including crust techniques, and proper filling handling that can be beneficial for newer bakers.

Ingredient information provides insights on selecting the best fresh ingredients, including how to differentiate between quality dairy products, ideal for any recipe.

For equipment recommendations, check listings that highlight essential tools that make baking easier, ensuring successful outcomes.

Seasonal variations also add freshness to your baking repertoire; look for fruity sticks or spice mixes that reflect the time of year and delight your palate.

Join the Conversation

We invite our readers to share their experiences! Post photographs of your pie creations and celebrate your baking success on social media platforms.

Join in recipe reviews to provide feedback or suggestions. Your input helps enhance our community and encourages others to try their hand at baking.

Engage with us about your variations or adaptations, encouraging others to experiment with their flavors and techniques while honoring their culinary creativity.

Don’t hesitate to share your photography tips for capturing the beauty of your dessert; we love to see how our recipes come to life in your kitchens!

The Recipe

Super Easy Cream Pie

Serves: 8

Prep Time: 15 mins

Cook Time: 5 mins

Total Time: 20 mins

Kitchen Equipment Needed

  • Mixing bowl
  • Whisk
  • Pie dish
  • Measuring cups and spoons
  • Plastic wrap

Ingredients

  • 1 pre-made pie crust
  • 2 cups heavy cream
  • 1/2 cup sugar
  • 1 teaspoon vanilla extract
  • Pinch of salt

Directions

  1. Begin by preparing your pie crust according to package instructions and set aside to cool.
  2. In a mixing bowl, combine heavy cream, sugar, vanilla extract, and salt.
  3. Using a whisk, whip the mixture until soft peaks form, be careful not to over-whip.
  4. Pour the whipped mixture into the cooled pie crust, smoothing the top with a spatula.
  5. Cover with plastic wrap and refrigerate for at least 2 hours to set properly.
  6. Once set, slice and serve with your favorite toppings, such as whipped cream or fruit.

Recipe Notes

  • For added flavor, experiment with different extracts like almond or citrus.
  • Store any leftovers in the refrigerator for up to 3 days.
  • Feel free to top the pie with chocolate shavings or berries for an appealing presentation.

Delicious Keto Ham and Egg Cups Recipe for Low-Carb Meals

Keto Ham and Egg Cups: A Delicious Low-Carb Breakfast Delight

⚖️
Difficulty
Easy

⏲️
Prep Time
10 mins

🕒
Cook Time
20 mins

⏱️
Total Time
30 mins

🍽️
Servings
6 cups

Start your day off right with these Keto Ham and Egg Cups, a breakfast that packs a flavorful punch while keeping your carb count low. Perfect for those following a ketogenic lifestyle, these little cups are loaded with protein and rich, savory flavors that will keep you satisfied until lunchtime. Imagine biting into a delicate, fluffy egg cloud encased in crispy ham—it’s a delightful combination that can be enjoyed any time of the day, not just breakfast.

These keto-friendly egg cups are not only easy to make, but they are also incredibly versatile. You can customize them with your favorite ingredients—add in some colorful veggies or top with your favorite dairy-free cheese for an added dimension of taste. Whip them up over the weekend and store them in the fridge for a quick grab-and-go breakfast during the busy workweek. The smell of baked eggs and ham will have your mouth watering and your family asking for more!

Quick Recipe Highlights

  • Flavor Profile: Each bite offers a bursts of salty ham combined with the creamy richness of eggs and the freshness of any added vegetables.
  • Texture: The ham provides a satisfying crunch that perfectly contrasts the fluffy, tender eggs.
  • Aroma: The savory scent of baked ham mingling with fresh herbs will fill your kitchen, tempting everyone to the breakfast table.
  • Visual Appeal: With their golden tops and vibrant colors from any added veggies, these cups are not only delicious but also visually stunning.
  • Skill Level Needed: This recipe is beginner-friendly and requires no advanced cooking techniques.
  • Special Equipment: A muffin tin is essential for shaping and baking these delightful cups.

Recipe Overview

  • Difficulty Level: Easy. This recipe is straightforward and perfect for cooks of any skill level.
  • Category: Breakfast. Ideal for starting your day on a high note or for brunch gatherings.
  • Cuisine: American with a keto twist, making this recipe suitable for modern dietary preferences.
  • Cost: An economical recipe, utilizing affordable ingredients like eggs and ham.
  • Season: Perfect for any season, but especially great for spring and summer when fresh vegetables are in abundance.
  • Occasion: Great for weekday breakfasts or festive brunches with family and friends.

Why You’ll Love This Recipe

Keto Ham and Egg Cups are a taste sensation that’s hard to beat. The combination of salty, savory ham and rich, creamy eggs creates a delightful experience for your palate. Each cup brings a burst of flavor that is nourished and hearty, perfect for those looking for a satisfying low-carb meal. Whether you’re in a rush or have the time to relax, these cups cater to all breakfast scenarios.

Convenience is another great advantage of this recipe. With just a few simple ingredients, you can whip these cups together in under thirty minutes. They can be prepped ahead of time and eaten throughout the week, saving you many chaotic mornings. Just pop them in the microwave for a quick and easy meal that still feels indulgent.

Nutritionally speaking, these egg cups are a powerhouse. Eggs are loaded with high-quality protein and essential nutrients, while the absence of bread or high-carb components helps keep your carb intake low. These cups can provide your body with energy and the necessary fuels without derailing your diet.

Socially, they’re a fantastic option for brunches and gatherings, allowing guests to serve themselves while enjoying a unique twist on traditional dishes. You can easily double or triple the recipe, making them a crowd-pleasing option that is also easy to prepare and present.

Cost-effectiveness is also a notable perk. Most ingredients are pantry staples or easily available at your local grocery store, allowing you to enjoy a gourmet-feeling meal without the price tag. This recipe truly hits all the right notes for a satisfying breakfast, making it a must-try in your keto repertoire.

Historical Background and Cultural Significance

The origins of egg-based dishes stretch back to ancient times, with diverse cultures utilizing eggs as a staple ingredient in their cuisines. In American kitchens, egg cups have become increasingly popular as a trendy, easy breakfast option suited to busy lifestyles. However, variations exist worldwide, from Spanish frittatas to Japanese tamagoyaki, each celebrating the humble egg. The keto movement has reinvented this concept by removing carb-heavy ingredients while focusing on wholesome ingredients, aligning with health trends.

Culturally, breakfast has long been considered an important meal to start the day. Across various countries, egg dishes symbolize nourishment and vitality, making them staples on breakfast tables. With the modern twist of keto dieting, the humble egg takes center stage, showcasing its versatility as a protein-rich option stripped of excess carbs.

Over the years, many adaptations of baked egg dishes have evolved. From simple scrambled eggs to extravagant quiches, each recipe reflects cultural influences and regional tastes. This recipe will continue the legacy, inviting others to explore keto-friendly variations that still promise satisfaction.

Regional variations of this dish can be found in different parts of the world, revealing how common ingredients like eggs and ham are celebrated. In Italy, frittatas brim with seasonal vegetables, while in Mexico, breakfast tacos incorporate eggs alongside traditional spices. The keto ham and egg cups stand out as an accessible, easy-to-make option that embraces these influences while adhering to low-carb guidelines.

Ingredient Deep Dive

Eggs

Eggs are one of the most versatile food items, offering nutrients that support overall health, including a high-quality protein source. Historically significant across cultures, eggs symbolize fertility and life, often featured during celebrations. Nutritionally, they provide essential vitamins and minerals, such as vitamin D and B12. When selecting eggs, look for organic or free-range options for better quality. Store them in the refrigerator for optimal freshness, and consider alternatives like egg substitutes for various dietary needs.

Ham

Ham is a beloved protein choice globally, often associated with festive occasions, especially in Western cuisines. Historically, it has been a way for people to preserve pork for long periods, serving as a hearty source of nutrients. Ham offers various nutritional benefits, including protein and essential minerals like iron and zinc. When choosing ham, opt for nitrate-free or uncured options whenever possible. Store leftover ham properly in an airtight container to maintain its flavor and quality.

Common Mistakes to Avoid

  • Not preheating the oven: Ensure your oven is hot before baking the cups to achieve the right texture.
  • Using low-quality ham: Invest in good ham, as flavor significantly impacts the final dish.
  • Cooking at the wrong temperature: Baking at too low a temperature can make the cups cook unevenly.
  • Skipping the greasing step: Always grease your muffin tin to prevent sticking.
  • Overfilling the cups: Overfilling can lead to overflow during cooking, resulting in a messy oven.
  • Using cold ingredients: Allow eggs and other refrigerated ingredients to reach room temperature for better mixing.
  • Ignoring cooking time: Keep an eye on baking time to avoid overcooking or drying out the eggs.
  • Not tasting the mixture: Always sample your egg mixture for seasoning before baking.
  • Failing to allow cooling time: Let the cups cool for a few minutes before removing them from the tin for a proper shape.
  • Not adding a variety of ingredients: Be creative with fillings to enhance flavor and nutrition.

Essential Techniques

Greasing the Muffin Tin

This technique is fundamental to ensure your ham and egg cups don’t stick to the pan. Use a non-stick spray or brush with oil to coat the tin. The key to mastering this technique is ensuring even coverage without excess fat. Watch for sticking as a sign that your technique needs adjustment.

Mixing Ingredients

Properly mixing the ingredients ensures even distribution of flavors. Whisk the eggs until blended, incorporating air, which helps achieve fluffy cups. Avoid overmixing, which can toughen the texture; stop when just combined.

Pro Tips for Perfect Keto Ham and Egg Cups

1. Experiment with spices to elevate flavor, such as adding smoked paprika for a subtle kick.
2. Use silicone muffin liners for easy removal and fun colors.
3. Preheat your oven to ensure even cooking and prevent sogginess.
4. Try different cured meats like turkey bacon or prosciutto for unique flavor variations.
5. Add cheese just before baking for a gooey, melty bite.
6. Customize with seasonal vegetables for added nutritional benefits.
7. Allow the cups to cool in the tin slightly before transferring to a wire rack for optimal texture.
8. Store in an airtight container to keep fresh in the fridge for up to a week.

Variations and Adaptations

Feel free to personalize your Keto Ham and Egg Cups. You might consider adding vegetables like spinach, bell peppers, or mushrooms to increase nutritional content and flavor complexity. For seasonal adaptations, think about incorporating ingredients like pumpkin in fall or asparagus in spring.

Additionally, you could swap out the ham for other proteins, like cooked chicken or sausage, to create entirely new flavor profiles. If you’re looking to modify textures, consider blending the eggs with cream for a richer taste or adding shredded cheese for creaminess.

In terms of presentation, the cups can be garnished with fresh herbs such as chives or parsley, adding freshness and a pop of color to your dish. Don’t hesitate to serve them with salsa or avocado on the side for added flavor and nutrition.

Serving and Presentation Guide

Plating these egg cups can be simple yet elegant. Place them in the center of a colorful plate, and consider using a vibrant garnish of fresh herbs around them. Drizzle with a bit of homemade mayo or hot sauce for a gourmet finish.

For modern serving suggestions, present them on a wooden board with small bowls of assorted toppings like hot sauce, cheese, or sautéed veggies. Serve while warm to ensure that the texture remains fluffy, and consider storing them in warmers if serving at a brunch buffet.

Portion control is easy with these cups. Each one serves as an ideal breakfast portion, allowing guests to enjoy a guilt-free indulgence. Keeping a few sides on hand, like sliced fruit or low-carb muffins, can round out the meal beautifully.

Wine and Beverage Pairing

For a casual brunch vibe, consider pairing your Keto Ham and Egg Cups with a refreshing mimosa made with sugar-free orange soda for a low-carb twist. If you’re considering wine, a light Chardonnay works nicely, as its acidity complements the savory flavors of the ham and eggs.

For a non-alcoholic option, consider serving freshly brewed herbal tea or a low-carb coffee with cream. These choices help balance the richness of the cups while maintaining a refreshing complement.

Temperature plays a crucial role in beverage pairings; serving drinks chilled against the warm egg cups creates a pleasurable dining experience.

Storage and Shelf Life

To maximize freshness, store your Keto Ham and Egg Cups in an airtight container in the refrigerator. Properly stored, they can last for up to a week. Be sure to keep any extra components or sauces separate to maintain the best texture when reheating.

If you want to extend shelf life, consider freezing the cups. Place them in a single layer on a baking sheet, freeze, and then transfer to an airtight container or freezer bags. This method prevents squishing during storage and allows you to enjoy them for up to two months.

When reheating, warm them in the microwave for short intervals to prevent overcooking. Aim for a warm internal temperature without cooking through again, which can toughen the eggs.

Make Ahead Strategies

For those busy mornings, take advantage of the making-ahead potential of Keto Ham and Egg Cups. Prepare the mixture and fill the muffin tins the night before, and all you’ll need to do in the morning is bake them.

Alternatively, batch cook multiple trays and store them in the fridge or freezer, ensuring you have breakfasts ready to go. Inspect the flavor and quality when reheating, aiming for that perfect fluffy texture.

Consider adding fresh elements, such as avocado or salsa, just before serving to keep those ingredients fresh and vibrant, enhancing your meal experience.

Scaling Instructions

Scaling your Keto Ham and Egg Cups is a breeze. To halve the recipe, reduce the ingredients while paying attention to cooking time, which may decrease slightly. To double or triple the recipe, utilize multiple muffin tins or bake in batches.

Adjusting cooking times is essential when increasing the quantity; ensure that each cup is cooked evenly. When scaling, consider adjusting your oven temperature based on the number of cups being prepared, ensuring everything is cooked to perfection.

Finally, make sure to account for how your refrigerator or freezer can accommodate extra batches, ensuring optimal freshness during storage.

Nutritional Deep Dive

Each Keto Ham and Egg Cup delivers a fulfilling mix of macronutrients, primarily driven by the protein from eggs and ham. A typical cup might contain approximately 150 calories, depending on the ingredients used. With minimal carbohydrates, this recipe supports a ketogenic dietary approach that many seek for weight management.

Micronutrients also shine in this recipe, as eggs provide vitamin D, B12, and selenium, while selecting high-quality ham ensures a good source of zinc. Each cup also aligns well with dietary considerations that stress lower carbohydrate intake without sacrificing essential nutrients.

Additionally, this recipe can aid in weight management. Packed with protein, they will keep you satiated longer without the temptation to snack, helping maintain balanced blood sugar levels throughout your day.

Dietary Adaptations

For those following specific dietary requirements, consider making the Keto Ham and Egg Cups gluten-free by ensuring all ingredient labels are free from gluten-containing elements. For dairy-free options, simply replace cheese with nutritional yeast or omit it entirely for a still-tasty dish.

Vegans can adapt this recipe by using flaxseed meal mixed with water as an egg substitute, however, the overall texture will differ from traditional egg cups. Low-carb and keto-friendly modifications are at the heart of this dish, so feel free to experiment with non-meat protein alternatives, like tofu or tempeh.

Moreover, for a paleo-friendly version, ensure all processed ingredients are organic and grass-fed, capturing that clean eating essence while enjoying an utterly flavorful experience.

Troubleshooting Guide

If your cups turn out dry, double-check baking times. Eggs can overcook quickly, lose moisture, and become rubbery if left too long. For balancing flavor, taste the mixture before baking; under-salting is a common mistake.

When handling ingredient substitutions, be mindful of moisture levels, as adding eggs from cooked ingredients can change the baking dynamics.

If your cups stick to the pan, consider using a more robust grease method next time or using silicone molds. Lastly, monitor ingredient freshness; old eggs or ham could affect texture and flavor.

Recipe Success Stories

The community has embraced these Keto Ham and Egg Cups. Many fans rave about easy adaptations they’ve made, incorporating various herbs and spices to make the recipe their own. Additionally, some have shared feedback highlighting how they’ve become a staple for quick, satisfying breakfasts.

Adaptation stories add to the recipe’s allure, with readers experimenting with seasonal vegetables. Others have provided photography tips, demonstrating the visual appeal with vibrant presentations. Each success story adds depth to this simple yet impactful dish, showcasing the recipe’s incredible versatility.

Frequently Asked Questions

1. Can I freeze Keto Ham and Egg Cups?
Yes, you can freeze them! Simply place the cooled cups in an airtight container or freezer bag. They can last for up to two months. When reheating, thaw in the fridge overnight and warm in the oven or microwave.
2. How long do these egg cups last in the refrigerator?
Keto Ham and Egg Cups can be stored in the refrigerator for up to one week in an airtight container, making them a great make-ahead meal.
3. Can I use something other than ham?
Absolutely! You can use turkey bacon, sausage, or even vegetables like zucchini for a meatless option. Get creative with your ingredients!
4. Are these breakfast cups suitable for meal prep?
Yes, they are perfect for meal prep! Bake a large batch on the weekend and enjoy them throughout the week.
5. Can I add cheese to the recipe?
Yes, cheese is a great addition! Try shredded cheese placed on top before baking for a deliciously gooey texture.
6. What can I serve with these cups?
They pair well with avocado, salsa, or a refreshing salad. Consider serving with a side of low-carb bread for a fuller meal.
7. Can I add veggies to the mixture?
Definitely! Chopped vegetables like bell peppers, onions, or spinach can be added to enhance flavor and nutrition.
8. How do I reheat them properly?
You can reheat them in the microwave for about 30 seconds, or in a preheated oven at 350°F (175°C) for about 10-15 minutes until warmed through.
9. What type of ham should I use?
Opt for nitrate-free ham or organic options if possible. This choice promotes better quality and flavor.
10. Is this recipe suitable for other diets?
Yes! They can be easily adapted for gluten-free, dairy-free, and paleo diets, depending on the specific ingredient choices.

Additional Resources

Explore related recipes that suit a low-carb lifestyle, including other egg-based breakfasts, savory muffins, and keto snacks that keep you full and satisfied. For further technique guides, learn about sous vide egg cooking or how to make creamy sauces without carbs.

Ingredient information is vital; familiarize yourself with low-carb options for bulk meals and engage with your local butcher for quality meats. Additionally, check for seasonal variations in produce to enhance your dishes year-round.

Join the Conversation

We encourage you to share your thoughts and experiences with the Keto Ham and Egg Cups! Engage with us on social media, share your adaptations or favorite tips. Photograph your successful creations and provide feedback for others in our community.

Whether you prefer vibrant garnishes or imaginative variations, we hope to foster a lively discussion around this delightful recipe!

The Recipe

Keto Ham and Egg Cups

Serves: 6 cups

Prep Time: 10 mins

Cook Time: 20 mins

Total Time: 30 mins

Kitchen Equipment Needed

  • Muffin tin
  • Mixing bowl
  • Whisk
  • Baking spray or oil

Ingredients

  • 6 large eggs
  • 1 cup diced ham
  • 1/4 cup shredded cheese (optional)
  • 1/4 cup chopped vegetables (optional)
  • Salt and pepper to taste
  • Fresh herbs (optional)

Directions

  1. Preheat your oven to 350°F (175°C) and grease the muffin tin.
  2. In a mixing bowl, whisk together the eggs, salt, and pepper until well combined.
  3. Add the diced ham and any optional ingredients like cheese or vegetables. Stir until evenly distributed.
  4. Pour the egg mixture into the prepared muffin tin, filling each cup about 3/4 full.
  5. Bake for 20 minutes or until the cups are set and slightly golden on top.
  6. Remove from the oven and allow to cool slightly before serving.
  7. Garnish with fresh herbs if desired and enjoy!

Recipe Notes

  • These cups can be stored in the fridge for up to a week or frozen for later use.
  • Feel free to experiment with different proteins and veggies to suit your taste.
  • Adjust seasonings according to preference for enhanced flavors.

Keto Air Fryer Mahi Mahi Recipe for a Delicious Dinner

Keto Air Fryer Mahi Mahi: A Low-Carb Delight for Dinner Tonight!

⚖️
Difficulty
Easy

⏲️
Prep Time
10 mins

🕒
Cook Time
15 mins

⏱️
Total Time
25 mins

🍽️
Servings
4

Are you ready to dive into a delightful dinner that’s both keto-friendly and bursting with flavor? This Keto Air Fryer Mahi Mahi is the perfect dish to impress your family or to enjoy on a cozy night in. With its tender, flaky texture and zesty seasoning, this recipe will satisfy your taste buds while keeping you on track with your low-carb lifestyle. The air fryer ensures that your fish cook evenly while achieving that beautiful golden crisp on the outside without the need for excessive oil.

This Mahi Mahi recipe combines the benefits of an air fryer with the rich flavors of the ocean, making it a healthy choice for dinner tonight. Perfectly seasoned and easy to prepare, this dish is not only delicious but also meets keto requirements, ensuring you can indulge without straying from your dietary goals. Pair it with fresh, low-carb vegetables or a side salad for a complete meal that’s as beautiful as it is satisfying.

Quick Recipe Highlights

  • Flavor Profile: Mahi Mahi is known for its mild flavor, and when combined with a hint of lemon and garlic, it creates a mouthwatering dish that’s both savory and a touch tangy.
  • Texture: This fish has a firm, flaky texture that stands up well to air frying, making it a satisfying centerpiece to any meal.
  • Aroma: The aromatic blend of spices, garlic, and citrus will fill your kitchen with an enticing fragrance as it cooks.
  • Visual Appeal: The crispy exterior and white flaky fish create a visually stunning dish, perfect for serving guests.
  • Skill Level Needed: This recipe is simple and accessible, making it ideal for beginner cooks and seasoned chefs alike.
  • Special Equipment: All you need is an air fryer to create a restaurant-quality meal at home.

Recipe Overview

  • Difficulty Level: This Keto Air Fryer Mahi Mahi is classified as easy, as it requires minimal preparation and cooking time. With straightforward instructions, anyone can make it!
  • Category: This dish fits perfectly into the main course category, ideal for dinner and gatherings.
  • Cuisine: Influenced by tropical flavors, this dish showcases the best of seafood cuisine and is perfect for those cravings for something fresh and light.
  • Cost: Mahi Mahi is moderately priced, typically ranging from $10-$15 per pound, making it a viable option for special occasions while keeping your budget in check.
  • Season: Mahi Mahi is available year-round, but it’s particularly best enjoyed during the warmer months when fresh seafood is at its peak.
  • Occasion: This dish is wonderful for family dinners, beach barbecues, or a low-carb-friendly meal during casual get-togethers.

Why You’ll Love This Recipe

The taste and texture of the Keto Air Fryer Mahi Mahi are unmatched. With a perfect balance of spices, the fish is lightly seasoned to enhance its natural flavor while remaining keto-compliant. The air fryer locks in moisture and creates a delightful crisp on the outside, providing a satisfying crunch with each bite.

This dish is incredibly convenient, allowing for quick preparation and cooking. Within 25 minutes, you can have a delicious meal on the table, making it ideal for busy weeknights or last-minute dinner plans. Additionally, the air fryer requires minimal cleanup compared to traditional frying methods, making it easy to cook and enjoy with less hassle.

Nutritionally, Mahi Mahi is a fantastic source of lean protein and healthy omega-3 fatty acids, making it an excellent choice for your keto diet. With lower calories and carbs than many other protein sources, it supports weight management without sacrificing flavor.

Cooking this dish can also be a fantastic social experience. Invite friends over and impress them with your culinary skills by preparing this simple yet sophisticated meal. Whether it’s a dinner party or a casual get-together, your guests will rave about this delightful seafood dish.

Lastly, this recipe is cost-effective. By purchasing fresh or frozen Mahi Mahi, you can offer a restaurant-quality meal at home without spending a fortune. Paired with inexpensive seasonal vegetables or a simple salad, it creates a well-rounded meal perfect for everyday dining.

Historical Background and Cultural Significance

Mahi Mahi, also known as Dolphin Fish, has deep historical roots, originating from warm ocean waters. Popular among coastal communities, it has been celebrated for centuries as a staple seafood in various cuisines. Its vibrant colors and rich flavor have made it a sought-after catch for both commercial fisheries and sport fishermen.

The cultural significance of Mahi Mahi lies in its versatility in culinary traditions around the world. It is immensely popular in Caribbean and Hawaiian cuisine, often grilled or served in fish tacos, showcasing its adaptability to different flavors and cooking methods.

Over the years, the recipe for preparing Mahi Mahi has evolved. From traditional grilling to modern air frying, these methods showcase the fish’s natural flavors while accommodating various dietary needs, such as keto and gluten-free diets. The air fryer, specifically, has emerged as a popular cooking method, providing a healthier alternative to standard frying.

Regional variations of Mahi Mahi preparation exist, reflecting local tastes and ingredient availability. In Hawaii, Mahi Mahi is often served with fruity salsas, while in Mexico, it’s commonly incorporated into fish tacos, demonstrating the global appreciation of this versatile fish.

Ingredient Deep Dive

Mahi Mahi: This fish is celebrated for its firm texture and slightly sweet flavor. Rich in potassium, magnesium, and vitamin B, it’s a nourishing option for meal planning. When selecting Mahi Mahi, look for flesh that is moist and has a vibrant appearance. Store it in the coldest part of your fridge and consume it within two days. For longer storage, freeze it and ensure to use it within three months for optimal flavor.

Olive Oil: Olive oil adds healthy fats and enhances the flavors of your Mahi Mahi. Known for its heart-healthy benefits, olive oil contains antioxidants and can contribute to lower cholesterol levels. When selecting olive oil, choose extra virgin for the best quality and flavor. Store it in a cool, dark place, and avoid using oil that has an off smell or flavor.

Common Mistakes to Avoid

  • Not preheating the air fryer: Ensure you preheat your air fryer before adding the fish for even cooking and a crispy exterior.
  • Overcrowding the basket: Avoid placing too much fish in the air fryer at once. Give each piece enough space for proper airflow to achieve crispiness.
  • Skipping the oil: While it’s a low-carb recipe, a small amount of oil is essential for achieving a crispy texture and preventing sticking.
  • Using frozen fish: If using frozen Mahi Mahi, be sure to thaw it completely for even cooking. Cooking from frozen can lead to unevenly cooked fish.
  • Ignoring cook time: Keep an eye on the cook time. Mahi Mahi cooks quickly, and overcooking can lead to a dry texture.
  • Not seasoning enough: Fish can benefit greatly from seasoning, so ensure to adequately season your Mahi Mahi for the best flavor.
  • Skipping the marination: Allowing the fish to sit in a marinade for at least 30 minutes can enhance flavor depth.
  • Not checking for doneness: Use a meat thermometer to ensure the internal temperature reaches 145°F for perfectly cooked fish.
  • Using damaged fish: Always check for freshness before cooking; do not use fish with an off smell or discoloration.
  • Neglecting side dishes: Mahi Mahi is delightful on its own, but pairing with fresh sides enhances the meal experience.

Essential Techniques

Preheating the Air Fryer: This technique is crucial as it ensures even cooking and helps achieve a crispy texture. To master this, set your air fryer to the desired temperature before cooking. Most models will indicate when they are ready, but it’s always a good idea to let it run for a few minutes.

Correctly Seasoning the Fish: Proper seasoning enhances the natural flavor of the fish. Use a mix of dried herbs, spices, and citrus juices to achieve the best results. Be generous as the seasoning needs to penetrate the fish for maximum flavor, and adjust based on your personal preferences.

Pro Tips for Perfect Keto Air Fryer Mahi Mahi

1. Always dovetail your spices into a seasoning blend beforehand to ensure uniform coverage on the fish.

2. Investing in a meat thermometer will help maintain perfect doneness, preventing overcooking.

3. Using parchment paper in the air fryer can help with cleanup and prevent sticking.

4. Pairing Mahi Mahi with a vibrant salsa can elevate the dish and add freshness.

5. Allow the fish to rest for a few minutes after cooking for the juices to redistribute, enhancing flavor.

6. Marinate the fish for at least 30 minutes to fully incorporate flavors from spices and citrus.

7. Experiment with different culinary herbs for unique flavor profiles – the options are endless!

8. For a crunchier texture, consider sprinkling crushed nuts or seeds as a topping before air frying.

Variations and Adaptations

Consider regional adaptations such as adding tropical fruits like mango or pineapple for a Caribbean flair, or spices like paprika and cayenne for a Southwest feel. Seasonal adaptations may include serving with grilled asparagus in summer or roasted Brussels sprouts in fall, balancing flavors with seasonal veggies.

Dietary modifications can also be made. For a dairy-free option, avoid buttery sauces and focus on olive oil and herbs. If you’re looking for a flavor variation, infuse your oil with herbs like rosemary or thyme for a subtle twist. Texturally, you can complement the flaky Mahi Mahi with crispy vegetables or nuts on the side to achieve a delightful crunch.

Moreover, for modern presentation techniques, consider plating your Mahi Mahi on a vibrant bed of greens, drizzled with a citrus reduction for a gourmet experience at home.

Serving and Presentation Guide

Plating your Mahi Mahi with elegance can truly enhance the dining experience. Use white plates to allow the vibrant colors of the fish and sides to stand out. You can garnish with fresh herbs like parsley or cilantro for a pop of color. For modern serving suggestions, consider placing it on a wooden board with lime wedges for a rustic touch, or serve in individual bowls for a cozy, casual appeal.

Temperature is essential; Mahi Mahi should be served warm to enjoy its rich flavors. Portion control is also pivotal; serve 4-6 ounces of fish along with a side of steamed vegetables or salad for a balanced meal.

Wine and Beverage Pairing

For wine pairings, a crisp Sauvignon Blanc or a light Pinot Grigio complements the delicate flavor of Mahi Mahi wonderfully. If you prefer non-alcoholic alternatives, consider sparkling water with a splash of lemon or herbal iced tea, providing refreshing contrasts to the meal.

For a cozy dinner, enjoy a warm cup of chamomile tea after your meal to aid digestion and round off your dining experience.

Storage and Shelf Life

To store cooked Mahi Mahi, place it in an airtight container in the refrigerator. It is best consumed within three days post-cooking to preserve freshness. When freezing, ensure it is well-wrapped to avoid freezer burn, ideally consumed within three months. For signs of spoilage, check for off odors or discoloration.

Reheating should be done gently, either in the air fryer at a low temperature or in the oven, ensuring it stays moist. Avoid microwaving, as this can lead to a rubbery texture. If frozen, thaw the fish overnight in the refrigerator before reheating.

Make Ahead Strategies

To streamline your cooking process, you can marinate Mahi Mahi a day in advance for deeper flavor absorption. Prepping vegetables or side dishes ahead of time will also allow for a quick assembly during cooking.

When storing steps, keep the marinated fish separated in a sealed container in the refrigerator. The quality is maintained up to 24 hours; any longer may affect texture. When ready to cook, ensure to bring the fish back to room temperature for even cooking, and then air fry for the best results.

Scaling Instructions

If you wish to halve or double this recipe, simply adjust the ingredient amounts accordingly. For halving, use a smaller air fryer model while ensuring fish pieces aren’t overcrowded. If doubling, you may need to cook in batches to avoid dampening texture.

For larger groups, batch cooking your Mahi Mahi can also be efficient, simply varying the cooking time slightly based on thickness. Always taste test to ensure adjustments for seasoning are balanced.

Nutritional Deep Dive

Each serving of Keto Air Fryer Mahi Mahi is rich in protein and low in carbohydrates, making it an ideal dish for anyone following a ketogenic diet. Mahi Mahi provides essential omega-3 fatty acids, which are important for heart health. Each fillet typically contains around 20 grams of protein, 2 grams of carbs, and minimal calories, making it a guilt-free option.

Additionally, the dish brings vital micronutrients to your meal, including vitamin B12 and selenium, which contribute to overall well-being, emphasizing the importance of incorporating nutrient-rich foods into your diet.

Dietary Adaptations

This Keto Air Fryer Mahi Mahi is naturally gluten-free and low-carb, making it suitable for many dietary needs. For dairy-free variations, simply omit any butter or cream-based sauces and stick to olive oil. Those on a vegan or vegetarian diet may consider substituting Mahi Mahi with a hearty vegetable medley or tofu, seasoned similarly for flavor.

For paleo enthusiasts, this recipe aligns perfectly as it avoids processed ingredients. If you’re looking for low-FODMAP options, avoid certain seasoning combinations and stick to fresh herbs that are compliant with the diet. Each adaptation ensures that various dietary needs can enjoy this delicious Mahi Mahi dish without feeling left out.

Troubleshooting Guide

If you encounter texture issues where the fish comes out too dry, consider reducing the cooking time or covering with foil in the last few minutes to retain moisture. If flavors seem off, ensure you’re using fresh spices and consider adjusting with more citrus to elevate taste.

For temperature challenges, remember that each air fryer operates differently; adjusting cooking times slightly may be necessary. If you run into difficulties with sticking, always preheat and use a small amount of fat to prevent this issue.

Recipe Success Stories

Many home cooks have praised this Mahi Mahi recipe for its ease and flavor, often sharing modifications such as introducing different spice blends that worked wonders! Readers have experimented with mango salsa and fresh herbs, reporting back on how these variations brought new life to their dinners.

Photography tips shared among the community emphasize the importance of natural light to capture the vibrant colors of this dish, ensuring that every meal looks as good as it tastes!

Frequently Asked Questions

1. Can I use frozen Mahi Mahi for this recipe? Yes, but ensure it is fully thawed before cooking for the best results. Frozen Mahi Mahi can lead to uneven cooking if not thawed.

2. What can I serve with Mahi Mahi? Complement your dish with a side of vegetables, salad, or low-carb rice alternatives for a balanced meal.

3. Is this dish suitable for meal prep? Absolutely! You can marinate the fish a day before, and it stores well in the refrigerator.

4. What is the best way to store leftovers? Store in airtight containers in the fridge for up to 3 days or freeze for longer storage.

5. How do I know when the fish is done? Use a meat thermometer; Mahi Mahi is perfectly cooked at an internal temperature of 145°F.

6. Can I substitute Mahi Mahi with another fish? Yes, other firm white fish such as cod or snapper work well but may require slight adjustments in cooking time.

7. What if I don’t have an air fryer? You can bake Mahi Mahi in the oven; just adjust cooking times to ensure it’s thoroughly cooked.

8. Are there spice alternatives for the seasonings? Absolutely! Feel free to experiment with your favorite spices; garlic powder and paprika are great substitutes.

9. Can I use any type of oil for cooking? Yes, though olive oil is preferred for its flavor and health benefits, canola or avocado oil works well too.

10. How many carbs are in a serving of Mahi Mahi? Each serving typically contains 2 grams of carbs, making it an excellent fit for a keto diet.

Additional Resources

For more delicious keto recipes that complement this Mahi Mahi, check out our collection of low-carb seafood dishes. Explore our technique guides on air frying and various ingredient information to boost your cooking skills. Don’t forget to check out seasonal variations to keep your meals fresh and exciting!

Join the Conversation

We love hearing from our community! Share your photography tips or experiences with this recipe on social media, and don’t hesitate to leave your reviews below. Engage with fellow cooks to exchange ideas and adaptations to this Keto Air Fryer Mahi Mahi, and keep the conversation going!

The Recipe

Keto Air Fryer Mahi Mahi

Serves: 4

Prep Time: 10 mins

Cook Time: 15 mins

Total Time: 25 mins

Kitchen Equipment Needed

  • Air Fryer
  • Mixing Bowl
  • Meat Thermometer
  • Cooking Spray or Brush

Ingredients

  • 4 Mahi Mahi fillets
  • 2 tablespoons olive oil
  • 2 cloves garlic, minced
  • 1 teaspoon paprika
  • Salt and pepper to taste
  • Juice of 1 lemon
  • Fresh herbs for garnish (optional)

Directions

  1. Preheat your air fryer to 375°F (190°C).
  2. In a mixing bowl, combine olive oil, minced garlic, paprika, salt, and pepper.
  3. Coat the Mahi Mahi fillets evenly with the marinade, ensuring all sides are covered. Let marinate for at least 15 minutes.
  4. Place fillets in the air fryer basket, leaving space between each piece.
  5. Air fry for 12-15 minutes, or until the fish looks golden and flakes easily with a fork (145°F internal temperature).
  6. Reduce the cook time slightly for thinner fillets.
  7. Remove from the air fryer, garnish with lemon juice and fresh herbs if desired, and serve immediately.

Recipe Notes

  • For enhanced flavor, consider marinating the fish for up to an hour before cooking.
  • This dish pairs beautifully with a fresh salad or sautéed vegetables.
  • Experiment with different seasonings to find your perfect flavor combination!