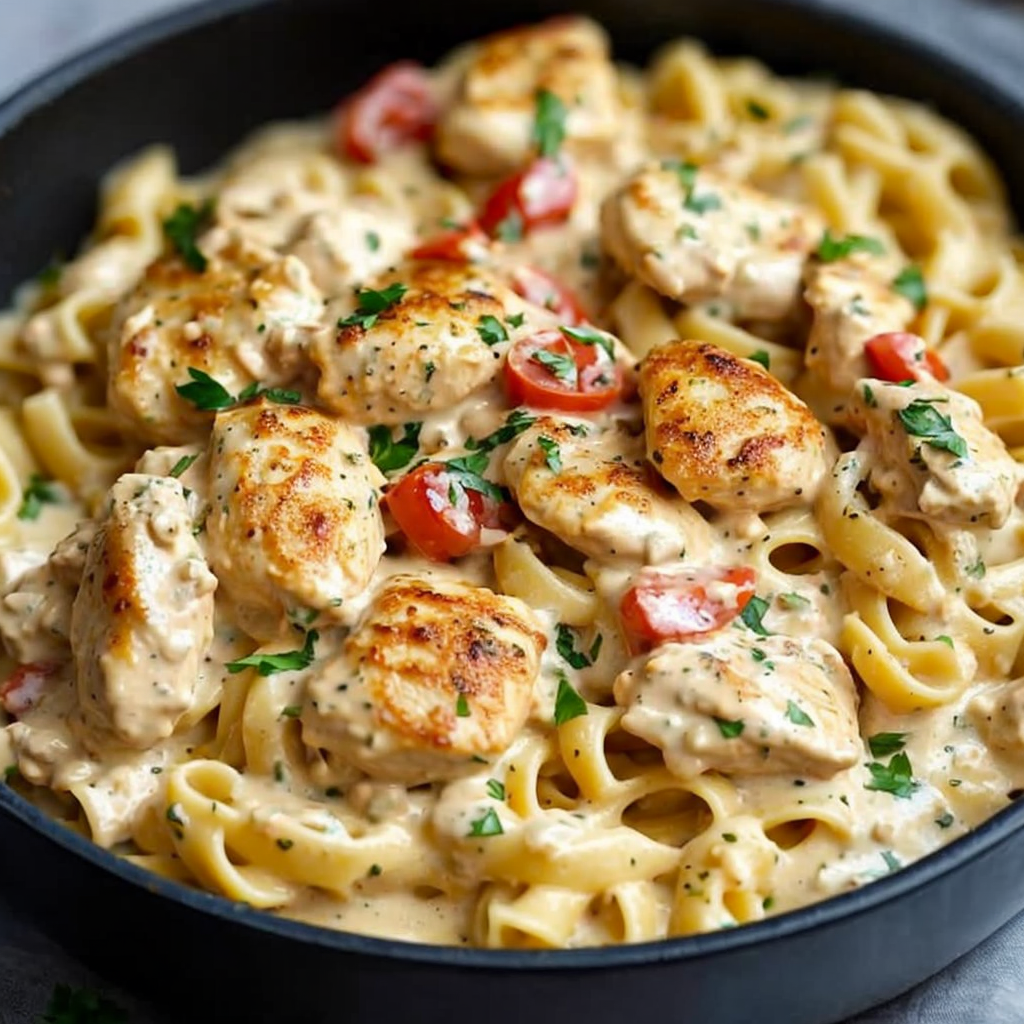
Chicken and Vegetable Dish: Healthy, Delicious, and Easy to Make

healthy chicken recipes, one-pan chicken meals, chicken stir-fry with vegetables, roasted chicken and vegetables, easy chicken dinner, chicken veggie skillet

Chicken and Vegetable Dish: A Healthy and Flavorful Choice


Introduction

Creating a balance between flavor and nutrition in your meals is easier than you think. A Chicken and Vegetable Dish provides the perfect harmony of protein and fiber, making it a wholesome option for weeknight dinners or meal prep. For more inspiration, check out “The Ultimate Comfort Food Crockpot Potato Soup with Hashbrowns”.


The Ingredients You Need

To make the perfect Chicken and Vegetable Dish, gather these key ingredients:

  • Chicken: Choose boneless, skinless chicken breasts, thighs, or drumsticks.
  • Vegetables: A colorful array of bell peppers, broccoli, carrots, and zucchini.
  • Seasonings: Garlic, paprika, oregano, and salt enhance the flavor.
  • Optional Add-Ons: Fresh herbs like parsley or cilantro for garnish.

Preparation Steps

  1. Prepping the Ingredients
    Wash and chop the vegetables into bite-sized pieces for even cooking.
  2. Seasoning the Chicken
    Marinate the chicken in olive oil, garlic, and spices for at least 30 minutes.
  3. Cooking Techniques
    • Skillet: Sauté chicken and vegetables for a quick and easy meal.
    • Sheet Pan: Roast everything together in the oven at 400°F for 20-30 minutes.
    • Slow Cooker: Combine ingredients and cook on low for 6-8 hours.

For a detailed guide on roasting techniques, explore “Mastering Spaghetti Carbonara”.


Tips for Success

  • Cut Uniformly: Ensure even cooking by chopping vegetables to the same size.
  • Add Veggies Later: For crisp-tender vegetables, add them halfway through cooking.
  • Flavor Boost: A splash of lemon juice or balsamic vinegar before serving adds zest.

Serving Suggestions

Pair your dish with these complementary sides for a complete meal:

  • Steamed rice, quinoa, or mashed potatoes.
  • Fresh salad or garlic bread.

Learn how to make the perfect side dishes with “Slow Cooker Magic: Unveiling the Ease of Crock Pot Baked Ziti”.


FAQs

  1. Can I use frozen vegetables?
    Yes, but thaw them first for even cooking.
  2. What’s the best chicken cut?
    Boneless thighs are juicy and flavorful.
  3. How can I make this dish gluten-free?
    Replace flour or breadcrumbs with gluten-free options.

Internal Linking Opportunities

  1. Use “The Ultimate Comfort Food Crockpot Potato Soup with Hashbrowns” as an anchor for comfort food recipes.
  2. Link to “Slow Cooker Magic: Unveiling the Ease of Crock Pot Baked Ziti” under slow cooker meals.
  3. Highlight “Mastering Spaghetti Carbonara” for cooking techniques.

Conclusion

A Chicken and Vegetable Dish is the ultimate combination of flavor, health, and simplicity. Whether you choose to stir-fry, roast, or slow cook, this dish adapts to your needs while satisfying your taste buds. Explore more meal ideas on ExoRecipes and discover the joy of cooking healthy and delicious meals!

Baked Fried Chicken: Crispy, Flavorful, and Healthier Comfort Food

oven-fried chicken, crispy baked chicken, healthy fried chicken recipe, crunchy baked chicken, guilt-free fried chicken, baked crispy chicken

aked Fried Chicken: A Healthier Comfort Food Favorite


Introduction

When it comes to comfort food, fried chicken often ranks at the top. But what if you could enjoy the same crispy, flavorful experience without the guilt of deep frying? Enter Baked Fried Chicken—a game-changer that combines health-conscious baking techniques with the beloved crunch of traditional fried chicken.

For more delicious comfort food ideas, check out our recipes for “Slow Cooker Chicken and Gravy Over Noodles” and “Rediscovering Comfort: Sour Cream and French Fried Onion Pork Chops”.


What is Baked Fried Chicken?

Baked Fried Chicken offers a guilt-free twist on a classic dish by replacing deep frying with baking. The result? A crunchy, flavorful coating that doesn’t skimp on satisfaction.


Ingredients for Baked Fried Chicken

Core Ingredients

  • Chicken: Thighs, drumsticks, or breasts work best.
  • Coating: Use flour, breadcrumbs, or crushed cornflakes for texture.
  • Marinade: Buttermilk or egg wash ensures the coating adheres perfectly.
  • Seasonings: Garlic powder, onion powder, paprika, cayenne pepper, salt, and black pepper.

Optional Add-Ons

  • Fresh herbs like thyme or rosemary.
  • Grated Parmesan cheese for an extra layer of flavor.

Step-by-Step Instructions

1. Marinate the Chicken

  • Rinse and pat dry the chicken pieces.
  • Soak in a buttermilk marinade for 2-4 hours. This step enhances tenderness and flavor.

2. Prepare the Coating

  • Combine flour or breadcrumbs with your chosen seasonings in a shallow bowl.

3. Coat the Chicken

  • Remove the chicken from the marinade, letting excess drip off.
  • Dredge each piece in the coating mixture until fully covered.

4. Bake

  • Place the chicken on a wire rack over a baking sheet for even airflow.
  • Bake in a preheated oven at 400°F for 40-50 minutes, flipping halfway through.

Tips for Perfect Baked Fried Chicken

  • Spray the chicken lightly with oil before baking for a golden crust.
  • Avoid overcrowding the baking sheet to ensure even cooking.
  • Use a meat thermometer to confirm the chicken reaches an internal temperature of 165°F.

Serving Suggestions

  • Pair with sides like mashed potatoes, roasted vegetables, or coleslaw.
  • Serve with dipping sauces such as ranch, honey mustard, or barbecue.

For more side dish inspiration, try our “Family Night Favorite: Easy French Bread Pizza” or “Chicken Bacon Ranch Potatoes”.


Storage and Reheating

  • Store leftovers in an airtight container in the refrigerator for up to three days.
  • Reheat in an oven or air fryer to maintain crispiness.

FAQs

  1. What’s the best way to make the coating stick to the chicken?
    Use a wet marinade like buttermilk or an egg wash for better adhesion.
  2. Can I make this recipe gluten-free?
    Absolutely! Substitute flour with gluten-free alternatives and breadcrumbs with crushed gluten-free crackers.
  3. How do I prevent soggy chicken?
    Ensure the chicken is placed on a wire rack to allow airflow during baking.
  4. Can I freeze Baked Fried Chicken?
    Yes, freeze cooked chicken in an airtight container for up to three months. Reheat in an oven for best results.

Internal Linking Opportunities

  1. Link to “The Ultimate Guide to Making Crispy Chicken Strips at Home” using crispy chicken techniques.
  2. Link to “Dorito Chicken Casserole” using comfort food casseroles.
  3. Link to “Homemade KFC-Style Famous Bowl Casserole” using homemade fast-food alternatives.

External Links

  1. Oven-Fried Chicken Perfection: “How to Make the Crispiest Oven-Fried Chicken”
  2. Healthy Chicken Recipes: “Top Healthy Chicken Meals”
  3. Crispy Baking Techniques: “Secrets to Crispy Baked Foods”

Conclusion

With its crispy exterior, juicy interior, and guilt-free preparation, Baked Fried Chicken is a must-try for anyone seeking a healthier spin on a classic favorite. Whether for a family dinner or a weekend treat, this recipe is bound to impress. Explore more comfort food ideas on ExoRecipes and enjoy the best of homemade cooking!

Hearty Beef Barley Soup: A Comforting Classic Recipe

hearty beef soup, classic barley soup, beef and vegetable soup, slow-cooked beef soup, barley stew recipe, beef and grain soup, comfort food soup

Beef Barley Soup Recipe: A Hearty Classic for All Seasons


Introduction

Beef Barley Soup is a timeless comfort food loved for its rich flavor and satisfying texture. This hearty soup combines tender beef, chewy barley, and wholesome vegetables, making it the perfect dish for a chilly day or a comforting family dinner.

For more warm and hearty recipes, check out “The Ultimate Comfort Food: Crockpot Potato Soup with Hashbrowns” or “Slow Cooker Magic: Unveiling the Ease of Crockpot Baked Ziti”.


What Makes Beef Barley Soup Special?

  • Balanced Nutrition: Packed with protein, fiber, and essential vitamins.
  • Comforting Flavors: A slow-cooked blend of savory beef, nutty barley, and aromatic herbs.
  • Versatility: Easily customizable with your favorite vegetables or spices.

Ingredients for Beef Barley Soup

Core Ingredients

  • Beef: Chuck roast or stew meat, cubed.
  • Barley: Pearl or hulled barley for texture and nutrition.
  • Vegetables: Onions, carrots, celery, and optional additions like mushrooms or spinach.
  • Seasoning: Bay leaves, thyme, garlic, salt, and pepper.
  • Broth: Beef stock for depth of flavor.

Optional Additions

  • A splash of red wine for richness.
  • Fresh parsley for garnish.

Step-by-Step Recipe

  1. Sear the Beef
    • Heat oil in a Dutch oven and brown the beef cubes. This step enhances the soup’s flavor.
  2. Prepare the Base
    • Sauté onions, carrots, and celery until softened. Add garlic and cook until fragrant.
  3. Combine Ingredients
    • Add barley, broth, and seasonings. Bring to a boil, then reduce heat to simmer.
  4. Simmer to Perfection
    • Let the soup cook for 1-2 hours until the beef is tender and the barley is cooked.

Tips for the Best Beef Barley Soup

  • Use fresh herbs for an aromatic boost.
  • Rinse barley before adding to remove excess starch.
  • Simmer gently to avoid overcooking the barley.

Serving Suggestions

  • Pair with crusty bread or a light green salad.
  • Garnish with fresh parsley or grated Parmesan cheese.

Storing and Reheating

  • Store in an airtight container in the refrigerator for up to 3 days.
  • Freeze leftovers for up to 3 months; reheat gently on the stove.

FAQs

  1. What’s the best cut of beef for this soup?
    Chuck roast, stew meat, or short ribs work well.
  2. Can I make this soup gluten-free?
    Substitute barley with quinoa or rice.
  3. How can I avoid mushy barley?
    Add barley halfway through cooking or cook it separately.

Internal Linking Opportunities

  1. Link to “Rediscovering Comfort: Sour Cream and French Fried Onion Pork Chops” using hearty comfort food recipes.
  2. Link to “Family Night Favorite: Easy French Bread Pizza” with quick and easy family dinners.
  3. Link to “Slow Cooker Chicken and Gravy Over Noodles” using slow cooker recipes.

Conclusion

Beef Barley Soup is a classic that never goes out of style. Its comforting flavors and hearty ingredients make it a go-to recipe for any season. Try this simple, delicious soup and enjoy a warm, satisfying meal with your loved ones. For more inspiring dishes, explore our collection of comforting recipes on ExoRecipes.

Elevate Dinner with Peppercorn Steak and Creamy Shallot Soup

Peppercorn Steak with Creamy Shallot Soup: A Flavorful Culinary Delight

⚖️
Difficulty
Moderate

⏲️
Prep Time
15 mins

🕒
Cook Time
30 mins

⏱️
Total Time
45 mins

🍽️
Servings
4

Peppercorn Steak with Creamy Shallot Soup is not just a meal; it’s an experience that will tantalize your taste buds and leave you wanting more. This dish presents a beautiful harmony of flavors, where the boldness of peppercorns perfectly complements the richness of the creamy shallot soup. Imagine a perfectly seared steak, juicy and tender, paired with a velvety soup that warms the soul. Every bite is an invitation to indulge in culinary elegance, perfect for special occasions or cozy dinners at home.

The complexity of flavors in this dish makes it stand out, with the peppercorns giving the steak a delightful heat and the shallots in the soup adding a hint of sweet yet savory depth. Crafted with love and care, this dish promises to impress your guests and create lasting memories around the dining table. Bring your family together over this meal that combines both heartiness and sophistication, making it an ideal choice for any gathering.

Quick Recipe Highlights

  • Flavor Profile: The dish features a fantastic interplay between the peppery steak and the creamy sweetness of the shallot soup, creating a perfect balance.
  • Texture: Expect a surprising contrast between the grilled, juicy steak and the smooth, rich soup that envelops your palate.
  • Aroma: The aromatic notes of roasted shallots and black pepper will fill your kitchen, inviting everyone to the table.
  • Visual Appeal: The dish is a feast for the eyes, showcasing a golden-hued soup with vibrant herbs and a perfectly cooked steak on the side.
  • Skill Level Needed: While this recipe is moderately challenging, it is very rewarding and manageable for enthusiastic home cooks.
  • Special Equipment: You’ll need a good quality skillet for searing the steak and a blender for achieving the creamy texture in the soup.

Recipe Overview

  • Difficulty Level: This recipe requires a moderate skill level, suitable for cooks who are comfortable using the stove and working with meat.
  • Category: This dish fits perfectly into hearty dinners and is great for special occasions, date nights, or holiday meals.
  • Cuisine: Inspired by classic French cuisine, this recipe elevates common ingredients into a sophisticated dish worthy of fine dining.
  • Cost: Depending on ingredient quality, expect a cost range of $20 to $40, making it an upscale but accessible choice.
  • Season: Ideal for cooler weather, it offers warmth and comfort, making it a great choice for fall and winter months.
  • Occasion: Perfect for upscale dinners, celebrations, and family gatherings, this meal is sure to impress your guests.

Why You’ll Love This Recipe

Taste and texture appeal: The sumptuous steak paired with the creamy shallot soup creates a delightful eating experience. Each component of the recipe contributes to its overall profile, delivering a savory taste that’s enriched with the hint of spice from the peppercorns.

Convenience and preparation benefits: This recipe can be made in under an hour, making it a quick yet impressive dish for weekday dinners or entertaining guests. Whole ingredients mean you can easily find them at your local grocery store without any hassle.

Nutritional advantages: The dish is packed with protein and essential nutrients from the shallots and pepper, providing a well-rounded meal that keeps you satisfied. It’s both hearty and nutritious, making it a great choice for health-conscious individuals.

Social and entertaining value: Sharing this recipe with friends and family creates an inviting atmosphere. It’s a conversation starter, with its delicious flavors and unique pairing that everyone will enjoy.

Cost-effectiveness and accessibility: While the dish may feel luxurious, the ingredient list is manageable for most budgets. This makes it an achievable gourmet experience for any home cook.

Historical Background and Cultural Significance

The origins of steak with sauce can be traced back to classic French cooking, where chefs aimed to highlight the flavors of perfectly cooked meats. Peppercorns, a staple in many cuisines, became popular due to their robust flavor and health benefits.

Culturally, this dish represents a celebration of fresh, high-quality ingredients and cooking techniques that highlight their natural flavors. In France, serving steak and soup is a common tradition, often found in bistros and family gatherings.

Over time, the combination of peppercorn steak and creamy sauces has evolved into various regional interpretations worldwide, highlighting local ingredients while keeping the essence of the original dish.

In many places, variations have emerged, from spicy adaptations in different cultures to lighter versions that still aim to capture the beloved flavors of the classic recipe.

Ingredient Deep Dive

Steak: Contains high levels of protein, iron, and other essential vitamins, making it a nutritious choice. When selecting steak, look for cuts that are well-marbled for tenderness. To store, keep it in the coldest part of your refrigerator and consider using a vacuum-sealed bag for longevity. Substitute with chicken or tofu for a different twist.

Shallots: Often underappreciated, shallots offer a milder flavor than onions with a hint of sweetness. Nutritionally, they provide antioxidants and are a great source of minerals. Select bulbs that feel firm; look for signs like sprouting or sogginess to avoid. Shallots can be stored in a cool, dark place, and for a lighter option, they can be substituted with green onions.

Common Mistakes to Avoid

  • Overcooking the steak can lead to a tough meal; use a meat thermometer to check doneness.
  • Not allowing the steak to rest can result in loss of juices; let it sit for a few minutes before slicing.
  • Skipping the seasoning step compromises flavor—don’t be shy with salt and pepper!
  • Using low-quality ingredients can make a significant impact on the final dish; always opt for fresh and high-quality products.
  • Not blending the soup enough can leave it chunky; for a creamy consistency, blend thoroughly.
  • Forgetting to taste along the way could lead to unbalanced flavors; adjust seasonings to your preference.
  • Using the wrong pan for searing the steak may prevent a good crust from forming; choose a heavy-bottomed skillet.
  • Rushing through prep can lead to a messy kitchen and uneven cooking; take your time to measure and prepare ingredients properly.

Essential Techniques

Proper steak searing: This technique is crucial for creating that delightful crust on your steak. To master it, ensure your skillet is preheated and dry before placing the meat in. Common pitfalls include overcrowding the pan, which can lead to steaming instead of searing, and flipping the steak too soon.

Blending soup: Achieving the perfect creamy consistency is important for the shallot soup. A blender or an immersion blender can provide the desired smoothness. Avoid overfilling your blender to prevent spillage and ensure even blending for a deliciously creamy texture.

Pro Tips for Perfect Peppercorn Steak with Creamy Shallot Soup

1. Choose the right cut of steak for maximum tenderness; cuts like ribeye or filet mignon work beautifully.

2. Let your steak reach room temperature before cooking. This helps in cooking evenly from edge to edge.

3. Experiment with different types of peppercorns to introduce unique flavors to your steak.

4. Enhance the soup with a splash of white wine; it adds depth and complexity to the flavor.

5. Garnish with fresh herbs for a pop of color and taste; consider chives or parsley for a lovely look.

6. If you’re short on time, prepare the soup in advance; it tastes even better the next day!

7. Don’t rush the blending—take your time to achieve a velvety smooth consistency in the soup.

8. Serve the soup hot, but make sure the steak is cooked to your desired doneness for the best experience.

Variations and Adaptations

Consider regional variations like replacing steak with lamb for a unique twist that’s popular in Mediterranean cuisine. Seasonal adaptations can include vegetables like asparagus in spring or roasted root vegetables in the fall, adding a fresh element to the meal.

For dietary modifications, swap sour cream with a dairy-free alternative for a vegan approach, and use vegetable stock to ensure it’s entirely plant-based.

Flavor variations can be introduced by incorporating herbs, such as rosemary or thyme, into the steak marinade, enriching the overall flavor profile.

Texture modifications might involve thickening the soup with cream cheese for an alternative creamy texture or blending in roasted garlic for depth.

Finally, presentation alternatives can be considered—serve in elegant bowls for special occasions or rustic plates for casual gatherings to match the atmosphere of your meal.

Serving and Presentation Guide

When plating, use deep bowls for the shallot soup to show off its creamy texture and garnish with fresh herbs. The steak should be beautifully sliced and arranged beside the soup, perhaps atop a bed of mashed potatoes for elegance.

Garnishing ideas can include a drizzle of balsamic reduction atop the soup for an added flavor dimension and visual appeal. Traditional accompaniments such as crusty bread can be served on the side, enhancing the meal’s comfort factor.

Consider modern serving suggestions like pairing with a fresh salad to balance the richness of the dish. Serve at room temperature for the steak to maintain the juicy texture while ensuring the soup is hot before presenting to your guests.

For portion control, slice the steak into smaller pieces before serving to allow for sharing and tasting, inviting guests to indulge in richer flavors.

Wine and Beverage Pairing

Wine pairings can elevate the dining experience; consider a robust red wine, such as Cabernet Sauvignon, which complements the richness of the steak. For white wine lovers, a Chardonnay works wonders with creamy sauces.

Non-alcoholic alternatives like sparkling water with a lemon twist can refresh the palate without overpowering flavors. If a warm beverage is preferred, a balanced herbal tea can sit well alongside the meal.

When pairing with coffee, select a rich roast that mirrors the steak’s boldness, making for an excellent adult beverage combination. Ensure your drinks are served at the appropriate temperatures to enhance their flavors alongside your dish.

Storage and Shelf Life

Store leftovers in an airtight container in the refrigerator for up to three days. For longer preservation, consider freezing the soup separately; it maintains flavor well when adequately sealed. Aim for glass containers for the best storage practice, preventing any flavors from leaching.

Signs of spoilage to watch for include off-smells or changes in color—discard if you notice anything unusual. When reheating, use the stovetop for gradual warming or the microwave in short intervals for the best texture retention.

For freezing, allow the soup to cool completely, then pour into freezer bags. This method allows for easy portioning and quick defrosting during a busy week.

Make Ahead Strategies

For a smooth cooking experience, prepare the soup a day in advance. Flavor intensifies overnight, building a richer taste that enhances your meal. Store and reheat it just before serving, simplifying your cooking on the main event day.

Quality impact can be assessed by tasting your soup before serving; adjust seasoning as needed before hosting. Keep ingredients for the steak pre-prepped, such as marinating overnight for deeper flavor infusion.

Assembly tips could involve prepping garnishes in advance and storing them separately. This allows for a fresh presentation without last-minute stress. When reheating the soup, remember to stir consistently for an even temperature throughout.

Scaling Instructions

To halve the recipe, use fewer shallots and adjust cooking time for the steak accordingly, keeping in mind to taste the soup along the way to maintain flavor balance.

Doubling or tripling requires larger pans and careful attention to cooking times; monitor the internal temperature of the steak to prevent overcooking.

For equipment adjustments, consider utilizing multiple pans for searing steaks if making in larger quantities. Timing modifications should ensure that each steak is cooked individually for optimal doneness.

Lastly, when scaling the recipe, maintain proper storage considerations to reduce food waste while ensuring freshness and quality.

Nutritional Deep Dive

This dish provides a balanced meal by packing protein-rich steak and nutrient-dense shallots, contributing to fulfilling macro requirements. A standard serving offers approximately 35-40 grams of protein, essential for muscle preservation and overall health.

Micronutrient analysis of the ingredients reveals beneficial vitamins like B6, B12 from the steak, and antioxidants from shallots, lending health benefits beyond mere satiety. Ensure proper portion analysis, keeping servings in check for a balanced diet.

For those mindful of weight management, understanding the calorie density of the meal assists in making informed dietary choices while enjoying delicious flavors.

Dietary Adaptations

For gluten-free needs, simply ensure all ingredients are certified gluten-free, including stock options. Consider using flour alternatives to thicken the soup if necessary.

A vegan adaptation can be achieved with plant-based steak substitutes and coconut cream for the soup, maintaining rich flavors while aligning with dietary restrictions.

Low-carb enthusiasts can opt for zucchini noodles instead of bread, providing a fulfilling experience without the carbs. Keto-friendly supplements, such as cauliflower mash, can also replace heavier side dishes.

Paleo dieters should swap ingredients processing methods while enjoying natural flavors of fresh produce in the soup and accompanying salad options.

Troubleshooting Guide

If the steak isn’t tender, it may need a longer resting time after cooking, promoting even distribution of juices. Adjust the cooking method to improve juiciness, using techniques such as sous vide for precise temperature control.

For flavor balance, remember to taste throughout cooking; if overly salty, consider adding a dash of sugar to mellow the intensity. If the soup is too thin, use a cornstarch slurry to thicken it effectively.

In case of ingredient substitutions, refer to a conversion chart for ratios, ensuring similar textures and flavors in the final dish. Timing concerns can be mitigated by keeping a close watch on cooking duration and appropriate doneness of each component.

Recipe Success Stories

Our community has shared numerous feedback showcasing the delight this recipe brings to their families. One reader mentioned successfully replacing black pepper with a blend of spices, enhancing their culinary experience.

Those who adapted the recipe to suit dietary preferences shared their unexpected successes. A reader’s suggestion of a mint garnish added an exciting twist and a fresh touch that delighted their guests.

Photography tips from readers reveal best practices in capturing the vibrant colors of the dish, with natural light and a simple backdrop significantly enhancing pictures.

Frequently Asked Questions

Q: Can I prepare this dish in advance?
A: Yes, the cream soup can be made ahead. Store it in an airtight container and reheat before serving. The steak is best cooked fresh, although marinating can be done a day prior.

Q: What should I serve with Peppercorn Steak?
A: Consider sides like garlic mashed potatoes, steamed vegetables, or a fresh salad to complement the dish beautifully.

Q: Can the shallot soup be frozen?
A: Yes, the soup freezes well. Allow it to cool completely, then transfer it into freezer-safe containers.

Q: How do I know the steak is done?
A: Use a meat thermometer; for medium-rare, aim for an internal temperature of 135°F (57°C).

Q: Is this recipe suitable for beginners?
A: While it’s moderately challenging, a keen beginner can still follow along with the detailed instructions provided.

Q: Can I use different types of steak?
A: Absolutely! Cuts such as flank, sirloin, or ribeye can provide different flavor profiles and textures.

Q: What spices can I use for more flavor?
A: Experiment with spices like smoked paprika, garlic powder, or herbs like thyme or rosemary for added depth.

Q: How long should I rest the steak after cooking?
A: Resting the steak for at least 5-10 minutes allows the juices to redistribute, ensuring a juicier bite.

Q: Can I make the soup thicker?
A: Yes, adding a cornstarch slurry or blending it longer can enhance the creaminess of the soup.

Q: Is there a vegetarian alternative?
A: Yes, substitute the steak with plant-based protein and ensure all other ingredients align with a vegetarian lifestyle.

Additional Resources

If you enjoyed this recipe, be sure to check out our collection of other hearty comfort food recipes, including herb-roasted chicken and creamy mushroom risotto. Explore our technique guides to master various cooking methods, and for ingredient information, visit our dedicated section that dives deeper into healthy cooking practices.

For those interested in seasonal variations, keep an eye out for our upcoming posts tailored to fresh ingredients from local farmers’ markets, ensuring your meals always have the best flavors depending on the season!

Join the Conversation

We’d love to hear how your version of Peppercorn Steak and Creamy Shallot Soup turned out! Share your photography on social media with the hashtag #PeppercornSteakDelight to inspire others. You can also leave a review or feedback to engage with our community.

Recipe reviews are invaluable, so consider providing your variant story, especially any successful adaptations or creative twists you’ve experienced. Together, let’s create a conversation around culinary exploration and enhance our cooking adventures!

The Recipe

Peppercorn Steak with Creamy Shallot Soup

Serves: 4

Prep Time: 15 mins

Cook Time: 30 mins

Total Time: 45 mins

Kitchen Equipment Needed

  • Skillet
  • Blender
  • Meat thermometer
  • Cutting board

Ingredients

  • 4 steaks (ribeye or any preferred cut)
  • 1 cup shallots, diced
  • 1 cup heavy cream
  • 2 tablespoons olive oil
  • 2 tablespoons black peppercorns, crushed
  • Salt to taste
  • 1 cup beef broth
  • Fresh chives for garnish

Directions

  1. Heat olive oil in a skillet over medium-high heat.
  2. Season steaks with salt and crushed peppercorns on both sides.
  3. Cook steaks to your desired doneness, approximately 4-5 minutes per side for medium-rare.
  4. Remove steaks from the skillet and let rest while preparing the soup.
  5. Add diced shallots to the same skillet, cooking until softened, about 3-4 minutes.
  6. Pour in the beef broth and bring to a simmer, allowing flavors to meld.
  7. Stir in heavy cream, and blend using a blender until smooth.
  8. Serve the creamy shallot soup alongside the sliced peppercorn steak, garnished with fresh chives.

Recipe Notes

  • Feel free to use different cuts of steak based on preference.
  • If you like your soup spicier, increase the amount of black peppercorns.
  • Store leftovers in an airtight container for up to three days.

Delicious Chicken Broccoli Alfredo Stuffed Shells Recipe to Try

Delicious Chicken Broccoli Alfredo Stuffed Shells: A Comfort Food Delight

⚖️
Difficulty
Medium

⏲️
Prep Time
30 mins

🕒
Cook Time
25 mins

⏱️
Total Time
55 mins

🍽️
Servings
4 servings

Indulge yourself in the creamy dream of Chicken Broccoli Alfredo Stuffed Shells, where hearty pasta shells embrace a rich blend of tender chicken, vibrant broccoli, and luxurious Alfredo sauce. This recipe not only delights the palate but also fills the kitchen with enticing aromas, transforming a simple family dinner into an extraordinary event. The harmony of flavors and textures in these stuffed shells promises satisfaction with each bite, making it a favorite for both adults and kids alike.

What makes this dish truly special is the alfredo sauce, which brings a velvety creaminess that complements the smoky chicken and the slight crunch of broccoli. The combination creates a comforting dish that’s perfect for any occasion, be it a weeknight dinner or a cozy gathering with friends. Trust me; everyone will be asking for seconds!

Quick Recipe Highlights

  • Flavor Profile: A delightful mix of savory chicken and creamy Alfredo with fresh broccoli for a burst of flavor.
  • Texture: The tender stuffed pasta shells juxtaposed with creamy filling and crisp-tender broccoli create a satisfying mouthfeel.
  • Aroma: The comforting scents of garlic and parmesan waft through the air, inviting everyone to the table.
  • Visual Appeal: Golden, bubbling cheese on top enhances the dish’s appeal, making it as beautiful as it is delicious.
  • Skill Level Needed: This recipe is accessible for home cooks who enjoy a challenge without being overly complicated.
  • Special Equipment: An oven-safe baking dish and a pot for boiling the shells are necessary for this recipe.

Recipe Overview

  • Difficulty Level: The medium difficulty level is perfect for home cooks who are familiar with basic cooking techniques.
  • Category: This dish fits into comfort food and pasta categories, making it ideal for family meals.
  • Cuisine: Influenced by Italian cuisine, it integrates comforting pasta traditions with American flavors, perfect for any dining occasion.
  • Cost: The approximate cost per serving is economical, providing value while delivering great taste.
  • Season: Any season is perfect for this dish, as it warms you up on cold evenings and delights during warm summer nights.
  • Occasion: Perfect for family dinners, potlucks, or even holiday gatherings, this dish suits various themes and tastes.

Why You’ll Love This Recipe

The Chicken Broccoli Alfredo Stuffed Shells are a beloved choice, offering an unbeatable combination of creamy satisfaction and filling nutrition. Each shell is packed with a flavorful filling that brings the taste of comfort food to the forefront, elevating any meal from mundane to memorable. The balance of rich Alfredo sauce and tender chicken makes this dish not only delightful but also satisfying.

Convenience is a key selling point for this recipe as it can be prepared in advance and refrigerated until needed. This makes it a great option for busy weeknights or when you want something special without the hassle of last-minute cooking. Simply bake it before serving, and enjoy a home-cooked meal that tastes like you spent hours in the kitchen!

From a nutritional standpoint, each serving packs protein from the chicken and essential vitamins from the broccoli. It’s a delightful way to sneak in vegetables for picky eaters while providing a wholesome meal for everyone. When it comes to social dining experiences, these stuffed shells become a conversation starter—everyone will want to know your secret with the delectable Alfredo sauce!

Cost-effectiveness is also a compelling reason to make this dish. With affordable ingredients that are easy to find, Chicken Broccoli Alfredo Stuffed Shells allow you to enjoy a restaurant-style dish at home. Plus, the ability to feed a crowd easily makes it a frugal choice for family gatherings or larger events.

Finally, the love for this recipe extends beyond the kitchen. It’s a dish meant for sharing, bringing people together over a plate full of deliciousness. Whether you serve it at a dinner party or a cozy family night, expectations will always be met with smiles and satisfied appetites.

Historical Background and Cultural Significance

The creation of stuffed pasta can be traced back to various regions in Italy, where different forms of pasta have been filled with meat, cheese, or vegetables for centuries. The idea of combining chicken and broccoli into a creamy bake reflects modern American adaptations of classic Italian cooking. Notably, the use of Alfredo sauce originated from Rome, with chef Alfredo di Lelio making the sauce popular in the early 1900s.

Culturally, pasta has created a bond over generations in many households around the world. Celebrated for its versatility, pasta forms the foundation of family traditions and gatherings. Chicken Broccoli Alfredo Stuffed Shells provide a unique twist on these traditional dishes, offering ample opportunity for sharing while still allowing cooks to showcase their personal touches.

Over time, the recipe for Alfredo sauce has evolved. Initially, the sauce was a simple combination of butter and cheese, but now it embraces cream for a richer texture. The addition of broccoli is a relatively modern take designed to incorporate more vegetables into the diet without sacrificing taste or comfort.

Regional variations of stuffed pasta are abundant, with each region of Italy bringing unique flavors to the table. From Lasagna in the north to Canneloni in the south, choosing to fill pasta shells offers a blank canvas for creativity. The Chicken Broccoli Alfredo Stuffed Shells honors these traditions, allowing anyone to enjoy the essence of Italian cooking right in their home.

Ingredient Deep Dive

Chicken: Chicken is a staple protein known for its versatility and mild flavor. This meat is prized globally for its ease of preparation and can be enjoyed in numerous cuisines. Nutritionally, chicken is an excellent source of protein, necessary for muscle maintenance and growth. When selecting chicken for this recipe, look for fresh, organic options where possible, as they have better flavor and quality. To store raw chicken, keep it in the refrigerator and use it within 1-2 days or freeze if you plan to use it later.

Broccoli: Broccoli is a nutrient-dense vegetable that excels in providing vitamins C, K, and fiber. This cruciferous vegetable adds both color and health benefits to dishes. When buying broccoli, look for firm, vibrant heads with tight florets. Store broccoli unwashed in the refrigerator and consume within a few days for optimal freshness. For variation, you can substitute with asparagus or spinach, adding a different flavor profile while maintaining the nutritional benefits.

Alfredo Sauce: The classic Alfredo sauce combines cream, butter, and cheese, providing a luxurious coating that elevates any dish. This sauce has roots in Roman cooking, where it was created to appeal to those who enjoy rich flavors. Homemade variants are often healthier and customizable, allowing spice and herb additions based on personal preferences. Whenever possible, choose fresh, quality cheese that can enhance the flavor and texture of the sauce. Alfredo sauce can be made ahead of time and refrigerated for later use, prolonging its shelf life while ensuring freshness in your dish.

Common Mistakes to Avoid

  • Overcooking the pasta shells: Ensure you cook them al dente to prevent mushiness when baking. A little bite is essential.
  • Not preheating the oven: Always preheat the oven to ensure the dish cooks evenly, enhancing the creamy texture of the Alfredo.
  • Using low-quality cheese: Opt for freshly grated cheese instead of pre-packaged grated varieties, as they contain anti-caking agents that alter flavor and melting quality.
  • Skipping the seasoning: Don’t forget to season each layer of the dish for depth of flavor; a simple touch of salt and pepper enhances every element.
  • Not letting the filling cool: If the chicken and broccoli are hot when mixed into the stuffing, they’ll steam the shells and make them soggy.
  • Using too much sauce: Balance the sauce, as adding excess can overpower flavors and lead to a soggy bottom.
  • Not letting the dish rest: Allow it to cool for a few minutes after baking to help set the filling and make serving easier.
  • Omitting the baking time: Baking provides the chance for flavors to meld; follow the suggested time for best results.
  • Neglecting presentation: Take time to garnish and present the dish nicely; this enhances the dining experience.
  • Ignoring storage guidelines: Store leftovers in airtight containers and consume within a few days; follow freezing protocols for longer preservation.

Essential Techniques

Cooking Pasta al Dente: Cooking pasta to the perfect al dente texture helps maintain its shape while ensuring it doesn’t become mushy. This involves cooking it in boiling salted water for the recommended time while testing its firmness. Look for a slight resistance in the center, and remember it will continue to cook in the oven. Avoid overcooking by checking a minute or two before the time indicated on the package.

Making Alfredo Sauce: Mastering Alfredo sauce involves this simple balance: melt butter, whisk in heavy cream, and then gradually add cheese while constantly stirring. This technique is crucial to prevent clumping and ensure a smooth, creamy sauce. Cook over low heat to avoid scorching, and taste frequently to achieve your desired flavor and consistency.

Stuffing Shells: Properly stuffing the shells takes patience and practice. Use a piping bag or spoon to fill them generously without tearing. Press the filling gently to ensure shells are packed but not overly full, which could cause them to burst. Visual cues for success include full shells without the filling spilling out when placed in your baking dish.

Baking with Cheese: To achieve a perfectly golden cheese crust, layer cheese on top and bake on a higher heat for the final 5-10 minutes. A broiler can also be used, but watch closely to prevent burning. Ideal visual cues are bubbly edges and a lightly golden surface, enhancing both appearance and flavor.

Pro Tips for Perfect Chicken Broccoli Alfredo Stuffed Shells

1. **Use Fresh Ingredients:** Fresh herbs and quality cheese can drastically improve flavor profiles. Always opt for freshly grated parmesan and herbs for better taste.
2. **Customize the Filling:** Feel free to add other vegetables or proteins to the filling, such as bell peppers, or even switch out chicken for turkey.
3. **Make It Ahead:** Prepare the stuffed shells in advance and refrigerate. Just pop them into the oven for a quick meal on busy days!
4. **Experiment with Sauces:** While Alfredo is classic, experiment with white sauces or tomato-based alternatives for different flavor experiences.
5. **Don’t be Bashful with Spices:** A hint of nutmeg or Italian seasoning can elevate the flavor of the dish, adding depth and warmth.
6. **Top with Fresh Herbs:** Garnish with fresh parsley or basil right before serving for a burst of color and freshness.
7. **Serve with a Side Salad:** A light salad can balance the heaviness of the stuffed shells, making the meal well-rounded and satisfying.
8. **Consider a Healthier Alfredo:** Substitute some heavy cream with a blend of milk and flour for a lighter version without sacrificing flavor.

Variations and Adaptations

For those wishing to embrace different flavors, consider regional variations such as using Italian sausage or ground beef in addition to, or instead of, chicken. Each brings a distinct flavor profile to the dish, allowing you to customize based on seasonal availability.

During the summer, incorporate seasonal vegetables such as zucchini or roasted red peppers, switching out broccoli when it’s not in season. For a hearty twist, add in spinach cooked with garlic for additional nutrition and color.

If dietary modifications are needed, gluten-free pasta shells can work perfectly well. Additionally, a dairy-free Alfredo sauce can be made using cashews blended with nutritional yeast for a condensed flavor without dairy.

When considering texture, feel free to top the dish with crispy breadcrumbs or crushed chips for added crunch, while cheese options can be adjusted based on dietary preferences.

Serving and Presentation Guide

Plating these stuffed shells can be as creative as you desire. One technique is to lay a bed of Alfredo sauce on the plate before delicately placing the stuffed shells atop it, providing an inviting color contrast. Drizzling more sauce over the top and garnishing with freshly chopped parsley creates a stunning visual appeal.

For garnishing, consider a light sprinkle of freshly grated parmesan and a few spears of blanched broccoli on the side to frame the dish. Alternatively, serve them in individual ramekins for a fun, restaurant-style presentation that sets the scene for an elevated dining experience.

Bear in mind the importance of temperature, as these stuffed shells should be served hot to fully enjoy the creamy richness of the sauce. Portion control can be tailored to occasion, serving fewer for an appetizer or more for family meals to ensure no one leaves the table hungry.

Wine and Beverage Pairing

Pairing a light white wine like Chardonnay complements the creamy flavors of Chicken Broccoli Alfredo Stuffed Shells beautifully. A crisp Sauvignon Blanc can also provide a refreshing contrast to the dish’s richness. If you prefer non-alcoholic options, consider sparkling water with a wedge of lemon to cleanse the palate between bites.

For those who enjoy coffee or tea, a robust black tea complements creamy dishes well without overwhelming the flavor. When serving wine, ensure that it is chilled to enhance enjoyment, especially in warmer weather.

Storage and Shelf Life

To store leftover Chicken Broccoli Alfredo Stuffed Shells, place them in an airtight container in the refrigerator. Properly stored, they can last up to 3-4 days. For longer storage, consider freezing the cooked dish by tightly wrapping it in plastic wrap and then aluminum foil to prevent freezer burn, allowing it to last for up to 2-3 months.

Spoilage signs include an off-odor, unusual discoloration, or a slimy texture, which means it should be discarded. To reheat, bake in the oven until hot throughout, or for a quicker option, use the microwave, stirring halfway for even heating.

If previously frozen, remember to let the dish thaw in the refrigerator for several hours or overnight before reheating to maintain the best texture and flavor.

Make Ahead Strategies

Preparing Chicken Broccoli Alfredo Stuffed Shells can be simplified by splitting the process into stages. You can boil the pasta shells and prepare the filling a day in advance, storing them in separate containers in the refrigerator. This allows assembly to be quick and easy, perfect for entertaining.

The whole dish can be assembled a few hours before baking, covered, and kept in the fridge until needed. Just ensure to consider added cooking time if the dish is coming straight from cold storage.

For an extra kick, add fresh ingredients like herbs or grated cheese right before baking to enhance the flavor and presentation while keeping the dish fresh and appealing.

Scaling Instructions

Halving the recipe requires a half batch of each ingredient and adjusted cooking time slightly to prevent overcooking. If planning to double or triple the recipe, ensure you have appropriately sized baking dishes and increase cooking time accordingly.

When scaling, be mindful of ingredient ratios, especially spices and sauces, as too much can dilute the flavor balance. Cooking tools such as pots and utensils may also need to be adjusted for larger quantities.

When storing scaled leftovers, divide portions into appropriate-sized containers to maintain freshness. Label everything clearly and consider freezing portions for easy access later.

Nutritional Deep Dive

Each serving of Chicken Broccoli Alfredo Stuffed Shells generally contains a balance of macronutrients due to the chicken, broccoli, and pasta. Expect a healthy serving of protein from the chicken, providing essential amino acids necessary for muscle repair and growth.

Micronutrient analysis shows ample amounts of vitamins, particularly vitamin C from broccoli and various B vitamins from the pasta. Broccoli also contributes dietary fiber, promoting healthy digestion.

When considering health benefits, the combination of protein and vegetables creates a filling meal, beneficial for those maintaining an active lifestyle. Portion sizes are essential to ensure weight management, as too much creamy sauce can lead to higher calorie intake.

Should dietary needs be a concern, moderating or swapping ingredients can maintain nutritional integrity. For example, substitute with a whole grain pasta to boost fiber content.

Dietary Adaptations

For gluten-free diets, choose gluten-free pasta shells, which are widely available in health food stores. This allows those with gluten intolerance to enjoy the dish without compromising taste.

Dairy-free options are achievable with the use of nut-based cheeses or creating your own creamy sauce from soaked cashews blended with garlic and nutritional yeast to achieve similar flavors.

Vegan adaptations can include chickpea-based pasta or adding lentils to create protein-rich alternatives while skipping animal ingredients altogether.

For low-carb versions, consider replacing pasta with zucchini noodles or cauliflower rice; both provide lower carbohydrates while allowing for delicious stuffed flavors.

Within the keto framework, a chicken and vegetable filling combined with cheese can be entirely keto-friendly without sacrificing flavor.

Troubleshooting Guide

If the texture turns out too dry, this may be due to overbaking. Always adhere to the suggested baking times and consider covering with foil if the tops brown too quickly.

For flavor balance issues, ensure to taste-test throughout the cooking process; adding salt or spices incrementally can best adjust the dish to your preference.

If ingredients do not meld well or if the sauce becomes clumpy, try whisking vigorously while heating, as this can help restore a smooth consistency.

Equipment challenges can arise if your oven is not calibrated correctly. Invest in an oven thermometer to ensure even cooking and proper temperature management.

Lastly, if substitutions were made, be cautious with ratios, as ingredient swaps can affect final flavor and consistency. Adjust seasoning according to taste to rectify any imbalance.

Recipe Success Stories

Our community has been buzzing about their experiences with Chicken Broccoli Alfredo Stuffed Shells! Many have shared stories of adapting the recipe with family, showcasing variations like shrimp or kale that have been met with rave reviews.

Readers have delighted in modifying the dish, experimenting with different cheeses, or incorporating seasonal vegetables. Suggestions on social media have inspired others along the way, transforming it into a versatile culinary centerpiece.

Photography enthusiasts have provided beautiful visuals of their platings, highlighting the vibrant colors and sumptuous textures that make this dish stand out on dinner tables.

Overall, these stuffed shells have fostered connections among cooks, igniting conversations around recipe adaptations and successful gatherings where family and friends gathered to enjoy their delicious creations.

Frequently Asked Questions

Can I use different types of cheese for the filling?
Absolutely! Feel free to experiment with different types of cheese like ricotta, mozzarella, or goat cheese, as they will all add a unique flavor and texture to the dish.

Can I prepare this dish in advance?
Yes, you can assemble the stuffed shells ahead of time! Just assemble the dish, cover it tightly, and store it in the refrigerator until you are ready to bake.

Is it possible to make this dish vegetarian?
Certainly! You can substitute the chicken with sautéed mushrooms or more vegetables, ensuring to maintain a delicious flavor profile.

What’s the best way to reheat leftovers?
Reheat in the oven for best texture. Cover with foil and bake at 350°F (175°C) for about 20 minutes, or until heated through to maintain the creamy consistency.

Can I freeze Chicken Broccoli Alfredo Stuffed Shells?
Yes, you can freeze them before baking or after, tightly wrapped. To reheat, thaw in the refrigerator overnight and then bake as instructed.

What can I serve with this dish?
This dish pairs well with a light salad or garlic bread on the side for contrast and extra satisfaction during meals.

How do I ensure shells don’t stick together?
To prevent sticking, rinse the shells briefly in cold water after draining and add a bit of oil, ensuring they remain separate while you’re stuffing them.

Are there any side dishes that complement this pasta?
Yes! Consider serving steamed asparagus or a simple mixed green salad dressed with lemon vinaigrette for a refreshing balance.

Can I modify it to include more vegetables?
Definitely! Feel free to add spinach, artichokes, or even peppers to the filling for added nutrition and flavor vibrancy.

How do I know when my stuffed shells are done?
The dish is done when it bubbles around the edges, and the cheese on top is melted and golden brown. Insert a knife to check the internal temperature if unsure.

Additional Resources

For those eager to dive deeper into the world of cooking, we offer a selection of related recipes highlighting delicious stuffed pasta options, from classic lasagna to innovative even light vegetarian alternatives. Exploring muscle-building techniques and understanding the ingredients behind successful cooking can also benefit your culinary journey.

Consider investing in reliable kitchen equipment that aids in the cooking process, including quality pots for boiling, colanders for draining, and a reliable oven for baking. Seasonal variations can also inspire your cooking; try utilizing fresh herbs and vegetables at their peak for a burst of flavor in your meals.

Join the Conversation

We invite you to share your experiences with Chicken Broccoli Alfredo Stuffed Shells! Engage with us on social media to showcase your unique take on this delightful recipe, share photographs, and exchange tips or variations that make it your own. Your feedback not only inspires others but also builds a community around delicious cooking experiences and shared successes in the kitchen.

The Recipe

Chicken Broccoli Alfredo Stuffed Shells

Serves: 4 servings

Prep Time: 30 mins

Cook Time: 25 mins

Total Time: 55 mins

Kitchen Equipment Needed

  • Large pot
  • Colander
  • Baking dish
  • Piping bag or spoon for stuffing
  • Mixing bowl
  • Whisk

Ingredients

  • 12 jumbo pasta shells
  • 2 cups cooked, shredded chicken
  • 1 cup steamed broccoli, chopped
  • 1 ½ cups Alfredo sauce
  • 1 cup shredded mozzarella cheese
  • ½ cup grated parmesan cheese
  • 1 tablespoon olive oil
  • Salt and pepper to taste
  • Fresh parsley for garnish (optional)

Directions

  1. Preheat the oven to 350°F (175°C).
  2. Cook pasta shells according to the package instructions until al dente; drain and set aside.
  3. In a mixing bowl, combine shredded chicken, chopped broccoli, and half of the Alfredo sauce. Season with salt and pepper.
  4. Stuff each pasta shell generously with the chicken and broccoli mixture.
  5. Spread remaining Alfredo sauce over the bottom of a baking dish, and place the stuffed shells on top.
  6. Sprinkle mozzarella and parmesan cheese over the stuffed shells.
  7. Bake in the preheated oven for about 25 minutes, until the cheese is melted and bubbly.
  8. Let cool for a few minutes before serving, garnished with fresh parsley if desired.

Recipe Notes

  • This dish can be made ahead and stored in the refrigerator before baking.
  • For added flavor, consider adding garlic powder or Italian seasoning to the filling.
  • Feel free to customize the filling by adding other vegetables or proteins.