Delicious Slow Cooker Three Envelope Pot Roast Recipe Unveiled

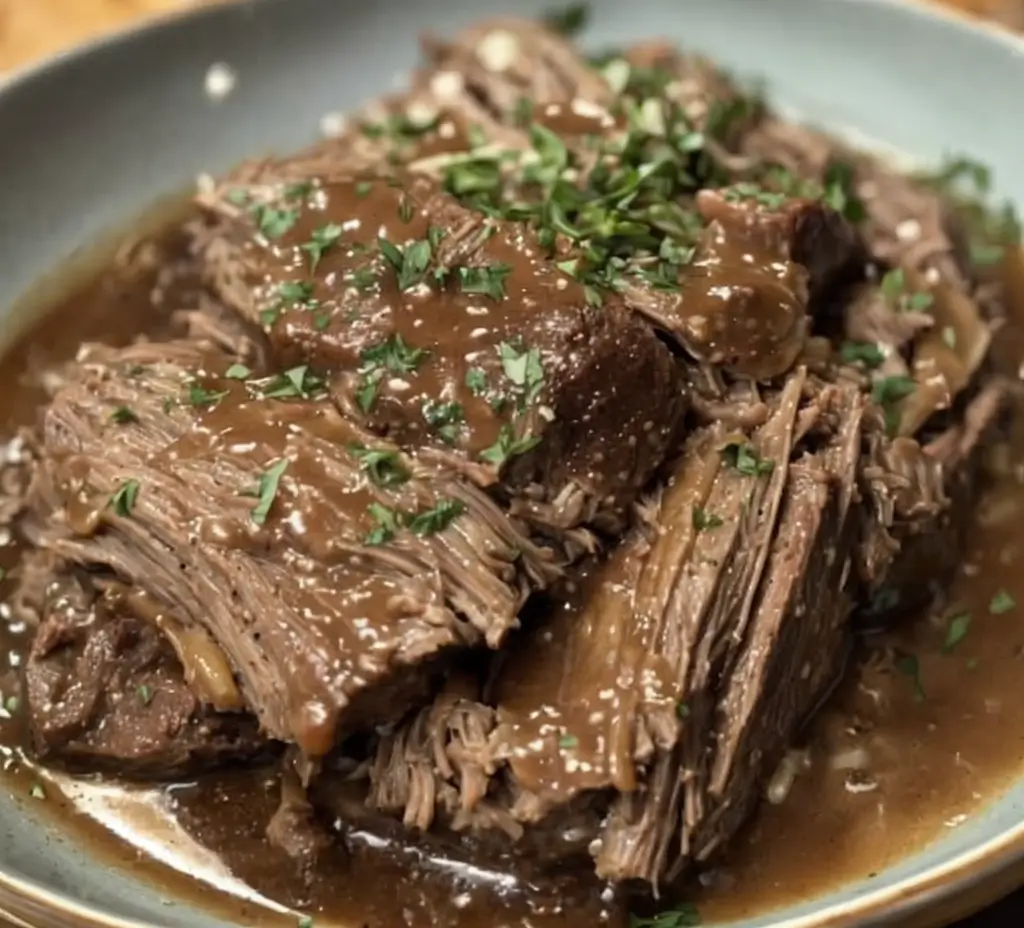
Slow Cooker Three Envelope Pot Roast: The Ultimate Comfort Dish

⚖️
Difficulty
Easy

⏲️
Prep Time
15 mins

🕒
Cook Time
8 hours

⏱️
Total Time
8 hours 15 mins

🍽️
Servings
6-8

In the world of hearty meals, few dishes are as comforting as a Slow Cooker Three Envelope Pot Roast. This recipe combines the rich flavors of beef with the convenience of slow cooking. Imagine coming home after a long day to the aroma of tender, juicy meat wafting through your home, inviting you to the dinner table. The blend of seasonings from three different envelopes immerses each bite in a burst of flavor, making it a family favorite.

What makes the Slow Cooker Three Envelope Pot Roast particularly appealing is its mouthwatering texture. After hours in the slow cooker, the beef becomes meltingly tender, practically falling apart with the slightest touch. The cooking process allows the flavors to meld together beautifully, creating a dish that is not just a meal, but an experience to savor. The combination of its delicious taste and inviting aroma will make this pot roast a staple in your household.

Quick Recipe Highlights

  • Flavor Profile: The pot roast offers a savory blend thanks to the hidden treasures of envelope seasonings that enhance the beef’s natural flavors.
  • Texture: Expect melt-in-your-mouth beef served in a luscious sauce that complements the tender vegetables.
  • Aroma: As it cooks, the roast releases a rich, savory scent that transforms your home into a cozy haven.
  • Visual Appeal: The beautifully caramelized beef accompanied by vibrant vegetables creates a feast for the eyes.
  • Skill Level Needed: No advanced cooking skills required; this recipe is perfect for beginners.
  • Special Equipment: A slow cooker is essential for achieving the perfect pot roast.

Recipe Overview

  • Difficulty Level: Easy. This recipe does not require intricate techniques, making it accessible to all home cooks.
  • Category: Comfort food. Pot roast is synonymous with family meals and cozy dinners.
  • Cuisine: Hearty American cuisine, with roots in traditional home-cooked meals that celebrate simplicity.
  • Cost: Budget-friendly; most ingredients are affordable and easy to find in your local grocery store.
  • Season: Ideal for fall and winter, when warm, hearty meals are most appealing.
  • Occasion: Perfect for Sunday dinners, holiday gatherings, or simply as a weeknight treat for your family.

Why You’ll Love This Recipe

The taste and texture appeal of Slow Cooker Three Envelope Pot Roast will leave you craving more. The infusion of seasoning envelops the beef, resulting in a flavor profile that’s savory and slightly tangy, balanced by the natural sweetness of the caramelized root vegetables. Each forkful delivers a satisfying blend of tender meat and flavorful sauce that pairs wonderfully with mashed potatoes or crusty bread.

Convenience and preparation benefits make this dish an undeniable winner. Simply toss the ingredients in your slow cooker in the morning, set it, and forget it until dinner time. The hands-off cooking allows you to carry on with your day, knowing that a rich meal is waiting for you. This is especially appealing for busy families looking to simplify dinner time without sacrificing flavor.

From a nutritional standpoint, this pot roast packs plenty of protein and essential vitamins from the veggies; it’s a complete meal that can fit into many dietary plans. The slow cooking process also allows flavors to meld together, ensuring that every bite is imbued with depth and richness.

There’s a special social and entertaining value in serving pot roast. Picturesque and impressive, it can serve as a centerpiece for family gatherings or holiday celebrations. Friends and family will gather around the table to enjoy this delicious comfort food, making memories over each generously served portion.

Lastly, the cost-effectiveness of the Slow Cooker Three Envelope Pot Roast is noteworthy. With easily sourced ingredients and minimal prep work, you can create a satisfying meal that feeds a crowd without breaking the bank, making it a go-to choice for any occasion.

Historical Background and Cultural Significance

The origin story of pot roast can be traced back to 19th-century America, where it became an essential home-cooked dish celebrating simple ingredients. It epitomizes the notion of culinary comfort and community, reflecting the heart of family values in American culture. A comforting dish initially intended for feeding large families, pot roast has evolved into a cherished tradition at dinner tables across the country.

Culturally, pot roast represents warmth and hospitality. Often associated with gathering around the table, it carries connotations of sharing and familial bonds. Its preparation and serving have often been seen as an expression of love and care, especially during gatherings when families come together to celebrate holidays or milestones.

Over the years, the evolution of the pot roast has seen various adaptations across regions. Ingredients may vary based on local availability and cultural influences, leading to unique takes on this classic dish. Whether it’s a Southern-style pot roast with a kick of spice or a traditional New England preparation fortified with root vegetables, every adaptation brings depth and a story of its own.

Regional variations of pot roast demonstrate the dish’s flexibility. For instance, some cultures incorporate spices and herbs specific to their culinary traditions, adding a distinctive twist to the classic recipe. Each regional take not only boosts flavor but also showcases the incredible diversity of American cuisine.

Ingredient Deep Dive

Beef Chuck Roast

Beef chuck roast is often the star of the pot roast. Known for its well-marbled fat and connective tissue, it becomes wonderfully tender when slow-cooked. Rich in flavor, this cut of meat is budget-friendly, making it a popular option for families. When selecting beef chuck, opt for meat that has good marbling, indicating juiciness.

Nutritionally, beef is an excellent source of protein, iron, zinc, and B vitamins, making it vital for a balanced diet. To store, wrap the roast tightly and keep it in the refrigerator for up to three days, or freeze for longer shelf life. For those who may not consume red meat, chicken thighs can be substituted for a lighter, yet equally flavorful alternative.

Envelope Seasonings

The envelope seasonings bring an exceptional blend of flavors to the pot roast, acting as the foundation for the dish’s distinctive taste. Typically featuring ranch seasoning, brown gravy mix, and Italian dressing mix, these envelopes deliver both convenience and variety. When shopping, look for brands without artificial additives for a more wholesome meal.

Using seasoning envelopes can enhance the dish’s flavor while providing a quick solution for busy cooks. When storing, keep the envelopes in a cool, dry place, away from sunlight to maintain freshness. A homemade alternative can include a mix of spices such as garlic powder, onion powder, and dried herbs to suit personal taste.

Vegetables

Pot roast is commonly accompanied by root vegetables like carrots, potatoes, and onions, each adding their unique character to the dish. Carrots lend sweetness, potatoes provide heartiness, and onions boost the savory essence. When selecting vegetables, choose fresh, firm ones for the best texture and flavor.

Nutritionally, these vegetables offer a wealth of vitamins and minerals, contributing to a well-rounded meal. For storage, keep root vegetables in a cool place, avoiding moisture to prolong shelf life. If you’re looking to change things up, feel free to add seasonal vegetables like parsnips or turnips for variety.

Common Mistakes to Avoid

  • Not browning the beef: Browning the roast before cooking enhances its flavor and creates a delicious crust. Skip this step, and you may miss out on a rich taste.
  • Overcrowding the slow cooker: Too much meat and vegetables can prevent even cooking. Ensure there is enough space for heat circulation.
  • Using low-quality ingredients: Premium cuts of meat and fresh vegetables make a noticeable difference. Invest in quality for top-notch results.
  • Ignoring the cooking time: Slow cooking is key for tenderness; don’t rush the process. Allow the roast to cook for the designated time to fully develop flavor.
  • Not seasoning properly: The right balance of seasoning is crucial. Taste and adjust levels to ensure a well-seasoned final dish.
  • Preparing without a plan: The recipe should be followed closely for the best results. Gather all ingredients beforehand to streamline preparation.
  • Forgetting about the liquid levels: Ensure there’s enough liquid in the slow cooker to prevent drying out. Monitor levels during cooking if needed.
  • Skipping the resting period: Allowing the pot roast to rest post-cooking helps retain juices, ensuring a moist and flavorful result.
  • Excessive stirring: Once you add the ingredients, resist the urge to stir throughout cooking. Keeping the lid on helps maintain the heat and moisture.
  • Not allowing for residual cooking: Be mindful that the roast will continue to cook once removed from the slow cooker, especially if covered.

Essential Techniques

Browning the Meat

Browning the meat is essential as it develops a rich flavor through the Maillard reaction. To master this, heat your skillet until it’s hot, then sear the meat on all sides to achieve a golden crust. Common pitfalls include overcrowding the pan and failing to let the meat brown undisturbed, which can lead to steaming rather than browning.

Look for a deep, golden-brown color to know you’ve succeeded. This step is crucial to creating depth in your pot roast’s flavor profile.

Layering Ingredients

Properly layering your ingredients in a slow cooker can significantly affect cooking outcomes. Start with vegetables at the bottom, followed by the meat, then pour the liquid and seasoning on top. This layering helps ensure even cooking and flavor distribution.

Avoid adding everything at once, as this can lead to uneven cooking. Pay attention to how the ingredients sit; they should be evenly distributed for optimal results.

Adjusting the Cook Time

Slow cookers can vary in temperature settings, so adjusting the cooking time may be necessary. Familiarize yourself with your specific appliance’s behavior. Occasionally check for doneness and tenderness; adding extra time if needed ensures your meat reaches the desired consistency.

Be aware of the texture you wish to achieve. If it’s not fork-tender by the end of the cooking time, continue cooking and monitor carefully.

Pro Tips for Perfect Slow Cooker Three Envelope Pot Roast

1. **Choose the right beef cut:** For the best results, opt for a chuck roast, as its fat content results in tender meat. Avoid lean cuts that may dry out during the long cooking process.
2. **Prep your vegetables ahead of time:** Chop and store your vegetables the night before to save time. This will help streamline your cooking process and ensure everything is ready when you’re prepared to start the slow cooker.
3. **Sear your beef before cooking:** Browning your chuck roast before adding it to the slow cooker enhances flavor and creates a more appealing final dish. This extra step is well worth the time.
4. **Utilize fresh herbs:** While dried herbs work well, fresh herbs like thyme or rosemary can elevate the flavor. Add them in the last hour of cooking for a fresh burst of taste.
5. **Experiment with liquid:** Consider mixing different liquids such as beef broth, red wine, or even a splash of balsamic vinegar for added depth and flavor.
6. **Use a meat thermometer:** To ensure your beef is cooked to the perfect temperature, check with a meat thermometer. Aim for about 190°F for optimal tenderness.
7. **Create a gravy:** Once the pot roast is done, use the cooking liquid to create a quick gravy by thickening with cornstarch or flour for a sumptuous accompaniment.
8. **Save the leftovers:** Store any leftover pot roast for sandwiches or salads the next day. The flavors continue to deepen, making for a delicious second meal.

Variations and Adaptations

Regional variations of this pot roast include dishes infused with regional spices or local ingredients. For example, a Southwestern version might include chili powder and corn, while a Mediterranean twist could incorporate olives and artichokes.

During colder months, seasonal adaptations can result in adding root vegetables like sweet potatoes or butternut squash for added sweetness and nutrition. Alternatively, during warmer months, consider lighter, seasonal veggies like zucchini or bell peppers.

For those following diets such as paleo or keto, substitute root vegetables with cauliflower or turnips for a low-carb option.

Explore flavor variations by using different seasoning envelopes or a combination of homemade spices to tailor the dish to your taste preferences. For an Italian flare, consider adding a sprinkle of Italian seasoning or diced tomatoes.

Consider presentation alternatives by slicing the pot roast and serving it over creamy polenta or in a bowl with a hearty broth for a rustic vibe.

Serving and Presentation Guide

For an inviting presentation, slice the pot roast and arrange it on a platter, surrounded by colorful vegetables. Drizzle some of the cooking liquid as a sauce to enhance both flavor and aesthetics.

Garnishing with fresh herbs like parsley or rosemary not only adds a pop of color but also elevates the dish’s appeal. Pair the pot roast with traditional accompaniments such as mashed potatoes or crusty bread to complete the meal.

Consider serving the pot roast on a rustic wooden cutting board for a cozy, homey presentation. Keep temperature in mind; serve the pot roast warm, allowing the meat to retain its juices and tenderness.

For portion control, consider serving smaller slices on side plates along with a generous helping of vegetables to promote balanced eating.

Wine and Beverage Pairing

Complement your Slow Cooker Three Envelope Pot Roast with a full-bodied red wine such as a Cabernet Sauvignon or a Merlot. Their bold flavors pair beautifully with the robust taste of the beef, enhancing the dining experience.

For non-alcoholic alternatives, opt for sparkling water with a splash of cranberry juice or a rich, dark brewed tea to round out your meal. Both choices offer refreshing contrasts to the hearty flavors of the pot roast.

When considering coffee pairings, a dark roast or an espresso can complement the dish well, especially if served alongside a rich dessert after the meal.

Temperature matters, so serve your wine at room temperature for reds and chilled for non-alcoholic options to maintain refreshing qualities.

Storage and Shelf Life

To store your Slow Cooker Three Envelope Pot Roast, place leftovers in an airtight container and refrigerate within two hours of cooking. Proper storage helps maintain freshness for up to 3-4 days.

For long-term preservation, consider freezing portions in freezer-safe containers. It remains safe for up to 4 months, allowing you to enjoy a home-cooked meal even on your busiest days.

Keep an eye out for signs of spoilage such as off odors or discoloration; these are indicators that the dish may no longer be safe to eat.

When reheating, aim for a temperature of 165°F to ensure proper food safety. Heating in a saucepan over low heat with some added broth can help maintain moisture during the reheating process.

Make Ahead Strategies

For efficient meal planning, consider prepping your Slow Cooker Three Envelope Pot Roast in advance. Chop vegetables and portion the seasonings the day before, storing them in airtight containers in the refrigerator for freshness.

Consider assembling the pot roast in the slow cooker insert the night before, covering it, and refrigerating it overnight. In the morning, all you have to do is plug in the slow cooker, making it an ideal solution for busy weeknights.

Assess the quality impact by noting that making it ahead intensifies flavors. The longer the ingredients mingle together, the tastier your pot roast will be.

Assembly is straightforward; layer the ingredients according to the recipe without needing to cook, allowing you to create a delicious meal with ease upon returning home.

During reheating, feel free to add fresh herbs or a splash of broth to revive the dish and enhance its flavor.

Scaling Instructions

If you plan to serve a smaller crowd, simply halve the recipe by reducing all ingredients accordingly. Most slow cookers can accommodate a half recipe without issue.

For larger gatherings, doubles or triples the recipe while ensuring you have a slow cooker sufficiently large for increased quantities. You may want to consider cooking in two batches to achieve optimal results.

Adjust timing modifications as larger quantities may require slightly longer cooking times. Monitor doneness closely, ensuring moisture levels remain sufficient.

Consider storage implications; increased portions might need more space in the fridge or freezer. Ensure you have suitable containers that can accommodate the larger volumes.

Nutritional Deep Dive

Evaluating the macronutrient breakdown of the Slow Cooker Three Envelope Pot Roast reveals that it is a protein-rich meal primarily due to the beef content. Protein is essential for muscle repair and overall health, making this dish an excellent dietary choice.

Micronutrient analysis indicates that the vegetables contribute essential vitamins like A and C, along with minerals such as potassium and iron found in the beef. Such nutritional benefits support immune function and overall well-being.

From a health perspective, the meal can fit into many dietary considerations, especially when enjoyed in moderation. Balanced with hearty vegetables, it offers a well-rounded dinner option that doesn’t skimp on flavor.

Portion analysis is vital; strive to serve a balanced plate with an appropriate ratio of meat and vegetables. Consider employing weight management tips by pairing with lighter side dishes such as salads to make every meal satisfying.

Dietary Adaptations

For those needing gluten-free options, ensure the envelope seasonings are labeled gluten-free or make your own spice blend without gluten-containing ingredients.

In a dairy-free version, there’s no need for modifications, as this recipe does not include dairy ingredients.

For a vegan adaptation, replacing the beef with a hearty mushroom or tempeh mix can yield a delicious result alongside the seasoning that brings ample flavor.

Low-carb followers can adjust the recipe by omitting potatoes and opting for a mix of low-carb vegetables to maintain the hearty feel without the added carbs.

It’s simple to transform this dish into a keto or paleo favorite by sticking with the protein and vegetable focus while allowing for healthy fats through cooking oils.

If dietary restrictions include low-FODMAP needs, eliminating garlic and onion from the recipe and selecting compliant vegetables supports digestive wellness while maintaining flavor.

Troubleshooting Guide

If you encounter texture issues, consider the cooking time. If the meat is tough, it likely needs more time in the slow cooker. Ensure the lid stays on throughout the cooking process to retain heat.

For flavor balance, adjust seasoning to taste. If the dish is too salty, adding an additional vegetable or broth can help dilate the flavors. Adjust sweetness levels through careful seasoning for a more satisfying profile.

If serving at the wrong temperature, ensure you’re reheating the meat and sides thoroughly before serving. Use a food thermometer to evaluate temperature levels accurately.

Overcoming equipment challenges is simple by keeping your slow cooker plugged in and checking for functionality in advance. If you’re short on time, consider using a stovetop method instead.

When dealing with ingredient substitutions, remember that not all swaps are equal. For instance, if substituting meats or vegetables, cooking times and textures may vary, affecting the overall end result.

If facing timing concerns, keep a close eye on the clock. Pot roast benefits from slow cooking, so adjust timing based on your schedule without rushing the process.

Recipe Success Stories

Readers often share their feedback on making the Slow Cooker Three Envelope Pot Roast, with many noting its ease and impressive flavors. Variations brought in from personal touches such as adding different vegetables or spices have also taken center stage in feedback.

Some readers have successfully adapted the recipe for batch cooking, allowing them to enjoy meals throughout the week. This meal prep approach has garnered culinary praise from creative home chefs.

Photography tips for presenting the pot roast have become popular within the community, with suggestions for attractive plating and garnishing providing inspiration for enticing social media posts.

Those sharing adaptation stories highlight how family traditions are enriched by engaging the next generation in cooking. Kids often love to help with layering veggies or selecting spices, making cooking a family affair.

The comments section routinely fills with positive experiences, including easy cleanup tips and clever storage solutions that have greatly increased the pot roast’s appeal in busy modern kitchens.

Frequently Asked Questions

Can I use a different cut of meat?

Yes, while beef chuck roast is recommended for its tenderness, you can substitute with brisket or even pork shoulder for a unique twist. Just keep in mind the cooking times may differ slightly based on the cut’s thickness and fat content.

How do I adjust the recipe for a slower cooker with fewer settings?

For slow cookers with only low and high settings, simply adjust the cooking time. If making on low, expect to cook for 8-10 hours, whereas on high, aim for 4-6 hours, checking for tenderness regularly.

What can I do with leftovers?

Leftover pot roast can be used in various ways—shred it for tacos, slice for sandwiches, or mix it into casseroles for a hearty meal. The flavors continue to develop, making them even tastier the next day.

Can I cook this recipe without a slow cooker?

Absolutely! You can prepare it in a Dutch oven on the stovetop or in the oven. Adjust the cooking time to about 2-3 hours, depending on your method, and monitor settings closely for doneness.

How do I avoid dry meat?

To prevent dryness, ensure the meat is well marbled, and keep the lid on during cooking time. Adding sufficient liquid, such as broth, helps maintain moisture as well.

Can I prepare this recipe in advance?

Absolutely! You may chop your vegetables and seasonings the night before and combine them in the slow cooker insert. Refrigerate overnight and cook in the morning for a hassle-free dinner later.

What side dishes pair with this pot roast?

Classic side dishes include mashed potatoes, green beans, or even a fresh salad. A hearty bread or creamy polenta also complements the dish beautifully.

Is this recipe gluten-free?

Not necessarily. The seasoning envelopes may contain gluten, so be sure to choose gluten-free options or make a spice blend from scratch using compliant seasoning.

Can I freeze the leftovers?

Yes, pot roast freezes well. Make sure to use airtight containers and label them with the date. It will retain quality for up to 4 months in the freezer.

What’s the cooking time for frozen pot roast?

If cooking from frozen, increase your slow cooker time by 1-2 hours. Always check internal temperature to ensure it reaches at least 190°F for safe consumption.

Additional Resources

Consider exploring related recipes like Beef Stroganoff or a classic Beef Stew for more delightful comfort meal ideas. Technique guides on slow cooking principles can help refine your skill set for optimal results.

Ingredient information is an excellent resource for understanding the nuances of different cuts of meat, which can impact your cooking. Investing in quality kitchen tools such as a reliable slow cooker can significantly enhance your cooking experience.

For seasonal variations, explore how local produce can elevate your meals by customizing pot roasts to reflect seasonal ingredients and flavors.

Join the Conversation

Share your version of the Slow Cooker Three Envelope Pot Roast on social media and tag us! Photography tips such as using natural light and incorporating colorful side dishes can uplift your posts and encourage others to join in on the cooking experience.

Leave a review telling us about your experience, any variations you tried, and share tips that made your pot roast the best ever. Community engagement enriches our cooking adventures and inspires new creativity in the kitchen.

The Recipe

Slow Cooker Three Envelope Pot Roast

Serves: 6-8

Prep Time: 15 mins

Cook Time: 8 hours

Total Time: 8 hours 15 mins

Kitchen Equipment Needed

  • Slow Cooker
  • Skillet for browning
  • Cutting board
  • Sharp knife
  • Airtight storage containers

Ingredients

  • 3-4 lbs beef chuck roast
  • 1 packet ranch seasoning mix
  • 1 packet brown gravy mix
  • 1 packet Italian dressing mix
  • 4 medium carrots, chopped
  • 4 medium potatoes, peeled and cubed
  • 1 onion, quartered
  • 1 cup beef broth

Directions

  1. Begin by searing the beef chuck roast in a hot skillet until browned on all sides. This step enhances flavor.
  2. Layer the chopped vegetables (carrots, potatoes, onions) at the bottom of the slow cooker.
  3. Place the seared beef on top of the vegetables.
  4. In a bowl, mix the ranch seasoning, brown gravy mix, and Italian dressing mix. Sprinkle generously over the meat.
  5. Pour the beef broth into the slow cooker, making sure to add liquid around the sides.
  6. Cover and cook on low for 8 hours, or until the meat is fork-tender.
  7. Once cooked, let the roast rest for 10-15 minutes before slicing to serve.

Recipe Notes

  • For extra flavor, add a splash of red wine to the broth before cooking.
  • Feel free to customize the vegetables based on seasonal offerings.
  • Store leftovers in an airtight container in the refrigerator for up to 3-4 days.
  • This recipe is great for meal prep and freezes well for up to 4 months.

Delicious Low-Carb Flourless Carrot Cake Recipe Without Oatmeal

Flourless Carrot Cake: A Delightfully Moist and Low-Carb Treat

⚖️
Difficulty
Easy

⏲️
Prep Time
15 mins

🕒
Cook Time
30 mins

⏱️
Total Time
45 mins

🍽️
Servings
8

The Flourless Carrot Cake is a stunning dessert that combines the sweetness of fresh carrots with a rich, moist texture. This recipe is perfect for anyone looking to indulge without the extra carbohydrates typically found in traditional cakes. With no flour or oatmeal, this cake is truly unique, allowing the natural flavors of the ingredients to shine through. It’s not only a delightful treat for your taste buds but also a wonderful option for those who follow low-carb or gluten-free diets.

As you take your first bite, you’ll be welcomed by the warm spices of cinnamon and nutmeg blended seamlessly with the luscious sweetness of carrots. Each forkful reveals a tender crumb that melts in your mouth, leaving a hint of the aromatic vanilla and the subtle warmth of brown sugar. This cake is not just about taste, it also brings a sense of comfort and homeliness, making it an ideal dessert for family gatherings or special occasions.

Quick Recipe Highlights

  • Flavor Profile: The cake features a harmony of sweet carrots and warm spices, complemented by a hint of vanilla.
  • Texture: Expect a moist and fluffy texture that feels delicate yet substantial in each bite.
  • Aroma: The scent of freshly grated carrots mingled with warm spices creates an irresistible allure.
  • Visual Appeal: The cake’s golden brown color, flecked with bits of carrot, makes for an inviting presentation.
  • Skill Level Needed: This recipe is beginner-friendly, requiring minimal baking skills to achieve a delicious result.
  • Special Equipment: A mixing bowl, whisk, and a cake pan are all you need for this simple recipe.

Recipe Overview

  • Difficulty Level: The Flourless Carrot Cake is easy to make, ideal for novice bakers. Its step-by-step instructions ensure success without the complexity of traditional recipes.
  • Category: This cake fits perfectly in the dessert category, making it an excellent choice for after meals or special celebrations.
  • Cuisine: Drawing inspiration from classic baking traditions, this recipe reflects the comforting qualities of homemade treats across various cultures.
  • Cost: The ingredients are relatively inexpensive, making this flourless cake budget-friendly for anyone.
  • Season: Carrots are in peak season during the fall and winter, making it the perfect time to enjoy this warm and spiced dessert.
  • Occasion: Ideal for birthdays, holidays, or simply a cozy afternoon snack with friends and family.

Why You’ll Love This Recipe

First and foremost, the taste and texture of this Flourless Carrot Cake will delight anyone who tries it. The combination of carrots, spices, and a touch of sweetness results in a cake that is not overly sweet, making it an ideal dessert for any palate.

This cake is incredibly convenient to prepare. With just a handful of ingredients, you can whip it up in no time. The minimal effort involved means that you can spend less time in the kitchen and more time enjoying the company of loved ones.

Nutritionally, this cake shines as well. Being flourless and low-carb, it’s perfect for those looking to indulge in dessert while keeping their dietary goals in check. The natural fibers from the carrots offer added health benefits, making this dessert feel a little less guilty.

When it comes to social gatherings, this cake is a talking point. Its unique flourless twist intrigues guests, and with each bite, it sparks conversations about dietary practices and innovative desserts. It’s a great way to impress friends and family with your baking skills.

Lastly, this Flourless Carrot Cake is cost-effective. You can access the ingredients easily at local grocery stores, and you won’t break the bank while making a delicious dessert that serves multiple people.

Historical Background and Cultural Significance

The origins of carrot cake can be traced back to the medieval periods when sugar was scarce and expensive. People utilized sweet vegetables like carrots to make desserts, leading to the creation of this sweet treat we enjoy today. Over time, recipes evolved, incorporating spices and creams to enhance flavor.

Culturally, flourless desserts represent a shift towards healthier baking practices, especially in recent years where dietary restrictions have become more prominent. Many home bakers have adapted classic recipes, leading to an increase in gluten-free and low-carb options in the culinary world.

This Flourless Carrot Cake captures the essence of tradition while also embracing modern dietary needs. It reflects a collective movement towards healthier eating without sacrificing flavor or enjoyment.

Regional variations have sprung up, with some cultures adding nuts or dried fruits, giving the cake unique twists that create a delightful exploration of flavors and textures.

Ingredient Deep Dive

Carrots are the star ingredient in this cake. They not only bring sweetness but also moisture, making for a pleasantly rich texture. Nutritionally, carrots are loaded with vitamins and antioxidants, particularly beta-carotene, which is beneficial for eye health. When selecting carrots, opt for firm, smooth ones without blemishes; store them in a cool, dark place for freshness.

Another cornerstone of this recipe is eggs. They provide structure and help bind the ingredients, contributing to the cake’s fluffiness. Eggs are also an excellent source of protein and essential nutrients. Always choose fresh eggs for the best results and store them in the refrigerator.

Common Mistakes to Avoid

  • Using old or wilted carrots can affect the flavor and texture of the cake. Always choose fresh, firm carrots.
  • Not fully grating the carrots can leave chunks that impact the cake’s consistency. Ensure they’re finely grated for even baking.
  • Overmixing the batter can lead to a dense texture. Mix just until combined for a lighter cake.
  • Underbaking the cake may result in a soggy center. Check doneness with a toothpick; it should come out clean.
  • Skipping the cooling step can affect presentation. Allow the cake to cool completely before serving.
  • Using too much sweetener can overwhelm the flavor. Balance is key; start with less, and adjust to taste.
  • Not prepping the cake pan correctly can lead to sticking. Always grease and line your pan with parchment paper.
  • Forgetting to add spices can dull the flavor. Measure spices carefully for the best taste.
  • Rushing the prep time may lead to mistakes. Take your time to prepare each step thoroughly.
  • Not checking the oven temperature can result in uneven baking. Use an oven thermometer to maintain accurate temperatures.

Essential Techniques

One important technique is properly grating the carrots. Use the finest grater or a food processor to ensure they blend well into the batter. This step affects both texture and flavor, as larger chunks can disrupt the fluffiness of the cake.

Another essential skill is mixing the batter without overmixing. For a light and airy cake, combine ingredients gently until just mixed. Overworking the batter can achieve a dense texture, which is not desirable for this recipe.

Pro Tips for Perfect Flourless Carrot Cake

1. Use fresh, high-quality ingredients for the best flavor.

2. Add nuts like walnuts or pecans for added texture and flavor.

3. Consider adding pineapple for a tropical twist.

4. Allow the cake to cool completely before frosting to prevent melting.

5. Top with a cream cheese frosting for classic flavor pairing.

6. Experiment with spices; adding ginger can enhance the depth of flavor.

7. Serve with a scoop of vanilla ice cream for a delightful contrast.

8. Store leftovers properly to maintain freshness and texture.

Variations and Adaptations

Regional variations of carrot cake often include additional ingredients like raisins or coconut for added flavor. Seasonal adaptations might see courses incorporating spices associated with holiday flavors, such as nutmeg and clove.

For dietary modifications, consider using egg substitutes for a vegan version or sweetener alternatives for a lower glycemic index dessert. Flavor variations include adding zest from oranges or lemons for a citrus twist.

Serving and Presentation Guide

For plating, consider a rustic presentation: simply dust the cake with powdered sugar or dusting of cocoa powder. A sprig of mint or edible flowers can enhance visual appeal.

Garnishing ideas include a drizzle of balsamic reduction or whipped cream for a modern touch. Traditional accompaniments like a scoop of cream cheese frosting complement the cake beautifully.

Wine and Beverage Pairing

When it comes to wine pairings, a sweet Riesling or a spicy Gewürztraminer pairs wonderfully with the cake’s flavors, enhancing the natural sweetness of the carrots.

For non-alcoholic alternatives, consider pairing with fresh-squeezed iced tea or sparkling water with a slice of lemon. These drinks refresh the palate and highlight the cake’s sweetness.

Storage and Shelf Life

The cake should be stored in an airtight container at room temperature for up to 3 days or in the refrigerator for up to a week. Consider wrapping slices in plastic wrap for longer storage.

Signs of spoilage include a change in color or a sour smell, indicating it’s time to discard. Reheating slices briefly in the microwave works well without drying out, and freezing is a great option for longer storage.

Make Ahead Strategies

To prep ahead, consider grating the carrots the night before and storing them in an airtight container in the fridge. This can save time, especially on busy baking days.

As the cake can be frozen, bake it in advance and freeze until ready to serve—just make sure to thaw it completely before decorating or serving.

Scaling Instructions

If halving the recipe, reduce the baking time slightly but keep an eye on the cake to prevent overbaking. Doubling or tripling the recipe is also easy; simply ensure your mixing bowl is large enough to accommodate the additional ingredients.

When scaling recipes, be cautious with timing as larger cakes may take longer, while smaller batches may bake faster. Always check for doneness with a toothpick.

Nutritional Deep Dive

This Flourless Carrot Cake is rich in nutrients. Each slice provides a decent amount of carbohydrates from the carrots, while still being low-carb compared to traditional cakes. Moreover, the natural sweetness of the carrots reduces the need for excess sugar.

In terms of micronutrients, the carrots contribute vitamins A and C, essential for a balanced diet. Mindful portion sizes can help with weight management while enjoying this delicious treat without overindulgence.

Dietary Adaptations

The recipe is inherently gluten-free, making it suitable for those with gluten intolerances. For a dairy-free version, simply substitute the cream cheese frosting with a coconut cream alternative.

This cake can also be adapted for vegan diets by utilizing flax eggs as an alternative to traditional eggs, yielding a similar structure without animal products. Low-carb enthusiasts can swap out sugar for erythritol or another suitable sweetener.

Troubleshooting Guide

If the cake turns out too dense, it may have been overmixed. Always mix just until combined to keep the texture light. If the flavor is off, ensure you’re using fresh spices and proper measurements to enhance the cake’s natural sweetness.

Baking temperature is crucial; an overly hot oven can dry out the cake. Always preheat your oven and use an oven thermometer for accuracy. Adjusting baking times is key, particularly with larger or smaller batches.

Recipe Success Stories

Feedback often highlights the cake’s moistness and flavor depth, motivating them to share the recipe with family and friends. Photography enthusiasts frequently share their beautifully decorated cakes, showcasing the potential for stunning presentations.

Frequently Asked Questions

Can I substitute carrots with another vegetable? Yes, zucchini or even sweet potatoes can be used to create variations of this cake with just as much moisture and flavor.

How can I make this cake vegan? Replace eggs with flax eggs, using 1 tablespoon of flaxseed meal mixed with 3 tablespoons of water per egg needed.

Can I freeze leftovers? Absolutely! Wrap slices in plastic wrap and store them in an airtight container. It can last up to 3 months in the freezer.

What should I serve with the cake? Pair it with a light whipped cream, vanilla ice cream, or a citrus-infused glaze for added flavor.

Is it necessary to frost the cake? No, it can be enjoyed plain; however, frosting adds a delightful creaminess that many find appealing.

How do I know when it’s done baking? Insert a toothpick in the center; it should come out clean or with a few moist crumbs.

Can I use store-bought carrot puree? While possible, it’s recommended to use freshly grated carrots for the best flavor and moisture content.

What makes it a low-carb dessert? The lack of flour and the use of low glycemic sweeteners contribute to the cake’s low carbohydrate content.

How do I make it sweeter? You can adjust the sweetness by adding more sweetener to taste, but be cautious not to overdo it.

Will the texture change if I skip the nuts? The cake may lose some crunch, but it will still be delicious without them.

Additional Resources

For those looking to continue their baking journey, consider exploring similar recipes like gluten-free chocolate cake or almond flour brownies. Technique guides can help enhance skills further, particularly for decorating and ingredient substitutions.

Ingredient information can also be valuable; understanding the differences between types of sweeteners can make a significant impact on baking outcomes. Seasonal variations are another fantastic way to keep recipes fresh and exciting.

Join the Conversation

We invite you to share your thoughts, adaptations, and experience with this Flourless Carrot Cake in the comments. Post your photos on social media and tag us so we can celebrate your baking achievements together!

The Recipe

Flourless Carrot Cake

Serves: 8

Prep Time: 15 mins

Cook Time: 30 mins

Total Time: 45 mins

Kitchen Equipment Needed

  • Mixing bowl
  • Whisk
  • 9-inch round cake pan
  • Parchment paper

Ingredients

  • 2 cups grated carrots
  • 4 large eggs
  • 1/2 cup melted coconut oil
  • 1/2 cup brown sugar
  • 1 tsp vanilla extract
  • 1 tsp baking powder
  • 1 tsp cinnamon
  • 1/2 tsp nutmeg
  • 1/2 tsp salt
  • 1/2 cup chopped walnuts (optional)

Directions

  1. Preheat your oven to 350°F (175°C) and prepare the cake pan by greasing and lining it with parchment paper.
  2. In a large mixing bowl, whisk together the eggs and brown sugar until well combined.
  3. Add the melted coconut oil and vanilla extract to the mixture and stir until fully incorporated.
  4. In another bowl, mix the grated carrots with the baking powder, spices, and salt.
  5. Combine the dry carrot mixture into the wet mixture until just mixed; be careful not to overmix.
  6. Fold in the chopped walnuts if using.
  7. Pour the batter into the prepared pan and smooth the top.
  8. Bake for 25-30 minutes, or until a toothpick inserted in the center comes out clean.
  9. Allow to cool in the pan for 10 minutes, then transfer to a wire rack to cool completely.

Recipe Notes

  • For added sweetness, top with cream cheese frosting.
  • Store leftovers in an airtight container at room temperature for 3 days.
  • This cake can also be frozen for later enjoyment.

Delicious Pork Spring Rolls with Zesty Peanut Lime Sauce Recipe

Pork Spring Rolls with Peanut Lime Sauce: A Delicious Fusion of Flavors

⚖️
Difficulty
Medium

⏲️
Prep Time
30 mins

🕒
Cook Time
15 mins

⏱️
Total Time
45 mins

🍽️
Servings
4

Pork spring rolls with peanut lime sauce are not just a meal; they are an experience that tantalizes your taste buds and evokes memories of bustling night markets in Southeast Asia. These rolls are perfectly wrapped in tender rice paper and filled with juicy, seasoned pork, crunchy vegetables, and aromatic herbs, providing a delightful bite every time. Paired with the vibrant and tangy peanut lime sauce, every roll burst with flavor, creating a dish that’s both fresh and satisfying.

The combination of savory pork, refreshing herbs like mint and cilantro, and the zesty lime in the dipping sauce embodies the harmonious balance of flavors typical in Asian cuisine. As you bite into the spring roll, the crunch of fresh vegetables gives way to the tender meat and a burst of sauce, filling your senses with a symphony of taste. Perfect for an appetizer, finger food at parties, or even as a fun family meal, these pork spring rolls will make a delightful addition to your dining repertoire.

Quick Recipe Highlights

  • Flavor Profile: These spring rolls offer a complex taste with savory pork, crunchy vegetables, and a zesty peanut lime sauce that enhances every bite.
  • Texture: The rolls combine a crispy exterior with tender meat and fresh, crunchy veggies, delivering an enjoyable mouthfeel.
  • Aroma: Expect a fragrant aroma from fresh herbs, a hint of spice from the pork, and the nutty scent of the peanut sauce.
  • Visual Appeal: Vibrant colors of green herbs, the pink of pork, and the earthy hues of the sauce create a visually appealing dish.
  • Skill Level Needed: This recipe is approachable for home cooks at a medium skill level, involving simple techniques for wrapping and frying.
  • Special Equipment: You’ll need a non-stick skillet for cooking and a shallow dish for soaking the rice paper.

Recipe Overview

  • Difficulty Level: While the recipe is labeled medium, beginners can easily master the required techniques with practice, especially frying and rolling.
  • Category: This dish is perfect as an appetizer or a party snack, making it versatile for various meal occasions.
  • Cuisine: Blending elements from Vietnamese and Thai cuisine, this dish showcases the rich flavors and techniques of Southeast Asian cooking.
  • Cost: With reasonably priced ingredients, this dish can be made for about $15 to $20, depending on your choice of pork and other local prices.
  • Season: These spring rolls are delightful year-round but feel particularly fresh in warm weather when herbs are abundant.
  • Occasion: Perfect for gatherings, potlucks, or casual dinners, showcasing your culinary skills while satisfying guests.

Why You’ll Love This Recipe

Pork spring rolls with peanut lime sauce provide an explosive taste experience that brilliantly combines savory and refreshing flavors. The pork, marinated in a delicate blend of spices, is enhanced by the sour notes of lime and the crunchy textures of fresh vegetables. Each roll offers the perfect balance of flavors, making it easy to indulge without overwhelming your palate.

Convenience is another reason to love this recipe. With ingredients that are quick to prepare and straightforward cooking methods, you can have a delicious meal ready in under an hour. Plus, the spring rolls can be prepped ahead of time and fried just before serving, making them a great choice for entertaining or busy weeknights.

Nutritionally, the spring rolls present a healthy option packed with protein from the pork, vitamins from crisp vegetables, and healthy fats from peanut sauce. Serving these rolls can promote a balanced meal, and when paired with the right ingredients, they can cater to various dietary preferences.

Socially, these pork spring rolls are an excellent choice for gatherings or family dinners. The interactive nature helps break the ice in social settings, where family and friends can gather around the table, rolling their own spring rolls and dipping into the delicious sauce. This communal cooking experience fosters connection and makes for a memorable meal.

Finally, the cost-effectiveness of this recipe cannot be overlooked. Using basic ingredients like pork, rice paper, and a few fresh vegetables ensures an affordable meal that doesn’t compromise on taste or presentation. Considering the wow factor they provide, these spring rolls are a smart choice for budget-conscious cooks.

Historical Background and Cultural Significance

Pork spring rolls have a rich history that can be traced back to ancient Asian culinary traditions. Originally, spring rolls were made during the spring festival to celebrate the harvest, symbolizing prosperity and new beginnings. The dish has since evolved, with countless variations emerging throughout Asian countries, each adding their unique twist to the classic recipe—Vietnamese Goi Cuon and Thai Po Pia are popular examples.

The cultural importance of spring rolls extends beyond mere sustenance. In many homes, they represent family gatherings and celebrations, often made in large batches during festive occasions. The act of wrapping and rolling the ingredients together also symbolizes unity and cooperation among family members during cooking.

Over the years, the recipe for spring rolls has evolved significantly, embracing different flavors and preparation techniques. Today, you can find them fried or fresh, with a variety of fillings ranging from vegetables to meats. The evolution is a testament to how traditional recipes can adapt and thrive amidst changing culinary landscapes.

Regional variations of spring rolls showcase the diversity of ingredients and cultural influences worldwide. In the Philippines, for instance, fresh lumpia features a Mexican influence, incorporating beans and different meat fillings while embracing local vegetables. Such variations celebrate regional ingredients and preferences, enhancing the legacy of spring rolls globally.

Ingredient Deep Dive

Pork

Pork is a traditional filling in many Asian cuisines, highly valued for its rich flavor and versatility. Known for providing various essential nutrients, pork is an excellent source of protein, vitamins B6 and B12, and several other minerals that support overall health. When selecting pork for spring rolls, look for fresh cuts with a balanced fat content for flavor and moisture during cooking.

For storage, keep raw pork in the refrigerator for up to 3-5 days or freeze it for longer shelf life. If using ground pork, ensure it reaches an internal temperature of 160°F (71°C) during cooking to ensure safety. If you need a substitution, chicken, shrimp, or tofu can also work well in creating delicious variations of these spring rolls.

Peanut Butter

Peanut butter brings a creamy texture and rich flavor to the peanut lime sauce, deeply associated with Southeast Asian cuisine. Packed with protein and healthy fats, it’s a nutritious addition that enhances the overall flavor while providing satiety. When selecting peanut butter for the sauce, opt for natural varieties, which have fewer additives and better flavor.

Storage recommendations for opened peanut butter suggest keeping it in a cool, dry place. You can also refrigerate it to prolong freshness. If you’re looking for alternatives, sunflower seed butter or almond butter can provide similar textures and flavors in your dips.

Common Mistakes to Avoid

  • Using stale or old rice paper: Ensure your rice paper is fresh for the best texture. Old sheets can be brittle and harder to work with.
  • Overstuffing the rolls: A common mistake is to fill them too much, which can lead to tearing. Use moderate amounts so they can close easily.
  • Not soaking the rice paper properly: If the rice paper is under-soaked, it can be tough. Make sure to soak it until soft, but not too long to avoid it becoming mushy.
  • Poorly cooking the pork: Ensure the pork is thoroughly cooked to avoid any health issues; check its internal temperature.
  • Skipping marinating: Marinating the pork enhances its flavor. Don’t skip this step for optimal taste.
  • Frying at the wrong temperature: To achieve crispy rolls, your oil needs to be hot enough (about 350°F or 175°C). Test the heat with a small piece of bread; it should bubble promptly.
  • Not using enough dipping sauce: Don’t skimp on the peanut lime sauce; it elevates the rolls, enriching each bite.
  • Inadequate resting time: Allow the cooked spring rolls to rest briefly on a paper towel after frying to drain excess oil before serving.

Essential Techniques

Wrapping spring rolls is an essential technique to master for success. With proper technique, you can create a neat and secure roll. Start by soaking the rice paper until it’s pliable, then place the filling in the center. Fold the sides over the filling, and carefully roll from the bottom to ensure a tight seal. Practice will make you efficient at this step, ensuring each roll looks appealing.

Frying spring rolls properly is another key to achieving that golden, crispy exterior. Work with preheated oil and avoid overcrowding the pan—this can lower the oil temperature and lead to soggy rolls. Fry in small batches, allowing each roll enough space to cook evenly. Use a slotted spoon to gently turn the rolls until they are golden brown and fully cooked.

Pro Tips for Perfect Pork Spring Rolls

Select fresh ingredients to enhance flavor: Whenever possible, use fresh herbs and vegetable fillings to elevate the taste of your pork spring rolls.

Pre-soak rice paper before assembly: Ensure the rice paper is adequately moistened but not over-soaked to avoid tearing. A quick dip is usually sufficient.

Incorporate diverse textures: Adding a variety of vegetables can create a contrast that enhances the spring rolls’ bite, balancing the tender meat with crunchy elements.

Experiment with fillings: Don’t limit yourself to pork—try chicken, shrimp, or a combination of veggies for a new twist on the recipe.

Adjust the sauce: If desired, tweak the peanut sauce’s heat level by adding chili paste or fresh chilis, enhancing the flavor profile of the dish.

Fry in batches: Ensure that the oil has returned to temperature before adding new rolls; this helps maintain crispiness.

Variations and Adaptations

Spring rolls are highly adaptable, allowing for a range of fillings beyond traditional pork. Consider swapping in shrimp, which complements the peanut sauce beautifully, or going vegetarian with options like tofu and mixed vegetables.

Seasonal variations using fresh produce can also enhance your dish. In summer, for example, incorporating crunchy cucumbers and bright bell peppers adds a refreshing twist, while in fall, roasted sweet potatoes can add a comforting sweetness.

For those with dietary restrictions, consider gluten-free rice paper and adapting the sauce to remove any allergens. Experiment with nuts or seeds for nut-free versions of the sauce.

Flavor variations invite creativity. Instead of traditional peanut sauce, opt for a sweet chili sauce for dipping or a spicy hoisin sauce for a different flavor profile.

Serving and Presentation Guide

When serving pork spring rolls, presentation matters. Arrange them on a large platter, perhaps garnished with fresh herbs or lime wedges to emphasize the vibrant colors. A variety of sauces served in small bowls adds a contemporary touch.

Garnishing with sesame seeds or crushed peanuts can enhance visual appeal while offering extra texture. If serving for a group, consider a DIY spring roll station, allowing guests to make their own customized rolls.

Temperature is also crucial; serve spring rolls warm, as they taste best when freshly made. For parties, they can be served as finger food, where they are easy to manage and fun to eat.

Portion control can be helpful, as spring rolls tend to disappear quickly! Consider serving them alongside lighter side dishes, providing balance to the meal.

Wine and Beverage Pairing

Pairing wine with pork spring rolls can enhance your dining experience. A crisp Gewürztraminer or a light Pinot Grigio pairs nicely with the flavors of the rolls, complementing the spice and acidity of the peanut sauce.

For a non-alcoholic option, a refreshing iced tea or sparkling water with lime will balance the richness of the sauce while offering a delightful contrast.

If coffee or tea pairs well with your meal, a light green tea can reflect the fresh herbal notes in the dish and cleanse the palate effectively between bites.

Consider serving drinks chilled, especially in warmer months, to provide a refreshing counterpoint to the spring rolls.

Storage and Shelf Life

To maintain freshness, store leftover pork spring rolls in an airtight container in the refrigerator for up to 2 days. Keep the dipping sauce separate to prevent the rolls from becoming soggy.

When freezing, wrap individual spring rolls in plastic wrap, followed by aluminum foil, and then place them in a freezer-safe bag. They can last 1-2 months in the freezer but will lose some quality upon thawing.

To reheat, do not microwave; instead, heat them in a skillet on low heat or bake in the oven until warm and crispy. For stored sauce, it can be refrigerated for up to a week.

Signs of spoilage include an off smell or changes in texture, indicating that the spring rolls should be discarded.

Make Ahead Strategies

Prepping pork spring rolls ahead of time can save you time on busy days. You can prepare the filling in advance, storing it in the refrigerator for up to 2 days. When ready to serve, wrap the rolls shortly before cooking to ensure freshness.

Soak the rice papers just before assembling your rolls, as they can dry out if pre-soaked for extended periods.

Assess the impact on quality; the longer pork or ingredients sit, the more flavorful they may become but be mindful not to let them sit long enough to spoil.

Consider cooking and freezing spring rolls for quick meals later. Just fry them, cool, and freeze, then reheat as needed. Don’t forget to add any fresh items right before serving to keep the dish lively.

Scaling Instructions

Scaling your pork spring roll recipe can be easily done. If halving the recipe for a smaller gathering, ensure to adjust your quantities gradually, especially for spices and sauces, to keep the flavor profile intact.

Doubling or tripling the recipe for larger gatherings requires careful consideration of cooking in batches, especially during frying, to maintain the ideal oil temperature.

Adjust timing slightly, as larger quantities may require more time in the prep phase but not necessarily during cooking.

For equipment adjustments, ensure your frying pan has adequate size and capacity, or consider using a deep fryer if preparing large quantities.

Keep in mind that scaling affects storage; ensure your containers are big enough for larger batches, especially when refrigerating or freezing.

Nutritional Deep Dive

Evaluating the macro breakdown of pork spring rolls showcases adequate protein and healthy fats, primarily coming from the pork and peanut sauce, which contribute to a filling meal.

Micronutrient analysis reveals that these rolls offer a range of vitamins and minerals, including iron from pork and various vitamins from fresh vegetables, making them a nutritious option.

Health benefits manifest in the pairing of protein and healthy fats, contributing to satiety and providing sustained energy without excess carbohydrates often associated with heavier meals.

Dietary considerations should include serving sizes; with multiple rolls, it’s easy to overindulge, so portion wisely to align with dietary goals.

For weight management, consider baking or air-frying the rolls instead of pan-frying for a lighter version, reducing overall fat content without sacrificing flavor.

Dietary Adaptations

For gluten-free options, ensure the rice paper is gluten-free—these are typically naturally gluten-free allowing for inclusive diets.

For dairy-free needs, ensure that the sauce and fillings do not contain any dairy products, making them safe for vegan consumers.

Low-carb adaptations can involve replacing traditional fillings with spiralized veggies or cauliflower instead of rice paper while keeping the pork tasty and satisfying.

Keto diets can also benefit from this dish by incorporating healthier fats and reducing vegetables while preserving the pork ingredient, aligning with macronutrient goals.

Paleo followers can enjoy spring rolls too, by sticking to traditional ingredients while avoiding any processed components.

Troubleshooting Guide

If you notice texture issues, such as rolls being too soggy, ensure that both the rice paper and filling are balanced in moisture. Over-soaking rice paper can lead to undesirable results.

For flavor balance, if the rolls taste bland, increase the seasoning in your pork mixture and serve with extra peanut sauce for an added flavor kick.

Temperature problems during frying can also affect outcome; if rolls are burning outside and raw inside, lower the cooking temperature and adjust timing to allow even cooking.

Using the right equipment is crucial; ensure your frying pan is nonstick to prevent sticking, and a thermometer can help monitor oil temperatures.

Ingredient substitutions should be tested ahead of time; some may cook differently, requiring adjustments in time or technique.

Timing concerns can arise especially during busy times; pre-prepping fillings and soaking rice paper can alleviate frantic moments for better outcomes.

Recipe Success Stories

Community feedback has been overwhelmingly positive, with many home cooks noting that these pork spring rolls have become a family favorite. They’ve reported greater success when making the rolls together, creating opportunities for quality family time in the kitchen.

Variation successes have emerged, with readers swapping out pork for chicken or utilizing different sauces, leading to unique twists on the classic recipe. Some have shared their experiences with adding local spices, which reflect regional tastes beautifully.

Adaptation stories reveal how individuals have made this recipe suit dietary restrictions while maintaining taste, showcasing flexibility in ingredient choices. Feedback has also included ideas for healthier versions, replacing frying methods with air frying or baking.

Photography tips have also been shared. Many cooks have found that natural light enhances the visual presentation of spring rolls, tempting others with their night market aesthetic.

Frequently Asked Questions

1. Can I make spring rolls ahead of time? Yes, you can prepare the filling ahead of time and keep it in the refrigerator, wrapping the rolls just before cooking for the best results.

2. What can I substitute for pork in the recipe? Chicken, shrimp, or even tofu are excellent substitutes, providing different flavor profiles while maintaining the spring roll concept.

3. How should I store leftover spring rolls? Store them in an airtight container in the refrigerator for up to 2 days, separating the dipping sauce to avoid sogginess.

4. Can I freeze the cooked spring rolls? Yes, you can freeze cooked spring rolls; wrap them tightly and store in a freezer-safe container for 1-2 months.

5. What is the best way to reheat frozen spring rolls? Frying them directly from frozen or baking them in the oven until crispy are the best reheating methods to maintain their texture.

6. How can I make the sauce spicier? You can add chili paste or fresh chopped chilis to your peanut lime sauce for some extra heat that complements the dish well.

7. Are spring rolls gluten-free? Yes, as long as you use gluten-free rice paper, these spring rolls can be made to suit gluten-sensitive diets.

8. What other sauces pair well with spring rolls? Besides peanut lime sauce, sweet chili sauce or a tangy hoisin sauce are popular alternatives that add a different flavor dimension.

9. How do I know when the pork is cooked through? Use a meat thermometer to ensure the pork reaches an internal temperature of 160°F (71°C) for safe eating.

10. Can I use frozen vegetables in the filling? It’s generally better to use fresh vegetables, as frozen might affect the texture but, if thawed and cooked well, can work in a pinch.

Additional Resources

To expand your culinary repertoire, consider exploring related recipes, such as other types of spring rolls, satay chicken skewers, or fresh summer rolls.

Techniques like mastering the perfect dipping sauce or learning to fry can elevate your cooking skills further—finding guides and videos online can provide additional insights.

Ingredient information is crucial; exploring more about the nutrition and benefits of herbs and spices can enhance your understanding of flavors.

Equipment recommendations can support your cooking; investing in a deep fryer or quality non-stick pan may yield better results for frying dishes at home.

Seasonal variations, using available local ingredients, can keep your meals fresh and exciting throughout the year.

Join the Conversation

We invite you to share your experiences with making pork spring rolls in the comments below. Consider sharing photos of your creation on social media—hashtag #PorkSpringRolls and inspire others.

Don’t forget to provide your photography tips or inspiration for adapting ingredients; your input can enrich our cooking community and potentially become a feature in one of our follow-ups.

Sharing your variations and twists on this recipe makes for a meaningful exchange, helping fellow cooks elevate their dishes. Join us and spread the love for delicious dining experiences, one roll at a time!

The Recipe

Pork Spring Rolls with Peanut Lime Sauce

Serves: 4

Prep Time: 30 mins

Cook Time: 15 mins

Total Time: 45 mins

Kitchen Equipment Needed

  • Non-stick skillet
  • Shallow dish for soaking rice paper
  • Mixing bowl
  • Meat thermometer (optional)

Ingredients

  • 1 lb ground pork
  • 1 package rice paper (8-10 sheets)
  • 1 cup shredded cabbage
  • 1/2 cup grated carrots
  • 1/2 cup chopped fresh herbs (mint, cilantro)
  • Oil for frying

Directions

  1. In a bowl, mix ground pork with seasonings and marinate for at least 15 minutes.
  2. Meanwhile, prepare the peanut lime sauce by mixing peanut butter, lime juice, soy sauce, honey, and a pinch of salt.
  3. Heat oil in your skillet until hot (about 350°F or 175°C).
  4. While the oil heats, soak rice paper in warm water until soft, approximately 30 seconds.
  5. Lay the soaked rice paper on a flat surface; add a portion of pork mix, followed by vegetables and herbs.
  6. Fold in the sides and roll tightly. Repeat with all rice paper sheets.
  7. Fry the rolls in hot oil until golden and crispy, turning occasionally for even cooking, about 3-4 minutes.
  8. Drain on paper towels and serve hot with peanut lime sauce.

Recipe Notes

  • Feel free to adjust the sauce ingredients to suit your taste.
  • Make sure the oil is hot enough before frying to prevent soggy rolls.
  • Customize filling ingredients based on your preferences and seasonal veggies.

Delicious Pickled Eggs with Sausage and Onions Recipe Guide

Pickled Eggs with Sausage & Onions: A Flavorful Delicacy

⚖️
Difficulty
Easy

⏲️
Prep Time
15 mins

🕒
Cook Time
30 mins

⏱️
Total Time
45 mins

🍽️
Servings
4 servings

Pickled eggs with sausage and onions is a delightful dish that marries tangy flavors with savory elements, creating a culinary experience that tantalizes the taste buds. The process of pickling eggs infuses them with a zesty pepper and vinegar marinade, which perfectly contrasts with the rich, hearty taste of sausage and the mild sweetness of sautéed onions. This combination results in a versatile dish that can be enjoyed as a savory snack, a picnic item, or a stand-alone meal.

As you prepare this dish, the vibrant color of the pickled eggs and the aroma of sautéed onions will fill your kitchen, creating an irresistible atmosphere. Perfectly cooked sausages add a juicy texture that complements the firm yet yielding nature of the pickled eggs, ensuring a satisfying mouthfeel with every bite. Whether served on a charcuterie board or as a topping for salads or sandwiches, pickled eggs with sausage and onions will be a memorable addition to your culinary repertoire.

Quick Recipe Highlights

  • Flavor Profile: This dish combines the sharp tang of pickled eggs with the hearty flavors of sausage, enhanced by the sweetness of sautéed onions.
  • Texture: Expect a delightful contrast between the creamy, tangy eggs and the juicy, rich sausage alongside the tender but slightly crunchy onions.
  • Aroma: The aromas of simmering spices meld with the savory scent of sausage and sweet onions, creating an inviting cooking environment.
  • Visual Appeal: The vibrant yellow and pink hues of the pickled eggs alongside the golden-brown sausages and onions make for an eye-catching presentation.
  • Skill Level Needed: This recipe is easy enough for beginners, requiring basic kitchen skills for chopping, boiling, and sautéing.
  • Special Equipment: A large bowl for pickling and a sauté pan for cooking the sausage and onions are all you need to create this dish.

Recipe Overview

  • Difficulty Level: This easy recipe is perfect for both novice cooks and experienced chefs looking for a quick and satisfying dish to prepare.
  • Category: This dish falls under appetizers or snacks, providing a perfect accompaniment to gatherings or light meals.
  • Cuisine: Influenced by traditional preservation techniques, pickled eggs are popular in various culinary traditions, particularly in American and European cuisines.
  • Cost: With budget-friendly ingredients like eggs, sausage, and onions, this recipe ensures an affordable culinary experience.
  • Season: Best enjoyed year-round, pickled eggs can serve as a delightful snack during summer picnics or a comforting meal in winter.
  • Occasion: Great for casual gatherings, parties, or as part of brunch spreads, pickled eggs with sausage and onions bring a unique flavor profile to any occasion.

Why You’ll Love This Recipe

There are so many reasons why pickled eggs with sausage and onions will become a staple in your culinary collection. To start, the unique taste and texture appeal of this dish creates a memorable eating experience. The contrasting flavors of tangy pickled eggs with the savory, hearty sausage make every bite satisfaction guaranteed. Additionally, this dish boasts nutritional advantages, as eggs provide a rich source of protein while sausage offers essential nutrients, making it a hearty, well-rounded option.

One of the key benefits of this recipe is its convenience. With only a handful of ingredients and minimal cooking steps, it’s easy to whip together, making it perfect for busy weeknights or last-minute gatherings. Just boil, pickle, and sauté – it’s that simple! Beyond convenience, this dish also shines in social settings, easily captivating guests’ palates and serving as a great conversation starter.

Moreover, the cost-effectiveness of this recipe cannot be overlooked. Utilizing common ingredients ensures that you can enjoy this delicious dish without breaking the bank. If you’re looking to impress without spending a fortune, pickled eggs with sausage and onions provide a gourmet touch at an accessible price point. Lastly, this recipe’s adaptability allows you to explore different ingredient variations and creative presentations that cater to your personal taste and occasions.

Historical Background and Cultural Significance

Pickled eggs have a rich history that dates back to ancient preservation techniques, which were vital for food storage before modern refrigeration. This method of pickling not only preserves the eggs but also imparts unique flavors that have been enjoyed in various cultures. Traditionally consumed in the U.S., pickled eggs also have roots in European regions where they were served as bar snacks, highlighting their popularity in communal eating and social gatherings.

In addition to their historical relevance, these eggs have cultural significance across many communities. Often seen as a symbol of resourcefulness, pickled eggs allowed families to make use of eggs during peak production seasons. As a result, many families have passed down recipes through generations, solidifying their nostalgic value in cultural celebrations and family gatherings.

Over the years, the evolution of pickled eggs has expanded the realm of culinary possibilities, influencing different regions to incorporate local flavors and spices into their variations. Most notably, adding sausages and onions provides a satisfying twist that melds traditions and showcases modern preferences in savory dishes.

Additionally, regional variations of this dish can be found, with some areas enhancing their pickled eggs with beets for color or spices like peppercorns and garlic for added complexity. Such adaptations highlight the versatility of pickled eggs and their ability to reflect local food trends and ingredients while remaining a beloved staple.

Ingredient Deep Dive

Eggs serve as the primary ingredient in this dish and hold a special place in culinary history. Considered symbolic of fertility and life, eggs have been a staple in diets for centuries, celebrated for their versatility and nutrient profile. Rich in protein, vitamins, and minerals, eggs contribute to muscle maintenance and overall health. When selecting eggs, look for fresh, local options and choose those with a clean, unblemished shell to ensure quality. Proper storage involves refrigeration to maintain their freshness and flavor, as eggs can easily spoil when left at room temperature.

Sausages are another crucial component of this dish, offering both flavor and texture. Depending on the type, sausages may vary in spice content, fat content, and overall taste. Historically, sausages have been made as a means of preserving meat and utilizing every part of the animal, signaling respect for resources. When choosing sausages for this recipe, consider options like smoked or sweet varieties to complement the pickled eggs. As with eggs, proper storage is essential, requiring refrigeration until ready to use. Additionally, sausage can be substituted with plant-based options for those with dietary restrictions.

Onions, the last main ingredient, lend sweetness and depth to this recipe. Onions have been used throughout culinary history, not only for flavor but also for their health benefits, such as anti-inflammatory properties and essential nutrients. When selecting onions, choose firm bulbs with minimal blemishes. They can be stored in a cool, dry place away from direct sunlight for maximum shelf life. For unique twists, consider substituting with green onions or shallots to explore different taste profiles and enhance the dish.

Common Mistakes to Avoid

  • Overcooking the eggs: This results in a rubbery texture and a green ring around the yolk. Aim for a gentle boil and simmer for 8-10 minutes.
  • Using old eggs: Freshness impacts both flavor and texture. Always check the expiration date and opt for the freshest eggs available.
  • Skipping the pickling time: Allowing the eggs to pickle for at least 24 hours is essential for flavor infusion; don’t rush this step.
  • Not adjusting seasoning: Taste your pickling liquid before adding it to the eggs; not all vinegar is created equal. Adjust acidity according to preference.
  • Choosing poor-quality sausages: Low-fat sausages can result in a dry dish. Opt for quality sausages that will enhance overall flavor.
  • Improperly slicing the onions: Ensure even slices for consistent cooking and an attractive presentation.
  • Ignoring refrigeration: Store pickled eggs in the fridge to maintain freshness and prevent spoilage; they can last several weeks when properly stored.
  • Not simmering the sausage long enough: The sausages should be cooked until browned and heated through for optimal flavor and texture.
  • Serving without garnish: Presentation matters, so garnishing with fresh herbs can elevate the dish visually and enhance the flavor.
  • Neglecting to test the pickling liquid: Always taste your pickling mixture before using it; the balance of flavors is key to a successful dish.

Essential Techniques

Hard boiling eggs is a fundamental cooking technique for this recipe. It’s important to avoid overcooking, which can result in a dry texture. To master this, start by placing cold eggs in a pot and covering them with water. Bring to a gentle boil, then reduce heat and cover for about 12 minutes. Once done, immediately transfer to an ice bath to halt the cooking process and maintain texture.

Pickling is another critical technique. The process not only preserves food but also enhances flavors. To perfect this technique, make sure to let your pickling mixture cool before adding the eggs to prevent curdling. The longer you allow the eggs to sit in the pickling brine, the more flavorful they will become. Always ensure the eggs are fully submerged in the brine for even seasoning.

Sautéing onions involves controlling heat and timing to achieve the perfect flavor. Start with medium heat and add a pinch of salt to help the onions release moisture. Stir them regularly to avoid burning, and remove them from the heat once they are soft and golden. This delicious sweetness will complement the savory elements of your dish beautifully.

Slicing and seasoning the sausage correctly is vital. For even cooking, slice sausage evenly and place them in a preheated pan to allow for optimal browning. Season them according to your taste, either with just salt and pepper or a medley of herbs to enrich flavor profiles.

Pro Tips for Perfect Pickled Eggs with Sausage & Onions

– Use farm-fresh eggs for the best flavor and quality.
– Experiment with different vinegars (such as apple cider or rice vinegar) for unique taste profiles.
– Add spices to the pickling brine to create flavor variations, such as dill, garlic, or bay leaves.
– Consider using a combination of smoked and fresh sausages for a deeper flavor experience.
– Slice the pickled eggs just before serving to maintain their vibrant color and appeal.
– For extra aromatics, incorporate herbs like dill or parsley into the cooking process.
– Ensure your pickling brine is well-cooled before adding the eggs to maintain their integrity.
– Make larger batches for meal prep and enjoy them throughout the week as a convenient snack option.

Variations and Adaptations

For regional variations, consider adding local spices or herbs that reflect your culinary heritage. For instance, southern styles may incorporate cayenne or hot peppers to introduce heat. Seasonal adaptations allow you to include ingredients like fresh herbs and vegetables when they are at their peak.

Dietary modifications can easily be made by substituting traditional sausage with plant-based or turkey options for a leaner dish. If you’re looking for flavor variations, experimenting with different pickling spices will provide unique twists on the classic flavor.

Consider texture modifications by adding crushed nuts or seeds for an unexpected crunch, perfect for topping salads or served in sandwiches. Lastly, presentation alternatives such as serving eggs in a mason jar for picnics or on a colorful platter can enhance the dining experience.

Serving and Presentation Guide

For a beautiful presentation, slice pickled eggs in half and arrange them on a decorative plate alongside the sausage and onions. Garnish with fresh herbs like parsley or dill for a pop of color. Consider serving the dish on a wooden board, accompanied by assorted crackers or bread.

Pair the dish with pickled vegetables or roasted potatoes, complementing the flavors while adding to the visual appeal. Temperature-wise, serve either chilled straight from the fridge or at room temperature for a more relaxed dining experience. Don’t forget to consider portion control to ensure everyone gets a taste without overindulging.

Wine and Beverage Pairing

For wine pairings, opt for a light white wine like Sauvignon Blanc, which refreshes the palate with its acidity. Alternatively, a dry rosé provides a lovely complement to the pickled eggs’ flavors. If you prefer non-alcoholic options, consider serving sparkling water infused with lemon or herbs to cleanse the palate.

Coffee or tea can also be delightful companions to this dish; a robust black coffee pairs nicely, while a light herbal tea offers a refreshing contrast. Always serve beverages at optimal temperatures to enhance the overall dining experience.

Storage and Shelf Life

To maximize freshness, store pickled eggs in a sealed container within the refrigerator. They can last up to four weeks properly stored, thanks to the pickling process. Use a glass jar to avoid any reactions with the pickling spices and maintain flavor integrity.

Signs of spoilage include a strong off-odor, discoloration, or a change in texture. If unsure, it’s best to err on the side of caution and discard them. For reheating, serving pickled eggs cold showcases their pickled nature, but they can also be added to warm dishes if desired.

Freezing is generally not recommended due to the texture changes that may occur, but leftovers can be stored in an airtight container for easy future meals.

Make Ahead Strategies

To get a head start, you can prepare the pickling brine and boiled eggs a day before. This allows for flavors to develop and infuse. Store the eggs in the brine overnight, ensuring maximum flavor impact.

While making the sausage and onions, consider preparing a larger batch, which can be stored in the fridge for quick assembly of dishes later in the week. Upon reheating, ensure you warm them gently to preserve texture and flavor without drying them out.

Adding fresh herbs or greens right before serving enhances visual appeal and freshness, ensuring a delightful crunch and vibrant color.

Scaling Instructions

If you want to halve the recipe, be conscious of halving all ingredients uniformly to maintain the same flavor profile. For a larger gathering, double or triple the recipe while adjusting cooking times as needed to ensure everything cooks evenly.

In terms of equipment adjustments, using larger pots or pans may be necessary for bigger batches. Timing modifications also apply; larger quantities may take additional time to reach the desired cooking temperature.

Finally, consider how excess servings will be stored, ensuring compliance with food safety standards by properly cooling and refrigerating.

Nutritional Deep Dive

In terms of macro breakdown, pickled eggs provide a solid source of protein, healthy fats, and minimal carbs, making them great for balanced diets. Each egg yields essential nutrients, including vital vitamins such as B12 and D, as well as minerals like iron and selenium.

Micronutrient analysis highlights the health benefits of the onion and sausage components, providing antioxidants and vitamins. Together, they contribute to a well-rounded nutritional profile that supports various dietary needs.

For those watching their weight, understanding portion analysis can help. One serving of pickled eggs with sausage is filling yet not overly caloric, making it appropriate for snacking or as an entrée. For specific dietary considerations, tailoring ingredients can enhance benefits while reducing unwanted elements.

Dietary Adaptations

For gluten-free options, select gluten-free sausages and ensure no gluten-containing ingredients are used in the pickling brine.

For dairy-free needs, this recipe is naturally dairy-free, making it suitable for various diets without modification. Vegans can enjoy a version using chickpeas, replacing eggs alongside plant-based sausages for protein.

Low-carb dieters can appreciate the protein-rich nature of this dish without the addition of traditional carbs. Keto enthusiasts will find pickled eggs to fit seamlessly into their eating plan, while paleo fans can enjoy the wholesome ingredients without emotional baggage.

Those following a low-FODMAP diet will want to tweak the recipe, skipping high-FODMAP onions or switching them with carrots or bell peppers while retaining core flavors.

Troubleshooting Guide

For texture issues, if eggs become rubbery, ensure you don’t overcook them during hard boiling; sticking to the recommended time is key. Misbalance in flavor can occur if you don’t taste the pickling brine before adding; minor adjustments during this stage can impact the final dish significantly.

Address temperature challenges by ensuring all cooked ingredients are allowed to cool before storing together, as hot items cause condensation, influencing flavors and freshness. Equipment challenges may arise if you lack an appropriate pot; not having pickling weights may affect brine penetration; consider using a clean stone or even a filled jar to keep the eggs submerged.

When it comes to ingredient substitutions, explore variants but note that not all substitutions yield the same results; be cautious with seasoning adjustments, as some herbs can intensify flavors beyond expectation. For timing concerns, plan accordingly to give enough time for pickling — don’t rush this vital step.

Recipe Success Stories

Community feedback on pickled eggs with sausage and onions often cites their unique and memorable flavors as the highlight of gatherings. Readers have shared successful variations, incorporating local spices from their regions, resulting in uniquely personal twists on this classic dish.

Adaptation stories abound, with many users excited about experimenting with their favorite sausage types, from spicy chorizo to savory Italian links, showcasing the dish’s versatility. Photography tips encourage showcasing the vibrant colors of the pickles alongside the hearty sausage platters, making the dish not only delicious but visually appealing.

Overall, the positive engagement surrounding this recipe highlights its ability to resonate with both seasoned chefs and cooking novices while becoming a go-to choice for families and gatherings.

Frequently Asked Questions

How long do pickled eggs last in the fridge?

When stored in a sealed glass jar with adequate pickling liquid, pickled eggs can last about 3-4 weeks in the fridge. Regularly check for signs of spoilage before consuming.

Can I use other meats besides sausage?

Absolutely! While sausage offers robust flavor, you can experiment with smoked meats, like ham or bacon, for unique taste profiles that still pair beautifully with pickled eggs.

Is it safe to eat pickled eggs?

Yes, as long as they are prepared safely, including the proper pickling process and stored correctly in the refrigerator away from sunlight.

Can I make these eggs without vinegar?

Vinegar is integral to the pickling process and flavor, but if you’re looking for alternatives, consider experimenting with citrus-based marinades, though the final taste may differ significantly.

How do I know when the pickled eggs are ready to eat?

After 24 hours in the pickling liquid, the eggs will be sufficiently flavored. However, waiting up to a week will enhance their taste even further.

What is the best vinegar for pickling eggs?

White vinegar is commonly used due to its neutral flavor, but apple cider vinegar can add a nice sweetness and depth to the brine.

Can I freeze pickled eggs?

Freezing pickled eggs is not recommended as the texture can suffer upon thawing. It’s best enjoyed fresh or within a few weeks of making.

Can I eat pickled eggs if pregnant?

Generally, pickled eggs are safe for pregnant women, provided they’re made with pasteurized eggs and proper food safety precautions are followed.

What can I serve with pickled eggs?

These eggs are versatile! They pair well with salads, sandwiches, or can simply be served alongside your favorite crackers or crusty bread.

Do I need to pasteurize the eggs before pickling?

It’s recommended to use pasteurized eggs to improve safety, reducing the risk of salmonella when pickling.

Additional Resources

If you enjoyed this recipe and are looking for related options, consider our delicious variations of pickled vegetables or explore our guides on preserving seasonal produce. For those keen on improving their pickling techniques, we offer comprehensive guides to mastering the art of fermentation. Don’t forget to visit our equipment recommendations to find the best jars and tools to enhance your cooking experience.

For seasonal variations, try creating a summer picnic platter featuring these pickled eggs alongside fresh garden salads and homemade dips for a refreshing outdoor meal.

Join the Conversation

We love hearing from our community! Share your take on pickled eggs with sausage and onions on social media and join the discussions about your experiences. Include photos of your presentations and adaptations to inspire others in their culinary adventures. Your reviews and feedback help us create more delicious recipes tailored to your preferences—join us in building a food-loving community!

The Recipe

Pickled Eggs with Sausage & Onions

Serves: 4

Prep Time: 15 mins

Cook Time: 30 mins

Total Time: 45 mins

Kitchen Equipment Needed

  • Large pot for boiling eggs
  • Sauté pan
  • Sealed glass jar for pickling
  • Measuring cups
  • Sharp knife and cutting board

Ingredients

  • 6 large eggs
  • 1 cup white vinegar
  • 1/2 cup water
  • 1 tablespoon sugar
  • 1 teaspoon salt
  • 1/2 teaspoon crushed red pepper flakes
  • 1 tablespoon pickling spices
  • 8 ounces smoked sausage, sliced
  • 1 onion, thinly sliced

Directions

  1. Hard boil the eggs by bringing a pot of water to a boil. Gently add the eggs and boil for 10 minutes. Remove and place in an ice bath to cool.
  2. In a separate pot, combine vinegar, water, sugar, salt, and pickling spices. Bring to a boil, then remove from heat and let cool.
  3. Once the eggs are cooled, peel them and place them in a jar.
  4. Pour the cooled pickling liquid over the eggs, ensuring they are fully submerged. Seal and refrigerate for at least 24 hours.
  5. In a sauté pan, cook the sausage until browned. Remove and set aside.
  6. In the same pan, sauté the onions until they are soft and caramelized.
  7. To serve, arrange the pickled eggs with the sausage and onions. Enjoy!

Recipe Notes

  • Feel free to adjust the sugar and salt levels according to your taste.
  • Experiment with additional herbs and spices in the pickling brine for varied flavors.
  • These pickled eggs pair wonderfully with crunchy vegetables or on top of salads.

Delicious Cheddar-Crusted Ground Beef and Rice Casserole Recipe

Cheddar-Crusted Ground Beef and Rice Casserole: A Comforting Delight

⚖️
Difficulty
Easy

⏲️
Prep Time
15 mins

🕒
Cook Time
30 mins

⏱️
Total Time
45 mins

🍽️
Servings
4

Welcome to a world of comfort food with our Cheddar-Crusted Ground Beef and Rice Casserole. This delightful dish marries the savory richness of ground beef with hearty rice, all enveloped in a crunchy layer of melted cheddar cheese. Perfect for weeknight dinners or family gatherings, it offers a satisfying combination that will leave everyone at the table asking for seconds. The aroma of bubbling cheese and sautéed onions fills the air, creating a warm and inviting atmosphere that will make you feel right at home.

Picture this: each spoonful delivers a creamy texture from the rice, rich depth from the beef, and a golden, crispy top that creates a delightful contrast. Not only does it satisfy your hunger, but it also tugs at the heartstrings with its nostalgic feel. This casserole brings together simple ingredients to craft an unforgettable dish that helps you create lasting memories with family and friends.

Quick Recipe Highlights

  • Flavor Profile: The casserole bursts with savory flavors from ground beef, complemented by the sharpness of cheddar, while subtle notes from spices elevate the overall taste.
  • Texture: Enjoy a wonderful contrast between the creamy rice and the crispy cheddar crust, providing a lush mouthfeel that makes each bite enjoyable.
  • Aroma: The tantalizing smell of sautéed onions mingling with melted cheese creates an inviting and homey scent that will have everyone gathering around the dinner table.
  • Visual Appeal: The golden-brown crust on top contrasts beautifully with the colorful medley of beef and rice, making this dish visually delightful.
  • Skill Level Needed: Perfect for novice cooks, this recipe involves straightforward steps and minimal techniques, making it an easy win.
  • Special Equipment: You will need a large baking dish, skillet, and mixing utensils for this cozy casserole.

Recipe Overview

  • Difficulty Level: This dish is rated easy, making it accessible for all skill levels. The simplicity in preparation allows even beginner cooks to shine.
  • Category: Ideal for family dinners, this casserole falls under hearty meals that nourish and satisfy.
  • Cuisine: Drawing inspiration from classic American comfort food, this casserole reflects the heartwarming essence of home-cooked meals.
  • Cost: With affordable and easily accessible ingredients, this dish offers a budget-friendly option for feeding a family without breaking the bank.
  • Season: Enjoy this casserole year-round, but it shines especially in cooler months when hearty dishes feel most comforting.
  • Occasion: Perfect for weeknight dinners, potlucks, or family gatherings, it caters well to any occasion needing a touch of comfort food.

Why You’ll Love This Recipe

This Cheddar-Crusted Ground Beef and Rice Casserole is not just about taste; it’s an experience. Each bite combines familiar flavors that evoke comfort and happiness. The creamy rice coats the pallette while the grounded beef adds a filling quality, ensuring no one leaves the table hungry. The cheddar crust is the pièce de résistance, offering a delightful crunch that contrasts beautifully with the softness beneath it, making this dish a true comfort food masterpiece.

Additionally, the convenience of preparation cannot be overstated. With just 15 minutes of prep and 30 minutes in the oven, you can set your dinner on autopilot while you tend to other tasks. It’s a great time-saver during busy weeks, freeing you to enjoy family time or relax after a long day.

On the nutritional front, this casserole packs a punch. Ground beef is an excellent source of protein, which is vital for muscle growth and overall health. Coupled with rice, this dish provides a balanced meal that fuels your body without overwhelming it with complex preparations.

Serving this casserole becomes a joyous occasion. It’s a dish that invites sharing, bringing families together. Whether at a casual dinner or a festive gathering, the camaraderie that builds around sharing a warm casserole is irreplaceable.

Lastly, this dish is highly cost-effective. With ingredients usually found in most pantries, you can whip up a filling meal without needing elaborate ingredients. This accessibility ensures that everyone can indulge in this delightful casserole.

Historical Background and Cultural Significance

Casseroles have long been a staple in American kitchens, particularly valued for their ability to serve multiple people with ease. The concept of cooking ingredients together in a single vessel dates back to ancient culinary practices, allowing cooks to create meals that are both economical and satisfying. Over time, these one-dish meals evolved, accommodating regional ingredients and family traditions, making them a beloved aspect of home cooking.

The Cheddar-Crusted Ground Beef and Rice Casserole embodies this legacy. Popularized in the mid-20th century, casseroles became synonymous with American family dining; they offered a practical solution to busy lives while facilitating creativity in the kitchen. This dish, with its comforting simplicity and flavor, stands as a reminder of those traditions while inviting modern cooks to add their twist.

As culinary methods evolved, so did casserole recipes. Originally focused on rice and meats, later versions incorporated diverse vegetables and spices, adding depth and flavor complexity. The inclusion of cheese, like cheddar, transformed the casserole into a gooey, rich meal that became a family favorite across generations.

Regional variations also play a significant role in the casserole’s history. From the New England seafood casseroles to Southern-style baked dishes, each iteration reflects local ingredients and preferences. This adaptability showcases the casserole’s ability to unite people through food, regardless of cultural background.

Ingredient Deep Dive

Ground Beef: Ground beef is an incredibly versatile ingredient with deep-rooted significance in many culinary traditions. It serves as a staple in American cuisine, offering a rich source of protein and essential nutrients like iron and B vitamins. When selecting ground beef, aim for lean cuts to reduce grease and enhance flavor. Proper storage in an airtight container in the fridge can extend freshness, while freezing allows for longer preservation.

Rice: Rice is a global food staple that transcends cultures and cuisines, providing a base for countless dishes. Whole grain varieties, like brown rice, contribute fiber, while white rice offers a quick-cooking, versatile option. When selecting rice, choose varieties best suited for your dish; for this casserole, long grain or jasmine rice works beautifully. Store in a cool, dry location to ensure longevity.

Cheddar Cheese: Often dubbed America’s favorite cheese, cheddar enriches dishes with its sharp, distinct flavor. Known for its high calcium content, it also adds a delightful creaminess to casseroles. When purchasing, opt for block cheese and shred it yourself for better melting quality. Store cheddar in the fridge, wrapped tightly to maintain freshness.

Common Mistakes to Avoid

  • Overcooking the beef: Sautéing too long can result in dry meat. Aim for just before it’s completely cooked, as it will finish cooking in the oven.
  • Under-seasoning: Always taste your mixture before baking. Season carefully; remember flavors will meld during cooking.
  • Incorrect oven temperature: Preheating your oven is crucial for evenly baking your casserole. An incorrect temperature can ruin the cooking time.
  • Ignoring the cheese layer: Ensure you add a generous amount of cheese to achieve that delightful crispy top.
  • Skipping the rest time: Let the casserole sit for a few minutes before serving to allow it to set and makes serving easier.
  • Using cold ingredients: Room temperature ingredients mix better, so let your refrigerated items sit out for a bit before starting.
  • Not covering while baking: If the top browns too quickly, cover the casserole with foil to prevent burning.
  • Choosing the wrong rice: Stick to long-grain varieties for the best texture; sticky rice can alter the dish’s mouthfeel.

Essential Techniques

Sautéing: Sautéing is vital for flavor development in your casserole. It helps release aromas from onions and browns the beef for a deeper taste. To master this technique, cook on medium heat, stirring frequently until ingredients are softened and aromatic. A common pitfall is cooking on too high a heat, which can lead to burning rather than browning.

Baking: Even baking ensures your casserole cooks throughout, leaving no cold spots. Be mindful of the oven temperature, avoid opening the door frequently, and use a thermometer to ensure ideal doneness. A visual cue for success is a golden-brown crust on top that indicates both the cheese and casserole base are perfectly cooked.

Pro Tips for Perfect Cheddar-Crusted Ground Beef and Rice Casserole

1. Use freshly grated cheese for better melting consistency. Pre-packaged shredded cheese may contain anti-caking agents that prevent smooth melting.
2. For an extra flavor boost, add spices such as paprika or garlic powder to the beef mixture as it cooks.
3. Experiment with different cheese types in combination for a more complex flavor profile—consider adding mozzarella for stretchiness or gouda for smokiness.
4. Incorporating vegetables like bell peppers, peas, or corn enhances the dish’s nutritional value and adds vibrant color.
5. If you prefer a spicier kick, consider adding diced jalapeños or a sprinkle of red pepper flakes to the beef mixture.
6. Bake the casserole in a glass or ceramic dish; this helps maintain even heat distribution.
7. For a crispy topping, broil the casserole for the last few minutes of cooking, watching closely to avoid burning.
8. Let your casserole sit after baking; this will allow the flavors to settle and results in cleaner portions when serving.

Variations and Adaptations

You can easily personalize this casserole based on personal taste preferences. For a regional twist, try adding southwestern ingredients such as black beans, corn, and taco seasoning for a Mexican flair. In colder seasons, consider adding root vegetables like carrots or parsnips for added sweetness and heartiness.

When it comes to dietary modifications, this recipe can be adapted to be gluten-free by replacing traditional rice with no-gluten grain options like quinoa. For a healthier version, try incorporating brown rice and lean ground turkey or chicken.

You can also introduce alternative flavors by using different cheeses, such as pepper jack for heat or Parmesan for a more distinct taste. Texture modifications are easy too; you can add crunchy toppings like crushed tortilla chips or breadcrumbs mixed with herbs for a delightful crunch.

In terms of presentation, consider serving the casserole in individual ramekins for a personal touch, or garnish with fresh herbs like parsley for a pop of color and freshness.

Serving and Presentation Guide

Presentation enhances the overall dining experience. To plate your casserole, use a solid spatula to cut clean squares, ensuring a proper lift from the dish. For garnishing, a sprinkle of chopped herbs like parsley or cilantro works great to brighten the dish’s appearance.

Modern serving suggestions include pairing the casserole with a side salad for a refreshing contrast; consider using a light vinaigrette to offset the richness of the dish. Ensure that the casserole is served warm, as the flavors and textures are at their best when fresh out of the oven. For portion control, consider serving smaller sections on smaller plates to encourage moderation while allowing guests to savor the flavors.

Wine and Beverage Pairing

A robust red wine, such as a Merlot or Cabernet Sauvignon, pairs beautifully with this hearty casserole. Its tannins complement the richness of the beef while enhancing the cheddar’s flavors. If you prefer white wine, a full-bodied Chardonnay offers a nice contrast to the savory notes.

For non-alcoholic alternatives, consider serving sparkling water with a slice of lemon to cleanse the palate. Iced tea also serves as a refreshing accompaniment, especially when sweetened lightly. If seeking a warm beverage to complement the dish, a cup of herbal tea brings a gentle warmth that pairs well with the comforting nature of the casserole.

Storage and Shelf Life

To store leftovers, make sure the casserole is completely cooled, then transfer it into an airtight container. Refrigerate for up to 3-4 days. For longer storage, it can be frozen; just cover tightly in plastic wrap and aluminum foil to avoid freezer burn, keeping it fresh for up to three months.

When reheating, use the oven for the best results. Preheat to 350°F (175°C) and bake until heated through, about 20-25 minutes. To ensure even warmth, cover it with foil to retain moisture. If currently frozen, allow to thaw overnight in the fridge before reheating. Signs of spoilage include off smells or unusual colors—do not consume if these signs are present.

Make Ahead Strategies

To make this casserole ahead of time, prepare the entire dish up to the baking step, then cover and refrigerate for up to 24 hours. This allows flavors to meld beautifully before cooking. If freezing, assemble the casserole in advance, covering it tightly to preserve freshness.

Consider prepping individual components, such as cooking the beef and chopping vegetables, days in advance. When ready to bake, simply combine the ingredients and bake straight from the fridge, adding a few extra minutes to the timer as needed. If you want to add fresh elements, like herbs or green onions, do so right before serving to keep them vibrant and flavorful.

Scaling Instructions

Scaling the recipe is straightforward. For halving, use half the amount of each ingredient while adjusting cooking time as needed. When doubling or tripling, ensure that your baking dish is large enough; consider cooking in two separate dishes if your oven can’t accommodate the size.

Adjust cooking time based on depth; deeper casseroles may require additional time. When preparing larger quantities, it’s essential to monitor for doneness, as baking more contents can influence cooking speed. Remember to consider storage—larger batches might need more attention in the fridge or freezer.

Nutritional Deep Dive

Analyzing the nutritional content reveals a balanced meal rich in macro and micronutrients. The protein from ground beef supports muscle growth and repair, while rice provides a substantial source of carbohydrates for energy.

Calories vary based on ingredients used; opting for lean beef and reducing cheese can lower overall caloric intake. Important vitamins and minerals are found in the toppings too, especially if vegetables are incorporated.

For those managing weight, serving sizes should be kept in mind; the satisfaction derived from the hearty ingredients can help curb cravings for snacks later. By filling your plate with a mix of greens and the casserole, you can create a more sustainable meal.

Dietary Adaptations

Adapting this casserole to meet dietary needs is easy and versatile. For a gluten-free option, replace regular rice with quinoa, and ensure other ingredients are certified gluten-free.

For dairy-free variations, swap out cheddar for dairy-free cheese alternatives available in the market today. If following a vegan lifestyle, consider using plant-based ground meat and nutritional yeast as a cheesy flavor replacement.

Low-carb enthusiasts can use cauliflower rice instead of traditional rice, achieving a similar texture while remaining within their dietary preferences. Finally, customizing spice levels is easy; spicy individuals can add jalapeños or hot sauce for an extra kick.

Troubleshooting Guide

If you encounter texture issues, such as the dish being too dry, consider adding a bit more broth or cream before baking. Should it turn out too wet, allow it to rest for a few minutes post-baking to help it set.

For flavor balance, if your casserole is too bland, try incorporating more seasoning while cooking the beef or adding a touch of acidity, like lemon juice or vinegar, to brighten the dish.

Temperature problems can arise, leading to unevenly cooked results. Use a thermometer to avoid this; the internal temperature should reach 165°F. If your cheese topping is burnt while the casserole remains cold, try covering the dish with foil for part of the cook time, allowing for more gentle heat circulation.

Ingredient substitutions can alter cooking times. For example, if using frozen vegetables, adjust the initial cooking time accordingly. And if meal prep impacts timing, visually check for doneness by looking for bubbling cheese and an internal temperature of 160°F.

Recipe Success Stories

This casserole has garnered rave reviews within communities and family gatherings. Many have shared stories about how it was a hit at potlucks for its rich flavors and the nostalgic memories it evokes. Adaptations by readers—like including seasonal vegetables or substituting proteins—have also showcased the recipe’s versatility.

A photographer shared their beautiful rendition with a golden crust, inspiring others to experiment with food photography. The ease of preparation has made it a go-to recipe for busy families looking for a delightful homestyle meal that doesn’t sacrifice on flavor.

Moreover, feedback has consistently highlighted how well it reheats, maintaining its deliciousness while providing extra servings. These success stories reinforce the dish’s place in family traditions and everyday meals.

Frequently Asked Questions

Can I freeze leftovers?

Yes, you can freeze leftovers by ensuring they are stored in an airtight container. The casserole can be frozen and kept for up to three months, allowing you to enjoy it later with minimal effort.

What can I serve as a side dish?

Pair this casserole with a fresh green salad, roasted vegetables, or garlic bread. These sides will complement the rich flavors and add variety to your meal.

Can I make this recipe in advance?

Absolutely! You can prep the casserole ahead of time and store it in the refrigerator for up to 24 hours before baking. It will taste even better as the flavors meld.

How can I make it spicier?

For a spicy kick, consider adding diced jalapeños to the beef mixture or a sprinkle of red pepper flakes. Hot sauce can also be served on the side for those who prefer to add heat to individual portions.

What if I don’t have ground beef? Can I use other meats?

Yes, you can substitute ground turkey, chicken, or even plant-based meat alternatives to fit specific dietary preferences or what you have on hand.

Can I change up the cheese?

Of course! You can use different types of cheese like gouda, mozzarella, or provolone to create a different flavor profile or blend cheeses for a unique twist.

How do I know when the casserole is done?

The casserole is done when the top is golden brown and the internal temperature reaches 165°F. You can also check that it is bubbling around the edges for a visual cue.

What is the best way to reheat leftovers?

The best way is to reheat in the oven at 350°F for about 20-25 minutes. Cover it with foil to retain moisture while ensuring it heats evenly throughout.

Is this casserole suitable for kids?

Yes! The flavors are mild and comforting, making it appealing to children. Additionally, you can adjust seasoning according to their taste preferences.

What type of rice should I use?

For this recipe, long-grain white rice or jasmine rice works beautifully. Avoid sticky rice varieties, as they may alter the desired texture of the dish.

How can I make this dish vegetarian?

You can replace the ground beef with cooked lentils or a mix of finely chopped mushrooms for a similar texture and boost of flavor. Use vegetable broth instead of beef broth for added depth.

Additional Resources

Explore related recipes that provide variations of casseroles or hearty home-cooked meals. Resources on essential cooking techniques will help refine your skills while ingredient information can guide your selections for future dishes. Check for equipment recommendations that make the cooking process smoother. Seasonal variations can also inspire you to incorporate fresh ingredients as they become available.

Join the Conversation

We invite you to engage with us through social media—share your versions and adaptations of the Cheddar-Crusted Ground Beef and Rice Casserole. We love to see your photographs, hear your feedback, and learn how you’ve made this recipe personal. Your suggestions and variations enrich our community, and together, we create a vibrant tapestry of culinary experiences.

The Recipe

Cheddar-Crusted Ground Beef and Rice Casserole

Serves: 4

Prep Time: 15 mins

Cook Time: 30 mins

Total Time: 45 mins

Kitchen Equipment Needed

  • Large baking dish
  • Skillet
  • Mixing utensils

Ingredients

  • 1 lb ground beef
  • 1 cup long-grain white rice, uncooked
  • 1 onion, chopped
  • 2 cups beef broth
  • 1 cup shredded cheddar cheese
  • Salt and pepper to taste
  • 1 tablespoon olive oil
  • 1 teaspoon garlic powder

Directions

  1. Preheat the oven to 350°F (175°C).
  2. In a skillet, heat olive oil over medium heat and sauté chopped onions until translucent.
  3. Add the ground beef, salt, pepper, and garlic powder to the skillet, cooking until browned.
  4. Stir in the uncooked rice and beef broth, and mix well.
  5. Transfer the mixture to a greased baking dish and cover with aluminum foil.
  6. Bake for 30 minutes. Remove foil, sprinkle shredded cheddar cheese on top, and bake for an additional 10 minutes until the cheese is melted and bubbly.
  7. Allow to cool for a few minutes before serving.

Recipe Notes

  • Feel free to add your favorite vegetables, such as bell peppers or peas, into the casserole for added nutrition and flavor.
  • This casserole may be prepared ahead of time and stored in the refrigerator before baking.
  • Leftovers can be frozen for up to 3 months; reheat as needed.