Decadent Velvety Lobster Sauce to Elevate Gourmet Dishes

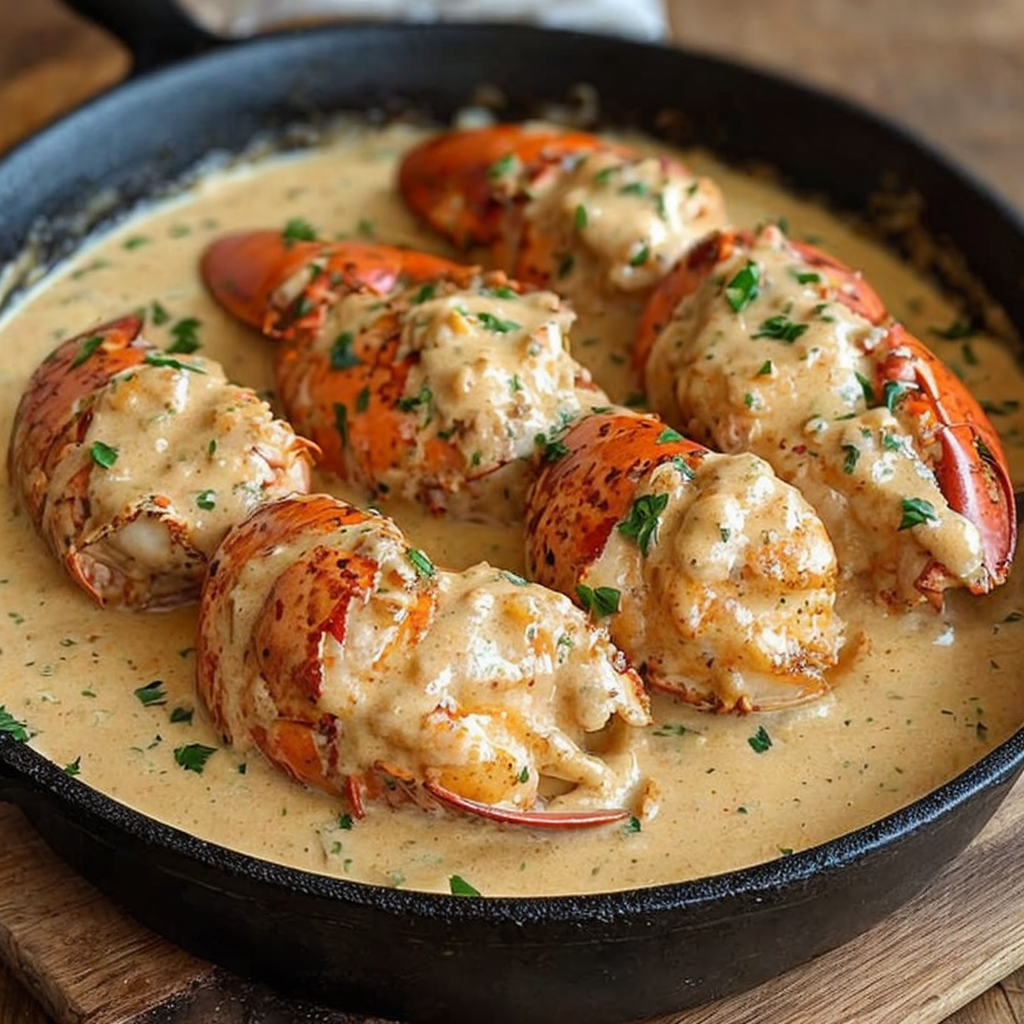
Velvety Lobster Sauce for Gourmet Dishes: Elevate Your Culinary Experience

⚖️
Difficulty
Medium

⏲️
Prep Time
20 mins

🕒
Cook Time
30 mins

⏱️
Total Time
50 mins

🍽️
Servings
4

When it comes to elevating your culinary creations, nothing makes a dish stand out quite like a rich, flavorful sauce. The Velvety Lobster Sauce brings a luxurious touch to gourmet dishes, combining the sweetness of fresh lobster with creamy textures and a hint of acidity. This exquisite lobster sauce is perfect for drizzling over pasta, seafood, or even grilled vegetables, promising to delight the palate of anyone fortunate enough to indulge.

The depth of flavor in this sauce is anchored by a blend of aromatic ingredients that build complexity with each layer. Fresh lobster meat infuses a briny sweetness, balanced by a medley of garlic, shallots, and herbs. The resulting sauce is not only visually stunning, with its rich coral hue but it also delivers a variety of textures, from silky smoothness to tender lobster chunks. Whether you’re hosting a dinner party or looking to impress someone special, this Velvety Lobster Sauce is the perfect way to create a memorable dining experience.

Quick Recipe Highlights

  • Flavor Profile: The flavor combines the sweet, tender notes of lobster with the creamy richness of butter and heavy cream, resulting in an opulent taste that lingers.
  • Texture: This sauce offers a smooth, velvety mouthfeel, punctuated by the tender bites of lobster meat that enhance each bite.
  • Aroma: The aroma is enticing, featuring fresh herbs, garlic, and shallots that fill the kitchen with an irresistible scent that invites guests to the table.
  • Visual Appeal: The sauce boasts a beautiful, shiny finish with flecks of fresh herbs, making it an elegant addition to any plate.
  • Skill Level Needed: This sauce is considered medium difficulty given its need for precise timing and technique in scaling and combining ingredients perfectly.
  • Special Equipment: A sturdy saucepan and a whisk are essential to master the emulsification and ensure a creamy texture.

Recipe Overview

  • Difficulty Level: While the Velvety Lobster Sauce requires some technique, it’s approachable for those with basic cooking skills and can be executed successfully with attention to detail.
  • Category: This sauce fits perfectly into both seafood-centric and special occasion meals, ideal for intimate dinners or large gatherings.
  • Cuisine: Influenced by classic French cooking, the lobster sauce embodies techniques like sautéing and emulsion, giving a nod to high-end cuisine with a home-cooked feel.
  • Cost: Known for its premium ingredients, including fresh lobster, expect moderate costs per serving which can fit well for a special treat.
  • Season: Available year-round, this dish is especially favored in summer and early fall when lobster is at its peak.
  • Occasion: Perfect for special occasions, date nights, or celebratory meals, this lobster sauce will impress any guest.

Why You’ll Love This Recipe

The Velvety Lobster Sauce offers unparalleled taste and texture, transforming ordinary dishes into extraordinary culinary creations. Every mouthful presents a delightful interplay of creamy and succulent flavors that are sure to impress. The incorporation of lobster elevates even the simplest ingredients, allowing you to indulge in a gourmet experience right at home.

Emphasizing convenience, this sauce is relatively quick to prepare yet provides the sophistication of fine dining, making it perfect for home cooks who want to elevate their meals without spending all day in the kitchen. The straightforward steps allow you to focus on quality ingredients and techniques that yield maximum results, offering you a path to culinary success.

Nutritionally, lobster is an excellent choice, rich in protein and low in fat, providing health benefits while still feeling indulgent. The use of cream offers a good source of calcium and other essential nutrients, allowing you to enjoy this sauce guilt-free as part of a balanced meal.

Socially, this Velvety Lobster Sauce shines during dinner parties or family gatherings, serving as a conversation starter and a centerpiece for your meal. It brings everyone together to share in the luxurious flavors, inviting them to experience the art of good food and great company.

Cost-effectively, making this sauce at home allows you to enjoy gourmet flavors without the restaurant price tag. By sourcing fresh lobster directly and preparing it yourself, you create an accessible dining experience that doesn’t compromise on quality or flavor.

Historical Background and Cultural Significance

The origins of the Velvety Lobster Sauce can be traced back to coastal cultures where seafood plays a central role in cuisine. Lobster itself has been a delicacy for centuries, once considered food for the less fortunate, it transitioned into a symbol of luxury and indulgence.

In many culinary traditions, seafood sauces have cultural significance, often crafted with local ingredients and techniques. This sauce reflects the marriage of refined French sauce-making techniques with fresh, local seafood, symbolizing the celebration of coastal cuisine.

As the recipe evolved over time, adaptations began to appear, utilizing different herbs, spices, or bases that reflect regional preferences. The richness of the sauce encourages innovation, allowing chefs to infuse their local flavors, further enhancing its reputation.

Today, the Velvety Lobster Sauce is enjoyed in upscale restaurants and home kitchens alike, connecting generations of cooks through a shared appreciation of fresh seafood. It’s a dish that represents both tradition and modernity, proving the timeless appeal of a well-crafted sauce.

Ingredient Deep Dive

Lobster: Lobster is not just a culinary delicacy; it holds a significant place in American seafood culture, particularly in New England. Known for its sweet, tender meat, lobster is not only versatile but also rich in protein and vitamins. When selecting lobster, be sure to look for live lobsters or fresh, high-quality frozen options to ensure maximum flavor. Proper storage involves keeping it chilled or frozen, and substitutions can include shrimp or crab, though flavors will vary.

Butter: Butter serves as a base for many sauces, giving them a rich, silky texture and flavor. It has a rich history in French cuisine, often used for both cooking and flavor enhancement. Not only does it offer delectable taste, but it also provides essential fatty acids. When using butter, opt for unsalted varieties to control the salt levels in your dish. For health considerations, substitutions can include olive oil or ghee for different flavor profiles.

Common Mistakes to Avoid

  • Overcooking the lobster: Ensure you don’t overcook the lobster as it can turn rubbery. Time it wisely to keep it tender.
  • Not using fresh ingredients: Using stale or low-quality ingredients can compromise the overall taste. Always source the best you can find.
  • Skipping the aromatics: Aromatics like garlic and shallots are essential for depth; don’t leave them out!
  • Ignoring the sauce’s consistency: If the sauce is too thick, add a bit of broth or cream gradually to adjust; if too thin, cook longer.
  • Lack of seasoning: A pinch of salt and freshly cracked pepper enhances flavors; don’t forget to season as you go.
  • Not whisking properly: When emulsifying, it’s crucial to whisk vigorously to incorporate the butter for a creamy texture.
  • Using cold ingredients: Make sure all your ingredients are at room temperature before combining for the best emulsion.
  • Forgetting to taste: Tasting as you cook ensures the flavors balance perfectly before serving.

Essential Techniques

Emulsification: Mastering emulsification is key to creating a rich and creamy lobster sauce. By combining fat and liquid carefully, you achieve a smooth, cohesive sauce. To succeed, add the butter slowly while whisking vigorously, as rapid incorporation creates an emulsion. Watch for visual cues, such as a glossy texture, to gauge your success.

Sautéing aromatics: The foundation of flavor in many sauces begins with sautéing. This technique caramelizes sugars and releases essential oils from ingredients like garlic and shallots. To perform it well, use medium heat, and avoid crowding the pan to prevent steaming. Look for a golden-brown color to signal it’s time to add other components.

Pro Tips for Perfect Velvety Lobster Sauce

1. Use a combination of butter and cream for a perfectly balanced richness that enhances the lobster’s flavor.
2. Always use fresh lobster for the best taste; frozen can work but make sure it’s high-quality.
3. Sauté your aromatics slowly to extract maximum flavor before adding liquids.
4. When making the sauce, keep all your ingredients at room temperature for smoother emulsifying.
5. Use a whisk rather than a spoon; it incorporates air and helps emulsify better.
6. Adjust the acidity with a splash of lemon juice, which enhances the overall flavor.
7. For a more intense lobster flavor, consider reserving lobster shells to create a quick stock to incorporate.
8. Experiment with different herbs like thyme or tarragon to personalize your Velvety Lobster Sauce.

Variations and Adaptations

Lobster sauce can be adapted in numerous ways to suit various palates. Consider adding sautéed mushrooms for an earthy flavor or incorporating saffron for a luxurious twist. During seasonal variations, replace lobster with crab or scallops, bearing in mind that flavor highlights will shift with different seafood.

For dietary modifications, using coconut milk instead of heavy cream can create a dairy-free version while still maintaining creaminess. You can also switch up the aromatics by adding a touch of chili for a spicy kick or incorporate zest from citrus fruits for brightness. Presentation can be varied as well; serve it over creamy polenta for an Italian flair or alongside grilled asparagus for a fresh, vibrant side.

Serving and Presentation Guide

To create a beautifully presented dish, start with a base of your choice, such as pasta or a creamy risotto. Drizzle the Velvety Lobster Sauce generously over the top, allowing it to pool slightly on the plate. Garnishing options include finely chopped chives or parsley, adding a touch of color and freshness.

Consider using a shallow bowl for serving; it allows the sauce to be the star of the dish. Temperature is key – ensure the sauce is served warm for an inviting aroma and flavor. Portion control is also important; a small ladleful is often enough to impart plenty of flavor without overshadowing the dish.

Wine and Beverage Pairing

The rich flavors of Velvety Lobster Sauce pair beautifully with crisp white wines such as a Sauvignon Blanc, which complements the sauce’s creaminess without overpowering it. Alternatively, a light Chardonnay can enhance the buttery notes while providing a balanced acidity.

For non-alcoholic options, consider serving a sparkling water infused with lemon or cucumber, which cleanses the palate beautifully between bites. If you’re a fan of warm beverages, an herbal tea with chamomile or a light floral tea can smoothly contrast the dish’s richness. Regardless of the pairing, ensure all beverages served are chilled and refreshing for the best dining experience.

Storage and Shelf Life

When it comes to storing your Velvety Lobster Sauce, keep it in an airtight container in the refrigerator where it will last for up to three days. If you plan to store it long term, consider freezing it in portions. When freezing, use freezer-safe containers, and ensure it’s cooled to room temperature before placing it in the freezer to avoid condensation.

Signs of spoilage include off odors, discoloration, and changes in texture. For reheating, gently warm the sauce over low heat on the stovetop, stirring frequently to restore its velvety texture. Avoid using a microwave as it can cause the sauce to separate. Frozen sauce can be thawed overnight in the refrigerator, allowing it to maintain its rich flavors.

Make Ahead Strategies

For those looking to ease the cooking process, the Velvety Lobster Sauce can be made in advance. You can prepare the sauce up to two days ahead and store it in the refrigerator, allowing flavors to meld. Make sure to reheat gently to avoid curdling the cream.

If you’re cooking lobster fresh, consider cooking it a day prior and refrigerating until you’re ready to make your sauce; this can streamline your process significantly. Whole components can also be prepped separately, such as chopping aromatics or assembling the base, which will reduce time on the day of serving. Just ensure everything is well stored to maintain freshness.

Scaling Instructions

If you’re looking to adjust the recipe, halving can be straightforward; simply measure out half the amounts for each ingredient while maintaining the cooking times. When doubling or tripling the recipe, keep a close eye on the consistency of the sauce, as larger batches may require additional adjustments for liquid.

For equipment adjustments, make sure to use a larger pot to prevent overcrowding, maintaining even cooking and incorporating all ingredients smoothly. Timing could change slightly with larger quantities, so taste periodically to ensure flavors remain balanced. Proper storage techniques should also be considered for any leftovers as larger batches will yield more.

Nutritional Deep Dive

Lobster is high in protein, low in fat, making it an excellent choice for those looking for healthy meal options. Each serving delivers essential nutrients such as vitamin B12, zinc, and omega-3 fatty acids, which support cardiovascular health. Moreover, a portion of the Velvety Lobster Sauce can provide a satisfying, hearty addition to your diet without exceeding recommended daily values.

When considering portion analysis, moderation is key, as heavy cream increases caloric content. To keep it balanced, serve this sauce in appropriate portions, alongside vegetables or health-conscious sides. For those watching their weight, pairing with lighter meals can help maintain a healthy lifestyle without sacrificing flavor.

Dietary Adaptations

The Velvety Lobster Sauce can easily be adapted for various dietary restrictions. For a gluten-free version, ensure any broth used is certified gluten-free and continue using the same techniques to achieve a luxurious consistency. If you’re catering to a dairy-free audience, substituting heavy cream with coconut cream could offer a similar richness that complements the seafood beautifully.

For vegan alternatives, consider using plant-based seafood alternatives combined with coconut milk and nutritional yeast for depth. If you’re adhering to low-carb or keto diets, keep the sauce as is, as it naturally aligns with those restrictions given its high protein content. Always communicate any dietary changes clearly to guests to ensure everyone can enjoy this scrumptious sauce!

Troubleshooting Guide

If you encounter texture issues with your lobster sauce, it may be due to overcooked cream or improper emulsification. To correct it, whisk gently on low heat, adding a splash of lobster stock or cream to restore silkiness. Should your sauce taste excessively salty, consider adding a pinch of sugar or a squeeze of lemon juice to balance the flavors.

Temperature problems often arise from abrupt heat alterations; if the sauce is too hot, it may separate. Gradually adjust the heat while stirring continuously to prevent this. If you need to substitute ingredients, be aware that substitutions can alter the final flavor; always aim to use similar profiles to maintain the sauce’s delicious essence. Timing adjustments should also be made if you notice flavors aren’t integrating; take the time to let everything meld together before serving.

Recipe Success Stories

From home cooks to professional chefs, the Velvety Lobster Sauce has garnered rave reviews for its incredible taste and presentation. Many have shared their success stories online, showcasing their variations and adaptations of the recipe, which highlight creativity in using seafood alternatives or seasonal ingredients.

Readers have reported wonderful experiences hosting dinner parties centered around this sauce, frequently commenting on how it serves as the highlight of any meal. Photography enthusiasts have also taken to their social media platforms, adept at capturing the vibrant hues of the sauce, proving that great food is as much about visual appeal.

Successful adaptation stories include incorporating local ingredients or utilizing leftovers from a previous meal. These suggestions inspire others in their cooking endeavors and promote a sense of community around sharing great food experiences and enhancements.

Frequently Asked Questions

Can I make this sauce ahead of time? Yes, you can prepare the Velvety Lobster Sauce a day or two in advance, refrigerate it, and gently reheat it before serving to allow the flavors to meld for an even richer taste.

Can I substitute lobster with another seafood? Absolutely! While lobster provides a unique flavor, shrimp, crab, or scallops can also work beautifully in this sauce while retaining similar textures.

How do I thicken my lobster sauce? If your sauce is too thin, simmer it on low heat to reduce liquid or add a tablespoon of cornstarch mixed with water to thicken it. Remember to whisk continuously for even consistency.

What should I serve this sauce with? This sauce pairs wonderfully with pasta, grilled fish, or steamed vegetables, enhancing the flavor profiles of your chosen dish spectacularly.

Is this lobster sauce gluten-free? Yes, the Velvety Lobster Sauce is naturally gluten-free. Just ensure any broth or additional ingredients used are gluten-free certified.

Can I freeze the lobster sauce? While it’s best enjoyed fresh, you may freeze the sauce in airtight containers for up to three months. Thaw and gently reheat to restore its texture and flavor.

What herbs work best in this recipe? Fresh herbs like tarragon, parsley, or chives complement the lobster’s sweetness beautifully, enhancing both flavor and presentation.

Is there a vegetarian option for this sauce? While traditionally made with lobster, you can create a rich sauce by using mushroom stock and sautéing a blend of herbs and vegetables for a delicious alternative.

How spicy is this sauce? This recipe is not spicy, but you can add a pinch of red pepper flakes for a bit of heat if you’d like to customize your sauce.

Can I use leftover lobster to make this sauce? Yes, leftover lobster works great! Just make sure to add it in at the end to prevent overcooking.

Additional Resources

If you enjoyed creating the Velvety Lobster Sauce, consider exploring other seafood recipes such as Shrimp Alfredo or Crab Carbonara to expand your culinary repertoire. Technique guides focusing on making seafood sauces or mastering emulsifications can also deepen your skill set in the kitchen.

For ingredient information, look into sourcing fresh seafood, which not only enhances flavor but supports local fishers. Equip yourself with information about essential kitchen gadgets that can aid in seafood preparation to ensure a seamless cooking experience.

Seasonal variations can introduce freshness to your meals; try incorporating summer vegetables or herbs that complement the Velvety Lobster Sauce for a more vibrant dish. Adapting recipes to match your tastes can create endless opportunities for culinary adventures in your kitchen!

Join the Conversation

We invite you to share your own experiences making the Velvety Lobster Sauce and any unique adaptations you’ve tried! Engage with our community through our social media channels by sharing your photos and feedback using our dedicated hashtags.

If you’ve made this sauce, please consider leaving a review or commenting on your favorite elements. Your suggestions could inspire others to try their hand at this gourmet delicacy. Let’s build a community of home cooks who are excited to explore the world of flavors together — we can’t wait to hear your stories!

The Recipe

Velvety Lobster Sauce

Serves: 4

Prep Time: 20 mins

Cook Time: 30 mins

Total Time: 50 mins

Kitchen Equipment Needed

  • Sturdy saucepan
  • Whisk
  • Cooking spatula
  • Cutting board
  • Knife

Ingredients

  • 2 fresh lobsters (about 1.5 pounds each)
  • 4 tablespoons unsalted butter
  • 2 shallots, finely chopped
  • 2 cloves garlic, minced
  • 1 cup heavy cream
  • 1/2 cup lobster stock
  • Salt and pepper to taste
  • Fresh herbs, for garnish (parsley or chives)

Directions

  1. Begin by cooking the lobsters in boiling water, following the recommended cooking time based on their weight. Once cooked, remove the lobster meat and chop into bite-sized pieces.
  2. In a saucepan, melt the butter over medium heat. Add the chopped shallots and garlic, sautéing until translucent and fragrant.
  3. Pour in the lobster stock and bring to a gentle simmer, allowing it to reduce by half. This intensifies the flavor of your sauce.
  4. Lower the heat and stir in the heavy cream, carefully whisking to combine until the sauce thickens to your desired consistency.
  5. Add the reserved lobster meat to the sauce, seasoning with salt and pepper to taste. Allow it to warm through for a few minutes without boiling.
  6. Serve the sauce over your choice of pasta, seafood, or vegetables, garnished with fresh herbs for a vibrant touch.

Recipe Notes

  • You can replace the lobster in this recipe with shrimp or crab if desired. Adjust cooking times accordingly.
  • For a lighter version, consider using half-and-half instead of heavy cream.
  • This sauce can be prepared ahead of time and reheated gently before serving.

Delicious Herb-Infused Chicken with Zesty Lemon Orzo Recipe

Herb-Infused Chicken with Lemon Orzo: A Flavorful Escape

⚖️
Difficulty
Moderate

⏲️
Prep Time
15 mins

🕒
Cook Time
30 mins

⏱️
Total Time
45 mins

🍽️
Servings
4

Get ready to elevate your dinner game with this Herb-Infused Chicken with Lemon Orzo recipe. This dish combines the tender flavors of herb-marinated chicken with vibrant, zesty lemon orzo, creating a dish that not only satisfies your hunger but also delights your senses. Imagine succulent chicken breasts infused with fragrant herbs, perfectly complemented by fluffy orzo pasta laden with the brightness of fresh lemon. It’s a harmonious blend that promises to impress your family and friends alike, making it a go-to for any dinner table.

As you prepare this dish, the aroma of fresh herbs wafts through your kitchen, inviting everyone to gather around the table. The colors of the dish, with the golden-brown chicken and the gleaming yellow orzo, create a visual feast ready to be enjoyed. Every bite combines tender chicken with the delightful chewiness of orzo, all bolstered by the fresh zing of lemon. Whether it’s a weekday meal or a weekend dinner party, this recipe will surely become a favorite in your culinary repertoire.

Quick Recipe Highlights

  • Flavor Profile: This recipe features a fragrant bouquet of herbs that infuses the chicken, while the lemon orzo delivers a bright, zesty finish.
  • Texture: Expect juicy, tender chicken paired with a light yet hearty orzo, providing a delightful contrast in each bite.
  • Aroma: The enticing scent of garlic and fresh herbs permeates the air, making the cooking experience even more enjoyable.
  • Visual Appeal: Presented beautifully, the golden chicken contrasts radiantly with the vibrant creamy orzo, making it a showstopper.
  • Skill Level Needed: A moderate skill set is required for this recipe, involving marinating, searing, and intricate cooking techniques.
  • Special Equipment: All you need are standard kitchen tools, including a skillet and pot to cook the chicken and orzo respectively.

Recipe Overview

  • Difficulty Level: This dish is rated as moderate because it involves several cooking techniques, but with careful attention, anyone can master it.
  • Category: Perfect for a comforting family meal or an elegant dinner party, this recipe fits well into the main course category.
  • Cuisine: This dish draws inspiration from Mediterranean cuisine, famous for its use of fresh herbs, olives, and citrus flavors.
  • Cost: With easily accessible ingredients, the total cost of making this meal is budget-friendly, typically under $20.
  • Season: Ideal for spring and summer seasons when fresh herbs are abundant, making this dish burst with flavor.
  • Occasion: It’s perfect for family dinners, gatherings, or special occasions where you want to impress your guests.

Why You’ll Love This Recipe

The appeal of Herb-Infused Chicken with Lemon Orzo lies in its delightful taste and texture. Each bite is a culmination of freshly marinated chicken, seasoned to perfection, delivering robust flavor. The orzo adds a chewy texture that beautifully complements the tender chicken. You’ll love how this recipe harmoniously blends bright and earthy notes, transforming a simple dinner into a gourmet experience.

This recipe is also highly convenient, allowing for quick preparation and cooking, making it suitable for busy nights. The marination can be done in advance, and with just 30 minutes of cooking, a satisfying dish is ready in no time. It’s ideal for those evenings when you crave something impressive yet uncomplicated.

Nutritionally, this dish is a winner as it balances lean protein from the chicken with carbohydrates from the orzo, rounded out by vitamins from fresh herbs and lemon. This creates a well-rounded meal that supports a healthy lifestyle while tantalizing the taste buds.

Additionally, Herb-Infused Chicken with Lemon Orzo shines in social settings. Its vibrant colors and delightful aroma make it appealing for gatherings, inviting conversations as guests share their admiration for the dish. Serving it family-style can further enhance the communal dining experience, bringing everyone together.

Lastly, this dish is accessible in terms of cost and preparation. The ingredients are commonly found, and the steps are straightforward. You can easily adjust the recipe and create abundance by simply increasing the quantities, all while fitting your budget — making it not only delicious but practical as well.

Historical Background and Cultural Significance

The origins of herb-infused dishes can be traced back to ancient times when the use of herbs was vital for preservation and enhancing flavors. Herbs like rosemary, thyme, and parsley have long been staples in Mediterranean cooking, valued not only for their flavor but also their health benefits. This recipe embodies such rich traditions that have influenced culinary practices across the globe.

Culturally, Mediterranean cuisine is characterized by vibrant flavors, using fresh ingredients in innovative ways. Meals are centered around social dining, highlighting the importance of sharing and celebration. Preparing herb-infused chicken resonates with these values by encouraging collaboration in the kitchen and shared enjoyment at the table.

Over time, this recipe has evolved but remains a celebration of simplicity and freshness. Variations may include different herbs or cooking methods, showcasing regional preferences while preserving the dish’s essence. Such adaptations demonstrate the recipe’s flexibility while honoring its historic roots.

Different regions may add unique twists to reflect local ingredients, showcasing the diversity of flavors within Mediterranean cuisine. Each variant tells its own story, influenced by geography, culture, and seasonal availability of ingredients, making herb-infused chicken a dish that connects people through diverse culinary traditions.

Ingredient Deep Dive

Chicken is the star of this dish, providing a lean source of protein crucial for muscle repair and overall health. It’s important to choose quality chicken that is fresh and free of additives. When selecting chicken, look for a vibrant pink color, avoid any discoloration, and ensure that it feels firm to the touch. Proper storage involves refrigerating raw chicken or freezing it if you don’t plan to use it within a couple of days. For variety, feel free to substitute chicken with turkey or tofu for a different protein option.

Orzo, a type of pasta, is not only versatile but it also adds a hearty element to the dish. Made from durum wheat, it provides complex carbohydrates, promoting sustained energy. Choosing whole-grain orzo enhances the nutritional profile significantly. When shopping for orzo, look for brands that use high-quality grains, and when storing, keep it in an airtight container to maintain freshness. Orzo can also be exchanged with quinoa or rice for gluten-free options.

Common Mistakes to Avoid

  • Not marinating the chicken long enough: Ensure at least 30 minutes to absorb flavors fully, ideally overnight.
  • Overcooking the chicken: Use a meat thermometer to achieve the perfect doneness, ideally 165°F.
  • Skipping the resting time: Let the chicken rest post-cooking to retain its juices.
  • Adding lemon juice too early: This can cook the chicken; put it in the orzo just before serving.
  • Using low-quality herbs: Fresh herbs elevate the dish significantly; opt for the best you can find.
  • Cooking orzo in too little water: Ensure plenty of water so the pasta doesn’t stick.
  • Not seasoning during cooking: Layer flavors by seasoning both the chicken and orzo adequately.
  • Neglecting to taste as you go: Always sample throughout for seasoning adjustments.
  • Being inconsistent with ingredient sizes: Cut vegetables and chicken uniformly for even cooking.
  • Ignoring presentation: A beautiful presentation enhances the overall appeal of the meal.

Essential Techniques

Marinating chicken is vital for infusing flavor. Ensure the marinade has an acidic component, like lemon juice or vinegar, to tenderize the meat and enhance its taste. Allow sufficient time for the marinade to work its magic, and avoid overcrowding the bag or container to ensure even flavor distribution. A common pitfall is skipping this step, which can lead to bland chicken; use a sealed container to maximize flavor absorption.

Cooking the orzo requires precision; make sure to follow package instructions regarding water ratios and cooking time. Stirring occasionally prevents sticking and ensures even cooking. Be mindful of overcooking, resulting in mushy pasta. Pay attention to the clock and the texture for perfect al dente orzo that retains a pleasing bite.

Pro Tips for Perfect Herb-Infused Chicken with Lemon Orzo

1. Use fresh herbs whenever possible; they provide more flavor than dried ones, enhancing the overall taste of the dish.

2. Sear the chicken for a golden crust, which adds depth of flavor and visual appeal to your plate.

3. Incorporate a splash of white wine into the orzo for an added layer of richness and complexity.

4. Consider adding sautéed vegetables to your orzo for a colorful, nutritious boost.

5. Taste your dish at various stages, adjusting seasoning and acidity as needed to achieve that perfect balance.

6. Pair your herb-infused chicken with a simple salad drizzled with olive oil and lemon to complement the flavors.

7. When plating, sprinkle additional fresh herbs and lemon zest for an added burst of freshness.

8. Experiment with different herbs, such as cilantro or basil, for a unique twist on the traditional flavors.

Variations and Adaptations

To suit different tastes, consider regional variations such as incorporating saffron, frequently used in Mediterranean dishes for an earthy, aromatic profile. Seasonal adaptations can include adding fresh peas or asparagus in spring for a vibrant touch. For dietary needs, you could try gluten-free orzo or substitute chicken for chickpeas or lentils, making it vegetarian-friendly. Additionally, flavoring the dish differently with spices such as smoked paprika or curry can lead to delightful outcomes. Texture modifications may include incorporating toasted nuts for a crunch or using a cream-based sauce for a richer alternative, along with different presentation styles to keep it exciting.

Serving and Presentation Guide

Plating your Herb-Infused Chicken with Lemon Orzo elegantly makes all the difference. Use a large platter to group the chicken and orzo together, ensuring vibrant colors are prominent. Garnish with freshly chopped herbs and a sprinkle of lemon zest to brighten the visual. Include lemon wedges around the plate or for guests to finish their plates with a fresh squeeze. Traditional accompaniments include a light salad or a side of grilled vegetables, elevating the meal into a delightful feast.

Wine and Beverage Pairing

When pairing wine with Herb-Infused Chicken with Lemon Orzo, a crisp white wine, such as Sauvignon Blanc or Pinot Grigio, works beautifully, complementing the citrus notes of the dish. For those preferring non-alcoholic alternatives, consider serving sparkling water with a wedge of lemon for an effervescent touch. If coffee or tea is more your style, a herbal tea can be a calming finish to a flavorful meal while keeping the palate refreshed.

Storage and Shelf Life

For effective storage, allow any leftovers to cool down before transferring to an airtight container. Refrigerate promptly and consume within 3-4 days for optimal freshness. Signs of spoilage include off odors or discoloration. For longer storage, this dish can be frozen; ensure it is kept in moisture-proof containers. When reheating, do so gradually in the oven or microwave to prevent drying out, adding a splash of broth or water can help maintain moisture and texture.

Make Ahead Strategies

Preparation can be streamlined by marinating the chicken the night before, allowing the flavors to meld beautifully. Pre-cook the orzo in advance and store it in the refrigerator, mixing in some olive oil to prevent sticking. You can also prep any fresh herbs and vegetables to ensure a quick assembly on cooking day. When reheating, add fresh herbs or a squeeze of lemon to revive the flavors and brightness of the dish, making it feel freshly made.

Scaling Instructions

For smaller servings, halving the recipe is straightforward; use smaller chicken cuts for even cooking. Doubling or tripling is equally easy, just make sure to space out the chicken in a larger skillet to ensure an even sear. Pay attention to timing as larger quantities may require a bit more cooking time. When scaling, ensure that the seasoning is adjusted properly to maintain flavor balance throughout the dish.

Nutritional Deep Dive

This recipe boasts a balanced nutritional profile. The chicken delivers lean protein contributing to muscle maintenance, while the orzo offers energy-boosting complex carbohydrates. Rich in essential vitamins from the assortment of herbs, the dish supports overall health. Watching portion sizes can effectively contribute to weight management without sacrificing enjoyable flavors. For a moderate calorie count, this meal provides generous servings without surpassing daily nutritional allotments.

Dietary Adaptations

For gluten-free adaptations, replace orzo with quinoa or rice, maintaining the essence of the dish. Those on dairy-free diets can skip any cheese garnishes and still enjoy the aromatic flair of the herbs. For a vegan version, swap the chicken for grilled portobello mushrooms or chickpeas, ensuring you keep the delightful scents and flavors alive with herbs. Low-carb variations can use cauliflower rice to retain the orzo’s texture while cutting down on carbs. Each of these adaptations allows for a delicious, personalized touch while respecting dietary needs.

Troubleshooting Guide

If your chicken is dry, ensure you’re not overcooking and that resting time is respected. Undercooked chicken is a common concern, easily addressed by checking internal temperatures. For overly salty orzo, add a small amount of sugar to balance the flavors. If your dish lacks flavor, consider adjusting the seasoning throughout the cooking process, especially with fresh herbs added last. Troubles with equipment can often be resolved by using the right tools; a good pot can make all the difference in achieving that desired tenderness.

Recipe Success Stories

Readers have sung praises for this recipe, highlighting its versatility and ease. Many have shared their spin on the dish, incorporating local flavors and seasonal ingredients to make it their own. Adaptations have ranged from using wild mushrooms instead of chicken to adding unique spices that reference their heritages. Suggestions to enhance the dish through presentation tips, such as serving on colorful plates or utilizing edible flowers, have sparked creativity among community members. These individual successes showcase the recipe’s flexibility and appeal, inviting everyone into the kitchen to experiment.

Frequently Asked Questions

Can I use frozen chicken for this recipe?
It’s best to use fresh chicken, but if you must use frozen, ensure it’s thawed completely before marinating and cooking.

How can I make this dish spicier?
Add a pinch of red pepper flakes to the chicken marinade or serve with a spicy condiment on the side.

Is there a low-carb substitute for orzo?
Absolutely! You can use riced cauliflower or spiralized zucchini to create a lower-carb version that still feels hearty.

What herbs work best for marinating chicken?
Fresh thyme, rosemary, and parsley are excellent choices, but feel free to experiment with others based on personal taste.

Can I prepare this meal in advance?
Yes! You can marinate the chicken and cook the orzo a day ahead, keeping them separate until it’s time to serve.

What sides pair well with this dish?
A light salad or grilled vegetables complement the flavors perfectly, adding color and freshness to the meal.

Can I make this dish in a slow cooker?
While it can be done, adjust cooking times accordingly; add orzo towards the end to prevent it from becoming mushy.

Is there a vegetarian version of this dish?
Absolutely! Replace chicken with chickpeas or grilled eggplant for a delicious vegetarian take.

What is the best way to store leftovers?
Store in an airtight container in the fridge for up to four days, or freeze for longer storage, reheating thoroughly before consuming.

Does the cooking time change with different chicken cuts?
Yes, thighs and drumsticks may take longer than breasts; always check for internal temperature to ensure proper doneness.

Additional Resources

For those interested in expanding their culinary repertoire, check out related recipes such as Mediterranean Quinoa Salad or Grilled Vegetable Skewers. Technique guides on marinating meat and cooking pasta will also elevate your kitchen skills, as does familiarizing yourself with ingredient profiles for better meal planning. Don’t forget to explore equipment recommendations—it’s proven that the right tools make a significant difference in kitchen efficiency and results.

Join the Conversation

We invite you to share your experiences with this Herb-Infused Chicken with Lemon Orzo recipe on social media! Tag your photos and variations using #[RecipeName] to connect with other food enthusiasts. We love hearing feedback and recipe reviews, so leave your thoughts in the comments. Your creativity is essential in keeping the conversation alive, inspiring others to embark on their culinary adventures.

The Recipe

Herb-Infused Chicken with Lemon Orzo

Serves: 4

Prep Time: 15 mins

Cook Time: 30 mins

Total Time: 45 mins

Kitchen Equipment Needed

  • Skillet
  • Pot for orzo
  • Meat thermometer
  • Mixing bowl for marinating

Ingredients

  • 4 chicken breast fillets
  • 1 cup orzo pasta
  • 2 tablespoons olive oil
  • Juice of 1 lemon
  • 1 teaspoon dried oregano
  • 1 teaspoon dried thyme
  • 3 cloves garlic, minced
  • Salt and pepper to taste
  • Fresh parsley for garnish

Directions

  1. In a mixing bowl, combine olive oil, lemon juice, oregano, thyme, garlic, salt, and pepper to create the marinade.
  2. Add the chicken breasts to the marinade and let it sit for at least 30 minutes.
  3. While the chicken marinates, bring a pot of salted water to a boil and cook the orzo according to package instructions. Drain and set aside.
  4. Heat a skillet over medium-high heat. Remove the chicken from the marinade and add it to the skillet.
  5. Cook the chicken for about 6-7 minutes on each side until it reaches an internal temperature of 165°F.
  6. Add the cooked orzo to the skillet, stirring in any remaining marinade to coat the pasta.
  7. Serve hot, garnished with fresh parsley and lemon zest.

Recipe Notes

  • For best results, marinate the chicken overnight.
  • Feel free to add seasonal vegetables to the orzo for a nutritional boost.
  • Leftovers can be stored in the fridge for up to 4 days.

15-Minute Shrimp Scampi: Quick, Easy, and Delicious

quick shrimp scampi, garlic butter shrimp, lemon shrimp scampi, easy shrimp pasta recipe, 15-minute seafood dinner

15-Minute Shrimp Scampi: A Quick, Flavorful Dinner Solution

Introduction

15-Minute Shrimp Scampi is a quick and effortless dish bursting with buttery, garlicky, and citrusy flavors. Perfect for busy weeknights, this recipe is a crowd-pleaser that doesn’t compromise on taste. Whether served over pasta, with crusty bread, or alongside a light salad, shrimp scampi adapts beautifully to any occasion. For another quick weeknight favorite, check out the recipe for 20-Minute Lemon Pasta, which pairs wonderfully with this dish.

This recipe’s simplicity makes it a favorite for those looking to elevate their dinner game with minimal effort. Its light, zesty sauce complements a variety of side dishes, such as Garlic Butter Breadsticks or Honey Garlic Butter Roasted Carrots. Let’s dive into this quick and delicious recipe.


Ingredients and Tools

Ingredients

  • For the Scampi Sauce:
    • 3 tablespoons butter
    • 2 tablespoons olive oil
    • 4 garlic cloves, minced
    • ½ cup white wine (or chicken broth for a non-alcoholic version)
    • 2 tablespoons fresh lemon juice
  • For the Shrimp:
    • 1 pound large shrimp, peeled and deveined
    • ½ teaspoon red pepper flakes (optional)
    • Salt and freshly cracked black pepper to taste
  • Optional Garnishes:
    • Fresh parsley, chopped
    • Grated Parmesan cheese

Tools Needed

  • A large skillet
  • Tongs or a spatula
  • Lemon zester

Step-by-Step Instructions

1. Preparing the Shrimp

  • Start by peeling and deveining your shrimp. Remove the tails if desired.
  • Toss the shrimp in a light seasoning of salt, pepper, and a drizzle of olive oil.

2. Making the Scampi Sauce

  • Heat butter and olive oil in a large skillet over medium heat.
  • Add the minced garlic and sauté until fragrant (about 1 minute).
  • Pour in the white wine or chicken broth, and allow the liquid to reduce slightly.

3. Cooking the Shrimp

  • Place the shrimp into the skillet in a single layer.
  • Cook each side for 2–3 minutes until the shrimp turns pink and opaque. Avoid overcooking to preserve texture.

4. Bringing It All Together

  • Add lemon juice and red pepper flakes for a hint of spice.
  • Sprinkle freshly chopped parsley and Parmesan cheese over the shrimp before serving.

For a similar quick and versatile dish, explore Crispy Popcorn Shrimp, which makes an excellent appetizer or snack.


Serving Suggestions

Pairing Options

  • Toss shrimp scampi with linguine, spaghetti, or angel hair pasta for a complete meal.
  • Serve with Garlic Butter Breadsticks for a comforting side.

Creative Presentations

  • Serve in a shallow dish with lemon wedges and a sprinkle of parsley for a restaurant-quality look.
  • Pair with a glass of crisp Sauvignon Blanc or a sparkling water infused with lemon.

Customizations and Variations

Flavor Variations

  • Add cherry tomatoes or spinach for a pop of color and added nutrients.
  • Substitute shrimp with scallops or chicken for a different protein option.

Dietary Adjustments

  • Gluten-Free: Use gluten-free pasta or serve over zucchini noodles.
  • Dairy-Free: Replace butter with a plant-based alternative.

Creative Add-Ons

  • Top with toasted breadcrumbs for an added crunch.
  • Mix in capers for a tangy twist.

Storage and Reheating

Storage Tips

  • Store leftover shrimp scampi in an airtight container in the refrigerator for up to 3 days.

Reheating Instructions

  • Reheat gently in a skillet over low heat, adding a splash of broth to maintain the sauce’s consistency.

FAQs

  1. Can I use frozen shrimp?
    Absolutely. Thaw them overnight in the fridge or under cold running water before use.
  2. What’s a good substitute for white wine?
    Chicken broth or a splash of lemon juice works well.
  3. How do I prevent shrimp from overcooking?
    Cook just until the shrimp turns pink and opaque—overcooking makes them rubbery.
  4. Can I prepare the sauce ahead of time?
    Yes, the sauce can be made in advance and reheated when ready to cook the shrimp.
  5. What pasta works best with shrimp scampi?
    Linguine, spaghetti, or angel hair pasta pairs beautifully with the light and flavorful sauce.

Internal Linking Opportunities


External Links

  1. Simply Recipes Shrimp Scampi
    Anchor Text: “Simply Recipes’ Quick Shrimp Scampi”
  2. Skinnytaste Light Shrimp Scampi
    Anchor Text: “Skinnytaste’s Skinny Shrimp Scampi”
  3. The Pioneer Woman Shrimp Scampi
    Anchor Text: “The Pioneer Woman’s Classic Shrimp Scampi Recipe”

Conclusion

With its quick preparation and delicious flavors, 15-Minute Shrimp Scampi is a must-try for busy individuals looking to elevate their dinner. Pair it with Garlic Butter Breadsticks and 20-Minute Lemon Pasta for a complete meal that’s as impressive as it is easy to make. Let this recipe become your new go-to for weeknight dinners or casual gatherings!

Delicious Zesty Lemon Butter Fish Fillet Recipe for Perfect Dining

Zesty Lemon Butter Fish Fillet: A Bright and Flavorful Dish

⚖️
Difficulty
Easy

⏲️
Prep Time
10 mins

🕒
Cook Time
15 mins

⏱️
Total Time
25 mins

🍽️
Servings
4

Lemon Butter Fish Fillet is a delightful dish that combines the freshness of zesty lemon with the richness of butter, resulting in a symphony of flavors that dance on your palate. This recipe showcases tender fish fillets cooked to perfection, enveloped in a luscious sauce that enhances the natural taste of the fish. The vibrant citrus notes not only brighten up the dish but also evoke a sense of warmth and comfort. Whether you’re new to cooking or a seasoned chef, this recipe is perfect for impressing your family or guests with minimal effort.

Imagine the aroma wafting through your kitchen as the fish cooks. The zesty lemon and melted butter create a fragrant blend that invites everyone to the table. Each bite delivers a perfect balance of creaminess and acidity, making it an irresistible choice for any occasion. Pair this dish with a fresh salad or steamed vegetables for a wholesome meal that is both satisfying and refreshing.

Quick Recipe Highlights

  • Flavor Profile: Bright lemon acidity balances the richness of butter, complemented by delicate fish flavor.
  • Texture: The fish fillets are flaky and tender, while the buttery sauce has a smooth, silky mouthfeel.
  • Aroma: A heavenly mix of zesty citrus and savory butter that entices your senses.
  • Visual Appeal: The fish is beautifully golden with a glossy lemon butter sauce that glistens and invites you to dig in.
  • Skill Level Needed: This easy recipe requires basic cooking skills, making it accessible for all home cooks.
  • Special Equipment: A non-stick skillet is essential for even cooking and preventing the fish from sticking.

Recipe Overview

  • Difficulty Level: This is an easy recipe that caters to all skill levels, making it an ideal choice for weeknight dinners or special occasions.
  • Category: This Zesty Lemon Butter Fish Fillet falls under main courses, perfect for a light lunch or a hearty dinner.
  • Cuisine: Inspired by classic Mediterranean flavors, this recipe brings together the freshness of seafood with vibrant citrus herbs.
  • Cost: Ingredients such as fish fillets and citrus are relatively affordable, making this an economical choice for a meal.
  • Season: This dish shines in spring and summer when fresh fish and local produce are abundant.
  • Occasion: Perfect for family dinners, gatherings, or special romantic evenings at home.

Why You’ll Love This Recipe

Taste and texture appeal: The combination of buttery goodness with zesty lemon elevates the fish, making each bite a burst of flavors. The rich texture of the fish contrasts wonderfully with the lightness of the sauce, creating a pleasurable dining experience.

Convenience and preparation benefits: This recipe requires minimal prep time and uses readily available ingredients, making it an excellent option for busy nights when you still want a gourmet meal without the hassle.

Nutritional advantages: Fish is known for being a great source of lean protein and omega-3 fatty acids, promoting heart health. This recipe integrates healthy fats via butter without being overly indulgent.

Social and entertaining value: The beautiful presentation makes this dish an impressive centerpiece for any dinner. Easy to prepare in large batches, it’s perfect for entertaining or family gatherings.

Cost-effectiveness and accessibility: Most ingredients can be found in any grocery store, and the overall cost of this dish is low, making it accessible for all families without compromising on flavor or quality.

Historical Background and Cultural Significance

The origins of preparing fish with butter and citrus trace back to coastal regions where seafood remains a staple in the diet. Cooks have long recognized that citrus not only enhances flavors but also preserves the freshness of fish.

In Mediterranean cuisine, lemon is a traditional accompaniment to various seafood dishes. Its acidity can cut through rich flavors, making it a perfect match for butter. Over the years, this culinary tradition evolved, creating numerous adaptations that celebrate seafood.

The Zesty Lemon Butter Fish Fillet represents a blend of simple cooking approaches and elegant presentation. It showcases how humble ingredients can transform into exquisite tastes, making seafood accessible for many.

Regional variations of this dish include diverse cooking styles and additional spices, integrating local flavors that showcase the cultural richness of coastal communities around the world.

Ingredient Deep Dive

Fish Fillet: Fish has been a fundamental part of diets in many cultures due to its accessibility and nutritional benefits. Choosing fresh, high-quality fillets is key—look for clear eyes and a mild aroma. Store fish in the coldest part of the refrigerator and consume it within two days for optimal freshness. Substitutes include chicken or tofu for different protein profiles.

Lemon: This vibrant citrus fruit is celebrated for its refreshing acidity and versatility in cooking. Rich in vitamin C, lemons contribute to a healthy diet. When selecting lemons, choose ones that feel heavy for their size and have a bright, smooth skin. Store them at room temperature or in the fridge for longer shelf life.

Butter: A staple in many cuisines, butter adds richness and flavor to dishes. Opt for unsalted butter for better control over seasoning. Store butter in the refrigerator and use it within a month for the best taste. For a dairy-free alternative, consider using olive oil or plant-based butter.

Common Mistakes to Avoid

  • Not drying the fish: Ensuring the fish is dry before cooking helps achieve a beautiful sear, preventing it from steaming in the pan.
  • Overcooking the fish: Fish can dry out quickly; pay close attention to cooking times and use a thermometer for best results.
  • Ignoring seasoning: Always season the fish and sauce adequately to enhance flavors; taste as you go.
  • Using low-quality fish: The quality of the fish significantly influences the dish; always opt for the freshest option available.
  • Skipping the pre-heating step: Ensure your skillet is hot enough before adding the fish for a perfect cook and color.
  • Lemon juice in advance: Squeezing lemon juice too early can lead to bitterness; add it just before serving.
  • Cooking with too much heat: Cooking at too high a temperature can burn the butter, leading to an unpleasant taste.
  • Not pairing with sides: Enhance the dish by carefully selecting sides that complement the flavors, such as roasted vegetables or grains.

Essential Techniques

Perfectly Searing Fish: Achieving a perfect sear on fish is vital for flavor and texture. Start with a hot pan and ensure the fillets have space to cook evenly. Use a spatula to flip only once for a lovely crust.

Making Lemon Butter Sauce: To create a flavorful sauce, melt butter and add lemon juice at the right moment. Whisk to incorporate flavors and avoid burning the butter by managing the heat effectively.

Pro Tips for Perfect Zesty Lemon Butter Fish Fillet

Use fresh herbs like parsley or dill for garnish; they add color and freshness. Enhance the butter sauce with a dash of white wine to elevate flavors. Experiment with adding minced garlic for an aromatic twist. Keep the fish fillets at room temperature for about 15 minutes before cooking to promote even cooking. Always taste and adjust seasoning in your sauce, ensuring a well-balanced finish. Serve immediately after cooking for the best texture and taste.

Variations and Adaptations

You can adapt this recipe by using different fish varieties, such as salmon or trout, to introduce new flavors. Seasonal adaptations include adding fresh summer herbs or vegetables to brighten the dish. For dietary modifications, consider a low-carb version by serving it with a salad instead of grains.

If you want to enhance flavor variations, try incorporating spices like paprika or cumin into the butter sauce. For texture modifications, you can also sauté vegetables alongside the fish for a one-pan meal. Presentation can be playful by serving on a bed of wilted spinach or alongside colorful cherry tomatoes.

Serving and Presentation Guide

When plating your Zesty Lemon Butter Fish Fillet, consider using a white plate to emphasize the vibrant colors of the dish. Garnish with fresh herbs and a lemon wedge for a pop of color. Pair with seasonal greens for added freshness and create height by layering ingredients.

For a sophisticated touch, drizzle the lemon butter sauce artfully around the plate. Serve with crusty bread to soak up the delicious sauce. Consider temperature factors; serve the fish immediately for the best experience, ensuring it remains warm.

Wine and Beverage Pairing

Pair this dish with crisp, white wines like Sauvignon Blanc or Chardonnay, which compliment the zesty flavors beautifully. If you’re looking for a non-alcoholic option, opt for sparkling water with a slice of lemon or herbal iced tea for refreshment.

For a more robust combination, consider pairing with a light-bodied Pinot Noir, which brings aromatic complexity without overpowering the fish. Always serve these beverages chilled to enhance the dining experience.

Storage and Shelf Life

Store any leftover fish in an airtight container in the refrigerator for up to two days. Ensure it is cooled to room temperature before sealing. Reheat gently in a skillet over low heat to avoid drying out the fish.

Signs of spoilage include an off smell or a change in color. If you need to freeze the cooked fish, wrap it tightly in plastic wrap and foil, ensuring it’s well-protected against freezer burn. It can maintain quality for up to three months.

Make Ahead Strategies

For a time-saving approach, prepare the lemon butter sauce ahead of time and store it in the refrigerator. You can also marinate the fish fillets in lemon juice and seasonings overnight for deeper flavor infusion.

Additionally, prepping sides or accompaniments beforehand streamlines the meal process. Ensure to reheat the sauce gently before serving to maintain the butter’s luscious texture, and incorporate fresh elements like herbs right before serving for optimal flavor.

Scaling Instructions

For halving the recipe, simply reduce the quantities of fish and sauce by half. If doubling or tripling, ensure your cooking pan is large enough to accommodate additional fillets without overcrowding.

Adjust cooking times by monitoring closely, as larger quantities may require slightly more time. Always select equipment appropriate to your needs, and consider seasoning adjustments based on the increased volume to maintain flavor balance.

Nutritional Deep Dive

This dish is rich in protein and essential vitamins while being moderate in fats, thanks to the butter. Fish provides important omega-3 fatty acids, promoting cardiovascular health. The lemon adds a boost of vitamin C, contributing to immune function.

Evaluate portion sizes for better weight management, and consider how this dish fits into your overall dietary goals. Combining this meal with a variety of vegetables ensures a well-rounded plate filled with essential nutrients.

Dietary Adaptations

For a gluten-free adaptation, this recipe naturally fits dietary needs, as all core ingredients are gluten-free. A dairy-free option is easily achieved by substituting butter with olive oil or a vegan butter alternative.

If you need a low-carb version, serve the fish atop a bed of sautéed greens instead of starchy sides. Other adaptations include modifying the spice profile for keto or paleo diets, allowing for broad flexibility.

Troubleshooting Guide

If your fish turns out too dry, ensure you’re monitoring the cooking time closely. Consider cooking with slightly lower heat to maintain moisture. For flavor balance issues, consider adjusting the acidity; a splash of vinegar or more lemon juice can improve taste.

If you encounter difficulties with equipment, ensure your skillet is preheated to prevent sticking. If the sauce curdles, whisk continuously over low heat until the consistency returns to creamy.

Recipe Success Stories

Home cooks have loved the simplicity and flavor profiles of this dish, often sharing adaptations and personal touches that enhance the recipe. Some readers have successfully swapped fish varieties, resulting in unique flavors that resonated well with their family and friends.

Photography enthusiasts highlight this dish’s visual appeal, showcasing the golden fillets and bright sauce on their social media accounts. Feedback reveals excitement over how quickly it can be prepared, making it a go-to for last-minute dinner plans.

Frequently Asked Questions

1. Can I use frozen fish for this recipe?
Yes, frozen fish works well, but make sure to thaw it completely and dry it well before cooking to avoid excess moisture.

2. What type of fish is best for this recipe?
White fish such as cod, tilapia, or haddock are great choices due to their mild flavor and flaky texture.

3. Can I add other herbs to the sauce?
Absolutely! Fresh herbs like thyme or basil can be a wonderful addition to enhance the flavor profile of the sauce.

4. Is this recipe suitable for meal prep?
Yes, you can prepare the sauce in advance and store it. However, it’s best to cook the fish fresh to maintain its texture.

5. How can I tell when the fish is done cooking?
The fish should be opaque and flake easily with a fork. Using a food thermometer, it should reach an internal temperature of 145°F (63°C).

6. What sides pair well with this dish?
Light sides like a mixed green salad, steamed asparagus, or even a quinoa pilaf complement the fish nicely.

7. Can I make this recipe gluten-free?
Yes, this dish is naturally gluten-free! All ingredients are free from gluten, making it a safe choice.

8. What can I use instead of butter?
You can substitute olive oil or a vegan alternative to keep the dish dairy-free.

9. Does the lemon butter sauce can be made in advance?
Yes, you can prepare the lemon butter sauce ahead of time and store it in the refrigerator. Reheat gently before serving.

10. Can I use a different type of citrus?
Yes, you can experiment with lime or orange juice for a different flavor profile while maintaining the same basic recipe.

Additional Resources

If you enjoy this Zesty Lemon Butter Fish Fillet, you might also like our recipes for Garlic Herb Shrimp or Mediterranean Grilled Salmon, which highlight similar flavors. For technique guides, explore our sections on perfecting searing fish or mastering butter sauces to boost your culinary skills.

Consult our ingredient information for tips on selecting the freshest seafood and maintaining quality in your kitchen. Embrace seasonal variations by incorporating fresh produce with each meal, enhancing your dishes alongside the fish.

Join the Conversation

We invite you to share your experiences with this Zesty Lemon Butter Fish Fillet! Post your creations on social media and tag us to feature your delightful dishes. Engage with our community by leaving your reviews, sharing photography tips, and suggesting your variations of the recipe.

Your valuable input helps others make delicious choices and discover new ways to enjoy this recipe. Together, let’s celebrate cooking and the wonderful experiences it brings to our tables.

The Recipe

Zesty Lemon Butter Fish Fillet

Serves: 4

Prep Time: 10 mins

Cook Time: 15 mins

Total Time: 25 mins

Kitchen Equipment Needed

  • Non-stick skillet
  • Spatula
  • Measuring cups and spoons
  • Whisk
  • Citrus juicer

Ingredients

  • 4 fish fillets (cod or tilapia)
  • 1/2 cup unsalted butter
  • 1/4 cup fresh lemon juice
  • Zest of 1 lemon
  • Salt and pepper to taste
  • Fresh parsley for garnish

Directions

  1. Heat the non-stick skillet over medium-high heat.
  2. Season the fish fillets with salt and pepper on both sides.
  3. Add butter to the skillet, allowing it to melt and foam slightly.
  4. Carefully add the fish fillets skin-side down and cook for 4-5 minutes.
  5. Flip the fillets gently and cook for another 4-5 minutes until cooked through.
  6. Reduce heat, add lemon juice and zest, stirring to combine with the melted butter.
  7. Remove from heat and garnish with fresh parsley before serving.

Recipe Notes

  • Feel free to substitute the fish with your preferred variety.
  • For added flavor, include minced garlic when melting the butter.
  • Serve immediately with your choice of sides for the best experience.

Homemade Sopapilla Recipe: Sweet, Crispy, and Irresistible

sopapillas recipe, easy sopapilla recipe, crispy fried pastry, New Mexican sopapillas, traditional sopapillas

Homemade Sopapilla Recipe: A Sweet Delight from Your Kitchen

Introduction

Homemade sopapillas are a golden, puffy pastry with a crisp texture and a soft, hollow center. Originating from New Mexico, these treats have become a staple for both sweet and savory dishes. Drizzle them with honey, sprinkle with powdered sugar, or serve them alongside your favorite savory fillings for a versatile dish that’s sure to impress. Pair them with Cinnamon Roll Cake with Cream Cheese Glaze for a decadent dessert spread.

This guide will walk you through the process of making sopapillas, offering tips for perfect results, variations for different flavors, and storage advice. For another fried pastry recipe, explore Crispy Fried Cheesecake Bites to expand your repertoire.


Ingredients and Tools

Ingredients

  • Dry Ingredients:
    • 3 cups all-purpose flour
    • 2 teaspoons baking powder
    • 1 teaspoon salt
  • Wet Ingredients:
    • 1 ¼ cups warm water
    • Neutral oil (vegetable or canola) for frying
  • Optional Toppings:
    • Honey
    • Powdered sugar
    • Cinnamon sugar
    • Chocolate sauce

Tools Needed

  • Rolling pin
  • Mixing bowl
  • Frying pan or deep fryer
  • Slotted spoon
  • Paper towels

Step-by-Step Instructions

1. Preparing the Dough

  • Combine flour, baking powder, and salt in a large mixing bowl.
  • Gradually add warm water while mixing to form a soft dough.
  • Knead the dough for 5 minutes, then cover it and let it rest for 30 minutes.

2. Rolling and Cutting the Dough

  • Roll out the dough to ¼-inch thickness on a floured surface.
  • Use a knife or pastry cutter to divide the dough into 4-inch rectangles or triangles.

3. Frying the Sopapillas

  • Heat oil to 375°F in a deep pan.
  • Fry the dough pieces in small batches, flipping once they puff and turn golden brown.
  • Remove with a slotted spoon and drain on paper towels.

For another quick and crispy treat, check out Honey Garlic Butter Roasted Carrots, which pairs beautifully with savory sopapillas.


Serving and Customizations

Sweet Toppings

  • Drizzle honey over warm sopapillas for a traditional finish.
  • Dust with powdered sugar or cinnamon sugar for a dessert-like twist.

Savory Variations

Creative Additions

  • Add cocoa powder to the dough for a chocolate-infused sopapilla.
  • Sprinkle crushed nuts or coconut flakes for added texture.

Storage and Reheating

Storage Tips

  • Place leftover sopapillas in an airtight container at room temperature for up to 2 days.
  • Refrigerate or freeze for extended storage.

Reheating Instructions

  • Reheat in an oven at 350°F for 5–7 minutes for a crisp texture.
  • Use an air fryer for quick reheating without compromising the puffiness.

FAQs

  1. What makes sopapillas puff?
    The combination of a well-kneaded dough and hot oil allows steam to form inside, creating a hollow center.
  2. Why are my sopapillas not puffing?
    Ensure the oil is hot enough (375°F) and the dough is rolled evenly.
  3. Can I bake sopapillas instead of frying?
    Yes, bake at 400°F for 10–12 minutes, though they won’t puff as much.
  4. What’s the best oil for frying?
    Neutral oils like vegetable or canola oil are ideal for frying sopapillas.
  5. How can I make gluten-free sopapillas?
    Use a gluten-free flour blend and adjust water as needed for the right consistency.

Tips for Perfect Sopapillas

  • Always preheat your oil to 375°F to ensure even puffing.
  • Don’t overcrowd the frying pan to avoid lowering the oil temperature.
  • Let the dough rest to improve elasticity and puffiness during frying.

Internal Linking Opportunities


External Links

  1. Muy Bueno Sopapillas Recipe
    Anchor Text: “Muy Bueno’s Sopapillas Recipe”
  2. Tastes Better From Scratch Sopapillas
    Anchor Text: “Tastes Better From Scratch Sopapillas Guide”
  3. Allrecipes Sopapillas
    Anchor Text: “Authentic Sopapilla Recipe on Allrecipes”

Conclusion

Making homemade sopapillas is easier than you think! Whether you enjoy them as a sweet dessert with honey or a savory meal with fillings, they are a versatile and crowd-pleasing option. Pair them with recipes like Homemade Picadillo with Flour Tortillas or Cinnamon Roll Cake with Cream Cheese Glaze for an unforgettable dining experience.