Delicious Banana Peanut Butter French Toast Roll-Ups Recipe

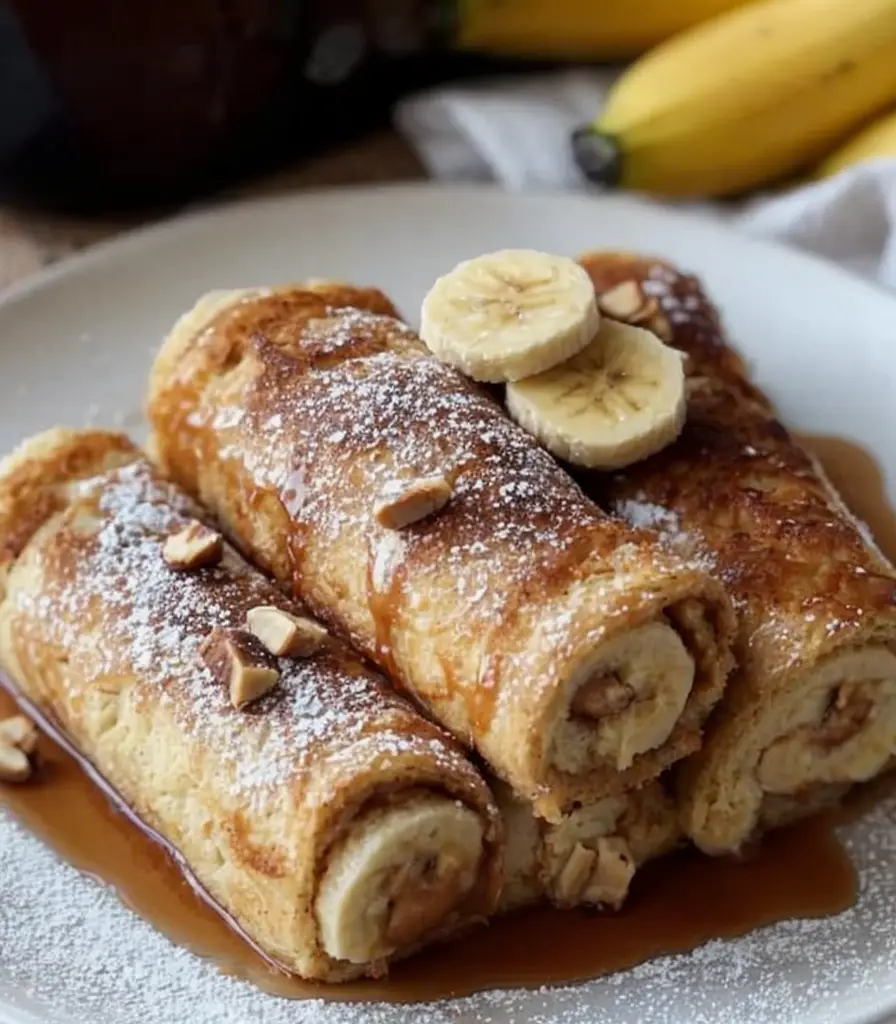
Delicious Banana Peanut Butter French Toast Roll-Ups: A Breakfast Delight

⚖️
Difficulty
Easy

⏲️
Prep Time
10 mins

🕒
Cook Time
15 mins

⏱️
Total Time
25 mins

🍽️
Servings
4

If you’re looking for a delightful addition to your breakfast routine, these Banana Peanut Butter French Toast Roll-Ups are the perfect choice. This recipe features soft, sweet bananas and creamy peanut butter wrapped in crispy, golden-brown bread, all enhanced with a hint of cinnamon. Each bite is a heavenly combination of flavors that will satisfy your morning cravings while providing a nutritious boost to your day.

Not only are these roll-ups incredibly delicious, but they are also quick to prepare, making them an ideal option for busy mornings or leisurely brunches. The fun, roll-up format adds a playful twist to traditional French toast, appealing to both kids and adults alike. Serve them drizzled with warm maple syrup or topped with fresh fruits and whipped cream for a breakfast that feels indulgent but is easy to make.

Quick Recipe Highlights

  • Flavor Profile: Sweet bananas and nutty peanut butter create a perfect balance with a hint of cinnamon.
  • Texture: The crispy exterior contrasts beautifully with the creamy filling, making each bite satisfying.
  • Aroma: The warm, inviting scent of cinnamon and toasted bread fills the kitchen, creating a welcoming atmosphere.
  • Visual Appeal: These roll-ups are golden, inviting, and can be beautifully garnished with fresh fruit.
  • Skill Level Needed: Perfect for beginners, as well as seasoned cooks looking for a quick and fun dish.
  • Special Equipment: You will need a non-stick skillet and a rolling pin for easy assembly.

Recipe Overview

  • Difficulty Level: This recipe is simple and straightforward, requiring minimal techniques and ingredients. It’s perfect for anyone who is new to cooking.
  • Category: Ideal for breakfast or brunch, these roll-ups can also serve as a sweet snack or dessert option.
  • Cuisine: Inspired by American breakfast traditions, this recipe incorporates classic flavors in a creative format.
  • Cost: The ingredients used are economical, making this a budget-friendly option for families and individuals.
  • Season: These roll-ups can be enjoyed year-round, especially when bananas are in season.
  • Occasion: Perfect for casual family breakfasts, festive brunches, or even sleepover treats.

Why You’ll Love This Recipe

First and foremost, the taste and texture of Banana Peanut Butter French Toast Roll-Ups will impress anyone. The rich creaminess of the peanut butter pairs exquisitely with the sweet, soft bananas, all enveloped in the comforting embrace of lightly toasted bread. This combination not only satisfies your taste buds but also fills your belly, making it a wholesome start to any day.

Convenience is another advantage of this recipe. It takes just minutes to whip together all the ingredients and prepare these delectable roll-ups. Perfect for those who are short on time yet still want to enjoy a homemade breakfast, you can even prep them the night before!

Nutrition is not forgotten in this recipe. Bananas provide essential vitamins and minerals, while peanut butter is rich in healthy fats and protein. This makes the roll-ups not only a tasty treat but a nutritionally beneficial option as well.

Whether you are serving them to family or friends, these roll-ups have a social appeal that ignites conversation and joy around the breakfast table. They not only make a beautiful presentation on the plate but also invite everyone to dig in and share their favorite toppings and variations.

Finally, this recipe demonstrates cost-effectiveness. With simple ingredients that are readily available in most household pantries, you can create an impressive breakfast without breaking the bank.

Historical Background and Cultural Significance

The origins of French toast can be traced back to ancient times when people found ways to reuse stale bread. As cultures evolved, so did the recipes, and it became a popular breakfast option across various countries. The introduction of peanut butter, primarily in the United States in the 20th century, transformed many dessert and snack recipes, making it a staple in American kitchens.

In many cultures, breakfast is no mere meal; it’s a ritual that sets the tone for the day. In the U.S., combining peanut butter with familiar breakfast staples like bananas symbolizes comfort and homeliness, making these roll-ups not just food but a nostalgic experience.

This recipe reflects the evolution of breakfast dishes, showcasing how traditional elements can be reimagined to create something fun and new. By wrapping a classic French toast into a portable roll-up, it brings a fun twist to a beloved dish.

Regional variations of French toast exist worldwide, with each country typically adding its own local flavors and techniques. This recipe draws on the American preference for nut spreads, creating a fusion that speaks volumes about adaptability and creativity in cooking.

Ingredient Deep Dive

Bananas: Rich in potassium and dietary fiber, bananas have a tropical sweetness that many people love. They are versatile and can be used in baking, smoothies, or eaten fresh. When selecting bananas for this recipe, opt for those that are ripe but not overly soft to prevent them from turning too mushy.

Additionally, bananas can be stored at room temperature until ripe, after which they can be refrigerated to prolong freshness. If you have overripe bananas, consider using them in baking or smoothies as a delicious alternative.

Peanut Butter: This ingredient is a fantastic source of protein and healthy fats. Originating in the U.S., peanut butter has become a globally enjoyed pantry staple. When choosing peanut butter, look for natural brands that contain minimal additives and preservatives. Smooth peanut butter replicates a creamier texture, but chunky can add a delightful crunch.

Store peanut butter in a cool, dry place, and if you want to extend its life, refrigeration can be a good option. If you prefer, almond or sunflower seed butter can be excellent alternatives for those with nut allergies.

Common Mistakes to Avoid

  • Over-soaking the bread, which can lead to soggy roll-ups with a mushy texture. Use the egg mixture sparingly to avoid this issue.
  • Choosing overly ripe bananas; while they should be soft, extremely overripe fruit can lead to a messy filling.
  • Cooking on too high a heat can burn the exterior while the inside remains uncooked. Opt for medium heat to ensure even cooking.
  • Not allowing the skillet to heat sufficiently before adding the roll-ups, which may cause them to stick.
  • Skipping the cinnamon, which adds essential flavor—it’s a crucial part of the French toast experience!
  • Neglecting to chill the mixture, which may lead to uneven spreads of peanut butter and banana.
  • Using stale or dry bread. Fresh bread that can hold moisture works best to create a soft interior.
  • Not pressing the roll-ups firmly while cooking can cause them to unravel—ensure a gentle but firm grip when flipping.
  • Serving them cold; a warm roll-up is delightful and helps revive the flavors.
  • Overloading the filling can cause overflow during cooking, so keep it modest for best results.

Essential Techniques

Master the art of rolling by keeping the filling centralized. This prevents spillage and ensures even cooking. Gently flatten the bread with a rolling pin before assembling to create a thinner layer that rolls up more easily.

Another key technique is proper heat management. Start with medium heat and adjust as needed to ensure the exterior crisps without burning. Use a non-stick skillet or lightly greased pan to aid in the flawless flipping of your roll-ups.

Pro Tips for Perfect Banana Peanut Butter French Toast Roll-Ups

1. Use different types of bread for unique flavors, such as brioche or wraps, to add a delightful twist.

2. Experiment with flavored peanut butter like chocolate or honey for additional taste layers.

3. For added indulgence, drizzle melted chocolate or Nutella on top before serving.

4. Make extra roll-ups and freeze for a quick breakfast option later on!

5. Consider adding a sprinkle of nuts or granola in the filling for extra crunch and nutrition.

6. Pair with a protein like scrambled eggs to balance the sweetness and create a fuller meal.

7. Garnish with seasonal fruits like berries or kiwi for a colorful presentation.

8. Serve with a side of yogurt to enhance flavor and nutritional value.

Variations and Adaptations

For a chocolate lover’s delight, include a few chocolate chips along with the banana and peanut butter. This can transform your roll-ups into a dessert-like morning treat that feels indulgent yet comforting.

Seasonal adaptations can mean adding spiced apples or pumpkin puree in the autumn for a comforting fall variant that embraces the season’s flavors. Also, consider switching in almond or sunflower butter for those with nut allergies, providing a similar texture and flavor profile.

For a lighter option, try a low-carb bread or even zucchini-based wraps to keep the same filling while maintaining a low-carb approach. Additionally, gluten-free bread can ensure this recipe aligns with gluten-free dietary needs without sacrificing taste.

Lastly, consider serving these roll-ups with a light dusting of powdered sugar or a drizzle of maple syrup to enhance presentation, making them even more inviting!

Serving and Presentation Guide

When plating Banana Peanut Butter French Toast Roll-Ups, consider a simple, elegant arrangement that enhances their appeal. Stack them neatly in a pyramid or arrange them in a line, garnished with fresh fruits for a pop of color.

Drizzle with honey or maple syrup just before serving for an eye-catching finish, and a light sprinkle of cinnamon or powdered sugar can further elevate the presentation. Use vibrant berries or mint leaves as garnish for added freshness, ensuring an artistic and delicious showcase.

For added interest, serve the roll-ups alongside a small bowl of yogurt for dipping or drizzling. This not only offers a complementary flavor but also introduces a delightful contrast to the rich peanut butter.

Wine and Beverage Pairing

While these roll-ups are often enjoyed as a standalone breakfast treat, pairing them with the right beverages can elevate the experience. A light, fruity sparkling wine pairs beautifully with the sweetness of the roll-ups, making for an inviting brunch option.

For non-alcoholic alternatives, a freshly squeezed orange juice adds a refreshing citrusy note that balances the richness of the peanut butter. An iced coffee or chai latte can also complement this breakfast, enhancing the flavor profile while providing an energizing boost to your morning routine.

Storage and Shelf Life

To store leftover Banana Peanut Butter French Toast Roll-Ups, place them in an airtight container in the refrigerator for up to 3 days. When reheating, opt for an oven or skillet to maintain the crispiness of the exterior.

If you want to extend their lifespan, these roll-ups can be frozen. Wrap them individually in plastic wrap and place them in a freezer-safe bag for up to 2 months. To reheat, allow them to thaw in the refrigerator overnight before warming them in the oven.

Make Ahead Strategies

These delicious roll-ups are not only quick to make but also suitable for meal prep. Assemble the roll-ups and store them in the fridge for up to 24 hours before cooking. This allows the flavors to meld, making for an even tastier breakfast option.

For those in need of speed in the morning, you can cook them ahead of time and reheat in the skillet or microwave, adding a quick drizzle of syrup before serving for a fresh touch.

Scaling Instructions

To halve this recipe, simply use two pieces of bread and one banana instead of four slices and two bananas. Adjust the peanut butter accordingly for balanced flavor. For larger gatherings, feel free to double or triple the recipe by ensuring a larger cooking surface to accommodate all roll-ups simultaneously.

Take note of cooking times, as they may vary with larger batches, so always ensure even cooking by flipping regularly. Store any extras carefully, following the same guidelines for immediate and future consumption.

Nutritional Deep Dive

Each serving of Banana Peanut Butter French Toast Roll-Ups provides a balanced macro breakdown. The combination of carbohydrates from the bread, fats from the peanut butter, and proteins from eggs creates a satisfying meal that fuels your day.

This recipe also boasts a good supply of micronutrients, including potassium from bananas and vitamin E from peanut butter. A comprehensive analysis will reveal that these roll-ups support energy levels, muscle function, and overall health.

Dietary Adaptations

For a gluten-free version of these roll-ups, swap regular bread for gluten-free bread options available in most stores. Ensure that all additional ingredients, particularly sauces and condiments, are also gluten-free.

Going dairy-free? Just choose a non-dairy milk substitute in the egg mixture, and enjoy the loves of this delicious breakfast item. A vegan approach can be realized using a plant-based alternative to eggs and nut butters that comply with vegetarian lifestyles.

Troubleshooting Guide

If your roll-ups turn out too soggy, ensure you’re not over-soaking the bread. Use enough egg mixture to coat but not saturate the slices. If the filling spills out while cooking, reduce the amount you place inside each roll to prevent overflow.

Should you encounter burning on the outside while the inside remains cold, check your heat settings; cooking them on lower heat for a longer time ensures an even cook. Adjust the cooking times based on thickness of the bread you’re using to avoid uneven results.

Recipe Success Stories

Community feedback has shown that many families love to make this recipe together, creating cherished moments over breakfast. Readers frequently share their adaptations, such as using flavored nut butters or adding chocolate chips, highlighting the recipe’s versatility.

Many have reported success in creating this dish not just for breakfast but also for dessert, showcasing its adaptability in different mealtimes. The ease of preparation has encouraged readers to make this a staple for when guests come to visit.

Frequently Asked Questions

Can I use other fruits instead of bananas?

Absolutely! Berries, peaches, or apples can be great substitutes. Just ensure they are cut into small pieces for easier rolling.

What type of bread is best to use?

White sandwich bread, whole grain, or even brioche work great. Choose a bread that you enjoy and stays fresh for optimal results.

Can I make these roll-ups ahead of time?

Yes, you can assemble them the night before and store in the fridge. Just cook them fresh in the morning for the best texture.

What other spreads can I use instead of peanut butter?

You can substitute with almond butter, Nutella, or even a yogurt spread for a different flavor profile.

Are these roll-ups suitable for freezing?

Yes, they freeze well! Wrap individually and store in a freezer-safe container or bag. Reheat when ready to enjoy!

Can I omit the cinnamon?

While cinnamon adds warmth and flavor, you can omit it if you prefer. You may also choose to substitute with nutmeg for a different aromatic experience.

How do I know when they are done cooking?

They should be golden brown and crispy on the outside. The filling should be warm without any cold spots inside.

What can I top them with?

Options are endless! Consider fresh fruit, whipped cream, syrup, or even a dusting of powdered sugar for added sweetness and flair.

Can I make these roll-ups vegan?

Yes! Use plant-based egg substitutes and coconut or almond milk for the batter; other than that, follow the recipe as directed.

Is this recipe kid-friendly?

Absolutely! Kids love rolling their own and can help choose fillings, making it a fun family activity.

Additional Resources

For more delightful breakfast ideas, check out our other recipes featuring family favorites. Explore technique guides that delve into mastering the art of breakfast and ingredient information that highlights the nutritional benefits of classic ingredients. Don’t forget to browse equipment recommendations to make your cooking experience even easier.

Join the Conversation

We’d love to hear your thoughts about these Banana Peanut Butter French Toast Roll-Ups. Share your photos on social media and tag us for a chance to be featured! Join our community by leaving a review of your experience, and let us know about your unique variations. Together, let’s celebrate the joys of cooking and create delicious memories through food.

The Recipe

Banana Peanut Butter French Toast Roll-Ups

Serves: 4

Prep Time: 10 mins

Cook Time: 15 mins

Total Time: 25 mins

Kitchen Equipment Needed

  • Non-stick skillet
  • Rolling pin
  • Mixing bowl
  • Spatula
  • Measuring cups and spoons

Ingredients

  • 4 slices of bread
  • 1 large banana, sliced
  • 1/4 cup peanut butter
  • 2 eggs
  • 1/4 cup milk (or plant-based alternative)
  • 1 teaspoon cinnamon
  • Butter or oil for frying
  • Maple syrup for serving

Directions

  1. In a mixing bowl, whisk together eggs, milk, and cinnamon.
  2. Flatten each slice of bread using a rolling pin. Spread peanut butter evenly, followed by a line of banana slices.
  3. Roll each slice tightly and secure with a toothpick if necessary.
  4. Heat a non-stick skillet over medium heat and add butter or oil.
  5. Dip each roll-up into the egg mixture, coating thoroughly, then place in the skillet seam side down.
  6. Cook until golden brown and crispy, 3-4 minutes on each side.
  7. Remove toothpicks if used, and serve warm with maple syrup.

Recipe Notes

  • For added flavor, consider incorporating a pinch of nutmeg into the egg mixture.
  • These roll-ups can be customized with different nut butters or additional fillings like chocolate chips or nuts.
  • Leftovers can be stored in the refrigerator and reheated for convenience.

Indulge in Irresistible Mini Chocolate Peanut Butter Pies Today

Irresistible Mini Chocolate Peanut Butter Pies: A Decadent Delight

⚖️
Difficulty
Easy

⏲️
Prep Time
20 mins

🕒
Cook Time
10 mins

⏱️
Total Time
30 mins

🍽️
Servings
12 mini pies

Imagine sinking your teeth into a rich, creamy mini chocolate peanut butter pie that perfectly balances sweetness and saltiness. With each bite, the decadent layers of chocolate and velvety peanut butter dance on your palate, leaving you craving more. These mini indulgences are not only delicious but also incredibly easy to prepare, making them the perfect treat for any occasion. Whether you’re celebrating a birthday, hosting a holiday gathering, or simply satisfying your sweet tooth, these irresistible mini chocolate peanut butter pies are sure to impress.

These delightful miniature pies are made with a buttery graham cracker crust that crumbles deliciously, complementing the smooth, rich filling. Each mini pie is topped with a luscious chocolate ganache, providing an elegant finish that will have your guests coming back for seconds. The delightful combination of flavors and textures creates an unforgettable dessert experience that is both satisfying and indulgent.

Quick Recipe Highlights

  • Flavor Profile: The pleasing contrast of rich chocolate and nutty peanut butter creates a sensational flavor experience.
  • Texture: Enjoy the crunch of the crust paired with the smoothness of the filling and the glossy finish of the ganache.
  • Aroma: The warm scent of baked cookies mixed with the sweet aroma of chocolate and peanut butter fills your kitchen.
  • Visual Appeal: Cute and dainty, these mini pies boast a gorgeous chocolate glaze that catches the eye.
  • Skill Level Needed: This simple recipe requires minimal skills, perfect for both novice and experienced bakers alike.
  • Special Equipment: You only need a muffin tin, mixing bowls, and a whisk for successful preparation.

Recipe Overview

  • Difficulty Level: These mini chocolate peanut butter pies are labeled easy due to their straightforward steps and minimal cooking time.
  • Category: This recipe falls under desserts, specifically no-bake treats that are creamy and sweet.
  • Cuisine: While these pies have American roots, their combination of chocolate and peanut butter resonates with various culinary influences.
  • Cost: The approximate cost is budget-friendly, making use of common pantry staples like graham crackers, chocolate, and peanut butter.
  • Season: These mini pies are perfect for any season but shine during summer gatherings and holiday parties.
  • Occasion: Whether it’s a picnic, potluck, or birthday bash, these bite-sized desserts fit beautifully into any celebration.

Why You’ll Love This Recipe

These mini chocolate peanut butter pies will capture your heart with their delightful taste and texture. The rich, chocolatey filling pairs perfectly with the creamy peanut butter, creating a balanced and satisfying dessert. Their small size allows for guilt-free indulgence, making it easy for everyone to enjoy this treat without feeling overwhelmed.

The convenience of this recipe sets it apart. It requires no baking time, making it simple to prepare ahead of time. You can whip them up quickly and refrigerate until ready to serve, ensuring you can enjoy your guests without fussing over the dessert at the last minute.

Nutritionally, the inclusion of peanut butter provides protein, while the rich chocolate satisfies your sweet cravings. The balance of flavors also ensures you don’t overindulge, making these pies a sweet treat you can feel good about.

Social gatherings will become even more special with these mini pies making an appearance. Their eye-catching presentation and delightful taste will undoubtedly earn you compliments and requests for the recipe, making them a signature dish for dessert tables.

Lastly, this recipe is cost-effective. Using simple ingredients that are often already in your pantry, you can create an impressive dessert that won’t break the bank. It’s an accessible option for anyone seeking to make a delicious homemade treat without high costs.

Historical Background and Cultural Significance

The origin of chocolate and peanut butter desserts dates back to the early 20th century when chocolate became widely available to American households. Peanut butter, initially a health food served in elite circles, soon found its way into everyday cooking and baking. The merging of these two beloved ingredients has created a dessert staple that has won over dessert enthusiasts for generations.

Culturally, these mini chocolate peanut butter pies resonate with the American love for comfort food and sweet indulgences. They reflect a trend in modern American cuisine that embraces the combination of flavors and textures, ultimately satisfying a wide range of palates. The mini version of traditional pies allows everyone to partake in the delicious experience without the commitment of a larger pie.

As the recipe has evolved, variations have emerged, leading to unlimited possibilities for flavors, crusts, and toppings. Classic recipes have found modern twists, including vegan substitutes or gluten-free options, allowing more people to enjoy this treat.

Regional variations highlight local ingredients and preferences, showcasing the versatility of the chocolate and peanut butter combination. In the South, for instance, chocolate and peanut butter desserts often integrate Southern pecans or local favorites, adding a unique layer of flavor and culture to each recipe.

Ingredient Deep Dive

Chocolate: Chocolate holds significant cultural importance, especially in the United States, where it has transformed from a luxury item into a beloved everyday ingredient. Nutritionally, dark chocolate provides antioxidants and can improve heart health. When selecting chocolate, look for high-quality options with minimal additives, and store it in a cool, dry place. You can substitute chocolate chips with cacao powder if desired, but adjustments to sugar content will be necessary.

Peanut Butter: Peanut butter has its roots in the Americas, where it has been a staple for many decades, particularly during the rise of health foods in the early 20th century. Nutritionally, it is rich in protein and essential fats, making it a popular choice for energy. Look for brands with minimal added sugars and oils. Peanut butter should be stored in a cool location and can be substituted with almond butter for a different flavor profile.

Common Mistakes to Avoid

  • Overmixing the filling can lead to a dense texture instead of the desired creamy consistency.
  • Using sweetened peanut butter can make the pies overly sweet; opt for natural varieties for better balance.
  • Failing to cool the ganache properly can result in it being too runny when attempting to top the pies.
  • Using the wrong size muffin tin can affect cooking time; always check that you’re using standard mini sizes.
  • Not chilling the pies long enough before serving can lead to a messy presentation.
  • Ignoring the crust’s baking time can result in a burnt or bland flavor, so keep an eye on it.
  • Using low-quality chocolate can diminish the flavor; always choose good quality for the best results.
  • Rushing the cooling process can affect both the flavors developed and the overall texture.
  • Forgetting to account for the filling spreading when adding the ganache can lead to overflow.
  • Using non-stick spray instead of butter can affect the texture of the crust negatively.

Essential Techniques

Making the Graham Cracker Crust: This step is crucial as it provides the foundational flavor and texture. Begin by finely crushing the graham crackers to ensure an even texture. Mixing with melted butter helps bind the crumbs together, creating a crumbly but cohesive crust. A common pitfall is under- or over-pressing the crust; you want it dense enough to hold together but not packed so tightly that it becomes hard.

Preparing the Chocolate Ganache: Mastering ganache is key to achieving a glossy finish. The cream should be heated until almost boiling before pouring it over the chopped chocolate, allowing for a smooth melt. A common mistake is not letting it sit long enough, leading to a grainy texture. You want it to meld beautifully, and visual cues include a silky sheen and the absence of unmelted chocolate pieces.

Pro Tips for Perfect Irresistible Mini Chocolate Peanut Butter Pies

1. Use high-quality ingredients for the best flavor; rich chocolate and natural peanut butter make a significant difference.
2. Make sure to chill the filling properly before topping with ganache for clean, defined layers.
3. Experiment with various flavor combinations, such as adding a pinch of sea salt on top for a sweet-salty experience.
4. Consider making a gluten-free crust using almond flour or gluten-free cookies for those with dietary restrictions.
5. Always taste your filling and adjust sweetness accordingly before pouring it into the crust.
6. If making ahead, keep ganache and filling separate until ready to serve for the freshest results.
7. Use silicone muffin pans for easy removal and cleaner presentation.
8. Allow your pies to sit at room temperature for a few minutes before serving to enhance flavors.

Variations and Adaptations

If you’re looking to mix things up, consider regional variations such as using different types of nut butter instead of peanut butter, such as almond or cashew for a new twist. For seasonal adaptations, you could add a hint of peppermint during the holidays or pumpkin spice in the fall to align with seasonal flavors.

Dietary modifications can easily be made with this recipe. For a vegan version, you can substitute the butter and chocolate with dairy-free alternatives. If you’re looking for lower-carbohydrate options, consider using a sugar substitute in the filling and opting for a nut-based crust.

Texture modifications are unlimited as well; consider tossing in a handful of crushed nuts or a layer of whipped cream for added depth. Presentation alternatives include serving them in elegant dessert cups or on a beautiful platter to enhance visual appeal at gatherings.

Serving and Presentation Guide

These mini chocolate peanut butter pies should be plated with care. When serving, consider using paper liners to enhance their look and make serving easier. Garnishing with a dollop of whipped cream, a sprinkle of crushed peanuts, or a drizzle of chocolate sauce will elevate the presentation significantly.

When it comes to traditional accompaniments, a fresh fruit salad can provide a light counterbalance to the richness of the pies. For modern servings, consider pairing them with coffee or espresso to enhance the chocolate flavors.

Be conscious of temperature considerations; serving the pies chilled allows for the best flavor and texture. For portion control, offer them on small plates, allowing guests to indulge without overwhelming their appetites.

Wine and Beverage Pairing

To complement the rich flavors of the mini chocolate peanut butter pies, consider pairing them with a sweet dessert wine like port or a rich red wine such as Cabernet Sauvignon. These wines can enhance the dessert’s chocolate notes while balancing its sweetness.

For non-alcoholic alternatives, a creamy hot chocolate or a classic milkshake would be a delicious pairing. Additionally, a cup of freshly brewed coffee or strong tea provides a lovely contrast, cutting through the richness.

Remember temperature considerations; serving wines chilled and hot drinks steaming enhances both experience and enjoyment.

Storage and Shelf Life

These mini chocolate peanut butter pies can be stored in the refrigerator, covered with plastic wrap or in an airtight container to keep them fresh. The ideal storage temperature is below 40°F. They can typically last up to a week, but for the best flavor, enjoy them within three days.

Signs of spoilage include an off smell, changes in texture, or the development of mold. If the chocolate ganache becomes dull or grainy, that can also indicate spoilage. Reheating isn’t necessary, but if you prefer a softer pie, let them sit at room temperature for a few minutes before enjoying.

For freezing, these pies can last up to three months. Ensure they are properly wrapped to prevent freezer burn. When ready to serve, let them defrost in the refrigerator overnight for best results.

Make Ahead Strategies

To save time, prep the filling and crust ahead and store them separately in the fridge. Make the crust up to two days in advance; it will hold up nicely, which makes assembly a breeze when you’re ready to create the pies.

When planning an event, assemble the mini pies the day before, topping them with ganache, and store in the refrigerator until you’re ready to serve. Keeping the layers separate until serving time helps maintain optimal texture and freshness.

Avoid compromising on quality by waiting to add any fresh toppings, such as whipped cream or nuts, until just before serving. This will keep them light and delightful.

Scaling Instructions

When scaling the recipe, halving it is straightforward; simply divide each ingredient by two for a smaller batch. For doubling or tripling, adjust your kitchen tools and advise how larger muffin tins may be necessary to accommodate.

Timing modifications may be required; larger quantities may need slightly longer chilling times. Ensure to taste the filling and adjust sweetness as needed when increasing the volume.

For storage considerations, ensure each scaled-up batch is stored separately in airtight containers to maintain freshness, particularly since mini pies can be cold dense.

Nutritional Deep Dive

Analyzing the macros of these mini chocolate peanut butter pies reveals a balanced mix of fats, carbohydrates, and protein. While they are considered a treat, moderation is necessary due to the sugar content from chocolate and crust.

Micronutrient analysis shows that peanut butter brings essential vitamins and minerals, such as Vitamin E and magnesium, contributing to overall nutritional value.

Health benefits include the potential heart benefits of dark chocolate and the energy-boosting properties of peanut butter, making it a satisfying treat when enjoyed in moderation.

Dietary considerations can vary; for those observing sugar intake or dietary restrictions, consider adjusting the recipe with natural sweeteners or low-carb options.

For portion analysis, stick to one pie as a serving in moderation to keep within calorie guidelines if weight management is a concern.

Dietary Adaptations

These mini chocolate peanut butter pies can easily be adapted for various dietary needs. To make them gluten-free, opt for gluten-free graham crackers or ground nuts for the crust base.

For dairy-free options, select a dairy-free chocolate for the ganache and use a plant-based butter substitute in the crust. Vegans can indulge with these mini pies by using coconut cream in lieu of traditional dairy products.

Low-carb and keto modifications may involve substituting peanut butter with almond or another low-carb nut spread while also adjusting the sweetener.

For a paleo-friendly version, replace traditional ingredients with those allowed on the paleo diet, ensuring to avoid processed sugars and use only natural sweeteners.

Low-FODMAP adaptations can include using suitable alternatives like coconut cream with caution around peanut butter if sensitive to certain legumes.

Troubleshooting Guide

If you’re experiencing texture issues, ensure your filling achieves a smooth consistency by mixing fully; a grainy texture usually indicates under-mixing or poor-quality chocolate.

Flavor balance can be adjusted by tasting before adding all ingredients; sometimes, an extra pinch of salt may enhance the overall flavor profile.

If temperature problems arise during creating the ganache, remember to let the cream almost boil before adding — this ensures a proper melt that won’t separate.

Equipment challenges are often solved by ensuring proper non-stick sprays are used and muffin pans are greased adequately to prevent sticking during removal.

Ingredient substitutions should be approached with caution, as significant differences in flavor and texture can occur. Be prepared to experiment with quantities and flavors if considering alternative ingredients.

Timing concerns can affect the final product, so always keep an eye on the chilling time of the layers before moving on to the next step; patience can significantly improve results.

Recipe Success Stories

Community feedback on these indulgent mini chocolate peanut butter pies has been overwhelmingly positive. Many find themselves amazed by how an easy recipe can yield restaurant-quality desserts right at home.

Variation successes abound, from those who have added chili to a chocolate topping for a surprising kick to those who had successfully made them gluten-free without compromising texture or flavor. Each unique attempt emphasizes the recipe’s flexibility and adaptability.

Reader suggestions about topping ideas have often included crushed pretzels or caramel drizzle, showcasing a fun way to add personalization to this classic dessert. Many have shared that these modifications have been a hit at gatherings.

Photography tips from the community highlight the beautiful contrast of colors these mini pies offer; a recommendation includes using natural light for the best shots, emphasizing textures and layers with simplicity.

Ultimately, this recipe serves as a platform for culinary creativity, fostering community bonds through shared experiences in the kitchen.

Frequently Asked Questions

1. Can I use a different type of nut butter?
Yes! Almond butter or cashew butter can be excellent substitutes for peanut butter. Just keep in mind that each nut butter has its own flavor profile, so it will slightly alter the overall taste of the pies.

2. How can I store leftover pies?
Store your mini chocolate peanut butter pies in an airtight container in the refrigerator. They should last for about a week. It’s best to enjoy them within 3–4 days for optimal flavor and freshness.

3. Can I freeze these mini pies?
Yes, you can freeze them for up to 3 months! Just be sure they are well-wrapped or in a freezer-safe container to prevent freezer burn. Thaw them in the refrigerator overnight before serving.

4. What if I want to make these pies vegan?
To make these pies vegan, simply use dairy-free chocolate and coconut cream instead of heavy cream for the ganache. Ensure your peanut butter is also free from additives.

5. How can I make the crust gluten-free?
You can make a gluten-free crust by substituting regular graham crackers with gluten-free alternatives or ground nuts. Just ensure all ingredients used are certified gluten-free.

6. Can I add more chocolate to the filling?
Absolutely! Adding more melted chocolate to the filling will intensify the chocolate flavor. Just be careful not to overtighten the filling to avoid it becoming too firm.

7. What’s the difference between using chocolate chips and chocolate bars?
Chocolate bars often have a higher cocoa content and can have a richer flavor than chocolate chips. Chocolate chips may contain stabilizers meant to prevent them from melting, making them less flavorful when used in recipes.

8. Can I customize the flavor of the ganache?
Yes! Add a splash of vanilla extract or flavored extracts like hazelnut or peppermint to the ganache to infuse additional flavor.

9. How do I know when the pies are done chilling?
The pies are ready when the filling has fully set and is firm to the touch. It’s typically best to chill them for at least 2 hours or until completely cooled.

10. What can I replace if I don’t have graham crackers?
You can use crumbled cookies, digestive biscuits, or a nut-based crust made with ground nuts and coconut oil as an alternative for a gluten-free version.

Additional Resources

If you enjoyed the mini chocolate peanut butter pies, you might also be interested in similar recipes like no-bake cheesecake bites or chocolate mousse cups. Exploring technique guides can help refine your baking skills and expand your dessert repertoire.

For more ingredient information, understanding the differences between various chocolate types can further enhance your selections, providing richer culinary experiences. Ensure you have the right kitchen tools for successful baking by investing in high-quality equipment, especially for dessert preparation.

When seeking seasonal variations, consider utilizing fresh seasonal fruits like strawberries or peaches to complement your dessert spread. Seasonal adaptations can really elevate your gatherings!

Join the Conversation

We would love to see your take on these Irresistible Mini Chocolate Peanut Butter Pies! Share your creations on social media with us. If you’ve made variations or added toppings, please share your tips and photos to inspire others.

Recipe reviews help foster community engagement and provide valuable feedback for recipe developers. If you have suggestions for future recipes or techniques you’d like to learn, let us know!

Engaging with our community through recipe variations promotes creativity, ensuring everyone can enhance their culinary skills and enjoy their favorites in new ways.

The Recipe

Irresistible Mini Chocolate Peanut Butter Pies

Serves: 12 mini pies

Prep Time: 20 mins

Cook Time: 10 mins

Total Time: 30 mins

Kitchen Equipment Needed

  • Muffin tin (mini size)
  • Mixing bowls
  • Whisk
  • Double boiler or microwave-safe bowl
  • Measuring cups and spoons

Ingredients

  • 1 ½ cups graham cracker crumbs
  • ½ cup melted butter
  • 1 cup creamy peanut butter
  • ½ cup powdered sugar
  • ½ cup heavy cream
  • 1 cup semi-sweet chocolate chips
  • Pinch of salt

Directions

  1. Preheat the oven to 350°F (175°C). In a bowl, combine graham cracker crumbs and melted butter. Stir until evenly combined.
  2. Press the mixture into the mini muffin tin to create a crust, about 1/4 inch thick. Bake for 10 minutes and let cool.
  3. In a bowl, mix peanut butter, powdered sugar, and a pinch of salt until smooth. Spoon evenly into each cooled crust.
  4. For the ganache, heat heavy cream in a double boiler until just about to boil. Pour over chocolate chips and let sit for a minute, then stir until smooth.
  5. Pour the ganache over each pie, ensuring an even layer. Refrigerate for at least 2 hours until set.

Recipe Notes

  • For extra flavor, add a splash of vanilla extract to the peanut butter filling.
  • Feel free to substitute other nut butters if desired.
  • If you want to make these gluten-free, use gluten-free graham cracker crumbs or almond flour for the crust.

Savory Crockpot French Onion Meatloaf Topped with Swiss Cheese

Crockpot French Onion Meatloaf with Melted Swiss Cheese: A Comfort Food Delight

⚖️
Difficulty
Easy

⏲️
Prep Time
15 mins

🕒
Cook Time
6 hours

⏱️
Total Time
6 hours 15 mins

🍽️
Servings
6 servings

This Crockpot French Onion Meatloaf with Melted Swiss Cheese is a dish that combines the rich, savory flavors of classic French onion soup with the comfort of a hearty meatloaf. The tenderness of the meatloaf is beautifully complemented by the gooey, melted Swiss cheese on top, creating a union of textures that makes every bite a delight. Perfect for family dinners, this recipe is not only satisfying but is also simple to prepare, making it an impressive meal with minimal fuss.

The aromatic notes of caramelized onions and herbs waft through the kitchen as this decadent dish simmers in your crockpot. This rich aroma heightens anticipation, making it an excellent choice for gatherings and cozy evenings at home. Whether paired with mashed potatoes, a fresh salad, or crusty bread, you’ll find that this meatloaf satisfies both the stomach and the soul.

Quick Recipe Highlights

  • Flavor Profile: The combination of savory ground beef, sweet caramelized onions, and tangy Swiss cheese creates a delightful flavor explosion.
  • Texture: The soft, moist meatloaf contrasts perfectly with the gooey, melt-in-your-mouth cheese topping.
  • Aroma: An enchanting bouquet of caramelized onions, herbs, and simmering meat fills the air.
  • Visual Appeal: Golden cheese atop a perfectly formed meatloaf makes for a stunning presentation.
  • Skill Level Needed: This recipe is beginner-friendly, requiring minimal cooking skills.
  • Special Equipment: A crockpot is essential for slow cooking this dish to perfection.

Recipe Overview

  • Difficulty Level: This easy recipe is perfect for novice cooks, requiring simple preparation and minimal monitoring.
  • Category: As a main dish, this meatloaf fits well into the comfort food category.
  • Cuisine: Inspired by French cuisine, this recipe takes classic elements and turns them into a family favorite.
  • Cost: The ingredients are affordable and readily available, making this dish accessible for most budgets.
  • Season: Ideal for cooler months, this hearty dish is perfect for fall and winter meals.
  • Occasion: It’s a great choice for family dinners, potlucks, or casual gatherings with friends.

Why You’ll Love This Recipe

This Crockpot French Onion Meatloaf is not just about taste; it promises comfort in every bite. The combination of ground beef and tender caramelized onions enveloped in melted Swiss cheese gives an indulgent experience that invites seconds. Every mouthful bursts with flavors reminiscent of cold weather comfort food, and the slow cooking makes the meatlov especially juicy and tender.

The convenience of using a crockpot elevates this recipe even further. You can simply throw the ingredients together in the morning, set it to cook, and forget about it until dinnertime. This hands-off approach makes it perfect for busy individuals or families looking for a hearty home-cooked meal without the stress of active cooking.

Besides being delicious, this meatloaf is also packed with nutrients. The beef provides protein and iron, while the onions offer vitamins and fiber. You can feel good serving this meal to your loved ones, knowing it not only fills them up but also nourishes them.

This dish shines during social gatherings and entertaining. It’s hard not to smile at the sight of a beautifully plated meatloaf, especially when your guests catch a whiff of its savory aroma. Sharing this meal brings people together and creates an inviting atmosphere of warmth and friendship.

Affordability is another standout feature of this Crockpot French Onion Meatloaf. With budget-friendly ingredients that you likely already have on hand, you can serve a comforting meal to your family without breaking the bank. There’s something inherently satisfying about cooking with wholesome ingredients that won’t stretch your budget.

Historical Background and Cultural Significance

The origins of meatloaf can be traced back to ancient times when various cultures created dishes combining ground meat and spices to create hearty meals. As cooking evolved, so did the methods and ingredients used, leading to regional adaptations. In France, the tradition of incorporating caramelized onions into dishes became popular, influencing the creation of our Crockpot French Onion Meatloaf.

Culturally, meatloaf has become a symbol of home-cooked comfort food in the United States. Families have cherished it for generations, and its versatility has made it an enduring dish at dinner tables across the country. By adding Swiss cheese and a French-inspired twist, we honor traditional flavors while keeping the heart of the dish grounded in the classic meatloaf we know and love.

As culinary traditions mix and adapt, the French onion flavor profile has influenced countless dishes. This recipe showcases how classic French flavors can seamlessly blend into American comfort food. Over the years, variations have emerged, leading to new takes on this beloved meal, with different cheeses and toppings to suit individual preferences.

Regional variations of meatloaf can surprise those unfamiliar with the dish’s versatility. For example, Southern-style meatloaf may incorporate barbecue flavors while others from the Midwest could include ketchup or other sauces. This adaptability allows cooks to create personal takes on the classic, maintaining its status as a beloved comfort food.

Ingredient Deep Dive

Main ingredients include ground beef, onions, Swiss cheese, breadcrumbs, and seasonings.

Ground beef, a staple protein in many households, offers essential nutrients, including zinc and selenium. When buying ground beef, look for lean cuts to ensure a flavorful yet less fatty result. Proper storage involves keeping it refrigerated and using it within a few days for freshness. If necessary, ground beef can be frozen, but be mindful of using it within three to four months for best quality. Alternatives such as ground turkey can provide a leaner option, while vegetarian substitutes like lentils or veggie patties can also work well in this recipe.

Onions are the key players in creating that signature French onion flavor. Rich in antioxidants, they provide health benefits, such as supporting cardiovascular health. When selecting onions, choose firm bulbs free of blemishes. Proper storage entails keeping them in a cool, dry place. Additionally, caramelized onions can be prepared ahead and used in various dishes, enhancing flavor profiles. Onion substitutes can include shallots for a milder taste or green onions for a fresher twist.

Swiss cheese, known for its nutty flavor and melt-in-your-mouth texture, is essential for that gooey topping. This cheese type offers a good source of calcium and protein but should be used in moderation due to its fat content. When choosing Swiss cheese, look for slices that have a nice shine and a soft texture. Properly wrapped cheese can last in the fridge for a few weeks. For variations, Gruyère or Emmental can add unique flavor nuances.

Breadcrumbs act as the binding agent in meatloaf, keeping it moist while providing structure. Made from toasted bread, they contribute vitamins and fiber depending on the type chosen. When purchasing breadcrumbs, opt for whole grain or seasoned varieties for added flavor. Store breadcrumbs in airtight containers to maintain freshness. Alternatives include crushed crackers or oats for a gluten-free option.

Seasonings such as salt, pepper, and herbs not only enhance the dish but also provide various health benefits. Fresh herbs, like parsley, can add essential vitamins and minerals, while spices contribute to overall health. When selecting herbs, fresh options add depth to flavor, while dried versions are more concentrated. Store herbs in a cool, dark place, and feel free to experiment with different flavor profiles like adding Italian or Mexican spices for a unique twist.

Common Mistakes to Avoid

  • Overmixing the meatloaf mixture can lead to a dense texture rather than a light and fluffy one. Mix just until combined for the best results.
  • Failing to properly season can result in a bland meatloaf. Taste the mixture before cooking to adjust herbs and spices as necessary.
  • Not allowing the meatloaf to rest after cooking can cause it to fall apart. Let it sit for at least 10 minutes before slicing.
  • Cutting into the meatloaf too soon can lead to juices spilling out, making it dry. Patience is key for a moist outcome.
  • Using too much filler, like breadcrumbs, can make the meatloaf overly dry. Stick to the ratio suggested in the recipe.
  • Neglecting to check the internal temperature might result in undercooked meatloaf. Aim for an internal temperature of 160°F for safety.
  • Not greasing the crockpot can lead to sticking and a messy cleanup. Use non-stick spray or olive oil on the pot before adding the ingredients.
  • Oven temperature miscalculations can hurt your meatloaf. If baking instead of slow cooking, ensure the oven is preheated precisely.
  • Skipping the cheese topping can deprive the dish of its decadent finish. Always add the topping for that perfect comfort food experience.
  • Ignoring the choice of ground meat could alter the flavor significantly. Select a fresh, quality ground meat for the most flavorful meatloaf.

Essential Techniques

Caramelizing onions is a crucial step that adds depth and sweetness to the meatloaf. It requires patience; cook them slowly over low heat, stirring occasionally until they achieve a golden brown color. This technique could make the difference between a simple meatloaf and an extraordinary one.

When mixing the meatloaf, it’s essential to treat the mixture gently. Over-mixing can create a dense loaf, while under-mixing can result in loose meat. Aim for a just-combined consistency to achieve the perfect texture.

Chilling the formed meatloaf before cooking can help it hold its shape, providing a better structure once cooked. Refrigerating for at least 30 minutes before placing it in the crockpot allows the flavors to meld and the loaf to firm up.

Pro Tips for Perfect Crockpot French Onion Meatloaf

1. For a deeper onion flavor, sauté the onions before adding them to the meat mixture.
2. Consider using a blend of meats, like pork or turkey with beef, for enhanced flavor and texture.
3. Broil the meatloaf for a few minutes at the end of cooking for a crispy cheese topper.
4. Line your crockpot with parchment paper for easier cleanup.
5. Experiment with different cheeses to change the flavor profile; consider sharp cheddar or gouda.
6. Add moisture to the mix with a tablespoon of Worcestershire sauce or a splash of beef broth.
7. Top the meatloaf with additional caramelized onions for a gourmet finish.
8. If you’re short on time, form your meatloaf the night before and refrigerate; it’s ready to cook in the morning.

Variations and Adaptations

Regional variations can include Southern-inspired additions like barbecue sauce mixed into the meatloaf. Experimenting with seasonal ingredients, such as mushrooms in the fall or bell peppers in summer, can provide excitement to the dish. If dietary restrictions arise, consider making a gluten-free version using gluten-free breadcrumbs or noontime meals that incorporate quinoa instead.

For extra spices, incorporating herbs such as thyme or rosemary can elevate the flavor complexity. To add texture, consider mixing in finely diced vegetables like carrots or zucchini. Finally, you can adapt the presentation by serving individual meatloaf muffins instead of a whole loaf, making it a fun option for dinner parties.

Serving and Presentation Guide

For plating, slice the meatloaf carefully and arrange the pieces on a warm plate. A garnish of fresh parsley or microgreens can not only add a pop of color but also enhance the meal’s appeal. Traditional accompaniments include creamy mashed potatoes, but you can also serve the meatloaf alongside roasted vegetables for a healthy balance.

Modern serving suggestions can include a drizzle of gravy or a dollop of sour cream on each slice. Remember to serve it hot, as this enhances the flavors and allows the cheese to stay gooey. Portion control is essential; aim for 1-2 slices per person, depending on appetite, and serve with an appropriate side dish for a complete meal.

Wine and Beverage Pairing

When serving Crockpot French Onion Meatloaf, a smooth red wine such as Merlot or a light-bodied Pinot Noir pairs wonderfully. These wines complement the meatiness of the dish while balancing the cheese’s richness. For non-alcoholic alternatives, a sparkling apple cider or a crisp iced tea would work beautifully.

If you enjoy coffee, consider a medium roast brewed to a warm temperature to round out the meal. The temperature of the beverages should ideally match the comfort of the food – not too hot or too cold so that everything harmonizes well.

Storage and Shelf Life

To store leftover meatloaf, ensure it’s cooled completely before transferring it to an airtight container. Keep it in the refrigerator for up to 3-4 days. For longer storage, meatloaf can also be frozen for up to 3 months. Just ensure it’s well-wrapped to prevent freezer burn.

Recognizing the signs of spoilage is crucial; any off-smells or changes in texture indicate it should be discarded. When reheating, ensure the meatloaf reaches an internal temperature of 165°F. You can use the oven to reheat, maintaining the crispy texture, or use a microwave for convenience.

Make Ahead Strategies

You can prepare the meat mixture a day in advance, storing it in the refrigerator until you’re ready to cook. This not only saves time but allows the flavors to meld together beautifully. If you plan to use the crockpot, consider assembling it the night before to have it ready to plug in the next morning.

While assembling, portion out the mixture into individual loaves or muffin tins for easier reheating later. To maintain optimal freshness, ensure proper wrapping if you plan to freeze any assembled loaves. When reheating, add an extra splash of broth to maintain moisture.

Scaling Instructions

To halve the recipe, simply proportionally reduce each ingredient. For doubling or tripling, ensure you use a larger crockpot or adjust cooking times. Monitor the mound size since smaller loaves may cook faster than suggested. Always check internal temperature to guarantee thorough cooking.

When scaling, it’s essential to give yourself enough time for cooking and proper rest. Adjust storage containers accordingly, as scaling up will create more leftovers, which can be a delight to have on hand for easy meals throughout the week.

Nutritional Deep Dive

Understanding the nutritional breakdown of this meatloaf can help you make informed choices. A serving typically provides a good amount of protein, iron, and other essential minerals. However, depending on serving size and additional sides, calories can add up, making portion control key for weight management.

While including vegetables like onions contributes vitamins and minerals, consider incorporating additional veggies into the mix for enhanced fiber content. Analyzing your nutrient intake can support a balanced diet, ensuring you’re receiving adequate vitamins and minerals while enjoying satisfying meals.

Dietary Adaptations

For gluten-free diners, substitute traditional breadcrumbs with gluten-free options, like oats or almond flour. Those needing a dairy-free version can replace the Swiss cheese with dairy-free cheese or nutritional yeast for a cheesy flavor without the lactose.

Vegan modifications can involve using lentils or chickpeas combined with flaxseed meal as a binder instead of ground beef. Low-carb or ketogenic dieters may enjoy a version made with ground turkey or chicken, replacing breadcrumbs with groundnuts or seeds.

Lastly, for a low-FODMAP take, use green onions in place of regular onions and ensure that your bread is compliant. This caters to dietary needs without compromising on flavor.

Troubleshooting Guide

Texture issues can arise if the meatloaf is too dry; ensure the right balance of meat to breadcrumbs is maintained. A too-wet mix can be remedied by adding more crumbs or oats.

Flavor balance is crucial; if it’s too bland, increase seasoning, add Worcestershire sauce, or utilize fresh herbs. For those without access to them, kitchen substitutes can help adjust flavor profiles.

Temperature problems can often be resolved by checking equipment accuracy; be aware of any inconsistencies in the slow cooker’s heat settings.

Overly greasy meatloaf may indicate excessive fat in your chosen meat; consider using leaner cuts.

Lastly, timing concerns may arise if the crockpot’s cooking duration is not followed—a good policy is to test for doneness around an hour before the estimated finish time.

Recipe Success Stories

Community feedback has been overwhelmingly positive, with many sharing how this Crockpot French Onion Meatloaf has become a staple in their households. Readers frequently rave about the dish’s rich flavor and how it’s perfect for comforting family dinners.

Adaptation stories highlight how some have successfully switched out ingredients, like trying different cheese options or adding their favorite herbs. The beauty of this recipe is its versatility, allowing cooks to experiment with tastes that excite their families.

Photography tips for capturing the essence of the dish include using natural light and garnishing the plate with fresh parsley for a pop of color.

Engaging with readers who share their variations and experiences adds a layer of community that deepens the connection to this comforting recipe.

Frequently Asked Questions

Can I make this meatloaf in the oven instead of a crockpot? Absolutely! Preheat your oven at 350°F and bake for about an hour or until the internal temperature reaches 160°F.

Can I use ground turkey instead of beef? Yes, using ground turkey will create a leaner meatloaf, though the taste and texture might differ slightly.

How long can I store leftovers? Leftovers can be stored in an airtight container in the fridge for 3-4 days. For longer storage, freeze it for up to 3 months.

What can I serve with this meatloaf? Traditional sides include mashed potatoes or green beans, but you can also try it with a fresh salad or crusty bread.

Is it safe to reheating meatloaf multiple times? Yes, as long as it is properly stored and brought back to an internal temperature of 165°F each time you heat it.

Can I leave out the cheese? Yes, while the Swiss cheese adds a delicious element, you can certainly make it without for a dairy-free option.

How can I tell when the meatloaf is done? Use a meat thermometer; it should register at least 160°F in the center of the loaf to ensure it’s cooked through.

Does this recipe work for meal prep? Yes! You can make it in advance and reheat for easy lunches or dinners throughout the week.

What other cheese could work for this recipe? Other great options include gouda, cheddar, or a cheese blend to suit your taste.

Can you freeze the uncooked meatloaf? Yes, you can shape it and freeze it. Just thaw it overnight in the fridge before cooking.

Can I add vegetables to the meatloaf? Yes, finely diced vegetables such as bell peppers or zucchini can add flavor and moisture.

Additional Resources

Looking for more delicious recipes? Check out our slow cooker favorites for easy meal ideas. Enhance your culinary skills with technique guides focused on meat preparation and seasoning. For those interested in ingredient information, we’ve got a wealth of details on selecting and storing different meats, cheeses, and vegetables.

Seasonal variations also provide inspiration; for fall, consider adding pumpkin puree to your meatloaf for a unique twist. Discover how versatile this humble dish can be and find new ways to impress your family.

Join the Conversation

We would love to hear from you! Share your experiences with our Crockpot French Onion Meatloaf recipe on your social media channels. Post your photos, variations, or even your tips for perfecting the dish.

Engaging with the community not only enhances our collective knowledge but also brings us together around the joy of cooking. Feel free to leave feedback and suggestions, and let’s inspire one another in our home kitchens.

The Recipe

Crockpot French Onion Meatloaf with Melted Swiss Cheese

Serves: 6 servings

Prep Time: 15 mins

Cook Time: 6 hours

Total Time: 6 hours 15 mins

Kitchen Equipment Needed

  • Crockpot or slow cooker
  • Mixing bowl
  • Measuring cups and spoons
  • Meat thermometer
  • Wooden spoon or spatula

Ingredients

  • 1 lb ground beef
  • 1 large onion, finely chopped
  • 1 cup breadcrumbs
  • 2 large eggs
  • 1 tsp Worcestershire sauce
  • 1 tsp garlic powder
  • 1 tsp salt
  • 1 tsp pepper
  • 1 cup shredded Swiss cheese
  • Fresh parsley for garnish

Directions

  1. In a large mixing bowl, combine the ground beef, chopped onion, breadcrumbs, eggs, Worcestershire sauce, garlic powder, salt, and pepper.
  2. Mix until just combined—do not overmix.
  3. Shape the mixture into a loaf and place it in the greased crockpot.
  4. Cover and cook on low for 6 hours or until the internal temperature reaches 160°F.
  5. In the last 15 minutes of cooking, sprinkle shredded Swiss cheese over the meatloaf and cover until melted.
  6. Once cooked, carefully remove the meatloaf from the crockpot, let it rest for 10 minutes, and slice.
  7. Serve hot, garnished with fresh parsley.

Recipe Notes

  • Feel free to add additional spices or herbs to customize the flavor to your liking.
  • This meatloaf can be frozen once cooked and reheated later.
  • Leftovers can be used in sandwiches or served cold for lunch.

Delicious Stuffed Chicken Breast with Spinach and Sun-Dried Tomatoes

Stuffed Chicken Breast with Spinach and Sun-Dried Tomatoes: A Flavorful Delight

⚖️
Difficulty
Medium

⏲️
Prep Time
15 mins

🕒
Cook Time
30 mins

⏱️
Total Time
45 mins

🍽️
Servings
4

Stuffed chicken breast with spinach and sun-dried tomatoes is a delightful dish that captures the essence of comfort food while offering a delightful burst of flavors. Imagine juicy, tender chicken breasts stuffed to perfection with a rich mixture of fresh spinach, tangy sun-dried tomatoes, and creamy cheese. Every bite reveals the medley of flavors, setting off an explosion of taste that will leave your palate dancing. It’s the perfect backdrop for a hearty family meal or an elegant dinner party.

Beyond its incredible taste, this stuffed chicken breast also boasts a vibrant visual appeal with its bright green spinach and red sun-dried tomatoes peeking through the golden-brown chicken exterior. The harmonious blend of textures, from the crispy outside to the soft, cheesy filling, makes each bite a satisfying experience. Whether served alongside roasted vegetables or a simple salad, this dish is sure to impress.

Quick Recipe Highlights

  • Flavor Profile: This dish features a beautiful combination of savory chicken with the nutty flavor of spinach and the slight tartness of sun-dried tomatoes, complemented by the creaminess of cheese.
  • Texture: Experience a delightful contrast between the crispy chicken skin and the tender stuffing, which creates a satisfying mouthfeel.
  • Aroma: The enticing aroma of fresh herbs combined with the rich smell of baking chicken create an inviting atmosphere in your kitchen.
  • Visual Appeal: This recipe looks stunning on the plate, with colorful ingredients and a golden-brown crust, making it a feast for the eyes as well as the palate.
  • Skill Level Needed: Our stuffed chicken breast is categorized as medium difficulty, perfect for both novice cooks and experienced chefs wanting to surprise their guests.
  • Special Equipment: You’ll need a sharp knife for butterflying the chicken, a baking dish, and toothpicks or kitchen twine to secure the filling.

Recipe Overview

  • Difficulty Level: This stuffed chicken recipe is considered medium-level due to the need for careful preparation and ensuring the chicken is cooked properly while keeping the filling moist.
  • Category: This dish falls under main course meals, ideal for both everyday dinners and special occasions.
  • Cuisine: The recipe is rooted in Mediterranean cuisine, showcasing the flavors common in Italian and Greek dishes.
  • Cost: The primary ingredients are budget-friendly, with costs averaging around $15-$20 depending on quality and source.
  • Season: Stuffed chicken breast is perfect for all seasons; however, it shines particularly bright in spring and summer with fresh herbs and vegetables.
  • Occasion: This dish is highly suitable for family gatherings, dinner parties, or romantic meals, making it a versatile choice for various occasions.

Why You’ll Love This Recipe

The taste and texture of stuffed chicken breast with spinach and sun-dried tomatoes will captivate your senses. The delicate flavors blend seamlessly as the savory chicken complements the vibrant stuffing. The mix of creamy cheese, earthy spinach, and tangy tomatoes adds complexity, making it a noteworthy centerpiece for any meal. Each forkful offers a balance of richness and freshness, ensuring a truly elevated dining experience.

Convenience is another reason to adore this recipe. With a prep time of just 15 minutes and a cook time of 30 minutes, it’s perfect for busy weeknights yet sophisticated enough for entertaining. The step-by-step instructions make it easy to follow, allowing you to impress your family or guests without a culinary degree. Assemble, bake, and serve for a magnificent meal with minimal fuss.

On the health front, stuffed chicken breasts are packed with beneficial nutrients. Spinach is loaded with vitamins A and K, while sun-dried tomatoes bring antioxidants and a wealth of flavor. Lean chicken is an excellent source of protein, making this dish a smart choice for balanced nutrition. Combine it with a light salad, and you have a wholesome meal.

Socially, this recipe encourages togetherness. Preparing and enjoying stuffed chicken breast can be a communal activity, perfect for family cooking nights or entertaining friends. Sharing this flavorful dish fosters warmth and connection, making memorable moments around the dining table.

Lastly, its cost-effectiveness makes it accessible. Using simple yet wholesome ingredients ensures that this dish is both economical and impressive. With minimal additional expenses for a side dish or wine pairing, you can create a gourmet experience at home without breaking the bank.

Historical Background and Cultural Significance

The origins of stuffed chicken dishes can be traced back to ancient times when various cultures experimented with stuffing meats. The practice of filling poultry with different ingredients is found in many culinary traditions, each showcasing regional flavors and ingredients. Over the years, Mediterranean flavors have influenced modern stuffed chicken dishes, with each prep encapsulating historical and cultural narratives.

Stuffed chicken has significant cultural importance in various cuisines, serving as a celebration dish for gatherings and holidays. Particularly in Italian and Greek cultures, chicken is often a centerpiece during family celebrations where love and tradition blend through food. The Mediterranean emphasis on fresh ingredients, herbs, and flavors shines in this recipe, echoing the region’s culinary ethos.

The evolution of this recipe reflects contemporary cooking trends that emphasize health and flavor. With an increasing focus on nutritious meals, incorporating vegetables like spinach aligns with modern dietary preferences, making stuffed chicken appealing to today’s cook. More than just a dish, it’s a testament to evolving culinary practices that sustain timeless traditions.

Regional variations of stuffed chicken can be found in many Mediterranean countries, where local ingredients dictate the stuffing. For instance, adding feta cheese and olives in Greek variations enriches the flavor profile, while Italian versions may include risotto or mushrooms. These adaptations highlight the diversity and creativity inherent in adapting a classic dish to fit different regional tastes.

Ingredient Deep Dive

Chicken breast serves as the ideal protein base for this recipe. Known for its adaptability and mild flavor, it allows the stuffing to shine while providing a hearty meal. When choosing chicken, opt for organic or free-range varieties for optimal taste and nutrition. It’s best to keep raw chicken properly refrigerated and consume it within a couple of days or freeze for longer storage.

Spinach is a nutrient powerhouse, rich in vitamins A, C, and K, as well as iron and magnesium. This leafy green adds flavor and nutritional benefits to the dish, making it an essential component. Fresh spinach is often preferred for its vibrant color and texture, but frozen spinach can work as a convenient substitute. To store fresh spinach, keep it in a moisture-free environment, avoiding excessive washing until ready to use.

Sun-dried tomatoes bring an intense, concentrated flavor to the dish. They offer a sweet and tangy profile that contrasts beautifully with the savory chicken. Look for sun-dried tomatoes packed in oil for added moisture, enhancing the dish’s overall flavor. Store sun-dried tomatoes in a cool, dark place, and once opened, refrigerate them in a sealed container to maintain freshness.

Cheese adds a creamy, decadent element to the stuffed chicken. Options such as goat cheese or mozzarella work wonderfully, bringing distinct flavors and textures. When selecting cheese, consider the melting properties you desire. For storage, keep cheese wrapped tightly in the fridge to avoid moisture loss and maintain its quality. Certain cheeses can also be frozen, extending their shelf life for later use.

Herbs and spices, such as garlic, basil, or oregano, amplify the dish’s flavor profile, enhancing every bite. Fresh herbs provide the best aroma and taste, but dried versions can work well as substitutes in a pinch. When using herbs, always check for freshness and store them in airtight containers in a cool environment for longevity.

Common Mistakes to Avoid

  • Overstuffing the chicken: This may cause it to burst during cooking, spilling out the filling. Aim for a generous yet manageable amount of stuffing.
  • Not seasoning the filling: Ensure each ingredient is appropriately seasoned to enhance the dish’s overall flavor. Taste as you go.
  • Using dry chicken: Make sure to monitor your cook time to avoid overcooked, dry chicken, which can result from baking it too long.
  • Insufficient sealing: Secure the stuffed chicken properly with toothpicks or kitchen twine to prevent the filling from escaping during cooking.
  • Skipping the resting time: Allowing the chicken to rest post-cooking allows the juices to redistribute, ensuring moist, flavorful meat.
  • Using frozen spinach without thawing: This can introduce excess moisture into the filling. Always thaw and drain frozen spinach beforehand.
  • Ignoring the internal temperature: Always check that the chicken reaches a safe internal temperature of 165°F to ensure it’s fully cooked.
  • Underestimating cook time: Factors like oven calibration and chicken thickness can affect timing, so start checking for doneness earlier than you think.
  • Neglecting marination: For even deeper flavor, consider marinating the chicken for a few hours or overnight before stuffing and cooking.
  • Forgetting garnishes: Don’t overlook the finishing touches such as fresh herbs, which enhance the presentation and flavor.

Essential Techniques

Butterflying chicken breast is essential for even cooking and stuffing. By making a horizontal cut almost through the thickness of the breast, you can open it up to create a pocket for stuffing. To master this technique, use a sharp knife and take your time, ensuring not to cut all the way through. Look for visual cues, such as the pocket’s evenness, to ensure success.

Securing the stuffed chicken is vital to keep your filling intact while cooking. Toothpicks or kitchen twine can be used to close the pocket. Each end should be secured tightly but not excessively, as this may cause the chicken to dry out. Check for any leaking stuffing during cooking and ensure you use a sharp knife to make clean cuts when necessary.

Baking is the primary method for cooking stuffed chicken breast, providing even heat for a tender result. Preheating your oven is crucial for achieving the right cooking environment from the beginning. Visual cues for success include a golden-brown exterior and juices running clear when tested. An instant-read thermometer offers the best method to ensure the chicken cooks to the recommended temperature.

Pro Tips for Perfect Stuffed Chicken Breast

1. For extra flavor, consider marinating the chicken in lemon juice and herbs for a few hours before preparation to infuse it with herbs and acidity.
2. Mix herbs into the stuffing for a flavor boost; fresh basil or parsley can complement the spinach and cheese beautifully.
3. Searing the chicken briefly in a hot pan before baking will give it a lovely golden color and added flavor from the Maillard reaction.
4. Experiment with different cheeses to discover your favorite combination; sharp cheddar or ricotta can offer unique flavors.
5. Bake the chicken on a wire rack set over a baking sheet to promote even cooking and prevent steam from making the bottom soggy.
6. Allow the chicken to rest after baking for at least 5-10 minutes; this helps retain juices and enhances overall flavor.
7. For a crispy topping, sprinkle breadcrumbs mixed with Parmesan on the chicken during the last 5 minutes of baking for a delightful crunch.
8. Pair the dish with a refreshing salad or side vegetables to balance the richness of the stuffed chicken.

Variations and Adaptations

Regional variations of stuffed chicken can incorporate local flavors and ingredients, such as adding feta and olives for a Greek twist or using Italian herbs like oregano and thyme. Seasonal adaptations can be made by changing the stuffing according to what’s fresh, such as roasted red peppers in the summer or sweet potatoes in fall.

Dietary modifications can cater to various preferences. For a gluten-free version, ensure all ingredients are certified gluten-free, and consider using gluten-free breadcrumbs if opting for a crunchy topping. Vegan and plant-based adaptations can include substituting chicken with large portobello mushrooms or firm tofu, filled with a combination of veggies and grains.

Flavor variations can enhance the basic stuffing; try adding artichoke hearts, roasted garlic, or different cheeses for diverse profiles. Texture modifications could involve adding chopped nuts for a crunch or cooked grains for added heartiness. Presentation alternatives may include slicing the stuffed chicken into medallions for a more elegant plating instead of serving whole.

Serving and Presentation Guide

Plating techniques for stuffed chicken breast should focus on elevating its presentation. Slicing the chicken diagonally showcases the stuffing beautifully, revealing vibrant colors. Place the chicken on a bed of sautéed greens or a light salad to create visual contrast and a fresh touch.

Garnishing ideas include fresh herbs like parsley or basil sprinkled atop the chicken for a burst of color and freshness. Incorporating seasonal vegetables around the plate adds balance and radiance while complementing the dish. Traditional accompaniments like roasted potatoes or wild rice enhance the overall meal experience.

Modern serving suggestions might involve individual portions served on rustic wooden boards or stone plates for a trendy aesthetic. Ensure that the chicken is served hot, as this enhances the enjoyment of flavors. Consider portion control tips, such as serving with smaller sides or family-style sharing platters to encourage diners to savor each bite.

Wine and Beverage Pairing

When choosing a wine to pair with stuffed chicken breast, white wines such as Sauvignon Blanc or Chardonnay work well, providing a crispness that balances the richer filling. For red wine lovers, a light Pinot Noir can complement the flavors without overpowering them.

Non-alcoholic alternatives like sparkling water with a splash of lemon or a refreshing iced tea can also be delightful accompaniments to enhance the meal. If you enjoy coffee or tea post-meal, a smooth coffee or herbal tea can provide a comforting finish.

Temperature considerations should always be taken into account; whites should be chilled to about 50°F, while reds are best served slightly below room temperature. Serving in appropriate glassware elevates the dining experience, enhancing both aroma and flavor appreciation.

Storage and Shelf Life

To ensure that stuffed chicken breast maintains its quality, store any leftovers in an airtight container in the refrigerator. It’s best consumed within 3-4 days to enjoy optimal flavor and texture. Place a layer of parchment paper between layers if stacking to prevent moisture accumulation.

For longer storage, you can freeze the cooked chicken. Wrap it tightly in plastic wrap, followed by aluminum foil, to prevent freezer burn. When reheating, ensure that it reaches an internal temperature of 165°F for safety.

Signs of spoilage can include an off odor or changes in color. If left unwrapped, the chicken may become dry, so always use proper storage techniques to maintain texture. Reheating should be done gently in an oven or covered skillet over low heat to preserve the dish’s juiciness.

Make Ahead Strategies

To save time, consider prepping the stuffed chicken breast a day in advance. Assemble the chicken with the filling and store it wrapped in the refrigerator until ready to bake. This not only saves time but also allows the flavors to meld for a richer taste.

If you prefer, prepare the filling and chicken separately and store them in airtight containers. Bring the chicken to room temperature before baking it to ensure even cooking. Quality may be impacted slightly if frozen, so opt for fresh ingredients whenever possible for the best results.

Additionally, consider adding fresh herbs or vegetables just before baking to maintain their brightness and texture. This will enhance the overall appeal of the dish when served.

Scaling Instructions

If you wish to halve the recipe, simply reduce each ingredient proportionally and adjust the cooking time slightly, keeping an eye on the chicken for doneness. For doubling or tripling, ensure to use larger pans or baking dishes to allow for even cooking.

Equipment adjustments may be necessary for larger batches; consider using multiple baking trays or a larger oven. Timing modifications should also be factored in, with thicker pieces requiring longer cooking times.

Storage considerations remain the same, ensuring you keep any leftovers in airtight containers. Larger servings can allow for various meal occasions, especially during family gatherings or events.

Nutritional Deep Dive

A macro breakdown of this dish reveals lean protein from chicken, healthy fats from cheese, and valuable vitamins from spinach and tomatoes. Each serving of stuffed chicken offers about 25-30 grams of protein, making it suitable for muscle repair and growth.

Micronutrient analysis shows beneficial elements such as Vitamin A from spinach, contributing to eye health, and potassium from tomatoes, aiding in heart function. This dish also contains essential minerals, including calcium found in cheese, which supports bone strength.

When considering health benefits, the high protein content can aid weight management, as proteins promote satiety. Coupled with the nutrient-dense vegetables, this meal supports balanced nutritional intake, beneficial for overall well-being.

Dietary considerations must include monitoring portion sizes, especially if portioned with sides. Adapting the recipe for specific dietary needs, like low-carb or gluten-free, is manageable while maintaining good nutrition.

Dietary Adaptations

For gluten-free diets, ensure all ingredients, including seasoning and cheese, are labeled gluten-free. This dish is easily adaptable without sacrificing flavor, making it accessible for those with gluten sensitivities.

Dairy-free variations can substitute cheese with nutritional yeast or dairy-free cheese. This keeps the filling creamy while avoiding dairy ingredients, catering to lactose intolerance or allergies.

Vegan adaptations could involve using hearty vegetables like mushrooms as the ‘chicken’, making for a satisfying alternative packed with flavor. The filling can include legumes or grains to mimic protein content.

Keto and low-carb adaptations focus on reducing starch ingredients while emphasizing healthy fats and protein. Alternatively, a paleo version could eliminate dairy and processed ingredients while retaining natural flavors and nutrition.

Troubleshooting Guide

Texture issues may arise if the chicken is overcooked, resulting in dryness. Always monitor the cook time closely and use a meat thermometer to check for doneness reliably.

Flavor balance might become skewed if too much salt is added to either the chicken or stuffing. Adjust with acidity, like lemon juice, to brighten the flavors without overwhelming seasoning.

Temperature problems are common if the oven isn’t calibrated correctly. Consider using an oven thermometer to confirm that cooking temperatures are accurate for optimal results.

Equipment challenges may arise with old or inadequate baking dishes. Opt for high-quality, sturdy bakeware that can withstand high temperatures and promote even cooking.

Ingredient substitutions can alter flavor; if making swaps, consider the compatibility of alternative ingredients and adjust seasoning accordingly to retain flavor integrity. Also, fresh herbs should be added towards the end of cooking for punchy flavor.

Timing concerns may lead to undercooked chicken. Always allow adequate time for cooking, and remember that larger pieces may require additional time, checking more frequently for doneness as necessary.

Recipe Success Stories

Community feedback on this stuffed chicken recipe has been overwhelmingly positive, with readers praising its flavor and presentation. Many have shared their take on the dish, incorporating local ingredients to make it their own, resulting in delightful variations that inspire creativity in the kitchen.

Variation successes include integrating different kinds of cheeses and stuffing materials, such as artichokes or ricotta, showcasing how adaptable this recipe can be. Readers have expressed joy in sharing this dish at family gatherings, noting it becomes the star of the table.

Photography tips have emerged as well, with users suggesting to capture the colorful filling and golden crust to entice others. User-generated photos on social media demonstrate the versatility of the dish, encouraging a sense of community among home cooks.

Incorporating seasonal ingredients has led to mixed success stories, with many enjoying the opportunity to experiment with flavors while keeping the dish relevant to various times of the year. Feedback from the community continues to inspire tweaks and improvements to the original recipe.

Frequently Asked Questions

1. Can I prepare this dish ahead of time? Yes, you can prepare the stuffed chicken breast the day before. Just keep it refrigerated until you are ready to bake it.

2. What can I substitute for chicken breast? You can use turkey breast or portobello mushrooms as a substitute if looking for a poultry-free or lower-fat option.

3. How do I prevent the chicken from drying out? Ensure you bake at the correct temperature, use a meat thermometer to check for doneness, and let the chicken rest post-cooking.

4. What should I serve with stuffed chicken? Pair it with a simple side salad, roasted vegetables, or garlic bread to round out the meal.

5. Can this recipe be frozen? Yes, cooked stuffed chicken can be frozen. Wrap it tightly and store in an airtight container for up to three months.

6. How can I make this recipe dairy-free? Use dairy-free cheese options or nutritional yeast to maintain flavor and texture without dairy products.

7. What is the best way to reheat leftovers? Reheat in the oven at a low temperature to prevent drying out, ensuring they are heated all the way through.

8. How thick should I slice the chicken? When slicing, aim for pieces about half an inch thick to ensure each bite showcases the stuffing.

9. Can I add other vegetables to the stuffing? Absolutely! Feel free to customize your stuffing with bell peppers, zucchini, or mushrooms, depending on your preferences.

10. How can I add more flavor to the chicken? Marinate the chicken before stuffing, or add spices to the seasoning mix in the stuffing for an extra flavor boost.

Additional Resources

For readers looking for inspiration, consider exploring other related recipes that feature stuffed ingredients, such as stuffed peppers or baked zucchini. Technique guides on how to butterfly chicken or prepare homemade marinades can enhance your cooking skills.

Ingredient information on how to select the best cheeses or seasonal greens can ensure you make informed choices, elevating your dish. Equipment recommendations for high-quality baking dishes can also help ensure success every time.

Seasonal variations such as adding fall vegetables or spring herbs provide an opportunity to try new combinations and taste profiles, making this recipe relevant throughout the year.

Join the Conversation

We encourage you to share your experiences with this stuffed chicken breast recipe on social media! Include your photographs and any adaptations you’ve tried. Community engagement helps foster a sense of belonging and encourages others to try new things in the kitchen.

Leave a comment below detailing your results or any tips you found useful while preparing the dish. Each experience shared not only empowers others but enriches the culinary experience across our community. We love seeing your success stories and offering a platform for creative ideas!

The Recipe

Stuffed Chicken Breast with Spinach and Sun-Dried Tomatoes

Serves: 4

Prep Time: 15 mins

Cook Time: 30 mins

Total Time: 45 mins

Kitchen Equipment Needed

  • Sharp knife
  • Baking dish
  • Cutting board
  • Meat thermometer
  • Toothpicks or kitchen twine

Ingredients

  • 4 boneless, skinless chicken breasts
  • 1 cup fresh spinach, chopped
  • ½ cup sun-dried tomatoes, chopped
  • 1 cup mozzarella cheese, shredded
  • 2 cloves garlic, minced
  • 1 teaspoon dried basil
  • 1 teaspoon olive oil
  • Salt and pepper to taste
  • Toothpicks or kitchen twine for securing

Directions

  1. Preheat the oven to 375°F (190°C).
  2. In a mixing bowl, combine spinach, sun-dried tomatoes, mozzarella, garlic, basil, and olive oil. Season with salt and pepper.
  3. Butterfly each chicken breast by slicing it horizontally, but not all the way through, creating a pocket.
  4. Stuff each breast with the spinach mixture, pressing it down gently.
  5. Secure the openings with toothpicks or kitchen twine.
  6. Place the stuffed chicken in a baking dish, drizzling with additional olive oil and seasoning with salt and pepper.
  7. Bake for 25-30 minutes, or until the chicken is cooked through and the juices run clear.
  8. Remove toothpicks before serving and let it rest for 5 minutes.

Recipe Notes

  • Feel free to customize the filling with additional ingredients like feta cheese or pine nuts.
  • For extra flavor, marinate the chicken for an hour before stuffing.
  • This recipe can easily be doubled for larger gatherings.
  • Serve with a light salad or roasted vegetables for a complete meal.

Delicious Black Pepper Chicken Recipe You’ll Love to Make

Black Pepper Chicken: A Spicy Delight for Your Dinner Table

⚖️
Difficulty
Easy

⏲️
Prep Time
15 mins

🕒
Cook Time
20 mins

⏱️
Total Time
35 mins

🍽️
Servings
4 servings

Black Pepper Chicken is a delectable dish that marries bold spices with the succulent flavors of fresh chicken. The delightful pungency of freshly ground black pepper enhances the natural taste of the chicken, providing a mouthwatering experience for anyone who takes a bite. This dish not only satisfies your taste buds, but it is also a feast for the eyes, featuring vibrant vegetables that add color and nutrition.

As you prepare this dish, the aroma fills the kitchen, inviting family and friends to gather. The combination of heat from the black pepper and sweetness from bell peppers creates a perfect balance that is sure to impress. Whether you are looking to whip up a quick weeknight dinner or need an impressive dish for entertaining guests, this Black Pepper Chicken recipe is the perfect solution.

Quick Recipe Highlights

  • Flavor Profile: This dish features a spicy and savory blend of black pepper with an underlying sweetness from bell peppers, creating a harmonious flavor experience.
  • Texture: The chicken is tender and juicy while the vegetables provide a satisfying crunch, offering a delightful contrast in each bite.
  • Aroma: The fragrance of sizzling chicken and toasted black pepper creates an irresistible invitation for anyone nearby.
  • Visual Appeal: Bright colors from fresh vegetables against the glistening, glossy sauce make this dish not only tasty but visually stunning.
  • Skill Level Needed: This recipe is perfect for beginners, requiring basic cooking skills and minimal equipment.
  • Special Equipment: You will need a sharp knife, cutting board, and a large skillet or wok to prepare this dish efficiently.

Recipe Overview

  • Difficulty Level: This recipe is categorized as easy, making it accessible for cooks of all skill levels. You’ll benefit from step-by-step instructions that guide you seamlessly through the cooking process.
  • Category: Black Pepper Chicken fits perfectly into the main course category, as it is filling and satisfying, making it an ideal centerpiece for any dinner.
  • Cuisine: Rooted in Asian culinary traditions, Black Pepper Chicken showcases influences from Chinese cuisine, characterized by spice and quick, high-heat cooking techniques.
  • Cost: The cost of ingredients for this recipe is relatively low, making it budget-friendly without sacrificing quality or flavor.
  • Season: Enjoy this dish year-round, especially in cooler months when heartier meals are preferred.
  • Occasion: Black Pepper Chicken is versatile enough for both casual family dinners and more formal occasions, perfect for impressing your guests.

Why You’ll Love This Recipe

Black Pepper Chicken is a delight to the palate with its perfect blend of flavors. The heat from black pepper complements the sweetness of the bell peppers wonderfully. Each bite offers a satisfying crunch with tender chicken, making it a dish you won’t forget.

This recipe is designed for convenience, allowing you to pull it together in just a short time. With minimal prep work required, it’s perfect for busy weeknights. Just slice your ingredients, toss them in a skillet, and you have a delicious meal ready to serve.

In terms of nutrition, chicken is a great source of lean protein, while the vegetables provide essential vitamins and minerals. This makes Black Pepper Chicken not only tasty but a nutritious option for a weeknight dinner.

Socially, this dish is a crowd-pleaser. Whether hosting friends or gathering the family, it invites conversations over its flavorful profile and aromatic experience. People love sharing the recipe afterward too, creating a sense of community around this delightful dish.

Lastly, it’s cost-effective. Most ingredients are common pantry staples, making it easy to whip up without needing an elaborate shopping list. You can treat your family and friends to a restaurant-quality meal at home, ensuring they leave satisfied and happy.

Historical Background and Cultural Significance

Black Pepper Chicken has roots in traditional Asian cuisine, where black pepper has been used for centuries to enhance the flavor of many dishes. Its prevalence in cultures across Asia showcases not only culinary versatility but also the historical significance of trade routes that introduced this spice to different regions.

Culturally, black pepper is often referred to as the “king of spices” and has played an essential role in the culinary practices of many Asian countries. This dish is celebrated not only for its taste but also for its historical value, bringing diners a taste of cultural traditions and local flavors.

The evolution of this recipe over time has seen variations, adapting to local ingredients and preferences. As Asian cuisines have become more popular worldwide, Black Pepper Chicken has established itself as a staple in Chinese restaurants, loved for its comforting and satisfying characteristics.

Regional variations can include additional vegetables or alternative proteins, such as beef or tofu, showcasing the dish’s flexibility to cater to different tastes while maintaining the core flavor profile of black pepper.

Ingredient Deep Dive

Chicken
Chicken is a staple protein in many cultures around the world. It is versatile, easy to cook, and can absorb flavors well, making it ideal for a variety of dishes. Nutritionally, chicken is leaner than many other meats, providing essential nutrients like protein, B vitamins, and selenium. When selecting chicken, look for firm, pink flesh with no signs of dryness, and store it in a cold area of your refrigerator to maintain freshness. Chicken can be substituted with turkey or plant-based proteins for a delicious alternative.

Black Pepper
Black pepper, often dubbed the “king of spices,” has a rich history tied to trade and culinary practices. Its bold flavor can elevate any dish, while also offering potential health benefits, including improved digestion and respiratory health. When selecting black pepper, opt for whole peppercorns for maximum freshness, and store them in a cool, dark place. It can be substituted with white pepper for a similar taste but different flavor profile.

Common Mistakes to Avoid

  • Using pre-ground pepper: Always use freshly ground black pepper for the best flavor.
  • Overcooking the chicken: Aim for tender, juicy chicken; use a meat thermometer to check for doneness.
  • Neglecting to marinate: Allowing the chicken to marinate in spices enhances flavor and tenderness.
  • Using too much heat: High heat is essential, but be careful not to burn the spices or chicken.
  • Not preparing ingredients beforehand: Have all ingredients ready to go; this makes cooking smoother.
  • Skipping the vegetables: They add flavor, nutrition, and color to the dish; don’t leave them out!
  • Ignoring tasting: Always taste and adjust seasoning as you cook for the best flavor.
  • Choosing low-quality ingredients: Fresh, high-quality ingredients make a significant difference in taste.
  • Rushing the cooking time: Allow the chicken to sear properly to achieve that beautiful golden color.
  • Incorrect storage: Ensure that leftovers are cooled before refrigerating to maintain freshness.

Essential Techniques

Marinating
Marinating is an essential step that enhances the flavor and tenderness of chicken. For this recipe, marinate the chicken in a mix of black pepper, soy sauce, and other spices. To master marinating, allow at least 30 minutes or even overnight for deeper flavor absorption. Avoid undersalting, which can lead to bland results.

High-Temperature Cooking
Using high heat is critical to achieving that wonderful sear. Start your skillet on medium-high heat before adding oil and chicken to ensure even cooking and browning. Visual cues for success include a sizzling sound as the chicken hits the pan and a nice browning on the surface.

Pro Tips for Perfect Black Pepper Chicken

1. Use quality chicken thighs for juiciness—this part of the bird is less prone to dryness than breasts.
2. Ground your black pepper fresh for a more intense flavor profile.
3. Don’t overcrowd the pan; cook in batches for even browning.
4. Allow chicken to rest after cooking for juices to redistribute.
5. Play with your vegetable choices; broccoli, snap peas, and carrots can add unique flavors.
6. Top off with chopped scallions for an added crunch and flavor boost just before serving.
7. Use a splash of vinegar in your marinade to enhance the flavor complexity.
8. Serve with a side of rice or noodles to soak up the flavorful sauce.

Variations and Adaptations

For a regional twist, try using Sichuan pepper for a unique mouth-numbing experience. In terms of seasonal adaptations, you can incorporate seasonal vegetables like zucchini during summer or Brussels sprouts in the fall. For those looking for dietary modifications, swap out chicken for cauliflower for a vegan option. Spice enthusiasts may try adding chili flakes for extra heat, while those needing a change in texture can add crispy fried onions on top for a satisfying crunch. Presentation wise, serve in a colorful bowl topped with fresh cilantro for a vibrant finish.

Serving and Presentation Guide

Plating your Black Pepper Chicken can enhance the dining experience. Use a wide, shallow bowl to showcase the colorful chicken and vegetables. Garnish with fresh cilantro or sesame seeds for a pop of color. Serve alongside steamed rice or noodles, ensuring a beautiful contrast. Temperature considerations are essential; serve hot, directly from the stove, to maximize flavor. For portion control, consider using individual bowls to keep servings consistent.

Wine and Beverage Pairing

For wine pairings, a crisp white wine such as Sauvignon Blanc complements the spice of Black Pepper Chicken well. Alternatively, pair it with a light Pinot Noir if preferring red. If non-alcoholic options are preferred, consider iced green tea with lemon for a refreshing counterpart. Temperature for serving should ensure that wines are slightly chilled, enhancing the overall dining experience.

Storage and Shelf Life

To store your Black Pepper Chicken, allow it to cool to room temperature before transferring it to an airtight container. It can be refrigerated for up to 3-4 days. If you have leftovers, ensure you reheat them gently in a skillet to maintain texture. Signs of spoilage include off smells or discoloration. For long-term storage, consider freezing the dish in a sealed container or freezer bag for up to 2 months.

Make Ahead Strategies

Preparing Black Pepper Chicken ahead of time can save valuable minutes during busy weekdays. You can slice the chicken and vegetables in advance, storing them separately in your fridge. Marinating the chicken the night before allows for better flavor absorption. When ready to cook, simply toss everything in the skillet. If making a large batch, cool and store properly for reheating on future nights.

Scaling Instructions

Scaling this recipe is straightforward. For half the recipe, reduce all ingredients proportionately, ensuring cooking time remains similar. When doubling or tripling, be cautious of pan size; consider using two pans if necessary to avoid steaming instead of searing. Adjust timing slightly, as larger quantities may require more cooking duration. Always ensure ingredients are selected for freshness when scaling.

Nutritional Deep Dive

Black Pepper Chicken packs a nutritional punch without sacrificing taste. The protein content from chicken supports muscle health, while the colorful vegetables ensure a rich array of vitamins A and C. In terms of macros, expect moderate carbohydrates from added vegetables, while healthy fats can be included with oils used for cooking. For weight management, consider portion control, as this dish is both filling and satisfying.

Dietary Adaptations

For a gluten-free version, use tamari instead of soy sauce, ensuring a completely gluten-free meal option. Dairy-free individuals can confidently enjoy this dish as written, as it does not contain any dairy ingredients. Vegans may adapt the recipe by substituting chicken with tofu or tempeh, benefiting from the protein-rich alternative. For those following a low-carb or keto diet, serve with leafy green vegetables instead of rice.

Troubleshooting Guide

If your chicken ends up too dry, consider adjusting cooking time or checking temperatures more carefully in future preparations. Should flavors seem unbalanced, you might have undersalted; always taste and adjust seasoning as needed. For texture issues, ensure that you are not overcrowding the pan during cooking to achieve proper crispiness. If substitutions are necessary, always opt for fresh alternatives to maintain taste.

Recipe Success Stories

Community feedback surrounding Black Pepper Chicken has been overwhelmingly positive. Many have shared their variations by introducing different proteins or spices, which sparks creativity and excitement within the home cooking community. Readers often express their delight when they serve this dish at gatherings and celebrate the recipe’s simplicity paired with its impressive taste.

Frequently Asked Questions

Can I use boneless chicken breasts instead of thighs?

Yes, boneless chicken breasts can be used, though thighs tend to yield more flavor and juiciness due to their fat content.

What can I substitute for soy sauce?

Tamari is a great gluten-free alternative, while coconut aminos can provide a slightly sweeter flavor for a soy-free option.

Can I make this dish in advance?

Yes, prepping vegetables and marinating chicken beforehand will allow for quick cooking when you’re ready to serve. Store components separately in the fridge.

How spicy is this recipe?

The spice level can be adjusted by adding more or less black pepper. For added heat, consider incorporating crushed red pepper flakes.

Is Black Pepper Chicken suitable for kids?

Generally, it is suitable for kids, but you may consider reducing the amount of black pepper for a milder flavor.

What is the best way to reheat leftovers?

Gently reheating in a skillet over low heat keeps the chicken tender and prevents it from drying out.

Can I add more vegetables?

Absolutely! Feel free to include your favorite vegetables like broccoli or snap peas for added nutrition and flavor.

What sides go well with this dish?

Steamed rice or noodles are classic accompaniments, but you can also serve it with a fresh salad for crunch.

How do I know when my chicken is cooked through?

Use a meat thermometer to check for an internal temperature of 165°F (75°C) for safety and doneness.

Can I freeze Black Pepper Chicken?

Yes, it freezes well! Store in an airtight container for up to two months. Reheat gently when ready to enjoy.

Additional Resources

Explore related recipes, such as General Tso’s Chicken or Sweet and Sour Chicken, that highlight similar flavors but offer unique twists. Check out technique guides for stir-frying, marinating, or handling spices effectively for improved results in your dishes. Utilize ingredient information to explore the health benefits of vegetables commonly used in Asian cooking.

Join the Conversation

Engage with us by sharing your personal experiences cooking Black Pepper Chicken on social media. We love seeing your creativity and adaptations! Don’t forget to leave a review or comment with your thoughts on this recipe, and let us know how it turned out in your kitchen. Share photography tips to help others capture their cooking experiences beautifully.

The Recipe

Black Pepper Chicken

Serves: 4 servings

Prep Time: 15 mins

Cook Time: 20 mins

Total Time: 35 mins

Kitchen Equipment Needed

  • Large skillet or wok
  • Sharp knife
  • Cutting board
  • Measuring cups and spoons
  • Spatula or wooden spoon

Ingredients

  • 1 lb boneless, skinless chicken thighs, cut into bite-sized pieces
  • 2 tablespoons soy sauce
  • 2 teaspoons freshly ground black pepper
  • 1 tablespoon vegetable oil
  • 1 bell pepper, sliced
  • 1 onion, sliced
  • 3 cloves garlic, minced
  • 2 green onions, sliced for garnish

Directions

  1. In a bowl, marinate the chicken pieces with soy sauce and black pepper for at least 15 minutes.
  2. Heat the oil in a large skillet over medium-high heat.
  3. Add the marinated chicken and cook until browned and cooked through, about 5-7 minutes.
  4. Add sliced bell pepper, onion, and garlic; stir-fry for an additional 5 minutes.
  5. Adjust seasoning, if necessary, and garnish with green onions before serving.

Recipe Notes

  • For an extra layer of flavor, consider additional marinating time of up to several hours in the refrigerator.
  • Feel free to add your favorite stir-fried vegetables to the dish.
  • If preferred, substitute chicken with tofu or another protein source for variety.