Stuffed Chicken Breasts with Spinach and Sun-Dried Tomatoes Recipe

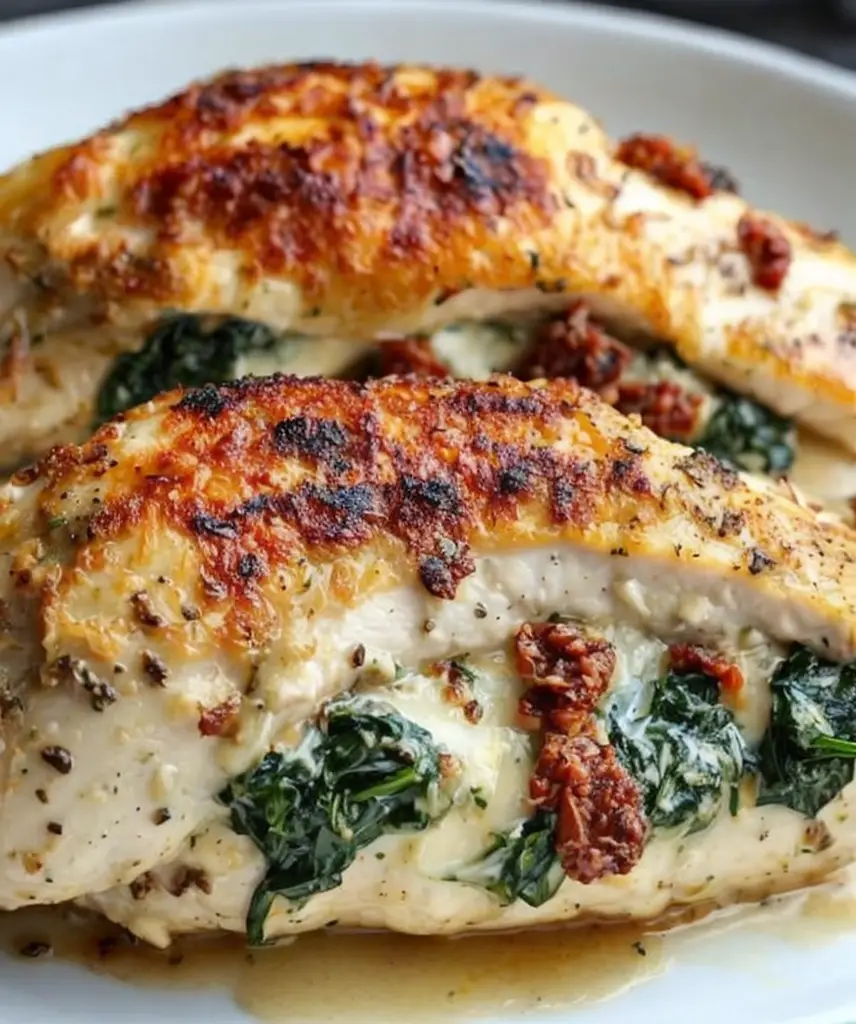
Stuffed Chicken Breasts with Spinach and Sun-Dried Tomatoes: A Savory Delight

⚖️
Difficulty
Moderate

⏲️
Prep Time
15 mins

🕒
Cook Time
30 mins

⏱️
Total Time
45 mins

🍽️
Servings
4

Indulge in the delightful combination of tender chicken breasts stuffed with a savory mixture of spinach, sun-dried tomatoes, and creamy cheese. This stuffed chicken recipe is more than just a meal; it’s an experience that envelops your senses with vibrant flavors and stunning presentation. The juicy chicken, paired with the nutrient-rich spinach and the sweet-tart sun-dried tomatoes, offers a burst of taste with every bite. Whether it’s a family dinner or a special occasion, this dish will impress and satisfy everyone at the table.

As the chicken breasts bake, they become infused with the rich flavors of the filling, while the aroma of garlic and spices waft through your kitchen, inviting everyone to gather around. This recipe is as visually appealing as it is tasty, with the vibrant greens of the spinach and the deep red of the tomatoes creating a beautiful contrast against the golden-brown chicken. Get ready to create a masterpiece that looks almost too good to eat!

Quick Recipe Highlights

  • Flavor Profile: The combination of savory chicken, tangy sun-dried tomatoes, and earthy spinach creates a flavor explosion that’s both hearty and fresh.
  • Texture: The chicken is succulent and tender, while the stuffing adds a delightful creaminess that contrasts beautifully with the meat.
  • Aroma: The aroma of garlic and baked chicken fills the air, heightened by the fragrant herbs used in the stuffing.
  • Visual Appeal: Golden brown chicken stuffed with vibrant greens and reds is not only delicious but also stunning on the plate.
  • Skill Level Needed: Moderate; some experience with chicken preparation and stuffing is helpful for the best results.
  • Special Equipment: A sharp knife for cutting the chicken, a skillet for sautéing, and a baking dish for finishing in the oven.

Recipe Overview

  • Difficulty Level: This recipe is marked as moderate, as it requires some knife skills to slice and stuff the chicken breasts carefully, but the steps are straightforward and rewarding.
  • Category: Dinner; this dish is perfect for an inviting evening meal or entertaining guests.
  • Cuisine: This recipe is influenced by Mediterranean flavors, where sun-dried tomatoes and spinach are popular ingredients.
  • Cost: This recipe is cost-effective, with ingredients easily found at any grocery store, making it accessible for most home cooks.
  • Season: Ideal for all seasons, this dish is especially comforting during autumn and winter family gatherings.
  • Occasion: Perfect for anniversaries, dinner parties, or as a cozy family meal any night of the week.

Why You’ll Love This Recipe

The taste and texture appeal of stuffed chicken breasts are unmatched. The savory chicken envelops a creamy stuffing that pops with fresh flavors, making it a dish that caters to various palates. The blend of creamy cheese with the slight crunch of sun-dried tomatoes and the softness of cooked spinach creates a balanced mouthfeel that satisfies.

For those who value convenience in the kitchen, this recipe shines. With a relatively short prep time and straightforward cooking method, you can have this sumptuous dish on the table in under an hour, making it a go-to recipe for busy weeknights or intimate dinner gatherings.

In addition to its delightful flavors, this stuffed chicken also offers nutritional advantages. Chicken is an excellent source of protein, while spinach provides iron and vitamins A and C, making it a wholesome choice for any meal. The sun-dried tomatoes pack an antioxidant punch, enhancing the overall health benefits of this dish.

Serving stuffed chicken breasts is a joy in social settings. They provide an element of sophistication and are sure to impress guests at any dinner party. This dish invites conversation and complements various side options, allowing for an engaging dining experience.

Lastly, the cost-effectiveness and accessibility of this recipe are compelling reasons to try it. With simple ingredients that are easy to find, you can create a gourmet meal without breaking the bank, proving that great flavors can come from humble origins.

Historical Background and Cultural Significance

The origin of stuffed chicken dishes can be traced back to ancient cuisines across various cultures, where the practice of enhancing meats with flavorful fillings became a staple. In Mediterranean regions, for instance, the connection between fresh produce and protein is central to culinary traditions, reflecting the local agriculture and the love for wholesome, hearty meals.

Culturally, stuffed chicken has been celebrated for centuries. It often represents hospitality and care, showcasing the cook’s effort to provide a rich and satisfying meal. Special occasions in many societies often feature stuffed proteins as a central dish, illustrating their importance in communal dining experiences.

The evolution of stuffed chicken recipes is fascinating. Variations have emerged globally, adapting to local ingredients and cooking methods. Today, stuffed chicken combines classic techniques with modern flavors, making it a versatile dish suitable for various culinary preferences.

Regional variations abound; in Italy, for example, you might find chicken breasts stuffed with prosciutto and herbs, highlighting the unique flavor profiles of different areas. Such adaptations emphasize the dish’s flexibility while honoring its cultural roots.

Ingredient Deep Dive

Chicken Breasts: Chicken is a staple protein globally, with a long history of being a versatile and nutritious source of food. When selecting chicken breasts, look for those that are firm, plump, and free of any blemishes. Nutritionally, chicken breasts offer lean protein, crucial for muscle health and weight management. They can be stored in the fridge for 1-2 days or frozen for several months, ensuring they’re always available for a hearty meal. For substitutions, turkey breasts can work well, offering similar textures and flavors.

Spinach: A staple in many cuisines, spinach has been celebrated since ancient times for its rich nutritional profile and versatility in cooking. Packed with vitamins and minerals, spinach supports healthy immune function and bone health. Choosing vibrant, fresh spinach leaves with no discoloration is essential, and it’s best stored in the refrigerator. Spinach can also be substituted with other leafy greens like kale or Swiss chard for diverse flavor profiles.

Sun-Dried Tomatoes: These tomatoes have a long history, particularly in Mediterranean diets where they are celebrated for their concentrated flavors. Rich in antioxidants, sun-dried tomatoes enhance the nutritional value of dishes. When selecting, prioritize those packed in oil, as they retain moisture and flavor, and store them in a cool, dry place. If sun-dried tomatoes are unavailable, fresh tomatoes can be roasted as an alternative, though the flavor will differ.

Cheese: Cheese has a rich heritage in global cuisines, providing depth and creaminess to many dishes. In this recipe, a cheese like feta or mozzarella adds flavor and moisture. For the freshest taste, choose blocks of cheese and shred them yourself. Options for substitutions include dairy-free alternatives or ricotta cheese, which can yield a different yet delightful texture.

Common Mistakes to Avoid

  • Cutting the chicken breasts too thinly can cause them to dry out during cooking. Always leave enough meat for a juicy stuffing.
  • Overstuffing the chicken breasts can lead to a messy and uneven cooking process. Aim for a moderate amount of stuffing, ensuring even cooking.
  • Not properly seasoning the stuffing might result in bland flavors. Make sure to season each component generously.
  • Failing to let the stuffed chicken rest before slicing can cause the juices to leak out, making the chicken dry.
  • Using pre-shredded cheese may result in a less creamy texture due to added preservatives. Always opt for block cheese when possible.
  • Neglecting to preheat the oven can lead to uneven cooking. Ensure your oven reaches the desired temperature before placing the chicken in.
  • Skipping the browning step can miss the opportunity for added flavor. Sear the chicken on the stove before baking for the best taste.
  • Not checking the internal temperature can result in undercooked chicken. Always use a meat thermometer to ensure a safe temperature.
  • Using low-quality sun-dried tomatoes can detract from the overall flavor. Invest in good quality products for the best results.
  • Not pairing the dish with suitable sides may lead to an unbalanced meal. Consider options that complement the chicken’s flavors to enhance the dining experience.

Essential Techniques

The technique of stuffing chicken breasts is vital not just for flavor but for ensuring even cooking. To master this, use a sharp knife to create a pocket without cutting all the way through. Common pitfalls include overstuffing, which can cause the chicken to burst during cooking. A good visual cue for success is to press gently on the filled chicken; if it feels firm but not overly tight, it’s likely just right.

Searing the chicken before baking enhances flavor and texture. This technique allows the outside to develop a rich, golden-brown crust, locking in moisture. Common mistakes include skipping this step, which can result in a less flavorful dish. Look for a sizzling sound and a golden color as visual cues for success.

Pro Tips for Perfect Stuffed Chicken Breasts

– Choose the freshest ingredients possible for the stuffing to maximize flavor and nutritional benefits.
– For added moisture, consider marinating the chicken breasts in a simple mixture of olive oil, lemon juice, and herbs for a couple of hours before cooking.
– If you have leftover stuffing, bake it in a small dish alongside the chicken for extra serving options.
– Use twine to tie the chicken breasts if they are prone to opening during cooking; this keeps the stuffing inside.
– Consider adding a splash of white wine to the baking dish to create a flavorful steam that moistens the chicken.
– For a crispy topping, sprinkle breadcrumbs or crushed nuts over the chicken breasts before baking for added texture.
– Experiment with different herbs in the stuffing to customize the flavor profile to your liking.
– Always let the stuffed chicken rest after cooking to minimize juice loss when cutting.

Variations and Adaptations

Regional variations of stuffed chicken can bring unique flavors and flair. In Greek cuisine, adding olives and feta cheese creates a Mediterranean twist, enhancing the savory experience. Seasonal adaptations are just as fun; consider incorporating roasted vegetables during fall or fresh herbs in spring for a lighter touch. Dietary modifications can also be made to cater to specific needs: use quinoa as a gluten-free stuffing base or decrease cheese for a healthier alternative.

Flavor variations are limitless; try a spicy southwest twist with jalapeños and pepper jack cheese or an Italian-inspired mix with basil and parmesan. Texture modifications may include adding toasted nuts for crunch or adding cream cheese to the filling for extra creaminess. Presentation alternatives can elevate your dish further; consider serving with a vibrant coulis or a salad arrangement to impress your guests.

Serving and Presentation Guide

For plating, take care to slice the stuffed chicken breasts diagonally to showcase the colorful filling. Consider using a large, white plate to make the colors pop. Garnishing with fresh herbs like parsley or basil adds a touch of freshness and color. Traditional accompaniments like roasted vegetables or a light salad are great options to balance the richness of the chicken.

Modern serving suggestions may include a drizzle of balsamic reduction or a side of quinoa for a contemporary twist. Temperature considerations are essential; serve the stuffed chicken warm but not steaming to enhance the dining experience. For portion control, aim for a stuffed chicken breast per person in addition to side dishes to maintain a balanced meal.

Wine and Beverage Pairing

For perfect wine pairings, opt for a crisp white wine like Chardonnay or Pinot Grigio, which complements the savory flavors of the chicken and the stuffing. A light red, such as Pinot Noir, can also work well for those who prefer red options. For non-alcoholic alternatives, a sparkling water with a lemon wedge is elegant and refreshing.

Coffee or herbal tea can enhance the meal experience as a post-dinner beverage; a light green tea can cleanse the palate effectively after the meal. Always consider serving wines chilled to enhance the flavors and the overall dining experience.

Storage and Shelf Life

When storing leftover stuffed chicken, allow it to cool completely before placing it in an airtight container. The chicken can be refrigerated for 3-4 days, retaining its quality if stored correctly. If you want to extend its shelf life, consider freezing individual portions, which can last for up to 3 months.

Signs of spoilage include any off-smells, slimy textures, or changes in color. For reheating, use an oven set at 350°F (175°C) to regain moisture; you can cover the chicken with foil to prevent it from drying out. If freezing, let it thaw overnight in the refrigerator before reheating for the best texture and flavor.

Make Ahead Strategies

For a make-ahead approach, prepare the stuffing a day in advance and store it in the refrigerator. You can also assemble the stuffed chicken, wrap it tightly in plastic wrap, and store it for up to 24 hours before baking. This prep timeline allows flavors to meld beautifully before cooking.

Storage between steps is crucial; keep the assembled chicken in a cool spot before baking to maintain freshness. Assess the quality impact of letting it rest longer, checking the protein for any signs of spoilage. When ready to cook, simply follow the original baking directions.

If using fresh herbs or garnishes, add those right before serving to maintain their vibrant colors and flavors.

Scaling Instructions

Halving the recipe is straightforward; just adjust the ingredient quantities accordingly and use fewer chicken breasts. Doubling or tripling the recipe requires ensuring your baking equipment is appropriately sized to accommodate larger portions, like using multiple baking dishes if necessary.

Timing modifications may include slightly adjusting cooking times, especially with larger quantities; always check the internal temperature to ensure all the chicken is cooked through. For scaling leftovers, consider how much your guests will eat and adjust accordingly to avoid waste, keeping in mind that stuffed chicken holds up well for refrigeration.

Nutritional Deep Dive

In terms of macro breakdown, a serving of stuffed chicken typically offers high protein content, making it an excellent choice for muscle repair and growth. The contribution of vegetables in the stuffing adds fiber, which aids digestion and promotes satiety.

Micronutrient analysis highlights this dish’s richness in vitamins A and C from spinach, essential for immune health, along with calcium from cheese. The health benefits extend to promoting overall vitality, supporting bone health, and enhancing skin appearance with a balanced diet.

Understanding portion analysis is critical; balancing protein with vegetables and healthy fats can aid in weight management efforts. This dish can fit into various meal plans, ensuring that flavors and nutrients are available in one delicious package.

Dietary Adaptations

For gluten-free adaptations, substitute regular breadcrumbs with gluten-free options or omit them altogether. For dairy-free diets, consider using almond cheese or nutritional yeast in place of traditional cheeses.

For vegan adaptations, replace chicken with firm tofu or portobello mushrooms, and utilize legumes or grains mixed with spices as the stuffing base. Low-carb and keto options are possible by using zucchini boats or bell peppers instead of chicken; this not only reduces carbs but spices up the dish creatively.

Further dietary modifications could apply to those following paleo, low-FODMAP, or specific diets; for paleo enthusiasts, simply omit grains and emphasize fresh ingredients. Experimenting with different ingredients to tailor the dish means it’s accessible for many dietary needs without compromising taste.

Troubleshooting Guide

If the chicken’s texture seems dry, check cooking times and methods; overcooking is often the culprit. For flavor balance issues, assess seasoning added to the stuffing and the meat. If a specific herb or spice lacks intensity, experiment with fresher versions.

Common equipment challenges include using inadequate pans that may lead to uneven cooking. Ensure the oven is accurate; a thermometer can help with this. Ingredient substitutions might affect taste; when in doubt, consult guidelines for balance while preserving flavor integrity.

Timing concerns often crop up; always prepare sides and accompaniments ahead of time, allowing you to focus less on the chicken. Staying organized helps to avoid delays and missteps.

Recipe Success Stories

Community feedback highlights how this stuffed chicken recipe has become a family favorite, with many sharing their variations and personal touches. Readers have reported success with altering the stuffing, such as adding different cheeses or vegetables, catering to their tastes.

Adaptation stories reveal that some have embraced this recipe for holiday gatherings, showcasing how versatile it is and how well it holds up in larger batches. The ease of preparation while still delivering impressive results has encouraged many to try cooking at home more frequently.

Photography tips from the community suggest presenting the dish on rustic wooden boards or elegant dinner plates to capture its beauty effectively. Snapping pics of the colorful stuffing peeking through slices always garners attention on social media.

Frequently Asked Questions

1. How do I prevent the chicken from drying out?
To prevent dry chicken, ensure you don’t overcook it and allow it to rest after baking. Monitoring the internal temperature with a meat thermometer can also help you achieve juicy results.

2. Can I prepare this recipe ahead of time?
Yes! You can assemble the stuffed chicken breasts and store them in the fridge for up to 24 hours before cooking to enhance flavors and convenience.

3. What can I serve with stuffed chicken?
A variety of sides complement stuffed chicken beautifully, including roasted vegetables, fresh salads, or creamy mashed potatoes for a well-rounded meal.

4. How do I store leftovers?
Allow any leftovers to cool before placing them in airtight containers; they can be refrigerated for 3-4 days or frozen for longer storage.

5. What temperature should stuffed chicken be cooked to?
The internal temperature of the chicken should reach 165°F (74°C) to ensure it is fully cooked and safe to eat.

6. Can I use frozen spinach instead of fresh?
Yes! Frozen spinach can be a great alternative, just make sure to thaw and drain excess moisture beforehand.

7. How can I make this dish gluten-free?
Simply substitute the bread crumbs in the stuffing with gluten-free options or skip them altogether for a healthy, gluten-free version.

8. What if I don’t have sun-dried tomatoes?
If sun-dried tomatoes are not available, you can use fresh tomatoes, though the flavor profile will slightly change. Roasted red peppers serve as another flavorful alternative.

9. Can I make the stuffing spicy?
Absolutely! You can add chopped jalapeños, chipotle peppers, or any preferred spicy seasoning to the stuffing to kick up the heat.

10. How do I know the chicken is properly stuffed?
The chicken is properly stuffed when there is enough filling without causing the chicken to tear. A gentle squeeze should keep the stuffing neatly in place.

Additional Resources

Explore related recipes for more delightful creations. For example, try our Spinach and Ricotta Stuffed Shells for a pasta twist or Roasted Vegetable Quinoa Salad for a light side. Technique guides focusing on chicken prep or mastering stuffing techniques can add great value to your cooking repertoire.

For ingredient information, learning about the health benefits and best cooking practices for popular vegetables and proteins will enhance your culinary skills. Lastly, equipment recommendations for essential kitchen tools will make your cooking experiences more streamlined and enjoyable.

Join the Conversation

We invite you to share your thoughts on this recipe on social media! As you try this stuffed chicken dish, use hashtags to connect with others making similar creations. Share your photography tips and successes in our community forums, and don’t hesitate to leave feedback or suggest variations based on your experiences. Engaging with fellow cooking enthusiasts enriches the journey of culinary exploration.

The Recipe

Stuffed Chicken Breasts with Spinach and Sun-Dried Tomatoes

Serves: 4

Prep Time: 15 mins

Cook Time: 30 mins

Total Time: 45 mins

Kitchen Equipment Needed

  • Sharp knife
  • Skillet
  • Baking dish

Ingredients

  • 4 chicken breasts
  • 1 cup fresh spinach, chopped
  • ½ cup sun-dried tomatoes, finely chopped
  • 1 cup cheese (feta or mozzarella), shredded
  • 2 cloves garlic, minced
  • 1 teaspoon Italian seasoning
  • Salt and pepper to taste
  • Olive oil for cooking

Directions

  1. Preheat your oven to 375°F (190°C).
  2. In a skillet, heat olive oil over medium heat; add garlic and sauté until fragrant.
  3. Stir in the chopped spinach and sun-dried tomatoes, and cook until spinach wilts. Remove from heat.
  4. In a bowl, mix the sautéed vegetables with the shredded cheese and Italian seasoning.
  5. Use a sharp knife to cut a pocket into each chicken breast without cutting all the way through.
  6. Stuff each chicken breast with the prepared filling. Season the outside with salt and pepper.
  7. In the same skillet, sear each side of the chicken breasts for about 3-4 minutes until golden brown.
  8. Transfer the seared chicken to a baking dish and bake for 20-25 minutes or until the internal temperature reaches 165°F (74°C).
  9. Allow to rest for 5 minutes before slicing and serving.

Recipe Notes

  • Feel free to experiment with additional spices or vegetables in the stuffing.
  • Leftover stuffing can be baked separately for extra side options.

Indulge in Creamy Honey Pepper Chicken Mac and Cheese Delight

Creamy Honey Pepper Chicken Mac and Cheese Delight: A Comfort Food Masterpiece

⚖️
Difficulty
Moderate

⏲️
Prep Time
20 mins

🕒
Cook Time
30 mins

⏱️
Total Time
50 mins

🍽️
Servings
4 servings

Indulging in a plate of Creamy Honey Pepper Chicken Mac and Cheese Delight is like wrapping yourself in a warm blanket on a chilly evening. This recipe beautifully marries the richness of creamy mac and cheese with the tantalizing sweetness of honey and the playful kick of pepper, creating a symphony of flavors that dances on your palate. The chicken, seared to perfection, adds a hearty element to this luxurious dish, making it a wholesome choice for family dinners or casual gatherings.

Imagine the comforting aroma wafting through your kitchen as the cheese melts into a velvety sauce, complimented by the fragrant notes of honey and pepper. Each bite is a delightful experience, bringing together comfort and gourmet in a way that leaves everyone asking for seconds. This dish not only satisfies hunger but also warms the heart, making it a perfect highlight for any dining occasion.

Quick Recipe Highlights

  • Flavor Profile: Creamy with a hint of sweetness from honey, balanced by the spiciness of black pepper and savory goodness of chicken.
  • Texture: A perfect blend of creamy, gooey cheese and tender chicken with a chewy pasta base.
  • Aroma: A comforting aroma with sweet honey notes mingling with the savory scent of sautéed chicken.
  • Visual Appeal: A vibrant dish characterized by the creaminess of the cheese, golden seared chicken, and a sprinkle of black pepper.
  • Skill Level Needed: This recipe requires basic cooking skills with some familiarity in sautéing and sauce preparation.
  • Special Equipment: A large pot for pasta, a skillet for the chicken, and a baking dish for assembly.

Recipe Overview

  • Difficulty Level: While this dish is not overly complex, it does require attention to detail in preparing the sauce and cooking the chicken properly.
  • Category: Ideal for main courses, it fits perfectly for family meals or potluck gatherings.
  • Cuisine: This recipe draws inspiration from both American comfort food and a hint of gourmet influences.
  • Cost: This creamy mac and cheese dish uses affordable ingredients, making it budget-friendly without sacrificing flavor or quality.
  • Season: Best enjoyed in the fall and winter months, but delightful any time of year.
  • Occasion: Perfect for cozy family dinners, celebrations, or casual get-togethers.

Why You’ll Love This Recipe

Imagine savoring a dish that feels like a warm hug on a plate. The creamy honey pepper chicken mac and cheese is perfectly crafted to deliver an extraordinary taste experience. With each mouthful, the sweetness from honey balances the richness of the cheese, while the pepper adds just the right amount of heat. This intriguing flavor combination keeps your taste buds excited, making every forkful with your favorite side or salad a delightful experience.

Convenience is another great aspect of this recipe. The preparation time is quick, allowing you to whip up a delicious meal without spending hours in the kitchen. Everything can be boiled, sautéed, and baked within fifty minutes, ensuring dinner is ready to be served without unnecessary delays. This makes it especially compatible with busy weeknights or weekends when you want a delightful yet easy-to-make meal.

Not only does this dish delight the palate, but it also offers nutritional advantages. The combination of chicken, pasta, and cheese provides a satisfying meal that packs protein and carbs, fueling your body effectively. Adding vegetables like spinach or broccoli could further enhance its nutritional profile, making it a versatile dish that can cater to various dietary preferences.

Serving Creamy Honey Pepper Chicken Mac and Cheese Delight can be an exciting and joyous occasion. This dish has a beautiful presentation, with its creamy texture and glistening chicken, perfect for impressing guests or celebrating special moments. The colors and textures invite conversation and enjoyment, turning any meal into a festive gathering.

Lastly, this meal’s cost-effectiveness makes it even more appealing. Most ingredients are easily accessible and budget-friendly, allowing you to create this delicious dish without breaking the bank. With this recipe, you can serve classy comfort food that is both satisfying and economical, making it a win-win for your kitchen and wallet.

Historical Background and Cultural Significance

The origins of mac and cheese can be traced back centuries, with roots in both Italy and the United States. However, the combination of creamy sauces with pasta evolved significantly in America, where it has become a beloved comfort food. The addition of chicken and a touch of honey creates a unique blend that adds a modern twist to this traditional dish, celebrating the versatility of flavors.

Culturally, mac and cheese holds a special place in American homes, symbolizing warmth and family gatherings. The dish is often associated with childhood memories, making it a nostalgic favorite for many. By incorporating honey and pepper, this recipe pays homage to the traditional roots while adding a contemporary flair that resonates with today’s culinary trends.

Over time, variations of macaroni and cheese have emerged, influenced by different regions and personal tastes. The integration of chicken and honey reflects how diverse ingredients can be harmonized to create something uniquely comforting. As culinary practices evolve, this dish embodies the spirit of adaptation, accommodating different cultural influences.

Regional variations have contributed to the popularity of macaroni and cheese. Some areas prefer adding spices and herbs, while others might include different proteins or vegetables. This recipe for Creamy Honey Pepper Chicken Mac and Cheese Delight illustrates this evolution, taking a classic dish and elevating it with thoughtful ingredients and modern practices, ensuring it remains a staple on many tables.

Ingredient Deep Dive

Chicken

Chicken has been a primary protein source in many cultures, valued for its versatility and affordability. It is not only flavorful but also rich in lean protein, making it an essential part of a balanced diet. When selecting chicken for this recipe, look for fresh, high-quality pieces to ensure optimal taste and texture.

Nutritionally, chicken is an excellent source of protein which supports muscle growth and repair. It’s also low in fat, especially when skinless, making it a healthy choice for various diets. For storage, raw chicken should be kept refrigerated and used within 1-2 days, while cooked chicken can be stored in the fridge for up to four days.

Substitutions for chicken could include turkey, tofu for a vegetarian option, or mushrooms for a plant-based alternative. Each of these ingredients will provide their unique flavors while complementing the creamy sauce.

Pasta

Pasta is a staple in many cuisines across the globe. It not only serves as an excellent base for countless dishes but also offers a comforting texture that pairs well with creamy sauces. For this recipe, elbow macaroni or shells work perfectly, capturing the luscious cheese sauce in every bite.

In terms of nutrition, pasta provides carbohydrates, which are a primary source of energy. Whole grain or gluten-free pasta varieties can be used for those seeking healthier or specialized options. When selecting pasta, look for options with minimal ingredients for the best quality.

To store, uncooked pasta can be stored in a cool, dry place for years, while cooked pasta should be refrigerated and used within a few days. For a gluten-free version, consider using chickpea or lentil-based pasta that can provide added protein.

Common Mistakes to Avoid

  • Not salting the pasta water: This is a crucial step that enhances the flavor of the pasta; neglecting it can lead to bland pasta.
  • Overcooking the chicken: Ensure that the chicken is cooked just enough to remain juicy, as overcooked chicken can become dry and tough.
  • Using cold ingredients: Bring your dairy products to room temperature before mixing. Cold ingredients can cause the sauce to clump.
  • Not whisking the cheese: When adding cheese to the sauce, whisk continuously to create a smooth consistency; stopping can lead to a clumpy sauce.
  • Choosing the wrong type of cheese: Using pre-packaged shredded cheese can contain anti-caking agents that hinder melting; opt for freshly grated cheese instead.
  • Skipping the taste test: Always taste your sauce before serving to adjust seasoning; it ensures balanced flavors.
  • Leaving the pasta al dente: Cooking the pasta to al dente texture is important as it will continue cooking in the oven, becoming mushy otherwise.
  • Forgetting to bake: Although it’s tempting to skip baking, this step allows the flavors to meld wonderfully and gives the mac and cheese a delicious, golden crust.
  • Not incorporating fresh ingredients: Adding fresh herbs or vegetables can enhance flavor and nutritional value; neglecting this limits the vibrancy of the dish.
  • Rushing the sauce: Take your time when preparing the cheese sauce, ensuring smooth incorporation of flavors; impatience may lead to separation and lumpiness.

Essential Techniques

Sautéing chicken is an essential technique for this recipe. It’s important because it adds depth of flavor to the dish; searing creates a golden crust, enhancing the taste. To master this technique, ensure your skillet is preheated and the chicken pieces are not overcrowded, allowing even cooking. Common pitfalls include not allowing the chicken to rest after cooking, resulting in loss of juices.

Making a creamy cheese sauce is all about balance. Important steps include gradually introducing cheese to a warmed mixture to avoid lumpiness. Whisk continuously for a smooth result. The visual cue for success is a thickened sauce that clings to the back of a spoon; if it’s too watery, continue cooking while stirring gently.

Pro Tips for Perfect Creamy Honey Pepper Chicken Mac and Cheese Delight

– Use a mix of cheeses for depth: Try combining sharp cheddar with creamy mozzarella for a richer flavor profile.
– Flavor boost with seasonings: Incorporate herbs like thyme or rosemary, or spices like smoked paprika for extra flavor notes.
– Introduce veggies: Add sautéed vegetables like spinach or bell peppers for color and health benefits.
– Make it extra creamy: Stir in a dollop of cream cheese or sour cream at the end for an indulgent texture.
– Prepare ahead: Assemble the dish in advance, cover, and store it in the fridge until ready to bake.
– Experiment with toppings: Add breadcrumbs mixed with parmesan cheese for a crunchy topping that contrasts with the creamy base.
– The right pasta texture: Cook the pasta just under al dente, as it will absorb some of the sauce while baking.
– For spice lovers, amp up the heat: Mix in a pinch of cayenne pepper or add diced jalapeños for a bolder kick.

Variations and Adaptations

Regional variations of this recipe can include different proteins, such as spicy chorizo or even seafood, based on local preferences. Seasonal adaptations could incorporate fresh vegetables like zucchini or tomatoes, adding brightness and nutrients suitable for summer. For dietary modifications, try substituting pasta with spiralized zucchini for a lighter, low-carb alternative.

Flavor variations might include the use of BBQ sauce blended into the cheese for a smoky twist, or adding truffle oil for a gourmet touch. Texture modifications can arise from adding crunchy toppings like fried onions or crushed tortilla chips, bringing delightful contrast to the creamy interior.

In terms of presentation, consider serving in individual ramekins for a refined look, or family-style in a large, colorful casserole dish garnished with freshly chopped herbs.

Serving and Presentation Guide

For plating, use a large serving bowl to showcase the creamy texture and vibrant colors of the dish. Consider garnishing with parsley or chives for visual appeal. Traditional accompaniments may include crusty bread or fresh salad to balance the richness of the mac and cheese.

Modern serving suggestions may involve individual portions in ramekins, perfect for entertaining. Temperature considerations are essential; serve the dish hot for the best flavor.

For portion control, consider plating smaller servings alongside lighter sides, ensuring guests enjoy their meal without overeating. Lastly, use a ladle to serve generously, but avoid overflowing to maintain a neat presentation.

Wine and Beverage Pairing

When it comes to wine pairings, a supple Chardonnay will complement the creamy cheese beautifully, while a refreshing Sauvignon Blanc can cut through the richness. For those preferring red wine, a light Pinot Noir offers a fruity contrast that harmonizes well.

Non-alcoholic alternatives such as sparkling water with a splash of lemon can provide a refreshing counterpoint. If coffee or tea is more your style, rich espresso pairs surprisingly well, drawing out the flavors of the meal.

For serving, ensure wine is slightly chilled for whites while reds can be served at room temperature, creating an inviting atmosphere for your meal.

Storage and Shelf Life

Proper storage methods are vital for keeping your creamy honey pepper chicken mac and cheese fresh. Store leftovers in an airtight container in the refrigerator, where they can last up to four days. For optimal freshness, ensure the dish is cooled before sealing.

When it comes to temperature requirements, refrigerate promptly after serving. Signs of spoilage include an off smell or visible mold; discard any leftovers that show these indicators.

For reheating, place servings in the microwave or oven. Adding a splash of milk can help restore creaminess. Freezing is an option; this dish keeps well for up to three months, but it may lose some texture. Thaw in the fridge overnight before reheating.

Make Ahead Strategies

Preparing ahead of time can make serving creamy honey pepper chicken mac and cheese a breeze. Start by prepping the chicken and creamy sauce earlier in the day, storing each component separately in the fridge.

Assemble the dish in the baking dish but cover tightly to prevent drying out. If prepared a day in advance, it can save considerable time on busy weekday dinners.

When it’s time to serve, simply bake until heated through and bubbly. Consider adding fresh breadcrumbs on top just before baking to maintain crispiness. For added freshness, garnish with chopped herbs after baking.

Scaling Instructions

Halving the recipe can be easily done by adjusting the quantities of each ingredient. For smaller gatherings, use a smaller baking dish, which will help maintain the balance of ingredients for improved flavor distribution.

Doubling or tripling the recipe is also straightforward; ensure you have adequate mixing space and a larger baking dish. Timing modifications may be necessary for larger quantities, focusing on ensuring everything cooks evenly.

Be mindful of storage considerations when scaling up; extra portions can be frozen for later enjoyment, just remember a little extra space for expansion in containers.

Nutritional Deep Dive

In this delightful dish, a macro breakdown reveals robust protein from chicken, complex carbohydrates from pasta, and healthy fats from cheese. Each serving provides substantial energy, making it a satisfying meal.

Micronutrient analysis shows contributions of B vitamins from chicken and various minerals such as calcium from cheese. Balancing these elements is paramount to ensuring an energizing meal.

Incorporating vegetables can elevate health benefits; think about including spinach or broccoli for added vitamins and fiber. Additionally, portion analysis ensures that while this dish is rich, each serving can be proportioned for Weight Management tips without excessive indulgence.

Dietary Adaptations

For gluten-free options, substitute pasta with gluten-free varieties made from rice or quinoa, allowing everyone to enjoy this tempting dish without compromise. Dairy-free options can include non-dairy cheese alternatives for those with lactose intolerance.

Vegan adaptations involve replacing chicken with plant-based proteins such as chickpeas or lentils, combined with cashew cream for a fulfilling sauce. Low-carb and keto modifications can use zucchini noodles instead of pasta, allowing for a lower-carb experience without sacrificing flavor.

For those following paleo diets, omit the cheese and replace it with nutritional yeast for a cheesy flavor while keeping it within dietary restrictions.

Troubleshooting Guide

Texture issues arise when the sauce becomes too thick or too thin; add milk for thinning or additional cheese for thickening. Flavor balance is crucial; if the dish tastes bland, sprinkle in more seasoning or cheese.

Temperature problems can occur if the pasta is overcooked or underbaked; always check for doneness before serving. Common troubleshooting for equipment challenges includes ensuring all tools are suitably prepped and available, minimizing kitchen chaos.

Ingredient substitutions may alter the dish’s flavor markedly, but experimenting with spices can lead to pleasant surprises. Monitor timing concerns through the cooking process, ensuring each element is prepared appropriately.

Recipe Success Stories

Many community members have shared how this Creamy Honey Pepper Chicken Mac and Cheese has become a favorite at family gatherings. The combination of flavors resonates with all ages, making it a winner among even the pickiest eaters.

Variation successes include readers trying out different protein choices, leading them to inventive pizzas and casseroles inspired by this recipe. Adaptation stories abound, with home cooks experimenting with seasonal vegetables and herbs to enhance their dishes uniquely.

Feedback from readers highlights how the recipe’s simplicity allows for creativity without overwhelming complexity. Creative photography tips encourage users to showcase their plates for social media sharing, further inspiring culinary explorations within the community.

Frequently Asked Questions

1. Can I prepare this dish ahead of time?
Yes, you can prepare the creamy honey pepper chicken mac and cheese ahead of time. Cook and assemble the components, then store them in the refrigerator until you are ready to bake.

2. How can I make this dish healthier?
To make it healthier, you can use whole-grain pasta or incorporate additional vegetables such as broccoli or spinach to increase the nutritional content.

3. Can I use other proteins instead of chicken?
Absolutely! You can substitute chicken with turkey, shrimp, or even plant-based proteins like chickpeas for a vegetarian option.

4. How do I store leftovers?
Store leftovers in an airtight container in the refrigerator for up to four days. You can reheat them in the oven or microwave.

5. Can I freeze this dish?
Yes, this mac and cheese freezes well. Allow it to cool, then store it in an airtight container or freezer bag for up to three months. Thaw in the refrigerator before reheating.

6. What kind of cheese works best?
A combination of sharp cheddar and mozzarella provides both flavor and creaminess. Feel free to experiment with other cheeses like gouda or fontina for a twist.

7. Can I make this recipe vegan?
Yes, replace the cheese with non-dairy options and use a plant-based protein like tofu or chickpeas to create a delicious vegan version.

8. What spices can I add for extra flavor?
You can enhance the flavor with spices like smoked paprika, garlic powder, or even crushed red pepper flakes for an extra kick.

9. Will this recipe work in a slow cooker?
While it can be adapted for a slow cooker, consider sautéing the chicken and preparing the cheese sauce separately before combining everything in the slow cooker for optimal texture.

10. How can I adjust the serving size?
You can easily adjust the serving size by halving or doubling the ingredients according to your needs, ensuring you’ll have enough for everyone.

Additional Resources

For those looking to expand their culinary repertoire, consider trying out similar recipes like creamy spinach pasta or honey garlic chicken. Technique guides on making sauces or mastering pasta can also elevate your cooking skills.

Ingredient information resources can help you understand the different types of cheese and their uses. Equipment recommendations for quality tools can also make your cooking experience smoother.

Lastly, seasonal variations will allow you to adapt your mac and cheese to lean into what’s freshest and most enjoyable at various times of the year.

Join the Conversation

We encourage you to share your thoughts on this delicious recipe! Share photos, your adaptations, and even your favorite serving suggestions on social media.

Engaging with the community through reviews and conversation fosters a lively interactivity that enhances everyone’s cooking journey. Recipe variations are welcome; tell us how you made this dish your own!

The Recipe

Creamy Honey Pepper Chicken Mac and Cheese Delight

Serves: 4 servings

Prep Time: 20 mins

Cook Time: 30 mins

Total Time: 50 mins

Kitchen Equipment Needed

  • Large pot
  • Skillet
  • Baking dish
  • Whisk
  • Measuring cups and spoons
  • Wooden spoon

Ingredients

  • 2 cups elbow macaroni
  • 2 tablespoons olive oil
  • 2 chicken breasts, cut into cubes
  • 1 teaspoon black pepper
  • 1 cup heavy cream
  • 1 cup shredded sharp cheddar cheese
  • ½ cup mozzarella cheese
  • ¼ cup honey
  • Salt to taste

Directions

  1. Preheat the oven to 350°F (175°C).
  2. Cook the elbow macaroni in a large pot of salted boiling water until al dente. Drain and set aside.
  3. In a skillet, heat olive oil over medium heat. Add chicken cubes and season with salt and black pepper. Cook until golden brown and fully cooked.
  4. In a separate saucepan, combine heavy cream and honey. Heat gently until warm, then stir in cheddar and mozzarella until melted and smooth.
  5. Combine the cooked pasta, chicken, and cheese sauce in a large bowl. Mix until well combined.
  6. Transfer to a baking dish, and bake for 20-25 minutes or until bubbly and golden.
  7. Let cool slightly before serving, and enjoy!

Recipe Notes

  • Feel free to add your favorite vegetables, such as spinach or broccoli.
  • Leftovers can be stored in the refrigerator for up to four days or frozen for later use.
  • Adjust honey and pepper levels to suit your taste preferences.

Indulge in Decadent Crème Brûlée Cake: A Luxurious Dessert

Crème Brûlée Cake – A Decadent Custard & Caramel Dessert

⚖️
Difficulty
Medium

⏲️
Prep Time
30 mins

🕒
Cook Time
50 mins

⏱️
Total Time
80 mins

🍽️
Servings
8

Indulge in the luxurious flavors of our Crème Brûlée Cake, a divine confection that marries the classic elements of crème brûlée with the comforting richness of cake. This exquisite dessert features layers of velvety custard, a golden caramel topping, and a tender cake base—all harmonizing to create an unforgettable experience for your taste buds. Each slice offers a delightful contrast between the creamy custard and a crisp, sugar-crusted exterior, inviting you to savor every bite.

The preparation of Crème Brûlée Cake is a celebration of culinary art, balancing technique and creativity. The process begins with crafting a smooth custard base, which is then poured over a buttery cake layer, resulting in a dessert that is both impressive and indulgent. With its charming presentation and rich flavors, this cake is perfect for special occasions or a sophisticated treat after dinner, ensuring that it will be a hit among friends and family alike.

Quick Recipe Highlights

  • Flavor Profile: Expect a delightful blend of vanilla, cream, and caramel notes, elevating your taste experience.
  • Texture: The cake is moist and supple, while the caramel topping provides a satisfying crunch.
  • Aroma: The enticing scent of baked vanilla and caramel wafts through the air, promising a heavenly taste.
  • Visual Appeal: Its golden-brown crust atop a creamy base creates an elegant visual, perfect for any dessert table.
  • Skill Level Needed: This recipe requires medium-level baking skills, ideal for those looking to enhance their culinary repertoire.
  • Special Equipment: A kitchen torch is essential for achieving the signature crunchy crème brûlée topping.

Recipe Overview

  • Difficulty Level: While crafting this Crème Brûlée Cake may seem daunting, the steps are straightforward, making it accessible to intermediate bakers willing to invest time.
  • Category: This dessert fits perfectly into sweet indulgences or as a show-stopping centerpiece for evening gatherings.
  • Cuisine: This cake draws inspiration from French culinary traditions, renowned for their rich pastries and desserts.
  • Cost: The ingredients are relatively affordable, with most pantry items and a few specialty items like vanilla beans forming the base.
  • Season: Ideal for all seasons, this cake shines particularly during festive gatherings where indulgence is welcomed.
  • Occasion: Perfect for anniversaries, birthdays, or dinner parties, it adds a touch of elegance to any occasion.

Why You’ll Love This Recipe

The Crème Brûlée Cake is a culinary delight that offers a rich taste and an enchanting texture. The creamy custard layer, complemented by a novel cake base, creates an interplay of indulgent flavors that will leave you craving for more. The contrast of a crisp caramelized top layer adds intrigue, ensuring your palate is treated with a variety of mouthfeel elements.

One of the most alluring aspects of this recipe is its manageable preparation. The relatively simple steps empower you to create an impressive dessert without excessive worry, making it an ideal choice for those who want to impress guests with minimal fuss. The combination of a classic recipe and a contemporary twist offers a rewarding baking experience without compromising flavor.

Beyond its magnificent flavor, this cake can provide advantages for those looking to enjoy a rich dessert without excessive portions. It encourages moderation—one slice will satisfy your sweet tooth and provide that luxurious crème brûlée experience without overwhelming your senses, making it a more mindful indulgence.

This Crème Brûlée Cake also serves as an excellent centerpiece for social gatherings. The moment you bring it to the dessert table, it becomes the talk of the evening, encouraging conversation and admiration. The shared experience of lightly caramelizing the sugar top adds excitement to dinner parties, making the preparation an interactive affair.

Lastly, the ingredients are versatile and accessible, ensuring that you can recreate this delightful dessert without breaking the bank. Many of the components can be found in your pantry, and with just a few fresh items, you can transform them into something truly extraordinary, making it a cost-effective choice for both everyday celebrations and special occasions.

Historical Background and Cultural Significance

Crème Brûlée has a fascinating history that traces back to the late 17th century in France, where it was first referenced in culinary texts. The term itself translates to “burnt cream,” aptly describing the dessert’s iconic crust and creamy base. Initially served as a simple dish among the wealthy upper classes, its allure began to spread across Europe, becoming a staple of patisserie.

Culturally, Crème Brûlée represents opulence and celebration. It was often featured in French banquets, symbolizing culinary excellence and sophistication. This cake adaptation adds a modern twist while preserving the traditional flavors that have elevated it through the ages, making the dessert both timeless and innovative.

The evolution of Crème Brûlée has inspired countless versions and adaptations, including the Crème Brûlée Cake. As bakers experiment and reinterpret classic recipes, they take influences from various global cuisines, leading to an exciting culinary evolution that blends tradition with creativity.

Regionally, you can find variants of Crème Brûlée across various cultures, each bringing unique spices and flavors to the basic recipe. From the creamy textures of classic French crème brûlée to adaptations that incorporate local ingredients, these variations showcase the versatility of this beloved dessert in different culinary landscapes.

Ingredient Deep Dive

– **Heavy Cream**: Heavy cream is essential for creating that rich custard base. Its high-fat content contributes to a smooth and luscious texture, making it a crucial ingredient in the Crème Brûlée Cake. Nutritionally, cream provides a good source of calcium, essential for bone health. When selecting cream, opt for pasteurized varieties, and store it in the refrigerator. If you need to substitute, half-and-half can work in a pinch but may not provide the same creaminess.

– **Egg Yolks**: Egg yolks play a pivotal role in crafting the custard. They add richness and the characteristic yellow pigmentation that brings warmth to the dish. When sourcing eggs, opt for organic or free-range when possible for better flavor and nutritional benefits. Store them in the refrigerator to maintain freshness. If you’re looking for substitutes, custard powder or silken tofu can work in specific recipes, although the texture will differ.

– **Granulated Sugar**: This key ingredient sweetens the custard and is essential for creating the crisp caramel topping. Besides adding sweetness, granulated sugar aids in the texture of the cake, making it light and fluffy. For optimal results, choose a high-quality sugar for your recipes. To keep granulated sugar fresh, store it in an airtight container. Brown sugar can be used as a substitute, giving the cake a richer flavor profile, though it may alter the color.

– **Vanilla Beans**: The use of vanilla beans elevates the flavor profile to luxurious levels. Beans contain tiny seeds, which provide bold, aromatic characteristics that are essential for a dessert like Crème Brûlée. When selecting vanilla beans, look for plump and shiny ones, indicating freshness and flavor. Store them in a cool, dark place to preserve their potency. Vanilla extract can be a substitute; however, the flavor will not be as intense and aromatic.

Common Mistakes to Avoid

  • Not tempering the egg yolks: Failing to temper the yolks when adding hot cream can result in scrambled eggs instead of a smooth custard.
  • Overmixing the batter: Liquid ingredients should be just combined; overmixing may lead to a dense cake, deviating from the desired light texture.
  • Using cold ingredients: Ensure that eggs and cream are at room temperature to achieve a better emulsion and consistency in your batter.
  • Ignoring oven temperature: An oven that is too hot can cause the custard to set improperly, while one that is too cool may not cook the cake through.
  • Burning the sugar: When caramelizing the sugar topping, keep a close watch; the sugar can quickly go from perfectly caramelized to burnt if left unattended.
  • Not using the right baking dish: The type of pan can affect how heat distributes, potentially leading to uneven cooking.
  • Skipping the cooling phase: Allowing the cake to cool completely is crucial; cutting it warm can lead to a messy presentation.
  • Using too much sugar for the topping: A thick layer of sugar can lead to difficulty in obtaining the desired caramelization.

Essential Techniques

– **Tempering the Eggs**: This technique is vital for creating a smooth custard. By gradually introducing hot cream to the egg yolks, you prevent the yolks from cooking too quickly. To master this technique, whisk the yolks continuously while slowly pouring in the cream. Look for a silky, even texture—if the mixture is grainy, it’s an indicator of overcooked yolks.

– **Caramelizing Sugar**: Achieving a perfectly caramelized crust requires patience and attention. Use a kitchen torch for even caramelization, moving in circular motions to avoid burning any one spot. The final texture should be crisp to the touch yet not too thick. Practice will help hone your technique, and visual cues include a bright amber color before it reaches the point of caramelization.

Pro Tips for Perfect Crème Brûlée Cake

– Always sift your flour before incorporation to remove clumps and ensure a lighter, fluffier cake.
– Experiment with different flavored sugars for the caramel topping, such as cinnamon or cocoa, for a unique twist.
– Use a high-quality vanilla extract if vanilla beans are unavailable, but note the flavor may differ.
– Set up the kitchen torch ahead of time and practice before caramelizing the cake to feel confident in achieving the desired result.
– Blend the custard mixture thoroughly but avoid incorporating too much air, which can cause bubbles in the final texture.
– Invest in an oven thermometer to ensure accurate temperature readings and consistent baking results.
– Allow the cake to chill completely before topping with sugar for a better surface for caramelization.
– Consider chilling the cake overnight; it enhances the flavors and promotes a smoother custard.

Variations and Adaptations

– **Regional variations**: Explore flavors from various cultures by adding lavender or coconut, inspired by French or tropical desserts.
– **Seasonal adaptations**: Substitute seasonal fruits like raspberries or mangoes in the cake batter for a fresh twist.
– **Dietary modifications**: Create gluten-free versions by substituting regular flour with almond or coconut flour, achieving a nutty flavor.
– **Flavor variations**: Experiment with chocolate, matcha, or espresso powder in the batter to infuse unique flavors.
– **Texture modifications**: Consider chilling the custard longer for a firmer consistency, perfect for those who enjoy a more set dessert.
– **Presentation alternatives**: Serve in individual ramekins for a personal touch, garnished with fresh berries or mint leaves for added allure.

Serving and Presentation Guide

To create an eye-catching presentation, consider plating techniques that highlight the Crème Brûlée Cake’s elegant design. Start by carefully slicing the cake with a serrated knife, ensuring a clean edge. Arrange each slice on a stylish dessert plate, allowing the glossy top layer to shine.

For garnishing, consider topping with lightly whipped cream or a scoop of vanilla ice cream for an indulgent touch. Fresh seasonal fruits, such as berries or citrus slices, can add color and enhance flavor, while sprigs of mint can provide a vibrant contrast. For a more modern approach, serve with a drizzle of chocolate or caramel sauce along the plate, adding depth to the presentation.

Temperature is crucial; this cake shines when served slightly chilled, allowing the flavors to develop while ensuring the custard remains creamy. Keep portion control in mind; this dessert is rich, and a smaller slice can be just as satisfying, especially when served with accompanying flavors that complement its richness.

Wine and Beverage Pairing

The right pairing can elevate your Crème Brûlée Cake experience. A sweet dessert wine such as a Sauternes or Moscato complements the cake’s rich vanilla and caramel flavors beautifully. The sweetness in these wines aligns with the dessert, creating a harmonious taste sensation.

For non-alcoholic alternatives, consider serving sparkling water infused with citrus or herbal notes, which can cleanse the palate between bites. A well-brewed cup of coffee can also enhance the experience, particularly if it features slight bitterness to balance the cake’s sweetness.

Temperature considerations are vital in pairing; serve dessert wines chilled, while coffee should be hot for optimal flavor release. Offering a variety of drink options ensures that your guests find the perfect compliment to their slice of heaven.

Storage and Shelf Life

When it comes to storage, keep your Crème Brûlée Cake in the refrigerator, where it can last for up to 4 days. Place it in an airtight container or cover it tightly with plastic wrap to prevent it from absorbing other flavors.

Monitor the cake for signs of spoilage, such as an off smell or changes in texture—both can indicate it’s time to discard the dessert. Reheating the cake is not recommended, as it can alter the desired creamy texture of the custard.

If you wish to freeze the cake, wrap each slice in plastic wrap followed by aluminum foil for an extended shelf life of about 3 months. When ready to enjoy, allow it to thaw in the refrigerator overnight for optimal taste and texture.

Make Ahead Strategies

If you’re planning for a special occasion, preparing the Crème Brûlée Cake a day ahead is an excellent strategy. You can bake the cake and prepare the custard, then chill them together to allow the flavors to meld beautifully.

Between steps, make sure to store the layers covered to prevent drying out. Assess the quality impact; chilling overnight enhances the flavors, making it even more indulgent. When it’s time to serve, quickly sprinkle and caramelize the sugar top right before plating to maintain the crunchiness.

Consider adding garnishes, such as whipped cream or fresh fruits, just prior to serving to maintain their freshness and visual appeal.

Scaling Instructions

Scaling the Crème Brûlée Cake recipe can be easily adapted to suit the number of servings you need. If halving the recipe, use smaller baking pans to ensure an even bake. Keep in mind that cooking times may vary, so it’s crucial to monitor doneness closely.

Conversely, if you are doubling or tripling the recipe, ensure you have sufficient mixing bowls and baking pans on hand. Adjusting cooking times might be necessary if you are using larger pans, so always conduct the toothpick test to check for doneness.

Consider storage space when scaling; a larger batch may require more refrigerator space for proper storage, especially if you plan to chill the cake or need to store unrefrigerated items separately.

Nutritional Deep Dive

Analyzing the macro breakdown reveals that the Crème Brûlée Cake is largely carbohydrate-based due to the sugar content, along with a significant amount of fats from the cream and butter. Protein primarily comes from the eggs, offering a slight balance to the overall dessert.

With regards to micronutrient analysis, the cake provides calcium and vitamins A and D from the essence of heavy cream and eggs, contributing to overall health benefits. Moderation is key, as the richness of the cake makes it a treat rather than a staple.

For those mindful of dietary considerations, breaking down the serving size is essential. Enjoying a small slice provides enjoyment without excessive calorie intake. Weight management becomes manageable when treats like this are savored, rather than consumed in heavy portions.

Dietary Adaptations

For gluten-free enthusiasts, substitute conventional flour with almond flour or a gluten-free blend in the cake batter. These alternatives maintain the cake’s fluffiness while accommodating dietary needs.

Dairy-free options can be created using coconut cream combined with almond or oat milk for a unique flavor that aligns with the essence of crème brûlée. Substitute vegan butter for a comparable richness while still keeping it plant-based.

Those following a low-carb or keto diet can use erythritol or stevia as sugar substitutes, ensuring you maintain that sweet indulgence without the carbohydrates. In contrast, paleo followers would appreciate a recipe swap emphasizing nut flours and natural sweeteners.

If you need to accommodate other specific diets, such as low-FODMAP, consider checking ingredient compatibility thoroughly to ensure everyone can join in the feast without concern.

Troubleshooting Guide

– **Texture issues**: If your cake is too dense or gummy, consider revisiting your mixing technique; overmixing should be avoided to maintain tenderness.
– **Flavor balance**: Should your cake taste overly sweet, balance it with a pinch of salt or by serving it with tart fruits to counteract the sweetness.
– **Temperature problems**: Make sure your oven isn’t running hot or cold by utilizing an oven thermometer; an inaccurate oven can lead to undesirable baking results.
– **Equipment challenges**: If your kitchen torch fails when caramelizing sugar, utilize the broiler option, but keep a close eye to prevent burning.
– **Ingredient substitutions**: When replacing custard staples, always consider the moisture content and adjust other ingredients as needed to maintain integrity.
– **Timing concerns**: If you notice your custard isn’t setting up, it may need additional baking time or a slight oven adjustment; monitor closely for best results.

Recipe Success Stories

Our readers have shared numerous success stories following the Crème Brûlée Cake recipe, sharing how they wowed their friends and family with this indulgence. Many have enjoyed customizing the flavors, such as adding espresso powder for a coffee-infused twist.

Photography enthusiasts have embraced showcasing their creations, often capturing the perfect caramelized surface, leading to inspiring new entries on social media platforms. Feedback comes filled with creativity, suggesting variations with vibrant fruits or seasonal herbs for added flair.

The community engagement surrounding this recipe highlights the joy of baking and sharing; readers have come forward with suggestions that have enriched the recipe refinement process. Each success story adds a rich layer to the Crème Brûlée Cake legacy.

Frequently Asked Questions

Can I make the Crème Brûlée Cake ahead of time?
Yes, this cake can be made a day in advance. Just ensure that it is kept in the refrigerator until ready to serve to maintain freshness.

What is the best way to store leftover cake?
Store any leftover cake in an airtight container in the refrigerator for up to 4 days.

How do I achieve the perfect caramelization on top?
Use a kitchen torch for the best results, moving in circular motions until you achieve a crisp, golden layer. If you don’t have a torch, you can carefully use the broiler.

Can I freeze the Crème Brûlée Cake?
Yes, but it’s best to freeze it sliced. Wrap individual portions tightly in plastic then foil to prevent freezer burn.

What can I use instead of egg yolks?
For a vegan alternative, silken tofu can be blended until smooth to mimic the custard consistency, although it won’t have an exact flavor match.

Why is my custard lumpy?
This usually occurs if the egg yolks were cooked too rapidly. Always temper the yolks gradually with the hot cream to avoid this issue.

What are common flavor variations for this cake?
Popular flavor variations include chocolate, orange zest, and coffee, all of which pair beautifully with the custard base.

How can I reduce the sugar content in the recipe?
You can experiment with sugar alternatives like monk fruit sweetener or stevia to match your preferred sweetness without the excess calories.

What is the key to prevent the custard from cracking?
Bake the cake in a water bath to keep the temperature even and help maintain moisture while cooking.

Can I substitute heavy cream with another dairy?
Yes, half-and-half or light cream can substitute heavy cream, although the richness may be reduced slightly.

Additional Resources

Looking to explore more? Discover related recipes that will complement your newfound baking skills, such as classic French tarts or rich cheesecakes. Enhance your culinary toolkit with technique guides ranging from basic baking methods to advanced pastry techniques, offering various ways to elevate your dessert game.

Learn about ingredients to understand the nuances and best practices for ensuring high-quality components in your recipes. With the right equipment recommendations at your fingertips, you can confidently navigate your way through various culinary endeavors.

Lastly, keep an eye out for seasonal variations, as these can inspire fresh takes on classic recipes, breathing new life into your baking repertoire.

Join the Conversation

Your culinary journey is just beginning! Join us on social media to share your own Crème Brûlée Cake creations—use the hashtag #CrèmeBrûléeCakeSuccess to connect with other baking enthusiasts. Photography tips abound, allowing you to capture the beauty of your baked goods while sharing with the world.

Engage in recipe reviews as you refine your baking skills, and be sure to contribute your unique twists on this classic dessert. Community engagement is what makes baking a joyful endeavor, allowing everyone to partake in the delicious experiences that great food can offer.

The Recipe

Crème Brûlée Cake

Serves: 8

Prep Time: 30 mins

Cook Time: 50 mins

Total Time: 80 mins

Kitchen Equipment Needed

  • Mixing bowls
  • Whisk
  • Kitchen torch
  • Baking dish
  • Oven thermometer
  • Rubber spatula

Ingredients

  • 2 cups heavy cream
  • 4 large egg yolks
  • 3/4 cup granulated sugar, divided
  • 1 vanilla bean, split and seeded
  • 1/2 cup all-purpose flour
  • 1/2 cup unsalted butter, softened
  • 1/4 teaspoon salt

Directions

  1. Preheat oven to 325°F (163°C) and prepare a baking dish for a water bath with hot water.
  2. In a saucepan, heat cream and vanilla bean over medium heat until simmering. Remove from the heat and let steep.
  3. In a bowl, whisk egg yolks and 1/2 cup sugar until pale and thick.
  4. Gradually whisk in the hot cream, tempering the yolks. Strain the mixture to remove lumps.
  5. In another bowl, combine flour, butter, remaining sugar, and salt until smooth. Combine with custard mixture.
  6. Pour into prepared dish and place in the water bath. Bake for 50 minutes or until set.
  7. Cool at room temperature before chilling in the fridge for at least 4 hours.
  8. Before serving, sprinkle a thin layer of sugar on top and use a kitchen torch to caramelize until golden.

Recipe Notes

  • For added flavor, consider adding a pinch of espresso powder to the cake mixture.
  • Ensure that the cream does not boil, as it can affect the custard’s texture.
  • Individual ramekins can be used instead of one large dish for personal servings.

Decadent Chocolate Swirl Cheesecake Slice Recipe You’ll Love

Chocolate Swirl Cheesecake Slice: Decadent Dessert Delight

⚖️
Difficulty
Medium

⏲️
Prep Time
20 mins

🕒
Cook Time
50 mins

⏱️
Total Time
70 mins

🍽️
Servings
12 slices

Indulging in a slice of Chocolate Swirl Cheesecake is an experience that tantalizes the senses. The rich, velvety cream cheese filling laced with a decadent chocolate swirl offers a perfect balance of flavors and textures. This delightful dessert is not just a feast for your palate; it’s a visual masterpiece with its marbled chocolate presentation. Whether you’re hosting a dinner party or simply treating yourself to a sweet escape, this cheesecake slice is bound to impress.

Every bite of this Chocolate Swirl Cheesecake Slice is a celebration of sweet and creamy goodness. The luscious chocolate counterbalances the tangy flavor of the cheese, making it a delightful combination. The crust, with its buttery crunch, provides the perfect foundation for the creamy filling. As the cheesecake bakes, the aroma fills the kitchen, teasing everyone nearby and increasing anticipation for that first heavenly slice.

Quick Recipe Highlights

  • Flavor Profile: Rich chocolate paired with a creamy, tangy filling creates an irresistible combination.
  • Texture: Smooth cheesecake with a velvety body and a crunchy graham cracker crust.
  • Aroma: A heavenly blend of chocolate and baked cream cheese that wafts throughout your kitchen.
  • Visual Appeal: Beautifully marbleized slices that showcase the chocolate and cream cheese swirls.
  • Skill Level Needed: Medium difficulty; requires some baking experience but is accessible to all.
  • Special Equipment: A springform pan is recommended for perfect baking and presentation.

Recipe Overview

  • Difficulty Level: This recipe is classified as medium. While it doesn’t require specialized skills, attention to detail in the mixing and baking processes is essential for achieving that perfect swirl.
  • Category: Dessert – perfect for any sweet occasion, ranging from family gatherings to elegant dinners.
  • Cuisine: Combining classic ingredients from traditional cheesecake recipes with contemporary flair, this dessert transcends cultural boundaries with its universal appeal.
  • Cost: Approximately $15 for 12 servings, making it both an economical and delightful way to satisfy your sweet tooth.
  • Season: Great for any season, but especially delightful during celebratory occasions such as holidays and birthdays.
  • Occasion: Ideal for birthday parties, holiday feasts, or even a cozy night in to pamper yourself with a sweet treat.

Why You’ll Love This Recipe

Each bite of this Chocolate Swirl Cheesecake Slice offers a blissful medley of flavors that dance on your taste buds. The combination of chocolate’s sweetness with the creaminess of the cheese creates a dessert that’s totally irresistible. The rich velvety texture complements the slight crunch of the crust, giving you a proper mouthfeel that enhances the overall experience.

This cheesecake not only captivates the palate but is also convenient to prepare. With simple steps and straightforward ingredients, it allows both novice and experienced bakers to create a show-stopping dessert without excessive effort. Once you master this recipe, you’re left with a foundational idea that you can adapt and experiment with.

Nutritionally, cheesecake can offer certain benefits depending on ingredient selections. Using lower-fat cream cheese can reduce the calorie count while still providing a rich and satisfying dessert. Additionally, you can enhance its nutritional value by incorporating yogurt for added probiotics.

Gathering friends or family around a beautiful cheesecake creates an inviting atmosphere perfect for socializing and sharing. The process of serving and enjoying cheesecake together can make any occasion feel special, turning an ordinary get-together into a memorable celebration.

Lastly, this Chocolate Swirl Cheesecake Slice is cost-effective while impressing guests with its gourmet feel. With a few staple ingredients, you can create a restaurant-quality dessert right at home, proving that delightful indulgence doesn’t always have to break the bank.

Historical Background and Cultural Significance

The origins of cheesecake can be traced back to ancient Greece, where it was served to athletes during the first Olympic games. This early version utilized simple ingredients like cheese and honey, showcasing the culinary simplicity of the time. As recipes evolved, the delightful dessert took new shapes depending on regional preferences, with variations flourishing across different cultures.

In the United States, cheesecake gained popularity in the 19th century, particularly with the introduction of cream cheese as a key ingredient. This shift allowed for the creation of what we now think of as the traditional New York-style cheesecake, which paved the way for innovative variations like our Chocolate Swirl Cheesecake.

Cheesecake’s cultural significance extends beyond its delicious taste; it often symbolizes celebration and togetherness. From weddings to festivals, cheesecake has found its place in heartfelt gatherings, representing happiness and indulgence.

Modern adaptations of cheesecake recipes evolve yet remain rooted in tradition. Chefs around the world experiment with flavors and styles, incorporating local ingredients to craft unique versions that appeal to a wider audience, such as this rich chocolate variation.

Ingredient Deep Dive

Chocolate serves as the star ingredient for this cheesecake, adding richness and depth. This beloved treat has ancient roots, with cacao being cultivated by the Mesoamerican civilizations as early as 1500 BC. The modern chocolate we use today is loaded with antioxidants and has been linked to numerous health benefits, including improved heart health and mood enhancement. When selecting chocolate for this recipe, opt for high-quality dark chocolate for deeper flavor and richness, and remember to store it in a cool, dark place to maintain freshness.

Graham cracker crumbs create the crust, providing a satisfying crunch and a subtle sweetness. Originating from the invention of Graham flour by Sylvester Graham in the 19th century, graham crackers became a pantry staple for many desserts. Nutritionally, they offer fiber while delivering those beloved crisp textures. When storing leftover crumbs, keep them in an airtight container to maintain freshness, and feel free to substitute with digestive biscuits for a twist.

Lastly, cream cheese is crucial for the filling. With origins linked to early American civilizations, this creamy cheese has revolutionized dessert practices around the globe. Cream cheese is rich in calcium and can be found in reduced-fat versions, making it a versatile addition to desserts. Choosing a high-fat version yields a richer flavor, while lower-fat options can help cut calories. Keep it refrigerated and use it by the expiration date for optimal flavor.

Common Mistakes to Avoid

  • Not letting the cream cheese soften: Starting with cold cream cheese can lead to a lumpy filling. Always allow it to come to room temperature first.
  • Overmixing the batter: Overmixing can incorporate too much air, leading to cracks in the cheesecake. Mix until just combined.
  • Skipping the water bath: A water bath helps stabilize the cheesecake during baking. If omitted, uneven baking or cracking may occur.
  • Not allowing the cheesecake to cool properly: Rapid temperature changes can cause cracks. Allow it to cool gradually before refrigerating.
  • Cutting too soon: Slicing the cheesecake before it has fully set can result in a messy presentation. Give it at least 4 hours in the fridge before cutting.
  • Forgetting to line the pan: Always line the bottom and sides of your pan with parchment paper for easy removal.
  • Using the incorrect pan size: Stick to the specified pan size in the recipe to ensure proper cooking times and proportions.
  • Not measuring ingredients correctly: Baking is a science, so precise measurements are crucial for your cheesecake’s success.
  • Neglecting decorations: A well-presented cheesecake enhances its appeal. Always consider how you want to garnish your cheesecake before serving.

Essential Techniques

Understanding the art of making a cheesecake requires mastering the technique of mixing ingredients. Incorporating everything at room temperature, followed by careful mixing, ensures a smooth batter. Avoiding overmixing will prevent undesirable air pockets, leading to a cheesecake that remains level as it bakes, without unsightly cracks.

The water bath technique is paramount in creating the perfect cheesecake. It helps maintain an even temperature and moisture level during baking, promoting even cooking. Learn to wrap the springform pan securely in foil to prevent water from entering while providing a gentle environment that enhances texture.

Pro Tips for Perfect Chocolate Swirl Cheesecake Slice

For guaranteed success, always use high-quality chocolate for the best flavor. Melt and let it cool before swirling into the cheesecake mixture for effortless mixing.

When preparing your crust, use finely crushed crumbs and mix with melted butter until even. This ensures a firm base that holds together upon slicing.

To create beautiful swirls, drop spoonfuls of chocolate on top of your cheesecake batter, then use a knife or skewer to swirl gently. Too much mixing will destroy the visual effect.

Equip yourself with a cake tester or toothpick to check for doneness; the cheesecake should be set but still slightly jiggly in the center.

Once the cheesecake is fully cooked, let it cool in the oven with the door ajar for at least an hour. This helps prevent cracking due to sudden temperature changes.

Always refrigerate your cheesecake overnight, as this helps improve flavor and allows it to set properly, making it easier to slice.

Enjoy serving with a dollop of whipped cream and fresh berries for added flair that complements the rich chocolate.

When cutting, use a hot knife for clean slices, dipping it in hot water and wiping it dry between cuts.

Variations and Adaptations

Consider experimenting with seasonal adaptations, such as adding pumpkin spice for a fall-inspired dessert or incorporating fresh berries in the summer to balance flavors beautifully. These can add a refreshing twist while maintaining the core structure of your cheesecake.

For those watching their carb intake, a low-carb sweetener can easily substitute for regular sugar in the filling. This yields a dessert that doesn’t compromise on taste while accommodating dietary preferences.

Certain variations focus on flavor combinations, like espresso for a mocha cheesecake or salted caramel for an added layer of sweetness and savory depth. Don’t shy away from mixing flavors before pouring them into the crust.

Texture modifications can include adding a layer of chocolate ganache on top for a luscious finish or sprinkling sea salt for a balanced flavor punch. Presentation enhancements, such as chocolate shavings or edible flowers make for stunning visual options.

Serving and Presentation Guide

For a delightful presentation, plate your cheesecakes with artistry. Consider using a dessert plate for each slice to create a pleasing visual appeal. Garnish with fresh whipped cream, chocolate shavings, or berries to enhance its appearance and flavor profiles.

Use a warm knife to slice through your cheesecake smoothly, ensuring clean edges and enhancing the aesthetic for your guests. A drizzle of chocolate sauce or caramel around the edges of the plate can elevate the overall presentation.

Serving temperature matters—cheesecakes are best served slightly chilled, allowing the flavors to bloom without being too cold. Aim to remove them from the refrigerator about 30 minutes before serving for optimal texture.

When considering portion control, keep slices reasonable to maintain balance with sweetness. Each slice should be satisfying but leave room for more flavors, as portioning can create a more enjoyable eating experience.

Wine and Beverage Pairing

Pair your Chocolate Swirl Cheesecake with a dessert wine like a port or a rich ruby merlot, enhancing the chocolate’s sweetness. Their deep flavors complement the richness of the cheesecake and provide a luxurious taste experience.

If you are looking for non-alcoholic options, a rich hot chocolate or coffee can beautifully complement the dessert, enhancing the rich chocolate notes.

For tea lovers, consider pairing with a strong chai or an Earl Grey, where the aromatic spices can contrast delightfully with the creamy cheesecake.

Ensure beverages are served at ideal temperatures; chilled wines enhance the sweetness while hot beverages can negate strong flavors when paired.

Storage and Shelf Life

To preserve the integrity of your Chocolate Swirl Cheesecake Slice, store it in an airtight container in the refrigerator. Proper cooling can extend longevity up to a week while maintaining its delicious flavors.

If you anticipate leftovers, consider freezing individual slices; wrapping them in plastic wrap followed by foil ensures both moisture retention and flavor preservation. Thaw each slice overnight in the fridge before enjoying once more.

Watch for signs of spoilage, including off-odors, undesirable changes in texture, or unusual discoloration. If any signs appear, it’s best to err on the side of caution and discard.

Reheating is straightforward—allowing the cheesecake to come to room temperature before serving will restore its original creaminess and enhance flavors, avoiding the need for heating.

Make Ahead Strategies

For those hosting events, consider creating your cheesecake the day before. This allows overnight chilling, which improves flavors through marination. It also offers convenience, reducing stress on the event day.

Storage between steps is straightforward; the crust can be made and stored in the refrigerator or freezer while mixing the filling can be done separately until ready to bake.

Assessing quality impacts means understanding that some flavors intensify overnight, while ensuring a proper seal during refrigeration keeps moisture locked in, maintaining the texture.

Assembly tips include assembling your cheesecake on the serving plate to avoid damage during transfer. This prevents breaking and maintains a perfect slice.

Fresh elements, like whipped cream or fruit toppings, should be added right before serving to keep them at optimal freshness.

Scaling Instructions

Scaling this recipe up or down is simple. Halving the recipe translates into smaller parties, whereas doubling for a big gathering ensures everyone enjoys a slice.

Equipment adjustments are crucial when scaling; be mindful of baking times and sizes, ensuring you follow through with suitable pan changes to fit any new quantity.

If you’re doubling or tripling the recipe, keep an eye on cooking times to accommodate extra batter. Adjustments accordingly in your oven may be required, particularly when needing to increase overall baking time.

When it comes to storage considerations, remember to allow for more space in your fridge or freezer for larger batches. Properly label each container to identify servings and dates.

Nutritional Deep Dive

This cheesecake offers a delightful macro breakdown with protein from cheese, fat from cream, and carbohydrates from sugar and crust. Each slice provides a satisfying balance that contributes to dietary needs in moderation.

Micronutrient analysis reveals essential vitamins such as calcium from cream cheese, promoting bone health while monitoring sugar intake promotes better energy levels when indulging responsibly.

Nutritional advantages arise from considering ingredient modifications; using yogurt increases protein without excessive calories, while darker chocolate enhances antioxidants.

Be mindful of portion analysis. Control your servings by considering the richness of the cheesecake; a small slice can suffice for a sweet craving.

Weight management tips suggest enjoying this dessert occasionally helps balance strict diets with indulgent treats, emphasizing moderation over restriction.

Dietary Adaptations

If you aim for gluten-free options, you can substitute regular graham crackers with gluten-free versions to maintain that delightful crust. Many stores offer gluten-free alternatives that work perfectly in this recipe.

For those seeking dairy-free options, using plant-based cream cheese available on the market can make this cheesecake accessible while keeping the flavor profile intact.

Vegan enthusiasts can replace the eggs with a mixture of silken tofu or a commercially available egg substitute, ensuring that you can enjoy this dessert without animal products.

Low-carb dieters can explore recipes using almond flour for the crust and erythritol for sweetening to align with their nutritional goals.

If you follow a keto or paleo diet, this recipe can be adapted to eliminate excess sugars and utilize natural sweeteners that meet those strict dietary frameworks.

For those on low-FODMAP diets, using lactose-free cream cheese is a simple yet effective way to adapt this recipe to fit dietary restrictions without sacrificing flavor.

Troubleshooting Guide

If you encounter texture issues, like a dense consistency, double-check your mixing methods; excessively beating introduces too much air. Keep it gentle for a silky smooth batter.

Flavor balance problems often arise from adjusting sugar levels; carefully taste as you add sweeteners, striving for the right balance without overpowering the cheesecake’s creamy finesse.

Temperature problems can arise if the oven is miscalibrated or opened during baking. Consider investing in an oven thermometer for accurate cooking results as well as allowing the cheesecake to rest once removed from heat.

If you run into equipment challenges, ensure that your tools are to the specifications required in the recipe; using a mixer that isn’t powerful enough could lead to undesirable textures and blends.

Ingredient substitutions may lead to disparities; understanding that not all ingredients perform the same can impact final results. Stick close to the recipe as much as possible to navigate these changes successfully.

Timing concerns can throw off your baking; utilizing timers while multi-tasking helps ensure that your cheesecake doesn’t over or under-cook, protecting its rich features.

Recipe Success Stories

The community feedback surrounding this Chocolate Swirl Cheesecake Slice is incredibly encouraging. Many have raved about the perfect combination of flavors, highlighting it as a standout dessert for various occasions.

Variation successes often arise from folks adapting the recipe to include their favorite flavors, with stories of delicious berry swirls and festive peppermint additions garnering wide applause.

Reader suggestions seen in online communities have led to fresh fruit toppings or adding zest layers that enhance traditional flavors, making the dessert even more vibrant.

Photography tips shared among readers include showcasing the marbled patterns well, with many encouraging a dark background to highlight the rich colors of the cheesecake.

Frequently Asked Questions

Q: Can I make this cheesecake in advance?
A: Yes! In fact, making it a day before helps develop flavor and ensures that it sets perfectly. Store it covered in the fridge until you’re ready to serve.

Q: What size pan should I use?
A: A 9-inch springform pan is recommended for this recipe. This size allows for the cheesecake to bake evenly and helps with easy removal.

Q: How do I prevent cracks in my cheesecake?
A: Cracks are often caused by rapid temperature changes. Bake your cheesecake in a water bath and avoid sudden peaks in heat for even baking.

Q: What’s the best way to store leftovers?
A: Keep any leftover cheesecake covered in an airtight container in the refrigerator for up to a week. It’s great for quick snacking!

Q: Can I freeze this cheesecake?
A: Absolutely! Wrap individual slices tightly in plastic wrap and place them in a freezer bag. They can last up to three months.

Q: What happens if I overbake the cheesecake?
A: Overbaking can lead to a dry and crumbly texture. Bake until the edges are set and the center is just slightly jiggly to prevent this.

Q: How can I add flavor variations to the cheesecake?
A: You can incorporate different flavorings like vanilla extract, espresso, or citrus zest for a unique twist on the classic cheesecake flavor.

Q: Is this cheesecake suitable for vegans?
A: Yes, you can modify the recipe to be vegan-friendly by using plant-based cream cheese and substitutes for eggs.

Q: Why is my cheesecake too dense?
A: This could result from overmixing the batter. Always mix gently to keep air pockets in check for a light and fluffy cheesecake.

Q: Can I use a different type of crust?
A: Yes! Feel free to try an Oreo crust or any other favorite cookie to change things up while still getting a delicious base!

Additional Resources

For more delightful treats, explore related recipes such as strawberry shortcake cupcakes or pumpkin spice tartlets that are sure to impress. Each offers unique flavors and presentations that can complement this cheesecake.

If you’re interested in mastering more techniques, our baking guides cover everything from perfecting crusts to glazing your desserts for visual appeal. Discover how to elevate your baking game today!

Ingredient information provides insights into seasonal or locally sourced alternatives for various ingredients, helping you maintain freshness while embracing adventurous cooking.

Equipment recommendations are available to assist with choosing the right tools for baking fantastic desserts at home, including mixers, pans, and quality baking sheets.

Don’t miss out on seasonal variations that highlight seasonal fruits or spices, allowing you to adapt your recipes based on what’s fresh and abundant.

Join the Conversation

Share your experiences with this recipe on social media, we love seeing how your versions turn out! Tag us using your photos of the beautiful Chocolate Swirl Cheesecake Slices you’ve made.

Photography tips shared by our community can offer insight into capturing the perfect angles to show off your finished product. A little attention to detail can make a big difference!

Be a part of the community by reviewing the recipe and sharing your ideas for possible adaptations or suggestions. This collaborative approach enriches the cooking experience for everyone involved.

Engagement with fellow bakers helps foster inspiration, whether through seeking advice or offering your unique variations that may inspire others!

The Recipe

Chocolate Swirl Cheesecake Slice

Serves: 12 slices

Prep Time: 20 mins

Cook Time: 50 mins

Total Time: 70 mins

Kitchen Equipment Needed

  • 9-inch springform pan
  • Mixing bowls
  • Electric mixer
  • Rubber spatula
  • Oven
  • Water bath setup (baking dish)

Ingredients

  • 1 1/2 cups graham cracker crumbs
  • 1/2 cup unsalted butter, melted
  • 4 (8-ounce) packages cream cheese, softened
  • 1 cup granulated sugar
  • 4 large eggs
  • 2 teaspoons vanilla extract
  • 1 cup sour cream
  • 1 cup dark chocolate, melted

Directions

  1. Preheat the oven to 325°F (160°C). Prepare the springform pan by lightly greasing it or lining with parchment paper.
  2. In a mixing bowl, combine graham cracker crumbs and melted butter until evenly moistened. Press the mixture into the bottom of the pan to form the crust.
  3. In a large mixing bowl, use an electric mixer to beat the cream cheese until smooth. Gradually add the sugar, continuing to mix until well fused.
  4. Add the eggs one at a time, ensuring each is fully combined before adding the next one. Mix in the vanilla extract and sour cream until smooth and creamy.
  5. Pour half of the cheesecake mixture into the prepared crust. Swirl in half of the melted chocolate, and then pour in the remaining cream cheese mixture.
  6. Add the remaining melted chocolate on top and use a knife to create the beautiful swirls in the batter. Do this gently to avoid mixing too much.
  7. Place the springform pan into a larger baking dish filled with hot water to create a water bath, then carefully place it in the oven.
  8. Bake for 50 minutes or until the edges are set and the center slightly jiggles. Turn off the oven and let the cheesecake cool in the oven with the door shut for one hour.
  9. Remove from the oven and let it cool completely before transferring to the refrigerator to chill for at least 4 hours or overnight for the best results.
  10. Once chilled, carefully remove the sides of the springform pan. Slice and serve with whipped cream and chocolate shavings if desired.

Recipe Notes

  • Feel free to experiment with flavored extracts like almond or orange.
  • If you wish, you can decorate the cheesecake with fresh berries or mint leaves for garnish.
  • Store leftovers covered in the refrigerator for up to a week or freeze for up to three months.
  • This recipe is easily adjustable; consider swapping out ingredients to suit your taste or dietary needs.

Delicious Garlic-Butter Chicken Bites with Creamy Parmesan Pasta

Garlic-Butter Chicken Bites with Parmesan Cream Pasta: A Creamy Delight for Dinner

⚖️
Difficulty
Easy

⏲️
Prep Time
15 mins

🕒
Cook Time
20 mins

⏱️
Total Time
35 mins

🍽️
Servings
4 servings

Garlic-Butter Chicken Bites with Parmesan Cream Pasta is an exquisite dish that brings richness and comfort to your dinner table. The tender and juicy chicken bites, saturated in a luscious garlic-butter sauce, marry beautifully with the creamy Parmesan pasta. The amalgamation of flavors dances on your palate – the garlic’s aromatic presence complemented by the nuttiness of the Parmesan cheese. This dish not only fills your stomach but warms your heart, making it the perfect meal for busy weeknights or a special gathering with loved ones.

What makes this recipe stand out is its simplicity without sacrificing flavor. With just a few ingredients, you’ll have a hearty meal that impresses both in taste and presentation. Creamy pasta can often feel heavy, but the garlic-butter sauce adds a light, fragrant touch that enhances the overall dining experience. Add a sprinkle of fresh herbs for a pop of color and a burst of freshness, transforming your simple dinner into a gourmet affair.

Quick Recipe Highlights

  • Flavor Profile: Rich and savory with hints of garlic and creamy Parmesan, balanced by the tender chicken.
  • Texture: The chicken bites are juicy, while the pasta is silky and creamy, creating a mouthwatering contrast.
  • Aroma: The garlic-butter sauce releases an inviting aroma that fills your kitchen, enticing everyone to dine.
  • Visual Appeal: The golden chicken bites paired with the creamy white pasta and vibrant herbs make for an attractive presentation.
  • Skill Level Needed: This dish is simple enough for beginner cooks but can be elevated by experienced chefs with pro techniques.
  • Special Equipment: A skillet and a pot for boiling pasta are all you need, along with basic kitchen utensils.

Recipe Overview

  • Difficulty Level: This dish is classified as easy due to its uncomplicated steps and brief preparation time, making it perfect for home cooks of all levels.
  • Category: A delightful option for a main course, it shines in family dinners, casual gatherings, or romantic evenings.
  • Cuisine: Drawing inspiration from Italian-American cuisine, this recipe blends traditional flavors with modern convenience.
  • Cost: The cost of making this dish is quite economical, with primary ingredients like chicken and pasta being affordable staples.
  • Season: Garlic-Butter Chicken Bites with Parmesan Cream Pasta is versatile for any season, making it a comforting meal year-round.
  • Occasion: Ideal for weeknight dinners or cozy weekends, it’s also a crowd-pleaser for potlucks or family feasts.

Why You’ll Love This Recipe

The harmonious blend of garlic and butter permeates the chicken bites, creating a savory taste that complements the creamy pasta perfectly. Every bite is a delightful contrast between the tender chicken and pasta, enveloped in a silky sauce that feels indulgent yet comforting.

What sets this recipe apart is the convenience of preparation. With just one skillet required for cooking the chicken and sautéing the sauce, cleanup is a breeze. This ease makes it suitable for those juggling busy schedules yet yearning for a homemade meal that tastes like a restaurant specialty.

From a nutritional viewpoint, this dish provides protein from the chicken while offering carbohydrates from the pasta. The addition of garlic not only enhances flavor but also offers health benefits, making this a guilt-free indulgence.

When hosting friends or family, Garlic-Butter Chicken Bites with Parmesan Cream Pasta becomes a centerpiece that sparks conversations and creates memorable moments. Its aroma draws guests to the table, while its taste leaves a lasting impression.

In terms of cost-effectiveness, this dish utilizes affordable ingredients without compromising taste or quality. It’s a reassuring choice for any home cook looking to impress their families or guests with a delectable meal that won’t break the bank.

Historical Background and Cultural Significance

The origins of garlic and butter can be traced back centuries, with both ingredients featuring prominently in various cultures around the world. Garlic, revered for its flavor and health benefits, has been celebrated in Mediterranean cooking for generations, while butter has long been a staple in numerous culinary traditions.

Garlic-Butter Chicken Bites with Parmesan Cream Pasta represents the blend of Italian and American cuisines, where simple yet flavorful ingredients come together to create a hearty meal. This dish reflects the Italian-American community’s cooking styles, which evolved as immigrants adapted traditional recipes to suit available ingredients.

Over time, variations of this basic recipe have emerged, showcasing different sauces and cooking styles, while maintaining the same core principles of comfort and flavor. This evolution allows home cooks to personalize the dish according to their taste preferences.

Regional variations include the use of different herbs or vegetables, showcasing how this versatile recipe can be adapted to reflect local ingredients. Whether in a family kitchen or at a festive gathering, this dish embodies the spirit of sharing and togetherness.

Ingredient Deep Dive

Chicken: Chicken is a widely eaten protein source, appreciated for its versatility. Its lean meat offers essential amino acids while being lower in fat compared to red meats. When selecting chicken, look for fresh pieces with a consistent color and firm texture. Proper storage involves refrigerating or freezing, and it can be substituted with turkey for a lighter option.

Parmesan Cheese: This hard cheese originates from Italy and is renowned for its robust flavor and granular texture. Parmesan is rich in calcium and protein and adds umami to dishes. For freshness, choose a wedge to grate at home rather than pre-grated options. It pairs beautifully with many dishes, but if unavailable, pecorino Romano works well as a substitute.

Common Mistakes to Avoid

  • Overcooking the chicken can lead to dryness; ensure to cook until just done, retaining moisture.
  • Using pre-grated Parmesan may not yield the same flavor intensity; always choose fresh where possible.
  • Boiling pasta too long can result in a mushy texture; aim for al dente for the best bite.
  • Ignoring the importance of seasoning during each step can lead to a bland dish, so taste as you cook.
  • Not letting the chicken rest before cutting can result in lost juices; allow it to rest for a few minutes.
  • Using a cold skillet to sear the chicken will hinder browning; always preheat the skillet.
  • Mechanical mixing of the pasta and sauce can cause it to break apart; gently fold together for the best results.
  • Skipping the fresh herbs can diminish the visual appeal and aromatic qualities of the dish.

Essential Techniques

Searing is crucial for developing flavor through caramelization, ensuring that the chicken bite captures an appealing crust. To master it, allow the skillet to heat adequately and avoid overcrowding the pan. Look for a golden-brown color as a sign of perfectly seared meat.

Making a cream sauce requires careful attention to prevent curdling or separation. Slowly incorporating the cheese while maintaining a consistent low heat will result in a smooth, velvety sauce. Be vigilant and stir often to create a unified texture.

Pro Tips for Perfect Garlic-Butter Chicken Bites with Parmesan Cream Pasta

1. Marinate the chicken briefly in olive oil, garlic, and herbs for enhanced flavor absorption.
2. Use salted butter to add another layer of flavor to the dish, balancing the richness of the sauce.
3. Fresh herbs, like parsley or basil, make excellent garnish for a burst of color and freshness.
4. Incorporate vegetables such as spinach or peas into the pasta for added nutrition and color.
5. For a spicy kick, add red pepper flakes to the garlic-butter sauce during cooking.
6. Always have your ingredients prepared and ready before cooking; this streamlines the process significantly.
7. Experiment with different pastas for varied textures; options like penne or fettuccine work well.
8. To give leftovers an extra flavor boost, reheat them with a splash of cream or broth.

Variations and Adaptations

For a touch of regional flair, consider adapting the recipe to reflect different cuisines. For instance, you could add Italian sausage for a unique flavor profile or incorporate Mediterranean veggies for a fresh twist.

Seasonal adaptations can include roasted vegetables in the fall or summer squash and tomatoes for a sunny, bright plate. This allows one to enjoy the recipe year-round while highlighting what’s freshest and most flavorful.

Dietary modifications are also possible; swapping regular pasta with gluten-free pasta will accommodate those with gluten sensitivities. If you aim for a lighter dish, consider using zucchini noodles instead of traditional pasta.

Flavor variations can be integrated with different cheeses, such as creamy goat cheese or a spicy pepper jack, providing a delightful and unique twist.

Texture modifications can be achieved by using panko breadcrumbs on the chicken for an extra crunch instead of just sautéing it.

Presenting the dish can be done creatively by layering the pasta and chicken in a beautiful serving dish, garnishing with lemon zest and chopped herbs for added brightness.

Serving and Presentation Guide

Consider using large, shallow bowls for plating the pasta, allowing the creamy sauce to pool beautifully around the ingredients. Garnishing with fresh herbs enhances the visual appeal and adds a burst of color and aroma.

For a more elegant touch, try drizzling a bit of high-quality olive oil on top before serving, which adds flavor and a glossy sheen.

Traditional accompaniments, such as garlic bread or a fresh garden salad, can enhance the dining experience, offering texture and freshness that complements the richness of the pasta.

Modern serving suggestions might include using small cast-iron skillets for individual servings, creating a rustic charm while keeping the food warm.

When it comes to temperature considerations, ensure the dish is served hot for the best taste experience, as creamy sauces tend to lose their appeal when lukewarm.

Portion control can be managed by serving smaller amounts in visually appealing dishes, allowing guests to enjoy the indulgent flavors without overloading their plates.

Wine and Beverage Pairing

For an ideal pairing, a crisp white wine like Sauvignon Blanc complements the richness of the creamy pasta beautifully, cutting through the butter and enhancing the flavors of the chicken.

Non-alcoholic alternatives include sparkling water with a squeeze of lemon or an herbal iced tea, providing a refreshing contrast to the rich dish.

Coffee or a light tea served after the meal can nicely round out the experience, enhancing the overall enjoyment of the evening.

Temperature considerations are key when serving wine; whites should be chilled while reds served slightly below room temperature offer a balanced palate.

For a sparkling wine option, Prosecco pairs wonderfully without overpowering the dish, maintaining a light and celebratory atmosphere.

Storage and Shelf Life

Store any leftovers in an airtight container in the refrigerator. Under proper conditions, they can last up to 3 days, preserving both taste and texture.

For longer storage, the dish can be frozen, albeit understanding that the cream may alter in texture but still remain delicious. Reheating should be gently achieved on low heat to avoid breaking the sauce.

Check for signs of spoilage, like off-odors or unusual textures, before consuming. It’s crucial to ensure that leftovers remain enjoyable and safe.

Reheating instructions involve warming gently in a saucepan over low heat, sparing the creamy texture and enhancing the flavors once more without any loss.

Freezing guidelines suggest portioning out the pasta and chicken separately for better quality upon thawing, ensuring each component retains its structure when defrosted.

Make Ahead Strategies

One can prep the chicken bites ahead of time by marinating them in garlic and butter, enhancing flavor and tenderness while saving time during the main cooking session.

Storage between steps can involve preparing the cream sauce in advance; simply warm it up before mixing it with freshly cooked pasta and chicken.

Quality impact assessment reveals that while the chicken stays flavorful when marinated beforehand, avoid making the cream sauce too early, which can alter its smooth texture.

Assembly tips should include cooking the pasta just before serving to maintain its ideal texture, ensuring it doesn’t become mushy during storage.

Reheating guidelines should prioritize using low heat to preserve flavors, along with stirring in a splash of cream to rejuvenate the sauce.

Adding fresh elements, like herbs or a squeeze of lemon, just before serving can greatly elevate the dish, ensuring it tastes fresh and vibrant.

Scaling Instructions

When halving the recipe, it’s simple to divide all ingredients, ensuring a consistent flavor profile for smaller servings.

Doubling or tripling the recipe requires adjusting cooking times; you may need to cook the chicken in batches to ensure even browning and cooking throughout.

Equipment adjustments come into play when scaling up; larger pots or pans may be necessary to accommodate increased ingredients without overcrowding.

Timing modifications become important, as larger batches may take longer to cook through; maintain an eye on smaller pieces for faster cooking.

Lastly, consider storage for different quantities, ensuring there’s adequate room in your fridge for leftovers if making a big batch.

Nutritional Deep Dive

A macro breakdown of Garlic-Butter Chicken Bites with Parmesan Cream Pasta reveals a balanced meal containing protein from the chicken, carbohydrates from the pasta, and fats from the butter and cheese.

Micronutrient analysis shows essential vitamins and minerals present in garlic, like vitamin C and B6, which enhance overall health, while the presence of calcium in Parmesan supports bone health.

Health benefits also include the inclusion of garlic, recognized for its potential to bolster the immune system and enhance cardiovascular health.

Dietary considerations for this dish can accommodate variance depending on personal or cultural needs. Careful ingredient choices can make it a more inclusive menu option.

Portion analysis confirms this recipe allows for substantial servings packed with flavor yet manageable enough to avoid heaviness, fitting into most dietary patterns well.

Weight management tips would suggest recognizing portion sizes as the dish is creamy and rich, making control essential for a enjoyable experience without excess.

Dietary Adaptations

For a gluten-free variation, utilize gluten-free pasta options, ensuring all ingredients are compliant to achieve a safe meal for those with sensitivities.

Dairy-free adaptations can involve the usage of almond or cashew cream instead of traditional creams, while nutritional yeast can offer a cheesy flavor without dairy.

For vegan diets, swapping chicken with a protein source like chickpeas or tempeh will still allow enjoyable flavor profiles, utilizing plant-based alternatives.

Low-carb dieters could replace traditional pasta with zoodles (zucchini noodles) to align with their eating preferences while retaining delicious flavors.

The Keto and Paleo diets can similarly utilize high-protein, low-carb substitutes to maintain flavor, prioritizing healthy fats for energy.

Low-FODMAP adaptations must be carefully crafted to include lactose-free creams and avoiding high-FODMAP ingredients for a compliant dish.

Troubleshooting Guide

If you’re managing texture issues, ensure the pasta achieves an al dente state before combining with the sauce. This prevents a gummy result and retains bite.

Flavor balance can be adjusted by tasting as you cook; add a pinch of salt or a squeeze of lemon juice to brighten flavors if they’re too rich.

Temperature problems can be mitigated by allowing the dish to heat slowly; reheating too quickly can disrupt the sauce’s creamy texture.

Equipment challenges might arise from using the wrong pan; always select a large enough skillet to accommodate the chicken evenly for optimal browning.

Ingredient substitutions can lead to unexpected results; when doing so, maintain a close watch on cooking times so that they adjust accordingly.

Timing concerns with chicken cook times can be resolved by utilizing a meat thermometer to ensure it reaches safe internal temperatures without drying out.

Recipe Success Stories

Community feedback often highlights the dish’s enjoyable richness combined with simplicity, making it a family favorite in many households.

Variation successes include those who adapt the dish with seasonal vegetables, enhancing nutritional value while adhering to personal tastes.

Readers suggest using whole-grain pasta for added fiber and a nutty flavor, showcasing an interest in healthier adaptations while still enjoying comfort food.

Photography tips often recommend capturing the creamy texture of the sauce and the golden chicken in natural light to emphasize the dish’s inviting nature and appeal.

Overall, the recipe’s adaptability allows it to meet diverse dietary needs, establishing itself as a versatile addition to weeknight dinners or special occasions alike.

Frequently Asked Questions

Can I use frozen chicken for this recipe?

Yes, you can use frozen chicken, but ensure it’s fully thawed in the refrigerator before cooking to ensure even cooking throughout.

How can I make the dish a bit spicier?

To add a spicy kick, incorporate crushed red pepper flakes into the garlic-butter sauce along with herbs of your choice.

Can I substitute the pasta with something else?

Absolutely! Zucchini noodles or spaghetti squash can work well as lower-carb alternatives that still absorb the flavors beautifully.

Is this dish suitable for meal prep?

Yes, it’s excellent for meal prep! Store in individual containers for up to three days for easy reheating throughout the week.

Does the sauce thicken over time?

Yes, the sauce may thicken as it cools down; if this occurs, add a splash of chicken or vegetable broth during reheating for creaminess.

What can I pair with this dish?

A light salad, garlic bread, or roasted vegetables make excellent side dishes that complement the creaminess of the pasta.

Can I make a vegetarian version of this recipe?

Certainly! Swap the chicken with tofu or tempeh for a vegetarian option that still captures all the delicious flavors.

How do I store leftovers?

Store leftovers in an airtight container in the refrigerator for up to three days. For longer storage, consider freezing them.

Can I use a different cheese?

Yes, feel free to experiment! Cheeses like goat cheese or mozzarella can provide different flavors and textures to the sauce.

What is the best way to reheat the leftovers?

Gently reheat in a saucepan over low heat, stirring often to retain the sauce’s creamy consistency without burning.

Additional Resources

For those interested in expanding their culinary repertoire, explore related recipes that incorporate similar flavors, such as Creamy Mushroom Pasta or Garlic Shrimp Alfredo.

Embark on technique guides available online to enhance fundamental skills admired in gastronomy, like sauce-making and ingredient pairing.

Ingredient information helps you understand seasonal availability, nutritional benefits, and best practices for selection and storage, making for a well-rounded culinary experience.

Equipment recommendations for a functional kitchen highlight must-have tools for cooking success, ensuring you approach each recipe with the right tools for the job.

Seasonal variations inspire creativity when utilizing fresh ingredients, resulting in vibrant flavors while keeping meals exciting and new.

Join the Conversation

Engage with our community by sharing your experiences or photos of Garlic-Butter Chicken Bites with Parmesan Cream Pasta on social media.

Seek out and offer photography tips for capturing the beauty of the dish, making your experience not just about taste, but visual delight too.

Recipe reviews encourage feedback from fellow cooks, allowing for recipe refinements and exchanges of variations that may inspire others.

Active community engagement brings together passionate cooks with a love for flavor and creativity, making the cooking experience a shared joy.

Explore recipe variations that cater to different dietary preferences and share your unique interpretations with others, enhancing our collective culinary adventure.

The Recipe

Garlic-Butter Chicken Bites with Parmesan Cream Pasta

Serves: 4 servings

Prep Time: 15 mins

Cook Time: 20 mins

Total Time: 35 mins

Kitchen Equipment Needed

  • Skillet
  • Large Pot
  • Measuring Cups and Spoons
  • Wooden Spoon or Spatula
  • Knife and Cutting Board

Ingredients

  • 1 pound of chicken breasts, cubed
  • 4 tablespoons of unsalted butter
  • 4 cloves of garlic, minced
  • 1 cup of heavy cream
  • 1 cup of grated Parmesan cheese
  • 8 ounces of pasta of your choice
  • Salt and pepper, to taste
  • Fresh parsley, for garnish

Directions

  1. In a large pot, boil salted water and cook the pasta according to package instructions until al dente.
  2. Meanwhile, in a skillet, melt 2 tablespoons of butter over medium heat, then add cubed chicken. Season with salt and pepper.
  3. Cook the chicken for about 7-8 minutes, stirring occasionally, until golden and cooked through. Remove from the pan and set aside.
  4. In the same skillet, melt the remaining butter, add minced garlic, and sauté for 1-2 minutes until fragrant.
  5. Reduce heat and stir in the heavy cream, slowly incorporating the Parmesan cheese until the sauce is thick and creamy.
  6. Add the cooked pasta and chicken back to the skillet, stirring to combine everything well. Adjust seasoning as necessary.
  7. Serve hot, garnished with fresh parsley and additional Parmesan if desired.

Recipe Notes

  • Fresh herbs enhance the dish; try adding basil or thyme for different flavor profiles.
  • For a lighter version, consider substituting half of the heavy cream with chicken broth.
  • Feel free to add vegetables like spinach or peas for added nutrition.