Delicious Cajun Shrimp Bake Recipe for a Flavorful Dinner

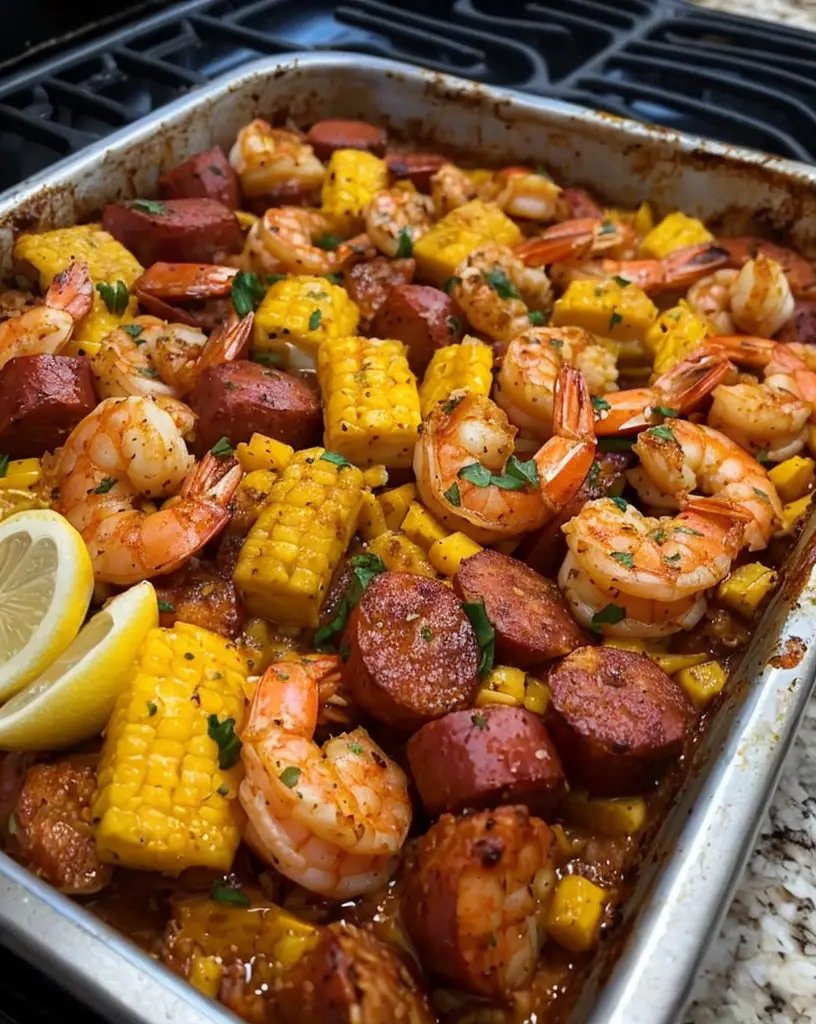
Cajun Shrimp Bake: A Flavorful One-Pan Delight

⚖️
Difficulty
Easy

⏲️
Prep Time
15 mins

🕒
Cook Time
25 mins

⏱️
Total Time
40 mins

🍽️
Servings
4

Are you ready to ignite your taste buds with a delightful blend of spices and fresh ingredients? This Cajun Shrimp Bake is the perfect dish to warm your soul and impress your guests. Rich in flavor, this easy one-pan meal delivers bold Cajun spices, succulent shrimp, and a medley of colorful vegetables, making it a family favorite. Perfect for weeknight dinners or gatherings, this recipe promises satisfaction with every bite. Experience the layers of flavor that only a Cajun-inspired dish can offer!

With a tantalizing aroma and vibrant presentation, this Cajun Shrimp Bake exemplifies comfort food while keeping health in mind. The combination of plump shrimp, bell peppers, and onions harmoniously mingles with classic Cajun seasoning to create an unforgettable dining experience. Whether you’re a seasoned chef or a kitchen novice, you’ll find joy in bringing this flavorful dish to your table.

Quick Recipe Highlights

  • Flavor Profile: This dish boasts a perfect balance of heat and depth, thanks to the zesty Cajun spices and fresh ingredients.
  • Texture: Tender shrimp combined with crisp vegetables create a delightful crunch that complements the tender, baked goodness.
  • Aroma: An irresistible blend of spices fills the kitchen, introducing notes of paprika, garlic, and herbs.
  • Visual Appeal: Bursting with color from the vibrant bell peppers and juicy shrimp, this dish is a feast for the eyes as well as the palate.
  • Skill Level Needed: This recipe requires basic cooking skills, making it accessible yet impressive for all levels of experience.
  • Special Equipment: No special tools are needed, just a baking dish and a spatula to mix and serve!

Recipe Overview

  • Difficulty Level: This Cajun Shrimp Bake is rated easy, thanks to its simple steps and minimal prep time.
  • Category: This dish fits perfectly into the dinner category, ideal for both cozy nights and festive occasions.
  • Cuisine: Originating from Louisiana, Cajun cuisine is known for its bold flavors and hearty ingredients that reflect its cultural heritage.
  • Cost: This recipe is budget-friendly, with ingredients that are accessible and affordable.
  • Season: Ideal for any season thanks to its fresh vegetables and spices, it especially shines in late spring and summer.
  • Occasion: Perfect for a casual family dinner or a lively gathering with friends, this dish fits any occasion.

Why You’ll Love This Recipe

The taste and texture appeal of the Cajun Shrimp Bake will ensure it becomes a staple in your recipe repertoire. The complex flavors of Cajun seasoning paired with succulent shrimp create a combination that’s hard to resist. Each bite offers a delightful interplay of tenderness from the shrimp and a slight crunch from the green peppers and onions.

This recipe brings convenience to the forefront, allowing you to prepare everything in one pan. Cleanup is a breeze, letting you spend more time with loved ones instead of scrubbing dishes. It’s perfect for busy weeknights, and the short prep time makes it a go-to meal when you’re short on time yet still want something delicious.

Nutritionally, this dish packs a punch with its combination of high-protein shrimp and fresh vegetables. Shrimp is an excellent source of lean protein, while the vegetables add vitamins, minerals, and fiber to your diet. It’s a wholesome choice for anyone looking to eat healthier without sacrificing flavor.

Hosting friends or family? This Cajun Shrimp Bake not only satisfies hungry mouths but also serves as a fantastic conversation starter. The vibrant colors and enticing aroma make it a crowd-pleaser that invites everyone to the table, and the communal serving style brings a sense of warmth to any gathering.

Best of all, the cost-effectiveness of this recipe makes it accessible to everyone. With a few affordable ingredients, you can impress your guests and family without breaking the bank. The recipe uses pantry staples and fresh veggies, showcasing that delicious meals don’t have to be expensive.

Historical Background and Cultural Significance

Cajun cuisine has its roots in the French Acadian immigrants who settled in Louisiana and adapted their cooking styles to local ingredients. This dish embodies the spirit of Louisiana with its bold flavors, influenced by the region’s diverse cultural heritage, including French, Spanish, and African cuisines. The use of spices and cooking techniques stems from these traditions, creating a rich culinary tapestry that is cherished today.

The cultural significance of Cajun food goes beyond just the flavors; it’s a celebration of community and family. Cajun dishes are often shared in large gatherings, emphasizing the importance of togetherness through food. Recipes like this Cajun Shrimp Bake are often passed down through generations, bringing people together in the kitchen as they create delicious meals while sharing stories and memories.

Over the years, the evolution of Cajun cuisine has seen it embraced by the wider culinary world. Dishes have been adapted and modified, but the essence remains. This Cajun Shrimp Bake captures the heart of these traditions while being simplified for modern home cooks.

Regional variations of the recipe include various seafood options, such as crawfish or crab, showcasing the area’s rich aquatic resources. These adaptations reflect the locals’ creativity and resourcefulness in using what’s available to create hearty, satisfying meals.

Ingredient Deep Dive

Shrimp: As a key component of Cajun cuisine, shrimp are abundant in Louisiana’s coastal waters. They are a low-calorie protein source rich in iodine and other essential minerals. When purchasing shrimp, opt for wild-caught for the best flavor and sustainability. Store shrimp in the coldest part of your refrigerator and use them within one to two days for optimal freshness.

Bell Peppers: Bell peppers add color, crunch, and sweetness to this dish. They are low in calories but high in vitamin C and other antioxidants. Look for firm, shiny peppers with no blemishes for the best quality. Store them in the fridge, and they can last up to a week. You can substitute with other colors or varieties for different flavors.

Onions: Onions bring depth and aromatic flavor to many dishes. They are an excellent source of vitamin C, B vitamins, and potassium. When selecting onions, pick those that are firm and heavy for their size. Store onions in a cool, dark place to prolong their shelf life. Sweet onions can be used for a milder flavor.

Cajun Spice Blend: This blend of spices is what gives the dish its distinctive flavor. Typically made from paprika, cayenne pepper, oregano, thyme, and garlic powder, it reflects the boldness of Cajun cooking. You can find pre-made blends at the store or create your own. Store in a cool, dry place for maximum freshness. Substitute with a homemade blend if you’re looking for a personalized flavor.

Common Mistakes to Avoid

  • Overcooking shrimp: Shrimp cook quickly; avoid overcooking to prevent rubbery texture. Watch closely, and remove when just opaque.
  • Not seasoning enough: The spices are crucial for flavor. Be generous with the Cajun seasoning but adjust to taste for spiciness.
  • Skipping the rest period: Allowing the dish to rest before serving helps the flavors meld. Don’t rush to serve immediately.
  • Using frozen shrimp without thawing: Always ensure shrimp are thawed properly before cooking for even cooking. Thaw in the fridge overnight or under cold water.
  • Not using a hot enough oven: A hot oven ensures that the shrimp bake quickly and develop a slight crust. Preheat accordingly.
  • Not chopping veggies evenly: Consistent veggie sizes promote even cooking. Take time to chop veggies uniformly.
  • Ignoring ingredient quality: Fresh and high-quality ingredients elevate dish flavors. Always choose the best options available.
  • Forgetting to check the seasoning after cooking: Taste before serving; adjust if needed to enhance flavor. A little salt or acid can elevate the dish.

Essential Techniques

Prepping Shrimp: Cleaning shrimp involves peeling and deveining for the best texture and presentation. Always rinse thoroughly and pat dry before cooking. Avoid leaving the shells on if you prefer a cleaner look and taste. Aim for medium to large shrimp for a satisfying bite.

Sautéing Vegetables: Sautéing helps to enhance the flavors and soften the vegetables. Begin with the hardest vegetables, like onions and peppers, allowing them to sweat and release moisture. This method creates a depth of flavor that serves as a foundation for the entire dish.

Layering Ingredients: For the best flavor, layer shrimp and vegetables in a baking dish effectively. Start with vegetables on the bottom and top with shrimp to ensure even cooking. This technique prevents overcooking the shrimp while allowing the veggies to absorb flavors.

Pro Tips for Perfect Cajun Shrimp Bake

1. Plan your prep: Organize ingredients and have all prepped before you start cooking. This streamlines the process and minimizes mishaps.

2. Use fresh spices: For the best flavor, use fresh spices if possible. They intensify the dish and bring out the best in ingredients.

3. Experiment with spice level: Adjust the cayenne pepper to your liking; your spice tolerance dictates how much to use. Start small and add more if needed.

4. Add a splash of lemon: A squeeze of fresh lemon juice before serving enhances freshness and adds brightness to the dish.

5. Don’t overcrowd the pan: If making a large batch, use two baking dishes to ensure an even cook. Crowding can lead to steaming instead of browning.

6. Let it rest: Allow the dish to sit for a few minutes after it comes out of the oven for the flavors to meld and improve texture.

7. Try different proteins: Feel free to swap shrimp for chicken or sausage for variations and to cater to your preferences.

8. Garnish thoughtfully: Sprinkle fresh herbs like parsley or green onions on top for color and added freshness before serving.

Variations and Adaptations

For a regional twist, consider using andouille sausage along with shrimp. The addition provides a smoky flavor that pairs beautifully with the spices, offering a heartier meal. Seasonal adaptations can include summertime vegetables like zucchini and corn to keep it fresh and vibrant.

If you’re looking for dietary modifications, swap shrimp for tofu or chickpeas for a vegetarian option. This maintains the essence of this dish while catering to different dietary needs. Flavor variations can be achieved by adding a splash of hot sauce or varying the spices based on your liking. Adjust the cooking time for alternative proteins for the best results.

Texture modifications can transform the dish completely. For example, adding breadcrumbs before baking creates a crunchy topping, enhancing the dish’s texture and presentation. Incorporate additional herbs or spices to personalize the flavor further.

Experiment with presentation by serving the Cajun Shrimp Bake in individual ramekins for an elegant touch at dinner parties or gatherings. The same dish can look entirely different when served in smaller portions, enhancing its visual appeal.

Serving and Presentation Guide

To plate the Cajun Shrimp Bake, use a large, shallow dish that showcases the vibrant colors of the ingredients. Serve hot, garnished with freshly chopped parsley or green onions for a pop of color. A squeeze of lemon over the top just before serving brightens the dish and enhances flavors.

Additional garnishing options may include a dollop of sour cream or a drizzle of olive oil for added richness. Traditional accompaniments like crusty French bread or rice help soak up the flavorful juices, creating a satisfying meal. If you’re feeling adventurous, consider pairing it with a light salad for a refreshing contrast.

Temperature considerations are crucial for serving this dish. Serve hot for maximum flavor and enjoyment, and while leftovers are delicious cold, reheating will revitalize flavors and textures. Manage portion control by considering serving sizes based on the number of guests and sides you’re offering.

Wine and Beverage Pairing

For wine pairings, a crisp white wine like Sauvignon Blanc complements the spices and seafood beautifully. Its acidity balances the richness of the dish, enhancing the overall dining experience. Alternatively, a chilled Pinot Grigio can work well to refresh and cleanse the palate.

If alcohol isn’t your preference, consider pairing with iced tea or lemonade, which provide a refreshing counterpoint to the rich flavors of the dish. Should coffee be desired, a lightly roasted blend can offer a nuanced accompaniment to the Cajun spices.

Storage and Shelf Life

To store your Cajun Shrimp Bake, allow it to cool to room temperature before transferring it to airtight containers. It can be refrigerated for up to three days. Make sure to consume it within this timeframe for the best flavors and textures.

If you plan to keep it longer, freezing is an option, though it may affect shrimp texture slightly. Use well-sealed, freezer-safe containers or bags to prevent freezer burn. To reheat, thaw overnight in the refrigerator and warm in the oven until heated through to preserve moisture.

Make Ahead Strategies

For a seamless cooking experience, you can prep specific ingredients ahead of time. Chop vegetables and marinate shrimp for up to 24 hours before cooking. This enhances flavor and saves you significant time on prep day.

Store the shrimp and veggies separately in the fridge, ensuring freshness is retained. Upon cooking day, simply combine and bake. For optimal texture, avoid pre-baking, as the shrimp may become rubbery; it’s best to assemble and bake as close to mealtime as possible. Add finishing touches right before serving to maintain freshness.

Scaling Instructions

Halving or doubling the recipe is straightforward; simply adjust ingredient amounts accordingly. Keep in mind that cooking time may vary slightly when scaling, particularly with larger batches, so monitor doneness and adjust as needed.

When doubling or tripling, consider using larger baking dishes or two trays to avoid overcrowding. Always taste and adjust seasoning as necessary, as doubling spices doesn’t always equate to the same flavor intensity. Store any leftovers correctly, adhering to the storage guidelines for optimal freshness.

Nutritional Deep Dive

This Cajun Shrimp Bake offers a balanced macronutrient profile, mainly consisting of lean protein from shrimp and healthy fats from olive oil. It also provides essential vitamins from the vegetables included, such as vitamin C and potassium.

This dish can be especially beneficial for those looking to manage weight, thanks to its high protein and fiber content, keeping you satiated longer. The diversity of vegetables contributes to an array of micronutrients, making this dish both satisfying and nutritious.

Dietary Adaptations

For those needing gluten-free options, this recipe is naturally gluten-free, thanks to the ingredients used. For dairy-free preferences, simply remove any cheese toppings or dairy-based sauces; it still tastes splendid without them.

Vegans can enjoy the core flavors by swapping shrimp for plant-based proteins such as tofu or tempeh. A low-carb version might substitute shrimp with zucchini noodles for a fantastic alternative that maintains the flavor punch of this Cajun dish.

Should you be considering a keto approach, focus on using low-carb vegetables and maintain the base recipe without altering the spices too heavily. The spice blend remains key in either adaptation. Paleo dieters can enjoy this dish by sticking to whole foods without refined ingredients as outlined.

Troubleshooting Guide

If the texture of your shrimp turns out rubbery, this is often due to overcooking. Be vigilant about timing, and remove shrimp from the oven as soon as they become opaque.

In terms of flavor balance, if the dish tastes bland, consider adjusting seasoning at the end. A pinch of salt and a splash of lemon juice can elevate flavors significantly. If the dish is too spicy, counter it with a dollop of sour cream or yogurt.

For temperature issues, be sure your oven is fully preheated before baking to ensure everything cooks evenly. If your oven runs hot, consider lowering the temperature slightly and cooking longer to avoid burning.

Recipe Success Stories

Many who have prepared this Cajun Shrimp Bake rave about how easy it is to make and how it can be adapted based on what you have on hand. Community feedback often highlights successful substitutions, with readers sharing their personalized spice blends and additional add-ins.

Variations attempted by home cooks, such as adding different seafood or vegetables, have inspired others, encouraging creative exploration. They frequently note how this dish pairs perfectly with a simple side salad or crusty bread, enhancing the overall meal experience.

Frequently Asked Questions

Can I use frozen shrimp? Yes, you can use frozen shrimp! Just make sure to thaw them properly before cooking to ensure even cooking and optimal texture.

What can I substitute for shrimp? You can substitute shrimp with chicken pieces, tofu, or sausage depending on your preference and dietary needs.

How do I know when the shrimp is done cooking? Shrimp is done when it turns opaque and forms a nice “C” shape. Avoid overcooking to prevent a rubbery texture.

Can this recipe be made ahead of time? Yes, you can prep the ingredients ahead of time and bake shortly before serving for maximum freshness.

What should I serve with this dish? This Cajun Shrimp Bake pairs beautifully with rice, quinoa, or crusty bread to soak up the flavorful juices.

Is this dish spicy? The spice level can be adjusted based on personal preference by modifying the amount of Cajun seasoning used.

Can I make this vegan? Yes, by swapping shrimp for tofu or another plant-based protein, this dish can cater to vegan diets.

What type of baking dish should I use? A standard 9×13 inch baking dish works perfectly, but you can use any large, oven-safe dish.

How long does leftovers last in the fridge? Leftovers should be consumed within three days when stored in an airtight container in the refrigerator.

Can I freeze the leftovers? Yes, leftovers can be frozen but may slightly alter in texture. Store in suitable containers for up to two months.

Additional Resources

For more flavorful seafood dishes, check out our collection of shrimp recipes that are just as easy to prepare. Explore our technique guides for mastering sautéing and baking to enhance your culinary skills. Additionally, delve into ingredient information to learn more about the benefits of using fresh produce and quality spices in your cooking.

Don’t forget to explore seasonal variations; adapting your cooking to utilize what’s fresh and available can elevate flavors and keep meals exciting. Our related recipe resources also available will inspire your next meal plan.

Join the Conversation

We invite you to share your experiences making this Cajun Shrimp Bake! Post your photos on social media, tag us, and let us know how your dish turned out. Your feedback and suggestions contribute to our vibrant community, and we’d love to hear about your adaptations and variations.

Don’t forget to leave a review on this recipe to help others discover its wonderful flavors. Join our community by subscribing to our newsletter for more delicious recipes and cooking tips. Your culinary journey starts here!

The Recipe

Cajun Shrimp Bake

Serves: 4

Prep Time: 15 mins

Cook Time: 25 mins

Total Time: 40 mins

Kitchen Equipment Needed

  • Baking dish (9×13 inch)
  • Cutting board
  • Sharp knife
  • Measuring cups and spoons
  • Mixing spoon or spatula

Ingredients

  • 1 lb shrimp, peeled and deveined
  • 1 bell pepper, chopped
  • 1 onion, chopped
  • 3 tablespoons Cajun seasoning
  • 2 tablespoons olive oil
  • 1 teaspoon garlic powder
  • Salt and pepper to taste
  • Fresh parsley for garnish (optional)

Directions

  1. Preheat the oven to 400°F (200°C).
  2. In a large bowl, combine the shrimp, bell pepper, onion, Cajun seasoning, olive oil, garlic powder, salt, and pepper. Stir until everything is evenly coated.
  3. Transfer the mixture to a baking dish and spread it out evenly.
  4. Bake in the preheated oven for 25 minutes, or until the shrimp are cooked through and the vegetables are tender.
  5. Let it rest for a few minutes, then garnish with fresh parsley before serving.

Recipe Notes

  • Feel free to adjust the seasoning levels to fit your spice tolerance.
  • Use any seasonal vegetables you have on hand for variation.
  • Leftovers can be stored in the fridge for up to three days.

Irresistible No Bake Blueberry Dream Cheesecake Recipe You’ll Love

Irresistible No Bake Blueberry Dream Cheesecake: A Refreshing Dessert Delight

⚖️
Difficulty
Easy

⏲️
Prep Time
20 mins

🕒
Cook Time
0 mins

⏱️
Total Time
4 hours (chill time)

🍽️
Servings
8 servings

Indulging in a slice of our Irresistible No Bake Blueberry Dream Cheesecake is like savoring a bright summer day. This decadent dessert features a luscious, creamy cheesecake filling that promises to be a delightful lightness on your palate, all served on a crunchy graham cracker crust. The burst of fresh blueberries adds a layer of vibrant color and refreshing taste, making this no-bake cheesecake an ideal treat for warm days or special occasions.

What sets this recipe apart is its simplicity. Forget about baking and the need for extensive kitchen tools; this dessert comes together effortlessly and can be made in advance. The combination of cream cheese and whipped cream creates a smooth and airy texture, while the tangy sweetness of blueberries balances the richness beautifully. Each bite is a perfect mix of creamy, fruity, and crunchy, ensuring you’ll crave more!

Quick Recipe Highlights

  • Flavor Profile: This cheesecake combines the sweetness of cream with the tartness of fresh blueberries for a balanced dessert.
  • Texture: Expect a heavenly creamy filling set against a crunchy graham cracker crust, providing a delightful contrast.
  • Aroma: The aroma of fresh blueberries and creamy cheese wafts through the kitchen, tantalizing your senses.
  • Visual Appeal: The cheesecake’s striking blue hue interspersed with creamy white makes it a stunning centerpiece.
  • Skill Level Needed: Perfect for beginners, this recipe requires no baking skills—just a little mixing and chilling.
  • Special Equipment: A springform pan is recommended for easy removal, along with basic mixing bowls.

Recipe Overview

  • Difficulty Level: This no-bake cheesecake is categorized as easy, making it suitable for all levels of home cooks.
  • Category: Ideal for desserts, this cheesecake can be enjoyed year-round.
  • Cuisine: This recipe is influenced by classic American dessert traditions, incorporating fresh local ingredients.
  • Cost: Estimated costs for this cheesecake are budget-friendly, with most ingredients easily accessible.
  • Season: Enjoy this refreshing dessert in warmer months when blueberries are in season for the best flavor.
  • Occasion: Perfect for summer barbecues, birthday parties, or any celebrations that call for a delightful treat.

Why You’ll Love This Recipe

The creamy filling combined with the burst of fresh blueberries makes this cheesecake a celebration of flavors. The balance of sweet and tangy will leave your taste buds dancing, making it a fantastic end to any meal. The texture is unbelievably light and creamy, ensuring that each bite melts in your mouth, while the crust provides satisfying crunchiness.

Convenience is another reason to love this recipe. With no baking required, it caters to those who prefer simpler methods in the kitchen. Just mix, layer, and chill—the dessert practically makes itself! Plan ahead, and you can have a stunning dessert ready in no time, allowing you to enjoy time with your guests instead of being stuck in the kitchen.

Nutritionally, blueberries are packed with antioxidants, vitamins, and minerals, making this cheesecake a relatively healthier indulgence. Coupled with the protein from the cream cheese, you can enjoy a guilt-free slice. This recipe also appeals to those looking for simple yet delicious desserts that can accommodate various dietary preferences.

Social gatherings are an excellent opportunity to showcase this cheesecake. Its stunning appearance and delicious flavor make it a crowd-pleaser, often leading to compliments and requests for the recipe. It’s an ideal dessert for sharing and enjoying with family and friends, fostering connection over good food.

Cost-effectiveness is yet another highlight of this recipe. Using affordable ingredients that are widely available means you won’t break the bank while making a delightful dessert. Its freshness and simplicity reflect a thoughtful approach to dessert making that doesn’t compromise on taste or indulgence.

Historical Background and Cultural Significance

The origin of cheesecake dates back to ancient Greece, where it was served to athletes during the first Olympic Games. This early version, made with fresh cheese and honey, laid the foundation for many variations later developed. The modern no-bake version gained popularity in the United States in the 20th century, providing a simplified approach that many home cooks embraced.

In American culture, cheesecake remains a beloved dessert, often synonymous with special occasions and gatherings. Blueberries, in particular, have deep-rooted significance, especially in regions like New Jersey, where they are cultivated extensively. This fruit not only adds flavor but also connects people to local agricultural traditions.

Over the years, cheesecake recipes have evolved, showcasing diverse flavors and ingredients. The no-bake cheesecake variant emerged as a convenient option for home bakers, facilitating easy preparation without the hassle of baking, thus broadening its appeal.

Blueberry cheesecake, specifically, captures the essence of summer, making it popular at barbecues and celebrations in warmer months. Each bite is a reminder of spending time in the sun with loved ones, drawing on nostalgic feelings of joy.

Ingredient Deep Dive

  • Blueberries: These tiny powerhouses are rich in antioxidants, known for promoting heart health and aiding in brain function. When selecting blueberries, look for firm, plump ones with a deep blue hue. Store them in the refrigerator to maintain freshness, and consider freezing extras to use in smoothies or baked goods later.
  • Cream Cheese: A staple in cheesecake recipes, cream cheese provides that signature creamy, tangy flavor. Opt for full-fat varieties for a richer taste, but consider lighter options if you’re watching calories. Be sure to let it soften at room temperature for easier mixing; this prevents lumps in your cheesecake.
  • Graham Crackers: These provide the base for the cheesecake crust. Choose brands without added sugars for a healthier option. Store leftovers in a cool, dry place, and they can serve as a crunchy topping when crushed over ice cream or yogurt.
  • Sugar: Adding sweetness to your cheesecake, sugar is essential for balancing flavors. Experiment with alternatives like honey or maple syrup for a unique twist, while keeping an eye on the sweetness level to maintain flavor balance.
  • Whipped Cream: Light and airy, whipped cream transforms the cheesecake into a dreamlike dessert. Use heavy cream for the best results, and chill your beaters beforehand to ensure fluffy peaks. Whipped cream can also be flavored with vanilla, which enhances the overall taste of your cheesecake.

Common Mistakes to Avoid

  • Overmixing the cheesecake filling, which can lead to a dense texture instead of airy and light. Mix until just combined to keep it fluffy.
  • Not allowing the cream cheese to soften at room temperature. This can cause lumps in the batter; always plan ahead and let it sit out for 30 minutes.
  • Skipping the chilling time can result in a cheesecake that’s too soft to slice properly. Ensure you let it chill for at least four hours, preferably overnight.
  • Using stale or crumbled graham crackers for the crust, leading to a less-than-ideal texture. Ensure your crackers are fresh and finely crushed.
  • Forgetting to line the springform pan can lead to a messy release. A layer of parchment paper can save you from potential heartbreak.
  • Not tasting the filling before setting it—there may need to be more sugar or vanilla to enhance flavor. Always sample and adjust before chilling.
  • Using low-quality ingredients can diminish the overall flavor. Invest in good quality cream cheese and fresh blueberries for the best results.
  • Cutting the cheesecake too soon after chilling, leading to messy slices. Let it sit for a few minutes at room temperature for easier cutting.

Essential Techniques

The art of mixing is crucial in perfecting your cheesecake. It’s important to avoid overmixing your ingredients; doing so can lead to dense and heavy textures. To master this technique, start slowly and gradually increase speed until just combined. Look for a smooth consistency without lumps, which indicates you’ve achieved the right balance.

Chilling the cheesecake is vital for getting that perfect set. It’s essential to wrap your cheesecake appropriately for chilling, ensuring no moisture can enter. Always use plastic wrap or a tight lid on your springform pan. You’ll know it’s ready when the surface feels firm and holds its shape when touched.

Pro Tips for Perfect Irresistible No Bake Blueberry Dream Cheesecake

– Use high-quality cream cheese for a richer flavor that elevates your cheesecake.
– Allow your cream cheese, and any other refrigerated ingredients, to come to room temperature for better mixing integration.
– Try blending the blueberries into the filling for a vibrant color throughout the cheesecake.
– Enhance flavor by adding lemon zest to the cheesecake filling, which pairs beautifully with blueberries.
– For added sweetness, drizzle honey over the top or mix it into the whipped cream before topping.
– Use decorative piping for whipped cream around the edges for an elegant presentation.
– Make it ahead of time; flavors deepen and improve after chilling overnight.
– Always keep an eye on portion sizes; a little goes a long way with rich desserts.

Variations and Adaptations

If you’re looking to diversify the cheesecake flavor, consider making a mixed berry version by exchanging blueberries for strawberries or raspberries in the filling. Seasonal variations can also be entertaining; try incorporating peaches or plums in a summer variation for a sweet twist.

For dietary modifications, you can substitute the cream cheese with a dairy-free counterpart, like cashew cheese, for a vegan option. Alternatively, for a low-carb version, use a nut-based crust instead of graham crackers, ensuring the recipe caters to various dietary needs.

Flavor balances can be adjusted based on personal taste; mix in spices like cinnamon or nutmeg for a spiced kick, creating a different sensory experience.

Lastly, consider changing the presentation by serving in individual jars for easy serving, or by topping with a berry compote and fresh mint leaves for an appealing contrast.

Serving and Presentation Guide

Plating your cheesecake beautifully is all about presentation. For a classic appearance, slice the cheesecake and arrange the segments on a serving platter. Consider adding a drizzle of blueberry sauce or a dollop of whipped cream to each slice for extra flair.

Garnishing with mint leaves or edible flowers can elevate the visual appeal tremendously. Alternatively, fresh blueberries placed strategically on top can give it a rustic yet elegant touch.

For a modern twist, consider serving individual portions in mason jars, making it easy to grab and enjoy. Pay attention to temperature; cheesecake is best served chilled, so keep it in the fridge until serving.

Be mindful of portion sizes; smaller slices not only look appealing but also encourage guests to sample multiple desserts.

Wine and Beverage Pairing

When it comes to wine pairings, a sweet Riesling complements the blueberries beautifully, enhancing their natural sweetness without overpowering the cheesecake. Similarly, a sparkling wine can provide a refreshing contrast that cleanses the palate.

For non-alcoholic alternatives, a lightly brewed herbal tea, like chamomile, pairs wonderfully with the rich flavor of the cheesecake. You can also serve it alongside lemonade for a refreshing and bright contrast that enhances the dessert’s summery feel.

Coffee can also make a delightful pairing; consider a light roast that won’t overshadow the flavors of the cheesecake. Serve temperatures should remain cool, maintaining freshness and enhancing flavors during the tasting experience.

Storage and Shelf Life

Proper storage is essential to keep your cheesecake fresh. It should be kept in the refrigerator, covered with plastic wrap or in an airtight container, to maintain its creamy texture and flavor.

When stored correctly, the cheesecake can last up to 5 days. Always check for signs of spoilage, such as off smells or changes in texture.

Reheating is generally not recommended, as cheesecake is best enjoyed chilled. If you must, do so very briefly in the refrigerator to soften.

Freezing is an option if you aim to keep it longer. Cut it into individual portions and wrap each slice tightly in plastic wrap before placing it in an airtight container. It can be frozen for up to 3 months.

Make Ahead Strategies

This cheesecake is ideal for preparation in advance. When making it ahead, plan for chilling time; it should ideally set overnight for the best flavor and texture.

Store components separately as you prepare; for instance, keep the crust in the fridge until you’re ready to assemble.

To maintain quality, consider assembling the cheesecake the day before a celebration so flavors meld beautifully overnight.

If you’re planning to garnish, hold off on adding fresh berries or whipped cream until just before serving to maintain their freshness.

Lastly, consider adding a fresh element upon serving, like a sprig of mint or a drizzle of sauce, ensuring it remains visually appealing when presented to guests.

Scaling Instructions

If you need to adjust the recipe, halving it is as simple as dividing all ingredients by two but maintaining the same preparation and chilling times. This flexibility makes it easy for smaller gatherings.

To double or triple the recipe, ensure you have a larger springform pan or multiple pans on hand. Adjust your mixing time as needed; larger batches may require more mixing time for even distribution.

Always keep equipment adjustments in mind; larger quantities may require the use of stand mixers or food processors for efficiency.

When considering timing, expect longer chilling times for larger cheesecakes. Store considerations will vary based on portion size, so think about how you’ll store extra portions when scaling.

Nutritional Deep Dive

This blueberry cheesecake offers a balanced profile of carbohydrates, fats, and protein. A slice typically contains about 320 calories, making it a moderate treat.

Micronutrient content, particularly from blueberries, can boost your intake of vitamin C and antioxidants, offering health benefits beyond just dessert.

For those on a nutritional journey, portion control is key; indulging in a single slice can keep you satisfied without going overboard. It’s advisable to enjoy this dessert on special occasions to balance diet with indulgence.

Weight management strategies can also revolve around the cheesecake’s cream cheese content; consider lighter options for lower calorie counts without losing flavor.

Dietary Adaptations

– **Gluten-free:** Substitute graham crackers with gluten-free options like almond flour or gluten-free cookie varieties.
– **Dairy-free:** Use coconut cream or other non-dairy cream cheese alternatives to make the filling suitable for a dairy-free diet.
– **Vegan:** Consider flax eggs or aquafaba to replace traditional ingredients, ensuring all elements are plant-based.
– **Low-carb/Keto:** Use a nut-based crust and low-carb sweeteners to keep your cheesecake suitable for low-carb lifestyles.
– **Paleo:** Opt for natural sweeteners like honey and use almond flour for the crust to maintain a paleo-friendly profile.
– **Low-FODMAP:** Focus on low-FODMAP fruits and sweeteners for those with dietary restrictions.

Troubleshooting Guide

If your cheesecake is too dense, it may be a result of overmixing the filling. To remedy this, ensure you mix gently until just combined.

For flavor balance, if the cheesecake tastes overly sweet or tangy, you can add a squeeze of lemon juice or a pinch of salt; both enhance flavor depth.

If your crust crumbles too much or doesn’t hold together, ensure you press it firmly into the pan and consider adding a little melted butter to bind it better.

If you encounter issues during assembly—like your filling being too loose—ensure your cream cheese is thoroughly softened and well-mixed before adding other liquids.

For timing concerns, if your cheesecake doesn’t seem set after the recommended chilling time, give it additional time in the fridge, especially in warm rooms where it may take longer to firm up.

Recipe Success Stories

Community feedback often highlights how this recipe becomes a hit during gatherings. Many home cooks have praised its simplicity and impressive presentation.

Variations abound, with readers sharing their unique takes, such as using different fruits or flavored extracts, enhancing their culinary skills by experimenting with flavors.

Adaptation stories reveal how families pass this recipe down, often becoming a cherished tradition during holidays and special celebrations.

Readers suggest adding unique garnishes, such as lemon zest or mint leaves, making every cheesecake truly their own masterpiece.

Photography tips often revolve around capturing the vibrant colors, suggesting natural light and clean backgrounds to make the cheesecake pop in visuals shared on social media.

Frequently Asked Questions

Can I freeze my no-bake cheesecake?

Yes, you can freeze no-bake cheesecake. Wrap individual slices in plastic and store them in an airtight container to keep them fresh for up to 3 months.

How long does the cheesecake need to chill?

The cheesecake should chill for at least four hours, but overnight is recommended for the best texture and flavor.

What can I substitute for blueberries?

You can substitute blueberries with strawberries, raspberries, or even peaches for a varied flavor profile.

Is it possible to make this cheesecake gluten-free?

Absolutely! Using gluten-free graham crackers or a nut-based crust is an excellent alternative.

Can I use low-fat cream cheese?

Yes, low-fat cream cheese is a suitable option, though it might alter the creaminess slightly. Full-fat options are recommended for best results.

What is the best way to cut the cheesecake?

For clean slices, dip a sharp knife in hot water, wipe it dry, and cut through the cheesecake. Repeat for each cut to maintain a clean edge.

Can I use frozen blueberries?

Yes, frozen blueberries can be used but should be thawed first and drained to prevent excess moisture from affecting the cheesecake.

How do I store cheesecake leftovers?

Store any leftover cheesecake in the fridge, covered with plastic wrap or in an airtight container, for up to 5 days.

What type of pan is best for this cheesecake?

A springform pan is ideal as it allows for easy removal of the cheesecake without damaging its structure.

Can I add flavor extracts to the cheesecake?

Absolutely! Vanilla extract or almond extract can enhance the flavor; just be sure to adjust to taste.

Additional Resources

If you’re looking for more delightful dessert recipes, consider trying variations of cheesecake, like pumpkin spice or chocolate.

For technique guides, you may find it helpful to explore no-bake desserts, mastering different types of chilled treats suitable for warmer months.

Ingredient breakdowns can be invaluable for understanding the benefits of berries and other fruits, providing insight into seasonal selections.

Investing in the right kitchen equipment, like quality mixing bowls and a sturdy springform pan, will enhance your baking experience.

Seasonal variations can also inspire new desserts; consider autumn flavors or winter themes for your next culinary adventure.

Join the Conversation

Share your cheesecake creations on social media to engage with others who appreciate this delicious dessert.

Consider offering photography tips to help others capture the beauty of desserts, making it a community learning experience.

Encourage recipe reviews by inviting feedback from friends and family, creating a dialogue around your cooking adventures.

Ask followers for their unique recipe variations, inviting creativity and collaboration in the kitchen.

Finally, create engagement by posting polls or questions about favorite cheesecake flavors, enhancing community interaction around dessert making.

The Recipe

Irresistible No Bake Blueberry Dream Cheesecake

Serves: 8 servings

Prep Time: 20 mins

Cook Time: 0 mins

Total Time: 4 hours (chill time)

Kitchen Equipment Needed

  • Springform pan
  • Mixing bowls
  • Electric mixer
  • Spatula
  • Measuring cups and spoons

Ingredients

  • 1 ½ cups graham cracker crumbs
  • ½ cup unsalted butter, melted
  • 2 cups cream cheese, softened
  • 1 cup powdered sugar
  • 1 teaspoon vanilla extract
  • 2 cups whipped cream
  • 2 cups fresh blueberries

Directions

  1. In a mixing bowl, combine graham cracker crumbs and melted butter until well mixed. Press firmly into the bottom of a springform pan.
  2. In another bowl, beat softened cream cheese with powdered sugar and vanilla extract until smooth.
  3. Fold in the whipped cream until just combined, being careful not to deflate the mixture.
  4. Gently fold in the fresh blueberries to incorporate throughout the filling.
  5. Pour the cheesecake mixture over the crust in the springform pan, smoothing out the top.
  6. Chill in the refrigerator for at least four hours or until set.
  7. Once set, remove the sides of the springform pan and serve cold.

Recipe Notes

  • For an added twist, experiment with other berries or fruit purees.
  • Keep leftovers in the fridge for up to five days.
  • For a richer flavor, add lemon zest to the filling.

Herb-Infused Chicken and Orzo: A Deliciously Fresh Dinner Recipe

Herb-Infused Chicken & Orzo: A Fresh, Flavorful Meal

⚖️
Difficulty
Intermediate

⏲️
Prep Time
15 mins

🕒
Cook Time
30 mins

⏱️
Total Time
45 mins

🍽️
Servings
4

Chicken and orzo make a fantastic pairing in the beloved dish known as Herb-Infused Chicken & Orzo. The succulent chicken, marinated with a symphony of fresh herbs, comes together with the delicate, chewy orzo pasta. This dish not only stands out for its vibrancy but also brings an explosion of flavors that dance on your palate. Imagine the way fresh sage, thyme, and parsley mingle with tender chicken, then unite with a bed of buttery orzo that’s just the right amount of al dente. It’s a comforting meal perfect for family dinners or a casual gathering with friends.

The beauty of this meal is its incredible versatility. This Herb-Infused Chicken & Orzo serves as a blank canvas for culinary creativity. You can easily adapt it with seasonal vegetables or a squeeze of lemon for brightness. Whether you’re craving a warm fill for a cold evening or looking to impress guests, the rich aroma and picturesque presentation of the dish make it the perfect choice. Plus, the ease of preparation means you can effortlessly bring restaurant-quality flavors to your kitchen table.

Quick Recipe Highlights

  • Flavor Profile: The blend of fresh herbs and tender chicken creates a savory sensation with a hint of brightness from lemon.
  • Texture: Juicy chicken complements the slight chewiness of the orzo, making each bite satisfying.
  • Aroma: Inviting aromas of herbs and garlic waft through your kitchen as the chicken cooks.
  • Visual Appeal: The golden-brown chicken and creamy orzo with scattered herbs create a visually stunning dish.
  • Skill Level Needed: This recipe requires some basic cooking techniques, making it suitable for those with intermediate culinary skills.
  • Special Equipment: A large skillet and a pot for boiling orzo are essential for this recipe.

Recipe Overview

  • Difficulty Level: This Herb-Infused Chicken & Orzo is classified as intermediate, requiring a bit of practice with cooking chicken and pasta.
  • Category: This dish falls under the main course category, making it a hearty option for lunch or dinner.
  • Cuisine: Inspired by Mediterranean flavors, this recipe incorporates fresh herbs and simple cooking methods typical of Italian and Greek cuisines.
  • Cost: With a moderate budget, you can prepare this delightful meal, thanks to accessible ingredients like chicken and orzo.
  • Season: Enjoy this recipe year-round, but it’s particularly refreshing in spring and summer when herbs are at their peak.
  • Occasion: Perfect for casual family dinners, gatherings, or as a comfort food meal after a busy day.

Why You’ll Love This Recipe

This Herb-Infused Chicken & Orzo dish is a symphony of flavors that excites the taste buds with each mouthful. The juiciness of the seasoned chicken harmonizes with the soft orzo, creating a satisfying texture combination. The dish is packed with nutritious ingredients that not only fill you up but also provide essential vitamins and minerals, making it a wise choice for health-conscious eaters.

One of the standout benefits of this recipe is its convenience. The preparation is straightforward, allowing you to immerse yourself in the cooking process without feeling overwhelmed. It’s a one-pan dish that offers simplicity without sacrificing flavor, making it perfect for busy weeknights.

Nutritionally, this meal provides a good balance of protein, carbohydrates, and healthy fats, ensuring you feel satisfied and energized. The use of fresh herbs not only elevates the flavor but also adds heart-healthy antioxidants, making it a heart-friendly option.

Socially, sharing a warm, hearty meal fosters connection and invites conversation. This Herb-Infused Chicken & Orzo is a great centerpiece for gatherings due to its vibrant look and irresistible aroma, encouraging everyone to gather around the table for a delightful experience.

When it comes to cost-effectiveness, this recipe utilizes kit staples for a wholesome meal that won’t break the bank. With moderate pricing and readily available ingredients, it’s an accessible option for everyone, making it both budget-friendly and delicious.

Historical Background and Cultural Significance

The origins of the Herb-Infused Chicken & Orzo can be traced back to Mediterranean regions, where chicken dishes are celebrated for their aromatic herbs and simple yet impactful flavor profiles. Historically, these regions cultivated chicken as a staple protein, often combining it with the grains available, such as orzo pasta, popular in many traditional dishes.

In Mediterranean cultures, meals are a communal experience, and dishes like Herb-Infused Chicken & Orzo play a significant role in bringing families together. The act of sharing food reinforces familial bonds and hospitality. This particular dish embodies that tradition with its hearty nature and shareable qualities.

Over the years, the recipe has evolved through family traditions and cultural influences, leading to countless variations across regions. While some add saffron or different vegetables, the essence of combining chicken with orzo remains a hallmark of Mediterranean cuisine.

Regional variations often highlight local produce, with some opting for a richer tomato sauce or even integrating seafood. This dish exemplifies how one recipe can adapt while still maintaining a familiar core that resonates universally.

Ingredient Deep Dive

Chicken: A staple in various cuisines, chicken is rich in protein and versatile in preparation. When selecting chicken for this recipe, opt for thighs or breasts with skin for added flavor and moisture. Fresh, properly thawed chicken ensures safety and tenderness. Store uncooked chicken in the coldest part of your fridge and consume it within 1-2 days or freeze for longer storage. As alternatives, you may use turkey or plant-based proteins for a variation.

Orzo: This tiny pasta resembles rice and is a culinary favorite for its versatility. Originating from Italy, orzo works well in salads, soups, or as a side. When selecting orzo, look for whole grain varieties for added nutrition. Store dry orzo in an airtight container away from moisture. You can substitute orzo with other small pasta shapes like couscous or quinoa for a gluten-free option.

Common Mistakes to Avoid

  • Overcooking the chicken can lead to dryness. Always check for doneness using a meat thermometer.
  • Not seasoning early enough can result in bland flavors. Ensure to marinate your chicken well and season the orzo during cooking.
  • Skipping the resting time for chicken after cooking can cause juices to escape when slicing.
  • Overcrowding the pan can lead to uneven cooking. Make sure chicken pieces are spaced apart for proper browning.
  • Cooking orzo too long can leave it mushy. Follow package directions for timing.
  • Using old or dried herbs can diminish flavor. Opt for fresh whenever possible or make sure dried herbs are stored properly.
  • Neglecting to preheat the skillet can result in uneven cooking and browning.
  • Not incorporating enough liquid while cooking the orzo can lead to a dry dish. Monitor closely to prevent sticking.

Essential Techniques

Marinating Chicken: Marinating enhances flavor and tenderness. For successful marinating: Prepare your marinade well in advance, using acid (like lemon juice) to help tenderize meat. Let the chicken soak for at least 30 minutes or up to overnight for maximum flavor infusion. Watch for signs of over-marinating, like a mushy texture.

Cooking Orzo: Cooking orzo to perfection means using a generous amount of boiling salted water and stirring occasionally. Generally, cook it for 8-10 minutes until al dente. To avoid clumping, do not rinse after draining; this helps the pasta absorb sauces better.

Pro Tips for Perfect Herb-Infused Chicken & Orzo

1. For deeper flavor, use a combination of fresh and dried herbs in your marinade.
2. Always let the chicken rest after cooking to maintain its juiciness.
3. Incorporate vegetables like bell peppers or spinach into the orzo for added nutrition.
4. Adjust the liquid in the orzo based on your texture preference; add broth for richness.
5. Consider topping with freshly grated Parmesan for extra creaminess.
6. For a crunch, toast the orzo lightly in the skillet before adding liquid.
7. Use a good-quality olive oil for marinating and cooking to elevate the flavor.
8. Experiment with spices like paprika or cumin for an unexpected twist.

Variations and Adaptations

Exploring regional variations of this Herb-Infused Chicken & Orzo can introduce fascinating twists. For Mediterranean flair, consider adding olives and sun-dried tomatoes to the dish. Adjust seasonings to reflect the various culinary traditions, perhaps using za’atar for a Middle Eastern influence.

During different seasons, you can adapt the recipe by including seasonal vegetables; asparagus in spring or pumpkin in the fall creates delightful contrasts. For dietary modifications, consider gluten-free orzo alternatives like quinoa for a nutritious touch without compromising flavor.

Flavor variations can be introduced through spices and marinades; a chipotle marinade can give a spicy kick for those who enjoy heat. As for texture modifications, incorporating nuts like pine nuts after cooking for a nice crunch can elevate the experience.

Presentation can vary greatly, too. A family-style serving in a large bowl may have a rustic charm, while individually plated portions can showcase elegant garnishing with fresh herbs.

Serving and Presentation Guide

Serving this Herb-Infused Chicken & Orzo beautifully is as essential as its preparation. For plating, use shallow bowls to highlight the colorful ingredients, ensuring the chicken is positioned prominently. Garnishing with fresh parsley or lemon zest adds brightness and enhances visual appeal.

Accompany with crusty bread for a delightful textural contrast and to soak up any delicious juices left behind. Consider serving alongside a simple green salad for a refreshing balance against the heartiness of the dish.

Temperature is key; this meal is best served warm, so be mindful of preheating serving bowls. Portion control is also important; aim for equal servings to maintain balance and ensure everyone enjoys each bite.

Wine and Beverage Pairing

The right beverage can elevate your Herb-Infused Chicken & Orzo to new heights. A light white wine, such as a Sauvignon Blanc or Pinot Grigio, complements the freshness of the herbs and chicken while enhancing the overall taste. If you prefer red, a light and fruity Pinot Noir can also work harmoniously.

For those seeking non-alcoholic alternatives, consider herbal iced tea with lemon or a refreshing sparkling water with mint for a delightful palate cleanser. If serving during later hours, a rich herbal tea can serve as a warming complement to the dish.

Temperature is key: serve wines chilled for whites and slightly cooler for reds. Highlighting the flavors of the dish while respecting their profile will create the perfect pairing.

Storage and Shelf Life

Proper storage of your Herb-Infused Chicken & Orzo will maintain its flavors and freshness. Allow the dish to cool to room temperature before transferring it into an airtight container. It can be refrigerated for up to 3 days, ensuring the chicken remains succulent.

For long-term storage, consider freezing the dish without any added components that can get mushy, such as fresh herbs. Consumed within 2 to 3 months, the flavors will still be bright upon reheating.

Signs of spoilage include off smells, discoloration, or an unusual texture. When reheating, ensure the dish reaches the internal temperature of 165°F to ensure safety.

Make Ahead Strategies

This Herb-Infused Chicken & Orzo can easily be made ahead of time for your convenience. Marinate the chicken a day prior to cooking, allowing the flavors to develop further. Cook the orzo but keep it slightly underdone to maintain optimal texture during the reheating process.

Once cooled, combine the orzo and chicken just before serving to prevent the pasta from absorbing too much moisture. If you’re meal prepping, consider storing individual portions in containers for easy grab-and-go lunches or dinners.

When reheating, add a splash of broth or water to recover some of the moisture lost during storage. Fresh herbs can be added just before serving for a burst of flavor and presentation.

Scaling Instructions

Scaling this Herb-Infused Chicken & Orzo recipe is straightforward. Halving the recipe is feasible; simply adjust quantities accordingly while maintaining the marinade’s proportion for the chicken. Doubling or tripling the recipe works well too; ensure you have sufficient cooking space to accommodate additional chicken and orzo.

Timing may require slight adjustments; larger quantities may need more time for the chicken to cook uniformly. Always use a thermometer for doneness to ensure safety.

Store leftover portions in the same airtight manner for extended freshness, and keep an eye on storage times per adjusted amounts. This flexibility makes the recipe perfect for gatherings or intimate dinners.

Nutritional Deep Dive

In examining the nutritional content of this Herb-Infused Chicken & Orzo, you’ll find a balanced macronutrient profile. The chicken provides ample protein for muscle repair and satiety, while the orzo contributes carbohydrates to fuel energy levels.

Micronutrient analysis reveals essential vitamins and minerals, particularly from the fresh herbs and any added vegetables. Ingredients like parsley hold vitamins A, C, and K, contributing to overall health.

For those focusing on health benefits, this meal is relatively low in saturated fat while providing heart-healthy fats if using olive oil for cooking. Managing portion sizes offers great potential for weight management without sacrificing flavor.

This dish showcases how enjoyable healthy eating can be, allowing for indulgent flavors wrapped in nutritious ingredients.

Dietary Adaptations

To make this Herb-Infused Chicken & Orzo suitable for various dietary preferences, several adaptations can be made. For gluten-free diners, substitute orzo with rice or gluten-free pasta versions available at stores.

Dairy-free modifications can include using coconut milk for creaminess without the dairy. For those following vegan diets, replacing chicken with chickpeas or jackfruit creates a satisfying alternative while maintaining protein levels.

For a low-carb version, consider eliminating orzo and using cauliflower rice instead. This could fit wonderfully with the herb flavors, making it a low-calorie option.

Whether you are following Keto or Paleo diets, adjusting the fats and using compliant ingredients allows for flexibility while keeping the core flavors intact, proving this dish’s versatility.

Troubleshooting Guide

If your Herb-Infused Chicken comes out tougher than expected, it may indicate overcooking. Use a meat thermometer to check the internal temperature and remove it from heat once it reaches 165°F.

Flavor balance is crucial; if too salty, adding a squeeze of lemon or some additional vegetables can help cut through intense flavors. Should your orzo become mushy, take care next time to keep an eye on cooking times and test for doneness early.

Equipment challenges may arise if your stove or pan doesn’t maintain heat; adjust your cooking environment to ensure even browning. Also, if you find yourself lacking a crucial ingredient, view substitutions closely related in flavor or texture to maintain the integrity of the dish.

Timing concerns are another area to watch; use timers to help keep track of each component to avoid over or undercooking any elements within the dish.

Recipe Success Stories

Community feedback on the Herb-Infused Chicken & Orzo has been overwhelmingly positive. Many home cooks have shared how easily they adapted the recipe to fit their flavor preferences and dietary needs, showcasing its versatility and appeal.

Success persists in the form of adaptation stories, where readers frequently highlight how adding seasonal ingredients or local herbs elevated their dining experience. Photography of prepared dishes in various presentations flood social media, inspiring excitement around this culinary favorite.

Readers often comment on how engaging the dish is for family gatherings, as people naturally gravitate towards a shared bowl of comfort food, turning meals into meaningful experiences.

The opportunity to create new variations continually sparks creativity. Readers have shared personal touches and local ingredient adaptions, generating a delightful discussion of flavor experiences and cooking stories.

Frequently Asked Questions

1. Can I use other types of pasta instead of orzo? Absolutely! While orzo provides a distinct texture, any small pasta shape, such as ditalini or acini di pepe, can work well in this recipe, providing similar satisfaction.

2. How do I store leftovers? Store the Herb-Infused Chicken & Orzo in an airtight container in the refrigerator for up to three days. For longer preservation, consider freezing it without any added fresh herbs.

3. Can I make this dish ahead of time? Yes, you can marinate the chicken ahead of time and boil the orzo just before serving.

4. Is the recipe suitable for meal prepping? Yes! This dish stores well, making it perfect for meal prep. Portion it into individual containers for easy grab-and-go lunches.

5. How can I make this dish gluten-free? Substitute orzo with gluten-free pasta options or quinoa to maintain flavor without the gluten content.

6. Can I use frozen chicken for this recipe? Yes, you can use frozen chicken, but it must be thawed properly before marinating and cooking.

7. What can I substitute for herbs if I don’t have fresh ones? Dried herbs can be used instead, but be sure to reduce the quantity since they are more concentrated in flavor than fresh herbs.

8. How do I make this dish spicier? Consider adding red pepper flakes or diced jalapeños to the marinade or the orzo while cooking for a spicy twist.

9. Is it possible to add vegetables to this dish? Absolutely! Incorporating seasonal vegetables like zucchini, bell peppers, or spinach can enhance the dish’s nutritional content and taste.

10. How do I adjust the cooking time for larger portions? When cooking larger batches, extend the cooking time slightly, and always check the internal temperature of the chicken to ensure it’s thoroughly cooked.

Additional Resources

For those interested in exploring further, there are myriad related recipes that complement classic Mediterranean meals. Check out our collection of one-pan meals or delve into seasonal vegetable recipes that pair wonderfully with this Herb-Infused Chicken & Orzo.

Technique guides on marinating meats and cooking pasta will enhance your culinary skills, making each dish you prepare that much better. Find detailed ingredient information for fresh herbs and inquire about their health benefits to elevate your meals.

Equipment recommendations will help you choose the right tools for effortless cooking, while seasonal variations can introduce the freshest ingredients available to keep your dishes dynamic and exciting.

Join the Conversation

We’d love to hear how you’ve made this Herb-Infused Chicken & Orzo your own! Share your photography tips or variations in the comments below. Engage with us on social media, where we encourage you to post your recipe adaptations and experiences in creating this delicious meal.

Your feedback, suggestions, and sharing of success stories only enhance our community, fostering a space where cooking enthusiasts can connect and inspire each other. Let’s keep the conversation going as we cook and enjoy meals together!

The Recipe

Herb-Infused Chicken & Orzo

Serves: 4

Prep Time: 15 mins

Cook Time: 30 mins

Total Time: 45 mins

Kitchen Equipment Needed

  • Large skillet
  • Pot for boiling orzo
  • Meat thermometer
  • Cutting board
  • Knife

Ingredients

  • 4 bone-in, skin-on chicken thighs
  • 1 cup orzo pasta
  • 2 tablespoons olive oil
  • 2 tablespoons lemon juice
  • 3 cloves garlic, minced
  • 1 tablespoon fresh parsley, chopped
  • 1 tablespoon fresh thyme, chopped
  • 1 tablespoon fresh sage, chopped
  • Salt and pepper to taste
  • 4 cups chicken broth

Directions

  1. In a bowl, combine olive oil, lemon juice, garlic, parsley, thyme, sage, salt, and pepper. Add chicken and marinate for at least 30 minutes.
  2. In a large skillet, heat olive oil over medium heat. Add marinated chicken skin-side down and cook until golden brown, about 5-7 minutes per side. Remove and set aside.
  3. In the same skillet, pour in chicken broth and bring to a boil. Stir in orzo and cook for 10 minutes.
  4. Return chicken to the skillet, reduce heat to low, cover, and let simmer until chicken is fully cooked, about 15 minutes.
  5. Serve the chicken over the orzo, garnished with extra herbs if desired.

Recipe Notes

  • Feel free to add seasonal vegetables for added nutrition.
  • The dish can be made ahead and reheated; just add a splash of broth when reheating.

Delicious Cream Cheese and Cherry Danish Recipe Made Easy

Cream Cheese and Cherry Danish: A Delightful Pastry Experience

⚖️
Difficulty
Intermediate

⏲️
Prep Time
25 mins

🕒
Cook Time
20 mins

⏱️
Total Time
45 mins

🍽️
Servings
12 pastries

Indulging in a Cream Cheese and Cherry Danish is like taking a step into a cozy bakery where the sweet aroma of baked goods fills the air. As you take a bite, the flaky, buttery pastry melds harmoniously with the velvety cream cheese filling, and the vibrant sweetness of cherries adds a delightful burst of flavor. This pastry is not just a treat; it’s a warm embrace that brings nostalgia and joy, making it a perfect addition to your morning coffee or an afternoon delight.

This recipe invites you to celebrate the simple pleasures of life—such as sharing delectable pastries with family during a Sunday brunch or surprising a friend with homemade goodies. Each layer of this Danish is crafted with care, ensuring that every bite is a perfect balance of sweetness and richness. Whether you’re an experienced baker or just starting out, the Cream Cheese and Cherry Danish is an enriching experience that will fill your kitchen with mouth-watering fragrances and happy chatter.

Quick Recipe Highlights

  • Flavor Profile: The luscious cream cheese and tart cherry filling create a delightful contrast, while a hint of vanilla enhances the sweetness.
  • Texture: Flaky pastry layers surrounding a creamy core provide a satisfying mouthfeel with every bite.
  • Aroma: The warm scent of baked pastry and cherries caramelizing in the oven will awaken your senses.
  • Visual Appeal: Golden-brown, beautifully shaped pastries filled with vibrant red cherries are a feast for the eyes.
  • Skill Level Needed: This recipe requires intermediate baking skills, focusing on dough handling and filling techniques.
  • Special Equipment: A rolling pin, pastry brush, and a baking sheet will simplify the cooking process.

Recipe Overview

  • Difficulty Level: This cream cheese and cherry Danish is categorized as an intermediate recipe, perfect for those who have a basic understanding of pastry-making techniques.
  • Category: These pastries can be enjoyed for breakfast, brunch, or as a delightful dessert, fitting into various meal categories.
  • Cuisine: Danish pastry is a renowned part of Scandinavian cuisine, combining rich baking traditions with modern flavors.
  • Cost: Approximate costs for ingredients are affordable, making this an accessible recipe for many home bakers.
  • Season: Spring and summer are ideal seasons for enjoying cherry Danish pastries, as fresh cherries are at their peak during these months.
  • Occasion: Perfect for gatherings, holidays, or as a special treat for yourself on any day that calls for a little indulgence.

Why You’ll Love This Recipe

With its perfect blend of unmistakable taste and appealing texture, the Cream Cheese and Cherry Danish is sure to become a favorite. The buttery pastry gives way to the creamy filling and tangy cherries, ensuring that every bite is satisfying and delicious. The delightful contrasts will have your taste buds dancing with joy, making this decadent treat hard to resist.

Convenience also plays a role in why you’ll adore this recipe. Preparing these pastries at home allows you to control the ingredients, ensuring freshness and avoiding preservatives found in store-bought alternatives. The process, while slightly intricate, is rewarding and leaves you with a sense of accomplishment as you create something beautiful and delicious.

From a nutritional standpoint, cream cheese can provide a satisfying source of protein and fat, especially when balanced with the natural sweetness of fresh cherries. Together, they create a treat that is indulgent yet can fit into a balanced diet when enjoyed in moderation.

Socially, the Cream Cheese and Cherry Danish offers great value. It’s an ideal snack for gatherings, allowing guests to indulge in a delightful pastry that pairs beautifully with coffee or tea. Sharing these pastries can foster connections and create lasting memories with friends and family.

Finally, considering cost-effectiveness, this cream cheese and cherry Danish can be made with readily available ingredients, making it an accessible baking project. Additionally, making pastries at home is generally less expensive than purchasing them from bakeries, allowing you to treat yourself or loved ones without breaking the bank.

Historical Background and Cultural Significance

The Cream Cheese and Cherry Danish pastry has its roots in the Danish pastry tradition, which dates back to the 19th century. Originally brought to America by immigrants from Denmark, this popular pastry has evolved to incorporate local ingredients and flavors, making it a beloved treat across different cultures. Its popularity skyrocketed, especially in café culture, where it became synonymous with comforting baked goods enjoyed alongside coffee.

Culturally, Danish pastries represent celebration and leisure. They are often associated with holiday gatherings and special occasions, symbolizing hospitality and warmth. Families and friends gather over pastry platters, creating memories that last a lifetime, fostering traditions that are passed down through generations.

The recipe’s evolution reflects broader culinary trends, where pastry-making has become an art form in its own right. Over time, adaptations have emerged, from different fillings to various ways of shaping the pastry, aligning with modern tastes while respecting traditional methods.

Regional variations of the Danish pastry are enormous, showcasing unique ingredients influenced by local cultures. In the U.S., for example, cherry fillings became popular due to the abundance of cherries in certain regions, adding a distinctly American twist to the classic recipe.

Ingredient Deep Dive

Cream cheese is a key component of this recipe, known for its rich, creamy texture. This ingredient originated in the United States during the 19th century and has become a pastry staple. Nutritionally, cream cheese is high in protein and provides a source of calcium. When selecting cream cheese, look for fresh products without additives for the best results. Store it in the refrigerator and be aware that it can spoil if left out for too long. Substitutes like mascarpone or ricotta can also be used for a slightly different flavor.

Cherries, whether fresh or tart, bring a burst of flavor and vibrant color to your Danish. Packed with antioxidants, cherries are known for their health benefits, including anti-inflammatory properties. Look for plump, firm cherries when selecting your fruit and consider freezing excess during peak seasons to enjoy later. If fresh cherries are not available, canned cherries in juice or frozen cherries without added sugar can be excellent alternatives for this recipe.

Common Mistakes to Avoid

  • Overworking the dough can lead to tough pastries; handle it gently and only roll it out as necessary.
  • Not chilling the dough can result in poor texture; always refrigerate the dough before baking to ensure flakiness.
  • Using stale or expired ingredients can negatively impact flavor; always check your expiration dates before baking.
  • Neglecting to preheat the oven can lead to uneven cooking; always ensure that the oven is at the correct temperature before placing in the oven.
  • Filling the pastries too much can cause them to overflow; use a moderate amount of filling for each Danish.
  • Skipping the egg wash will diminish the pastry’s golden color; don’t overlook this step for the best appearance.
  • Using a baking sheet that’s not lined can lead to sticking; always line with parchment paper for easy removal.
  • Baking at the wrong temperature can affect cooking times; ensure your oven is calibrated for accurate baking.
  • Not allowing the pastries to cool before serving can result in messy filling; let them sit for a few minutes.
  • Forgetting to adjust baking time for larger or smaller pastries can lead to over- or undercooked results.

Essential Techniques

Rolling pastry dough properly is essential for achieving a flaky texture. The key is to roll from the center outwards, applying even pressure. Avoid over-flouring the surface, which can toughen the dough. Mastery involves practice, where visual cues such as the dough’s elasticity indicate readiness.

Filling and shaping the Danish correctly is crucial. Make sure not to overfill, as it can burst during baking. Creating a small pocket for the filling with a well-defined border helps maintain shape. Common pitfalls include misjudging the amount of filling and not sealing the edges properly, which can lead to spills while baking.

Pro Tips for Perfect Cream Cheese and Cherry Danish

1. Use high-quality butter for optimal flakiness in the dough; good fat makes a significant difference in texture.
2. Chill all ingredients, including the cream cheese, before use; this prevents the butter from melting prematurely.
3. Experiment with flavor add-ins such as almond extract or lemon zest for a unique twist.
4. Always keep a close eye on pastries as they bake; ovens can vary, and pastries can quickly go from perfect to overdone.
5. Consider serving the Danish warm for an extra-enhanced experience; they taste divine right out of the oven!
6. Play around with different fruit fillings beyond cherry; try blueberry or mixed berries for new tastes.
7. Enjoy the Danish with a drizzle of icing for added sweetness; it provides a beautiful decorative finish.
8. Brush with cream or milk after baking for a shiny, appetizing look that enhances presentation.

Variations and Adaptations

Regional variations of the Danish can lead to delightful outcomes. For example, adding spices such as cinnamon or nutmeg can enhance the flavor profile and create a warming effect. Seasonal adaptations are also exciting; for instance, using pumpkin purée in the fall can create a comforting autumn treat.

Dietary modifications can cater to specific preferences; gluten-free pastry alternatives made from almond flour or oat flour can offer inclusivity. If avoiding dairy, using coconut cream can replicate the cream cheese texture with a unique flavor twist.

Exploring flavor variations can open a world of new possibilities. Consider incorporating lemon curd or chocolate chips, which can elevate the Danish to an entirely new dessert experience. For presenting the pastry, use fresh fruit garnishes or a sprinkle of powdered sugar for visual appeal.

Serving and Presentation Guide

To plate your Danish beautifully, consider a simple arrangement on a cake stand or a decorative platter. A dusting of powdered sugar or a drizzle of melted chocolate can enhance visual appeal significantly. Fresh cherries or mint leaves can serve as charming garnishes, adding color and freshness to the plate.

Accompany the pastries with traditional beverages like coffee or tea, creating a classic café experience. For modern serving suggestions, consider pairing them with flavored syrups or flavored creamers that align with the cherry profile.

Temperature plays a vital role in the enjoyment of pastries; serving them slightly warm can enhance the flavors. Avoid overcrowding on the plate to maintain an elegant presentation and consider portion control for balance.

Wine and Beverage Pairing

When it comes to wine pairings, a light Riesling or a fruity Sauvignon Blanc perfectly complements the sweet and tangy flavors of the Cream Cheese and Cherry Danish. These wines are crisp, enhancing the delicate pastry without overpowering it.

For those seeking non-alcoholic alternatives, consider pairing with a refreshing cherry lemonade or a sparkling water with a hint of cherry for a lively mix. If coffee is preferred, a medium roast that balances sweetness will create a delightful contrast with the creamy cheese and tart cherries.

Serving suggestions include chilling wines slightly and ensuring non-alcoholic beverages are served cold for a refreshing experience. The right beverage can enhance the overall enjoyment of this delightful pastry.

Storage and Shelf Life

Proper storage is essential to maintain the quality of your Cream Cheese and Cherry Danish. Store in an airtight container at room temperature for up to two days. For longer storage, consider refrigerating the pastries, which can extend their shelf life for about four days.

Ensure to check for signs of spoilage such as changes in texture or off odors, particularly with cream cheese fillings. If reheating, a few minutes in a preheated oven can revive the pastry’s flaky texture.

Freezing the Danish is also an option for longer-term storage. Wrap each pastry tightly in plastic wrap and place in a freezer-safe bag for up to three months. When ready to enjoy, thaw in the refrigerator overnight and reheat gently before serving.

Make Ahead Strategies

To streamline your baking process, consider preparing the cream cheese filling a day in advance. Store it in the refrigerator, allowing the flavors to meld together beautifully. You can also prepare and shape the pastries the night before, covering them and keeping them in the fridge until baking the next morning.

When storing between steps, ensure all elements are kept cool to maintain the integrity of the dough. Quality assessment is critical; keep an eye on the dough’s consistency to ensure it doesn’t become too soft.

For assembly, have all your ingredients prepped and organized, helping ensure a seamless baking experience. Lastly, opt to add fresh elements such as a sprinkle of powdered sugar just before serving for a beautiful, eye-catching finish.

Scaling Instructions

If you want to halve the recipe, simply divide all ingredients by two, which will adjust cooking times slightly; check for doneness a few minutes earlier. Conversely, doubling or tripling the recipe allows you to serve a larger crowd. Ensure you have sufficient baking sheets to accommodate the extra pastries.

When scaling, be mindful of the equipment adjustments; you may need to use larger mixing bowls or bake in batches. Timing modifications are essential, as larger quantities might take longer to bake through.

For storage considerations, remember that scaled-up recipes might require more space in the refrigerator or freezer, so plan accordingly. Whether scaling up or down, the delicious essence of the Danish remains constant.

Nutritional Deep Dive

Analyzing the macros of the Cream Cheese and Cherry Danish reveals a balance of carbohydrates, fats, and proteins. Each pastry generally packs around 200 calories, primarily from the pastry dough and creamy filling.

Micronutrient analysis shows a good source of calcium from the cream cheese and additional vitamins from the cherries, such as vitamin C and fiber. Baking with fresh ingredients not only boosts flavors but also provides health benefits through their nutrient content.

From a dietary perspective, consider portion analysis; enjoying one pastry at a time can help manage caloric intake. Weight management tips include pairing with healthier options like fruit or yogurt to balance indulgence.

Dietary Adaptations

Those following a gluten-free lifestyle can switch to gluten-free pastry mixes or create almond flour-based pastry dough to enjoy the Cream Cheese and Cherry Danish without compromise. For dairy-free options, substituting cream cheese with cashew cream or a thick coconut yogurt can maintain the creamy texture while catering to lactose intolerance.

Vegan variations can be achieved using plant-based cream cheese and ensuring that the pastry dough contains no eggs. Low-carb enthusiasts might consider using a dough made from almond flour or coconut flour, adapting the recipe to their dietary needs.

Keto dieters can find success by focusing on higher-fat fillings and minimizing sugar; using erythritol or stevia in your cherry filling can keep sugar content low while still providing sweetness.

Troubleshooting Guide

Texture issues can arise if the dough is overworked; to rectify, ensure you handle it gently and allow it to rest if it becomes tough. If the filling is too runny, consider draining excess liquid from the cherries before use to prevent soggy pastries.

Flavor balance can be adjusted by incorporating more sugar if overly tart; sampling the filling before assembly is crucial for achieving your desired flavor. In cases of temperature problems, investing in an oven thermometer helps ensure consistent results.

Equipment challenges may include lacking the right tools; improvisating with common kitchen items can be useful in a pinch. If ingredient substitutions lead to unsatisfactory results, take note of flavors and textures for future adjustments.

Timing concerns may occur if you overlap baking items; using a timer to keep track of multiple pastries will help stay organized while baking.

Recipe Success Stories

Community feedback on the Cream Cheese and Cherry Danish is glowing. Many bakers have shared their successful adaptations, exploring various fillings ranging from pumpkin spices to berry blends—demonstrating the recipe’s flexibility for creativity.

Readers often highlight the nostalgic connection to their childhood, recalling how sharing pastries with family brought joy and comfort. Many relate stories of gatherings centered around delicious Danish pastries, fostering connections and creating lasting memories.

Photography tips have also become a focal point, with followers sharing their beautifully styled Danish cakes on social media platforms, inspiring others to try their hand at this beloved recipe.

Encouraging adaptation tales reveal how each cook adds personal touches to the classic Danish, ensuring that every batch embodies their unique flair and love for baking.

Frequently Asked Questions

Can I freeze the Cream Cheese and Cherry Danish?

Absolutely! You can freeze the Danish before baking or after. Simply wrap them tightly and keep them in a freezer-safe container. When you’re ready to enjoy, thaw in the refrigerator overnight and bake as required.

What are good alternatives to cherries?

Feel free to use any fresh fruit like blueberries, raspberries or even apples. You could also try preserves or pie filling, depending on your flavor preferences.

How can I make the pastry vegan-friendly?

Substitute the cream cheese with a plant-based version and use a dairy-free butter for the pastry dough. Ensure to check all ingredient labels to avoid animal products.

What’s the best way to store leftovers?

Store the leftovers in an airtight container at room temperature for up to two days, or refrigerate for up to four days. Be sure to let them cool completely before storing.

Why are my pastries not rising properly?

Improper oven temperature is often the culprit; make sure your oven is preheated to the correct temperature before baking. Additionally, make sure your ingredients, especially yeast, are fresh.

Can I substitute the cream cheese with ricotta?

Yes! Ricotta can be used instead of cream cheese, offering a lighter flavor and texture. Just ensure it’s well-drained to avoid excess moisture.

What should I do if the filling leaks out while baking?

To prevent leaks, be cautious not to overfill the pastries. Ensuring the edges are well-sealed will also help contain the filling during baking.

Is this recipe suitable for beginner bakers?

This recipe is best suited for intermediate bakers due to the dough handling involved. However, with patience and practice, beginners can definitely tackle it!

How can I make the filling sweeter?

If you find the cherry filling too tart, you can add more sugar or a flavored syrup to it. Taste-testing before sealing your danishes allows for personal preference adjustments.

What kitchen equipment do I need?

A rolling pin, baking sheet, and mixing bowls are essential. If you have a pastry brush, it will be helpful for applying the egg wash for a shiny finish.

Can I make the dough ahead of time?

Yes! The dough can be made in advance and chilled in the refrigerator. Allow it to come to room temperature before rolling it out for use.

Additional Resources

If you enjoyed this recipe, explore related recipes that incorporate fruit and cream cheese, such as cheesecake bars or fruit tarts. Also, check out our technique guides on pastry making and dough handling to boost your baking skills further.

Information on seasonal fruits can help you choose the best ingredients throughout the year, adjusting your recipes based on what’s in season. Equipment recommendations for baking tools will help you build a kitchen that supports your baking creations efficiently.

Join the Conversation

We invite you to share your Cream Cheese and Cherry Danish creations on social media, using the hashtag #DanishDelight. Join our community by leaving your feedback and sharing your stories; we love to hear about your baking adventures.

Capturing the process of making these delightful pastries can inspire fellow bakers; sharing photos and tips not only builds connections but also enriches the experience for all. Together, let’s celebrate baking and the joy of sharing food with loved ones.

The Recipe

Cream Cheese and Cherry Danish

Serves: 12 pastries

Prep Time: 25 mins

Cook Time: 20 mins

Total Time: 45 mins

Kitchen Equipment Needed

  • Rolling pin
  • Baking sheet
  • Mixing bowls
  • Pastry brush
  • Measuring cups and spoons

Ingredients

  • 2 cups all-purpose flour
  • 1/2 cup unsalted butter, cold
  • 1 tsp salt
  • 1/4 cup sugar
  • 1/4 cup milk
  • 1/2 cup cream cheese, softened
  • 1 cup fresh cherries, pitted and halved
  • 1 egg (for egg wash)
  • 1 tsp vanilla extract
  • Powdered sugar (optional, for dusting)

Directions

  1. In a large bowl, combine the flour, sugar, and salt. Cut in the cold butter until the mixture resembles coarse crumbs.
  2. Add the milk gradually until a dough forms. Refrigerate for at least 30 minutes.
  3. Preheat the oven to 375°F (190°C) and line a baking sheet with parchment paper.
  4. Roll out the chilled dough on a floured surface to about 1/8 inch thick.
  5. Cut the dough into squares (about 4×4 inches) and place a small spoonful of cream cheese and cherries in the center of each square.
  6. Fold the corners over the filling and seal the edges with a fork or by pinching them closed.
  7. Place the Danish on the prepared baking sheet and brush the tops with beaten egg.
  8. Bake for 20 minutes or until golden brown. Allow to cool slightly before serving.
  9. Dust with powdered sugar before serving, if desired.

Recipe Notes

  • This Danish can be customized with your favorite fruit fillings.
  • Consider adding almond extract for additional flavor in the cream cheese mixture.
  • Filling can be prepared ahead of time and stored in the refrigerator for convenience.

Delicious Zucchini Carrot Cake Cheesecake Cookies Recipe to Try Today

Zucchini Carrot Cake Cheesecake Cookies: A Delicious Twist on Classic Flavors

⚖️
Difficulty
Medium

⏲️
Prep Time
20 mins

🕒
Cook Time
15 mins

⏱️
Total Time
35 mins

🍽️
Servings
24 cookies

Welcome to the ultimate indulgence: Zucchini Carrot Cake Cheesecake Cookies! This unique recipe perfectly marries the flavors of zesty carrots, subtle zucchini, and creamy cheesecake all wrapped into a delightful cookie form. Imagine the tantalizing fusion of spices that dancing through your taste buds with each bite, creating an unforgettable treat that is both comforting and sophisticated. Perfectly moist and delightfully chewy, these cookies also boast a luscious cheesecake center, making them perfect for any occasion, whether it’s a family gathering, potluck, or just a sweet treat to enjoy at home.

These Zucchini Carrot Cake Cheesecake Cookies not only satisfy your sweet tooth but also add a hint of nostalgia with their playful, cake-like texture. Each cookie is an invitation to enjoy the delightful complexities of flavors with every satisfying chewy bite. The addition of fresh vegetables provides a naturally sweet and moist base, allowing you to enjoy all the decadent flavors guilt-free. Bring joy to your kitchen and delight to your taste buds with this simple yet extraordinary recipe!

Quick Recipe Highlights

  • Flavor Profile: Expect sweet notes from the carrots, earthy undertones from zucchini, and a rich creaminess from the cheesecake filling.
  • Texture: These cookies present a soft, chewy exterior with a luscious, creamy center that melts in your mouth.
  • Aroma: The warm spices of cinnamon and nutmeg create an inviting aroma that fills your kitchen.
  • Visual Appeal: Vibrant orange and green flecks combined with a glistening cream filling make these cookies eye-catching.
  • Skill Level Needed: This recipe requires basic baking skills but is accessible for both novice and experienced bakers.
  • Special Equipment: A mixer, baking sheets, and parchment paper will make the process easier and more efficient.

Recipe Overview

  • Difficulty Level: This recipe is considered medium due to the multiple components involved, but is manageable with clear instructions for each step.
  • Category: These cookies are a delightful dessert that can also double as a lavish snack throughout the day.
  • Cuisine: This recipe draws from American baking traditions, blending classic carrot cake and cheesecake elements into a new format.
  • Cost: Ingredients are generally affordable, with the most significant expense being the cream cheese.
  • Season: These cookies are perfect for any season, especially spring and summer when fresh zucchini is abundant.
  • Occasion: Ideal for celebrations, casual gatherings, or as a creative treat for lunch boxes.

Why You’ll Love This Recipe

The combination of zesty flavors and soothing textures make these Zucchini Carrot Cake Cheesecake Cookies a fan favorite. The natural sweetness from the carrots and zucchini offers a unique taste profile that pairs beautifully with the creamy cheesecake interior. Each bite provides the perfect balance of sweetness and warmth, making them an irresistible indulgence for dessert lovers.

Convenience sets this recipe apart; it’s relatively quick to prepare and doesn’t require overly complicated techniques. Simply mix, scoop, and bake! For those busy days or last-minute gatherings, you can whip up these cookies in no time, offering a delicious surprise that impresses every guest.

Nutritionally, adding zucchini and carrots boosts the health factor of these cookies. Both vegetables contribute essential vitamins, minerals, and fiber while allowing you to sneak in some veggies into your treats. This makes them a little more wholesome compared to traditional cookies without sacrificing flavor.

Socially, these cookies serve as a great conversation starter. Their unique flavor and presentation will captivate your guests’ attention, encouraging them to savor and discuss this innovative take on classic desserts. Plus, they’re perfect for sharing with friends and family, helping to create memorable moments around the table.

Cost-effectiveness plays a role too. Using everyday ingredients, this recipe allows you to create impressive treats without breaking the bank. With a yield of about 24 cookies, you’re sure to have plenty to share or enjoy throughout the week!

Historical Background and Cultural Significance

The idea of combining zucchini and carrots in baked goods has roots in traditional home cooking, where frugal cooks sought to utilize seasonal produce effectively. Carrot cake, in particular, has a rich history dating back to medieval Europe when it was popular to sweeten baked goods with carrots instead of sugar. With the rise of American baking, this concept evolved, inspiring various renditions like zucchini bread, which became a staple in many households.

In America, the carrot cake gained immense popularity in the late 20th century, often enjoyed at celebrations such as birthdays and weddings. The use of zucchini in baking surged with the growth of community gardening, showcasing how people creatively used seasonal vegetables. Combining these two beloved ingredients reflects a trend in modern baking, where creative combinations are celebrated.

As recipes evolve, many aspects of the traditional carrot cake recipe have been modified, including healthier alternatives using whole grains and less sugar. The introduction of cheesecake elements adds another layer, celebrating the rich, creamy textures found in many beloved desserts.

Regional variations of carrot cake exist, with different spices, nuts, and frostings capturing the essence of local culinary traditions. Adding zucchini to the mix demonstrates the flexibility and creativity in American baking, illustrating how home cooks turn simple ingredients into delightful desserts.

Ingredient Deep Dive

In this recipe, zucchini serves not just as a filler but an important ingredient that adds moisture without overwhelming flavor. An excellent source of vitamins A and C, zucchini also provides a subtle, mild flavor that complements the sweetness of carrots. When selecting zucchini, look for firm, unblemished vegetables with a vibrant skin. For storage, keep zucchini in the fridge’s vegetable drawer for up to a week.

Carrots, a staple in many kitchens, add natural sweetness and a lovely orange hue to these cookies. Carrots are high in beta-carotene, an antioxidant that is converted to vitamin A in the body, aiding in vision and skin health. When choosing carrots, opt for smooth, firm specimens, avoiding those that feel soft. Store them in the refrigerator in a perforated plastic bag to keep them fresh longer.

Cream cheese provides the luscious cheesecake filling that steals the show in these cookies. Rich and creamy, it adds a delightful tang that balances the sweetness of the cookie. When selecting cream cheese, choose full-fat versions for best results, and store leftovers wrapped tightly in the fridge up to a week.

Flour is a foundational ingredient, offering structure and stability to the cookies. All-purpose flour usually produces great results, but for a nuttier flavor and denser texture, consider whole wheat flour. Always sift your flour before measuring to ensure accuracy in your cookie dough.

Sugar sweetens these delightful creations and also contributes to the cookies’ texture. A blend of brown and granulated sugar adds depth to the flavor profile. When making substitutions, consider alternatives like honey or maple syrup, but keep in mind that liquid sweeteners may alter the moisture balance.

Common Mistakes to Avoid

  • Overmixing the dough: This can lead to tough cookies. Mix just until combined to keep your cookies soft and chewy.
  • Using too much moisture: Excess water from zucchini can make your cookies overly wet. Squeeze out excess moisture before adding it to the batter.
  • Overbaking: Keep an eye on the baking time. Cookies should be lightly golden around the edges, but soft in the center.
  • Not chilling the dough: Allowing the dough to chill before baking can enhance the flavors and improve texture.
  • Skipping parchment paper: Using it can prevent sticking, ensuring your cookies release effortlessly from the baking sheet.
  • Ignoring oven temperature: An oven thermometer can help ensure your cookies bake correctly and thoroughly.
  • Not measuring accurately: Use measuring cups and spoons for precise measurements to yield consistent results.
  • Storing improperly: To maintain freshness, store cookies in an airtight container at room temperature. Refrigeration can lead to changes in texture.

Essential Techniques

To achieve the perfect Zucchini Carrot Cake Cheesecake Cookies, proper technique is crucial. Start by creaming the butter and sugars together until light and fluffy; this process incorporates air into the mixture, contributing to a lighter texture. Be careful not to overmix after adding the dry ingredients, which could lead to dense cookies.

Also, ensure the cream cheese filling is smooth before incorporating it into the cookie. If using chilled cream cheese, it may lead to lumps in the filling. Let it come to room temperature for a consistent mixture that blends beautifully into your cookie dough.

Regarding baking, pay special attention to oven temperatures. An accurate temperature will ensure the cookies bake evenly. If you find the tops of your cookies are browning too quickly, consider rotating the baking sheet halfway through for an even cook.

Pro Tips for Perfect Zucchini Carrot Cake Cheesecake Cookies

To achieve cookie perfection, start with room temperature ingredients, which can impact the final texture dramatically. This includes eggs, butter, and cream cheese, ensuring they mix more uniformly.

Consider adding chopped walnuts or pecans to your cookie dough for an additional crunch that contrasts beautifully with the soft cookie texture. These enhance flavor and provide a nutty richness that complements the other ingredients.

Experiment with spices. While cinnamon is a classic, consider adding a dash of ginger or a pinch of allspice for added warmth and depth. It can elevate flavors to new levels.

Utilize a cookie scoop for uniformity in size, allowing all cookies to bake evenly. It also simplifies portioning, preventing you from over or under-filling your cookies.

For an extra layer of flavor, drizzle a simple icing glaze made from powdered sugar and milk over cooled cookies, enhancing both flavor and visual appeal.

Wait until cookies have cooled on the baking sheet for a few minutes before transferring them to wire racks. This allows them to set properly, preventing crumbling during the transfer.

Finally, store cookies in an airtight container with parchment paper between layers to prevent sticking and keep them fresh longer.

Variations and Adaptations

These Zucchini Carrot Cake Cheesecake Cookies can be tailored to suit different tastes and dietary needs. For a seasonal twist, consider incorporating grated apples or pumpkin puree for a delightful flavor shift.

Vegan adaptations can be achieved by replacing eggs with flaxseed meal or applesauce, and substituting cream cheese with a vegan cream cheese alternative. This maintains the essence of the recipe while accommodating dietary preferences.

Gluten-free versions can be achieved by substituting all-purpose flour with a gluten-free flour blend. Just ensure the blend contains xanthan gum for structure; this is vital for maintaining the texture of your cookies.

Flavor variations are plentiful; try adding citrus zests like lemon or orange for a refreshing citrus contrast. You can also incorporate chocolate chips for an indulgent twist that chocolate lovers will adore.

For a unique texture, consider rolling the cookies in shredded coconut or chopped nuts before baking. This adds an exciting crunch and enhances the cookie’s visual appeal on the platter.

Finally, consider presenting these cookies on a beautiful tiered cake stand for an impressive display at gatherings; they become an eye-catching centerpiece at your dessert table.

Serving and Presentation Guide

Plating these cookies beautifully can elevate any event or gathering. Start by arranging the cookies on a beautiful platter, possibly accented with seasonal fruits or edible flowers for added color and interest.

Garnish with a drizzle of caramel or a sprinkle of powdered sugar over the top for a finishing touch that enhances visual presentation. Pair each cookie with a small scoop of vanilla ice cream or a dollop of whipped cream on the side for an elegant touch.

Consider creating a dessert bar where guests can assemble their own cookie sandwiches with cream cheese frosting, providing an interactive element at your event.

As for temperature, these cookies can be served warm or at room temperature. If serving them warm, be sure to let them sit for about 5 minutes after baking to prevent burns from the molten cheesecake center.

Finally, remember to consider portion control. These cookies can be quite rich; offering them in smaller sizes alongside a variety of other desserts encourages guests to sample and enjoy a wider array.

Wine and Beverage Pairing

Pairing beverages with Zucchini Carrot Cake Cheesecake Cookies can elevate your snack experience. A sweet Riesling complements the sweetness of the cookies while enhancing the spiced flavors beautifully.

For non-alcoholic options, consider serving a light ginger lemonade, which contrasts the cookies’ density and refreshes the palate. The spiciness of ginger in the drink pairs well with the warm spices used in the cookies.

If coffee is more your style, a rich espresso or lightly sweetened latte can enhance the creamy cheesecake filling while providing a balanced flavor profile that suits the cookies’ sweetness.

Ensure that beverages served are at the appropriate temperature. Chill white wines and serve coffees hot; this balance ensures a satisfying drinking and eating experience.

Bringing a variety of these choices to your next event keeps options open and allows everyone to find a pairing that suits their individual palate.

Storage and Shelf Life

When it’s time to store your Zucchini Carrot Cake Cheesecake Cookies, prioritize keeping them fresh and flavorful. Store them in an airtight container at room temperature for up to a week. If you require longer storage, consider refrigerating them where they can last for up to two weeks.

To prevent any texture loss, separate layers of cookies with parchment paper within the container. This practice helps air circulate, maintaining their delightful chewiness.

If you need to freeze any leftovers, wrap each cookie individually in plastic wrap and place them in a freezer-safe bag. They can be stored this way for up to three months. When ready to enjoy, simply thaw at room temperature or reheat gently in the microwave.

Look out for signs of spoilage, such as a sour smell or noticeable changes in texture. If the cookies appear dry or have developed mold, it’s best to discard them.

Reheating cookies is simple; consider using a low microwave setting or placing them in a preheated oven for a few minutes to restore their original texture.

Make Ahead Strategies

If you’re planning to make Zucchini Carrot Cake Cheesecake Cookies for an event, there are several strategies for preparation in advance. You can prepare the dough a day ahead and store it in the refrigerator, which allows the flavors to meld beautifully.

Consider baking half the batch and freezing the remaining dough for a quick treat at a later time. Shape the cookie dough, freeze the shapes on a baking sheet, then transfer to a freezer bag for later baking without thawing.

For those who enjoy hosting, prepare your filling and cookie dough separately, then assemble only when the time comes around. This method preserves freshness and allows you to customize the creamy filling by adding different flavors or spices.

Lastly, while you can bake cookies a day or two in advance, allow them to cool completely before storing. This prevents an undesired moisture lock that can impact the final texture.

Scaling Instructions

If you need to adjust the batch size of your Zucchini Carrot Cake Cheesecake Cookies, scaling is simple. To halve the recipe, divide each ingredient measurement in half, taking note that baking times may vary slightly.

If you’re looking to double or triple the cookie recipe, ensure you have a large enough mixing bowl and baking sheets. Consider an increased baking time, and remember to check for doneness, as larger batches may cook unevenly.

Equipment adjustments include using multiple baking sheets or working in batches to prevent overcrowding the oven. This helps maintain consistent temperature and timing for optimal results.

Be mindful of timing modifications, particularly if switching between small and large batches. Some adjustments might be necessary to ensure that all cookies achieve a proper bake.

When scaling, also consider your storage methods. Larger quantities may require more substantial containers for storage, ensuring that freshness is upheld across all cookies.

Nutritional Deep Dive

Analyzing the nutritional content of Zucchini Carrot Cake Cheesecake Cookies offers a delightful perspective on health benefits. Each cookie typically contains moderate amounts of carbohydrates, primarily sourced from natural ingredients such as carrots and zucchini.

You’ll find an interesting blend of macronutrients with healthy fats from butter and cream cheese, contributing to the delicious creamy center. These cookies provide protein as well, mainly from the eggs and cream cheese, aiding in muscle growth and repair.

Meanwhile, the micronutrient profile is worthy of note! Carrots deliver essential vitamins like A and K, while zucchini provides significant amounts of vitamins A and C. These nutrients support healthy vision, immune system function, and skin health.

Considering portion sizes is also vital—enjoying these cookies in moderation keeps your indulgence balanced and guilt-free. They offer a delightful treat that can fit into an overall healthy lifestyle when paired with nutrient-dense meals throughout the day.

Additionally, the fiber content from the vegetables promotes digestion, helping you feel satisfied without overeating. This enhances both the enjoyment and nutritional value of these sweet delights.

Dietary Adaptations

Accommodating diverse dietary preferences is a breeze with Zucchini Carrot Cake Cheesecake Cookies. For a gluten-free adaptation, consider using almond flour or a gluten-free blend to substitute regular flour, ensuring the texture remains soft yet sturdy.

For vegan enthusiasts, swap the eggs for flaxseed meal (1 tablespoon of flaxseed with 2.5 tablespoons water per egg) and replace cream cheese with a plant-based counterpart. These adjustments maintain flavor while catering to strict dietary guidelines.

If you’re looking for a lower-carb version, explore almond flour as a base and simply adjust sweeteners accordingly; using erythritol or similar alternatives can keep the sweetness without excess carbs.

For a Paleo approach, stick to whole food ingredients, using coconut oil in place of butter and combined alternatives for sweetening. Adjusting the recipe this way would not only fit within Paleo guidelines but offer an exciting flavor profile.

Those adhering to a low-FODMAP diet can omit certain ingredients or replace high FODMAP items with alternatives, maintaining digestive comfort. Always check product labels for hidden allergens.

The adaptability of this recipe demonstrates its versatility, making it suitable for a wide range of dietary needs without sacrificing flavor.

Troubleshooting Guide

If your Zucchini Carrot Cake Cheesecake Cookies face some roadblocks, don’t fret! Sometimes, texture issues can arise. If cookies turn out too cakey, it might be due to overly moist zucchini. Always ensure you squeeze out excess moisture before integrating it into the mix for optimal consistency.

Flavor balance can be another concern; if they seem bland, consider increasing the spices in your mix. Simply enhancing cinnamon or adding a dash of nutmeg can significantly elevate the final taste.

Temperature troubles might manifest if cookies burn on the outside while remaining undercooked in the center. Lower your oven temperature and allow for a longer baking time to achieve a perfect bake throughout.

Equipment challenges often come into play. If you don’t have a stand mixer, no need to panic! A sturdy hand mixer or even a whisk can work just fine—just ensure you’re ready to put in some extra effort.

Ingredient substitutions can cause issues; if you switch out cream cheese for a less fatty alternative, know that the texture may differ. Trial and error with substitutes is normal; keep meticulous notes for future attempts.

Lastly, maintain timing awareness during baking. If you’re adjusting quantities, it’s essential to keep an eye on the cookies, especially with larger batches to ensure even cooking throughout.

Recipe Success Stories

Many bakers have delighted in crafting Zucchini Carrot Cake Cheesecake Cookies for various occasions, and their experiences are nothing short of inspiring. Community feedback highlights how family gatherings saw these cookies become an instant hit, blending nostalgia and creativity seamlessly.

Readers love interchangeable ideas, such as incorporating chocolate chips or using different nut varieties, resulting in personalized and exciting variations. These adaptations have showcased the flexibility of the recipe, making it a crowd favorite.

Photographic successes abound as bakers capture their colorful concoctions, sharing tips on Instagram for visual appeal. Readers report fantastic turnout from visually appealing presentations, attracting more eyes and taste-testers alike.

Celebrations have ignited joyful memories around these cookies, often shared as a special treat during fall festivities, where family recipes intertwine with modern innovation.

Many recipe testers express gratitude for a treat that blends wholesome ingredients while satisfying their sweet cravings. The cookies’ delicious taste and unique twist make them perfect for sharing and spreading culinary joy.

Frequently Asked Questions

1. Can I prepare the dough in advance?

Yes! You can make the dough a day in advance and store it in the refrigerator. This allows the flavors to meld and can make the cookies even more delicious.

2. Can I freeze the cookies?

Absolutely! Bake them, let them cool, and then freeze them in an airtight container. They can last up to three months in the freezer.

3. What if I don’t like cream cheese?

If cream cheese isn’t your preference, you can swap it for mascarpone or a vegan cream cheese alternative that still maintains a creamy texture.

4. How do I avoid soggy cookies?

Make sure you thoroughly squeeze out excess moisture from the zucchini and store the cookies in an airtight container after they cool.

5. Can I add nuts to the recipe?

Definitely! Adding walnuts or pecans provides a nice crunch and enhances the overall flavor. Just remember to reduce the amount of flour slightly if you add a significant amount of nuts.

6. What’s the best way to store these cookies?

Store cookies in an airtight container at room temperature for up to a week. For longer storage, refrigerate them or freeze as mentioned.

7. Are these cookies suitable for kids?

Yes! They’re a fun way to get kids interested in vegetables, and the sweetness of the cookies will likely appeal to them!

8. Can I replace sugar with a sugar alternative?

Yes, you can substitute sugar with your favorite sugar alternative; just ensure you follow conversion ratios as necessary.

9. How can I ensure my cookies are uniformly baked?

Use a cookie scoop for even sizing and make sure to space them adequately on the baking tray to allow heat circulation.

10. What kind of zucchini should I use?

A standard green zucchini works best. Look for firm, unblemished specimens for the best texture in your cookies.

11. Can I customize the spice blend?

Absolutely! Adjust spices according to your preference. A little ginger or allspice adds an exciting twist to the flavor profile.

12. Should I chill the dough before baking?

Chilling the dough is optional, but it can enhance the texture and flavor of the cookies, resulting in a better overall end product.

Additional Resources

For those who enjoyed this recipe, you might also want to explore related recipes like classic carrot cake, zucchini bread, or cream cheese brownies. These desserts offer similar elements while providing different textures and presentations.

Consider checking out technique guides on proper cookie baking and variations to broaden your baking skills. Specific ingredient information on zucchini and carrots can enhance your understanding of these nutritious components, aiding you in making informed choices in the kitchen.

Exploring equipment recommendations for baking can also help aspiring bakers find the perfect tools for their kitchen. Investing in quality bakeware helps replicate these delicious cookies with consistency.

Lastly, observe seasonal variations where specific fruits and vegetables inspire adaptations of existing recipes, ensuring you enjoy baked goods year-round.

Join the Conversation

We invite you to share your baking experiences, insights, and tweaks to this Zucchini Carrot Cake Cheesecake Cookies recipe! Engage with us on social media by sharing your photos, results, and feedback.

We love to hear how this recipe has inspired your baking journey. Additionally, feel free to exchange ideas on flavor adaptations or special occasions where you’ve served these cookies.

Leave a comment below or tag us on Instagram with your delicious creations! Let’s create a vibrant community full of recipe enthusiasts, exchanging tips, fulfilling cravings, and inspiring one another!

The Recipe

Zucchini Carrot Cake Cheesecake Cookies

Serves: 24 cookies

Prep Time: 20 mins

Cook Time: 15 mins

Total Time: 35 mins

Kitchen Equipment Needed

  • Mixing bowls
  • Stand mixer or hand mixer
  • Baking sheets
  • Parchment paper
  • Cookie scoop
  • Measuring cups and spoons

Ingredients

  • 1 cup grated zucchini, excess moisture squeezed out
  • 1 cup grated carrot
  • 1 cup all-purpose flour
  • 1 cup brown sugar
  • 1/2 cup granulated sugar
  • 1/2 cup unsalted butter, softened
  • 1 egg
  • 1 teaspoon vanilla extract
  • 1 teaspoon cinnamon
  • 1/2 teaspoon nutmeg
  • 1/2 teaspoon baking soda
  • 1/4 teaspoon salt
  • 8 ounces cream cheese, softened
  • 1/4 cup powdered sugar

Directions

  1. Preheat the oven to 350°F (175°C) and line two baking sheets with parchment paper.
  2. In a mixing bowl, cream together the softened butter, brown sugar, and granulated sugar until light and fluffy.
  3. Add in the egg and vanilla extract, mixing until fully incorporated.
  4. In a separate bowl, whisk the flour, cinnamon, nutmeg, baking soda, and salt together.
  5. Gradually mix the dry ingredients into the wet mixture until combined.
  6. Fold in the grated zucchini and carrot until evenly dispersed throughout the dough.
  7. In another bowl, beat the cream cheese and powdered sugar together until smooth.
  8. Using a cookie scoop, drop dough onto prepared baking sheets, using your finger to create a small indentation in the center of each cookie.
  9. Fill the indentation with cream cheese mixture.
  10. Bake cookies for 12-15 minutes, or until the edges are lightly golden and the filling is set. Allow to cool on baking sheets for 5 minutes before transferring to wire racks to cool completely.

Recipe Notes

  • For a more intense flavor, consider adding chopped nuts like walnuts or pecans to the dough.
  • Feel free to swap cream cheese for a lighter or dairy-free option if desired.
  • Chill the cookie dough for at least 30 minutes before baking to help maintain shape and enhance flavor.