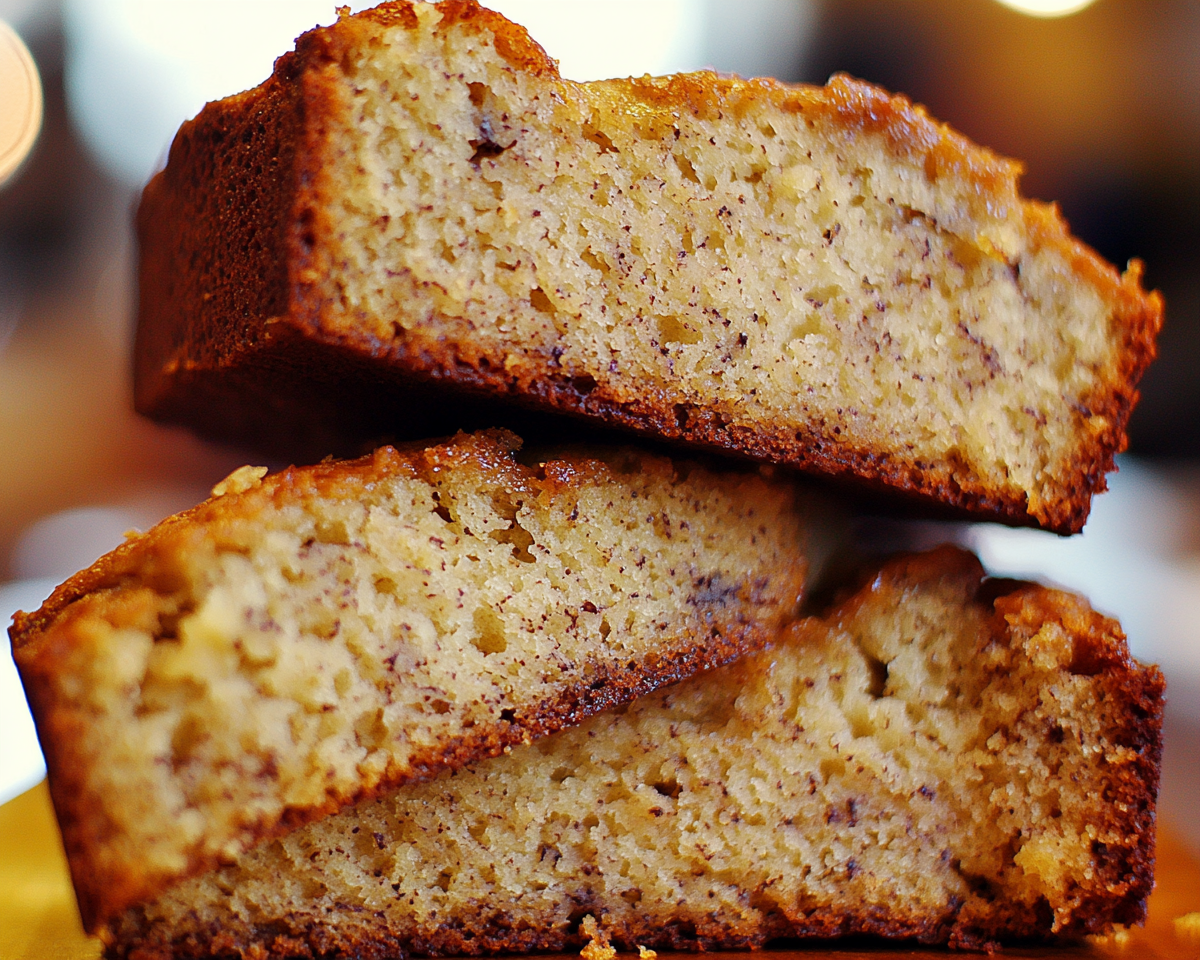
Super Moist Banana Bread Recipe: The Ultimate Guide to Perfect Banana Bread
Article: Super Moist Banana Bread
Introduction
Super moist banana bread is the epitome of comfort food, blending the sweet flavor of ripe bananas with a perfectly tender crumb. Whether you’re an experienced baker or new to the kitchen, mastering this simple yet satisfying recipe is a must. To elevate your banana bread game, consider incorporating tips on how to use overripe bananas in baking, which not only enhance flavor but ensure the moist texture every time.
Ingredients for Success
Essential Ingredients
The secret to irresistibly moist banana bread lies in selecting the right ingredients:
Bananas: Overripe with dark spots for maximum sweetness.
Brown sugar: Adds depth and moisture compared to white sugar.
Butter: A rich fat that locks in tenderness.
Eggs: A binding agent that ensures structure.
Baking soda: Helps the bread rise perfectly.
All-purpose flour: Provides the foundation of the batter.
Optional: Vanilla extract, nuts, or chocolate chips for added flavor.
Super moist banana bread is a simple yet versatile recipe that adapts to any occasion. Whether you enjoy it plain or experiment with add-ins, the key to success lies in ripe bananas and gentle mixing. Get creative and share your banana bread creations with family and friends!
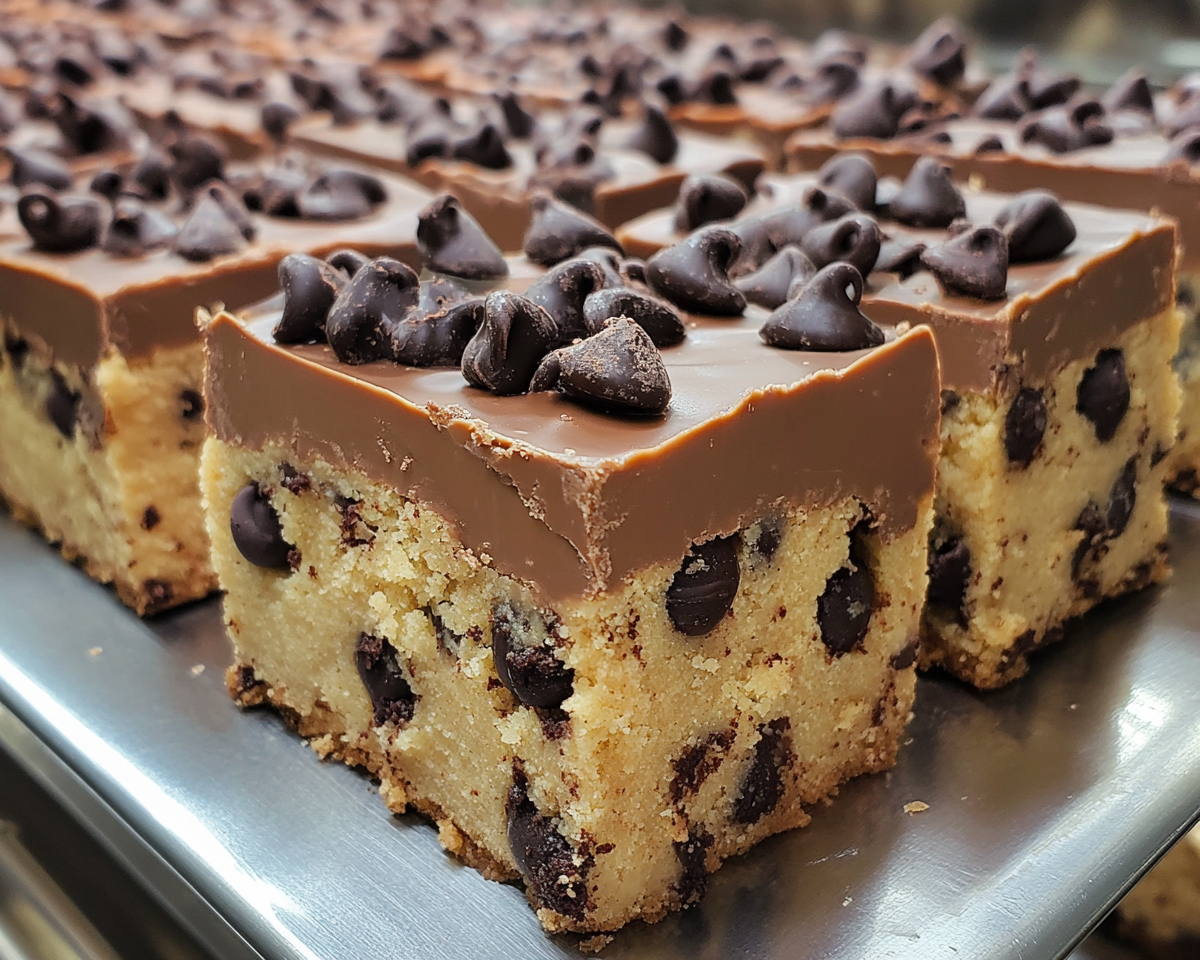
Imagine biting into a bar that perfectly combines the nostalgic sweetness of cookie dough with the rich decadence of chocolate. Chocolate-dipped cookie dough bars are a no-bake delight that can transform your snack game. Whether you’re looking for a quick treat or something to impress at gatherings, these bars hit the sweet spot. To master these bars, understanding the nuances of heat-treating flour and melting chocolate is key. Learn to safely heat-treat flour to avoid risks and ensure a smooth texture.
Suggest “Salted Caramel Rice Krispie Treats” for another no-bake dessert option.
Reference “Easy No-Bake Peanut Butter Oatmeal Cookies” for quick and allergy-friendly desserts.
Frequently Asked Questions
Q: Can I skip heat-treating the flour?
A: No, it’s essential for safety and avoiding raw contaminants.
Q: How can I make these vegan?
A: Use vegan butter, plant-based milk, and ensure your chocolate chips are dairy-free.
Q: Why is my dough too sticky?
A: Add more flour a tablespoon at a time until the consistency improves.
Q: Can I use different chocolate types?
A: Yes, dark, milk, or even ruby chocolate can be great substitutes.
Conclusion
Chocolate-Dipped Cookie Dough Bars are versatile, easy to make, and perfect for every occasion. Try them with different toppings, or share them as homemade gifts. Your family and friends will thank you!
Delicious Sweet Chili Pineapple Sauce: Easy Recipe to Savor
Sweet Chili Pineapple Sauce Recipe 🍍🌶️ – Easy & Delicious!
⚖️
Difficulty
Easy
⏲️
Prep Time
10 mins
🕒
Cook Time
15 mins
⏱️
Total Time
25 mins
🍽️
Servings
2 cups
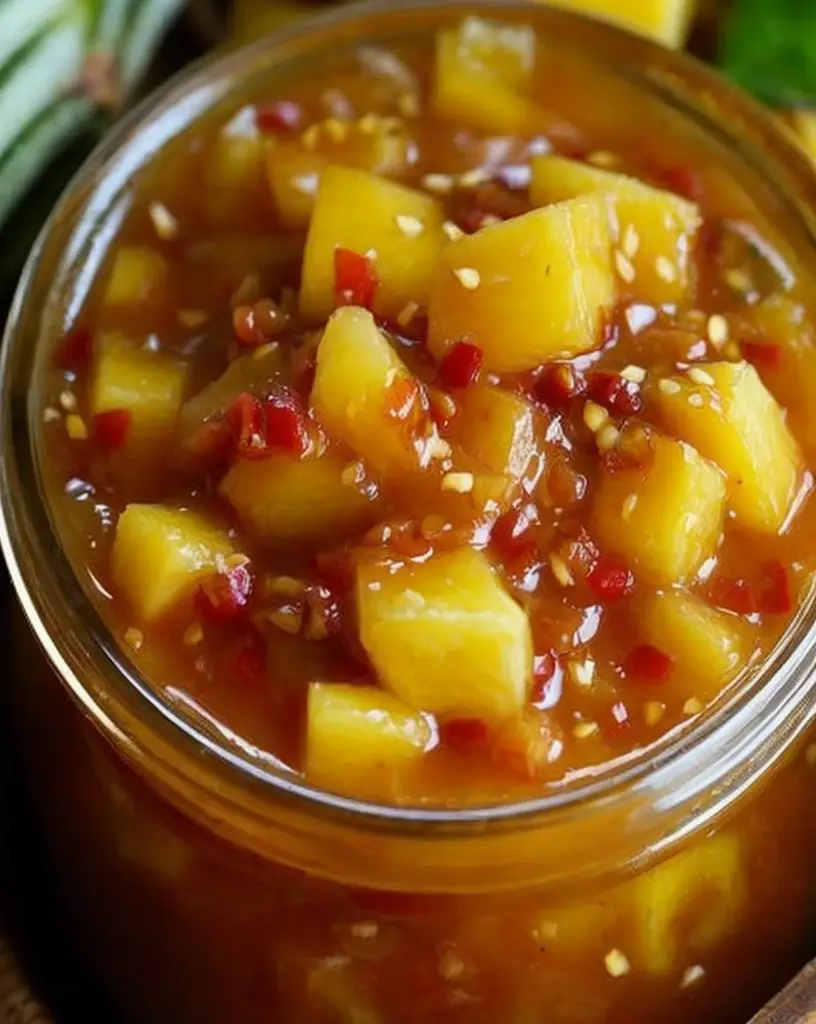
If you’re looking for a delicious and versatile sauce that can elevate your dishes, you will love this Sweet Chili Pineapple Sauce! This easy recipe combines the sweetness of ripe pineapple with a spicy kick from chili, creating a vibrant and flavorful condiment. Perfect for grilled meats, seafood, or as a dipping sauce for appetizers, this pineapple sauce packs a punch and will surely impress your guests at any gathering!
Imagine sitting around a summer barbecue, with the alluring aroma of grilled chicken wafting in the air, enhanced by the sweetness and heat of this pineapple sauce. The bold flavors blend harmoniously, offering a taste experience that is not only satisfying but unforgettable. Whether drizzled on tacos, used as a marinade, or served with spring rolls, this sauce will have you craving for more!
Quick Recipe Highlights
Flavor Profile: The bright sweetness of pineapple balances perfectly with the spicy and savory notes from the chili, creating a complex and delightful flavor.
Texture: Smooth with a slight chunkiness from the pineapple pieces, this sauce provides a satisfying mouthfeel.
Aroma: A tantalizing mix of sweet and spicy scents that is sure to whet your appetite.
Visual Appeal: A beautiful golden yellow hue speckled with red flecks from the chili, this sauce is not only tasty but also visually stunning.
Skill Level Needed: Easy; perfect for beginner cooks and those looking to impress without much effort.
Special Equipment: A saucepan, blender, and measuring cups are all you’ll need to whip up this sauce.
Recipe Overview
Difficulty Level: This sauce is easy to make, ideal for cooking novices and busy individuals looking for quick yet delicious results.
Category: This Sweet Chili Pineapple Sauce is great as a condiment, dressing, or marinade for a variety of dishes.
Cuisine: While inspired by Southeast Asian flavors, this versatile sauce fits well in many culinary traditions.
Cost: The ingredients are affordable, making this delicious sauce accessible for everyone.
Season: Enjoy this sauce year-round, especially in summer when fresh pineapples are at their best.
Occasion: Perfect for barbecues, parties, or even as a creative twist in weeknight dinners.
Why You’ll Love This Recipe
This Sweet Chili Pineapple Sauce will be a standout addition to your culinary repertoire. The thick consistency and vibrant flavor profile make it irresistible when paired with grilled meats or vegetables. The combination of sweet and spicy ensures that it appeals to all taste buds, making it a crowd-pleaser at gatherings. Easy to prepare, you can have this sauce ready in under 30 minutes, allowing for more time to enjoy your meal.
Moreover, this sauce isn’t just delicious; it’s nutritious! Pineapples are packed with vitamins, and the infusion of chilies brings an extra health boost, including metabolism-boosting properties. What’s more, this sauce can be made in batches and stored for later use, ensuring you always have a delectable condiment handy. This enhances your meal prep efficiency, especially when hosting friends and family.
The social aspect cannot be forgotten. Serving this Sweet Chili Pineapple Sauce during gatherings will undoubtedly spark conversations around the table. Friends and family will appreciate the unique flavors you’ve created, making your meals memorable. It’s also an excellent canvas for personal touches, allowing culinary creativity to flow as you experiment with additional ingredients or variations.
Cost-effectiveness is yet another benefit. By using easily accessible ingredients, you can create a gourmet-quality sauce without breaking the bank. Pineapples and chili are readily available in most grocery stores, so you won’t have difficulty sourcing your supplies. This versatility extends to usage; drizzle it on tacos, mix it into stir-fries, or serve it as a dip for spring rolls.
Finally, there is something deeply satisfying about creating your condiments. You control the ingredients, flavors, and balance, making this Sweet Chili Pineapple Sauce not just a recipe but a personal culinary triumph!
Historical Background and Cultural Significance
The origins of sweet chili sauces can be traced back to Southeast Asian countries, where culinary traditions embrace complex and vivid flavors. As these regions experienced global trade, the introduction of tropical fruits like pineapple allowed for exciting new combinations of sweet and spicy elements. Over time, sweet chili sauces evolved, with local chefs adding their unique touches, and creating the perfect accompaniments for a variety of dishes.
This Sweet Chili Pineapple Sauce is particularly inspired by the Indonesian and Thai flavors. Both cultures have championed the use of chili paired with sweet fruits to heighten the enjoyment of their culinary specialties. Over the years, the sauce became a staple in many homes, embodying the essence of hospitality and bringing friends and families together around meals.
As the recipe spread beyond its original borders, regional variations began to emerge. Some cultures prefer stronger heat with additional spices, while others may incorporate more vegetables or other fruits. This adaptability illustrates the versatility of the sauce and its capacity to bridge culinary gaps across diverse food landscapes.
Over the years, the popularity of sweet chili sauces grew, paving the way for modern twists on classic recipes. Today, chefs and home cooks alike continue to experiment with sweet chili sauces, incorporating unique ingredients and flavors to create their special versions, including the much-loved Sweet Chili Pineapple Sauce that brings a burst of tropical essence to the table.
Ingredient Deep Dive
Pineapple: Pineapple holds significant cultural value in many communities. Historically, it symbolizes hospitality and welcomes guests with its sweetness. Nutritionally, pineapples are an excellent source of vitamins C and B6, manganese, and dietary fiber. Choose a ripe pineapple, as it will yield the best flavor for your sauce. Store fresh pineapple in the fridge, and consider freezing leftovers to avoid waste. For alternatives, canned pineapple works well, although adjust the sugar in the recipe according to your sweetness preference.
Chili Peppers: Chili peppers, particularly in Asian cuisines, symbolize courage and boldness. Their heat is linked to various health benefits, such as increased metabolism and anti-inflammation. When selecting chili peppers, look for fresh and firm specimens without blemishes. Store them in a cool place or refrigerate for extended freshness. In the absence of fresh chili peppers, consider using chili powder or sauce as substitutions but tread lightly to avoid overpowering the dish.
Common Mistakes to Avoid
Overcooking the sauce can lead to overly thick consistency. Keep an eye on it while simmering to maintain desired texture.
Not tasting as you go can result in an unbalanced sauce. Adjust sweetness or heat based on your personal preference.
Using canned pineapple without draining excess liquid may make the sauce too watery. Ensure proper drainage to achieve the right consistency.
Ignoring quality of ingredients can lead to an unsatisfying flavor. Always opt for fresh, high-quality fruits and spices.
Skipping the blending step might prevent the sauce from achieving its smooth, cohesive texture. Blend well for the best results.
Falling into the trap of making too little can lead to disappointment; make enough for sharing, as it’s sure to be a hit!
Underestimating the importance of letting the sauce cool can lead to inconsistent flavors. Allow it to develop while cooling down.
Not storing the sauce properly will reduce its lifespan. Use airtight containers and maintain appropriate temperatures for best results.
Essential Techniques
Sauce Simmering: This technique involves cooking the ingredients over low heat for an intense flavor infusion. To master it, combine all ingredients in a pan and bring to a gentle boil before reducing heat. Watch for bubbling without boiling over, indicating the sauce is simmering properly. The visual cue is a reduction in sauce volume and thickening consistency.
Blending: Blending the sauce together gives it a smooth texture. Knowing when to stop blending is key; you want a cohesive mix, but some chunkiness for texture is desired. Use a blender or immersion blender for best results to achieve a balance between smooth and chunky. Be cautious with hot liquids to avoid splattering!
Pro Tips for Perfect Sweet Chili Pineapple Sauce
1. Experiment with different types of chili peppers to control the heat level of your sauce, allowing you to customize it for different palates.
2. Allow the sauce to cool completely before transferring it to storage. This will help prevent condensation inside the container, prolonging its shelf life.
3. Always adjust the seasoning based on your preferences; add more vinegar for acidity or sugar for sweetness until it meets your taste.
4. To further enhance flavors, consider adding a splash of soy sauce or a squeeze of fresh lime juice for additional depth and zing.
5. Pair the sauce with a variety of meats, vegetables, or even fruits, like grilled peaches, for unexpected and delightful flavors.
6. If you’re preparing the sauce ahead of time, remember that the flavors will meld and deepen if allowed to sit overnight in the fridge.
7. For a smoky essence, consider adding smoked paprika or chipotle powder to give an extraordinary flavor twist.
8. Don’t hesitate to double the recipe; this sauce is so versatile it can be used for various meals, snacks, and gatherings.
Variations and Adaptations
Consider exploring regional variations by substituting tropical fruits like mango or papaya for a unique twist. Seasonal adaptations are also fun; in fall, add pumpkin for a spiced variation, while in winter, a pinch of nutmeg can enhance the sauce. Dietary modifications include using agave or honey for a natural sweetener, making it vegan-friendly. Flavor variations could include smoked ingredients to add depth, while texture modifications like incorporating crushed peanuts provide a delightful crunch. Presentation alternatives could involve serving the sauce in small dipping bowls with assorted fresh vegetables, creating a vibrant and appealing display at your next event!
Serving and Presentation Guide
For an impressive presentation, consider serving the sauce in a small, elegant dish, garnished with fresh herbs such as cilantro or mint. Plating techniques can include drizzling the sauce artistically over a nature-inspired spread of grilled meats or stir-fried vegetables. Traditional accompaniments like spring rolls or grilled shrimp work harmoniously, enhancing the dining experience. Temperature-wise, the sauce can be served warm, at room temperature, or even chilled based on personal preference and the dish it’s accompanying. Finally, consider portion control by offering individual servings, allowing everyone to enjoy this delightful condiment without overwhelming their plates.
Wine and Beverage Pairing
A crisp, fruity white wine, like a Riesling or Sauvignon Blanc, complements the Sweet Chili Pineapple Sauce beautifully, enhancing its sweetness while balancing its heat. For non-alcoholic alternatives, consider coconut water or sparkling water infused with mint and lime for a refreshing pairing. If coffee or tea is more to your liking, a floral tea, such as jasmine, will provide a rich aroma that aligns nicely with the sauce’s flavors. Temperature considerations are also crucial; serve wines well chilled to refresh the palate, enhancing the dining experience.
Storage and Shelf Life
For optimal storage, keep the Sweet Chili Pineapple Sauce in an airtight container in the refrigerator. This sauce can last up to two weeks when stored properly. If you’d like to extend its shelf life, consider freezing it in ice cube trays, then transferring the cubes to a freezer bag for long-term storage. Signs of spoilage to watch for include off odors, unusual texture changes, or mold. If reheating, ensure the sauce is heated evenly without boiling, to maintain the exact flavor profile.
Make Ahead Strategies
To streamline meal prep, consider making the Sweet Chili Pineapple Sauce up to three days in advance. This allows flavors to develop and improve over time. Store the sauce in an airtight container in the refrigerator until you’re ready to use it. During storage, it may thicken slightly; if so, just stir in a bit of water or vinegar before serving. Additionally, pre-chop fresh ingredients and have them ready to go for when you’re preparing your meal. This will help reduce active cooking time and ensure a smoother cooking process.
Scaling Instructions
If you plan to serve a larger crowd, doubling or tripling the recipe is straightforward. Simply adjust the ingredient quantities proportionately but keep an eye on cooking time, as larger batches may require additional simmering. If halving the recipe, be sure to maintain the same balance of flavors; small adjustments may be necessary to ensure taste consistency. Remember that if tweaking the ingredients, corresponding adjustments in cooking times, especially for simmering and blending, might be needed.
Nutritional Deep Dive
This Sweet Chili Pineapple Sauce is relatively low in calories, making it a favorable option for sauces. It provides macronutrients primarily from the pineapple, coupled with carbohydrates and minimal fat content. The micronutrient profile is impressive, including vitamin C and manganese from pineapples, contributing to overall health benefits such as immune support and improved digestion. Whether you’re considering weight management or overall nutritional value, incorporating this sauce can enrich your diet with functional ingredients while enhancing your meals. A sensible portion goes a long way in supporting balanced choices!
Dietary Adaptations
This Sweet Chili Pineapple Sauce can easily be modified to suit various dietary preferences. For gluten-free diets, ensure no cross-contamination occurs with any sauces used, particularly soy sauce if added. For vegan options, utilize plant-based sweeteners like maple syrup instead of honey. If following a low-carb or keto diet, consider using sugar substitutes like erythritol, while still enjoying the sweet flavor. Paleo enthusiasts can appreciate the fresh ingredients used in this recipe. Always consult dietary requirements for any specific restrictions while enjoying this vibrant sauce!
Troubleshooting Guide
If you find your sauce too thin, allow it to simmer longer to evaporate excess liquid and thicken. On the other hand, if it ends up too thick, add a touch of water or vinegar gradually until you reach the desired consistency. If the flavor balance seems off, adjust sweetness and spice levels incrementally, tasting as you go. Equipment challenges, such as blending inconsistently, may be resolved by switching to an immersion blender, which provides better control. Lastly, ensure careful attention to timing; overcooking can heavily alter the sauce’s profile.
Recipe Success Stories
Community feedback has been overwhelmingly positive, with many praising how easy this Sweet Chili Pineapple Sauce is to prepare. Some have enjoyed experimenting with various fruits and spices, paving the way for their personalized adaptations. Feedback from readers has also highlighted how this sauce pairs beautifully with grilled seafood, with some even using it as a creative topping for burgers. Variations have flooded in, showcasing the collective culinary creativity in adapting this simple recipe!
Frequently Asked Questions
Q: Can I use frozen pineapple for this recipe? A: Yes, frozen pineapple can be used; ensure it’s thawed and drained properly to maintain consistency.
Q: How spicy is this sauce? A: The spice level depends on the type of chili peppers used. Feel free to adjust the quantity to fit your spice tolerance.
Q: Can I can this sauce for later use? A: Yes, the sauce can be canned using a water bath method, ensuring proper hygiene and sealing practices.
Q: How do I know if my sauce has gone bad? A: Signs include an off smell, unusual texture, or visible mold. Always check before using.
Q: What dishes does this sauce pair well with? A: It enhances grilled meats, seafood, and vegetable dishes; it can also be a delectable dip for fried items.
Q: Can I reduce the sugar in the recipe? A: Absolutely! Adjust the sugar or replace it with alternative sweeteners based on your dietary needs.
Q: How long does this sauce last in the refrigerator? A: When stored properly, it can last up to two weeks in an airtight container in the fridge.
Q: Is it okay to add additional spices? A: Yes! Feel free to experiment with spices like garlic or ginger for a different flavor profile.
Q: Can I use this sauce on salads? A: Certainly! It makes a delightful dressing for salad greens or grilled vegetables.
Q: What’s the best way to store leftovers? A: Store any leftover sauce in an airtight container and refrigerate to keep it fresh for later use.
Additional Resources
For those eager to expand their culinary skills, consider exploring related recipes featuring tropical fruits, such as mango salsa or coconut Thai curry. Technique guides on grilling, blending, and sauce-making can elevate your everyday cooking. For ingredient information, learning about different varieties of chili peppers will help you choose the right heat level for future recipes. Investing in quality kitchen equipment, like blenders and storage containers, can streamline your cooking process. Seasonal variations of sauces can also inspire you to adapt this Sweet Chili Pineapple Sauce using other fruits available in different seasons!
Join the Conversation
We invite you to share your variation of this Sweet Chili Pineapple Sauce on social media with our community. Include your favorite photos and tell us how it paired with your meals! Photography tips for showcasing your dish can also be beneficial; try close-ups and natural light for a delicious presentation. Additional recipe reviews from fellow cooks help create an engaging community, and we’re excited to witness your adaptations of this versatile sauce!
The Recipe
Sweet Chili Pineapple Sauce
Serves: 2 cups
Prep Time: 10 mins
Cook Time: 15 mins
Total Time: 25 mins
Kitchen Equipment Needed
Small saucepan
Blender or immersion blender
Measuring spoons and cups
Cutting board and knife
Ingredients
1 ripe pineapple, chopped
1-2 fresh red chili peppers, chopped (adjust to taste)
1/2 cup sugar (or alternative sweetener)
1/4 cup vinegar (rice or apple cider)
1/4 cup water
1 teaspoon garlic, minced (optional)
Directions
In a small saucepan, combine all ingredients: pineapple, chili peppers, sugar, vinegar, water, and garlic if using.
Bring to a gentle boil over medium heat, then reduce heat and let simmer for 15 minutes, stirring occasionally.
Once the mixture has thickened slightly, remove from heat and allow it to cool for 10 minutes.
Blend the mixture until smooth, leaving some chunks for texture if desired.
Transfer the sauce to an airtight container for storage or serve immediately.
Recipe Notes
This sauce can be stored in the refrigerator for up to 2 weeks.
Feel free to adjust the sweetness or spice according to your taste preferences.
This sauce pairs wonderfully with grilled meats, seafood, and appetizers.
For extra complexity, try adding a splash of soy sauce or lime juice.
Delicious Longhorn Steakhouse Parmesan Chicken Recipe You Can Make at Home
Longhorn Steakhouse Parmesan Chicken Recipe: A Deliciously Savory Experience
⚖️
Difficulty
Medium
⏲️
Prep Time
15 mins
🕒
Cook Time
30 mins
⏱️
Total Time
45 mins
🍽️
Servings
4
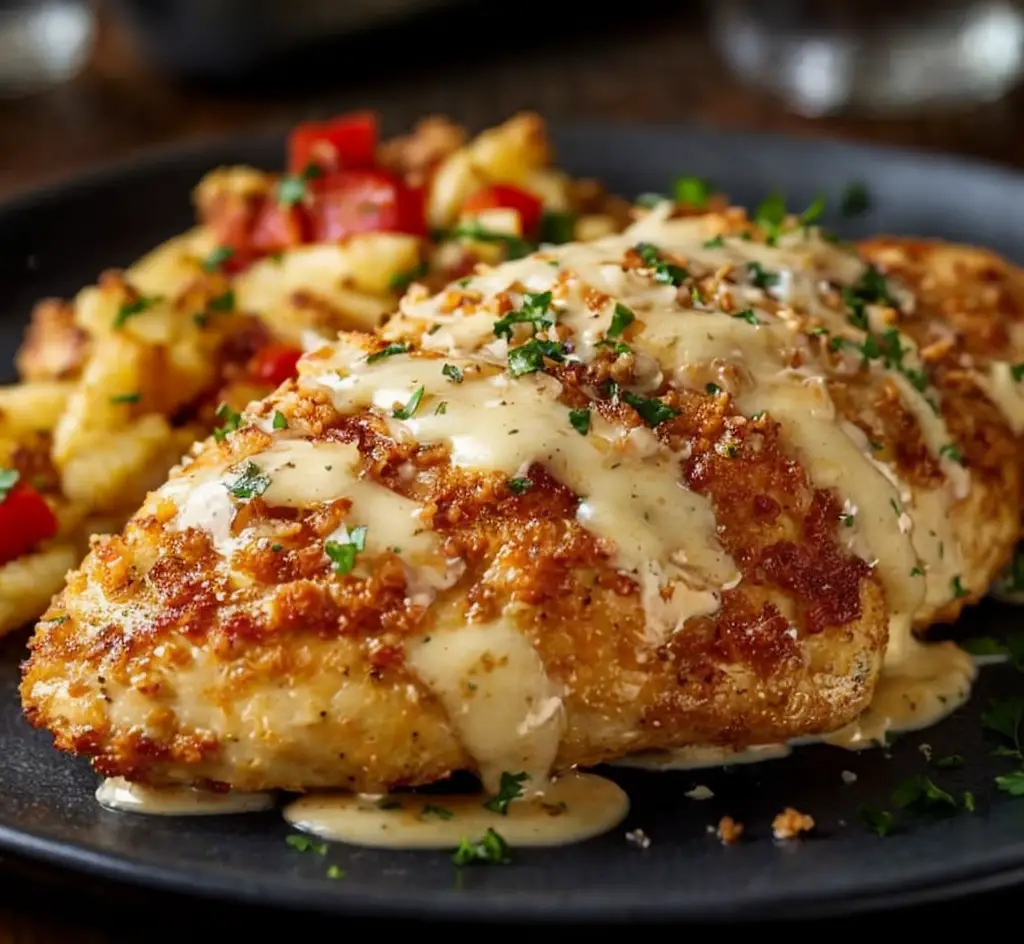
Indulge your taste buds with the Longhorn Steakhouse Parmesan Chicken Recipe, a perfect blend of tender chicken breast, savory parmesan cheese, and a dash of Italian herbs. This dish effortlessly captures the essence of dining out while allowing you to savor restaurant-quality flavors from the comfort of your home. Each bite delivers juicy chicken, enhanced by the crispy, cheesy topping that melts in your mouth. This indulgent recipe is perfect for family dinners or impressing guests at your next gathering.
What makes this Parmesan chicken truly special is its simple yet flavorful preparation. The ingredients come together harmoniously, creating a dish that is as pleasing to the eye as it is to the palate. The golden-brown crust is visually enticing, making it a showstopper on any dinner table. Whether paired with a fresh garden salad or creamy mashed potatoes, this recipe is sure to become a favorite.
Quick Recipe Highlights
Flavor Profile: The dish boasts a rich flavor, combining the nuttiness of Parmesan with aromatic garlic and herbs.
Texture: The chicken is incredibly tender, while the topping offers a satisfying crunch.
Aroma: Your kitchen will be filled with the mouthwatering scent of melting cheese and garlic as it bakes.
Visual Appeal: A beautifully golden crust layered over juicy chicken, garnished with fresh parsley creates an appealing presentation.
Skill Level Needed: This medium difficulty recipe requires basic cooking skills, making it accessible for home cooks.
Special Equipment: A baking dish and a meat mallet are essential for preparing this delicious meal.
Recipe Overview
Difficulty Level: This dish is categorized as medium difficulty, suitable for home cooks who have a bit of experience in the kitchen.
Category: Longhorn Steakhouse Parmesan Chicken falls under main dishes, perfect for hearty family meals.
Cuisine: This recipe is inspired by American cuisine with Italian influences, particularly the use of Parmesan and herbs.
Cost: The total cost for this meal is quite reasonable, making it an excellent choice for budget-conscious cooking.
Season: This dish is truly versatile, enjoyed year-round whether on a chilly evening or a warm summer night.
Occasion: It’s ideal for family gatherings, casual dinners, and even special celebrations, guaranteed to please everyone.
Why You’ll Love This Recipe
The Longhorn Steakhouse Parmesan Chicken recipe is a delightful experience for those seeking both taste and comfort. The rich, cheesy flavor combined with tender chicken creates a satisfying meal that nourishes the body and soul. Each forkful introduces a blend of perfectly seasoned chicken that offers a mix of satisfaction and delight, making it hard to resist seconds.
Preparation of this dish is straightforward, featuring easily accessible ingredients found in most kitchens. This simplicity in the cooking process allows you to engage with family around the dinner table without needing to spend hours in the kitchen. The ease of preparation makes it suitable even for weeknight dinners, providing a quick yet luxurious option for busy schedules.
In addition to its decadent taste, this recipe presents several nutritional benefits. Packed with protein from the chicken and micronutrients from the herbs and garlic, it’s a meal that supports overall health while delivering an indulgent experience. The use of fresh ingredients ensures that you’re consuming vitamins and minerals, a perfect evening meal for anyone in search of both flavor and health.
Socially, this Parmesan chicken epitomizes the joy of sharing good food. Whether served at a family dinner or a gathering with friends, its flavor and presentation will elicit compliments and create lasting memories. The communal aspect of sharing a beautifully cooked meal fosters connection and joy among those at the table.
Economically, this dish offers a high-quality dining experience for a fraction of restaurant costs. Preparing Longhorn Steakhouse Parmesan Chicken at home allows you to enjoy the delightful flavors without breaking the bank, making it an accessible and rewarding meal in today’s economy.
Historical Background and Cultural Significance
The origins of Parmesan chicken can be traced back to various Italian-American eateries, where the blending of cultures transformed simple chicken dishes into rich culinary experiences. As Italian immigrants settled in America, they adapted their traditional recipes to include local ingredients and flavor profiles, culminating in iconic dishes found in both homes and restaurants today.
Culturally, dishes like Parmesan chicken symbolize the blending of cuisine and heritage, showcasing how food can unite people from diverse backgrounds. Celebrated for its hearty flavor, chicken Parmesan has become an emblematic dish in Italian-American households, often served during family gatherings and celebrations.
Over the years, this recipe has evolved to include numerous variations, with chefs and home cooks alike putting their unique spins on the dish. From spicy chicken Parmesan to vegetarian adaptations, the foundational elements remain reminiscent of its rich culinary lineage while reflecting contemporary tastes.
Regional variations of Parmesan chicken abound, with each state showcasing different local ingredients or cooking styles. Whether it’s a Southern twist with a hint of Cajun spices or a New York-style with extra marinara, these adaptations continue to enhance its popularity and ensure that there’s a version to please every palate.
Ingredient Deep Dive
Chicken breasts are the cornerstone of this dish. Known for their versatility and lean protein profile, chicken is a staple in numerous cuisines worldwide. This ingredient has great cultural significance, representing the value placed on protein-rich diets across many societies.
Nutritionally, chicken is packed with essential vitamins and minerals, including vitamin B6, phosphorus, and niacin. When selecting chicken, look for breasts that are pale in color and firm to the touch, ensuring freshness. For storage, keep chicken in the refrigerator for no more than two days before cooking or freezing for later use. Substitutions like pork or turkey can also work, allowing for variations without sacrificing taste.
Parmesan cheese adds a rich, nutty flavor that helps elevate the overall dish. This cheese has an illustrious history, with roots tracing back to Italy, where it was revered for its quality and durability. Essential to many Italian recipes, parmesan brings a satisfying umami taste to countless dishes, including pasta and sauces.
The health benefits of Parmesan include being a good source of calcium and protein, making it a favorable addition to your cooking repertoire. When buying parmesan, opt for block cheese for freshness and flavor, and store it in the fridge wrapped in parchment paper. To substitute, consider pecorino or nutritional yeast for a dairy-free option.
Herbs and spices play a key role in defining the flavors of this chicken dish. Italian seasoning, a blend of herbs like oregano, basil, and thyme, is traditionally used to enhance the richness of the chicken and cheese. Choosing fresh herbs whenever possible delivers vibrant flavor notes and health benefits, including antioxidants.
Selecting high-quality herbs significantly impacts the flavor profile of your dish. Fresh herbs should be aromatic and free from blemishes while dried herbs must be stored in a cool, dark place to maintain potency. Substitute fresh with dried in fewer quantities for the same flavor boost.
Common Mistakes to Avoid
Overcooking the chicken: This common mistake results in dry, tough meat. Use a meat thermometer to ensure an internal temperature of 165°F for juicy chicken.
Neglecting to pound the chicken: If chicken breasts are uneven, they can cook improperly. Pounding them to an even thickness allows for uniform cooking.
Skipping the marinating step: Marinating chicken enhances flavor and tenderness. Allow your chicken to marinate for at least 30 minutes, or overnight for best results.
Using pre-grated cheese: Pre-grated Parmesan often contains anti-caking agents that can affect texture. Grate fresh cheese for the best outcome.
Not seasoning properly: Skipping or under-seasoning can lead to bland chicken. Always season your chicken generously before cooking.
Not letting the chicken rest: Allowing the chicken to rest after cooking redistributes juices for optimal moisture. A 5-10 minute rest is crucial before slicing.
Ignoring the baking time: Every oven is different. Keep a close eye on your chicken, adjusting cooking time as necessary to achieve the perfect golden crust.
Using insufficient oil: Not using enough oil can lead to sticking and uneven browning. Ensure your dish is adequately greased before cooking.
Forgetting to read through the recipe: Always read through your recipe before starting to avoid confusion during preparation.
Not adjusting for dietary needs: If cooking for guests with dietary restrictions, be mindful and make necessary adjustments to accommodate them.
Essential Techniques
Pounding chicken is a vital technique for ensuring even cooking. It tenderizes the meat and gives it a consistent thickness, avoiding dry edges. To master this technique, place the chicken between plastic wrap and use a meat mallet to pound gently. Aim for a thickness of about ½ inch for best results. Common pitfalls include using excessive force or skipping this step entirely, leading to uneven cooking.
Baking the chicken at the right temperature is crucial for achieving a perfectly golden crust. Set your oven to 375°F and bake until the chicken reaches the desired internal temperature. Look for visual cues—when the chicken’s exterior turns golden brown, it’s an indication that it’s close to being done. Overheating can cause dryness, so always monitor closely.
Pro Tips for Perfect Longhorn Steakhouse Parmesan Chicken
Marinate the chicken overnight for enhanced flavor—this step allows seasoning to penetrate deeply into the meat, transforming every bite into a delicious experience.
Use fresh herbs when possible. Fresh herbs add extra vibrancy and aromatic notes that dried herbs simply can’t match, elevating your dish significantly.
Allow the chicken to rest post-cooking. Letting it rest for 5-10 minutes before slicing keeps the juices locked in, ensuring each serving is moist and flavorful.
For a twist, experiment with various cheese blends. Mixing Parmesan with mozzarella creates a delightful stretchiness that adds texture to your dish.
Coat the chicken with breadcrumbs for added crunch. A thin layer of seasoned breadcrumbs provides a delightful contrast to the tender chicken beneath, enhancing both flavor and texture.
Use a meat thermometer to check doneness. Cooking chicken to an internal temperature of 165°F ensures that it’s safe and perfectly juicy without being dry.
Add a splash of white wine to the baking dish. This not only contributes moisture but also enhances the overall flavor profile, giving your chicken a subtle complexity.
Serve with a fresh salad. A light salad with vinaigrette balances the rich flavors of the chicken, making for a well-rounded meal that is both satisfying and refreshing.
Variations and Adaptations
Explore regional variations by incorporating local flavors or spices that align with your preferences. For instance, a Southern twist with the addition of cayenne pepper can add a delightful heat.
Seasonal adaptations are encouraged. In the summer, pairing this dish with fresh herbs like basil enhances its freshness. Meanwhile, winter variations might feature robust flavors such as rosemary or thyme.
Consider dietary modifications for those with specific needs. Gluten-free breadcrumbs can easily replace regular breadcrumbs, making this dish accessible for celiac diners.
Flavor variations include topping the chicken with marinara sauce before serving, providing a classic comfort food feel reminiscent of traditional Italian cuisine.
Texture modifications can be achieved by experimenting with different breadcrumb textures, like panko, for an extra crunch, or adding crushed nuts for added flavor.
Presentation alternatives enhance the visual appeal of the dish. Serving Parmesan chicken over a bed of spinach or arugula adds color and freshness, creating an eye-catching dish.
Serving and Presentation Guide
Plating techniques can elevate your dish significantly. Use a large, white plate to allow the colors of the chicken and garnishes to stand out, creating a visually appealing presentation.
Garnishing ideas include a sprinkle of fresh parsley or additional grated Parmesan, which not only enhances flavor but also brings a pop of color to the dish.
Traditional accompaniments include pairing it with spaghetti and marinara sauce for a classic Italian experience, or serving it alongside a light salad.
Modern serving suggestions might involve adding a drizzle of balsamic reduction over the chicken, enhancing both flavor and presentation for a gourmet touch.
Temperature considerations are vital. Serve the chicken piping hot for the best flavor and texture; food should reach at least 140°F for an enjoyable eating experience.
Portion control tips include serving equal portions of chicken alongside healthy sides, ensuring a balanced meal that maintains visual appeal.
Wine and Beverage Pairing
Wine pairings that complement this dish include a crisp Chardonnay, which enhances the richness of the chicken while balancing the flavors nicely.
Non-alcoholic alternatives like sparkling water with a citrus twist add refreshing notes that cut through the richness of the meal.
Coffee or tea pairings are less typical, but a lightly brewed herbal tea can cleanse the palate effectively, especially for those who prefer lighter options.
Temperature considerations for serving wine should align with typical standards; serve white wine chilled and red at a slightly cooler room temperature for optimal enjoyment.
Consider serving suggestions that encourage a relaxed atmosphere, such as offering a variety of beverages to complement the meal and engage your guests.
Storage and Shelf Life
For storage methods, keep the cooked chicken in an airtight container in the refrigerator for up to 3-4 days, ensuring freshness while preventing spoilage.
Maintain temperature requirements by refrigerating leftovers within two hours of cooking to reduce the risk of bacterial growth.
Recommended containers include glass or plastic airtight containers to optimize freshness and allow for safe reheating options.
Signs of spoilage include a sour smell or a film on the chicken, which means it should not be consumed. Always check for any changes in texture or color.
Reheating instructions advise using the oven to preserve the crispy topping; warm at 350°F until heated through, about 15-20 minutes.
Freezing guidelines allow for longer storage; wrap portions in plastic wrap and foil, storing them for up to three months in the freezer.
Make Ahead Strategies
Prep a timeline by marinating the chicken the night before to enhance flavor and save time on cooking day.
Storage between steps can include preparing the breadcrumbs and cheese mixture ahead, allowing for quick assembly when needed.
Assess the quality impact by considering how long the chicken sits before cooking; allowing it to rest infuses flavor, while prepping early may enhance convenience.
Assembly tips suggest organizing your mise en place for easy access to all ingredients, ensuring a smooth cooking experience.
Reheating guidelines stress gentle methods, using the oven instead of the microwave to maintain texture and flavor integrity.
Finally, fresh element additions such as sprinkling fresh herbs after reheating can brighten flavors and make the dish feel freshly prepared.
Scaling Instructions
If you’d like to halve the recipe, follow the same cooking techniques while ensuring browning and baking times stay consistent to achieve the perfect dish.
Doubling or tripling the recipe is feasible; assess your equipment to accommodate larger quantities, especially with baking dishes and oven space.
Equipment adjustments may include using larger pans or cooking in batches if your oven cannot accommodate a large number of servings simultaneously.
Timing modifications involve allowing for additional cooking time if increasing the quantity, closely monitoring the internal temperature of the chicken.
For storage considerations, make sure to have appropriate containers ready to accommodate leftovers from larger batches effectively and avoid spoilage.
Nutritional Deep Dive
The macro breakdown for Longhorn Steakhouse Parmesan Chicken includes high protein from the chicken, moderate fats from cheese, and minimal carbohydrates, making it a balanced meal.
Micronutrient analysis reveals significant amounts of calcium from the Parmesan, coupled with vitamins B6 and phosphorus that promote overall health.
Highlighting health benefits, this recipe supports muscle health and provides essential nutrients vital for maintaining a balanced diet.
Dietary considerations emphasize portion control, as watching serving sizes ensures that caloric intake aligns with personal health goals.
Weight management tips suggest pairing moderate portions of the chicken with nutrient-dense side dishes for a satisfying and healthy meal.
Dietary Adaptations
Gluten-free adaptations can be made using gluten-free breadcrumbs or ground nuts in place of traditional breadcrumbs, allowing everyone to enjoy this dish.
Dairy-free options involve omitting the cheese or utilizing nutritional yeast for a cheesy flavor without the dairy, ideal for vegan diets.
Vegan adaptations would necessitate a switch to plant-based chicken alternatives, ensuring a similar texture and flavor experience for those avoiding animal products.
Low-carb modifications involve substituting breadcrumbs with almond flour or crushed pork rinds to create a keto-friendly version without sacrificing taste.
The paleo diet can accommodate this dish by ensuring only whole-food ingredients are used, including high-quality chicken and natural seasonings.
For low-FODMAP options, limit garlic and onion elements while opting for herbs that provide flavor without triggering sensitivities.
Troubleshooting Guide
For texture issues such as dry chicken, ensure to monitor cooking times closely, adjusting based on your oven’s performance. A meat thermometer is essential for accuracy.
Flavor balance problems may arise from insufficient seasoning; always taste and adjust during preparation to ensure that flavors are well-rounded.
Temperature problems can occur if the oven is not preheated correctly, affecting cooking time; always allow sufficient time for the oven to reach the desired temperature.
Equipment challenges often stem from not having the right pans; ensure to use non-stick options when necessary to avoid sticking and ensure even cooking.
Ingredient substitutions should be made with thought; for instance, not all cheeses behave the same under heat, so be cautious with variations.
Timing concerns arise when cooking for a large group; pre-preparing ingredients allows for smoother cooking flow, reducing stress during meal preparation.
Recipe Success Stories
The community feedback for Longhorn Steakhouse Parmesan Chicken has been overwhelmingly positive, with numerous households sharing their successful preparation experiences.
Many have found great success with variations, experimenting with different cheeses or spice blends that cater to their family’s tastes while delivering delicious results.
Adaptation stories highlight how families have tailored this dish for special diets, reinforcing its versatility and commitment to inclusivity in meal preparation.
Reader suggestions often lead to creativity in cooking techniques, with ideas ranging from air frying to grilling to achieve perfect textures.
Photography tips shared by readers showcase beautifully plated dishes on social media, further encouraging others to try this delectable recipe.
Frequently Asked Questions
Q: Can I use frozen chicken for this recipe?
A: Yes, frozen chicken can be used, but ensure it’s completely thawed before cooking for even results. Allow it to sit in the fridge overnight for safe defrosting.
Q: What’s the best way to reheat leftovers?
A: The best way is to reheat in the oven at 350°F until warmed through, which maintains the crispy texture of the topping.
Q: Can this dish be made ahead of time?
A: Yes, you can prepare the chicken and coating ahead and store separately in the fridge until you’re ready to bake.
Q: Could I add vegetables to this dish?
A: Absolutely! Roasted vegetables like zucchini and bell peppers can be added alongside the chicken for a complete meal.
Q: How do I know when the chicken is done cooking?
A: Use a meat thermometer to check for an internal temperature of 165°F to ensure it is fully cooked and safe to eat.
Q: Can I use other types of cheese?
A: Yes, variations like mozzarella or provolone can be blended with Parmesan to achieve a different flavor profile while retaining the dish’s essence.
Q: Is this recipe low-carb?
A: By substituting breadcrumbs with crushed pork rinds or almond flour, you can create a delicious low-carb version.
Q: Can I grill the chicken instead of baking it?
A: Yes, grilling gives a fantastic smoky flavor to the chicken; just be sure to monitor the cooking time closely.
Q: How long will leftovers last in the fridge?
A: Leftovers can be stored in the fridge safely for 3-4 days when covered properly in an airtight container.
Additional Resources
For related recipes, consider trying chicken variations such as Chicken Parmesan or Chicken Piccata that maintain the Italian-inspired spirit of this dish.
Technique guides that can enhance your culinary skills include home cooking basics like marinating, breading, and seasoning effectively.
Ingredient information about key components, especially chicken and cheese varieties, can deepen your understanding of selecting quality products.
Equipment recommendations highlight essential tools like meat thermometers and baking sheets to improve your cooking process and ensure even results.
Seasonal variations can include fresh herbs during spring and summer, while opting for comforting spices in fall and winter, adapting the dish throughout the year.
Join the Conversation
Engaging with social media sharing can amplify your culinary pursuits. Share your cooking endeavors online, inviting friends and followers to try your take on the Longhorn Steakhouse Parmesan Chicken recipe.
Photography tips can enhance your presentation and inspire others, allowing your culinary creations to shine. Encourage others to share their finished dishes and celebrate food artistry.
Recipe reviews will build community around this dish, offering personal experiences and enhancements others may consider for their families.
Community engagement fosters a supportive environment; invite fellow food lovers to exchange tips, variations, and success stories centered around this beloved recipe.
Encourage dialogue about personal adaptations that enhance flavors and create a continued interest and enthusiasm for cooking together.
The Recipe
Longhorn Steakhouse Parmesan Chicken
Serves: 4
Prep Time: 15 mins
Cook Time: 30 mins
Total Time: 45 mins
Kitchen Equipment Needed
Baking dish
Meat mallet
Mixing bowls
Meat thermometer
Ingredients
4 boneless, skinless chicken breasts
1 cup grated Parmesan cheese
1 cup breadcrumbs
2 cloves garlic, minced
1 teaspoon Italian seasoning
Salt and pepper to taste
2 tablespoons olive oil
Fresh parsley for garnish
Directions
Preheat your oven to 375°F (190°C).
Pound chicken breasts to an even thickness for optimal cooking.
In a bowl, combine breadcrumbs, Parmesan cheese, garlic, Italian seasoning, salt, and pepper.
Drizzle olive oil over the chicken breasts and coat both sides well.
Press the breadcrumb mixture firmly onto the chicken to create a crispy top.
Place the chicken in a greased baking dish and bake for 25-30 minutes, or until golden brown.
Check internal temperature, ensuring it reaches 165°F.
Let the chicken rest for 5-10 minutes before serving. Garnish with fresh parsley.
Recipe Notes
For a kick, add crushed red pepper flakes into the breadcrumb mixture.
Leftovers can be stored in an airtight container and enjoyed within 3-4 days.
Feel free to substitute turkey or pork for a different flavor experience.
Irresistible Chicken Parmesan Grilled Cheese Sandwich Recipe for Food Lovers
Delicious Chicken Parmesan Grilled Cheese Sandwich: A Comfort Food Delight
⚖️
Difficulty
Easy
⏲️
Prep Time
15 mins
🕒
Cook Time
10 mins
⏱️
Total Time
25 mins
🍽️
Servings
2
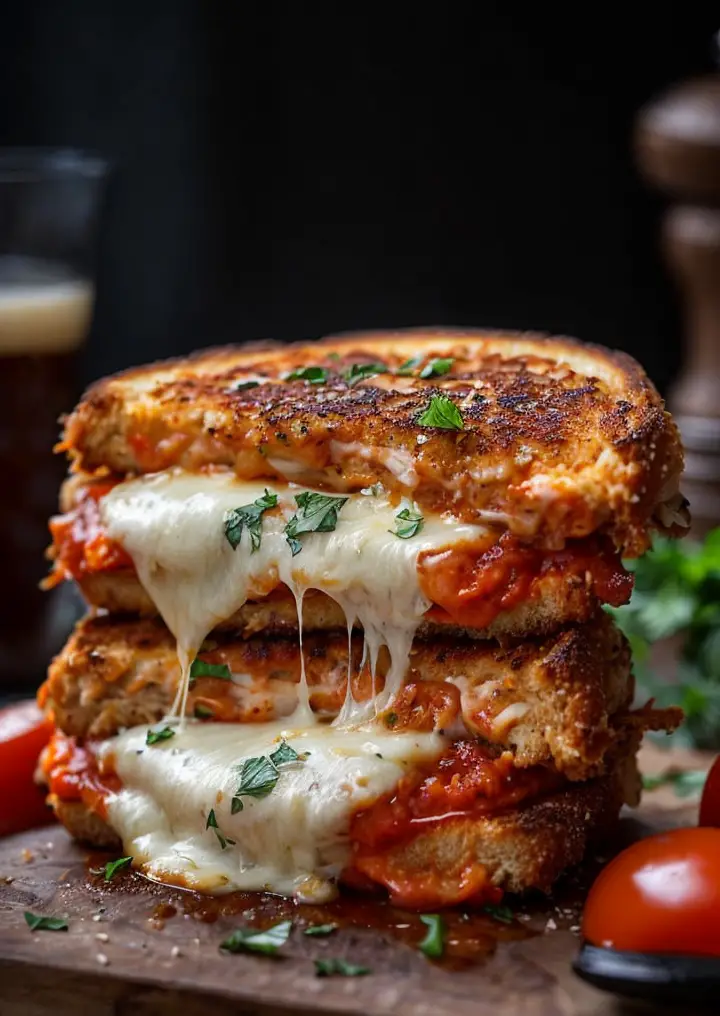
Indulge your taste buds with this mouthwatering Chicken Parmesan Grilled Cheese Sandwich! Combining the savory flavors of crispy chicken, rich marinara sauce, and gooey melted cheese, this delectable sandwich redefines comfort food. Imagine biting into perfectly toasted bread, revealing layers of tender chicken, luscious cheese, and a hint of Italian herbs. This recipe is perfect for any meal and is sure to please everyone at the table.
As the aroma of the grilled cheese wafts through your kitchen, you’ll feel a warm nostalgia for the classic flavors of Italian cuisine. This Chicken Parmesan Grilled Cheese Sandwich not only embodies the essence of comfort food, but also showcases a delightful fusion of textures and tastes. Whether you’re hosting a casual get-together or simply enjoying a comforting meal at home, this sandwich is bound to steal the spotlight.
Quick Recipe Highlights
Flavor Profile: The Chicken Parmesan Grilled Cheese Sandwich features a harmonious blend of cheesy, savory, and tangy flavors, making every bite a delight.
Texture: Experience a satisfying crunch from the grilled bread, contrasting beautifully with the tender chicken and creamy melted cheese inside.
Aroma: Expect an inviting aroma that combines the earthy scent of herbs with the rich sweetness of marinara sauce and a hint of garlic.
Visual Appeal: The golden-brown bread, contrasting with the vibrant colors of melted cheese and zesty marinara, makes this sandwich a feast for the eyes.
Skill Level Needed: This recipe is suitable for beginners, requiring simple assembly and grilling techniques to achieve delicious results.
Special Equipment: A skillet or frying pan is essential for achieving that perfect grilled cheese crust.
Recipe Overview
Difficulty Level: The Chicken Parmesan Grilled Cheese Sandwich is easy to prepare, involving straightforward steps and common ingredients.
Category: This delightful sandwich falls under the category of comfort food, perfect for lunch or a hearty snack.
Cuisine: Rooted in Italian-American culinary tradition, this sandwich brings together classic Italian flavors in a fun and accessible format.
Cost: The ingredients for this sandwich are budget-friendly, typically costing around $10 for two servings, making it an economical choice for family meals.
Season: Ideal for any season, this sandwich is especially comforting during colder months, offering warmth and satisfaction.
Occasion: Perfect for casual gatherings, game nights, or a cozy family dinner, this sandwich fits a variety of occasions.
Why You’ll Love This Recipe
This Chicken Parmesan Grilled Cheese Sandwich offers an irresistible taste and texture appeal. The combination of crispy bread enveloping moist chicken, marinara, and melted cheese creates a comforting yet exciting culinary experience. The familiar flavors of chicken parmesan take on a playful twist, making this dish enjoyable for both kids and adults.
Convenience is another reason to adore this recipe. With a prep time of just 15 minutes and a cooking time of 10 minutes, you can have a satisfying meal ready in under half an hour. This makes it an ideal dish for busy weeknights or last-minute gatherings, without compromising on flavor.
Nutritionally, this recipe provides a balanced combination of protein from the chicken, carbs from the bread, and calcium from the cheese. To add an extra dose of vegetables, consider serving it with a side salad or roasted veggies.
Socially, this grilled cheese sandwich is great for sharing! It invites everyone to gather ’round and enjoy a delicious meal together, making it perfect for parties or casual get-togethers. The interactive element of sharing sandwiches promotes laughter and conversation, enhancing your dining experience.
Finally, the cost-effectiveness of the Chicken Parmesan Grilled Cheese Sandwich cannot be overlooked. With easily accessible ingredients found at any grocery store, you can create a delicious meal that feels indulgent without breaking the bank.
Historical Background and Cultural Significance
The Chicken Parmesan Grilled Cheese Sandwich draws on the rich history of chicken parmesan itself, which originated in Southern Italy as “melanzane alla parmigiana.” Italian immigrants brought this dish to America, modifying it using locally available ingredients. The sandwich version pays homage to the original while making it even more portable and easy to enjoy.
Culturally, this dish reflects the Italian-American experience, combining traditional recipes with American tastes. The grilled cheese aspect represents a classic comfort food that resonates with many and brings a sense of nostalgia to meal times. This fusion of cultures highlights the adaptability and evolution of culinary traditions.
The evolution of the Chicken Parmesan Grilled Cheese Sandwich showcases innovation in the kitchen. Today, variations can be found across different regions in the U.S., each highlighting unique twists—ranging from spicy versions with jalapeños to cheese-stuffed bread for an extra indulgent touch.
Regional variations also play a significant role in shaping this dish. In areas with a strong Italian presence, such as New York and Chicago, chefs often elevate this sandwich with homemade marinara sauce, artisanal cheeses, and fresh herbs, resulting in diverse interpretations that celebrate local flavors.
Ingredient Deep Dive
– **Chicken:** Historically, chicken has been a staple protein in many cuisines, especially in Italy. It’s rich in protein and low in fat, making it a nutritious choice. When selecting chicken, look for fresh, free-range options if possible, and store it in the refrigerator, using within a few days or freezing for longer storage. You can substitute chicken with turkey or even veggies for a lighter version.
– **Cheese:** Cheese is central to Italian cuisine, and mozzarella is a classic choice for chicken parmesan. Mozzarella offers a delightful stretchiness when melted. When purchasing mozzarella, opt for fresh or low-moisture varieties for optimal melting. Store it in the refrigerator, keeping it tightly sealed. You can swap mozzarella for provolone or even a vegan cheese alternative based on dietary preferences.
– **Bread:** The bread used for the sandwich adds crunch and texture, vital in contrast to the tender chicken and sauce. Choose a crusty loaf like sourdough or ciabatta for best results. Select bread that feels fresh and firm. Store unused bread in a cool, dry place. For a gluten-free option, use gluten-free bread varieties available in stores.
– **Marinara Sauce:** This tomato-based sauce has roots in Southern Italian cooking and is beloved for its zesty flavor profile. When selecting marinara, look for brands that use simple ingredients, or make your own from scratch for maximum freshness. Store marinara in an airtight container in the fridge or freeze for longer use. Feel free to experiment with different sauces, such as pesto, if you wish to switch things up.
Common Mistakes to Avoid
Starting with cold ingredients: Ensure all ingredients are at room temperature to achieve even cooking. This helps the cheese melt perfectly and prevents the bread from burning before the chicken heats through.
Not preheating the skillet: Always preheat your skillet to ensure that the bread achieves that golden, crisp texture while keeping the interior warm and gooey.
Overloading on the filling: Be mindful of the amount of chicken and cheese you add. Too much filling can lead to a sandwich that’s hard to manage and may fall apart during cooking.
Skipping the toasting step: Don’t rush the toasting process; allow the bread to become golden brown on both sides for maximum flavor and crunch.
Using low-quality cheese: Opt for high-quality cheese to ensure the best melt and flavor. Avoid pre-shredded varieties that may contain anti-caking agents.
Neglecting seasoning: Seasoning the chicken before cooking adds depth to the flavor. Don’t forget to sprinkle some salt, pepper, and Italian herbs on the chicken.
Rushing the cooking time: Pay attention to the cooking times; taking a moment to creep up to perfect golden brown on both sides makes a huge difference.
Not letting it rest: After cooking, let the sandwich rest for a minute before cutting. This allows the cheese to set slightly, making it easier to handle.
Using the wrong type of bread: Choose sturdy bread that can hold up to the filling. Avoid using overly soft varieties that can easily become soggy.
Inadequate marinara sauce: Ensure that your maranara sauce has enough flavor; a bland sauce can make your sandwich lackluster. Opt for quality sauces or make your own for best results.
Essential Techniques
– **Grilling Bread Perfectly:** Achieving the ideal grilled cheese requires moderate heat to ensure the bread crisps up without burning. Use butter or oil generously to coat the outsides before grilling; watch for a beautiful golden brown.
– **Melting Cheese Strategically:** To achieve maximal meltiness, slice cheese thinly and layer it generously. Cover the skillet with a lid for a minute or two to trap steam, helping the cheese to melt into a gooey perfection without overcooking the sandwich.
– **Chicken Cooking Techniques:** Ensure the chicken is cooked properly by flattening it to an even thickness, allowing for faster, even cooking. Additionally, if you’re cooking from frozen, allow more time to ensure the inside is properly heated through.
– **Layering Flavors:** To maximize flavor, season each component of the sandwich and layer them thoughtfully. Start with a spread of marinara sauce on the bread, and then layer chicken and cheese to create a flavorful base.
Pro Tips for Perfect Chicken Parmesan Grilled Cheese Sandwich
– Choose fresh, high-quality ingredients for the best flavor experience — it makes all the difference in your dish.
– Experiment with different cheeses for unique flavor profiles; mix mozzarella with cheddar or pepper jack for a spicy kick.
– For added depth, toss some fresh basil or oregano into the marinara sauce.
– Pre-cook the chicken and freeze it for quicker assembly on busy nights; simply thaw and grill.
– Use butter instead of oil for the crispier, richer flavor in your bread.
– Rotate the sandwich halfway through cooking to ensure even browning on both sides.
– For a gourmet twist, add roasted red peppers or sautéed onions for added sweetness and depth.
– Serve with a side of extra marinara for dipping to enhance sauce lovers’ satisfaction.
Variations and Adaptations
– **Regional Variations:** Embrace local tastes by adding a spicy twist with jalapeño slices, or customizing with local cheese favorites. This allows the sandwich to cater to regional preferences and flavor profiles.
– **Seasonal Adaptations:** Dust off those summer herbs or swap out vegetables seasonally, such as fresh tomatoes in the summer or roasted squash in the fall for a delightful seasonal twist.
– **Dietary Modifications:** Consider a gluten-free or vegan adaptation by using gluten-free bread and a plant-based cheese alternative, allowing more people to enjoy this delicious sandwich.
– **Flavor Variations:** Add a layer of pesto or chipotle mayo for flavor intensity. Experimenting with different sauces beyond the classic marinara can bring freshness and innovation.
– **Texture Modifications:** Consider adding a layer of crispy bacon or fried egg on top for an elevated texture and flavor boost.
– **Presentation Alternatives:** Present with a light salad or crispy french fries to create a more rounded meal experience, leveling up the often simple sandwich.
Serving and Presentation Guide
For an inviting presentation, cut the Chicken Parmesan Grilled Cheese Sandwich diagonally and arrange it on a plate beside a small bowl of marinara sauce for dipping. Garnish with a sprig of fresh basil or a light sprinkle of grated parmesan on top to elevate the visual appeal. Consider plating it on a bright, contrasting surface to help the colors pop.
Traditional accompaniments like a side salad or crispy potato wedges contrast beautifully against the sandwich, creating an enjoyable dining experience. Additionally, consider serving at slightly cooler temperatures to allow flavors to bloom without burning your mouth.
Portion control can be adjusted based on appetite; serve smaller portions with more diverse sides for a unique dining experience, especially when entertaining or serving a larger crowd.
Wine and Beverage Pairing
For a delightful pairing, consider serving a light, crisp white wine such as Pinot Grigio or a Sauvignon Blanc, both of which will complement the richness of the cheese and the acidity of the marinara sauce.
For those preferring non-alcoholic options, sparkling water with lemon, or an Italian soda can refresh your palate without overpowering the flavors of the sandwich. If you’re a coffee enthusiast, a robust espresso can serve as an excellent post-meal choice to close out the dining experience.
Temperature considerations are important; serve your beverages chilled to refresh the palate, balancing the warm sandwich. A memorable experience often leads to wonderful conversations over shared food.
Storage and Shelf Life
Store any leftovers of the Chicken Parmesan Grilled Cheese Sandwich in an airtight container in the refrigerator. It’s best consumed within three days to maintain freshness and flavor. Reheat in a skillet on low heat for a couple of minutes to retain the crispy texture.
If freezing, consider wrapping individual sandwiches in plastic wrap and then aluminum foil for optimal preservation. This sandwich can be frozen for up to two months; simply reheat after thawing in the refrigerator overnight.
Signs of spoilage include an off-putting smell, mold, or significant changes in color; always ensure the sandwich is reheated thoroughly before consuming.
Make Ahead Strategies
To save time on busy evenings, prep the chicken ahead by breading and cooking it a day in advance. Store in the refrigerator, assembling and grilling the sandwich just before serving.
Another strategy is to prepare a batch of marinara sauce during meal prep and refrigerate or freeze it in portions. This can cut down your assembly time without sacrificing delicious, homemade flavors.
Quality impacts can vary when preparing in advance. Freshly grilled sandwiches will always taste better than microwaved versions; consider forming the sandwiches and wrapping them tightly until ready to grill for a fresher outcome.
When reheating, allow the sandwich to come to room temperature before cooking; this helps in getting an even warmth through the filling without overcooking the bread surface.
Scaling Instructions
If you wish to halve the Chicken Parmesan Grilled Cheese Sandwich recipe, simply reduce the chicken and cheese by half. You’ll still achieve delicious results while minimizing waste.
For a larger gathering, doubling or tripling the recipe is easily achievable; simply prepare batches and keep them warm in a slow cooker or an oven set at a low temperature while grilling.
Equipment adjustments may include larger skillets or grills, allowing multiple sandwiches to cook simultaneously, making the process more efficient and timely.
Timing modifications should consider increased cooking time for more sandwiches; keep an eye on browning to prevent burning amid higher quantities.
Storage considerations are crucial when preparing in bulk — ensure all components are adequately sealed to maintain freshness, especially when assembly is spread out with time.
Nutritional Deep Dive
A detailed macro breakdown of the Chicken Parmesan Grilled Cheese Sandwich typically reveals protein content from the chicken, carbohydrates from the bread, and fats from the cheese and any butter used in grilling. This balance makes it a satisfying meal option.
From a micronutrient perspective, this meal can offer a hearty dose of calcium from the cheese, along with vitamins A and C from the marinara sauce. These nutrients contribute to a well-rounded meal necessary for maintaining a healthy diet.
Health benefits vary but generally include protein for muscle maintenance and carbohydrates for energy. This makes it a perfect option post-workout or as a hearty lunch choice.
Portion analysis plays a significant role in enjoying this sandwich while maintaining weight management; consider serving smaller portions alongside salads or vegetables for a fuller meal experience without overindulgence.
Dietary considerations could include an emphasis on moderating cheese or swapping to lower-fat options for healthier outcomes without sacrificing texture.
Dietary Adaptations
For gluten-free adaptations, swap regular bread with gluten-free loaves while ensuring other ingredients’ compatibility. This allows those with dietary restrictions to enjoy a classic without concerns.
For dairy-free options, using plant-based cheese blends ensures a similar gooey texture and flavor profile, providing enjoyable experiences without the lactose.
Vegan adaptations are readily available by empanelling tofu or seitan to mimic chicken, ensuring the rest of the ingredients fit the plant-based diet seamlessly.
Low-carb or keto-friendly adaptations can consider using cloud bread or cauliflower bread alternatives, allowing low-carb enthusiasts to delight in a similar experience without the carbs.
Other dietary modifications can focus on ingredient reductions or swaps to suit individual preferences, ensuring that everyone can enjoy this flavorful Chicken Parmesan Grilled Cheese Sandwich draft.
Troubleshooting Guide
Should texture issues arise, such as the bread becoming soggy, ensure to use a sturdy bread and properly preheat the skillet to achieve that golden crunch on the outside.
Flavor balance concerns often occur if too much marinara is used; adjust by using less sauce or choosing less acidic brands to complement the cheese flavor without overwhelming.
Temperature problems can usually be solved by adjusting the heat settings on your stove; if the outside cooks too fast, lower the heat and place a lid on the sandwich to allow for even cooking throughout.
If you face equipment challenges such as uneven grilling, consider rotating the sandwich in the pan or using a press to ensure an even level of heat distribution across the sandwich.
Ingredient substitutions can confuse cooking times; keep similar ingredients in mind for approximate matching, allowing for a smoother cooking experience.
Timing concerns generally revolve around overcooking; use simple visual cues, such as crispness and golden color, to gauge cooking performance and ensure just-right results.
Recipe Success Stories
Our community’s feedback around this Chicken Parmesan Grilled Cheese Sandwich has been overwhelmingly positive, with readers praising its simplicity and deliciousness. Many have shared successful variations, such as spicy renditions featuring pepper jack cheese and hot marinara sauce.
Adaptation stories also abound, with individuals creating vegetarian versions using eggplant or portobello mushrooms as the main filling, allowing diverse dietary profiles to enjoy the recipe.
Readers have delightfully suggested photography tips, encouraging everyone to capture the golden, gooey interior side by side with the crispy exterior for that picture-perfect moment before the sandwich is devoured.
Various successes led to a thriving community of shared recipes in local circles, showcasing how food can connect people through shared experiences and joyful gatherings centered around good meals.
Frequently Asked Questions
Can I use leftover chicken for this recipe?
Absolutely! Leftover rotisserie chicken works perfectly and speeds up assembly time while still yielding delicious flavor.
What type of cheese is best for grilling?
For the best melt, use a high-quality mozzarella cheese. You can mix it with provolone or cheddar for additional flavor.
How can I make this sandwich healthier?
Consider using whole grain bread, lean chicken breast, and reducing the cheese for a lighter version of this comfort food classic.
Can I freeze the assembled sandwiches?
Yes, you can freeze the sandwiches before grilling. Wrap them tightly in plastic wrap and store them for up to two months.
How do I reheat leftover sandwiches?
The best way to reheat is by placing them in a skillet over medium heat until warm and the bread is crispy again. Avoid microwaving to maintain texture.
Can I make this sandwich without chicken?
Certainly! Consider using eggplant, mushrooms, or a meat substitute like tofu for a vegetarian or vegan option.
What are some ideal sides to serve with this sandwich?
A light side salad, crispy fries, or garlic bread complements the sandwich perfectly, ensuring a balanced meal.
Is there a way to make this sandwich gluten-free?
Yes! Simply replace the bread with your favorite gluten-free variety, and ensure all other ingredients are gluten-free as well.
What spices can I add to enhance flavor?
Consider adding Italian herbs like basil, oregano, or garlic powder to both the chicken and marinara for heightened flavor complexity.
Can I grill it in a panini press?
Definitely! A panini press ensures even grilling while producing crispiness on both sides, making it ideal for cooking this sandwich.
How do I avoid a soggy sandwich?
Limit the amount of marinara sauce used, spreading it lightly, and using sturdier bread helps prevent sogginess.
Additional Resources
For those looking to expand their cooking repertoire, check out related recipes like a classic Margherita Pizza or a rich Lasagna that brilliantly utilize the same flavor palette.
Techniques such as breading chicken or crafting the perfect marinara sauce can easily be adapted based on available resources and offer opportunities to engage in culinary exploration.
Ingredient information is readily available in many cookbooks or online resources if you’re curious about pairing or intensifying specific flavors used in this recipe.
Insights into kitchen equipment, such as non-stick pans or good-quality spatulas, can also significantly enhance your cooking efficiency, encouraging higher success in the kitchen.
Exploring seasonal variations allows for fresh inspiration, showcasing how simple ingredients can adapt to weather and harvest preferences for enriching your meal ideas.
Join the Conversation
We encourage you to share your Chicken Parmesan Grilled Cheese Sandwich creations on social media! Tagging us with your photos enhances community engagement and showcases individual creativity.
For those interested in culinary photography, tips on lighting and angles can transform simple food shots into enticing displays, inspiring others to try out the recipe.
Don’t hesitate to leave your thoughts and reviews on this recipe, letting us know how it went and any personal twists you added.
We invite recipe variations, allowing community feedback to foster connections and encourage shared culinary adventures, enhancing everyone’s experience in the kitchen.
The Recipe
Chicken Parmesan Grilled Cheese Sandwich
Serves: 2
Prep Time: 15 mins
Cook Time: 10 mins
Total Time: 25 mins
Kitchen Equipment Needed
Skillet or frying pan
Spatula
Meat mallet (optional)
Knife and cutting board
Ingredients
2 slices of crusty bread (sourdough or ciabatta)
1 cup cooked chicken breast, sliced
1/2 cup marinara sauce
1 cup shredded mozzarella cheese
Butter or olive oil for grilling
Salt and pepper to taste
Chopped fresh basil for garnish (optional)
Directions
Preheat a skillet over medium heat and add butter or olive oil.
Season the chicken slices with salt and pepper.
Spread a thin layer of marinara sauce on one side of each slice of bread.
Layer chicken slices and top with mozzarella cheese before closing the sandwich.
Place the sandwich in the skillet and grill for 4-5 minutes on each side until the bread is golden brown and the cheese melts.
Remove from the skillet and let it rest for a minute before slicing.
Garnish with fresh basil and serve with extra marinara for dipping.
Recipe Notes
You can use leftover chicken or rotisserie chicken for quicker preparation.
For an extra kick, add sliced jalapeños or spicy pepper jack cheese.
Make sure the skillet is adequately preheated to avoid sogginess during cooking.
Feel free to customize the toppings—spinach or arugula can add a fresh element!