Easy One-Pan Chicken with Buttered Noodles for Busy Nights

One-Pan Chicken with Buttered Noodles | Perfect for Busy Nights!

⚖️
Difficulty
Easy

⏲️
Prep Time
15 mins

🕒
Cook Time
25 mins

⏱️
Total Time
40 mins

🍽️
Servings
4 servings

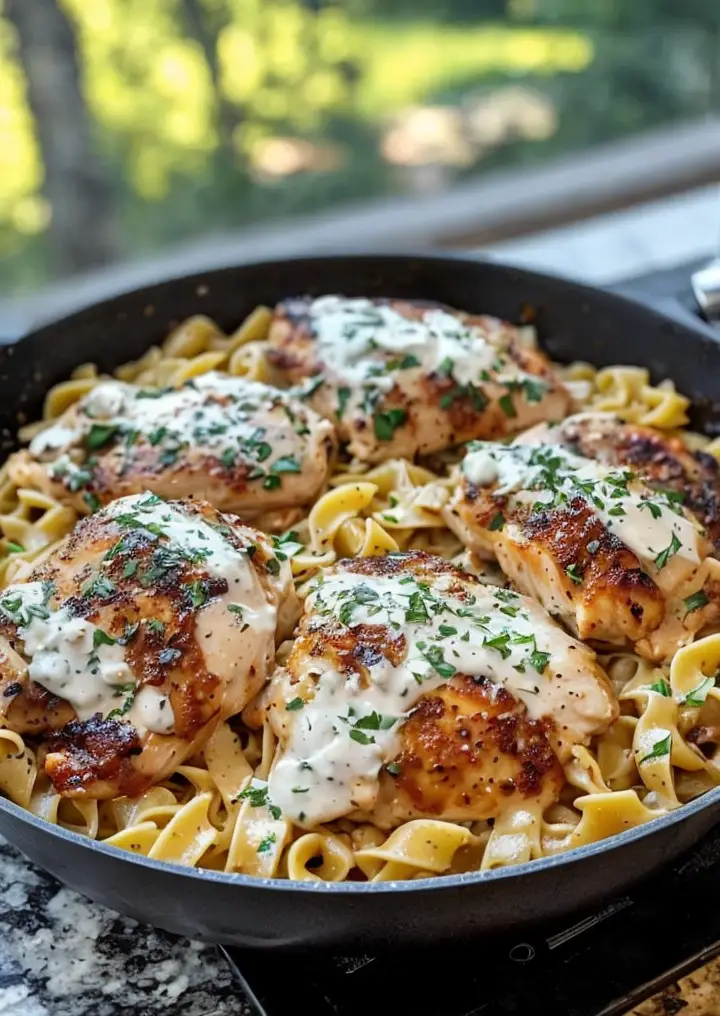
One-Pan Chicken with Buttered Noodles is the ideal meal for busy nights when you crave home-cooked comfort but lack time. This dish combines tender chicken seasoned to perfection with buttery noodles, all cooked in the same pan for maximum flavor and minimal cleanup. The creamy texture of the noodles complements the juicy chicken, making every bite a delight. It’s not just a meal; it’s a soothing experience that transforms your hectic day into a relaxing evening, allowing you to savor the moment with family or friends.

Imagine sitting down to a plate of perfectly cooked chicken alongside a mound of buttery, garlicky noodles. The aromas of garlic and fresh herbs waft through the air, instantly making your kitchen feel warm and inviting. This dish doesn’t just look appealing; it tastes even better. The simplicity of the ingredients highlights their natural flavors, creating an inviting meal sure to satisfy everyone around the table.

Quick Recipe Highlights

  • Flavor Profile: The dish features a savory blend of garlic, herbs, and buttery richness that enhances the chicken’s natural flavor, creating a comforting meal perfect for any night.
  • Texture: The contrast of the tender, juicy chicken paired with the silky, smooth noodles makes for an incredibly satisfying dining experience.
  • Aroma: Key aromatic notes include garlic, which adds warmth, and fresh herbs that invigorate your senses.
  • Visual Appeal: The bright, golden chicken juxtaposed against the rich, glossy noodles creates an inviting plate that begs to be devoured.
  • Skill Level Needed: This is an easy recipe, making it accessible for cooks at any skill level, particularly those just starting.
  • Special Equipment: No special equipment is needed—just a sturdy skillet or pan and basic cooking utensils.

Recipe Overview

  • Difficulty Level: Easy to moderate, this recipe requires basic cooking skills, making it suitable for beginner to intermediate cooks. It allows for greater exploration while not being overly complicated.
  • Category: This dish fits perfectly into the comfort food category, offering a hearty option that’s gratifying after a long day.
  • Cuisine: While influenced by American home cooking traditions, this dish has elements typical of many Western cuisines, focusing on simplicity and flavor.
  • Cost: The ingredients are economical, making this a budget-friendly meal option ideal for families and those keeping a close eye on their grocery bills.
  • Season: Perfect year-round, this recipe shines brightly in the cooler months as a cozy meal while still being light enough for spring and summer enjoyment.
  • Occasion: This is versatile enough for a weeknight dinner, family gatherings, or when hosting friends for a casual get-together.

Why You’ll Love This Recipe

One-Pan Chicken with Buttered Noodles brings together a wonderful balance of taste and texture that warms the heart. The savory chicken pairs beautifully with the rich, buttery noodles—an established combo that never fails to delight. Each bite introduces a blend of comforting flavors that make it hard to stop coming back for more. Whether you’re served at the dinner table or packed in lunches, this recipe provides joy in each mouthful.

In addition to its taste, the convenience of this recipe makes it a favorite for busy weeknights. With everything cooked in one pan, cleanup time is significantly reduced. You won’t have to spend your post-dinner hours scrubbing pots and pans. Instead, you can unwind and enjoy the leftovers or share the meal with family. The ease of preparation means you can whip up a delicious dinner in no time, making those evenings less stressful and more enjoyable.

Moreover, this dish packs a nutritional punch without sacrificing flavor. The chicken provides a good source of protein, which is essential for muscle health and satiety. Meanwhile, the pasta offers carbohydrates for energy, and with well-chosen herbs and spices, you can infuse flavors that support health. This makes it a great option for families looking to maintain a balanced diet.

Sharing meals like One-Pan Chicken with Buttered Noodles fosters connection and joy. Whether it’s a simple weeknight dinner or a gathering with friends, this recipe encourages togetherness and conversation over good food. The aromas wafting from the kitchen create a warm atmosphere, inviting everyone to sit down and enjoy each other’s company.

Not to mention, the cost-effectiveness of the recipe is a major plus. Using common pantry staples keeps it budget-friendly, allowing you to indulge without breaking the bank. Perfect for anyone who loves delicious food but is mindful of spending, this chicken and noodles dish is a reliable choice that meets various needs.

Historical Background and Cultural Significance

While One-Pan Chicken with Buttered Noodles seems like a modern creation, dishes like these have been staples in kitchens for generations. The concept of cooking a protein with a starch in one pot is rooted deep in culinary history, as it embodies simplicity and functionality that home cooks cherish. Roots can be traced back to the necessity of creating filling meals using minimal resources.

This dish has held cultural significance as a symbol of comfort food in American homes. Families have gathered around similar meals, sharing stories and making memories over hearty portions that fuel both body and soul. Each bite encapsulates warmth—a reminder of home-cooked meals during childhood, reinforcing bonds that last a lifetime.

Over time, recipes for chicken and buttered noodles have evolved, adapting to changing tastes and available ingredients. Regional variations have emerged, showcasing local flavors and techniques that personalize the dish further, making it unique to different households.

Today, a resurgence in one-pan meals reflects modern cooking trends that prioritize convenience and simplicity. One-Pan Chicken with Buttered Noodles illustrates that traditional recipes can flexibly adapt to today’s fast-paced lifestyle while still delivering the comfort and satisfaction we crave.

Ingredient Deep Dive

– **Chicken:** The star of the dish, chicken has been an essential protein source in cultures around the world. Nutritionally, it is rich in protein, vitamins, and minerals, supporting overall health. When selecting chicken, look for firm, moist pieces with no discoloration. Store it in the fridge for a day or two or freeze it for later use. For variations, dark meat can be used for a juicier experience.

– **Noodles:** Noodles, in various forms, are a staple in many cuisines, and their carbohydrate content provides energy. Choose quality pasta made from durum wheat for the best texture. Store dried noodles in a sealed container in a cool place. Consider whole-grain or gluten-free noodles for varied dietary preferences and health benefits.

– **Butter:** Essential for the sauce and noodles, butter adds richness and flavor. Made from churned cream, it has fat that enhances the dish’s mouthfeel. Use unsalted butter to control saltiness. Store butter in a cool, dark place, and when used in moderation, its deliciousness blooms in cooking, encouraging other flavors to shine.

– **Garlic and Herbs:** Garlic adds depth, while herbs like parsley provide freshness. Garlic possesses numerous health benefits, including immune support. Choose fresh, firm cloves for the best flavor and store them in a cool, dry place. Fresh herbs can enhance the dish’s aroma and visual appeal, offering additional health benefits. Substitutions, like garlic powder or dried herbs, can be understood based on availability.

Common Mistakes to Avoid

  • Not seasoning the chicken adequately: Under-seasoned chicken will not provide the flavor depth expected for the dish. Ensure to season well before cooking.
  • Overcooking the noodles: This can lead to a mushy texture that detracts from the dish’s overall appeal. Cook just until al dente for the best results.
  • Using too much butter: While butter adds richness, too much can make the dish overly greasy. Stick to the recommended amounts for the right balance.
  • Skipping the resting time for chicken: Allowing chicken to rest before slicing lets juices redistribute, resulting in juicier meat. Avoid cutting it immediately after cooking.
  • Neglecting to use a preheated pan: A hot pan helps to sear the chicken properly, creating a nice crust and locking in flavors. Always preheat to achieve the best results.
  • Crowding the pan: Placing too much chicken in the pan at once can hinder proper cooking, leading to steaming rather than browning. Cook in batches if needed.
  • Not using enough liquid for the noodles: Ensure there’s enough broth or water to give your noodles the right flavor and prevent them from drying out.
  • Forgetting aromatics: Garlic and fresh herbs enhance flavor profiles significantly. Always add them in the right sequences to avoid burning.
  • Using the wrong type of noodle: Different noodles cook at different rates. Ensure to select the correct type to match cooking times with your chicken.
  • Rushing the cooking process: Good flavors develop over time. Resist the urge to rush, and allow chicken to cook through thoroughly.

Essential Techniques

– **Searing Chicken:** Searing creates a delicious crust that enhances flavor. To master it, ensure your pan is hot and use enough oil. Watch for golden-brown color; it indicates a proper sear.

– **Cooking Noodles:** For perfectly cooked noodles, check the package instructions and taste for doneness. Frequently stirring helps prevent sticking and ensures even cooking.

– **Deglazing:** This technique helps incorporate fond – the brown bits stuck to the pan – into the sauce. Adding broth or wine while scraping the pan creates a deeper flavor profile.

– **Resting Protein:** Allowing chicken to rest post-cooking is crucial for texture and juiciness. Resting redistributes juices, so the meat retains moisture when sliced.

Pro Tips for Perfect One-Pan Chicken with Buttered Noodles

– Marinate the chicken in lemon juice and herbs for added flavor before cooking; this will enhance tenderness and infuse extra taste.
– For an extra touch, use freshly grated Parmesan cheese over the finished dish for a rich and creamy finish.
– Consider adding seasonal vegetables like spinach or peas during the last few minutes of cooking for additional nutrients and color.
– Substitute half the butter with olive oil for a healthier alternative without sacrificing flavor.
– Use chicken thighs instead of breasts for a juicier and more flavorful result.
– When cooking, use a lid to cover the pan briefly; this helps the chicken cook evenly without drying out.
– For a spicier touch, add red pepper flakes or cayenne pepper into the buttered noodles for a bit of heat.
– Experiment with different herbs such as thyme or rosemary for a variance in flavor that works with the chicken and butter noodles.

Variations and Adaptations

– **Regional Variations:** In Italy, similar dishes may feature a cream sauce with various herbs, reflective of local flavor profiles. Techniques from Italian cooking could easily adapt this dish into a pasta primavera or alfredo style.
– **Seasonal Adaptations:** For a seasonal twist, incorporate roasted vegetables like butternut squash in the fall or fresh zucchini in the summer, complementing the dish perfectly.
– **Dietary Modifications:** For gluten-free diets, alternative noodles such as rice or quinoa noodles can substitute for standard pasta, maintaining the dish’s beloved features without the gluten.
– **Flavor Variations:** Adding different sauces like teriyaki or buffalo sauce can give the dish a completely new flavor profile, appealing to various taste preferences.
– **Texture Modifications:** For added crunch, you could toss in toasted nuts or seeds just before serving.
– **Presentation Alternatives:** Serve the dish in a large family-style bowl for gatherings, garnished with freshly chopped herbs for colorful appeal.

Serving and Presentation Guide

Serving One-Pan Chicken with Buttered Noodles beautifully elevates the dining experience. Start by plating the chicken on a bed of noodles, drizzling the sauce over the top, and scattering freshly chopped herbs or spring onions for a burst of color. Consider using wide, shallow bowls or rustic plates to emphasize the homey feel.

Garnish with a sprinkle of freshly grated cheese or a drizzle of olive oil for added richness. Pair with a simple green salad dressed lightly to contrast the hearty dish. The use of warm, inviting dinnerware also contributes to a delightful presentation, enhancing the meal’s visual and sensory appeal.

Ensure to serve the dish warm, allowing for the ideal tasting experience. Discuss portion sizes with guests, providing more for those who appreciate seconds, while offering smaller portions for light eaters.

Wine and Beverage Pairing

Pairing wine with One-Pan Chicken with Buttered Noodles enhances the meal’s overall enjoyment. A crisp Chardonnay or a lightly oaked Sauvignon Blanc works beautifully, providing a refreshing contrast to the richness of the chicken and noodles.

For non-alcoholic alternatives, consider serving lemonade or iced herbal tea, offering a refreshing palate cleanser without overpowering the dish’s flavors. A light, tropical mocktail can also add an element of fun to the dining experience.

If coffee or tea is preferred, serve a light herbal tea that complements the meal without overshadowing it. Ensure beverages are chilled or served warm according to preference, aligning with seasonal trends.

Storage and Shelf Life

To store One-Pan Chicken with Buttered Noodles, allow the dish to cool to room temperature. Transfer portions into airtight containers, and keep them refrigerated for up to 3 days. The meal can also be frozen; however, the texture of the noodles may change upon thawing. For best results, consume frozen leftovers within 2 months.

When reheating, use the microwave or stove; add a splash of water or broth to maintain moisture. It’s vital to heat thoroughly to ensure food safety while keeping the dish delectable.

Signs of spoilage include an off smell or visible mold; always double-check before consuming leftovers to ensure they haven’t gone bad.

Make Ahead Strategies

To streamline your meal preparation, consider prepping the chicken ahead. Season and marinate in advance, allowing flavors to soak in. Alternatively, cook and cool the chicken, storing it in the fridge until needed.

Noodles can also be precooked and stored separately; simply warm them up before serving. Keeping components separate also helps maintain their textures until it’s time to enjoy.

When assembling, ensure to layer the noodles and chicken correctly to avoid mushiness. Fresh elements, like herbs or parmesan, can be added just before serving for optimal freshness.

Scaling Instructions

Halving One-Pan Chicken with Buttered Noodles is simple—just divide the ingredients and adjust cooking times slightly less than half, monitoring doneness. For larger gatherings, doubling or tripling the recipe is straightforward; however, you may need to cook in batches, ensuring even cooking and proper browning.

Adjust your equipment accordingly—using a larger pan or making two batches in separate pans may be necessary to accommodate increased volume. Timing will also vary, so keep an eye on both chicken and noodles for optimal texture and flavor.

Be mindful of how much extra storage space you will require if making large quantities ahead of time. Leftovers can always be enjoyed later!

Nutritional Deep Dive

The macros in One-Pan Chicken with Buttered Noodles consist largely of protein from chicken, carbohydrates from the noodles, and healthy fats from the butter. Tracking portion sizes plays a crucial role in meal planning, especially if you’re watching caloric intake.

Micronutrient-wise, this meal delivers vitamins and minerals from added herbs and vegetables. Leafy additions, such as spinach or parsley, can further enhance the nutritional value by adding iron, vitamin K, and other essential nutrients.

Health benefits come from the balanced macro proportions and the inclusion of proteins that support muscle recovery. Those watching their weight find this meal fitting, as it can be enjoyed in satisfying portions without unnecessary excesses.

Dietary Adaptations

– **Gluten-free:** Substitute regular noodles with gluten-free options like rice noodles or zucchini noodles to accommodate dietary needs without losing flavor.
– **Dairy-free:** Replace butter with olive oil or a dairy-free butter alternative to enjoy this dish without compromising dietary preferences.
– **Vegan:** Use tofu or seitan instead of chicken and a plant-based butter alternative to make the recipe suitable for vegans while maintaining texture and taste.
– **Low-carb:** Consider using spiralized vegetables or cauliflower rice as an alternative for noodles to reduce carbohydrate intake while still delivering satisfaction.
– **Keto:** Similar to low-carb adaptations, utilize high-fat options with additional cheeses to maintain ketogenic dietary profiles while enjoying a comforting meal.
– **Paleo:** Focus on non-processed ingredients and swap noodles with vegetable alternatives to create a dish that aligns with paleo dietary guidelines.
– **Low-FODMAP:** Choose the right noodles and limit garlic to maintain low-FODMAP compliance while ensuring the recipe remains flavorful.

Troubleshooting Guide

– **Texture Issues:** If your noodles are mushy, reduce cooking time next time or rinse with cold water after cooking to stop the cooking process.
– **Flavor Balance:** For an overly salty dish, add a touch of sugar or acid (lemon juice) to balance flavors effectively.
– **Temperature Problems:** If the chicken is overcooked outside but raw inside, use lower heat to cook more evenly in future attempts.
– **Equipment Challenges:** If you don’t have a suitable pan for serving, consider using a deep dish that can transfer easily from stovetop to table.
– **Ingredient Substitutions:** Choosing fresh over dried ingredients may intensify flavors; adjust your quantities accordingly based on your palate preferences.
– **Timing Concerns:** Start with the chicken if it takes longer to cook, allowing the rest of the dish to follow in good time without sacrificing quality.

Recipe Success Stories

Community feedback often highlights how easily adaptable One-Pan Chicken with Buttered Noodles is to individual tastes and preferences. Variations using different herbs or pasta types have led to many fan-favorite adaptations.

Readers have praised this recipe for its simplicity and robust flavors, often bringing forth suggestions to incorporate their latest kitchen experiments, enhancing the overall dish. Many have shared their photography tips, showcasing the beautiful presentation of their finished meals and encouraging others to join the fun.

Sharing stories of how this recipe has become a go-to for busy nights reflects its resonance with many home cooks, emphasizing that good food can still be simple and nourishing.

Frequently Asked Questions

Q1: Can I prepare this dish ahead of time?

A: Yes, you can marinate the chicken beforehand and store it in the fridge. Cooked portions can also be reheated, making this a convenient choice for meal prep.

Q2: How do I store leftovers?

A: Store in airtight containers in the refrigerator for up to three days. For longer storage, freeze portions for up to two months.

Q3: Can I use frozen chicken for this recipe?

A: It’s best to thaw chicken beforehand to ensure even cooking. However, if using frozen chicken, you’ll need to adjust the cooking times accordingly.

Q4: What’s the best type of noodles to use?

A: While traditional egg noodles are recommended, you can also use whole grain, gluten-free, or vegetable noodles based on your dietary needs.

Q5: Can I add vegetables to this dish?

A: Absolutely! Feel free to add vegetables like spinach, bell peppers, or broccoli for additional flavor and nutrients.

Q6: What can I do if the noodles are sticky?

A: Stir the pasta frequently while cooking and rinse with cold water after draining to prevent sticking in future recipes.

Q7: Do I have to use butter?

A: While butter enhances flavor, you can use olive oil as a healthier alternative or to suit dairy-free diets.

Q8: Can I make this dish in the oven?

A: Yes, you can bake the chicken and then cook the noodles separately, but adjust cooking times to ensure both are done perfectly.

Q9: How can I make this dish spicier?

A: Add red pepper flakes or cayenne pepper to the noodles for a kick of flavor that complements the savory ingredients.

Q10: Is this dish freezable?

A: Yes, this dish freezes well; however, the texture of the noodles might change. It’s best enjoyed fresh or properly reheated.

Additional Resources

Explore related recipes like One-Pan Lemon Garlic Shrimp or Garlic Butter Pasta for more delightful, easy dinners. Techniques such as knife skills or marinating will refine your cooking approach while enhancing flavor profiles.

For ingredient information, understanding the benefits of fresh herbs or selecting quality chicken can take your dishes to the next level. Check out seasonal variations for fresh ideas, such as adding seasonal vegetables to balance tastes during warmer months or full-flavored add-ins for winter meals.

Join the Conversation

We invite you to share your culinary journey with One-Pan Chicken with Buttered Noodles. Share photos on social media using our hashtag, or leave a comment about your own variations and experiences. Engage with our community to gather inspiration, ask questions, and provide feedback on recipe implementations.

Your input strengthens our connection, allowing us to grow together. Join us as we explore new flavors, share successes, and celebrate our collective love for food.

The Recipe

One-Pan Chicken with Buttered Noodles

Serves: 4 servings

Prep Time: 15 mins

Cook Time: 25 mins

Total Time: 40 mins

Kitchen Equipment Needed

  • Large skillet or frying pan
  • Wooden spoon or spatula
  • Measuring cups and spoons
  • Cutting board and knife

Ingredients

  • 1.5 lbs of chicken breasts, sliced
  • 8 oz egg noodles
  • 4 tablespoons butter
  • 4 cloves garlic, minced
  • 1 cup chicken broth
  • 2 tablespoons parsley, chopped
  • Salt and pepper to taste
  • Optional: grated Parmesan cheese for serving

Directions

  1. In a large skillet, melt 2 tablespoons of butter over medium heat. Add the sliced chicken, seasoning with salt and pepper. Cook until golden brown and fully cooked, about 5-7 minutes. Remove chicken from the skillet and set aside.
  2. In the same skillet, add remaining butter and garlic; sauté until fragrant (about 1 minute). Add chicken broth and bring to a simmer.
  3. Add the egg noodles to the simmering broth. Stir occasionally and cook according to package instructions until al dente, about 8-10 minutes.
  4. Return the cooked chicken to the skillet, mixing everything together. Cook for a couple more minutes to heat through and combine flavors.
  5. Garnish with parsley and serve hot, topped with grated Parmesan if desired.

Recipe Notes

  • Substitute chicken with tofu for a vegetarian alternative.
  • Use whole wheat noodles for a more nutritious option.
  • Add seasonal vegetables like peas or spinach for extra nutrition.

Delicious Crunchy Oreo White Chocolate Cookies Recipe You’ll Love

Crunchy Oreo White Chocolate Cookies: Indulge in a Heavenly Treat

⚖️
Difficulty
Easy

⏲️
Prep Time
15 mins

🕒
Cook Time
12 mins

⏱️
Total Time
27 mins

🍽️
Servings
24 cookies

If you’re on the hunt for a delightful cookie recipe that combines classic flavors with a sweet twist, look no further! Our Crunchy Oreo White Chocolate Cookies are sure to captivate your senses with their rich taste and satisfying texture. Imagine biting into a perfectly baked cookie, crispy on the outside, yet gooey and soft in the center, studded with crunchy Oreo pieces and a creamy white chocolate drizzle. This simple recipe brings the beloved flavors of Oreo cookies to a whole new level of indulgence!

Whether you’re preparing for a family gathering, a coffee break with friends, or simply satisfying your own sweet tooth, these cookies will not disappoint. With each batch, the kitchen fills with an irresistible aroma reminiscent of freshly baked treats. Perfect for dunking in milk or enjoying on their own, these cookies are the ultimate comfort food. So roll up your sleeves and let’s bake these delightful Crunchy Oreo White Chocolate Cookies!

Quick Recipe Highlights

  • Flavor Profile: These cookies offer a mouthwatering blend of chocolatey goodness from Oreos and sweet creaminess from white chocolate.
  • Texture: Enjoy a delightful crunch from the cookies paired with a soft and chewy interior, creating a perfect contrast.
  • Aroma: The warm, sweet scent of vanilla and chocolate wafts through the air, enticing everyone nearby.
  • Visual Appeal: With their striking black and white colors, these cookies are as pleasing to the eye as they are to the palate.
  • Skill Level Needed: An easy recipe perfect for both beginner bakers and seasoned pros looking for a fun treat.
  • Special Equipment: No complicated equipment required—just your trusted baking sheets and mixer.

Recipe Overview

  • Difficulty Level: This recipe is rated easy, making it accessible for bakers of all skill levels. Whether you’re just starting out or looking to share baking experiences with children, this delight is straightforward and enjoyable to make.
  • Category: Perfect as a dessert, snack, or party treat, these cookies fit well in various settings for any time cravings.
  • Cuisine: While these cookies draw inspiration from classic American recipes, they incorporate global flavors through the well-loved Oreo cookie.
  • Cost: Approximately $10-$15 for the whole batch, making it a budget-friendly treat for everyone.
  • Season: Enjoy these cookies year-round; their comforting flavors make them perfect for any season, whether cozying up in winter or having summer picnics.
  • Occasion: Ideal for birthdays, holiday gatherings, or casual get-togethers—these cookies elevate any occasion.

Why You’ll Love This Recipe

The combination of crunchy and chewy will delight your taste buds, making every bite a joyful experience. The richness of white chocolate, complemented by the Oreo cookie flavor, creates an indulgent treat that’s hard to resist. Whether you prefer them crispy or slightly soft, you can easily adjust the baking time to get the desired texture.

In addition to being delicious, these cookies are incredibly easy to prepare. With a prep time of just 15 minutes, you can whip up a batch and have them fresh out of the oven in no time. The minimal ingredients also mean you won’t break the bank on costly items, making this recipe a favorable option for spontaneous baking sessions.

Nutritionally, while these cookies are a treat, they can also be enjoyed in moderation as part of a balanced diet. The combination of Oreos and white chocolate can add a hint of joy without severely jeopardizing your nutritional goals.

Certainly, these cookies are not just for solo enjoyment. They are perfect for sharing at gatherings or parties, allowing you to showcase your baking skills and bring joy to your friends and family. Their attractive presentation and delicious taste make them great conversation starters.

Finally, with the simplicity of the ingredients used, you can always find substitutes based on what’s available in your pantry—ensuring you can whip up a mouthwatering batch whenever the craving strikes!

Historical Background and Cultural Significance

The Oreo cookie was created in 1912 and has since become one of the best-selling cookies in America. Its unique combination of chocolate wafer cookies with a creamy filling has inspired countless recipes, including the beloved Crunchy Oreo White Chocolate Cookies.

In American culture, the Oreo has transcended its role as merely a snack, becoming a symbol of indulgence shared among friends and family. Whether dunked in milk or creatively incorporated into various desserts like our featured recipe, Oreos hold a special place in many hearts.

This cookie recipe has evolved over the years, adapting to modern tastes while preserving the essence of the original Oreo cookie. The addition of white chocolate brings a contemporary twist that enhances the overall flavor and visual appeal.

Regional variations of the Oreo cookie recipe have emerged, each adding local flair—adding a layer of cultural richness to this universally loved treat. From incorporating local ingredients to altering textures, these adaptations celebrate creativity and tradition.

Ingredient Deep Dive

Oreos: These cookies have become a staple in many households, not just as a snack but as a key ingredient in numerous desserts. Rich in flavor, they boast a blend of chocolate and cream that resonates with both children and adults. When selecting Oreos, ensure they are fresh for optimal flavor. Store them in an airtight container to maintain their crunch. You can substitute classic Oreos with other flavors for a unique twist.

White Chocolate: Known for its creaminess and sweetness, white chocolate adds a rich layer to the cookies. Although it lacks cocoa solids, its buttery flavor complements the chocolatey Oreos perfectly. When choosing white chocolate, look for high-quality brands to avoid overly sweet or waxy options. Properly stored white chocolate can last up to a year when kept in a cool, dry place.

Common Mistakes to Avoid

  • Overmixing the dough can lead to tough cookies, so mix just until combined.
  • Not chilling the dough may cause the cookies to spread too much during baking.
  • Using expired baking soda can affect the rise of the cookies.
  • Baking at the wrong temperature can result in uneven cooking—always check your oven settings.
  • Pressing the dough too flat may result in overly crispy cookies instead of chewy ones.
  • Not using parchment paper can cause cookies to stick to the pan.
  • Skipping cooling time can lead to crumbly cookies that fall apart.
  • Using low-quality chocolate can affect the overall taste, so opt for good quality when possible.
  • Not measuring ingredients accurately can throw off the cookie’s texture and flavor balance.
  • Forgetting to preheat the oven can significantly impact baking time and texture.

Essential Techniques

Mixing Ingredients: Achieving the right consistency is essential. Start by creaming together the butter and sugars until light and fluffy, which incorporates air for a lighter cookie. Miss this step, and the cookies may turn out dense and flat.

Chilling the Dough: This crucial step prevents the cookies from spreading too much while baking, preserving the desired shape and texture. Aim for at least 30 minutes in the refrigerator. If time permits, even longer chilling can enhance the flavor as well.

Pro Tips for Perfect Crunchy Oreo White Chocolate Cookies

1. Always use room temperature ingredients for a smooth and consistent dough.

2. For a deeper flavor, add a pinch of sea salt to the dough.

3. Try mixing in chopped nuts for extra crunch and flavor.

4. Adjust the baking time to achieve your desired texture; a shorter bake yields chewier cookies while a longer time makes them crispier.

5. Allow the cookies to rest on the baking tray for a few minutes post-baking to set before transferring them to a cooling rack.

6. Aim for uniform cookie sizes to ensure even baking throughout.

7. Be creative! Incorporate various toppings like sprinkles or flavored chocolate drizzles.

8. Store cookies in an airtight container with a slice of bread to help maintain their softness.

Variations and Adaptations

For those looking to add regional variations, consider using different flavors of Oreos, such as mint or lemon. Seasonal adaptations can include adding pumpkin spice during the fall or crushed peppermint during the winter holidays. Dietary modifications include using gluten-free Oreos and dairy-free chocolate options for those with specific dietary needs. For extra texture, mix in pretzel pieces for a salty-sweet experience or add shredded coconut for an island twist. Experimenting with different drizzles or toppings can also create exciting new presentations.

Serving and Presentation Guide

When plating your cookies, stack them tall for visual drama or arrange them on a decorative platter. Consider dusting them with powdered sugar or drizzling with additional melted white chocolate for a gourmet touch. Pair them with a glass of cold milk or a scoop of ice cream for a delightful dessert experience. For a modern twist, serve alongside fresh berries or a fruit compote, balancing the sweetness nicely.

Wine and Beverage Pairing

To complement the rich flavors of these cookies, consider pairing them with dessert wines like Moscato or port. For non-alcoholic options, a hot cup of chocolate or a classic glass of milk works perfectly. If you enjoy coffee, a smooth espresso can enhance the cookies’ chocolatey flavors beautifully. Make sure to serve beverages at the appropriate temperatures to maximize the experience.

Storage and Shelf Life

Store your cookies in an airtight container at room temperature for up to a week to maintain their freshness. For longer storage, consider freezing them for up to three months. To do this, ensure they are completely cooled, wrap them in plastic wrap, and place in a freezer-safe container. Signs that your cookies may be going bad include changes in texture or an off smell. When ready to eat frozen cookies, simply thaw them at room temperature or pop them in the microwave for a few seconds.

Make Ahead Strategies

These cookies can be prepped ahead of time, allowing for quick baking when the craving strikes. You can prepare the dough and refrigerate it for up to 24 hours or freeze it for up to three months. Just remember to label your dough with the date! For freezing, scoop the cookie dough into balls and freeze them on a baking sheet before transferring to a zip-top bag. When ready to bake, simply add a minute or two to the baking time.

Scaling Instructions

If you want to halve or double the recipe, simply adjust the measurements proportionally. Most of the ingredients will work well in larger or smaller batches, although you may need to tweak baking times depending on the size of your cookies. If you find your dough becoming too soft in larger batches, let it chill in the refrigerator for a bit longer to ease handling.

Nutritional Deep Dive

These cookies offer a satisfying treat, but understanding their nutritional profile ensures you enjoy them responsibly. They predominantly consist of carbohydrates and sugars, providing a quick source of energy. However, they also contain fats from butter and chocolate, which can help keep you full. When considering dietary needs, moderation is key; enjoy a couple of cookies for a treat while balancing them with nutrient-dense foods throughout the day.

Dietary Adaptations

For those seeking gluten-free options, use gluten-free Oreos and flour. If dairy is a concern, opt for dairy-free chocolate and substitutes for butter. Vegan bakers can replace eggs with flaxseed meal or applesauce, achieving similar binding results. Low-carb enthusiasts can utilize keto-friendly cookies or almond flour alternatives to modify the recipe. Always ensure that all substitutes adhere to specific dietary needs for a safe and enjoyable treat.

Troubleshooting Guide

If your cookies turn out too flat, consider checking your baking powder’s freshness or chilling the dough to firm it up. If the cookies are too hard after baking, slightly underbake them next time to ensure a chewy texture. For flavor imbalance, a pinch of salt can elevate sweetness and richness. If baking at high altitudes, increase flour slightly to account for lower air pressure, which can cause cookies to rise quickly and then collapse.

Recipe Success Stories

Many bakers have reported rave reviews for these cookies, with some sharing stories of modifications they made that turned out delightful! Community members love experimenting with different Oreo flavors, leading to unique creations like peppermint or birthday cake versions. Photos shared online show beautiful cookie platters, inspiring others to try their hand at this simple but rewarding baking project. Feedback often highlights the cookies’ flavor profile and how they’ll be requested at future gatherings!

Frequently Asked Questions

Can I use dark chocolate instead of white chocolate? Absolutely! Dark chocolate provides a lovely contrast to the creamy Oreo flavor and can appeal to chocolate lovers.

How long can I store these cookies? These cookies can be stored at room temperature for up to a week or frozen for up to three months.

Can I substitute ingredients? Yes, feel free to experiment with different types of chocolate or even nut alternatives based on your preferences.

Do these cookies require chilling before baking? Chilling the dough is recommended as it helps control the spread during baking, giving you perfectly shaped cookies.

What can I do if my dough is too sticky? If the dough feels overly sticky, adding a bit more flour can help achieve the right consistency.

Are these cookies suitable for parties? Definitely! Their delicious flavor and appealing look make them a great addition to any social gathering.

Can I make these without eggs? Yes, you can replace eggs with a flaxseed mixture or applesauce for a vegan version.

What temperature should I serve these cookies at? These cookies are best served warm, shortly after baking, or at room temperature for enjoyable texture.

Can I add different mix-ins to the dough? Yes, adding nuts, different types of chocolate, or even spices can enhance the flavor profile.

How can I improve the presentation of these cookies? Consider drizzling melted chocolate on top or dusting them with powdered sugar before serving for a refined look!

Additional Resources

If you’re looking to expand your baking repertoire, consider checking out other cookie recipes that offer unique flavors and textures. Pair this recipe with techniques like cookie decoration or advanced baking methods to elevate your skills. For ingredient-specific information and alternatives, explore guides on various types of chocolate, flours, or specialized equipment. Seasonal variations can also inspire you to adapt and enhance your baking experiences!

Join the Conversation

We encourage you to share your cookie creations on social media! Don’t hesitate to tag us in your baking adventures to inspire others or ask questions. Every baking story adds to our community and enhances the joy of baking. Let’s engage with each other by sharing tips, feedback, or variations of this Crunchy Oreo White Chocolate Cookies recipe!

The Recipe

Crunchy Oreo White Chocolate Cookies

Serves: 24 cookies

Prep Time: 15 mins

Cook Time: 12 mins

Total Time: 27 mins

Kitchen Equipment Needed

  • Baking sheet
  • Parchment paper
  • Mixer
  • Mixing bowl
  • Measuring cups and spoons
  • Cooling rack

Ingredients

  • 1 cup unsalted butter, softened
  • 3/4 cup granulated sugar
  • 3/4 cup packed brown sugar
  • 2 large eggs
  • 1 teaspoon vanilla extract
  • 2 1/4 cups all-purpose flour
  • 1 teaspoon baking soda
  • 1/2 teaspoon salt
  • 1 cup crushed Oreo cookies
  • 1 cup white chocolate chips

Directions

  1. Preheat your oven to 350°F (175°C) and line a baking sheet with parchment paper.
  2. In a mixing bowl, cream together the softened butter, granulated sugar, and brown sugar until smooth and fluffy.
  3. Add in the eggs one at a time, incorporating them fully before adding the next. Stir in the vanilla extract.
  4. In another bowl, whisk together the flour, baking soda, and salt.
  5. Gradually add the dry ingredients to the wet mixture, mixing just until combined.
  6. Fold in the crushed Oreos and white chocolate chips gently.
  7. Drop rounded tablespoons of dough onto the prepared baking sheet, spacing them about 2 inches apart.
  8. Bake for 10-12 minutes, or until the edges are lightly golden. The centers may look slightly underbaked but will firm up as they cool.
  9. Remove from the oven and let cool on the baking sheet for about 5 minutes before transferring to a cooling rack.

Recipe Notes

  • Feel free to replace the white chocolate with dark or milk chocolate for a different flavor.
  • You can add a pinch of sea salt on top before baking for a delightful sweet-salty contrast.
  • For a fun twist, consider adding some mini marshmallows or nuts into the mix.

Delicious Creamy Spinach and Mushroom Lasagna Recipe to Try

Creamy Spinach & Mushroom Lasagna: A Comforting Culinary Delight

⚖️
Difficulty
Medium

⏲️
Prep Time
30 mins

🕒
Cook Time
45 mins

⏱️
Total Time
75 mins

🍽️
Servings
6

Lasagna is a timeless classic that brings comfort and warmth to any dinner table, and this Creamy Spinach & Mushroom Lasagna is no exception. Layers of tender pasta sheets are enveloped in a rich, creamy sauce enriched with fresh spinach and earthy mushrooms, which create a symphony of flavors that will please every palate. This recipe is perfect for both cozy family dinners and elegant gatherings.

What sets this lasagna apart is the delightful combination of textures and flavors. The velvety sauce contrasts with the slight chew of the pasta, while the sautéed mushrooms offer a hearty mouthfeel, complementing the vibrant, tender spinach. As it bakes, the cheese transforms into a golden, bubbling crust, inviting everyone to dive in for a serving. Ideal for vegetarians and meat-lovers alike, it provides an excellent way to enjoy the nutritious benefits of greens without compromising on taste.

Quick Recipe Highlights

  • Flavor Profile: This lasagna features a harmonious balance of creamy, savory, and earthy flavors from the mushrooms and cheese, lifted by the freshness of spinach.
  • Texture: The creamy sauce, soft pasta, and tender mushrooms create a comforting mouthfeel, while the cheese topping adds a delightful creaminess.
  • Aroma: The tantalizing aroma of garlic, sautéed mushrooms, and freshly baked cheese fills the kitchen, making it hard to resist taking a spoonful right out of the oven.
  • Visual Appeal: The vibrant green spinach against the creamy sauce and golden-brown cheese creates a beautifully layered dish that is as eye-catching as it is delicious.
  • Skill Level Needed: Medium; the steps involve layering and a bit of sautéing, making it accessible for home cooks who enjoy a moderate challenge.
  • Special Equipment: A deep 9×13-inch baking dish and a sauté pan are essential, alongside basic kitchen tools for assembling the lasagna.

Recipe Overview

  • Difficulty Level: This recipe falls under the medium category due to its layering techniques and requires some sautéing. However, the steps are straightforward, making it attainable for most home cooks.
  • Category: This creamy spinache & mushroom lasagna serves as a fantastic main dish at dinner, perfect for family meals, potlucks, or special occasions.
  • Cuisine: Drawing influence from classic Italian cuisine, lasagna has evolved globally, with this variant featuring prominent vegetarian ingredients popular in many Mediterranean diets.
  • Cost: Ingredients like spinach, mushrooms, and pasta are generally budget-friendly, making this dish accessible without sacrificing flavor or quality.
  • Season: This lasagna is perfect for any season, showcasing fresh ingredients in spring and summer while providing hearty comfort in fall and winter.
  • Occasion: Ideal for both casual weeknight dinners and festive gatherings, this recipe brings people together around the dinner table.

Why You’ll Love This Recipe

When it comes to taste and texture, this Creamy Spinach & Mushroom Lasagna will have you coming back for seconds. The creamy white sauce made from ricotta and bechamel hit with a blend of spices complements the savory mushrooms perfectly. Each bite is a luscious experience, and the leafy spinach brightens the dish with its fresh flavor and vibrant color.

Convenience is another reason to adore this lasagna. It can be prepared in advance, making it an excellent option for busy weeknights or gatherings. Simply assemble it a day before, pop it in the refrigerator, and bake it just in time for mealtime. This flexibility allows you to enjoy time with loved ones without stress.

The nutritional advantages of this dish cannot be overlooked. Packed with spinach, an excellent source of vitamins A and C, iron, and dietary fiber, this dish is not only filling but also contributes to a balanced diet. Coupled with the protein from the cheeses, this decadent meal supports your health and well-being.

Socially, a pan of Creamy Spinach & Mushroom Lasagna serves as an inviting centerpiece for gatherings. Serve it at dinner parties, family reunions, or holiday celebrations, and watch as it garners everyone’s attention and praise. It’s a dish that transcends cultures and unites people over a shared love of good food.

Finally, the cost-effectiveness of this recipe makes it accessible without breaking the bank. Ingredients like lasagna noodles, spinach, and herbs are affordable, allowing you to serve a hearty, satisfying meal to a large group, proving that great taste and nutrition don’t have to come with a hefty price tag.

Historical Background and Cultural Significance

Lasagna has roots in Ancient Greece and Rome, where flat sheets of pasta were first used in various dishes. As time passed and cultures merged, Italian chefs refined the concept into the layered dish we know today. Its historical significance showcases how simple ingredients can evolve into culinary delights over the centuries.

In Italian culture, lasagna is more than just a meal; it represents family gatherings and home-cooked comfort. Traditionally made with rich meats and cheeses, the dish has undergone modifications to cater to changing dietary preferences. The Creamy Spinach & Mushroom variant emphasizes plant-based ingredients while still delivering on indulgence and flavor.

The evolving nature of lasagna shows its versatility. In the modern age, adaptations have emerged, embracing vegetarian and health-conscious preferences, allowing cooks to reinterpret traditional recipes. As more people embrace alternative diets, versions like this one have become increasingly popular, showcasing a balance of tradition and innovation.

Regional variations also play a significant role in the cultural significance of lasagna. From the Bolognese forking its roots deep into Italian heritage to Eastern European layers, the dish adapts ingredients based on local produce and tastes, demonstrating its universal appeal across different cultures.

Ingredient Deep Dive

For this Creamy Spinach & Mushroom Lasagna, the hero ingredients are spinach, mushrooms, and pasta.

Spinach has been a staple in many kitchens worldwide. Its rich iron content and various vitamins contribute significantly to the overall health benefits of this dish. When selecting spinach, look for vibrant, fresh greens without any wilting or discoloration. Store it in the fridge wrapped in a damp paper towel to maintain its crispness. For substitutions, frozen spinach can work well, but be sure to drain it thoroughly to avoid excess moisture.

Mushrooms introduce earthy flavors and a meaty texture into the dish. Varieties such as cremini, shiitake, or button mushrooms can provide unique tastes while enriching your lasagna. Opt for firm, dry mushrooms free from blemishes or spots. Keep them in a paper bag in the fridge for the best preservation. If you’re looking to swap out mushrooms, consider eggplant or zucchini for an equally satisfying texture.

Lasagna noodles are the backbone of this dish, adding structure and stability. Choose between traditional wheat-based or gluten-free varieties based on dietary needs. Fresh noodles can enhance the meal’s flavor, while dried ones offer greater convenience and shelf life. When cooking, ensure they’re al dente so they absorb flavors while maintaining some bite.

Common Mistakes to Avoid

  • Not salting the pasta water can lead to bland noodles that don’t enhance the overall flavor of the lasagna.
  • Using excessive sauce can make the lasagna too watery; stick to recommended measurements to keep the layers intact.
  • Not allowing the lasagna to rest after baking can cause it to fall apart when sliced; letting it sit helps the layers set.
  • Skipping the sautéing step for mushrooms may result in a rubbery texture; always cook them to release their moisture and deepen their flavor.
  • Overloading layers with too many ingredients can lead to an uneven bake; keep a balanced ratio of ingredients for optimal results.
  • Using expired or old cheese can spoil the flavor; always check the freshness of dairy products before use.
  • Not preheating the oven can prevent the cheese from achieving that perfect golden brown crust; always ensure the oven is hot before baking.
  • Substituting ricotta with cottage cheese without adjusting the texture can lead to a strange consistency; consider blending for creaminess.
  • Ignoring the importance of fresh herbs can dull the flavor; always opt for fresh over dried for maximum impact.
  • Overcooking the lasagna can leave it dry; monitor cooking time closely for the best outcome.

Essential Techniques

Mastering the layering technique is crucial for this recipe. Proper layering ensures that each bite offers the perfect combination of flavors. Use a spoon to spread the sauce evenly, allowing the flavors to meld beautifully throughout the layers. Avoid overloading each layer to maintain a clean presentation.

Sautéing vegetables, particularly mushrooms, is another essential skill. This method draws out their moisture, enhancing the flavor while preventing a soggy lasagna. Aim for a golden brown color when cooking, and always keep the heat on medium-high to achieve that lovely caramelization.

Making a smooth béchamel sauce is vital for creamy texture. Gradually whisk flour and milk together over low heat, avoiding lumps. Don’t rush the process; patience is key to achieving the silky consistency this dish requires.

Pro Tips for Perfect Creamy Spinach & Mushroom Lasagna

– Use a mixture of cheeses like mozzarella, ricotta, and parmesan to create a depth of flavor and oozy texture.
– For added depth, consider sautéing garlic with mushrooms for an aromatic base that enhances the entire dish.
– Layer with fresh herbs like basil or thyme for an extra flavor boost that brightens the creamy sauce.
– Let the dish rest after baking to allow the flavors to settle and the lasagna to firm up for easy slicing.
– Experiment with different mushrooms, such as portobello or chanterelles, for varied taste experiences.
– If you prefer a spicier kick, add red pepper flakes to the vegetable mixture for a flavorful heat contrast.
– For a gluten-free option, alternate layers of zucchini slices or gluten-free noodles to keep the lasagna intact.
– Always cover the dish with foil when baking to keep it moist, removing it in the last 10-15 minutes for browning.

Variations and Adaptations

For regional variations, consider adding Italian sausage or other proteins for a meaty twist on this vegetarian classic. Seasonal adaptations could include butternut squash or roasted zucchini in place of spinach, capturing the essence of fall with hearty winter vegetables.

For those with dietary needs, this recipe is easily modified for gluten-free or dairy-free diets. Use gluten-free noodles or thinly sliced vegetables in place of pasta, and substitute traditional dairy with plant-based alternatives like cashew cheese or nutritional yeast.

Flavor variations can be introduced with spices like nutmeg or smoked paprika, enhancing the richness of the dish. Additionally, for a unique presentation, consider creating individual lasagnas in ramekins for guests to enjoy their personal serving.

Serving and Presentation Guide

When it comes to plating, ensure you slice the lasagna with a sharp knife and serve it on warm plates to maintain a delightful temperature. For garnishing, a sprinkle of freshly chopped basil or parsley adds a vibrant touch and freshness. Consider pairing it with a crisp salad for contrast and color.

Traditional accompaniments include garlic bread or a light tomato sauce drizzle on the plate. Modern serving suggestions may feature pairing with roasted vegetables or a glass of red wine for a complete dining experience.

Temperature considerations are essential; serve the lasagna hot but not scalding, allowing for a few moments of rest before slicing. For portion control, use a measuring cup or scoop to ensure each guest receives a fair serving.

Wine and Beverage Pairing

While this creamy dish pairs beautifully with a light, crisp white wine, consider a Chardonnay or Sauvignon Blanc for rich notes that complement the cheese. For red wine enthusiasts, a light-bodied Pinot Noir provides a nice balance with its natural acidity and fruit flavors.

If you’re looking for non-alcoholic options, consider sparkling water infused with lemon or herbs, offering a refreshing contrast to the richness of the lasagna. For coffee lovers, a mild roast complements the savory flavors wonderfully, serving as a delightful endnote to the meal.

Temperature is key for wine; serve whites slightly chilled and reds at room temperature for the best flavor profiles to shine through. Always consider the personal preferences of your guests when choosing beverage pairings to ensure everyone enjoys their dining experience.

Storage and Shelf Life

To store your lasagna, keep it in an airtight container in the refrigerator where it can last for three to five days. If you want to extend freshness, consider freezing individual portions wrapped securely in plastic wrap and aluminum foil for up to three months.

When it comes to signs of spoilage, look out for off-smells, discoloration, or unusual textures. Reheating should be done gently in an oven or microwave, ensuring it’s heated all the way through. For best results, thaw frozen portions overnight in the refrigerator before reheating.

When reheating lasagna, aim for an internal temperature of 165°F to ensure safe consumption. This ensures melted cheese and a hot filling, providing the comfort you initially enjoyed.

Make Ahead Strategies

To save time, consider prepping your ingredients a day before. Sauté mushrooms and spinach, and prepare the sauce ahead, letting the flavors develop overnight. Assemble the lasagna in the dish and refrigerate, ready to pop in the oven when needed.

When storing between steps, ensure that all components are tightly covered to prevent drying out. The quality of your layers will remain intact with proper storage techniques. Take care to keep components separate until ready to layer for optimal texture.

Reheating guidelines suggest slow warming in the oven for larger portions while being cautious not to overcook. Incorporating fresh ingredients like herbs or a sprinkle of cheese when baking will enhance freshness and flavor.

Scaling Instructions

If you want to halve this recipe, simply divide the ingredient quantities by two and use a smaller baking dish. Timing adjustments may involve reducing the cooking time slightly to ensure layers don’t dry out.

For doubling or tripling, you may need to adjust cooking time as larger lasagnas often take longer due to thickness. When baking, monitor the layers closely to ensure the cheese doesn’t overbake while achieving a golden crust.

For equipment adjustments, using multiple baking dishes can simplify serving larger gatherings. Consider space within your oven; larger trays can shift during cooking, ensuring an even bake.

Finally, remember that the storage for larger versions may also require more space in the refrigerator or freezer, so take that into account when scaling up your cooking.

Nutritional Deep Dive

The macro breakdown for this lasagna reveals a hearty serving of carbohydrates from pasta, proteins from cheese, and dietary fiber from spinach. The balanced mix ensures this dish supports energy needs while delivering wholesome nutrients.

Micronutrient analysis shows that spinach contributes iron and vitamins critical for health, while dairy provides calcium and phosphorus, essential for bone health. The dish is well-rounded, making it a satisfying choice for vegetarians and health-conscious eaters alike.

Considering dietary benefits, the presence of fiber assists digestion and promotes satiety. When enjoying lasagna as a hearty main dish, portion management becomes crucial; ensure servings are balanced for a nutritious meal.

Weight management tips suggest enjoying this lasagna mindfully, savoring each bite while pairing it with lighter sides like salads to enhance vegetable intake and reduce caloric load.

Dietary Adaptations

For gluten-free versions, replace traditional lasagna noodles with zucchini sheets or gluten-free alternatives, ensuring that the texture remains satisfying. For those with a dairy sensitivity, using cashew or almond-based cheeses provides a creamy quality while avoiding lactose.

A vegan adaptation can easily be achieved by swapping cheese with tofu ricotta, using nutritional yeast for added flavor, and ensuring pasta selections are egg-free. Experimenting with whole grain or lentil pasta adds nutritional value and a delightful twist.

For low-carb diets, focus on utilizing thinly sliced vegetables such as eggplant or squash in lieu of traditional pasta, while still retaining delicious layers of creamy filling.

Keto and paleo adaptations can emphasize the use of nut flours and healthy fats, ensuring flavor richness remains the priority while adhering to specific dietary restrictions.

Troubleshooting Guide

If your lasagna results in a soupy texture, it may be due to over-saucing or insufficient cooking time. Always allow the mixture to cool and set before serving. Consider adding breadcrumbs for thicker layers.

For flavor imbalances, taste the sauce before assembly to ensure seasoning is adequate. A pinch of salt or fresh herbs can dramatically uplift the overall taste.

Should any ingredient substitutions yield unexpected results, take note of moisture levels from fresh produce and adjust baking times accordingly to avoid sogginess.

If the top doesn’t develop that coveted golden crust, broil for a few minutes at the end of baking while tracking closely to prevent burning.

For timing concerns, check the layers often during cooking; every oven varies, and adjusting accordingly is vital for success.

Recipe Success Stories

Community feedback on this Creamy Spinach & Mushroom Lasagna has shown a diverse range of adaptations, highlighting how each cook brings their personality to the dish. Many have shared their unique ingredient twists, celebrating the creativity that variations inspire.

Successes have come from those experimenting with seasonal vegetables, discovering how adding fresh peppers or tomatoes enhances the lasagna’s flavor profile while staying true to the essence of the dish.

Photographic memories of beautifully layered lasagna adorn social pages, capturing the hearts of food lovers and encouraging others to give it a try. Reader suggestions often include serving ideas, from pairing with zesty salads to complementing the rich cheese layers.

Adaptation stories reveal how this recipe unites families, with grandchildren and grandparents recreating the comforting flavors of home together; each generation adding their personal touch.

Frequently Asked Questions

Can I freeze this lasagna?

Yes! This lasagna freezes nicely. Just wrap it tightly in plastic wrap and foil before placing it in the freezer. It can last up to three months. When ready to eat, allow it to thaw in the refrigerator overnight before reheating.

How do I prevent my lasagna from being watery?

To prevent a watery lasagna, ensure that you sauté the mushrooms to release their moisture beforehand. Additionally, use a well-cooked sauce and avoid over-saucing during assembly.

Can I make this ahead of time?

Certainly! You can assemble this lasagna a day in advance and store it in the refrigerator until you’re ready to bake. Just add an extra 10–15 minutes to the baking time if cooking from cold.

What can I use instead of ricotta cheese?

For a substitute, try blending cottage cheese with a little lemon juice for a similar consistency. Tofu blended with nutritional yeast also works well for a dairy-free version.

What are the best mushrooms to use?

While any mushrooms will work, cremini and shiitake add excellent depth of flavor. Button mushrooms are the most common and reliable option if you’re looking for something mild.

How can I add more protein to this dish?

Add cooked ground meat like beef, sausage, or turkey to the filling for added protein. Alternatively, you can include cooked lentils or beans for a vegetarian option.

Can I use no-boil lasagna noodles?

Absolutely! If using no-boil noodles, ensure your sauce is more liquidy to ensure the noodles cook thoroughly during baking.

What’s the best way to store leftover lasagna?

Keep any leftovers in an airtight container in the fridge. It will typically last 3–5 days. For longer storage, freeze individual portions.

How do I know when lasagna is done?

Your lasagna will be ready when it’s bubbly and the cheese is nicely browned on top. It should also be hot throughout when tested with a knife.

Can I use fresh spinach?

Yes! Fresh spinach can be used in this recipe to enhance flavor and nutrition. Just sauté it quickly before layering to reduce excess moisture.

What can I serve with lasagna?

Garlic bread, a light salad, or roasted vegetables make excellent accompaniments to balance out the richness of the lasagna.

Additional Resources

For those looking to explore more related recipes, check out other comforting pasta dishes like Mushroom Fettuccine Alfredo or Classic Baked Ziti. If you’re interested in mastering new techniques, look for guides on making homemade pasta or béchamel sauce.

Inquire deeper into ingredient information to understand the nutritional values of spinach and cheese, and explore equipment recommendations if you’re looking for the best tools to tackle lasagna making and other baked dishes.

Consider looking into seasonal variations by seeking out fresh vegetables during farmer’s markets or local co-ops to inspire your next lasagna adventure.

Join the Conversation

We love to see how you make this Creamy Spinach & Mushroom Lasagna your own! Share your photographs on social media, tagging our platform to engage with fellow food enthusiasts. Feel free to leave a review or comment with your adaptations and feedback—your experience can help inspire others!

Engaging with the community allows everyone to benefit from shared insights, as well as endorse new recipe variations that become family favorites. Your contributions make this culinary journey more enriching for everyone involved.

The Recipe

Creamy Spinach & Mushroom Lasagna

Serves: 6

Prep Time: 30 mins

Cook Time: 45 mins

Total Time: 75 mins

Kitchen Equipment Needed

  • 9×13-inch baking dish
  • Sauté pan
  • Mixing bowls
  • Spatula
  • Whisk
  • Measuring cups and spoons

Ingredients

  • 12 lasagna noodles
  • 2 cups ricotta cheese
  • 3 cups fresh spinach
  • 1 pound mushrooms, sliced
  • 4 cups mozzarella cheese, shredded
  • 1 cup parmesan cheese, grated
  • 2 tablespoons olive oil
  • 4 cloves garlic, minced
  • 3 cups béchamel sauce (see notes)
  • Salt and pepper to taste

Directions

  1. Preheat the oven to 375°F (190°C).
  2. In a sauté pan, heat olive oil over medium heat and add garlic. Sauté until fragrant.
  3. Add sliced mushrooms and cook until golden. Mix in spinach and cook just until wilted. Season with salt and pepper.
  4. In a baking dish, spread a thin layer of béchamel sauce on the bottom.
  5. Layer 3 noodles over the sauce, followed by one-third of the ricotta mixture, one-third of the mushroom-spinach mix, and a layer of mozzarella.
  6. Repeat the layering process twice more, finishing with noodles, béchamel, and a generous layer of mozzarella cheese.
  7. Cover the dish with foil and bake for 30 minutes. Remove foil and bake for an additional 15–20 minutes, or until the cheese is golden and bubbly.
  8. Allow the lasagna to rest for 10 minutes before slicing and serving.

Recipe Notes

  • Feel free to substitute any noodles for gluten-free options.
  • You can prepare the béchamel sauce ahead of time and keep it refrigerated.
  • Make sure to drain excess moisture from vegetables to avoid a soupy lasagna.
  • Customize with your favorite herbs such as thyme or basil for added flavor.

Indulge in Succulent Lobster Tails with Garlic Lemon Butter

Lobster Tails with Garlic Lemon Butter: A Luxurious Seafood Delight

⚖️
Difficulty
Medium

⏲️
Prep Time
15 mins

🕒
Cook Time
20 mins

⏱️
Total Time
35 mins

🍽️
Servings
4

Lobster tails with garlic lemon butter is an upscale seafood dish that’s perfect for a special occasion or luxurious weekend treat. The sweet, succulent meat of the lobster pairs beautifully with the rich, tangy garlic lemon butter, creating a mouthwatering experience that is both satisfying and indulgent. Imagine buttery pieces of lobster tail coated in a luscious, aromatic sauce that will have your taste buds dancing with delight.

Whether you’re preparing a romantic dinner or celebrating a milestone, this lobster tail recipe is sure to impress. Each bite is a remarkable fusion of flavors and textures, featuring the tender, juicy lobster meat enveloped in a decadent sauce that highlights the natural sweetness of seafood. Don’t be surprised if this dish becomes a staple in your culinary repertoire.

Quick Recipe Highlights

  • Flavor Profile: The combination of garlic and lemon creates a tangy, buttery sauce that enhances the naturally sweet flavor of the lobster.
  • Texture: The lobster meat is tender and juicy, contrasting perfectly with the creamy richness of the butter sauce.
  • Aroma: The fragrant notes of fresh garlic and zesty lemon fill the kitchen, making it hard to resist the final dish.
  • Visual Appeal: Bright yellow lemon zest sprinkled atop the glistening lobster tails creates an enticing presentation.
  • Skill Level Needed: This recipe requires a basic understanding of seafood cooking, but is accessible enough for home cooks looking to elevate their skills.
  • Special Equipment: You will need a good pair of kitchen scissors for easy lobster tail preparation and a basting brush for applying the garlic lemon butter.

Recipe Overview

  • Difficulty Level: This medium-difficulty recipe requires some handling of seafood and precision in cooking time to achieve perfectly tender lobster tails without overcooking.
  • Category: Ideal for dinner, this recipe serves as a luxurious main course that pairs wonderfully with sides like garlic bread or a fresh salad.
  • Cuisine: Influenced by coastal culinary traditions, this dish embodies the simplicity and elegance of seafood cooking prevalent in seaside towns.
  • Cost: Although lobster can be on the pricier side, this dish highlights premium ingredients that deliver an impressive culinary experience for special occasions.
  • Season: Lobster is best during its peak seasons in late spring to early fall, making it a perfect dish for summer celebrations.
  • Occasion: Elegant enough for anniversaries, holiday feasts, or special gatherings, this dish will undoubtedly elevate any dining experience.

Why You’ll Love This Recipe

Indulging in lobster tails with garlic lemon butter is a fantastic way to enjoy a taste of luxury at home. The flavor and texture deliver a delightful combination that captivates the palate and satisfies the senses. You’ll love the simplicity of preparing a dish that feels like fine dining without needing to leave the comfort of your home.

Convenience is another reason to love this recipe. Though it may seem fancy, the preparation process is surprisingly straightforward. You can easily impress guests or loved ones with minimal effort, allowing you to spend more time enjoying their company. Additionally, the nutritional benefits of this seafood dish make it an appealing choice for health-conscious diners.

This recipe shines when entertaining, as the gorgeous presentation of lobster tails creates an inviting atmosphere at the dinner table. Serving such an impressive meal encourages conversations around food and enhances the overall dining experience. Plus, with a bit of planning, any hurdles related to preparation time and costs can be well-managed.

Considering the cost, this recipe allows you to indulge in gourmet flavors at a fraction of the price of dining out. When you cook lobster tails at home, you’re not just saving money; you’re also gaining access to high-quality ingredients you can trust. Enjoying this dish, together with its rich history and culinary significance, reinforces its value as a must-try for aspiring home chefs.

Historical Background and Cultural Significance

Lobster has a rich and storied history that extends back to indigenous tribes who enjoyed the crustaceans long before European settlers arrived in North America. Once regarded as a food of the poor, lobsters gained favor among the wealthy, transforming into a delicacy. Today, this luxurious seafood transcends boundaries, celebrated in various culinary traditions worldwide.

In the realm of seafood dishes, garlic lemon butter plays a significant role in elevating the flavors of many preparations, particularly for lobster. This classic sauce has roots in Mediterranean cuisines, showcasing the brilliance of simple ingredients such as garlic, butter, and citrus. Chefs have long embraced this combination, ensuring its prominence on dinner tables of all backgrounds.

As cuisines evolve, so too have traditional recipes like lobster tails with garlic lemon butter. Regional variations abound, from spicy Sriracha-infused butter in some coastal areas to more exotic presentations that highlight additional ingredients such as herbs or spices. Each version reflects local tastes while maintaining the foundation of this delightful dish.

The cultural significance of enjoying lobster tails extends beyond mere sustenance; they represent celebration, luxury, and shared experiences around the dinner table. This dish epitomizes the essence of culinary enjoyment—creating special moments with family and friends through delicious food.

Ingredient Deep Dive

Lobster: As the star of this dish, lobster originates from coastal waters worldwide. Beyond being a delicacy, it’s rich in protein and omega-3 fatty acids, providing nutritional benefits like heart health and anti-inflammatory properties. When selecting lobster tails, look for bright, firm shells and a fresh sea scent. Store them in the refrigerator and consume within 1-2 days for optimal freshness or freeze for longer storage.

Butter: A critical component in creating the rich sauce, butter adds a luxurious mouthfeel and depth of flavor. Opt for unsalted butter to better control salt levels in the dish. butter offers high levels of vitamins A and D while boosting the overall flavor of the dish. When cooking, melt it gently to prevent burning and ensure a smooth, creamy sauce.

Garlic: Garlic is celebrated for its distinct aroma and flavor, contributing essential compounds that promote heart health and immunity. Fresh garlic is ideal for its pungent taste, peeled and chopped just before use for maximum flavor. Store garlic bulbs in a cool, dry place, and feel free to experiment with garlic powder or roasted garlic for different flavor profiles.

Lemon: This zesty fruit brings brightness and acidity that balance the richness of the lobster and butter, enhancing the overall flavor profile. Fresh lemons are best, with their juice and zest used to create a vibrant sauce. Lemons are loaded with vitamin C, contributing to a healthy diet. Store lemons in the refrigerator for longer shelf life or at room temperature for immediate use.

Common Mistakes to Avoid

  • Overcooking the Lobster: This can result in tough, rubbery meat. Always check for a minimum internal temperature of 145°F (63°C) and monitor closely as lobster cooks quickly.
  • Ignoring Quality: Opt for fresh, high-quality lobster for the best flavor and texture. Avoid frozen lobster that’s been improperly stored, as this can affect taste.
  • Underseasoning: Don’t skimp on seasoning throughout the cooking process. Properly seasoning each component enhances overall flavor, so taste and adjust as necessary.
  • Skimping on Butter: A good sauce requires ample butter for richness. Make sure to use enough to coat the lobster adequately without it becoming too oily.
  • Not Using Fresh Ingredients: Fresh garlic and lemon make a substantial difference. Avoid using stale or processed alternatives to maintain flavor integrity.
  • Rushing the Saucing Process: Allow the garlic to cook gently in the butter before adding lemon to prevent bitterness. Proper timing is crucial to achieve the right flavors.
  • Skipping the Temperature Check: Always use a meat thermometer to measure the internal temperature of your lobster for perfectly cooked results.
  • Neglecting Presentation: Beautifully plated dishes enhance the dining experience; take time to arrange your lobster attractively and consider garnishing with fresh herbs.

Essential Techniques

Mastering the art of cooking lobster tails requires understanding certain techniques that will enhance the dish’s outcome. First, know how to properly split and prepare lobster tails. Using kitchen shears, slice through the top shell, taking care not to cut the meat. This allows for easier cooking and an impressive presentation.

Next, mastering the garlic butter sauce is crucial. Begin by melting the butter slowly over low heat before adding minced garlic. This technique ensures the garlic becomes aromatic without burning; remember to monitor closely for visual cues like a light golden color.

Lastly, practice your timing for cooking lobster tails. Using a reliable timer, you can ensure that the tails reach their ideal doneness without overcooking. Factors like size and weight can influence cooking time, so get comfortable adjusting on the fly based on what you observe.

Pro Tips for Perfect Lobster Tails with Garlic Lemon Butter

Utilize high-quality lobster for a sweet, tender result. Always check for freshness when purchasing to ensure the best flavor.
– Baste the lobster tails with garlic lemon butter throughout the cooking process to lock in flavor and moisture.
– If using frozen lobster, thaw it in the refrigerator for 24 hours prior to cooking for optimal results.
– Experiment with different herbs like parsley or dill in the butter for added flavor complexity.
– Squeeze fresh lemon juice over the cooked tail just before serving to brighten the flavors.
– Garnish with fresh herbs to enhance the aesthetics of your dish and impart additional flavor.
– Serve the dish with crusty bread to soak up the extra garlic butter sauce.
– Make sure to have a meat thermometer on hand to check for doneness accurately.

Variations and Adaptations

This recipe offers a canvas for creativity, accommodating various tastes and occasions. For a regional twist, try incorporating spicy Cajun seasoning into your garlic butter for a distinctly Southern flair. Alternatively, a sprinkle of Old Bay seasoning provides a classic Mid-Atlantic touch.

Seasonal adaptations can be made by incorporating herbs, such as fresh chives or basil, into the butter mix for a refreshing summer taste. For those with dietary restrictions, consider a dairy-free alternative by substituting butter with olive oil or a vegan butter option while modifying the cooking process slightly.

Explore flavor variations by adding a hint of heat through red pepper flakes or swapping lemon for lime for a zesty twist. Presentation alternatives can also elevate the dish; consider serving on a bed of sautéed vegetables for vibrant color and added nutrition.

Serving and Presentation Guide

The presentation of lobster tails should be as impressive as their taste. Start by securing each lobster tail on a plate, cut side up, to showcase the bright, tender meat. Drizzle the rich garlic lemon butter generously over the tails for an eye-catching appearance.

Garnish with chopped fresh herbs like parsley or chives to add a pop of color. Citrus slices can also be arranged around the plate to enhance visual appeal and provide extra zing. Serve your dish alongside crusty bread, allowing your guests to soak up any leftover sauce.

Temperature plays a crucial role in the dining experience; aim for serving immediately after cooking while the tails are still warm. Portion control is vital; ensure each plate contains a suitable amount based on your overall menu and guest capacity.

Wine and Beverage Pairing

When pairing wine with lobster tails, a crisp white wine is often your best bet. A classic choice is a Chardonnay, which complements the buttery richness of the dish beautifully. Alternatively, a Sauvignon Blanc provides a refreshing acidity that balances the flavors.

For non-alcoholic options, a zesty sparkling water with lime can cleanse the palate and enhance the seafood experience. If coffee or tea is preferred, a light herbal tea with lemon can provide an elegant finish to your meal, harmonizing well with the citrus notes of the dish.

Always consider the serving temperature of your beverage; chilled wines and sparkling drinks are ideal for seafood, enhancing the overall dining experience.

Storage and Shelf Life

To store leftover lobster tails, keep them in an airtight container in the refrigerator, where they will last up to 2-3 days. Ensure they are cooled to room temperature before sealing to prevent moisture buildup that can lead to spoilage.

For longer storage, you can freeze cooked lobster tails. Wrap them tightly in plastic wrap and then place them in a freezer-safe bag. When reheating, avoid the microwave as it tends to overcook the meat; instead, use a gentle reheating method in the oven at a low temperature.

Signs of spoilage include a change in color or an off-putting odor. When reheating, aim for an internal temperature of 145°F (63°C) to ensure the meat is safely warmed.

Make Ahead Strategies

One of the advantages of lobster tails with garlic lemon butter is the ability to prepare certain elements in advance. You can make the garlic lemon butter ahead of time; simply store it in the refrigerator and warm it just before serving.

The lobster tails can be prepped by splitting the shell and deveining them, then stored in the refrigerator until you’re ready to cook. This way, the assembly is easy and quick, particularly if you have guests arriving.

For optimal quality, consume lobster within a day of preparation if stored in the fridge. Include fresh herbs just before serving for enhanced flavor and freshness, ensuring the dish always tastes vibrant.

Scaling Instructions

When scaling your recipe, consider the size of your lobster tails for proper cooking time. If halving the recipe, decrease the number of lobsters accordingly and adjust butter, garlic, and lemon quantities to suit.

For doubling or tripling, ensure your cooking vessel can accommodate the larger quantity without overcrowding, as this affects even cooking. Timing may need adjustment; keep a close watch on the internal temperature for the best results.

Also remember to consider storage for any leftovers, scaling up can lead to a more significant amount than originally planned. Ensure you have enough container space for both cooked and uncooked components.

Nutritional Deep Dive

Each serving of lobster tails with garlic lemon butter is a nutritious choice, rich in protein and low in carbohydrates. With approximately 27 grams of protein per serving, it serves as a filling option that supports muscle health and provides energy.

When examining micronutrients, lobster is a great source of vitamins and minerals, including vitamin B12, zinc, and selenium, all of which contribute to essential bodily functions and overall well-being.

Keep portion sizes in mind for managing overall calorie intake. Pairing the dish with salads or vegetables can create a balanced meal, enhancing its health benefits without overwhelming calorie counts.

Dietary Adaptations

For those following a gluten-free lifestyle, this recipe is naturally gluten-free, making it a safe and delicious option. Simply ensure all added ingredients, such as sauces or seasonings, align with gluten-free standards.

Dairy-free cooks can modify the recipe by substituting butter with olive oil or a plant-based butter alternative, providing similar flavor profiles while meeting dietary needs.

Variations for the keto and paleo diets can easily be achieved by maintaining focus on the high-protein aspects of the dish while using low-carb vegetables as accompaniments. With such adaptations, you can share the joy of this recipe while respecting dietary restrictions.

Troubleshooting Guide

Lobster texture can become tough if overcooked; aim for a firm yet gentle touch when testing for doneness. If the flavor is lacking, ensure you’re seasoning liberally at each stage of cooking to build flavor depth.

When experiencing temperature issues, keep a reliable meat thermometer handy to avoid cooking mishaps. Adjust for shell size and use visual cues to check the meat’s internal temperature.

If you face equipment challenges, a traditional oven works well if your grill fails; just adjust for different cooking times. When it comes to ingredient substitutions, knowing the basics of what complements lobster can ensure you’re set for success.

Recipe Success Stories

Throughout the years, home cooks have shared success stories of crafting this elegant dish, often highlighting the impressive reactions of family and friends who tasted it. Many have expressed excitement at achieving such restaurant-quality results in their kitchens.

Variations abound too, as people have embraced local flavors or used seasonal vegetables to complement their lobster and garlic lemon butter. The flexibility of the dish means it often finds a place on various dinner tables.

Readers often share photography tips for capturing the vibrancy of the dish; well-lit images showcasing the glossy lobster tails evoke desire to experience the flavor firsthand. Adaptation stories frequently highlight the creativity and resilience of home cooks who innovate while honoring this classic.

Frequently Asked Questions

How do I know when lobster tails are done?

Lobster tails are done when their meat is opaque and has reached an internal temperature of 145°F (63°C). You can use a meat thermometer for accurate readings.

Can I use frozen lobster tails?

Yes, but it’s essential to thaw them properly in the refrigerator before cooking. Avoid thawing at room temperature as it can lead to uneven cooking.

What sides pair well with lobster tails?

Common side dishes include garlic bread, asparagus, or a fresh salad. These pairings complement the richness of the lobster beautifully.

Can I prepare the garlic lemon butter ahead of time?

Absolutely! You can prepare the garlic lemon butter ahead of time and store it in the refrigerator. Just warm it up before serving.

Is this recipe suitable for a low-carb diet?

Yes, lobster tails are low in carbs, making this dish perfect for low-carb and keto diets. Just be mindful of your sides to keep the meal aligned with those dietary goals.

What is the best way to reheat lobster tails?

To reheat lobster tails, use an oven at a low temperature. Avoid using a microwave, as it can dry out the meat quickly.

Can I substitute lemon with another citrus?

Yes! Lime or orange can be effective substitutes. Each will provide a different flavor profile while still enhancing the dish.

Are there any vegetarian options using this recipe?

While this specific recipe focuses on lobster, consider using a vegetarian protein option like portobello mushrooms and complementing it with the garlic lemon butter for a flavorful alternative.

How should I store leftovers?

Store leftover lobster tails in an airtight container in the refrigerator for up to 2-3 days. For longer storage, wrap tightly and freeze.

Can I make this dish in advance?

While the lobster tails are best served fresh, you can prep components in advance, such as the garlic lemon butter. Cook the lobster just before serving for best results.

Additional Resources

Explore related recipes that can complement your main dish, like garlic butter shrimp or seafood pasta. Technique guides on how to properly cook lobster can also enhance your skills and confidence. For those curious about garlic varieties, there are breakdowns of each type and their culinary uses available.

You might also want to look into equipment recommendations like specialized lobster tools for easier eating or cooking methods. Seasonal variations are also worth considering, such as exploring different cooking techniques based on the freshest ingredients available.

Join the Conversation

Engage with your audience by encouraging them to share their cooking experiences and variations on this recipe. Social media platforms are perfect for showcasing delicious photography and gathering community feedback.

Take time to share your successes and ask readers to submit their adaptations or tips as well. Building a community around recipes creates connections and inspires culinary creativity, allowing everyone to participate in shaping delicious outcomes.

The Recipe

Lobster Tails with Garlic Lemon Butter

Serves: 4

Prep Time: 15 mins

Cook Time: 20 mins

Total Time: 35 mins

Kitchen Equipment Needed

  • Kitchen shears
  • Meat thermometer
  • Oven or grill
  • Medium saucepan
  • Basting brush
  • Cutting board

Ingredients

  • 4 lobster tails
  • 1/2 cup unsalted butter
  • 4 cloves garlic, minced
  • Juice of 1 lemon
  • Zest of 1 lemon
  • Salt and pepper to taste
  • Fresh parsley, chopped (for garnish)

Directions

  1. Preheat the oven to 425°F (220°C) or prepare your grill.
  2. Using kitchen shears, carefully cut the top shell of the lobster tails down to the base without cutting the meat completely.
  3. Gently pull the lobster meat upwards, resting it on top of the shell.
  4. In a medium saucepan, melt the butter over low heat. Add minced garlic and cook for 3-4 minutes until fragrant but not browned.
  5. Stir in lemon juice and zest, and season with salt and pepper.
  6. Place the lobster tails on a baking sheet or grill, baste generously with the garlic lemon butter.
  7. Bake or grill the lobster for about 20 minutes, basting halfway through, until the meat is opaque and cooked through.
  8. Remove from heat and let it rest for a few minutes. Garnish with chopped parsley before serving.

Recipe Notes

  • Experiment with different herbs in the butter for added flavor.
  • Consider broiling the lobster under high heat for the last few minutes for an extra char.
  • Feel free to adjust garlic and lemon to suit your taste preferences.

Indulge in Blueberry Cheesecake Heaven Rolls for Dessert Bliss

Blueberry Cheesecake Heaven Rolls: A Sweet Indulgence

⚖️
Difficulty
Medium

⏲️
Prep Time
30 mins

🕒
Cook Time
25 mins

⏱️
Total Time
55 mins

🍽️
Servings
12 rolls

Indulge your senses with our Blueberry Cheesecake Heaven Rolls, a delightful fusion of flavors sure to enchant dessert lovers. Imagine trying a soft, fluffy roll infused with creamy cheesecake and bursting with fresh blueberries. Each bite delivers a perfect balance of sweetness and tanginess that will have you dreaming of summer days filled with sun and berry picking. These rolls are perfect for special occasions or simply to treat yourself and your loved ones.

Blueberry Cheesecake Heaven Rolls not only taste divine, but they also bring a warm, inviting aroma to your kitchen as they bake. The rich scent of cheesecake mingles with the fruity essence of blueberries, making them a tempting addition to any dessert spread. Whether you’re hosting a brunch, celebrating a birthday, or just enjoying a cozy evening at home, these rolls will leave a lasting impression.

Quick Recipe Highlights

  • Flavor Profile: A heavenly combination of sweet blueberries and rich, creamy cheesecake centers that offer a burst of flavor in every roll.
  • Texture: Soft, pillowy rolls that contrast beautifully with the velvety cheesecake filling.
  • Aroma: The sweet scent of fresh blueberries combined with buttery dough creates an irresistible fragrance.
  • Visual Appeal: These rolls boast a gorgeous golden-brown exterior, with blueberry drizzles and a creamy glaze for a stunning finish.
  • Skill Level Needed: While beginner-friendly, these rolls require a few simple baking techniques, making it a rewarding challenge for novice bakers.
  • Special Equipment: A rolling pin, a mixing bowl, and a baking sheet are all you need to create these scrumptious rolls.

Recipe Overview

  • Difficulty Level: This recipe is rated medium in difficulty, perfect for aspiring bakers looking to enhance their skills while working with yeast dough.
  • Category: These rolls can be categorized as a dessert or breakfast treat, making them versatile for any meal.
  • Cuisine: While inspired by classic American desserts, the influence of global baking traditions makes these rolls a delightful treat.
  • Cost: With common pantry ingredients, this recipe is budget-friendly, costing approximately $10 to $15 for 12 rolls.
  • Season: Blueberry Cheesecake Heaven Rolls are best enjoyed in late spring and summer when blueberries are fresh and plentiful.
  • Occasion: Ideal for family gatherings, brunches, or as a sweet ending to dinner parties, these rolls are perfect for anytime you want to indulge.

Why You’ll Love This Recipe

Creating the perfect Blueberry Cheesecake Heaven Rolls elevates your baking game while offering delightful layers of taste and texture. The luscious creaminess of the cheesecake filling paired with juicy blueberries ensures a rich, satisfying experience. Each roll is a bite-sized piece of heaven that melts in your mouth, transporting you to dessert bliss.

You’ll love the convenience of this recipe as it comes together easily, perfect for beginner bakers. With straightforward steps and readily available ingredients, it’s a fantastic way to perfect basic baking skills while impressing family and friends with your culinary prowess. Plus, the joy of pulling freshly baked rolls from the oven adds a special touch to the whole baking experience.

Nutritionally, blueberries are celebrated superfoods, packed with antioxidants, vitamins, and fiber. Incorporating them into dessert not only satisfies your sweet cravings but also adds health benefits that you can feel good about. The cheesecake filling adds a dose of calcium and protein, making this treat slightly more guilt-free.

These rolls shine in social settings, bringing people together around your table. As they are served warm and fresh, they serve as a conversation starter, allowing you to share your baking triumphs. Plus, they are a fantastic dessert to share, making guests feel special and appreciated.

Cost-effectiveness is another significant factor. You can make a dozen delectable rolls for just a fraction of what you would spend at a bakery. This accessibility allows you to treat yourself and others without breaking the bank, making baking both a pleasurable and economical endeavor.

Historical Background and Cultural Significance

The origins of rolls like these can be traced through various baking traditions, often linked to home cooking and family gatherings. The combination of sweet and savory in a single roll resonates with many cultures that embrace fusion flavors. In culinary history, cheesecakes have roots in ancient Greece, showcasing the enduring popularity of cheese-based desserts.

Culturally, blueberries hold a special place in American cuisine, symbolizing summer and local harvests. Blueberry picking is a cherished activity, allowing families to connect with nature and each other, enhancing the enjoyment of seasonal ingredients. This recipe embraces that significance by showcasing fresh blueberries in a delightful dessert format.

Over the years, the evolution of cheesecake recipes reflects changing tastes and culinary developments. From traditional New York-style cheesecakes to more creative interpretations like these rolls, the dessert continues to inspire innovative baking adventures. As both a comfort food and a special occasion dessert, it offers a nostalgic touch for many.

Regional variations of blueberry rolls showcase how different cultures personalize traditional recipes. From sweet to savory interpretations, these rolls adapt based on local flavors and preferences, creating a delightful variety that can be enjoyed around the world.

Ingredient Deep Dive

Blueberries are often referred to as a superfruit, celebrated for their rich antioxidant properties. They play a vital role in reducing oxidative stress while supporting heart health. When selecting blueberries, look for plump, firm berries that are bright in color; avoid those that appear wrinkled or moldy. Store them in the refrigerator and consume within a week for optimal freshness. If fresh blueberries are scarce, frozen options work beautifully in this recipe.

Cream cheese, the star of our cheesecake filling, has a delightful creamy texture and a tangy flavor. Used in desserts for centuries, its classic pairing with sugar creates a luscious filling. Opt for full-fat cream cheese for a rich and velvety experience, and remember to let it soften before use for easy mixing. Store any leftovers in the refrigerator and consume within two weeks, or freeze for future baking endeavors.

All-purpose flour is a staple in baking, providing structure and stability to our rolls. When measuring flour, spoon it into your measuring cup and level it off with a knife for accuracy. For the best results, store flour in a cool, dry place in an airtight container. If you’re looking for alternatives, consider using whole wheat flour or gluten-free blends, keeping in mind that adjustments may be necessary for the texture.

Active dry yeast is the leavening hero in our rolls, enabling them to rise beautifully. Yeast requires sugar as food and warm water to activate. Always check the expiration date before use, and remember to proof it in warm water to ensure it’s alive. For those who prefer, instant yeast can be used as a substitute with slightly different activation methods. Store dry yeast in the refrigerator for longer-lasting freshness.

Common Mistakes to Avoid

  • Not proofing the yeast: Always proof your yeast in warm water before adding it to your dough to ensure it’s active. If your yeast isn’t bubbly after 5-10 minutes, it’s best to start over with new yeast.
  • Inaccurate ingredient measurements: Baking is a science; precise measurements are crucial. Use a digital kitchen scale for the best accuracy when baking.
  • Overworking the dough: Mixing the dough too much can lead to tough rolls. knead just until the ingredients are combined and a smooth texture forms.
  • Using cold ingredients: For a successful cheesecake filling, ensure your cream cheese is softened to room temperature. Cold cream cheese can create lumps in the filling.
  • Skipping the rising time: Allow the dough enough time to rise; shape perfection and airy rolls depend on this crucial step.
  • Failing to preheat the oven: Ensure your oven is fully preheated before baking to achieve an evenly cooked product.
  • Not cooling before frosting: Allow rolls to cool completely before applying any glaze; this ensures it sets correctly.
  • Using too much filling: Overstuffing your rolls can cause them to burst during baking. Stick to the recommended measurements for a perfect balance.
  • Not using parchment paper: This will help prevent sticking and ensure easy removal from the baking sheet.
  • Serving rolls too soon: Allow these rolls to cool slightly before serving; this enhances their overall texture and flavor.

Essential Techniques

Yeast activation is vital for light, fluffy rolls. To master this technique, always check the expiry date of your yeast and use a thermometer to ensure water is at the appropriate temperature, ideally between 100°F – 110°F. Look for foamy bubbles after proofing as a visual cue of success.

Kneading the dough properly encourages gluten development, crucial for texture. Use the heel of your palm to push the dough away from you, folding it back over itself. Knead for about 8-10 minutes until smooth and elastic. Take care not to add too much flour, as this can lead to dense rolls rather than soft ones.

Filling the rolls with cheesecake mixture requires practice for even distribution. A piping bag can provide excellent control but using a spoon works as well. Carefully spoon the filling into the center of each dough piece; less is more here to prevent overflow.

Baking at the right temperature ensures rolls cook thoroughly without burning. Invest in an oven thermometer to verify your oven’s heat accuracy. Always position the rolls in the center of the baking rack for even heat distribution.

Rolling the dough is essential for achieving uniformity in size and texture. Dust your work surface with flour to prevent sticking and ensure an even thickness of about ½ inch. A rolling pin helps achieve this while maintaining the integrity of the dough.

Applying the glaze should be done once the rolls are completely cool to enhance the presentation and flavor. A spoon or a food-grade brush can evenly distribute the glaze without compromising the rolls’ shape.

Pro Tips for Perfect Blueberry Cheesecake Heaven Rolls

1. Use fresh blueberries whenever possible; they yield the best flavor and texture. If fresh is unavailable, frozen blueberries can also work, but be sure to thaw and drain excess liquid beforehand.
2. For an extra creamy filling, consider adding a splash of vanilla extract to the cheesecake mixture for added depth of flavor.
3. Allow the dough to rest for at least 5 minutes after mixing to promote gluten relaxation, making it easier to roll out.
4. If you’re short on time, you can prepare the dough the night before; just refrigerate it after the first rise and allow it to come to room temperature before shaping.
5. Brush the tops of the rolls with melted butter immediately after baking for a beautiful golden sheen and added richness.
6. To enhance flavor, consider adding lemon zest to both the dough and filling for a refreshing twist that complements the blueberries.
7. Store any leftovers in an airtight container to keep them soft and fresh for days.
8. You can serve these rolls with a scoop of vanilla ice cream or a dollop of whipped cream for an indulgent dessert experience.

Variations and Adaptations

Regional variations of blueberry rolls can include unique spices or local fruit additions, offering a delightful twist on this traditional recipe. In the South, for instance, you might encounter a variation that includes sweet pecans for added crunch and flavor depth.

Seasonal adaptations could involve using other berries such as raspberries or blackberries during their peak seasons, allowing for flexible flavor profiles throughout the year. Consider making a mixed berry version by combining different summer fruits for a colorful dessert.

Dietary modifications can cater to specific needs, like substituting gluten-free flour for those with gluten sensitivities. Ensure to follow a reliable gluten-free flour blend that includes xanthan gum for a proper structure.

Flavor variations include using flavored cream cheese or incorporating spices such as cinnamon or nutmeg into either the dough or filling. This adds a new dimension and can be tailored to personal preferences.

For texture modifications, try incorporating shredded coconut into the filling to create a unique coconut blueberry cheesecake fusion. Coconut adds a wonderful chewiness that complements the creaminess of the cheese.

Presentation alternatives might involve using a muffin tin to shape rolls, resulting in individual servings that are equally charming and perfect for parties or family gatherings.

Serving and Presentation Guide

To plate your Blueberry Cheesecake Heaven Rolls beautifully, arrange them on a large serving platter, layering them in a circle for a beautiful presentation. Drizzling raspberry sauce or a simply made berry compote enhances their visual allure and adds a tangy contrast.

Garnishing with fresh mint leaves adds a pop of color and freshness to your dessert table. Alternatively, a sprinkle of powdered sugar can heighten the charm, giving them a classic and elegant look.

Traditional accompaniments often include a scoop of vanilla ice cream or whipped cream, enhancing the overall dessert experience. Separately serve additional blueberries on the side for a beautiful touch that complements the flavor profile.

Modern serving suggestions include placing rolls in individual ramekins or dessert cups for a more personal touch, perfect for larger gatherings. This ensures each guest has their own serving while adding an elegant twist.

Consider temperature when serving: these rolls are best enjoyed slightly warm or at room temperature, as this showcases the creamy filling while offering a comforting experience.

Finally, portion control is essential for managing serving sizes. Each roll can serve as a generous individual dessert, so consider letting guests take one or two rolls to enjoy alongside other desserts to balance flavors.

Wine and Beverage Pairing

Pair your Blueberry Cheesecake Heaven Rolls with a sweet dessert wine such as Riesling or Moscato, which complements the fruity flavors excellently. The sweetness of these wines elevates the entire experience without overwhelming the dessert.

For non-alcoholic alternatives, consider serving a refreshing lemonade or iced tea with a hint of mint to create a light and vibrant pairing. These options can enhance the fresh berries and creamy notes beautifully.

Coffee enthusiasts will find a well-brewed cup of coffee or an espresso to be a lovely accompaniment. The bitterness in coffee beautifully balances the sweetness of the cheesecake rolls, creating a satisfying finale to a meal.

When considering temperature, serve wines chilled to enhance their refreshing nature. For coffee, either serve it hot or make an iced version to complement the summer vibe.

For serving suggestions, consider crafting a dessert bar where guests can assemble their own plates with the rolls and chosen beverages, allowing for a fun and engaging dining experience.

Storage and Shelf Life

To store leftover Blueberry Cheesecake Heaven Rolls, place them in an airtight container at room temperature for up to 2 days to maintain their softness. After that, it’s best to refrigerate them to extend their shelf life.

Keep the rolls in the fridge for up to one week; ensure they’re adequately covered to prevent drying out. When ready to enjoy, warm them up slightly in the microwave or oven.

If you have a larger batch, consider freezing them for longer storage. Wrap the rolls in plastic wrap and then place them in a freezer-friendly container for up to 3 months.

Signs of spoilage include an off smell, dry texture, or visible mold; discard any rolls that appear less than fresh.

Reheating instructions are simple: wrap rolls in a damp paper towel and microwave for about 10-15 seconds to bring back their original softness. Alternatively, preheat your oven to 350°F and warm for about 10 minutes.

Freezing guidelines recommend thawing overnight in the fridge before reheating to retain moisture and flavor.

Make Ahead Strategies

To streamline your baking process, consider prepping the dough the night before. You can allow it to rise in the refrigerator, and then shape and bake it the next day, saving time while maintaining freshness.

You can store the cheesecake filling in a sealed container in the refrigerator for up to 2 days. This allows you to efficiently assemble your rolls without delay when you’re ready to bake.

Your prep timeline should include scheduling time for the dough to rise fully; plan on two hours in total for the first rise and rolling out. Additionally, preparing the rolls should take about 30 minutes, allowing for assembly without pressure.

Keep quality in mind: while you can have dough rise too long, it’s better to refrigerate for slower fermentation than to rush it. A cold rise can enhance the dough’s flavor profile and texture.

For assembly tips, pre-measure your ingredients and divide them into bowls. Having everything organized can make the actual preparation process smoother and more enjoyable.

If adding fresh elements like blueberries after baking, ensure you have them ready to go at serving time for freshness and flavor enhancement in each roll.

Scaling Instructions

When halving the Blueberry Cheesecake Heaven Rolls recipe, ensure that you divide each ingredient accurately for consistent results. This applies to yeast and flour for proper consistency and texture.

If doubling or tripling the recipe, allow sufficient mixing and rising space. You might need to adjust your baking time slightly, as larger batches can cook unevenly.

Adjusting equipment may include utilizando deeper or larger baking trays if scaling substantially; if using a smaller kitchen tool, consider baking in batches to maintain the quality.

Timing modifications are crucial; check on your rolls early when baking a larger batch to ensure they do not overcook.

Storage considerations become important when scaling; ensure that you have enough storage containers ready if making a larger quantity that would need to be stored or frozen.

Nutritional Deep Dive

Understanding macros in your Blueberry Cheesecake Heaven Rolls allows you to appreciate their nutritional profile. These delightful rolls contain carbohydrates primarily from flour and sugars, alongside healthy fats from the cream cheese.

Micronutrient analysis reveals that blueberries are rich in vitamins C and K, while cream cheese offers essential calcium. Together, they contribute to a balanced dessert that satisfies both taste and nutritional needs.

Consider the health benefits; blueberries may support heart health and cognitive function, while consuming moderate amounts of cream cheese adds beneficial fats necessary for proper nutrient absorption.

Dietary considerations are essential: keep aware of serving sizes to monitor calorie intake. Serving size can play a crucial role in maintaining a balanced diet while enjoying your favorite treats.

Finally, weight management tips suggest enjoying these rolls in moderation, perhaps savoring them on special occasions or sharing with friends to balance indulgence with wellness.

Dietary Adaptations

For gluten-free adaptations of Blueberry Cheesecake Heaven Rolls, swap all-purpose flour with a 1:1 gluten-free blend. Ensure the blend contains xanthan gum for proper dough strength and texture.

Dairy-free modifications can be achieved by using soy or almond cream cheese in place of traditional cream cheese. Many brands now offer rich, creamy alternatives that maintain similar flavors in baked goods.

For a vegan version, use a plant-based substitute for cream cheese and replace eggs with silken tofu or flaxseed meal for binding properties, ensuring the same delightful texture and taste.

If you follow a low-carb or keto diet, consider using almond flour or coconut flour to create a lower-carb roll. Adjust sweetener types for a suitable Keto-friendly option.

Paleo enthusiasts will need to substitute with almond flour and coconut sugar for a paleo-friendly dessert that stays true to ancient dietary principles without losing flavor.

For specific diets such as Low-FODMAP, consider eliminating certain ingredients and opting for lactose-free cream cheese. Always consult with dietary guidelines to ensure safety and enjoyment.

Troubleshooting Guide

If your rolls have a dense texture, it may be due to over-kneading. Next time, knead just until combined to keep them soft and airy.

Struggling with flavor balance? Incorporate a pinch of salt into the filling to enhance sweetness while counteracting overly ripe berries.

Temperature problems can occur during baking; invest in an oven thermometer to ensure proper heat settings for consistent baking results.

If equipment challenges arise, remember you can modify tools. Use a sturdy glass or a bottle in place of a rolling pin if one isn’t available.

Ingredient substitutions are possible, but understand how they affect the outcome. Knowing the role of each ingredient helps you adapt wisely for success.

Timing concerns can lead to over-baking. Keep a close eye on your rolls during the final minutes of baking, aiming for a golden hue without burning.

Recipe Success Stories

Community feedback often highlights the wondrous aroma that fills homes while these rolls bake. Many bakers report that their families can hardly wait for the rolls to cool before diving in.

Variation successes, such as adding chocolate chips or nuts, are also widely shared. Tweaking this basic recipe opens up endless possibilities that allow bakers to make it their own.

Readers suggest perfecting their photography skills by capturing these rolls fresh out of the oven. A light background with focused lighting can enhance the colors and make for an enticing image.

Sharing adaptation stories from crafting gluten-free or vegan versions encourages others to explore solutions for dietary restrictions while still enjoying delicious treats.

Engagement extends to social media, where bakers share pictures of their creations and celebrate successes with the wider community, inspiring others to recreate these rolls.

Frequently Asked Questions

Can I use frozen blueberries in this recipe?

Absolutely! Frozen blueberries can be used in this recipe, but make sure to thaw and drain them before use to avoid excess moisture in the filling.

How do I prevent my rolls from burning?

Keep a close eye on your rolls as they bake and consider rotating them halfway through baking. Using parchment paper on your baking tray can also help prevent sticking or burning.

Can I make these rolls the night before?

You can prepare the dough and filling the night before. Allow the rolls to rise in the refrigerator overnight, then bake them in the morning when ready to enjoy.

What should I do if my dough isn’t rising?

If your dough isn’t rising, it could be due to old yeast or the temperature being too cold. Ensure your yeast is active and keep the dough in a warm spot to facilitate proper rising.

What can I use instead of cream cheese?

For a dairy-free option, you can use nut-based cream cheese or a combination of silken tofu and citrus for tangy flavor. Be aware of the texture change, ensuring it remains smooth.

How long do these rolls last?

When stored properly in an airtight container at room temperature, these rolls stay fresh for about 2 days. Refrigerating them extends their life to about one week.

Can I freeze the rolls?

Yes! You can freeze these rolls by packaging them in an airtight container or freezer bag, where they can maintain their quality for up to 3 months.

What is the best way to reheat the rolls?

The best way to reheat rolls is to wrap them in a damp paper towel and microwave for 10-15 seconds. Alternatively, heat them in a preheated oven at 350°F for about 10 minutes.

Can I add more filling to the rolls?

You can, but be cautious as overfilling can lead to spills during baking. Stick to the recommended amounts for even baking results.

How do I ensure my rolls are soft?

To achieve soft rolls, be mindful of kneading time and avoid adding too much flour during the process. Let them rise long enough, and cover them with a cloth to maintain moisture as they cool.

Additional Resources

Explore related recipes on our blog for a comprehensive baking experience. From other fruit-infused rolls to delightful cheesecakes, there’s a recipe for every sweet tooth.

Technique guides can help refine your skills in baking, with tips for working with yeast, managing dough, and enhancing flavor profiles.

Ingredient information can provide deep insight into the nutritional benefits and uses of key ingredients in your favorite recipes, making you a well-rounded cook.

Finding the right equipment is crucial; check out our recommended list of baking tools to maximize your success in the kitchen and inspire creativity.

Seasonal variations of recipes keep the culinary experience fresh and exciting, allowing you to explore new flavors that reflect seasonal produce.

Join the Conversation

Your feedback and experiences enrich our community! Share your journey with Blueberry Cheesecake Heaven Rolls on social media to inspire others to try this delicious recipe.

Photography tips can enhance your culinary journey, allowing others to appreciate your creations. Don’t hesitate to showcase your baking talents through stunning images of your rolls.

Engage in conversation through recipe reviews, sharing what worked well and any twists you made to the original recipe, fostering a spirit of creativity.

Join in recipe variations, contributing your ideas or adaptations for others to explore and possibly incorporate into their versions of this delicious treat. Let’s create a thriving community where everyone feels inspired to bake!

The Recipe

Blueberry Cheesecake Heaven Rolls

Serves: 12 rolls

Prep Time: 30 mins

Cook Time: 25 mins

Total Time: 55 mins

Kitchen Equipment Needed

  • Mixing bowls
  • Rolling pin
  • Baking sheet
  • Parchment paper
  • Piping bag (optional)
  • Measuring cups and spoons
  • Oven thermometer (optional)

Ingredients

  • 2 cups all-purpose flour
  • 1 packet active dry yeast
  • 1/2 cup warm water (110°F)
  • 1/4 cup sugar
  • 1/4 cup melted butter
  • 1 egg
  • 1/2 tsp salt
  • 8 oz cream cheese, softened
  • 1 cup fresh blueberries
  • 1/2 cup powdered sugar (for glaze)
  • 1-2 tbsp milk (for glaze)

Directions

  1. In a mixing bowl, combine warm water and yeast, letting it proof for about 5 minutes until bubbles form.
  2. In a large bowl, mix flour, sugar, and salt, then add the yeast mixture, melted butter, and egg. Knead until smooth.
  3. Cover the dough with a towel and let it rise in a warm place for about 1 hour or until doubled in size.
  4. For the filling, mix softened cream cheese, sugar, and blueberries until smooth.
  5. Once dough has risen, punch it down and roll it out to about 1/2 inch thickness.
  6. Cut the dough into squares and place a spoonful of filling in the center of each square. Fold corners over filling and seal.
  7. Place rolls seam-side down on a baking sheet lined with parchment paper. Let rise for 30 minutes.
  8. Preheat your oven to 350°F and bake rolls for 25 minutes or until golden brown.
  9. For glaze, mix powdered sugar and milk until smooth. Drizzle over cooled rolls.

Recipe Notes

  • Store leftovers in an airtight container for up to 2 days at room temperature or freeze for later.
  • Substituting cream cheese with dairy-free varieties works well for those with dietary restrictions.
  • Experiment with adding lemon zest to the filling for an extra flavor kick.