Savor Cajun Lime Chicken in Creamy Tomato Sauce Delight

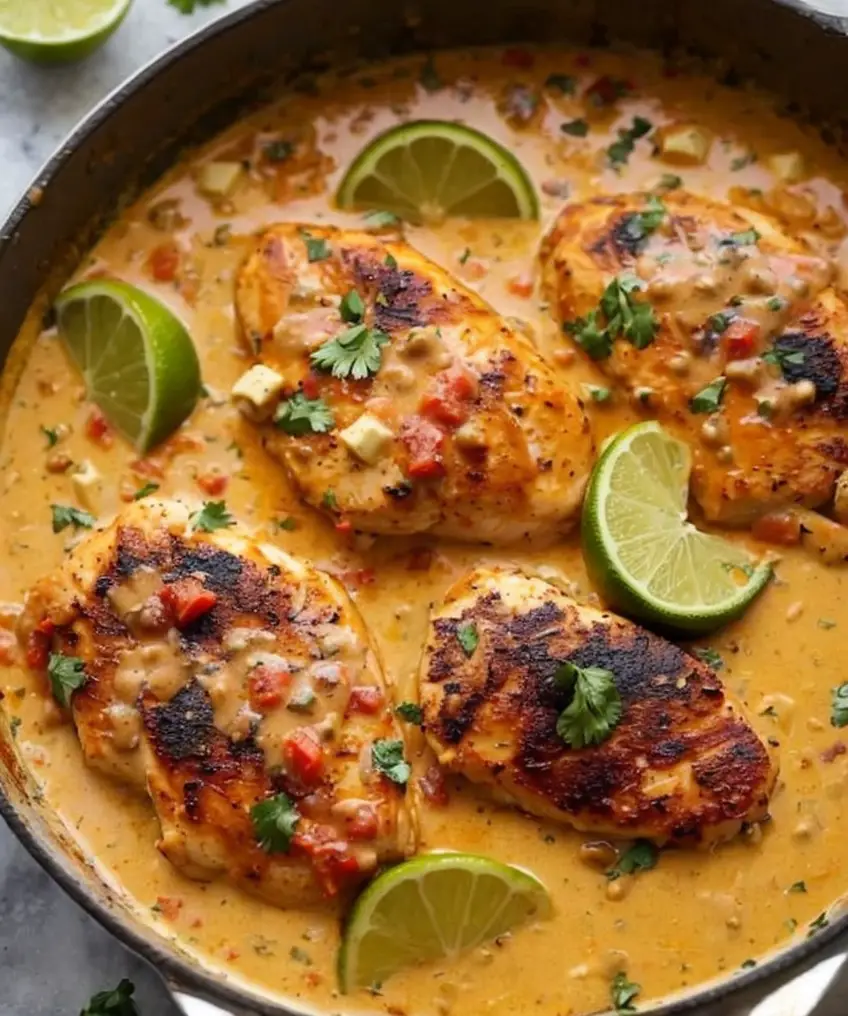
Cajun Lime Chicken with Creamy Tomato Sauce: A Flavorful Delight

⚖️
Difficulty
Medium

⏲️
Prep Time
15 mins

🕒
Cook Time
30 mins

⏱️
Total Time
45 mins

🍽️
Servings
4

This Cajun Lime Chicken with Creamy Tomato Sauce is a delightful dish that brings together the vibrant flavors of Cajun spices and the fresh zing of lime, all embraced by a rich and creamy tomato sauce. Imagine tender chicken marinated in a blend of spices, seared to perfection, and then bathed in a luscious sauce that tantalizes the taste buds. This recipe not only packs a punch in flavor but also makes for an eye-catching presentation on your dining table, ensuring that it becomes a favorite among family and guests alike.

The combination of spices creates a robust flavor that is balanced beautifully by the creamy tomato sauce, while the lime adds a refreshing burst that elevates the dish. As you savor each bite, you’ll appreciate how the multiple layers of taste intertwine, providing a satisfying texture that complements the tender chicken. Perfect for a weeknight dinner or entertaining friends, this dish invites warmth and enjoyment.

Quick Recipe Highlights

  • Flavor Profile: The Cajun spices offer a bold, peppery kick balanced with the tangy brightness of the lime.
  • Texture: Juicy chicken enveloped in a silky cream sauce, creating a delightful contrast of textures.
  • Aroma: The aromatic blend of Cajun spices and zesty citrus makes this dish irresistible.
  • Visual Appeal: A vibrant mix of colors from the creamy red sauce and golden-brown chicken creates a feast for the eyes.
  • Skill Level Needed: This recipe requires basic cooking skills, perfect for both novice and experienced cooks.
  • Special Equipment: A large skillet or sauté pan is essential for cooking the chicken and sauce.

Recipe Overview

  • Difficulty Level: This recipe is rated medium due to the need for proper cooking techniques to achieve perfect chicken and sauce consistency.
  • Category: It can be classified as a main dish, ideal for lunch or dinner.
  • Cuisine: Cajun cuisine is characterized by its rich and flavorful profiles, influenced by French, African, and Native American culinary traditions.
  • Cost: The ingredients are relatively inexpensive, making it an accessible option for meals without compromising on taste.
  • Season: This dish is suitable year-round, but it shines especially in spring when fresh limes are at their best.
  • Occasion: It’s perfect for family gatherings, casual dinner parties, or even a cozy date night at home.

Why You’ll Love This Recipe

The taste of Cajun Lime Chicken with Creamy Tomato Sauce is an adventure for your palate. The Cajun spice mix creates a flavorful base that enhances the chicken, while the creamy tomato sauce adds a luxurious, comforting element. The brightness of lime introduces an unexpected twist, making this dish not only appetizing but also refreshing.

Preparation is a breeze! The marinade can be prepared in advance, allowing the chicken to soak up the flavors. During cooking, you can multitask by preparing sides, making this recipe ideal for a quick weeknight meal or an elaborate dinner. With minimal cleanup needed, you’ll have more time to relax and enjoy your creation.

Nutritionally, this dish strikes a good balance. The chicken provides lean protein while the tomatoes are rich in antioxidants, particularly lycopene. This meal can be complemented with a variety of veggies or served over whole grains to enhance its health benefits further.

Cajun Lime Chicken is not just a meal; it’s an experience. It invites conversation and shared enjoyment around the dining table, perfect for celebrations or casual family dinners alike. Guests will appreciate the effort you put into creating such a delicious dish.

Lastly, this recipe is cost-effective. Using readily available ingredients from your pantry, you can whip up a restaurant-quality meal without breaking the bank. Its accessibility in terms of ingredients and preparation makes it a go-to dish for any home cook.

Historical Background and Cultural Significance

The origins of Cajun cuisine stem from the Acadians, French settlers who adapted their cooking methods to the ingredients available in the rural South. This blending of cultures created a unique and flavorful cuisine representing Louisiana’s rich heritage. Cajun dishes often reflect a history of resourcefulness, utilizing what was available in local markets and reflecting the community’s agricultural roots.

Cajun cooking holds cultural significance in Louisiana, where food is a central element of communal gatherings and celebrations. Dishes like Cajun Lime Chicken showcase the blending of ingredients and techniques passed down through generations. Because of this deep-rooted cultural history, Cajun cuisine is celebrated for its bold flavors and heartwarming traditions.

Over time, Cajun cooking has evolved and adapted, influenced by various culinary traditions including Creole, French, and Southern cooking. As a result, modern Cajun recipes, such as this chicken dish, showcase innovation while respecting their traditional roots.

Regional variations can also be seen, with different areas of Louisiana featuring their own twists on classic Cajun dishes. In some areas, a spicier blend of seasonings is favored, while others may incorporate seasonal vegetables or alternative proteins, showcasing the diversity within Cajun cooking.

Ingredient Deep Dive

Chicken: Chicken, particularly breast meat, is the star of this dish. It’s a lean protein, versatile in cooking, and absorbs flavors beautifully. When choosing chicken, look for fresh, organic options for the best taste and texture. Store raw chicken in the fridge and consume it within a couple of days or freeze it for later use. If you’re looking for a substitution, turkey breast can serve as a nice alternative.

Cajun Spices: The Cajun spice blend typically includes paprika, cayenne pepper, garlic powder, and onion powder. These spices not only add flavor but also bring warmth and depth to the dish. Each blend may vary based on the chef’s preference, but selecting fresh spices will enhance the overall taste. Store spices in a cool, dark place to maintain their potency, and consider making your own blend for a personal touch.

Tomatoes: Tomatoes, whether canned or fresh, form the base of the creamy sauce. They are rich in antioxidants, particularly lycopene, and provide a sweet yet tangy flavor profile. When selecting tomatoes, fresh options should feel firm and vibrant, while canned varieties should have minimal additives. Store tomatoes in a cool place, and once opened, canned tomatoes should be refrigerated and consumed within a week.

Heavy Cream: Heavy cream is used to create a luscious, creamy texture in the sauce. It adds richness and helps balance the spice levels. Always choose fresh cream with a high fat content for the best results. Store in the refrigerator and be mindful of expiration dates. For a lighter alternative, half-and-half can work, but it will yield a less rich sauce.

Common Mistakes to Avoid

  • Overcooking the chicken: This can lead to dry and tough meat. Use a meat thermometer to ensure doneness, aiming for an internal temperature of 165°F.
  • Using stale spices: Old spices can diminish the flavor. Always check your spice’s freshness for optimal taste.
  • Cooking on high heat without control: This can cause uneven cooking and burning. Use medium heat to ensure the chicken cooks through without charring.
  • Neglecting to marinate: Skipping the marinade reduces the flavor depth. Allow the chicken to marinate for at least 30 minutes, or overnight for even better infusion.
  • Rushing the sauce: A good sauce needs time to develop its flavors. Allow it to simmer gently, which helps meld the spices with the cream.
  • Not adjusting seasoning: Always taste your sauce before serving. A splash of lime or dash of salt can elevate flavors significantly.
  • Incorrect ingredient ratios: Following the recipe is crucial for balance. Adjusting ratios can lead to overpowering flavors.
  • Skipping garnishes: Simple garnishes like fresh herbs can brighten the dish and enhance presentation. Don’t skip this final touch!

Essential Techniques

Marinating Chicken: Marinating is crucial for infusing flavors into the chicken. Use acid-based marinades (like lime juice) to tenderize the meat. Ensure the chicken sits in the marinade for at least 30 minutes, or even longer if possible, to maximize flavor penetration.

Creating a Sauce: A good sauce involves constructing layers of flavor. Start by sautéing aromatics, then adding your liquid components. Allow it to simmer for a while to reduce and concentrate flavors. Pay attention to the consistency; a perfect sauce should coat the back of a spoon.

Sealing in Juices: Searing the chicken helps develop a crispy exterior while locking in juices. Ensure the skillet is hot before adding the meat, allowing a proper sear to form before flipping. This technique enhances both flavor and texture.

Pro Tips for Perfect Cajun Lime Chicken

1. Use fresh herbs like cilantro or parsley as a garnish, adding a fresh finish to the dish.
2. Adjust the amount of cayenne pepper based on your heat preference; start small and add more if desired.
3. For a smoky flavor, consider adding some smoked paprika to your spice blend.
4. Pair with a side of cornbread or rice to soak up the delicious sauce.
5. Let the dish sit for a few minutes after cooking to allow the juices to redistribute before serving.
6. Experiment with adding other vegetables to the sauce, such as bell peppers or spinach, for added nutrition.
7. Always taste and adjust seasonings throughout the cooking process to get the perfect balance.
8. For presentation, slice the chicken before serving, showcasing the juicy interior against the creamy sauce.

Variations and Adaptations

For a regional twist, consider incorporating local ingredients. Swap out traditional Cajun spices for a spicier blend if you crave more heat, or try adding some diced chorizo to the sauce for a unique taste.

Seasonal adaptations can include freshly diced tomatoes instead of canned ones when they are in-season, enhancing the dish’s brightness and flavor.

For those on dietary modifications, replacing heavy cream with coconut milk creates a dairy-free version while adding a subtle sweetness. Similarly, using zoodles or cauliflower rice can offer low-carb options.

Flavor variations might also arise by introducing additional herbs and spices, like basil or oregano, for a new aromatic profile, while texture modifications could include blending the sauce for a smooth finish or leaving it chunky.

Presentation alternatives can elevate the dish with unique plating techniques—serve in bowls or on rustic plates, and top with grilled lime halves for a vibrant visual touch.

Serving and Presentation Guide

Plating this dish beautifully can enhance the dining experience. Use a large white plate to contrast the bright colors of the chicken and sauce. Pour the sauce over the chicken and use a spoon to ensure even coverage, showcasing the creamy texture.

Garnishing adds a lively element; sprinkle freshly chopped herbs like cilantro or fresh lime zest just before serving.

Traditional accompaniments include rice or cornbread, creating a wholesome meal, while modern suggestions can involve serving over a bed of spiralized vegetables for a low-carb option.

Ensure the dish is served warm, as creamy sauces can lose their luster if allowed to cool. Use a ladle to control portion sizes when plating, keeping servings even and visually appealing.

Wine and Beverage Pairing

For wine pairings, a chilled Sauvignon Blanc complements the dish beautifully, as its citrus notes highlight the lime while balancing the richness of the sauce. Alternatively, a light-bodied red, such as Pinot Noir, can offer a nice contrast to the spiced chicken.

Non-alcoholic options include sparkling water with lime or citrus-infused iced tea, providing refreshing contrasts while echoing the dish’s main ingredient.

If enjoying coffee or tea, a mild herbal tea or dark roast coffee will not overpower the flavors and could provide a comforting finish to the meal.

Storage and Shelf Life

To store leftovers, allow the dish to cool completely before placing it in an airtight container. Keep in the fridge and consume within 3-4 days for optimal freshness. For long-term storage, freezing is an option; just ensure it’s in a sealable freezer-safe container.

When reheating, use gentle heat on the stovetop or microwave to prevent the chicken from drying out. Adding a splash of cream or broth during reheating can help retain moisture.

Check for signs of spoilage, such as off-smells or changes in texture, before consuming leftovers. Freezing guidelines suggest consuming within 2-3 months for best quality.

Make Ahead Strategies

You can prepare Cajun Lime Chicken in stages. Marinate the chicken up to 24 hours in advance to allow flavors to deepen.

Consider prepping the sauce independently; it can be made and stored in the fridge for a couple of days before serving.

For assembly, keep the cooked chicken and sauce separate, combining them just before serving for optimal freshness.

Reheating should be done gently to maintain the dish’s integrity, with fresh lime garnishes added just before serving to enhance flavor brightness.

Scaling Instructions

If you wish to halve the recipe, simply reduce all ingredient measurements by 50%, ensuring even flavors.

For doubling or tripling the dish, consider the size of your cooking equipment to avoid overcrowding, which can lead to uneven cooking.

Timing may vary with larger batches—extend cooking time as needed, observing visual cues for doneness.

Ensure storage containers are adequate based on batch size; larger batches may require stacking or multi-level storage solutions to maintain freshness.

Nutritional Deep Dive

From a nutritional perspective, this dish offers a well-rounded meal, rich in protein due to the chicken content. Each serving provides essential nutrients like B vitamins and iron beneficial for overall energy levels.

Micronutrient analysis can reveal the benefits of tomatoes, which contain vitamins A and C, contributing to immune health and skin vitality.

As for dietary considerations, this dish can be adjusted to suit various dietary patterns without losing its essence. Balancing portion sizes helps with weight management while ensuring all important food groups are included.

For those tracking macros, the protein content from chicken is significant, while the creamy sauce adds some fats; consider making adjustments based on dietary goals for a perfect fit.

Dietary Adaptations

With an eye on dietary needs, this Cajun Lime Chicken can easily be made gluten-free by confirming all ingredients are certified gluten-free.

A dairy-free version can be achieved by substituting heavy cream with coconut milk or vegan cream alternatives, while ensuring flavor remains robust.

For those opting for a vegan meal, consider using a plant-based protein such as grilled tofu or tempeh marinated in cajun spices for the same flavor profile.

Those looking for low-carb or keto options can simply skip rice and serve on a bed of spiralized zucchini instead.

Troubleshooting Guide

If you encounter texture issues with your chicken—perhaps it’s too tough—try reducing your cooking time or brining it beforehand to keep it moist. If over-seasoned, balance with a touch of cream or sugar to temper the flavors.

Flavor balance can vary; if the dish tastes too flat, consider adding a touch more acid with lime juice or adjusting spices toward the end of cooking.

Temperature problems may arise if the skillet isn’t adequately heated; preheating is essential for searing the chicken correctly.

If you run into equipment challenges, using a meat thermometer can prevent overcooking while ensuring chicken is cooked through.

For ingredient substitutions, be mindful of how flavors balance; for instance, switching out heavy cream may alter the sauce’s richness.

Timing concerns can often be resolved with careful preparation; having all ingredients ready at the start minimizes delays throughout the cooking process.

Recipe Success Stories

Numerous cooks have shared feedback on how this dish has become a highlight at their gatherings. The vibrant flavors and impressive presentation have garnered rave reviews, with many expressing their delight at replicating such a flavorful dish at home.

Variations have emerged, with readers experimenting with different spice blends or adding seasonal vegetables, showcasing the dish’s versatility. Adaptation stories often highlight how easily the recipe echoes personal tastes and preferences, further personalizing the experience.

Photography tips share how a well-styled plate draws viewers to the deliciousness, with many home cooks enjoying showcasing their culinary creations on social media.

Reader suggestions include pairing options or additional side dishes that pair well, creating a more rounded meal experience for potential new cooks eager to try this recipe.

Frequently Asked Questions

Q: Can I use chicken thighs instead of breasts?

A: Absolutely! Chicken thighs will add more moisture and flavor, although the cooking time may need adjustment due to their richer fat content.

Q: Is this recipe spicy?

A: The Cajun spices provide a kick, but you can adjust the cayenne pepper to suit your preferred spice level.

Q: Can I make this dish in advance?

A: Yes! Prepare the chicken and sauce ahead of time and reheat just before serving. It also tastes great the next day!

Q: What can I serve with this dish?

A: Serve with rice, mashed potatoes, or crusty bread to soak up the delicious sauce. A fresh salad would also complement the meal.

Q: How do I know when the chicken is cooked through?

A: Ensure the internal temperature reaches 165°F. Using a meat thermometer is the most reliable way to check doneness.

Q: Can I freeze leftovers?

A: Yes, you can freeze the chicken and sauce in an airtight container for up to three months. Just reheat thoroughly before serving.

Q: How do I store leftovers?

A: Allow it to cool, then store in an airtight container in the fridge for 3-4 days, or freeze for longer storage options.

Q: Can I substitute heavy cream?

A: Yes! You can use coconut milk or a plant-based cream for a lighter, dairy-free version.

Q: What other meats can I use?

A: You can substitute chicken with turkey, pork, or even shrimp, adjusting cooking times accordingly for different proteins.

Q: Is this a traditional Cajun dish?

A: While it incorporates Cajun flavors, this specific recipe has modern influences and can be adapted to various tastes.

Additional Resources

If you enjoyed this recipe and are looking for related options, consider exploring other Cajun-inspired dishes or techniques. For those interested in deepening their culinary skills, we recommend looking into basic knife skills, spice blending methods, and other sauce-making techniques.

Equipment recommendations include a quality skillet, food thermometer, and good-quality knives, essential for achieving the best results when preparing meals in the kitchen.

Don’t forget to explore seasonal variations to enjoy the freshest flavors available, adapting to what’s in season near you.

Join the Conversation

We invite you to share your experiences with this recipe! Whether it’s through social media or our blog comments, we love hearing about your culinary adventures.

Photography tips for sharing your dish include bright lighting and ample garnishing, which can elevate the visual appeal of your meal online.

Your recipe reviews help foster community engagement and inspire others to try it out. We encourage you to share any variations or twists you put on this classic dish—your creativity is welcome in our kitchen!

The Recipe

Cajun Lime Chicken

Serves: 4

Prep Time: 15 mins

Cook Time: 30 mins

Total Time: 45 mins

Kitchen Equipment Needed

  • Large skillet or sauté pan
  • Meat thermometer
  • Mixing bowl
  • Whisk
  • Cutting board
  • Knife

Ingredients

  • 4 boneless, skinless chicken breasts
  • 1 tablespoon Cajun seasoning
  • 2 tablespoons olive oil
  • 1 cup heavy cream
  • 1 can (14.5 oz) diced tomatoes
  • 2 limes, juiced and zested
  • Salt and pepper to taste
  • Fresh cilantro for garnish

Directions

  1. In a mixing bowl, combine chicken breasts, Cajun seasoning, lime juice, and some zest. Marinate for at least 30 minutes.
  2. In a large skillet, heat olive oil over medium heat. Add the marinated chicken and cook until golden brown, about 6-7 minutes on each side.
  3. Remove the chicken from the skillet and set aside. In the same skillet, add diced tomatoes and heavy cream, stirring until combined.
  4. Let the mixture simmer for 5 minutes, then return chicken to the skillet, coating it in the sauce. Cook an additional 5 minutes.
  5. Adjust seasoning with salt and pepper. Remove from heat and top with fresh lime zest and cilantro before serving.

Recipe Notes

  • For a lighter sauce, substitute heavy cream with Greek yogurt or coconut milk.
  • Feel free to add vegetables such as spinach or bell peppers to the sauce for an extra nutritional boost.
  • This dish pairs well with rice, quinoa, or bread for dipping.
  • Leftovers can be stored in an airtight container in the fridge for up to 4 days.

Deliciously Crispy Chicken Paired with Creamy Pasta Delight

Crispy Chicken with Creamy Pasta: A Comfort Food Delight

⚖️
Difficulty
Medium

⏲️
Prep Time
15 mins

🕒
Cook Time
30 mins

⏱️
Total Time
45 mins

🍽️
Servings
4

Crispy Chicken with Creamy Pasta is the ultimate comfort food that combines the savory crunch of golden-brown chicken with the indulgent creaminess of pasta in a rich sauce. This recipe not only satisfies your taste buds but also provides a delightful textural contrast that will leave you craving more. Each bite of the crispy chicken, paired with the velvety pasta, creates a mouthwatering experience that is both hearty and satisfying.

As you prepare this dish, imagine the aroma of seasoned chicken frying to perfection, combined with garlic and herbs sautéing in a buttery sauce. The visual appeal of this dish is undeniable, with the white pasta and golden chicken presenting a pleasing contrast. Enjoy this recipe for a family dinner or a cozy night in; either way, it is sure to impress.

Quick Recipe Highlights

  • Flavor Profile: The savory chicken, coupled with a creamy garlic sauce enriched with Parmesan cheese, creates a rich and satisfying flavor that’s irresistible.
  • Texture: Expect a delightful crunch from the fried chicken, which beautifully complements the soft, creamy pasta.
  • Aroma: The garlic and herbs will fill your kitchen with an enticing aroma, making it impossible to resist this dish.
  • Visual Appeal: The combination of crispy chicken and creamy pasta creates an eye-catching presentation that is perfect for any dinner table.
  • Skill Level Needed: This dish isn’t overly complex and is suitable for home cooks with basic frying and pasta-making skills.
  • Special Equipment: A skillet for frying and a pot for cooking pasta are all you need, making this recipe accessible.

Recipe Overview

  • Difficulty Level: The medium difficulty level stems from the frying technique and balancing the creamy sauce. Beginner cooks may feel challenged, but the steps are straightforward.
  • Category: This recipe can be categorized under main dishes, making it an ideal option for a filling lunch or dinner meal.
  • Cuisine: Influenced by Italian-American cuisine, it brings together classic flavors in a comforting style while adding a personal twist.
  • Cost: The ingredients are generally affordable, making this a budget-friendly dish that doesn’t compromise on flavor.
  • Season: Enjoy this dish year-round, as it is cozy enough for chilly days yet satisfying for any occasion.
  • Occasion: Perfect for family gatherings, date nights, or any casual celebration where comfort food is welcomed.

Why You’ll Love This Recipe

Taste and texture play a pivotal role in why you will fall in love with Crispy Chicken with Creamy Pasta. The succulent chicken, coated in a perfectly seasoned breading, provides a satisfying crunch that enhances the experience of the smooth, rich sauce enveloping the pasta. The contrasting flavors of garlic and Parmesan elevate the entire dish, making every bite a harmony of savory goodness.

In addition to its delightful taste, the convenience of this recipe cannot be overstated. Ready in just 45 minutes, it is perfect for busy evenings when you seek a comforting meal without a significant time investment. With simple steps and easy-to-find ingredients, you can whip up this dish with minimal effort, allowing you to spend more time enjoying your meal and less time in the kitchen.

The nutritional benefits also add to its appeal, as this recipe features lean protein from the chicken, while the pasta provides carbohydrates for energy. By adjusting the recipe slightly, you can even incorporate additional vegetables to enhance your dietary intake, ensuring that you savor every bite guilt-free.

Socially, this dish is a great option for entertaining. Its delicious taste and attractive presentation make it a crowd-pleaser, allowing you to impress family and friends alike. Dining together over a hearty plate of pasta fosters connections and builds memorable experiences that you will cherish.

Last but not least, this recipe is cost-effective, using ingredients you can easily find at your local grocery store without breaking the bank. This accessibility encourages more home cooking, allowing you to develop your culinary skills while enjoying delicious meals at home.

Historical Background and Cultural Significance

The origin of Crispy Chicken with Creamy Pasta draws from various culinary traditions that emphasize comfort food. Fried chicken has roots in Southern cooking, while creamy pasta dishes are often celebrated in Italian cuisine. The fusion of these two dishes highlights the beauty of culinary adaptation, showing how various cultures influence our cooking practices.

Culturally, this dish represents the blend of hearty American fare with classic Italian flavors, showcasing how food has the ability to bring different cultures together. It symbolizes family gatherings and comforting meals shared with loved ones, making it not only a dish but an experience.

Over time, Crispy Chicken with Creamy Pasta has evolved from simple home-cooked meals to restaurant favorites, frequently featured on bistro menus. This evolution reflects changing culinary trends that embrace comfort food and rich flavors, ensuring the dish remains relevant in contemporary dining.

Regional variations have emerged, with different spices and ingredients added to personalize the dish. Whether experimenting with different cheeses, sauces, or spices, the freedom to adapt this recipe allows cooks to put their unique spin on a timeless classic.

Ingredient Deep Dive

The star of the dish, chicken, boasts extensive cultural significance in various culinary traditions, symbolizing sustenance and comfort. Rich in protein, chicken promotes muscle health and recovery, making it a staple in many diets. When selecting chicken for this recipe, choose fresh, high-quality pieces, typically boneless and skinless for ease of cooking. For storage, ensure it is kept in a refrigerator at appropriate temperatures and avoid cross-contamination with other foods.

Pasta, the foundation upon which the dish’s creaminess is built, has roots in Italian cuisine and has grown to become a beloved ingredient worldwide. It offers sources of energy, fiber, and essential nutrients when prepared thoughtfully. Selecting the right type of pasta can enhance texture, and it is best stored in a cool, dry place. Should you need substitutions, consider using gluten-free variants or whole grain options for a healthier alternative.

Cream is the key to achieving that beautifully rich sauce. Its history goes back to the days when dairy was first cultivated, adding luxurious flavor and texture. While cream adds unctuousness, it is also essential for achieving a velvety consistency in sauces. When buying cream, look for heavy cream for the best result, and remember to store it in the refrigerator and check for freshness. Alternatives, like cashew or coconut cream, can be considered for dairy-free options.

Common Mistakes to Avoid

  • Overcooking the chicken can lead to dryness. Always ensure it reaches an internal temperature of 165°F while remaining juicy.
  • Using low-quality pasta can affect the final texture; opt for good-quality brands for a better bite.
  • Rushing the cooking of the sauce may leave it grainy; allow it to simmer and thicken properly.
  • Not salting the pasta water is a mistake; it should taste like the sea for flavorful pasta.
  • Skipping on resting time for the chicken can result in a loss of juices, affecting overall flavor.
  • Cream sauces need gentle heat; high temperatures can cause separation, resulting in a less appealing dish.
  • Chopping vegetables too small for the sauce can lead to burning; ensure even sizes for efficient cooking.
  • Ignoring seasoning adjustments; always taste and adjust flavor profiles before serving.

Essential Techniques

To successfully fry chicken, it’s important to master the technique of creating a proper breading. The key lies in seasoning your flour and ensuring it clings well to the chicken. Shake off excess flour before frying to achieve that golden and crispy exterior. Keep an eye on the oil temperature, as too hot can burn the coating while too low can leave it greasy.

When preparing the creamy sauce, sautéing garlic gently is vital to avoid burning, which imparts bitterness. Incorporating heavy cream slowly helps in achieving an even consistency. Visual cues of success include a rich, creamy texture with a silky sheen, signaling it’s ready to serve alongside the pasta.

Pro Tips for Perfect Crispy Chicken with Creamy Pasta

Brining the chicken in a saltwater solution for a couple of hours can enhance juiciness. Choose flavored oils for frying, such as olive or canola oil, to enrich the chicken’s flavor while frying. Always use a thermometer to check chicken doneness; this removes guesswork from the cooking process. Let the fried chicken rest on a wire rack instead of a plate to maintain its crispness.

Make sure to reserve some pasta cooking water before draining; this starch-rich liquid can help adjust sauce consistency. Adding freshly cracked black pepper elevates the dish’s flavor profile and balances the creaminess. If you want more color and nutrition, consider adding well-sautéed vegetables like spinach or mushrooms to the pasta.

Experimenting with different herbs and spices, such as thyme or chili flakes, can create exciting flavor variations. Lastly, always serve the dish hot with a sprinkle of fresh parsley for added brightness and visual appeal.

Variations and Adaptations

For regional variations, consider using Cajun spices for a zesty take on this dish, or incorporate Italian herbs like basil and oregano for a more authentic flavor. Seasonal adaptations may include adding roasted vegetables in the fall or spring to take advantage of in-season produce, enhancing both the taste and presentation.

Dietary modifications could involve utilizing gluten-free pasta or even spiralized zucchini for a lighter option. For those needing dairy-free alternatives, use coconut cream or cashew cream in the sauce for a rich texture without dairy.

Flavor variations such as adding crushed red pepper for a spicy kick or substituting different cheeses can dramatically alter the profile. Texture modifications might include using panko breadcrumbs for an extra crunch or mixed nuts for a unique twist.

Finally, presentation alternatives could involve serving portions in a hollowed-out bell pepper or on a bed of greens, offering an elegant touch to casual dining.

Serving and Presentation Guide

Plating techniques can dramatically affect your dish’s appeal. Opt for a large plate for the pasta base, then slice the crispy chicken and fan it out across the top. Use tongs to apply the sauce directly over the pasta to showcase its creamy goodness, while a sprinkle of parsley or freshly grated Parmesan can elevate the visuals.

Garnishing ideas include a drizzle of truffle oil for a gourmet touch or lemon zest for brightness. Traditional accompaniments for this dish often include garlic bread or a mixed green salad, balancing richness with freshness. For modern serving suggestions, consider serving in rustic bowls or a cast-iron pan to create a homey feel.

Temperature considerations are key; serve immediately while hot, as creamy sauces tend to thicken once cooled. Portion control tips include using ladles or scoops for equal servings, ensuring everyone enjoys the same delicious experience.

Wine and Beverage Pairing

For wine pairings, a crisp Sauvignon Blanc or a Chardonnay with a touch of oak complements the richness of the creamy pasta beautifully. If you prefer red, a light-bodied Pinot Noir can also work well, balancing the flavors without overpowering them.

For non-alcoholic alternatives, consider sparkling water with a splash of lemon juice for a refreshing counterpoint to the richness of the dish. If coffee or tea is more your style, a mild herbal tea can cleanse the palate in between bites, enhancing your dining experience.

Temperature considerations for beverages should ensure whites are chilled, while reds are served at room temperature for optimal enjoyment. Serving suggestions may also include a light cocktail, such as a gin and tonic with fresh herbs, complementing the meal without overwhelming.

Storage and Shelf Life

To properly store leftovers of Crispy Chicken with Creamy Pasta, allow the dish to cool completely before transferring to an airtight container. Refrigerate for up to three days for best quality. If freezing, consider portioning to allow for easy reheating, but keep in mind that the creaminess may change in texture upon freezing.

Make sure to check for signs of spoilage, such as an off smell or unusual texture, before consuming leftovers. For reheating, try using a stovetop instead of a microwave to help maintain the creamy sauce’s consistency; add a splash of broth if it thickens too much.

Storage in a cool, dry place ensures the ingredients remain fresh longer. Avoid prolonged exposure to air, as this can lead to spoilage, especially for the chicken.

Make Ahead Strategies

To prepare this dish ahead of time, you can marinate the chicken a few hours or even the day before for enhanced flavor. The sauce can also be made in advance; just reheat gently and add fresh cream before serving.

If making the pasta ahead, consider undercooking it slightly, as the pasta will continue to cook when reheated. Store it separately to avoid clumping.

Quality impact is minimal when following these make-ahead strategies, and assembling the dish just before mealtime ensures freshness. Add fresh elements, like herbs or lemon zest, right before serving to maintain vibrancy and flavor.

Scaling Instructions

Scaling this recipe is straightforward. Halving the quantities works well, especially if you want to create a smaller portion without compromising on flavor. When doubling or tripling, ensure ample space in your cooking vessels to keep everything even and properly cooked.

Adjusting equipment might be necessary as larger quantities could require wider or deeper pans for frying the chicken or greater pot sizes for pasta.

Timing modifications should be minimal, but be mindful that larger batches might require a bit more frying time. Storage considerations for larger quantities should include using multiple containers to maintain freshness and prevent excess air exposure.

Nutritional Deep Dive

Analyzing the macros for Crispy Chicken with Creamy Pasta reveals a solid protein source from the chicken, making it satiating and great for muscle repair. Carbohydrates from the pasta provide necessary energy, ensuring you stay full longer while enjoying your meal.

Micronutrient analysis shows contributions of calcium from the cream and vitamins from any added vegetables. Understanding these health benefits can motivate individuals to enjoy this dish regularly in a balanced diet.

For specific dietary considerations, focus on managing portion size to align with personal dietary goals, making adjustments based on individual caloric needs. This approach can allow for enjoyment of the dish without compromising health objectives.

Dietary Adaptations

For gluten-free alternatives, consider using corn or rice pasta options that come in various shapes and sizes. For those maintaining a dairy-free lifestyle, using non-dairy cream options alongside nutritional yeast can offer a cheese-like flavor without the dairy.

Vegan adaptations could include using tofu or chickpea cutlets in place of chicken, seasoned and fried similarly to maintain protein content while keeping the dish plant-based. Likewise, you can easily modify the recipe for keto diets by utilizing zucchini noodles instead of pasta, significantly reducing the carb intake.

Paleo dieters can swap traditional pasta for spaghetti squash and use almond flour for the breading on the chicken. Maintaining the dish’s core elements while allowing for nutritional flexibility ensures that it can cater to various dining preferences and dietary needs.

Troubleshooting Guide

Common texture issues, such as soggy chicken, usually stem from inadequate frying time or temperature. Always ensure oil is pre-heated to the right temperature for best results.

Flavor balance can be adjusted by seasoning as you go, tasting frequently to ensure adequate seasoning before serving. If a sauce is too thick, adding reserved pasta water can help achieve the desired consistency.

Equipment challenges, such as overheating grease, can lead to burnt chicken; use a thermometer to monitor oil temperature. Ingredient substitutions can often lead to unsatisfactory results—don’t overlook the importance of using high-quality ingredients for the best culinary experience.

Timing concerns may arise when multitasking; it’s essential to prep all ingredients beforehand to avoid delays during cooking, which can affect the quality of your final dish.

Recipe Success Stories

Community feedback often praises the dish for its robustness and comforting flavors, with many readers sharing their successful adaptations. The use of crushed red pepper for added heat has resonated especially well with those seeking a spicy variation.

Readers have reported amazing results when attempting this recipe for the first time, often complimenting the simplicity of the instructions and the rich, creamy taste that exceeds expectations.

Adaptation stories highlight various substitutions families have made to cater to different dietary restrictions, showcasing the versatility of the dish.

Photography tips from the community suggest using natural lighting to showcase the beautiful colors of the crispy chicken against the creamy pasta, creating visually stunning results that are Instagram-worthy.

Frequently Asked Questions

Can I substitute the chicken for another protein?

Yes, you can use shrimp, tofu, or chickpeas as alternate proteins. Adjust cooking times to suit the protein used; for instance, shrimp cooks faster than chicken.

Is this dish suitable for meal prep?

Absolutely! Prepare the chicken and sauce ahead of time, but keep them separate from the pasta until just before serving to maintain texture.

How can I make the sauce lighter?

Consider using low-fat cream or a mixture of cream with broth to reduce calories while still achieving a creamy texture.

What are some vegetable additions I can make?

You could add sautéed spinach, mushrooms, or roasted red peppers for added nutrition and flavor without sacrificing quality.

Can this recipe be frozen?

Yes, you can freeze portions of the dish. However, the texture of the creamy sauce might change; be prepared for a slightly different consistency upon reheating.

How do I know when the chicken is cooked?

Use a meat thermometer to check for an internal temperature of 165°F. Alternatively, cut into the thickest part and ensure the juices run clear and no pink remains.

What can I serve with this dish?

This dish pairs beautifully with garlic bread, a fresh salad, or steamed vegetables, enhancing the overall meal experience.

How can I adjust the spice level?

Adapt the spice level by adding or reducing crushed red pepper or substitute it for smoked paprika for a different flavor profile without intense heat.

Is it possible to make this dish vegetarian?

Yes, you could use plant-based chicken substitutes or simply emphasize the pasta and creamy sauce, adding mushrooms and nuts for texture and flavor.

What type of sauce works best?

A creamy sauce made with heavy cream, garlic, and Parmesan is ideal. You can also explore white wine sauces or pesto for diverse flavors.

Additional Resources

Foundational cooking techniques, ingredient guides, and insights into essential kitchen tools are vital for anyone seeking culinary mastery. Explore related recipes such as various pasta dishes, chicken recipes, or comfort food classics to expand your culinary repertoire and inspiration.

Equipment recommendations include high-quality frying pans and non-stick pots for easy cooking and cleanup, ensuring creating perfection is straightforward. For seasonal variations, browse offerings that showcase seasonal produce, transforming your Crispy Chicken with Creamy Pasta into a well-rounded dish year-round.

Join the Conversation

Engage with our community by sharing your conquering attempts of this recipe on social media. Share your tips and techniques, as well as any variations you’ve concocted, and inspire fellow food lovers!

Our readers thrive on photography; be sure to snap a photo of your completed dish and share it with us, connecting over culinary successes and stories from your kitchen. Leave a review on our site, detailing your unique approach and flavors, as we love to hear how our recipes inspire creativity and tradition in your home!

The Recipe

Crispy Chicken with Creamy Pasta

Serves: 4

Prep Time: 15 mins

Cook Time: 30 mins

Total Time: 45 mins

Kitchen Equipment Needed

  • Frying pan
  • Pot for boiling pasta
  • Meat thermometer
  • Mixing bowl
  • Whisk

Ingredients

  • 4 boneless, skinless chicken breasts
  • 1 cup all-purpose flour
  • 2 large eggs, beaten
  • 1 cup breadcrumbs
  • 8 oz pasta of choice
  • 1 cup heavy cream
  • 3 cloves garlic, minced
  • ½ cup grated Parmesan cheese
  • 2 tbsp olive oil
  • Salt and pepper to taste
  • Fresh parsley for garnish

Directions

  1. Season chicken with salt and pepper. Dredge in flour, dip in eggs, then coat with breadcrumbs.
  2. Heat olive oil in a frying pan over medium heat. Cook chicken until golden and cooked through, about 7-8 minutes per side.
  3. Meanwhile, cook pasta according to package instructions. Drain and reserve some cooking water.
  4. In the same pan, add garlic and cook until fragrant. Pour in the cream and stir until combined, adding Parmesan cheese.
  5. Toss the cooked pasta in the creamy sauce, adding reserved pasta water if needed.
  6. Plate the pasta and top with crispy chicken, garnishing with fresh parsley before serving.

Recipe Notes

  • For gluten-free options, use gluten-free breadcrumbs and pasta.
  • Add sautéed vegetables to the pasta for extra color and nutrients.
  • This dish can be made ahead; just store components separately to maintain quality.

Delicious Baked French Toast Casserole for Perfect Brunch Delight

Baked French Toast Casserole – Best Brunch Recipe 🍞😋

⚖️
Difficulty
Easy

⏲️
Prep Time
15 mins

🕒
Cook Time
45 mins

⏱️
Total Time
60 mins

🍽️
Servings
8 servings

Discover the ultimate brunch experience with our Baked French Toast Casserole. This delightful casserole features layers of soft bread soaked in a sweet, creamy mixture of eggs, milk, and a hint of cinnamon, baked to golden perfection. Whether you’re hosting a family gathering, celebrating a holiday, or simply enjoying a lazy weekend morning, this dish will impress every palate and satisfy your cravings. Imagine slicing into a warm, flavorful piece, crowned with fresh fruits and a drizzle of maple syrup. It’s truly a feast for the senses!

The beauty of this Baked French Toast Casserole lies in its rich flavors and irresistibly comforting texture. Each bite melts in your mouth, combining sweet hints of vanilla with the warmth of cinnamon. The aroma wafting through your kitchen while it bakes is nothing short of heavenly, inviting everyone to gather around the table. With minimal prep time and the ability to be made ahead, this recipe transforms a traditional breakfast into a memorable occasion, allowing you to enjoy quality moments with loved ones.

Quick Recipe Highlights

  • Flavor Profile: Rich, buttery, and sweet with hints of cinnamon and vanilla.
  • Texture: Soft and custardy interior with a light, crispy topping.
  • Aroma: Sweet notes of cinnamon and vanilla waft through your kitchen during baking.
  • Visual Appeal: Generously topped with fresh berries and a dusting of powdered sugar for a colorful presentation.
  • Skill Level Needed: Beginner-friendly; anyone can master this with basic kitchen skills.
  • Special Equipment: A 9×13 inch baking dish and a whisk for mixing are all you need.

Recipe Overview

  • Difficulty Level: This Baked French Toast Casserole is easy enough for beginner cooks, requiring just simple layering and baking.
  • Category: Ideal for breakfast or brunch and perfect for family gatherings.
  • Cuisine: This dish draws inspiration from classic French breakfast traditions, presented in a contemporary casserole style.
  • Cost: With budget-friendly ingredients like bread, eggs, and milk, it’s an economical choice for any meal.
  • Season: Great year-round, but particularly enjoyed during fall and winter gatherings due to its comfort factor.
  • Occasion: Perfect for holidays, family brunches, and special occasions, bringing everyone together in a delicious way.

Why You’ll Love This Recipe

This Baked French Toast Casserole is a real crowd-pleaser with its balanced combination of taste and texture. The sweetness of the baking custard pairs beautifully with the sponge-like bread, creating a delightful experience with each bite. It’s the perfect treat to wake up to, offering a comforting start to any day. The contrasting texture of a lightly crispy top layer against the custardy middle ensures a brilliant mouthfeel that will have you going back for seconds.

The convenience factor is another major win for this brunch staple. By assembling the casserole the night before and allowing it to sit in the fridge, you can save precious time in the morning. Pop it into the oven while you prepare coffee or fresh juice, and by the time you gather everyone at the table, breakfast is ready and waiting. This simple make-ahead strategy allows maximum socializing time, encouraging conversations rather than kitchen chaos.

On the nutritional front, this dish offers the comfort of carbohydrates from the bread along with protein from the eggs and dairy. For families looking to enjoy a delicious meal while still being mindful of health, this casserole can be a heart-healthy option when made with whole grain bread and reduced-fat dairy products. Furthermore, it can be easily adapted for dietary needs, allowing everyone to indulge guilt-free.

Socially, Baked French Toast Casserole has become a staple for entertaining. It invites everyone to gather around and share good food, making it ideal for celebrations and relaxed Sunday brunches. The ability to serve a crowd with one pan simplifies entertaining, and the shared experience of enjoying a homemade meal adds to the joy of the occasion.

Finally, it’s an accessible dish that won’t break the bank. Ingredients are typically ones you already have on hand or can easily find at your local grocery store. Because of its affordability and generous servings, this casserole is perfect for families or large gatherings, ensuring all tastes are catered to while also remaining budget-friendly.

Historical Background and Cultural Significance

The origins of French toast can be traced back to ancient Rome, where the dish was made with stale bread and a mixture of milk and eggs. This economical meal allowed people to make the most out of leftover bread, avoiding waste and ensuring nourishment during tough times. As centuries went by, this frugal recipe evolved and spread across various cultures, adapting to local tastes and traditions.

In culinary cultures around the world, this type of dish is often associated with comfort and family gatherings. In America, French toast gained popularity as an indulgent breakfast option, particularly in diners where slices of bread were dipped in egg mixtures and cooked to order. Adding the casserole aspect to this traditional recipe introduces an element of convenience without sacrificing the heartwarming flavors.

Over time, Baked French Toast Casserole has experienced modern adaptations that incorporate a variety of ingredients and flavors such as fruit, spices, and even different types of bread. These innovations not only provide delicious variations but also invite creativity, allowing cooks to personalize the dish according to seasonal availability or dietary restrictions.

Regional variations further enhance this recipe’s significance in the culinary world. From using brioche in France to the classic challah in Jewish homes, each culture brings its own flair to the table. The Baked French Toast Casserole joins these traditions, embodying the spirit of sharing food and bringing people together.

Ingredient Deep Dive

Bread: The cornerstone of any French toast, bread provides the structure and texture. Typically, challah, brioche, or thick slices of white bread are preferred for their ability to absorb the egg mixture without falling apart. Bread selection is essential; artisanal or homemade varieties often yield the best results due to their freshness. Storing leftover bread in a cool, dry place can help maintain its quality, and it can be frozen for later use as well.

Eggs: Eggs are crucial for binding the ingredients and adding richness. They contribute protein and healthy fats, making the dish more filling and nutritious. Fresh eggs are best for flavor and texture, so choosing organic or farm-fresh when possible can enhance the dish. Proper storage in the refrigerator will keep them fresh longer, while egg substitutes can be used for those with dietary restrictions.

Milk: Milk adds moisture and creaminess to the egg mixture, creating the custard-like base. Whole milk or half-and-half can be used for a richer taste, while non-dairy alternatives are great for those avoiding animal products. Freshness is key, so always check for expiration dates. If you run out of milk, alternatives like yogurt or sour cream can also work well in a pinch.

Cinnamon: This warm spice is not only aromatic but also adds a comforting flavor typical in French toast recipes. Cinnamon has a long history of use in desserts and breakfast dishes, celebrated for its distinctive taste. Ground cinnamon is best used fresh, but it must be stored in a cool, dark place. You can also experiment with cardamom or nutmeg for a unique twist.

Common Mistakes to Avoid

  • Not letting the bread dry out: Ensure the bread is a bit stale before use; fresh bread can become mushy during baking.
  • Skipping the overnight soak: Allowing the casserole to sit enables the bread to properly absorb the egg mixture, enhancing flavor and texture.
  • Using too much liquid: Balance is key; if the mixture is too runny, the casserole can become soggy, ruining the dish.
  • Forgetting to grease the pan: Prevent sticking by greasing your baking dish adequately before adding the mixture.
  • Baking at the wrong temperature: A too-hot oven can cause the casserole to brown too quickly while remaining uncooked inside.
  • Overbaking: Keep an eye on the casserole; it’s best when still slightly soft in the center.
  • Not adding toppings: Don’t overlook garnishing with fresh fruits, nuts, or syrups, which greatly enhance the overall flavor and presentation.
  • Serving it cold: This dish is best served warm, so ensure to reheat properly if not served immediately.
  • Not covering while baking: If the top browns too quickly, cover with foil to ensure even cooking without burning.
  • Poring syrup too early: Wait until serving to avoid making the casserole soggy.

Essential Techniques

Soaking the Bread: This is crucial for achieving the desired custard-like texture. To master this, ensure that the bread pieces are fully submerged in the egg mixture. Allow the mixture to rest for at least an hour, or preferably overnight, which helps intensify the flavors. Common pitfalls include not using enough liquid or not letting it soak long enough. Visual cues for success include the bread appearing softer and slightly swollen.

Layering: Proper layering of ingredients can enhance flavor distribution throughout the casserole. Start with bread at the bottom, followed by the egg mixture, and then repeat. Avoid compacting the layers, as air circulation is essential for even cooking. The mix should feel airy yet cohesive when done right. Look for a slightly puffy and golden result as an indication of success.

Pro Tips for Perfect Baked French Toast Casserole

1. Choose day-old bread for best absorbency. This will prevent the casserole from becoming too soggy.
2. Experiment with different types of milk for a unique flavor. Almond, coconut, or oat milk can add interesting notes.
3. Add a splash of orange juice or zest to the egg mixture for a refreshing twist.
4. For an extra kick, consider adding a teaspoon of vanilla extract or maple extract to the mix.
5. Let the casserole cool slightly before serving; this helps it set and makes for easier slicing.
6. Serve with a variety of toppings, from fresh berries to whipped cream, to delight every palate.
7. For a slightly crunchier top, sprinkle with a mixture of brown sugar and oats before baking.
8. Customize this dish by mixing in spices that you enjoy, like nutmeg or allspice for added warmth.

Variations and Adaptations

One popular variation of the Baked French Toast Casserole is incorporating seasonal fruits like diced apples, pears, or berries. This not only adds flavor but also enhances the nutritional profile, making it a healthier option. In terms of seasonal adaptations, you can utilize pumpkin puree in the fall to create a comforting pumpkin spice french toast.

Dietary modifications also allow for gluten-free or dairy-free options. By using gluten-free bread and nondairy milk, you can cater to those with dietary restrictions while still enjoying this breakfast favorite. Vegan versions can be created through using flaxseed or chia seeds as an egg substitute, maintaining the dish’s hearty consistency.

Flavors can also be adjusted, such as introducing caramel sauce swirls or chocolate chips for an indulgent dessert-like treat. On the texture front, adding nuts can provide a delightful crunch, contrasting with the soft interior. Presentation alternatives such as serving in individual ramekins or using a muffin tin can add a unique touch, making it a fun option for gatherings.

Serving and Presentation Guide

For a beautifully plated Baked French Toast Casserole, consider cutting the casserole into squares or wedges, allowing each piece to showcase its golden crust and soft center. A light dusting of powdered sugar on top adds elegance while hinting at sweetness. Garnishing with fresh fruits like sliced strawberries, blueberries, or banana enhances visual appeal and freshness.

Traditional accompaniments such as maple syrup or whipped cream can be served on the side to allow guests to customize their dish to taste. Modern serving suggestions include scooping portions into individual bowls for a casual yet charming presentation. Ensure the casserole is served warm for optimal enjoyment, as hot drinks like coffee or tea complement it perfectly.

Pay attention to portion control; cut moderate slices to ensure everyone gets enough to satisfy their morning cravings without overwhelming them. The combination of flavors and textures in cada bite will surely be a highlight of the meal.

Wine and Beverage Pairing

While traditional pairing for breakfast dishes like this is typically non-alcoholic, consider serving a light sparkling wine or mimosa for a celebratory brunch. The refreshing taste of sparkling wine complements the sweetness of the casserole wonderfully, adding a festive touch to the meal.

For non-alcoholic options, fresh fruit juices such as orange or apple juice work beautifully with the flavors of the casserole. Additionally, a rich cup of coffee can elevate the experience, offering a lovely contrast to the sweetness of the dish. If opting for tea, a light herbal or floral blend pairs well without overwhelming flavors.

Always serve beverages at a suitable temperature—chilled juices and beverages should be served dry and cold, while hot drinks should be served steaming to enhance the overall brunch experience.

Storage and Shelf Life

To store leftover Baked French Toast Casserole, allow it to cool completely, then cover tightly with plastic wrap or aluminum foil and place it in the refrigerator. It can be stored for up to 3-4 days without significant loss of flavor. When reheating, ensure it is warmed through to at least 165°F.

For longer storage, consider freezing the casserole before baking. Slice it into portions, wrap each in plastic, and then place in a freezer-safe container. When ready to indulge, simply thaw overnight in the refrigerator and bake until heated through. Always check for signs of spoilage before consumption, such as appearance changes or off smells.

To reheat, preheat the oven to 350°F, cover the casserole with foil to prevent over-browning, and warm for 20-30 minutes. For a quicker option, individual portions can be reheated in the microwave for 1-2 minutes.

Make Ahead Strategies

Preparing your Baked French Toast Casserole in advance can significantly enhance your brunch experience. Begin by assembling the entire casserole the night before, ensuring the bread has ample time to soak overnight. Store it covered in the refrigerator; this allows the flavors to meld beautifully.

If you’re short on time, you can also prepare the egg mixture ahead of time and keep it in the fridge for later use. Simply pour it over the bread in the morning, then bake for a fresh, warm dish in less than an hour.

To ensure the quality doesn’t suffer, avoid adding toppings until just before baking. This will maintain their freshness and prevent browning. Finally, remember that freshly added elements like whipped cream or syrup should always be served separately to keep the main dish perfect.

Scaling Instructions

If you’re looking to adjust the servings of your Baked French Toast Casserole, scaling is straightforward. For halving the recipe, simply reduce each ingredient by half, and adjust the baking dish size accordingly, preferably using an 8×8 inch or similar-sized dish.

Doubling or tripling the recipe can easily be achieved by using a larger dish and extending baking time as necessary. Keep an eye on the casserole to ensure it sets properly, checking with a toothpick for doneness in the center.

Remember that baking times might change depending on the size of your baking dish—larger dishes may require additional time. Always use the visual cues for doneness, ensuring the center isn’t overly soft before removing from the oven.

Nutritional Deep Dive

In terms of macros, a typical serving of Baked French Toast Casserole includes carbohydrates primarily from the bread, protein from the eggs and dairy, and fats, depending on the milk and butter used. This balance makes for a filling breakfast that can kick-start your morning effectively.

Micronutrient analysis reveals that, depending on the ingredients used, the dish can provide vitamins and minerals such as calcium from dairy, vitamin B from bread, and even Vitamin C if fruits are included as toppings.

Health benefits of this dish include its ability to offer sustained energy through complex carbohydrates and protein, making it particularly suited for active mornings. Mindful portioning, especially if you’re watching your weight, can keep indulgence in check while providing satisfaction.

For those interested in dietary considerations, adaptations can optimize nutrient content. Whole grain or seed bread can enhance fiber content, supporting digestive health while managing blood sugar spikes. Enjoying this dish in moderation allows for balance in your overall diet without missing out on flavor.

Dietary Adaptations

For those following a gluten-free diet, selecting gluten-free bread varieties or using gluten-free flour can create an equally delicious version of Baked French Toast Casserole. Be mindful of any added sugars or preservatives in gluten-free bread.

If you’re looking for a dairy-free option, substitute regular milk with almond, soy, or coconut milk and use dairy-free butter. Silken tofu or non-dairy cream can act as effective replacements for eggs, allowing for an equally satisfying casserole that fits your dietary needs.

Vegan adaptations can be made using flaxseed meal combined with water as an egg alternative. Switching to plant-based milks and butters ensures that all dietary restrictions are honored while maintaining delightful flavor.

For those adhering to low-carb or keto diets, a fantastic alternative can include using low-carb bread options or even cauliflower as a substitute for bread, creating a unique twist while keeping it within dietary guidelines.

Troubleshooting Guide

If you’re facing texture issues, such as a soggy casserole, it’s likely due to over-soaking the bread or using 100% fresh bread instead of stale. Use a combination of stale and fresh for the best results in texture.

If the flavors seem off, ensure proper seasoning; a pinch of salt is essential to elevate the sweetness and balance flavors. If it’s too sweet, consider reducing any added sugars in the egg mixture.

Temperature problems can arise if the oven is not properly calibrated. Always use an oven thermometer to ensure your cooking environment is accurate, as undercooked casseroles may yield a runny center while overbaking can dry it out.

Should you run into equipment challenges, ensure your baking dish is suitable for the expected temperature and size, as glass or ceramic dishes often perform better than standard metal pans for even baking.

For ingredient substitutions, consider using equivalent amounts of additional ingredients to maintain texture and flavor, such as almond milk instead of regular milk or chia seeds in place of eggs in vegan recipes.

Timing concerns can be resolved by preparing in advance, allowing ample time for baking. Ensure to add an extra few minutes if doubling the recipe for larger dishes.

Recipe Success Stories

Community feedback around this recipe has been overwhelmingly positive. Many have praised the Baked French Toast Casserole for its simplicity and the ability to impress guests without exhausting effort. The ease of preparation has received particular note, making it a popular choice for both novice and experienced cooks alike.

Readers have shared variations including seasonal fruits, nuts, and different bread choices that resulted in unique versions of this classic dish. Such stories not only inspire adaptations but also enrich the community’s overall recipe experience.

Suggested photography tips for this casserole focus on capturing its golden crust and colorful fruit toppings. Natural lighting during the day complements the dish’s warm tones, appealing to potential recipe followers.

Lastly, we’ve collected numerous adaptations shared by users, demonstrating how Baked French Toast Casserole can serve countless tastes and dietary needs, proving its versatility in culinary settings.

Frequently Asked Questions

Q1: Can I use any type of bread?
Yes, you can use various bread types. Challah, brioche, or even whole wheat bread works well for this recipe. Each type will provide a different texture and flavor, so feel free to experiment.

Q2: How can I make this dish gluten-free?
To make a gluten-free version, simply choose gluten-free bread and ensure all other ingredients are gluten-free. Many grocery stores offer a variety of gluten-free options that work well in casseroles.

Q3: Can I prepare this casserole in advance?
Absolutely! You can prepare the casserole the night before and let it sit in the refrigerator. Just pop it in the oven the next morning for a hassle-free breakfast.

Q4: What toppings can I add?
Toppings can include fresh fruits, powdered sugar, maple syrup, or whipped cream. Choose any combination that suits your taste for a delicious finish!

Q5: How do I store leftovers?
Store any leftovers in an airtight container in the refrigerator for up to 3-4 days. You can heat slices in the microwave or oven before serving.

Q6: Can I freeze this casserole?
Yes, you can freeze it before baking or after it’s cooked. For best results, cover it tightly with foil or plastic wrap and store in the freezer for up to 2 months.

Q7: How do I reheat the casserole?
To reheat, simply bake at 350°F (175°C) until warmed through, or use the microwave for individual portions. Ensure it reaches an internal temperature of 165°F (74°C).

Q8: Is it possible to make this vegan?
Yes, swap the eggs for a flaxseed meal or chia seed mix (1 tablespoon of flaxseed or chia seeds with 2.5 tablespoons of water per egg) and use a dairy-free milk alternative.

Q9: Can I add chocolate or nuts to the mixture?
Absolutely! Incorporating chocolate chips, nuts, or even caramel into the mix adds a delightful twist. Just remember to adjust sweetness levels accordingly.

Q10: What should I serve with this casserole?
It pairs well with breakfast meats like bacon or sausage, fresh fruit, and of course, coffee or juice to complete your meal.

Additional Resources

Explore more related recipes like overnight oats, breakfast burritos, or quiches to diversify your brunch menu! Technique guides on mastering egg dishes and baking tips can further enhance your kitchen skills.

Learn about ingredient substitutions for dairy or gluten needs in your baking endeavors, ensuring all guests can enjoy the meal. Additionally, find recommended kitchen equipment to make your culinary experience more enjoyable and efficient.

Finally, embrace seasonal variations by incorporating ingredients based on the time of year, providing freshness and a homey touch to every dish.

Join the Conversation

Engaging with us on social media and sharing your take on this Baked French Toast Casserole can inspire others and build a supportive cooking community. Please feel free to post your photos, variations, and experiences in preparing this delightful dish.

Your feedback is invaluable; we love hearing about your successes or any adaptations you’ve made to fit your family’s tastes. Together, let’s explore the endless possibilities this recipe can bring to your brunch table!

The Recipe

Baked French Toast Casserole

Serves: 8 servings

Prep Time: 15 mins

Cook Time: 45 mins

Total Time: 60 mins

Kitchen Equipment Needed

  • 9×13 inch baking dish
  • Mixing bowl
  • Whisk
  • Measuring cups and spoons
  • Spatula

Ingredients

  • 1 loaf of french bread or challah, cut into cubes
  • 8 large eggs
  • 2 cups milk
  • 1/2 cup heavy cream
  • 1/2 cup sugar
  • 2 teaspoons vanilla extract
  • 2 teaspoons cinnamon
  • 1/4 teaspoon salt
  • 1/2 cup maple syrup (optional for serving)
  • Fresh fruits for garnish (optional)

Directions

  1. Preheat your oven to 350°F (175°C).
  2. In a large mixing bowl, whisk together the eggs, milk, cream, sugar, vanilla, cinnamon, and salt until fully combined.
  3. Add the cubed bread to the bowl, stirring gently until all pieces are coated. Let this soak for about 10-15 minutes.
  4. Transfer the mixture to a greased 9×13 inch baking dish, spreading it evenly.
  5. Bake in the preheated oven for 45 minutes, or until the top is golden brown and a knife inserted in the center comes out clean.
  6. Remove from the oven and let cool for a few minutes before slicing. Serve warm with maple syrup and fresh fruit.

Recipe Notes

  • This casserole can be prepared the night before and refrigerated for up to 12 hours before baking.
  • For added texture, sprinkle some oats or nuts on top before baking.
  • You can substitute the milk with almond or coconut milk for a dairy-free version.
  • Feel free to get creative and add chocolate chips or seasonal fruits to the mixture.

Indulge in No Bake Pineapple Heaven Cheesecake Bliss

No Bake Pineapple Heaven Cheesecake: A Tropical Delight in Every Bite

⚖️
Difficulty
Easy

⏲️
Prep Time
15 mins

🕒
Cook Time
0 mins

⏱️
Total Time
15 mins

🍽️
Servings
8 servings

This No Bake Pineapple Heaven Cheesecake is a delightful escape to a tropical paradise. With its creamy consistency and fruity sweetness, each slice is a perfect balance of indulgence and refreshment. The smooth cream cheese blended with rich whipped topping creates a luscious filling, complementing the vibrant sweetness of pineapple chunks. This dessert is not just for special occasions; it’s an everyday treat that brings sunshine to any gathering.

The tropical aromas of fresh pineapple combined with the creamy cheesecake waft through your kitchen as you prepare this simple yet elegant dessert. It’s a straightforward recipe that requires no baking, making it perfect for those hot days when you want a cool, refreshing treat without heating up the kitchen. Whether for a summer barbecue, a birthday celebration, or just because, this No Bake Pineapple Heaven Cheesecake promises to impress your guests and satisfy your sweet tooth.

Quick Recipe Highlights

  • Flavor Profile: Expect a delightful mix of creamy cheesecake and fresh pineapple sweetness that dances on your palate.
  • Texture: This dessert has a smooth and creamy filling with a slight crunch from the graham cracker crust.
  • Aroma: The fragrant notes of pineapple combined with the subtle sweetness of vanilla create an inviting aroma.
  • Visual Appeal: The vibrant yellow color of the pineapple against the creamy filling offers a beautiful contrast, making it perfect for presentation.
  • Skill Level Needed: This no-bake recipe requires minimal skills, making it accessible for beginners and baking enthusiasts alike.
  • Special Equipment: All you need is a mixing bowl, a whisk, and a pie dish or springform pan.

Recipe Overview

  • Difficulty Level: Creating this cheesecake is simple, as it involves mixing and layering ingredients with no complex baking techniques required.
  • Category: This is a dessert recipe perfect for summer celebrations, gatherings, or any sweet craving moment.
  • Cuisine: The recipe draws inspiration from classic American dessert traditions, featuring tropical flavors that enhance its appeal.
  • Cost: Relatively inexpensive with basic ingredients like cream cheese, whipped topping, and pineapple, this cheesecake offers great value.
  • Season: Best enjoyed during warmer months when fresh fruits are in season, adding to the tropical vibe.
  • Occasion: Ideal for parties, potlucks, or family dinners, it translates well for various occasions, bringing smiles all around.

Why You’ll Love This Recipe

This No Bake Pineapple Heaven Cheesecake captivates both the eyes and taste buds. The refreshing taste and creamy texture are simply irresistible, making it a crowd-pleaser. It’s not just about the flavor; the fun twist of tropical ingredients brings a vacation-like feel to your home. The addition of real pineapple takes the traditional cheesecake up a notch, creating an entirely new taste sensation that is both nostalgic and exciting.

Convenience is at the heart of this recipe. With a quick prep time of just 15 minutes, you can easily whip up this dessert after a long day. There’s no need for complicated preparation or baking, allowing you to focus on enjoying time with friends and family. Just mix, layer, and chill! This no-bake cheesecake saves time and effort while still delivering a spectacular dessert that looks and tastes gourmet.

Nutritionally, this cheesecake offers some benefits as well. While it’s indulgent, using fresh pineapple adds a dose of vitamins and minerals that many desserts lack. The inclusion of cream cheese provides protein, giving you a satisfying treat without an overwhelming sugar content. It’s a delightful occasion to enjoy dessert without the guilt, perfect for health-conscious dessert lovers.

Whether you’re hosting a gathering or simply looking to treat yourself, this cheesecake serves as a beautiful centerpiece. Its colorful layers and impressive appearance invite conversation and bring joy to your table. Share it with loved ones during special occasions, or enjoy it alone while savoring every creamy bite—it’s a dessert that creates memories.

Lastly, this No Bake Pineapple Heaven Cheesecake is an affordable choice for any home baker. The ingredients are easy to find and can fit well within a modest budget. Plus, making a larger batch won’t break the bank, allowing you to enjoy it at many gatherings without financial strain. This dessert is not just delicious but also accessible; a true win-win!

Historical Background and Cultural Significance

The pineapple, once considered the ultimate symbol of hospitality, has a rich history that finds its way into countless dessert recipes. Originating from South America, it has become a global favorite, celebrated for its sweetness and lush texture. Historically, presenting a pineapple at a social gathering symbolizes warmth and welcome, adding a layer of cultural significance to desserts made with this fruit.

Cheesecake itself has origins dating back centuries, with variations appearing in ancient Greek and Roman cuisines. The concept has evolved, leading to numerous styles and flavors. The post-war era saw the emergence of no-bake cheesecakes, allowing more people to enjoy this delightful dessert without traditional baking techniques, further solidifying its place in American culture. The No Bake Pineapple Heaven Cheesecake is emblematic of this evolution—bringing the classic flavors of cheesecake together with a tropical twist.

Regional variations of cheesecake exist worldwide, each adapting to local tastes and available ingredients. In the United States, we see adaptations incorporating fresh fruits, whipped toppings, and an array of flavors that suit the diverse palates of its people. The No Bake Pineapple Heaven Cheesecake is a sweet marriage of these traditions, taking a classic dessert and infusing it with vibrant tropical flavors, resulting in a beloved recipe shared across sheets of paper and family gatherings.

As culinary traditions continue to blend and evolve, the popularity of recipes like this reminds us of the delightful interchange of flavors and customs. They reflect our ever-expanding tastes while honoring the history behind the ingredients we cherish today.

Ingredient Deep Dive

  • Pineapple: Known for its bright flavor and beautiful appearance, pineapple is a tropical fruit rich in vitamins A and C, making it a nutrient-dense choice for desserts. When selecting fresh pineapple, look for a firm fruit with a sweet aroma; avoid any that have dark spots or an overly soft texture. Store fresh pineapple in the refrigerator wrapped in plastic to prolong freshness. Canned pineapple can be used as a convenient alternative, providing the same great flavor with a longer shelf life.
  • Cream Cheese: An essential component of many cheesecakes, cream cheese adds a rich, tangy depth to this dessert. Its fat content provides a creamy mouthfeel that perfectly balances the sweetness of pineapple. Opt for full-fat cream cheese for optimal results, as low-fat versions may compromise texture. Store leftovers properly in the fridge, and consider freezing it if you won’t use it soon, although thawed cream cheese may be best for cooking rather than spreadable uses.
  • Whipped Topping: Offering a light, airy texture, whipped topping enhances the cheesecake’s creaminess without making it too heavy. Dairy or non-dairy variations are available, catering to different dietary needs. When choosing store-bought whipped toppings, be mindful of added sugars and preservatives; aim for products made with natural ingredients. If you have leftovers, store them in the refrigerator, ensuring it’s sealed tightly to maintain freshness.
  • Graham Cracker Crust: The crumbly crust adds a satisfying crunch and complements the creamy filling. A pre-made graham cracker crust saves time, but making your own allows customization of sweetness and flavor. To store crushed graham crackers for a homemade crust, keep them in an airtight container to preserve their texture. If you’re looking for gluten-free options, consider using crushed gluten-free graham crackers or almond flour as a base.

Common Mistakes to Avoid

  • Overmixing the Filling: When incorporating the whipped topping with the cream cheese, mix gently. Overmixing can lead to a runny texture rather than the desired creamy consistency.
  • Using Warm Ingredients: Make sure your cream cheese is at room temperature before mixing to avoid lumps and ensure a smooth filling.
  • Skipping the Chill Time: Proper chilling allows the cheesecake to set correctly. Skipping this step means you may have a soupy dessert when slicing.
  • Not Draining the Pineapple: If using canned pineapple, be sure to drain excess juice to avoid a watery filling.
  • Inadequate Crust: Press the graham cracker crust firmly into the pan. A loosely packed crust may fall apart when slicing the cheesecake.
  • Using Expired Ingredients: Check the expiration dates on cream cheese and whipped topping to ensure freshness, as stale ingredients can greatly affect flavor and texture.
  • Substituting Ingredients: While substitutions can work, certain elements (like full-fat cream cheese) are critical for achieving the best flavor and texture.
  • Improper Storage: Ensure the cheesecake is covered when chilling or storing to prevent it from absorbing odors from other foods.
  • Neglecting Presentation: Spend a little time on presentation—garnishing with fresh pineapple or mint can elevate the visual appeal.
  • Ignoring Allergies: Be mindful of guests’ dietary restrictions regarding allergies or intolerances, especially when serving a mixed group.

Essential Techniques

  • Mixing: Introducing air into your cream cheese while mixing is essential for a light texture. Use a hand mixer on low speed initially, then increase to medium once combined. Carefully fold in whipped topping to maintain that fluffiness. Watch for visual cues: the mixture should be smooth with no lumps for the ideal creamy texture.
  • Chilling: Allowing the cheesecake to chill is crucial for setting. Aim for at least 4 hours in the fridge, preferably overnight if time allows. This helps the flavors meld together and creates a more cohesive dessert. Check the firmness with a gentle press—if it holds its shape and is cool to the touch, it’s ready to serve.

Pro Tips for Perfect No Bake Pineapple Heaven Cheesecake

  • For an extra tropical touch, add shredded coconut to the filling or top it with toasted coconut flakes.
  • Experiment with different fruits. Mango or strawberries can be delicious alternatives to pineapple.
  • Use a food processor for quicker graham cracker crust preparation, ensuring even texture and consistency.
  • Chill your mixing bowl and beaters before whipping the topping to achieve a fluffier consistency.
  • If you want a thicker filling, consider adding gelatin or a few tablespoons of powdered sugar to stabilize it.
  • Incorporate a splash of coconut milk into the filling for a creamier, more tropical flavor.
  • Let the cheesecake sit at room temperature for 10-15 minutes before slicing for easier cutting.
  • Garnish with fresh mint or additional pineapple slices for a beautiful presentation and fresh flavor.

Variations and Adaptations

  • For a chocolate version, try adding cocoa powder to the cream cheese mixture or using chocolate wafer cookies instead of graham crackers for the crust.
  • Seasonal adaptations include using pumpkin puree during fall to create a Pumpkin Pineapple Cheesecake that’s festive and flavorful.
  • If you’re looking for dietary modifications, you can substitute coconut cream for whipped topping to create a richer texture while keeping it dairy-free.
  • For a more intense flavor, mix in pineapple juice or even rum for an adult twist on this classic dessert.
  • Texture modifications can include adding chopped nuts or cookie pieces into the crust to enhance crunchiness.
  • Presentation alternatives can range from serving in individual cups layered with pineapple chunks to making mini cheesecakes in muffin tins.

Serving and Presentation Guide

  • For an elegant display, slice the cheesecake into even portions using a hot, dry knife to achieve clean cuts.
  • Add a dollop of whipped cream or a scoop of ice cream on each plate as a classic and beloved accompaniment.
  • Garnish with freshly sliced pineapple and mint leaves for visual appeal and fresh flavor enhancement.
  • Serve the cheesecake chilled but allow it to sit for a few minutes at room temperature for optimal flavor release.
  • Consider a sprinkle of colorful edible flowers for those special occasion dinners to elevate the aesthetic appeal.
  • Portion control is vital; use small plates for servings to showcase the cheesecake in a refined manner, allowing guests to sample various desserts.

Wine and Beverage Pairing

  • A light, fruity white wine like a Sauvignon Blanc pairs beautifully with the tropical flavors of the cheesecake, enhancing the sweetness without overpowering it.
  • For non-alcoholic options, consider serving a refreshing iced tea infused with pineapple or coconut flavors to complement the dessert.
  • If coffee is at your gathering, a smooth, medium-roast coffee works well, enhancing the creamy elements of the cheesecake while balancing out its sweetness.
  • Chilled sparkling water with a twist of lime can offer a refreshing palate cleanser after indulging in the cheesecake.
  • Ensure beverages are well-chilled to maintain the dessert’s refreshing experience; warm drinks can contrast uncomfortably with the cool cheesecake.

Storage and Shelf Life

  • Store leftovers in an airtight container in the refrigerator for up to four days. Ensure it’s well-covered to prevent it from absorbing other odors in the fridge.
  • The cheesecake must remain chilled; do not leave it at room temperature for longer than two hours to prevent spoilage.
  • Signs of spoilage include discoloration, an off smell, or an unintended sour taste; discard if any of these occurs.
  • If you want to extend the life of your cheesecake, you can freeze it. Wrap it tightly in plastic wrap and foil to prevent freezer burn.
  • To reheat and enjoy, let it thaw in the fridge for several hours; do not microwave, as this can ruin the texture.

Make Ahead Strategies

  • You can prepare this cheesecake a day or two in advance. Just be sure to cover it well in the refrigerator for optimal freshness.
  • If you plan to make the crust ahead of time, assemble and refrigerate it separately to ensure it remains crispy.
  • Quality, when made ahead, can remain high if not assembled for too long prior to serving; consider making the filling fresh if time allows.
  • When reheating, avoid adding fresh toppings until right before serving to maintain their texture and appeal.
  • Chill all components before assembling for a firmer texture and better flavor integration in the final product.

Scaling Instructions

  • Halving the recipe can easily be achieved by dividing all ingredients by two, making it perfect for smaller gatherings.
  • To double or triple the recipe, use larger mixing containers and consider the additional time needed for serving sizes.
  • For equipment adjustments, a larger springform pan may be necessary when scaling up to avoid overflow during chilling.
  • Timing modifications aren’t drastic, but ensure proper chilling times remain consistent with the recipe for best results.
  • For storage, ensure each scaled batch is well-separated in its container to prevent cross-contamination of flavors.

Nutritional Deep Dive

  • Macro breakdown shows that this dessert can provide a combination of carbohydrates, fats, and a moderate protein level depending on the cream cheese used.
  • Micronutrient analysis indicates crucial vitamins from the pineapple, such as vitamin C and manganese, that contribute to overall health benefits.
  • The health benefits of utilizing fresh fruit shine through in this recipe, along with protein-rich cream cheese making it a satisfying dessert option.
  • Dietary considerations are important; be cautious with portion sizes to manage sugar intake, especially for those monitoring their health or weight.
  • Understanding portion analysis can guide appropriate serving sizes, aiding individuals in managing their caloric intake and indulgence levels.

Dietary Adaptations

  • If you’re looking for a gluten-free version, simply replace graham crackers with gluten-free cookie options or crushed almonds for the crust.
  • Dairy-free variations can easily be created with cashew cream or coconut cream to substitute for traditional cream cheese and whipped topping.
  • For a vegan option, use coconut whipped topping and a plant-based cream cheese alternative, ensuring all ingredients align with dietary needs.
  • Low-carb adaptations can benefit from using almond flour in place of graham crackers, while also limiting added sugar in the filling.
  • Keto adaptations can follow low-carb guidelines, potentially bypassing any high-sugar fruits and focusing on lower-carb alternatives.
  • The paleo diet can integrate this cheesecake by using whole food ingredients without additives, focusing on natural sweeteners.
  • Low-FODMAP modifications may include carefully selecting low-fructose fruits to reduce digestive impact for sensitive individuals.

Troubleshooting Guide

  • If your cheesecake turns out too runny, check your mixing technique—overmixing can introduce excess air, affecting texture; always fold in the whipped topping gently.
  • For flavor balance issues, consider adding a dash of lemon juice to brighten the taste; sometimes, a hint of acidity can enhance flavors.
  • In case of temperature problems during serving, allow the cheesecake to warm slightly at room temperature for improved slicing.
  • If equipment challenges arise, such as a sticky crust, ensure that you’re pressing the base firmly or consider using a non-stick pan for easy removal.
  • Ingredient substitutions can lead to unexpected results; always follow the recipe closely, especially for binding agents in the cheesecake mix.
  • Timing concerns can affect quality; remember to adjust chilling times if making smaller or larger batches to ensure even setting.

Recipe Success Stories

  • Community feedback often highlights how welcoming and refreshing this dessert is at summer gatherings, with guests frequently asking for the recipe.
  • Variation successes showcase how easily the cheesecake adapts to different seasonal fruits, with strawberries becoming a popular alternative during spring.
  • Adaptation stories reveal readers swapping out heavy cream cheese for lighter alternatives to meet their dietary preferences without sacrificing flavor.
  • Photography tips shared by fellow bakers emphasize the importance of good lighting and garnishing for making this cheesecake look mouth-watering on social media.

Frequently Asked Questions

Can I use fresh pineapple instead of canned? Absolutely! Fresh pineapple adds a vibrant flavor, but remember to drain it well to avoid excess liquid in the filling.

How do I prevent the crust from getting soggy? Ensure that your crust is packed tightly and consider pre-baking it for 10 minutes to enhance firmness before adding the filling.

Can I make this cheesecake ahead of time? Yes! This cheesecake can be made up to 2 days in advance, making it an excellent option for prepping before gatherings.

What can I substitute for cream cheese? For a lighter option, consider using Greek yogurt or a plant-based cream cheese if you want a dairy-free alternative.

Can I freeze No Bake Pineapple Heaven Cheesecake? Yes, this cheesecake can be frozen. Just wrap it tightly and store it, though the texture may change slightly after thawing.

How long will it last in the fridge? It will stay fresh in the fridge for about 4 days when stored properly in an airtight container.

Is it possible to add extra flavor? Absolutely! You can include vanilla extract or rum for added depth to the flavor profile.

How should I cut the cheesecake for serving? For clean cuts, run a knife under hot water, dry it, and then slice the cheesecake; repeat for each cut.

Can I use a different type of crust? Yes, you can get creative! Try chocolate cookies, digestive biscuits, or even a nut crust for unique flavors.

What’s the best way to store leftovers? Keep leftovers in an airtight container in the fridge for up to 4 days to maintain the best flavor and freshness.

Additional Resources

  • For more refreshing desserts, check out our Mango Mousse and Strawberry Shortcake recipes for seasonal inspirations!
  • Explore ingredient information for puff pastry and local fruits to enhance your baking skills.
  • Technique guides on making homemade whipped cream can add an interactive touch to your dessert presentations.
  • Consider recommendations for kitchen tools, like high-quality mixing bowls and spatulas, to make the process smoother and more enjoyable.
  • Seasonal changes in fruit availability are a great opportunity to try new recipe variants, keeping your dessert selections fresh and exciting.

Join the Conversation

  • Share your completed No Bake Pineapple Heaven Cheesecake on social media and tag us! We love seeing your beautiful creations!
  • For photography, ensure good lighting and a clean presentation—natural light works wonders for showcasing your dessert!
  • Engage with fellow recipe enthusiasts in the comments—ask questions, share variations, and provide suggestions for enhancing this delightful recipe!
  • Share your experiences and adaptations for others to learn from as we create a community of home bakers excited about their culinary journeys.

The Recipe

No Bake Pineapple Heaven Cheesecake

Serves: 8 servings

Prep Time: 15 mins

Cook Time: 0 mins

Total Time: 15 mins

Kitchen Equipment Needed

  • Mixing bowl
  • Whisk or electric mixer
  • Pie dish or springform pan
  • Spatula

Ingredients

  • 1 can (20 oz) crushed pineapple, drained
  • 8 oz cream cheese, softened
  • 1 cup whipped topping
  • 1/2 cup powdered sugar
  • 1 cup graham cracker crumbs
  • 1/3 cup unsalted butter, melted

Directions

  1. Combine the graham cracker crumbs and melted butter in a bowl. Press the mixture firmly into the bottom of the pie dish or springform pan.
  2. In a separate bowl, beat the cream cheese and powdered sugar together until smooth.
  3. Fold in the drained crushed pineapple into the cream cheese mixture.
  4. Gently fold in the whipped topping until combined and smooth.
  5. Pour the filling into the prepared crust and spread evenly. Cover with plastic wrap and refrigerate for at least 4 hours before serving.
  6. Garnish with fresh pineapple or mint leaves before serving, if desired.

Recipe Notes

  • Use fresh pineapple for a more vibrant flavor.
  • Feel free to add shredded coconut for a tropical twist.
  • Make ahead and store in the refrigerator for up to 4 days; it also freezes well!

Crispy Homemade Mozzarella Sticks: The Ultimate Snack Recipe

Crispy Homemade Mozzarella Sticks: The Ultimate Snack Delight

⚖️
Difficulty
Easy

⏲️
Prep Time
15 mins

🕒
Cook Time
10 mins

⏱️
Total Time
25 mins

🍽️
Servings
4

Mozzarella sticks are the ultimate comfort food that often invoke nostalgia from childhood snacks. This crispy homemade mozzarella sticks recipe delivers that satisfying crunch paired with melting, gooey cheese that will have your taste buds singing. Imagine biting into a perfectly fried stick, golden on the outside and oozing with warm mozzarella inside, served with marinara or your favorite dipping sauce. This delightful snack not only pleases the palate but also enhances any gathering or movie night with friends and family.

The beauty of making mozzarella sticks at home lies in their simplicity and the ability to customize them to your liking. You control the quality of the ingredients used, ensuring your homemade mozzarella sticks are fresh, flavorful, and healthier than many store-bought options. Be prepared for a bit of a mess—but the joy of enjoying crispy, cheesy goodness will far outweigh any cleanup afterwards!

Quick Recipe Highlights

  • Flavor Profile: These mozzarella sticks are savory and cheesy, with a hint of garlic and herbs for an unforgettable burst of flavor.
  • Texture: The contrast between the crispy exterior and gooey cheese interior creates a delightful mouthfeel that’s hard to resist.
  • Aroma: The savory aroma of fried cheese wafts through the kitchen, making it impossible to wait until they’re ready.
  • Visual Appeal: Golden-brown and mesmerizingly cheesy, these mozzarella sticks are a feast for the eyes as much as they are for the stomach.
  • Skill Level Needed: If you can fry an egg, you can master the art of frying mozzarella sticks!
  • Special Equipment: You’ll need basic frying equipment like a deep pot, a thermometer for oil, and a draining tray to catch excess grease.

Recipe Overview

  • Difficulty Level: This easy recipe requires minimal skills, making it perfect for beginner cooks or anyone looking to enjoy a delicious homemade snack.
  • Category: Snack food that can serve as an appetizer or a party treat for sports game gatherings and family get-togethers.
  • Cuisine: Drawing influences from Italian-American cuisine, mozzarella sticks have become a popular snack across the United States.
  • Cost: “Crispy Homemade Mozzarella Sticks” are budget-friendly, with ingredients often costing less than $10 for a generous batch.
  • Season: Enjoy these mozzarella sticks year-round, but especially during game days, parties, or cozy winter evenings.
  • Occasion: Perfect for casual parties, family movie nights, or simply as a satisfying snack any time of the day!

Why You’ll Love This Recipe

Mozzarella sticks offer an incredible taste and texture that keeps snack enthusiasts coming back for more. The delicate crunch of the breadcrumb coating yields to the stretchy, melted cheese, creating a heavenly experience in every bite. The combination of flavors, particularly when dipped in marinara sauce or even ranch dressing, makes each serving even more delightful.

The convenience of this crispy homemade mozzarella sticks recipe cannot be overstated. With just a few ingredients and simple steps, you can whip up a batch of these cheesy delights in no time. They are perfect for busy weeknights or last-minute gatherings where you want to impress your guests without fussing in the kitchen for hours.

From a nutritional point of view, mozzarella cheese is a source of calcium and protein, making these treats a fun way to sneak in some nutrition as a snack. While they’re certainly a guilty pleasure, enjoying them in moderation can fit into a balanced diet, especially when paired with fresh veggies or a side salad.

Socially, mozzarella sticks are a fantastic option for gatherings. They are easily shareable and are a favorite among both kids and adults, making them a sure hit at parties. Whether you’re celebrating a special occasion or just kicking back for a casual evening, these crispy delights can light up the festivities.

Cost-efficiency is another advantage of making your own mozzarella sticks. Buying cheese and breadcrumbs in bulk not only saves money but also allows for customization in seasonings, ensuring your sticks are unique and tailored to your taste. With a small investment, you can create a large batch that will satisfy numerous guests.

Historical Background and Cultural Significance

The origins of mozzarella sticks can be traced back to the Italian tradition of frying cheese, a practice that celebrates the extraordinary texture and taste of mozzarella. Historically, cheese has played a vital role in Italian and Italian-American cuisine, transforming simple ingredients into comfort food for many. As immigration brought culinary traditions to the U.S., they evolved into the beloved appetizer we enjoy today.

Cultural significance lies in the nostalgia and comfort many associate with mozzarella sticks. They aren’t just snacks but a part of culinary culture in parties, family gatherings, and casual dining in America. Their popularity soared in the 1980s as fast food establishments added them to their menus, solidifying their place in American snack culture.

Over time, the recipe has evolved, adopting regional variations such as adding spices or experimenting with different cheeses. While the traditional version remains popular, variations have introduced flavors like jalapeño for a spicy kick or pepper jack cheese for a twist.

Different regions across the United States have created their own takes on mozzarella sticks, reflecting local tastes and preferences. In some areas, they may be served with unique sauces or sides, showcasing how versatile this dish can be within different culinary contexts.

Ingredient Deep Dive

Mozzarella cheese, a key ingredient, boasts a rich history that dates back to Italy in the 12th century. Traditionally made from water buffalo’s milk, mozzarella became popular due to its delightful texture and mild flavor. It’s rich in protein and calcium, and choosing fresh mozzarella can enhance the taste and stretchiness, making your sticks even cheesier and more delectable.

When selecting breadcrumbs for this recipe, opt for panko for a lighter, crispier texture. Panko breadcrumbs originated in Japan and are coarser than traditional breadcrumbs, yielding that perfect crunch you want in a mozzarella stick. They can be found in most grocery stores, and it’s wise to check for freshness to get the best results.

Eggs serve as an essential binding agent in this recipe. The protein in eggs helps hold the cheese and breadcrumbs together, ensuring that the cheese doesn’t ooze out during frying. Always choose fresh eggs for the best binding effect and flavor enhancement.

Flour acts as the primary coating foundation that allows the egg mixture to adhere to the cheese. All-purpose flour is typically used, but for a gluten-free option, you can substitute with a blend like almond or coconut flour. Both will add unique flavor and texture while maintaining the structural integrity required for proper frying.

Oil selection plays a significant role in frying. Vegetable oil or canola oil is ideal as they have high smoke points, which is essential for achieving that crispy outer layer. Avoiding olive oil for frying mozzarella sticks is advisable due to its lower smoke point, which could lead to a burnt flavor at high frying temperatures.

Common Mistakes to Avoid

  • Not drying the cheese: Allowing mozzarella to dry for at least 30 minutes before coating helps prevent the cheese from leaking during frying.
  • Overheating oil: If the oil temperature exceeds 375°F, it can result in overly brown sticks that are raw inside. Use a thermometer to ensure optimal frying conditions.
  • Inadequate coating: Skipping the flour and egg mixture will lead to breadcrumbs falling off during frying. Ensure each stick is thoroughly coated before frying.
  • Fry too many at once: Overcrowding the pan can lower the oil temperature, causing the sticks to fry unevenly. Fry in small batches for the best results.
  • Not using panko breadcrumbs: Utilizing traditional breadcrumbs may result in a less crispy texture. Opt for panko to achieve that perfect crunch.
  • Using cold cheese: Start with room temperature cheese to better facilitate even frying and a nice stretch when bitten into.
  • Popping oil: If your oil is splattering excessively, it could be too hot or you may have excess moisture. Lower the heat to prevent mess and ensure safety.
  • Serving too quickly: Allowing the mozzarella sticks to cool for a minute after frying helps set the cheese, preventing it from oozing out on the first bite.
  • Skipping the marinara: While they’re delicious on their own, serving them without a dipping sauce can be a missed opportunity for flavor enhancement.
  • Not seasoning properly: Failing to season the flour or breadcrumbs can result in bland sticks. Don’t hesitate to add garlic powder, salt, or Italian herbs for extra flavor.

Essential Techniques

Frying is the most crucial technique for achieving crispy mozzarella sticks. It’s essential to monitor oil temperature diligently; too hot and the breadcrumbs burn before the cheese melts, too cold and the sticks become soggy. Use a deep-fry thermometer for accurate readings, and adjust the heat as necessary to maintain a consistent temperature during frying.

Coating involves a process called dredging, where each stick is coated first in flour, then dipped in the egg mixture, and finally rolled in breadcrumbs. This technique enhances the adherence of the coating, ensuring a crispy exterior when fried. Mastering dredging is key; make sure to shake off any excess flour or breadcrumbs to prevent lumps.

Letting the cheese rest before frying is vital for ensuring the structural integrity of the mozzarella sticks. By allowing them to cool after initial preparation, you create a firmer texture that reduces the chance of bursting during frying.

Cooling the mozzarella sticks on a wire rack rather than on paper towels helps retain their crispiness as excess oil drips away. This technique ensures your sticks remain golden and crunchy rather than soggy.

Pairing your mozzarella sticks with a flavorful dipping sauce is an essential finishing touch. The contrast between the cheesy, salty flavor and a tangy marinara creates a delightful balance that elevates the overall snacking experience.

Pro Tips for Perfect Crispy Homemade Mozzarella Sticks

– Always use high-quality mozzarella cheese for the best flavor and melting characteristics. Fresh cheese can make a significant difference in taste.
– For an extra kick, experiment with coating the cheese sticks with flavored breadcrumbs or adding spices like cayenne pepper to the flour mixture for a spicy version.
– Freeze mozzarella sticks for 30 minutes before frying to help them maintain their shape and prevent leaking during cooking.
– Consider an assembly line when coating mozzarella sticks to streamline the process and ensure even coating.
– For an alternative cooking method, try baking your mozzarella sticks at a high temperature for a healthier option that still satisfies.
– Serve immediately after frying to ensure the best possible texture and flavor, as they are crispiest straight out of the oil.
– Mix things up by creating different dipping sauces to accompany your sticks; try a garlic aioli or spicy sriracha mayo for enhanced flavor.
– Use a deep-fryer if you have one; it maintains consistent temperature and results in evenly cooked and crispy mozzarella sticks.

Variations and Adaptations

Mozzarella sticks can easily be adapted to suit various tastes and dietary needs. For a regional twist, consider using pepper jack cheese for a zesty, spicy version. You can integrate jalapeños for added heat, or even blend different cheeses for a unique flavor profile.

Seasonal adaptations can also be refreshing; during the summer, add fresh herbs like basil or parsley to your breadcrumb mixture for a burst of freshness and color. You could even serve them with a light tomato salad to contrast the richness of the cheese.

Dietary modifications are possible too; for gluten-free options, utilize almond flour or gluten-free breadcrumbs for a similar texture and taste. Vegan mozzarella sticks can be created using plant-based cheese and egg substitutes, allowing more people to enjoy this snack.

For flavor variations, consider adding grated Parmesan cheese to your breadcrumb mixture or using a mix of Italian herbs to give your sticks a robust taste. Feel free to experiment with different oils or spices for frying; even sesame oil can impart a wonderful flavor.

Finally, think about presentation alternatives. Consider serving these sticks on a wooden board with various dipping sauces in small bowls, or garnish with fresh herbs like cilantro or parsley to enhance the visual appeal and elevate your snacking experience.

Serving and Presentation Guide

Plating plays a crucial role in the overall enjoyment of your crispy homemade mozzarella sticks. Arrange them in a fan shape on a plate, surrounded by vibrant dipping sauces for a striking visual presentation. Create height by stacking them slightly to add dimension to your serving display.

Garnishing with fresh herbs such as parsley or chives can elevate the presentation and add a splash of color. A squeeze of lemon or a sprinkling of cheese over the top prior to serving can entice guests and enhance flavor.

Traditional accompaniments include a side of marinara sauce, but don’t hesitate to experiment. Consider serving the sticks with a fresh salsa or a tangy ranch dip to mix things up. Offering a combination of sauces allows guests to choose their favorites.

Keep temperature considerations in mind when serving. Ensure that your mozzarella sticks are warm when presented, as cold sticks lose their appeal. If preparing in advance, a quick reheat in the oven can restore crispness.

Portion control can be a delightful challenge with mozzarella sticks, as they’re simply irresistible. Offer smaller portions to allow guests to try different dipping sauces without overindulging in a single dish—a great strategy for parties or gatherings.

Wine and Beverage Pairing

When considering wine pairings, opt for a crisp white wine such as Sauvignon Blanc or a light Pinot Grigio. These wines accentuate the flavors of mozzarella and balance the richness of fried foods. If you prefer red wine, a light-bodied option like Chianti can also work well.

For non-alcoholic alternatives, sparkling water with a splash of lemon or a refreshing homemade lemonade can cleanse the palate and complement the cheesy goodness of mozzarella sticks. Consider iced tea with a hint of mint as a delightful, refreshing choice.

If you want to enhance the dining experience further, coffee or espresso can work surprisingly well with savory dishes like mozzarella sticks, providing a new flavor dimension when paired thoughtfully.

Temperature considerations are essential—serve your chosen beverages chilled, especially on warm days, to provide a refreshing contrast to the warm and crispy mozzarella sticks.

Lastly, consider unique serving suggestions by including a themed drink like a DIY cocktail bar adjacent to the snack spread; this can elevate your gathering and provide a fun interactive element for guests.

Storage and Shelf Life

To maximize shelf life, store any leftover crispy homemade mozzarella sticks in an airtight container in the refrigerator. They will typically last for up to three days. When storing, ensure they are cooled to room temperature to prevent moisture buildup inside the container, which may lead to sogginess.

For longer storage, consider freezing mozzarella sticks before frying. Arrange them on a baking sheet in a single layer and place them in the freezer until solid. Once frozen, transfer the sticks to a freezer-safe bag or container. They can last for up to three months in the freezer.

Signs of spoilage include any noticeable changes in smell or appearance, such as a sour scent or visible mold. When in doubt, it’s best to err on the side of caution and discard any questionable leftovers.

Reheating previously cooked mozzarella sticks can be done in the oven for optimal crispiness. Preheat the oven to 375°F and bake them for about 10-15 minutes until heated through. Avoid microwaving, as this can result in a chewy, less desirable texture.

When reheating frozen sticks, no need to thaw—simply fry or bake directly from the freezer. Adjust the cooking time slightly to ensure they are heated through evenly.

Make Ahead Strategies

Planning to make crispy homemade mozzarella sticks ahead of time is easier than it seems. Prepare all your ingredients in advance—measure the cheese, breadcrumbs, and seasonings, and set aside each component. You can even prepare the sticks, coat them, and freeze them before frying.

For the best quality, assemble mozzarella sticks and freeze them individually on a baking sheet. Once they are frozen, transfer them to a freezer-safe container or bag for longer storage. This allows you to fry them fresh whenever the craving strikes.

Quality impact depends on how well you execute the pre-prep. If freezing, ensure they are fully frozen before storing them in a sealed container. This prevents them from sticking together and ensures that your sticks maintain their integrity.

When assembling mozzarella sticks ahead of time, consider having a quick reheating strategy. You can preheat the oil and fry them for just a few minutes, preserving their freshness while also allowing them to be enjoyed straight from the fryer when guests arrive.

For a fun twist, have a gathering feature; guests can assemble their sticks, providing an opportunity to mix ingredients and flavors. This interactive element allows for some creativity in the kitchen.

Scaling Instructions

Adapting the recipe for larger crowds is a straightforward process. To halve the recipe, simply reduce all ingredient quantities by half, which is perfect for smaller gatherings. If you’re looking to double or triple the quantity, ensure you have the capacity in your frying pot.

When scaling up, it’s crucial to have enough frying space. You may need to prepare multiple batches in shifts to ensure quality, as overcrowding can lead to uneven frying. Adjust cooking time slightly if frying in larger quantities.

Consider equipment adjustments as well. You may want to invest in a larger pot or a deep-fryer for consistent frying results when preparing larger batches. This guarantees that the oil temperature stays stable.

Timing modifications may be necessary when cooking additional batches. Keep an eye on the temperature and allow your oil to return to the right heat in between frying batches to maintain the texture of your mozzarella sticks.

For storage considerations, stay mindful of any leftover mozzarella sticks, as scaling recipes can often lead to extra snacks. Follow the storage guidelines mentioned above to keep them fresh for future enjoyment.

Nutritional Deep Dive

Understanding the nutritional components of homemade mozzarella sticks is beneficial for informed eating. The base of this dish, mozzarella cheese, is high in protein and calcium, contributing significantly to your daily values. One serving typically contains about 200-300 calories, which can vary based on the cooking method and added ingredients.

Exploring micronutrient analysis reveals that mozzarella provides essential nutrients such as Vitamin B12 and phosphorus. These nutrients are vital for overall health, impacting bone strength and energy levels. A cheese-based snack offers more than just a guilty pleasure but can contribute to a balanced diet.

Health benefits can be realized when consumed in moderation. Incorporating homemade mozzarella sticks into an overall nutritious diet allows for enjoyment without excessive concern over calories or fat. Pairing them with fresh vegetables or healthier dips can enhance the overall nutritional profile of your snack.

When analyzing portion sizes, consider a standard serving of about 4-5 sticks, which strikes a good balance between enjoyment and control. For weight management tips, incorporate lighter sides like salads to complement this dish and create a more filling meal.

In summary, enjoying crispy homemade mozzarella sticks can still be part of a healthy lifestyle with suitable dietary considerations and balanced eating habits.

Dietary Adaptations

For those with gluten sensitivities, making gluten-free crispy mozzarella sticks is easily achievable. Substitute regular breadcrumbs with gluten-free alternatives such as almond flour or gluten-free panko. This adjustment allows for a safe, delicious snack that doesn’t sacrifice flavor or texture.

Dairy-free cheese can create a suitable alternative for those who are lactose intolerant or choose to follow a vegan lifestyle. Using nut-based cheeses ensures that this dish remains enjoyable for all while still delivering on the gooey, cheesy element that mozzarella sticks are known for.

Consider low-carb alternatives by using cheese sticks wrapped in prosciutto instead of traditional breading. For individuals following a ketogenic diet, using a pork rind or a nut-based flour mix can create an equally satisfying snack with minimal carbs.

If you’re looking for paleo-friendly options, try using almond or coconut flour as substitutes for breadcrumbs. This enables you to create a crispy texture reminiscent of traditional mozzarella sticks while adhering to paleo guidelines.

For those adhering to a low-FODMAP diet, ensure that cheese is lactose-free and consider omitting garlic from the breadcrumb mixture. This way, you can still enjoy a version of mozzarella sticks that aligns with your dietary requirements.

Troubleshooting Guide

For texture issues, if mozzarella sticks turn out too dense or chewy, they may have been overcooked or the cheese was not of good quality. Ensure the oil reaches the proper frying temperature and opt for quality cheese for optimal results.

Flavor balance concerns can arise if the coating seems bland. Make sure to season both the flour and breadcrumb layers adequately; experimenting with herbs and spices can help elevate the taste dramatically.

Temperature fluctuations can lead to problems when frying. If the oil is too hot, the breading may burn before the cheese melts. Use a thermometer to monitor oil temperature to maintain consistency throughout the cooking process.

Equipment challenges, such as using the wrong frying pot, can lead to uneven cooking. Always opt for a deep, heavy-bottomed pot that holds heat well and minimizes splatter, ensuring a safe frying experience.

Ingredient substitution dilemmas can also arise. If you’re out of breadcrumbs or flour, consider crushed crackers or oatmeal as viable alternatives while still providing a crispy breading surface.

Timing concerns should not be overlooked. Ensure you’re frying in small batches to maintain a consistent oil temperature; cooking too many sticks at once can lead to soggy, undercooked results.

Recipe Success Stories

Community feedback often highlights the delightful crispy texture and mouthwatering flavor of these mozzarella sticks. Many readers rave about the ease of preparation, leading to successful experiences in their kitchens.

Variation successes abound; several readers enjoy experimenting with different cheeses or spices, leading to delicious outcomes and presenting new twists on the classic recipe.

Reader suggestions often include pairing the sticks with unique dipping sauces, creating an interactive element during gatherings that keeps guests engaged. Photography tips shared in the community show off the beautiful plating and garnishing ideas that elevate presentation.

Photography plays a significant role in recipe success; capturing the gooey cheese pull can inspire others to try making mozzarella sticks at home. Sharing these images online fosters community and encourages experimentation with the recipe.

Requesting feedback has led to discovering additional ways to adapt the recipe for dietary needs, showcasing the flexibility and love for versatile cooking.

Frequently Asked Questions

Can I use different types of cheese?

Absolutely! While mozzarella is traditional, feel free to experiment with other melting cheeses like cheddar or Monterey jack for unique flavors.

How do I prevent the cheese from oozing out while frying?

Make sure to freeze the mozzarella sticks for at least 30 minutes before frying. This helps keep the cheese in when cooking.

Can I bake mozzarella sticks instead of frying them?

Yes, baking is a healthier alternative! Preheat the oven to 375°F and bake for 15-20 minutes, or until golden brown.

What kind of oil is best for frying?

Use oils with a high smoke point, such as canola or vegetable oil. Olive oil is not recommended due to its lower smoke point.

How can I reheat leftover mozzarella sticks?

The best way to reheat them is in the oven at 375°F for about 10-15 minutes, ensuring that they remain crispy.

Can I make mozzarella sticks in advance?

Yes! You can prepare them up to the frying stage, freeze them on a baking sheet, and then store them in a freezer-safe bag for later frying.

How long can I store cooked mozzarella sticks?

Cooked mozzarella sticks can be stored in an airtight container in the refrigerator for up to 3 days.

What’s a good dipping sauce for mozzarella sticks?

Marinara sauce is classic, but garlic aioli, ranch dressing, or even spicy sriracha can elevate your dipping experience.

Can I make these gluten-free?

Absolutely! Use gluten-free breadcrumbs or almond flour to coat your sticks; they will still be delicious!

What if my mozzarella sticks fall apart while frying?

This may be due to not letting the cheese rest or hold its shape before cooking. Ensure they are fully coated and well-chilled before frying.

How do I achieve a crispy coating?

Using panko breadcrumbs is key! They provide a light, airy crunch that enhances the texture compared to regular breadcrumbs.

Additional Resources

Consider exploring similar recipes such as cheesy breadsticks or jalapeño poppers, which share cooking techniques and flavor profiles with mozzarella sticks. Tool lists for preparing fried foods can further streamline your efforts in the kitchen.

Guides on frying techniques can also help you master the process, offering tips on maintaining oil temperature and preventing splatter during cooking. Seasonal variations on fried snacks can inspire different appetizers for varying occasions, keeping your cooking exciting and fresh.

Exploring fresh ingredient information helps elevate your cooking experience. Understanding how to source and store cheese or breadcrumbs ensures that you’re always working with the best quality.

Join the Conversation

Engage with fellow food enthusiasts by sharing your crispy homemade mozzarella sticks on social media. Tag your creations and offer insights into the variations you’ve tried, creating a lively discussion in the culinary community.

Photography tips for showcasing your finished dish can also inspire others to try their hand at making these delicious snacks. Encourage others to leave reviews and share suggestions that will aid in crafting the perfect recipe.

Celebrate recipe variations by inviting followers to suggest their twists on mozzarella sticks. Building a community around shared culinary experiences fosters interaction and creativity in the kitchen.

Don’t hesitate to comment on your successes or challenges faced while making this snack. Sharing your journey encourages a supportive atmosphere and creates lasting connections with fellow cooks.

The Recipe

Crispy Homemade Mozzarella Sticks

Serves: 4

Prep Time: 15 mins

Cook Time: 10 mins

Total Time: 25 mins

Kitchen Equipment Needed

  • Deep frying pot or heavy-bottom skillet
  • Thermometer
  • Slotted spoon or spider
  • Wire rack or paper towels

Ingredients

  • 1 pound mozzarella cheese, cut into sticks
  • 1 cup all-purpose flour
  • 2 large eggs, beaten
  • 1 cup panko breadcrumbs
  • Salt and pepper to taste
  • Oil for frying

Directions

  1. Freeze the mozzarella sticks for 30 minutes to ensure they hold their shape while frying.
  2. Set up a dredging station with three shallow bowls: one with flour seasoned with salt and pepper, one with beaten eggs, and one with panko breadcrumbs.
  3. Dredge each mozzarella stick in flour, then dip it in the egg mixture, and finally coat it with panko breadcrumbs. Press the breadcrumbs firmly to ensure they stick.
  4. Heat oil in a deep pot to 375°F. Fry the mozzarella sticks in batches, avoiding overcrowding, for about 1-2 minutes or until golden brown and crispy.
  5. Remove the sticks with a slotted spoon and place them on a wire rack to drain excess oil. Serve warm with marinara sauce for dipping.

Recipe Notes

  • For a gluten-free option, substitute the flour and breadcrumbs with alternative choices.
  • Experiment with adding spices to the breadcrumb mixture for added flavor.
  • Frozen sticks can be cooked directly from the freezer; adjust frying time as needed.