Indulge in Decadent Boston Cream Pie Cheesecake Delight

Decadent Boston Cream Pie Cheesecake: A Sinful Delight

⚖️
Difficulty
Medium

⏲️
Prep Time
30 mins

🕒
Cook Time
60 mins

⏱️
Total Time
90 mins

🍽️
Servings
12 slices

Indulge your senses with this **Decadent Boston Cream Pie Cheesecake**, a rich and creamy blend that combines the luscious flavors of chocolate, vanilla, and moist cake in one irresistible dessert. This cheesecake is perfect for any occasion, whether it’s a birthday party, holiday gathering, or simply a self-treat. With its beautiful layers, it will not only satisfy your cravings but also impress your guests.

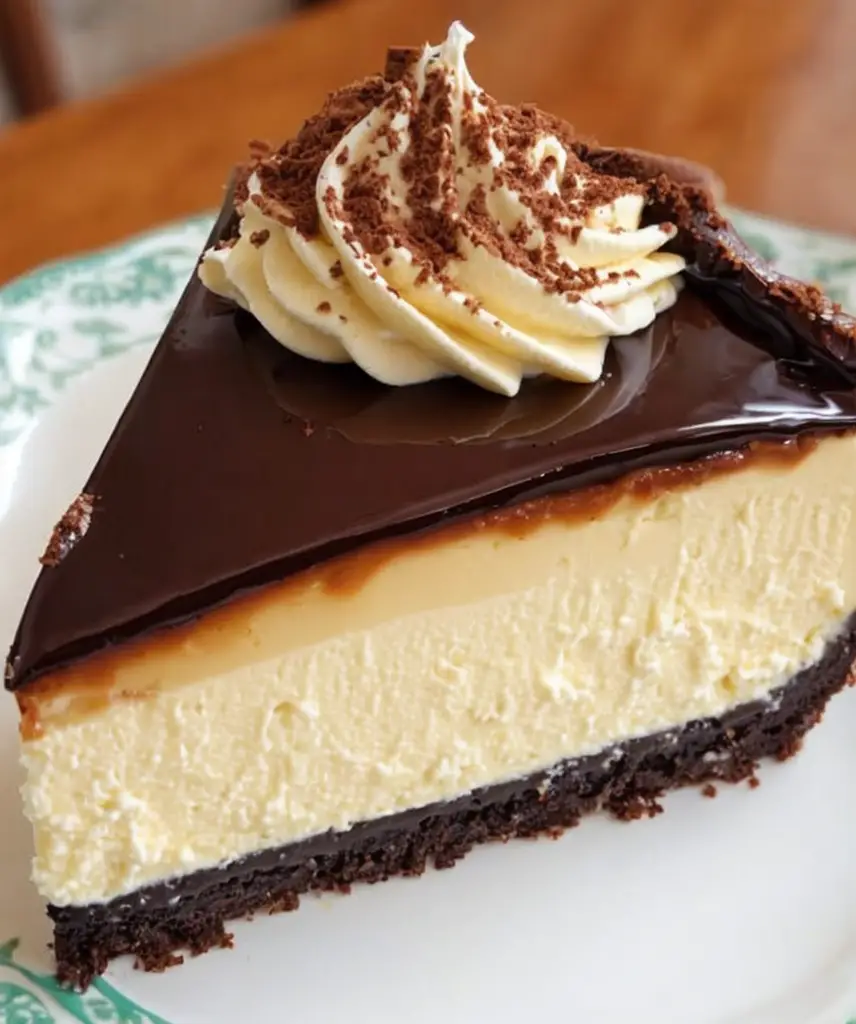
As you slice into this cheesecake, the smooth, rich vanilla custard filling and velvety chocolate topping create a delightful symphony of flavors. Each bite is a blissful journey that brings back memories of the classic Boston cream pie, but in a cheesecake form. The combination of the creamy cheesecake with the light, fluffy sponge cake base offers a textural contrast that is simply divine.

Quick Recipe Highlights

  • Flavor Profile: Expect a delightful mixture of rich chocolate and smooth vanilla, enhanced by a hint of buttery cake.
  • Texture: The cheesecake is creamy and dense, topped with a silky chocolate ganache, creating a lush experience.
  • Aroma: Enjoy the rich aromas of vanilla and chocolate mingling together as the cheesecake cools.
  • Visual Appeal: The layered presentation, with a glossy chocolate glaze, makes it a feast for the eyes.
  • Skill Level Needed: This recipe requires moderate baking skills, including knowledge of cheesecake techniques.
  • Special Equipment: You will need a springform pan, a mixer, and a saucepan for preparing the ganache.

Recipe Overview

  • Difficulty Level: While this cheesecake may seem daunting, the step-by-step instructions will guide you through each layer seamlessly.
  • Category: This recipe falls into the dessert category, making it a perfect end to any meal.
  • Cuisine: Inspired by both American and French culinary traditions, this cheesecake embodies the best of both worlds.
  • Cost: The overall cost of ingredients is moderate, making it accessible for home bakers looking for a special treat.
  • Season: This dessert is versatile and can be made year-round, but particularly shines at parties and celebrations.
  • Occasion: Ideal for birthday celebrations, holiday gatherings, or as a delightful weekend dessert.

Why You’ll Love This Recipe

This **Decadent Boston Cream Pie Cheesecake** is a true delight for both the palate and the eyes. The melding of flavors will tantalize your taste buds, making it hard to resist a second slice. Its rich, creamy texture is perfectly complemented by the smooth chocolate topping, creating a heavenly combination that will leave you and your guests craving more.

Preparing this cheesecake allows for an enjoyable baking experience. With a manageable prep time coupled with easy-to-follow steps, it makes for a wonderful opportunity to bond with family or friends as you create a masterpiece together. The finished product not only tastes incredible but looks like a professional bakery creation.

In addition to the unforgettable flavor, this recipe offers some nutritional benefits worth noting. Made with quality ingredients, this cheesecake can provide an indulgent treat while still bringing joy and satisfaction without excessive guilt.

This cheesecake is perfect for social gatherings. Its elegant presentation invites conversation, making it an excellent centerpiece for parties and celebrations. Sharing this dessert will create delightful moments, as everyone shares their thoughts on its delightful taste.

Lastly, this recipe is cost-effective, as its ingredients are widely available and do not break the bank. With its impressive flavors and quality presentation, you can create an unforgettable dessert that provides immense value for your investment.

Historical Background and Cultural Significance

The Boston cream pie, despite its name, is actually a cake! Its origins trace back to the 19th century when it was first created by chefs at the Parker House Hotel in Boston. This charming dessert has become synonymous with the city itself and was even designated as the official dessert of Massachusetts.

Throughout the years, the Boston cream pie has evolved, blending tradition with modern variations. The concept of transforming this classic pie into a cheesecake emerged as bakers sought to provide new interpretations of beloved desserts, allowing fans to enjoy the flavors they adore in more versatile forms.

The cultural significance of this beloved dessert extends beyond its delightful taste; it symbolizes the innovative spirit of American cuisine. As food cultures merge and change, desserts like the Boston cream pie cheesecake showcase the adaptability of culinary traditions, perpetuating their relevance in contemporary culture.

Regional variations have also emerged. While some may stick to the traditional chocolate and vanilla combination, others have played with flavors, introducing ingredients like espresso, caramel, or fruit, each bringing a unique twist on this iconic dessert.

Ingredient Deep Dive

Cheese: Cream cheese serves as the backbone of this cheesecake, delivering a rich and creamy texture. It is a source of calcium and protein and should be at room temperature for optimal blending. Store it in the fridge and avoid purchasing when expired. If unavailable, mascarpone can be used as a delightful alternative.

Chocolate: High-quality semi-sweet or dark chocolate contributes to the luscious chocolate ganache, providing rich flavor and antioxidants. Choose a bar over chips for better melting consistency, and store it in a cool, dry place. Substitutes like cocoa powder or milk chocolate can alter the flavor but work in a pinch.

Common Mistakes to Avoid

  • Not using room-temperature ingredients: Failing to let your cream cheese and eggs come to room temperature can result in a lumpy cheesecake.
  • Overmixing the batter: Mixing too vigorously incorporates air, leading to cracks in the surface once baked. Aim for a gentle blending.
  • Skipping the water bath: A water bath helps regulate heat and moisture, preventing dryness or cracking in the cheesecake.
  • Baking at the wrong temperature: Ensure your oven is preheated and at the correct temperature to avoid uneven cooking.
  • Not allowing the cheesecake to cool properly: Cooling too quickly can cause cracks and texture issues. Allow it to cool gradually in the oven.
  • Using a cracked springform pan: Inspect the seals; any leaks can lead to a ruined cheesecake.
  • Rushing the chill process: Allow your cheesecake ample time to set in the refrigerator; patience is key for the best texture.
  • Not tasting the ganache: Always taste your chocolate ganache to ensure it meets your desired sweet-to-bitter balance.
  • Ignoring baked cheesecake signs: Look for a slightly wobbly texture in the center, indicating it’s done without overbaking.
  • Neglecting to prep the pan: Grease the pan with butter to avoid sticking, which can ruin presentation.

Essential Techniques

Water Bath Technique: This method is essential for creating a moist environment for the cheesecake. Wrap the springform pan in aluminum foil to prevent water from seeping in. Place it in a larger pan filled with hot water before baking. This technique helps cook the cheesecake more evenly, reducing the chances of cracks.

Chilling the Cheesecake: After baking, allow the cheesecake to cool in the oven with the door ajar for about an hour. This gradual cooling prevents sudden temperature changes that can crack the top. Once at room temperature, move it to the refrigerator to chill for at least four hours before slicing.

Pro Tips for Perfect Decadent Boston Cream Pie Cheesecake

– Use high-quality chocolate for the ganache to elevate the cheesecake’s flavor, ensuring a rich and decadent experience.
– Always integrate the ganache while the cheesecake is still cold, allowing it to set up nicely without running off.
– Allow ingredients like cream cheese and eggs to come to room temperature to facilitate a smoother batter consistency.
– When preparing the crust, ensure it is tightly packed and baked until it smells fragrant, which enhances the flavor.
– For extra flair, top the cheesecake with chocolate shavings or berries to enhance the presentation visually.
– Always make sure your oven is calibrated accurately; an oven thermometer can help maintain the correct baking temperature.
– Practice patience; let the cheesecake set overnight for the best flavors to meld and enhance the overall richness.
– Consider garnishing with a sprinkle of coarse sea salt to balance the sweetness of the ganache and enhance its flavor.

Variations and Adaptations

This **Decadent Boston Cream Pie Cheesecake** can be modified in several exciting ways. For a seasonal touch, incorporate pumpkin puree into the cheesecake batter during fall or add a layer of fresh berries for a refreshing summer twist.

When it comes to dietary accommodations, you can experiment with gluten-free options by replacing conventional graham crackers with gluten-free ones. This adaptation does not compromise the texture or flavor while allowing those with dietary restrictions to enjoy the dessert.

Flavor modifications can also introduce varieties such as hazelnut or espresso to the ganache. These adjustments will infuse a deeper flavor profile while enhancing the overall richness!

To present the cheesecake differently, consider serving it in individual jars for easy handling and a stylish touch. This modern serving style allows for unique garnishing options!

Serving and Presentation Guide

Plating your cheesecake beautifully is crucial for making it visually appealing. Slice evenly using a hot, dry knife for clean cuts, then transfer slices to dessert plates with a gentle hand.

Garnishing with whipped cream, chocolate curls, or fresh fruit not only adds color but also showcases the flavors within. A drizzle of chocolate or caramel sauce can contribute an extra touch of decadence.

Consider traditional accompaniments such as coffee or tea to serve alongside the cheesecake, enhancing flavor consistency. For modern presentation, serve slices alongside a scoop of vanilla ice cream for a delightful contrast in temperature and texture.

Be mindful of temperature; this cheesecake should ideally be served chilled for the best flavor experience. Offer bites that are proportionate to ensure everyone can enjoy without excess.

Wine and Beverage Pairing

For the perfect pairing, consider serving a sweet dessert wine like a late-harvest Riesling. Its fruity notes will complement the cheesecake’s sweetness. Alternatively, a bold Port wine can amplify the richness of the chocolate ganache.

Non-alcoholic alternatives include a rich hot chocolate or an iced coffee, both of which offer a harmonious balance to the dessert’s creaminess. Remember to serve these beverages at the right temperature for the best experience.

If you’re opting for a coffee or tea pairing, a robust espresso can cut through the richness of the cheesecake, enhancing its chocolate flavors. When serving, offer cream or milk options to accommodate different preferences.

Storage and Shelf Life

To ensure the cheesecake remains fresh, store it in an airtight container in the refrigerator. It can last for up to one week. For longer storage, consider freezing individual slices wrapped in plastic wrap and placed in a freezer-safe bag. These can last up to three months!

Keep an eye out for signs of spoilage, such as an off smell or unusual texture, which indicate it’s time to dispose of the cheesecake. When ready to enjoy frozen slices, let them thaw in the refrigerator for a few hours before serving.

Reheating cheesecake is generally unnecessary; however, if you wish to warm a slice slightly, use a microwave for short intervals to avoid melting the ganache.

Make Ahead Strategies

This cheesecake is an excellent candidate for making ahead of time. Prepare the cheesecake entirely up to a day in advance, allowing sufficient chilling time for the flavors to meld beautifully.

If you’re planning an event, consider baking the cheesecake earlier in the week. An excellent strategy is to freeze the unglazed cheesecake, then thaw and add the ganache just before serving. This ensures maximum freshness.

Quality impacts are minimal if you treat the cheesecake with care, and assembling it before serving allows for a crisply plated presentation. When reheating any elements for serving, ensure they complement the cheesecake’s cold nature harmoniously.

Fresh elements like whipped cream or fresh fruit toppings should always be added just before serving for a vibrant and appetizing look.

Scaling Instructions

Scaling a recipe like this is quite easy. If you wish to halve the recipe, simply divide the ingredient amounts by two and adjust the pan size accordingly. For a smaller cheesecake, consider using a 6-inch springform pan to achieve the same great taste with less volume.

Doubling or tripling the recipe will require careful consideration of your mixing equipment. You may need to mix in batches to achieve even distribution within your batter.

Timing modifications are also necessary; larger cheesecakes will require additional baking time. Test for doneness by checking if the edges are set while the center remains slightly jiggly.

When storing oversized portions, ensure they are layered appropriately in the fridge or freezer to prevent sticking or uneven thawing.

Nutritional Deep Dive

On a macro level, this cheesecake is rich in fat and carbohydrates, primarily from cream cheese and sugar, while providing a moderate protein content. Nutritionally, it’s essential to consume it in moderation, as its richness can lead to higher caloric intake.

Key micronutrients present include calcium from cream cheese, which supports bone health. Additionally, chocolate possesses antioxidants that contribute positively to one’s overall health.

When it comes to dietary considerations, it’s advisable to factor in serving sizes. Enjoying smaller portions during special occasions can satisfy both cravings while maintaining balance in your diet.

For those mindful of weight management, consider pairing this dessert with a light, fresh fruit salad or a cup of herbal tea, balancing sweetness with lighter options for a fulfilling finish.

Dietary Adaptations

For gluten-free eaters, swap traditional graham cracker crust with gluten-free alternatives like almond flour for a delightful base that doesn’t compromise flavor.

Vegans can experiment with plant-based cream cheese and aquafaba (chickpea liquid) to replace eggs, creating a dairy-free, egg-free delight that maintains creamy texture.

For lower-carb or keto variations, utilize almond or coconut flour for the crust and an appropriate sugar substitute for the filling, ensuring a delectable dessert that aligns with dietary restrictions.

Consider low-FODMAP options by using lactose-free cream cheese and ensuring your chocolate is dairy-free; this can cater to individuals with sensitive stomachs while still delivering the same satisfaction.

Troubleshooting Guide

If your cheesecake is cracking, it may be due to overmixing or a rapid temperature change during cooking. Always mix gently and allow the cheesecake to cool gradually within the oven.

Texture issues, such as a grainy consistency, often result from cold ingredients; ensure your cream cheese and eggs are at room temperature for optimal blending.

Should the flavor be off-balance, taste and adjust your sugar or chocolate levels. Sometimes a pinch of salt can enhance chocolate flavors significantly.

If your ganache is too thin, ensure you allow it to cool properly before pouring. Also, using higher cocoa content chocolate can give a thicker consistency.

Finally, if the cheesecake is too dry, it may have been baked too long. Aim for a slight jiggle in the center when removing from the oven and allow it to set in cooling conditions.

Recipe Success Stories

Readers have raved about their experiences with this **Decadent Boston Cream Pie Cheesecake**, sharing how it became the star of their celebrations. Many have experimented with unique adaptations, such as incorporating their favorite flavors, proving the versatility of the recipe.

Community feedback has highlighted the cheesecake’s rich, creamy texture and seamless blend of flavors. Several home bakers enjoyed the process, finding the results deeply rewarding, prompting them to share photos on social media platforms.

Adaptation stories reveal readers choosing to invert the traditional flavor by incorporating fruit toppings or adjusting the base for dietary preferences, enhancing its broad appeal.

Photography tips shared by readers emphasize the importance of natural lighting when capturing the cheesecake’s glossy ganache; many found it easy to showcase its beauty with minimal effort.

Frequently Asked Questions

Can I make this cheesecake ahead of time?
Yes! This cheesecake is perfect for making a day or two in advance, allowing it to chill and flavor to develop beautifully. Just ensure it is properly sealed in the fridge.

What’s the best way to store leftover cheesecake?
Leftover cheesecake should be stored in an airtight container in the refrigerator, where it can last up to a week. You can also freeze portions for longer storage.

Can I use a different type of chocolate for the ganache?
Absolutely! While semi-sweet chocolate is traditional, dark chocolate or even white chocolate can provide delightful variations in taste.

How do I prevent my cheesecake from cracking?
To help prevent cracks, bake the cheesecake in a water bath and allow it to cool slowly. Mixing the batter gently and avoiding over-mixing is also essential.

Is it possible to make this recipe gluten-free?
Yes! Simply substitute the graham cracker crust with a gluten-free crust alternative or use almond flour as a base, staying true to an excellent flavor profile.

What should I serve with the cheesecake?
Offer accompaniments such as whipped cream, fresh fruit, or a scoop of ice cream to balance and elevate the delightful flavors of the cheesecake.

Can I customize the flavors of this cheesecake?
Certainly! Modifications can include adding fruit purees, flavored extracts, or even spices into the batter for a unique twist while maintaining its essence.

Is it necessary to use a springform pan?
While a springform pan is recommended, you can use a standard cake pan, but be sure to line the bottom with parchment for easy removal.

Can I freeze the cheesecake?
Yes, individual slices can be frozen for up to three months. Wrap them tightly in plastic wrap and store them in an airtight container.

What is the ideal baking temperature for the cheesecake?
Cheesecake is best baked at 325°F (160°C) to ensure even cooking without overbaking, which contributes to cracked surfaces.

Additional Resources

Expand your cooking repertoire with similar dessert recipes like our chocolate fudge cake or strawberry shortcake. For those looking to refine their baking techniques, check out our detailed guides on mastering the art of cake baking or cheesecake troubleshooting.

Explore ingredient information to understand the best types of cream cheese for cheesecakes, and find recommendations for the finest brands of chocolate to use in your desserts.

If you want to tap into seasonal variations, discover how to incorporate festive flavors in your baking during holidays, or attend local food festivals that celebrate desserts.

Finally, explore equipment suggestions to ensure you have the best tools necessary to create stunning cheesecakes and other confections.

Join the Conversation

We invite you to share your **Decadent Boston Cream Pie Cheesecake** experiences on social media, showcasing your stunning creations for others to admire. Use our hashtag to connect with fellow cheesecake enthusiasts and exchange tips or variations on our beloved recipe.

Feel free to leave photography tips or ideas for creative presentations. We love to hear how you’ve made the recipe your own! Join our community for discussions about recipe challenges, successes, and joyful moments that come when sharing delicious desserts.

Interactive discussion not only fuels our passion for baking but helps others find inspiration in the kitchen. So, let’s celebrate our collective love for all things cheesecake!

The Recipe

Decadent Boston Cream Pie Cheesecake

Serves: 12 slices

Prep Time: 30 mins

Cook Time: 60 mins

Total Time: 90 mins

Kitchen Equipment Needed

  • Springform pan
  • Mixer
  • Whisk
  • Measuring cups and spoons
  • Aluminum foil
  • Spatula
  • Double boiler or microwave-safe bowl

Ingredients

  • For the crust:
  • 1 ½ cups graham cracker crumbs
  • ½ cup unsalted butter, melted
  • ¼ cup sugar
  • For the cheesecake filling:
  • 2 lbs cream cheese, softened
  • 1 cup sugar
  • 1 teaspoon vanilla extract
  • 4 large eggs
  • For the ganache:
  • 8 oz semi-sweet chocolate, chopped
  • ½ cup heavy cream

Directions

  1. Preheat your oven to 325°F (160°C).
  2. In a mixing bowl, combine graham cracker crumbs, melted butter, and sugar. Press mixture firmly into the bottom of a springform pan.
  3. Bake the crust for 10 minutes, then set aside to cool while preparing the filling.
  4. In a large bowl, beat cream cheese until smooth. Gradually add sugar and mix until creamy, then incorporate vanilla.
  5. Add eggs one at a time, mixing just until combined. Avoid overmixing to minimize air bubbles.
  6. Pour the filling over the cooled crust and smooth the top.
  7. Wrap the springform pan in aluminum foil and place it in a larger baking dish filled with hot water for a water bath.
  8. Bake for 60 minutes or until the edges are set and the center is slightly jiggly. Turn off the oven and let it cool with the door ajar for one hour.
  9. Remove from the water bath and refrigerate for at least four hours until completely chilled.
  10. For the ganache, heat the cream in a saucepan until just boiling, then pour over the chopped chocolate. Let sit for a few minutes then whisk until smooth.
  11. Once the cheesecake has set, pour the ganache over the top, allowing it to drizzle down the sides.
  12. Chill again for at least 30 minutes to set the ganache before slicing and serving.

Recipe Notes

  • Feel free to add a layer of fresh fruit or nuts for extra flavor.
  • For a less sweet variation, reduce the sugar in the ganache by a few tablespoons.
  • Consider chocolate curls as an added garnish to enhance presentation.

Savor Authentic Mongolian Noodles with Ground Beef Recipe

Mongolian Noodles with Ground Beef: A Deliciously Simple Recipe

⚖️
Difficulty
Easy

⏲️
Prep Time
10 mins

🕒
Cook Time
20 mins

⏱️
Total Time
30 mins

🍽️
Servings
4

Mongolian Noodles with Ground Beef is a quick and satisfying meal that brings vibrant flavors to your table. Imagine tender noodles intertwined with savory ground beef, vibrant bell peppers, and a delightful soy sauce glaze—it’s an irresistible dish that delivers both taste and comfort. This dish is perfect for weeknight dinners when you crave something delicious but don’t have a lot of time to spare. Each bite bursts with umami, while the complementing textures offer a satisfying experience that will keep your taste buds dancing.

This recipe is not only simple to prepare but is also adaptable to your preferences. Whether you’re incorporating seasonal vegetables or adjusting the spice level, Mongolian Noodles can easily become a favorite on your dinner rotation. Its vibrant colors and aroma create an inviting dish that looks as good as it tastes, making it suitable for both family meals and gatherings with friends.

Quick Recipe Highlights

  • Flavor Profile: The balance of savory beef, soy sauce, and the freshness of vegetables creates a deliciously rich flavor.
  • Texture: A delightful mix of soft noodles with crisp veggies ensures a satisfying mouthfeel.
  • Aroma: The dish is infused with the wonderful scents of garlic, ginger, and soy sauce, making it hard to resist.
  • Visual Appeal: The bright colors of the bell peppers and green onions against the brown beef create a stunning dish.
  • Skill Level Needed: Ideal for beginner cooks who want to practice their knife skills and stove techniques.
  • Special Equipment: A large skillet or wok will help achieve the best flavor infusion and cooking results.

Recipe Overview

  • Difficulty Level: Mongolian Noodles with Ground Beef is an easy-to-prepare dish that requires minimal cooking steps, making it accessible for cooks of any level.
  • Category: This recipe falls under the category of stir-fry meals, a favorite for quick weeknight dinners.
  • Cuisine: With roots influenced by Mongolia, this dish reflects Asian culinary techniques and flavors.
  • Cost: Affordable and often made with ingredients you already have, this meal keeps your budget intact.
  • Season: Enjoy this dish all year round, but it’s especially great in spring and summer when fresh veggies are abundant.
  • Occasion: Perfect for casual family dinners or when entertaining guests; it’s a crowd-pleaser.

Why You’ll Love This Recipe

The delightful combination of Mongolian Noodles with Ground Beef creates a tantalizing taste experience. The rich flavor of beef melds beautifully with the savory sauce, while fresh vegetables add brightness. This dish satisfies cravings for comfort food without overwhelming your palate. Plus, preparing this dish is fast and straightforward, making it perfect for weekday lunches or quick dinners when time is of the essence.

The convenience of this recipe lies in its versatility. You can easily adjust it based on personal preferences or what you have on hand. Whether you like spicy food or prefer a mild flavor, you can customize the recipe to suit your taste. The noodles act as a wonderful canvas for a variety of ingredients, ensuring there’s something for everyone at the table.

From a nutritional standpoint, this dish offers a balanced meal that features protein from the ground beef and essential vitamins from the vegetables. Incorporating various vegetables increases the fiber content and enhances the dish’s overall health benefits.

When it comes to social gatherings, Mongolian Noodles make an impression without requiring hours of prep. Your friends and family will appreciate you preparing a beautiful meal, and you’ll love how little time it took to put together.

On top of that, the cost-effectiveness of this recipe makes it an excellent choice, even for those on a tight budget. With its simple ingredients and affordable options, you can enjoy a hearty meal without breaking the bank.

Historical Background and Cultural Significance

Mongolian Noodles are inspired by traditional Mongolian beef dishes, often featuring simple yet robust flavors that have stood the test of time. These dishes typically feature meats and vegetables, commonly prepared with stir-frying techniques, highlighting the adaptability of Mongolian cuisine to different regions and tastes.

In Mongolian culture, hearty meals are essential for providing energy, especially in cold climates. The use of beef in these recipes is significant, as meat has traditionally been a primary source of sustenance. Mongolian Noodles honor these cultural practices, celebrating a lifestyle connected to the land and livestock.

Over time, this recipe has evolved, incorporating various culinary influences from neighboring countries, such as China and Vietnam. As a result, you’ll find that many versions of Mongolian Noodles include several Asian staples, offering a unique twist each time you prepare it.

Regional variations also exist, with some people choosing to enhance the flavor with spices or additional vegetables based on local availability, making this a richly diverse dish across different cultures.

Ingredient Deep Dive

Noodles:
Noodles form the base of this dish and come in various types, including egg noodles, rice noodles, and even whole wheat options. They have a significant cultural role in many Asian cuisines, symbolizing longevity and good fortune. Nutritionally, noodles provide carbohydrates that serve as a primary energy source. Always store dried noodles in a cool, dry place, while fresh noodles should be refrigerated and consumed within a few days. For gluten-free diets, consider using rice noodles or gluten-free alternatives like zucchini noodles.

Ground Beef:
Ground beef is a popular protein choice due to its rich flavor and versatility. It’s widely used in various cuisines and is celebrated for its quick cooking time. Nutritionally, beef is a great source of protein, iron, and B vitamins. When selecting ground beef, look for lean options to reduce fat content, and always ensure proper refrigeration to maintain freshness. If you’re looking for an alternative, ground turkey or plant-based proteins can work as excellent substitutes in this recipe.

Common Mistakes to Avoid

  • Using overcooked noodles: This can lead to mushy textures. Be sure to cook noodles al dente for the best result.
  • Overcrowding the pan: Cooking too many ingredients at once can cause steaming instead of stir-frying. Work in batches if necessary.
  • Neglecting to prep ingredients: Make sure all vegetables are chopped before you start cooking to ensure everything comes together smoothly.
  • Skipping flavor checks: Always taste your dish and adjust the seasoning. The balance of flavors is crucial.
  • Using too much soy sauce: This can overpower other flavors. Start with less and add more as needed.
  • Not stirring frequently: Stir-frying requires constant movement. This helps to cook everything evenly and prevents burning.
  • Ignoring the protein: Properly browning the ground beef adds depth of flavor. Don’t skip this vital step.
  • Forgetting about garnishes: Fresh herbs and green onions brighten the dish. Don’t miss out on this finishing touch.
  • Serving immediately after cooking: Letting the dish sit for a few minutes allows flavors to meld.

Essential Techniques

One essential technique is stir-frying, which is crucial for achieving the desired texture and flavor in your Mongolian Noodles. Stir-frying quickly cooks ingredients at high heat, which enhances the flavor and texture. To master this, use a large, well-heated skillet or wok, and make sure to keep the ingredients moving. Common pitfalls include overcrowding the pan and cooking at too low of a temperature, both leading to steaming rather than browning.

Another important technique is preparing the ingredients in advance. This helps streamline the cooking process, allowing you to focus on timing and avoiding any rush. To do this effectively, chop all your vegetables and measure your spices before turning on the stove. Visually, all ingredients should be ready before you start to ensure that they cook evenly.

Pro Tips for Perfect Mongolian Noodles

Select the freshest ingredients for the best taste. Fresh vegetables and quality beef elevate the dish’s flavor.
Marinate the beef briefly in soy sauce and garlic for an extra punch, allowing it to soak in those flavors before cooking.
Experiment with additional vegetables like snap peas or bok choy for added nutrients and crunch.
Consider adding sesame oil towards the end of cooking to enhance the aromatic experience.
Serve with a sprinkle of sesame seeds for a nice crunch and a touch of elegance.
If making leftovers, avoid adding the noodles until just before serving to maintain their texture.
Customize the heat level with chili flakes or fresh chili for those who enjoy a spicier dish.

Variations and Adaptations

Regional variations of the dish often showcase different proteins such as chicken or pork, depending on what’s available. You can also try vegetarian options by substituting the beef with tofu or tempeh, maintaining the same flavor base for a delicious outcome. Seasonal adaptations can include adding spring vegetables like asparagus or zucchini in the summer, whereas root vegetables work well in the winter.

For those who have dietary restrictions, gluten-free noodles or low-carb options like spiralized vegetables can be excellent substitutions. Flavor variations can include adding different sauces such as teriyaki for a sweeter twist or adding more chili for a kick.

Presentation alternatives might involve serving the noodles in bowls garnished with fresh herbs or sliced green onions atop for a colorful finish.

Serving and Presentation Guide

When plating Mongolian Noodles, layering ingredients can create an appealing look. Start with a base of noodles and artfully add the stir-fried vegetables and beef on top. A generous sprinkle of green onions or sesame seeds not only adds flavor but also a lovely contrast against the noodles.

You can elevate the dish further with traditional accompaniments like pickled vegetables or serve it alongside a refreshing salad. A modern touch could include serving the noodles in individual bowls with extra sauce on the side for dipping.

Temperature considerations are essential here; Mongolian Noodles are best enjoyed hot. If they sit for too long, consider reheating gently before serving. Portion control is key to ensure everyone has enough, making sure to balance plate sizes for kids and adults alike.

Wine and Beverage Pairing

For wine pairings, consider a light red wine like Pinot Noir or a crisp white such as Sauvignon Blanc, both of which complement the savory flavors of the beef and vegetables perfectly. Alternatively, a refreshing beer like a pale ale or lager works well to cleanse the palate between bites.

Non-alcoholic beverages can include iced green tea or a ginger lemon soda that echoes the dish’s brightness. If you’re serving this recipe for a warm meal, consider offering it alongside a hot herbal tea that balances the savory profile.

Temperature considerations for your drinks are essential; serve your beverages chilled or at room temperature to enhance the overall dining experience.

Storage and Shelf Life

Mongolian Noodles are best consumed fresh but can be stored in an airtight container in the refrigerator for up to 3 days. For storage, ensure the container is airtight to maintain freshness and flavor.

When reheating, aim for gentle reheating methods such as a skillet or microwave, ensuring even heating to avoid rubbery noodles. Signs of spoilage to watch out for include unusual smells or changes in texture.

For longer storage, you can freeze the cooked noodles and beef mixture separately in freezer-friendly containers for up to 3 months. Just remember to let them cool down completely before sealing them up to prevent ice crystals from forming.

Make Ahead Strategies

To prepare in advance, you can chop vegetables and marinate the beef a few hours before cooking. This makes the actual cooking process much quicker and less hectic.

Storing each component separately before assembly helps preserve the quality of each element. Once ready to serve, simply stir-fry everything together. Different ingredients can be pre-cooked, such as the noodles or beef, and stored in the refrigerator for maximum freshness until meal time.

Reheating guidelines typically involve using a skillet over medium heat to warm everything through quickly without overcooking. Adding fresh vegetables just before serving can elevate the meal, making it taste freshly prepared.

Scaling Instructions

If you find yourself needing to halve the recipe, this is simple and requires only adjusting the ingredients accordingly.

When doubling or tripling, keep an eye on cooking times as larger batches may require slightly longer cooking periods. Also, consider using larger pans or multiple pans concurrently to accommodate the increased volume.

Adjust your equipment based on the quantity; ensure you use a pan that can hold all ingredients without overcrowding. Be mindful of timing modifications; you may need to cook in batches to maintain the proper heat level for stir-frying.

Lastly, pay attention to storage considerations when scaling; larger volumes may require different storage solutions, such as larger containers or multiple smaller ones, to keep everything fresh.

Nutritional Deep Dive

Mongolian Noodles provide an excellent macro breakdown, primarily comprised of carbohydrates, proteins, and moderate fats depending on the type of beef used. Understanding the portions is significant, as this dish can be easily tailored to meet dietary needs.

Micronutrient analysis shows that this meal offers vitamins A and C from the vegetables, along with essential minerals from the beef. The health benefits include substantial protein sources for muscle growth and recovery.

Dietary considerations are important; by switching to whole grain noodles, you can enhance fiber content. Adjusting portion sizes is crucial for weight management, particularly in ensuring balanced meals.

If you’re focused on nutrition, garnish with additional fresh vegetables or herbs to boost vitamins and antioxidants further.

Dietary Adaptations

For gluten-free options, substitute traditional noodles with rice noodles or spiralized vegetables like zucchini. Ensure that all sauces used are certified gluten-free to maintain the recipe’s integrity.

Dairy-free versions can be easily achieved, as this recipe is naturally dairy-free. Additionally, for a vegan twist, swap the ground beef for a plant-based alternative such as lentils or chickpeas, adjusting cooking times as necessary.

If you’re on a low-carb diet, consider using cauliflower rice or skipping the noodles altogether in favor of more vegetables. The flavors will remain rich, ensuring that you don’t feel like you’re missing out.

Keto and paleo diets can also enjoy this meal; simply focus on whole-food ingredients and avoid fillers, ensuring a nutrient-rich meal that aligns with dietary restrictions.

Troubleshooting Guide

If you encounter texture issues when preparing your noodles, ensure they are cooked just until al dente to avoid mushiness. Pay attention to the moisture levels—too much sauce can make them watery.

Flavor balance can be tricky; if the dish is too salty, try introducing a dash of vinegar or sweetness from sugar to counteract.

Temperature problems may arise if your skillet isn’t hot enough; ensure you heat it adequately before adding the noodles and beef for a proper stir-fry effect.

Common equipment challenges include sticking noodles; ensure your pan is well-oiled before cooking. If your vegetables are remaining uncooked while waiting on the meat, consider cooking them separately for even results.

Lastly, timing concerns can be remedied by prepping your ingredients beforehand and ensuring you have everything ready to go, reducing the chances of overcrowding and uneven cooking.

Recipe Success Stories

Our community has been thrilled with variations of Mongolian Noodles. Many readers have shared their successes substituting ground beef with healthier options like turkey or plant-based proteins, finding equally tasty outcomes.

Creative twists like adding unique vegetables or different flavor profiles have also been popular among our audience, showing the adaptability of this dish. Several users have reported back with beautiful photographs showcasing their own presentations of Mongolian Noodles, igniting conversations around recipe variations.

Listeners have also fostered community engagement by sharing reviews, encouraging others to try their adaptations, and sparking discussions on their personal culinary journeys with this recipe.

Frequently Asked Questions

Can I make Mongolian Noodles in advance? Yes, you can prepare the components in advance, such as chopping vegetables and marinating meat. Just store them separately until you’re ready to cook.

What if I don’t have ground beef? You can substitute ground beef with chicken, turkey, or even a plant-based option like lentils or tofu for a vegetarian alternative.

Can I use low-sodium soy sauce? Absolutely! Low-sodium soy sauce is a great choice to control salt levels without sacrificing flavor.

How can I make this recipe spicier? Adding fresh chilies or a sprinkle of crushed red pepper flakes during cooking can give your dish a spicy kick.

Is this dish suitable for meal prep? Yes, Mongolian Noodles store well for meal prep; just keep the components separate to maintain freshness.

Can I freeze leftovers? Yes, this dish can be frozen for up to three months. Just remember to allow it to cool before packaging it for freezing.

What other vegetables can I add? Feel free to include seasonal veggies like snap peas, broccoli, or bok choy for additional nutrition and flavor.

How do I prevent my noodles from sticking? Make sure to use enough oil in your pan, and avoid overcrowding to maintain proper cooking temperatures.

Can I use any other types of noodles? Definitely! You can try rice noodles, whole wheat noodles, or even zucchini noodles for a healthier option.

How long does it take to cook Mongolian Noodles? The total cooking time is around 20 minutes, making it a quick option for busy weeknights.

Additional Resources

To enhance your cooking experience, check out our related recipes for unique stir-fry dishes or explore indispensable technique guides to level up your kitchen skills. For ingredient information, we offer insights on selecting the freshest produce and quality meats. Looking for kitchen equipment? Our recommendations will help you find the best tools for this recipe and beyond. Additionally, you can explore seasonal variations to keep your meals exciting all year round.

Join the Conversation

We invite you to share your experiences with Mongolian Noodles on social media platforms. Post your variations or creative presentations, and engage with our community through recipe reviews. Your unique story can inspire others and contribute to our growing collection of recipe adaptations. Additionally, any photography tips you share will help budding cooks capture their culinary efforts beautifully.

The Recipe

Mongolian Noodles with Ground Beef

Serves: 4

Prep Time: 10 mins

Cook Time: 20 mins

Total Time: 30 mins

Kitchen Equipment Needed

  • Large skillet or wok
  • Cutting board
  • Chef’s knife
  • Measuring cups and spoons
  • Wooden spoon or spatula

Ingredients

  • 8 oz. noodles (egg or rice)
  • 1 lb. ground beef
  • 2 cups mixed bell peppers, sliced
  • 4 green onions, chopped
  • 3 cloves garlic, minced
  • 1 tbsp. ginger, minced
  • 3 tbsp. soy sauce
  • 1 tbsp. sesame oil
  • Salt and pepper to taste
  • Optional toppings: sesame seeds, additional green onions

Directions

  1. Cook the noodles according to package instructions. Drain and set aside.
  2. In a large skillet or wok, heat sesame oil over medium-high heat.
  3. Add the minced garlic and ginger; sauté for around 30 seconds until fragrant.
  4. Add the ground beef and cook until browned, breaking it apart as it cooks.
  5. Stir in the sliced bell peppers and cook until they are tender-crisp.
  6. Pour in the soy sauce, mixing everything well to coat.
  7. Add the cooked noodles and gently toss to combine until heated through.
  8. Season with salt and pepper to taste, and garnish with green onions and sesame seeds before serving.

Recipe Notes

  • Feel free to add in any other vegetables of your choice.
  • For a spicy kick, consider adding chili paste or crushed red pepper.
  • This recipe is easily doubled for larger gatherings.

Delicious Chicken with Creamy Mustard Asiago Sauce Recipe

Delicious Chicken with Creamy Mustard Asiago Sauce: A Flavorful Experience

⚖️
Difficulty
Medium

⏲️
Prep Time
15 mins

🕒
Cook Time
30 mins

⏱️
Total Time
45 mins

🍽️
Servings
4

Chicken with Creamy Mustard Asiago Sauce is a delightful dish that combines succulent chicken breast with a luxurious sauce that bursts with flavor. The mustard adds a tangy kick, while the Asiago cheese contributes a rich creaminess that envelops the chicken, making each bite delectable. This recipe is perfect for a family dinner or a gathering with friends, offering a unique twist on classic chicken preparations.

As you prepare this dish, you’ll be enveloped in the inviting aromas of sautéed garlic and mustard, which blend beautifully with the rich cream sauce. When plated, the chicken is covered in a velvety golden sauce that reminds you just how comforting home-cooked meals can be. With every mouthful, you’ll experience a balance of flavors that is both satisfying and unforgettable, making this chicken dish a standout at any dinner table.

Quick Recipe Highlights

  • Flavor Profile: Experience a delightful combination of tangy mustard, creamy Asiago, and savory chicken.
  • Texture: The dish features a tender chicken texture complemented by a rich and velvety sauce.
  • Aroma: Inviting aromas of garlic and mustard fill the air, enhancing the overall culinary experience.
  • Visual Appeal: Beautifully presented with a golden sauce, garnished for an elegant touch.
  • Skill Level Needed: Perfect for intermediate cooks looking to elevate their weeknight dinners.
  • Special Equipment: A skillet and whisk are key for this simple yet elegant dish.

Recipe Overview

  • Difficulty Level: This medium-level recipe involves sautéing and sauce-making, requiring basic cooking skills while allowing room for creativity.
  • Category: This can be classified as a main course suitable for both everyday dinners and special occasions.
  • Cuisine: This dish draws influence from Italian cooking, integrating creamy sauces with strong flavorful components.
  • Cost: Reasonably priced, depending on the quality of the chicken and cheese, averages around $15-$20 for four servings.
  • Season: Ideal for all seasons as it is hearty and comforting while still fresh and delightful.
  • Occasion: Perfect for family dinners, date nights, or any occasion that calls for a warming, indulgent meal.

Why You’ll Love This Recipe

The flavor and texture of Chicken with Creamy Mustard Asiago Sauce are sure to impress. The dish expertly blends salty and savory flavors, with the mustard providing a bright counterpoint to the creaminess of the Asiago. Each bite offers a satisfying chew, making every forkful a pleasure. The comforting essence of creamy sauces enhances the richness of the chicken, ensuring that it’s a meal to remember.

In terms of convenience, this recipe is quick and easy to prepare, making it accessible for any home cook. With minimal prep time and straightforward steps, you can have this dish on the table in no time. The one-pan nature of the recipe also reduces cleanup time, which is perfect for busy weeknights.

Nutritiously, this dish boasts lean protein from the chicken, paired with the calcium-rich Asiago. The mustard adds a dose of healthy spices, and you can easily incorporate additional vegetables or side dishes to enhance the nutritional value even more. It’s a well-rounded meal that will satisfy your taste buds while providing essential nutrients.

Socially, Chicken with Creamy Mustard Asiago Sauce holds great appeal. It’s a dish that invites conversation around the table and is sure to impress guests. Whether you’re hosting a casual dinner party or a formal gathering, this meal adds an element of sophistication without unnecessary complexity.

Lastly, for cost-effectiveness, this recipe utilizes popular ingredients that are easy to find and affordable. You can often find deals on chicken and cheese, making this a budget-friendly dinner option. The meal is satisfying without being overly indulgent, ensuring that you can enjoy a delicious home-cooked dish without breaking the bank.

Historical Background and Cultural Significance

The origins of chicken and creamy sauces are traced back centuries, where hearty meals using local ingredients became staples in homes. Chicken has long been celebrated across cultures for its versatility, making it a favored choice in numerous recipes. Creamy sauces have also evolved in culinary practices around the world, often used to elevate simple dishes and add flavor depth.

In many regions, mustard is seen as a symbol of warmth, friendliness, and hospitality. Combining mustard with cream showcases the beautiful culinary dance between rustic and refined. This contrast reflects the balance of ingredients that many culinary traditions aim to achieve, creating harmony on the plate.

As the recipe evolved, variations began to appear based on local cheeses and spices. Italian cooking embraces the use of creamy sauces with robust flavors, representing a deeper appreciation for food that nurtures the body and soul. Today, creamy chicken dishes like this one hold a respected place in family gatherings and festivals.

Regional adaptations also impact the dish, with various cultures contributing their flair. Some recipes may incorporate local herbs or vegetables, which enrich the flavor profile while providing cultural significance. The evolution showcases how traditional recipes can transform while still retaining their core essence.

Ingredient Deep Dive

As the main ingredient, chicken serves not only as a source of lean protein but also carries historical and cultural significance in many cuisines worldwide. Rich in essential nutrients, chicken can be prepared in numerous ways, making it a versatile choice for home cooks. When selecting chicken, choose cuts with good color and minimal blemishes for the best flavor and texture. Store in the refrigerator for optimal freshness and be sure to cook thoroughly.

Cream serves as a luscious base for sauces, elevating dishes with its rich texture and flavor. The cream also contains fat, which is essential for a balanced diet, providing energy and supporting vitamin absorption. Always opt for high-quality cream for the best results, and store it properly in the refrigerator to maintain its freshness.

Asiago cheese adds a distinct sharpness and depth to the sauce. This semi-hard cheese offers nutritional benefits, including calcium, which is vital for bone health. When selecting Asiago, look for authentic Italian varieties for the most robust flavor. Store it wrapped in parchment paper and placed in an airtight container for optimal longevity.

Common Mistakes to Avoid

  • Overcooking the chicken can lead to dry meat; ensure it’s cooked to a juicy tender state.
  • Not seasoning adequately can result in bland flavors; always taste and adjust seasoning accordingly.
  • Using low-quality cheese may affect flavor; opt for a good quality Asiago for the best taste.
  • Skipping the resting period for chicken may mean losing flavor; allow it to rest before serving.
  • Rushing the sauce-making process can lead to separation; pay attention to the cooking temperatures.
  • Ignoring the importance of deglazing can mean losing delicious caramelized flavors; be sure to scrape the bottom of the pan.
  • Forgetting to taste as you cook can result in unbalanced flavors; adjust seasoning progressively.
  • Using cold ingredients can affect the texture of the sauce; bring them to room temperature beforehand.

Essential Techniques

To achieve perfect chicken, mastering the sauté technique is essential. This involves cooking the chicken in a hot pan with a little oil to create a sear, sealing in the juices. Avoid overcrowding the pan, which can lower the temperature and produce steam instead of a crisp texture.

Creating a creamy sauce involves whisking together the ingredients over medium heat to prevent separation. Gradually add the cream and cheese after deglazing the pan; this method intensifies the flavors. Make sure to keep the heat low while whisking, ensuring the sauce thickens beautifully without burning.

Pro Tips for Perfect Chicken with Creamy Mustard Asiago Sauce

Use fresh ingredients for the best flavor. Fresh chicken, cream, and herbs enhance the overall taste of the dish immensely.

Always taste your sauce before serving. Adjust the seasoning or consistency to ensure it’s just right before plating.

Let the chicken rest after cooking for at least five minutes. This allows the juices to redistribute, ensuring a moist and tender bite.

Consider adding a splash of white wine to deglaze the pan for an added depth of flavor in your sauce, balancing acidity with creaminess.

Experiment with different mustards. Using Dijon, whole grain, or spicy brown can drastically change the sauce’s character while still honoring its foundational flavors.

Garnish with fresh herbs or a sprinkle of cheese right before serving to add visual appeal and a burst of freshness.

Variations and Adaptations

This recipe lends itself to many adaptations depending on the ingredients you have on hand. For a twist, consider swapping out the chicken for pork chops or turkey for a variation that maintains the creamy sauce profile.

Seasonal adaptations can also be delightful; for example, adding seasonal vegetables such as spinach or sun-dried tomatoes can boost both nutrients and colors in the dish, making it visually stunning as well as delicious.

For those following specific dietary needs, you can make this dish dairy-free by substituting the cream with coconut cream or a nut-based alternative while still achieving a creamy texture.

If you’re looking for a low-carb version, replace the cream with a cauliflower puree that delivers a comparable creaminess but with significantly fewer carbohydrates, ensuring the dish remains satisfying.

Changing the texture can take your dish to another level. Think about adding crunchy toppings like toasted nuts or breadcrumbs for a satisfying contrast to the creamy sauce.

For presentation alternatives, consider serving the chicken over a bed of vibrant greens or with a side of roasted root vegetables for a seasonal touch that enhances both flavor and visual interest.

Serving and Presentation Guide

When plating your Chicken with Creamy Mustard Asiago Sauce, aim to create a visually pleasing dish. Use a wide plate to give the chicken space to shine. Position the chicken in the center and drizzle the sauce over the top generously.

Garnish with fresh herbs such as parsley or chives for a pop of color and associated fresh flavors. Adding a sprinkle of lemon zest can also brighten the overall flavor profile and presentation.

Consider pairing this dish with traditional accompaniments like buttery mashed potatoes or a fresh green salad to balance the richness of the sauce.

To highlight the dish, serve it family-style in an elegant serving dish, allowing guests to serve themselves while enjoying the aroma that wafts from the chicken.

Temperature considerations are essential – serve the dish immediately after plating to ensure all elements are warm and inviting, creating an enticing experience for your guests.

Portion control is also something to consider, allowing diners to enjoy an ample serving without overwhelming their plates, ensuring everyone leaves satisfied but not stuffed.

Wine and Beverage Pairing

A wine pairing that complements Chicken with Creamy Mustard Asiago Sauce is a crisp Chardonnay. The acidity and mining characteristics in the wine will balance the richness of the cream in the sauce. Alternatively, a light Pinot Grigio might also carry the flavors beautifully without overwhelming the palate.

For non-alcoholic options, consider a sparkling water served with a slice of lemon. This refreshing beverage cuts through the creaminess, providing a light accompaniment to the meal.

If your meal extends into dessert, pairing a light tea or herbal blend can gently cleanse the palate after the rich chicken dish, enhancing the dining experience.

Always serve beverages at the appropriate temperature, with whites chilled, enhancing their crispness and making them more refreshing against the dish’s warm depth.

Storage and Shelf Life

Chicken with Creamy Mustard Asiago Sauce can be stored in an airtight container in the refrigerator for up to three days. Ensure the dish cools before sealing to prevent condensation, which can lead to spoilage.

For longer storage, consider freezing the dish. Use a freezer-safe container and keep for up to three months. To maintain quality, separate the chicken from the sauce until you’re ready to serve.

Signs of spoilage include an off odor or changes in texture. If the chicken appears slimy or has an unappetizing smell, it’s best to discard it.

Reheating can be done either on the stovetop over low heat or in the microwave. Adding a splash of cream can help maintain the sauce’s consistency during reheating to avoid dryness.

Freezing guidelines include thawing in the refrigerator and reheating thoroughly to ensure the chicken’s safety and quality before serving again.

Make Ahead Strategies

For those keen on planning meals, Chicken with Creamy Mustard Asiago Sauce allows room for a make-ahead strategy. Marinade the chicken the night before for optimal flavor infusion, saving time on prep day.

You can also prepare the sauce ahead of time. Store it separately in an airtight container and reheat gently to maintain its creamy texture without separating.

Quality may vary when making it ahead, so avoid combining the sauce with chicken until you’re ready to serve. This ensures that the chicken remains tender and juicy when you reheat the dish together.

Assembly tips include keeping your ingredients prepped and ready, which can cut down on actual cook time when you’re ready to serve.

Reheating guidelines suggest gently warming the dish in a pan and adding fresh herbs right before serving to renew freshness and vibrancy at the last moment.

Fresh elements like greens can be added right before serving, ensuring elevated flavors and nutrient density right on the plate.

Scaling Instructions

If you want to halve the recipe, simply divide each ingredient by two, ensuring you monitor cooking times closely as they may shorten with less volume.

Doubling or tripling the recipe requires larger pans or batches. Consider using multiple skillets to maintain adequate cooking space and ensure everything cooks evenly.

Equipment adjustments should accommodate the increased volume, using larger cooking vessels as necessary to avoid overcrowding, which can affect cooking times and quality.

Timing modifications may require you to adjust cooking time based on the size of the batches or the number of servings, always ensuring chicken is cooked through thoroughly.

For storage considerations, make sure ample space is available if scaling, as larger portions may take longer to cool, affecting overall safety and quality.

Nutritional Deep Dive

Nutritionally, Chicken with Creamy Mustard Asiago Sauce is balanced, offering a great amount of protein per serving, which is essential for muscle repair and energy. The dish pairs chicken with prevention properties from the mustard, which may boost metabolism.

Micronutrient analysis shows this dish contains calcium from the cheese, vital for bone strength, while the inclusion of chicken boosts iron levels.

Health benefits include low carbohydrate status, making it a suitable option for individuals looking to reduce carb intake without sacrificing flavor.

Dietary considerations should focus on portion control, ensuring balanced meals and digestible serving sizes when engaging in weight management techniques.

The recipe can be adjusted for health benefits without losing flavor, employing the use of low-fat or vegan options for those with distinct dietary needs.

Dietary Adaptations

For gluten-free adaptations, ensure all ingredient sources are labeled gluten-free. Substituting noodles or sides can customize the dinner while maintaining integrity for gluten-allergic individuals.

Dairy-free modifications can be tackled by replacing cream with coconut cream and using a dairy-free cheese substitute; flavors remain without compromising dietary restrictions.

Vegan adaptations lead toward replacing chicken with vegetables or legumes, focusing on achieving the same creamy sauce texture and flavor profile with plant-based ingredients.

Low-carb variations can explore cauliflower as a base for the sauce, offering satisfying taste experiences while respecting dietary limits.

Keto enthusiasts can delight in using full-fat ingredients while steering clear of high-carb accompaniments like rice or bread, maintaining ketosis while enjoying a rich flavor experience.

Paleo options encourage the use of natural ingredients, such as coconut milk for cream, which aligns with paleo principles while delivering beautiful textures and flavors.

Low-FODMAP families can replace mustard with appropriate low-FODMAP alternatives while modifying seasonings to minimize triggers, enjoying a comforting meal.

Troubleshooting Guide

For texture issues, if the sauce becomes too thick, gradually add a splash of chicken broth or cream to loosen it, ensuring it reaches the right consistency.

Flavor balance can be a concern; adding salt and acidity in small doses during cooking helps achieve harmony in the dish, enhancing natural flavors.

Temperature problems can arise when cooking chicken; always use a meat thermometer to ensure it reaches an internal temperature of 165°F for safety and quality.

Equipment challenges can be alleviated by preheating your pans to ensure an even cooking process, which enhances the overall meal quality.

Ingredient substitutions may lead to unplanned flavor profiles; always taste as you adjust recipes to identify potential pitfalls before serving to guests.

Timing concerns, particularly with sauces, should always involve periodic checks to adjust consistency before serving; better safe than sorry when serving your guests and family.

Recipe Success Stories

Community feedback has often praised the satisfying nature of this dish. Home cooks frequently share how it has elevated their weeknight meals into gourmet experiences, highlighting its adaptability to varying palates.

Numerous variations have emerged, with readers experimenting with local cheeses or spice mixes they have on hand, creating their unique spins while still adhering to the core recipe’s essence.

Adaptation stories often reveal families coming together around this recipe, showcasing how it has involved children and adults alike in the cooking process, ensuring a shared dinner experience.

Photography tips often suggest capturing the sauce’s sheen while respecting natural lighting, showcasing the vibrant colors that speak to its flavor potential, thus inspiring others to try it out.

Frequently Asked Questions

Q: Can I use a different type of cheese?
A: Yes! Feel free to experiment with cheeses like Parmesan or Gruyère for a different flavor, keeping in mind that texture may vary.

Q: What’s the best way to store leftovers?
A: Store leftovers in an airtight container in the refrigerator for up to three days or freeze for longer storage.

Q: Can I make the sauce vegan?
A: You certainly can! Substitute the cream with coconut cream and the chicken with chickpeas for a vegan twist.

Q: How can I add vegetables to the dish?
A: Consider adding sautéed spinach, mushrooms, or broccoli into the sauce for extra nutrients and flavor.

Q: What’s the best side dish to accompany it?
A: Mashed potatoes, rice, or a refreshing salad pair beautifully with the creamy sauce of the chicken.

Q: Can I use chicken thighs instead?
A: Absolutely! Chicken thighs work great for this recipe if you prefer a darker meat that’s also juicy.

Q: How do I know when the chicken is done cooking?
A: Use a meat thermometer to check the chicken reaches an internal temperature of 165°F.

Q: Can I prepare this dish in advance?
A: Yes, you can prep components separately and assemble just before consumption to ensure optimal freshness.

Q: Can I add a different type of mustard?
A: Yes! Feel free to experiment with honey mustard, grainy mustards, or spicy varieties to create a unique taste.

Q: What is the best way to reheat this dish?
A: Gently reheat in a pan over low heat, adding a splash of cream if needed to maintain the sauce’s consistency.

Q: Is this dish kid-friendly?
A: Yes! The creamy sauce and savory flavor make it appealing for kids, especially if paired with their favorite sides.

Additional Resources

If you’ve enjoyed this Chicken with Creamy Mustard Asiago Sauce, you might also relish recipes like Creamy Tuscan Chicken or Garlic Butter Chicken. These related recipes showcase similar flavor profiles and offer unique experiences while utilizing familiar techniques.

For technique guides, explore articles on sautéing, sauce-making, or chicken preparation to enhance your cooking knowledge.

Ingredient information articles can help you learn more about quality cheese selections or mustard varieties, empowering your culinary choices.

Equipment recommendations can lead you towards the best kitchen tools that simplify your cooking processes. A good skillet and whisk can cover many bases in the kitchen.

Lastly, consider seasonal variations. Keeping ingredients rotated according to the season not only keeps meals exciting but also ensures freshness and opacity.

Join the Conversation

We’re excited to hear about your experiences with this Chicken with Creamy Mustard Asiago Sauce recipe! Share your images and feedback on social media, inspiring others with your creations.

Photography tips can help enhance your culinary captures, showcasing the vibrant colors and textures the dish presents.

We encourage you to leave reviews and engage with our community by sharing your variations or personal touches you’ve added to the recipe.

If you try out a unique combination or ingredient, let us know! Your experimentation helps us all grow in the kitchen, creating diverse and delicious experiences for everyone.

Let’s celebrate creativity in cooking together!

The Recipe

Chicken with Creamy Mustard Asiago Sauce

Serves: 4

Prep Time: 15 mins

Cook Time: 30 mins

Total Time: 45 mins

Kitchen Equipment Needed

  • Skillet
  • Whisk
  • Meat thermometer
  • Airtight containers for storage

Ingredients

  • 4 boneless chicken breasts
  • 1 cup heavy cream
  • ½ cup Asiago cheese, grated
  • 2 tablespoons Dijon mustard
  • 2 cloves garlic, minced
  • Salt and pepper to taste
  • 2 tablespoons olive oil
  • Fresh parsley for garnish

Directions

  1. Heat olive oil in a skillet over medium heat.
  2. Season chicken breasts with salt and pepper, then add them to the skillet. Cook until golden brown on both sides and cooked through (about 5-7 minutes per side).
  3. Remove chicken from skillet and cover with foil to keep warm.
  4. In the same skillet, sauté minced garlic until fragrant, approximately 30 seconds.
  5. Deglaze the pan with a splash of chicken broth or white wine, scraping the bottom to release the flavorful bits.
  6. Reduce heat and stir in the heavy cream, mixed mustard, and grated Asiago cheese. Whisk until combined and the sauce is smooth.
  7. Return the chicken to the skillet, coating each piece evenly with the sauce. Allow the chicken to simmer for an additional 3-4 minutes to absorb the flavors.
  8. Serve hot, garnished with fresh parsley.

Recipe Notes

  • Feel free to experiment with different types of mustard for a unique flavor.
  • Consider adding vegetables like spinach or mushrooms to the sauce for an extra nutrition boost.
  • The sauce can be made ahead and heated just before serving to save time.
  • This dish pairs well with a side of creamy mashed potatoes or a fresh salad.

Delicious Beef Spring Rolls with Zesty Peanut Lime Sauce

Beef Spring Rolls with Peanut Lime Sauce: A Flavorful and Crunchy Delight

⚖️
Difficulty
Medium

⏲️
Prep Time
30 mins

🕒
Cook Time
15 mins

⏱️
Total Time
45 mins

🍽️
Servings
4

Embark on a culinary adventure with these irresistible Beef Spring Rolls with Peanut Lime Sauce. Each bite bursts with flavor, combining savory beef with crisp vegetables and a zesty peanut lime dip that will make your taste buds dance. These spring rolls are not just a meal; they are an experience that transports you through the vibrant streets of Southeast Asia.

The harmonious blend of herbs and spices with tender beef wrapped in delicate rice paper creates a perfect balance of taste and texture. Once you dip them into the creamy, tangy peanut sauce, you’ll find yourself reaching for seconds—or even thirds! Perfect for entertaining or a cozy dinner, these spring rolls offer a delightful, shareable dish that everyone will adore.

Quick Recipe Highlights

  • Flavor Profile: The beef is seasoned with garlic, ginger, and soy sauce, providing a savory depth, perfectly complemented by the zesty peanut lime sauce.
  • Texture: The spring rolls boast a crunchy exterior and a tender filling, creating a satisfying contrast in every bite.
  • Aroma: Aromatic herbs and spices fill the air, making it hard to resist the temptation to dig in right away.
  • Visual Appeal: Vibrant colors from fresh herbs and vegetables wrapped in translucent rice paper make a stunning presentation.
  • Skill Level Needed: While considered medium-level, the process is straightforward and rewarding, perfect for home cooks eager to try something new.
  • Special Equipment: A sharp knife, cutting board, and a clean, flat surface for assembling the rolls are all you’ll need.

Recipe Overview

  • Difficulty Level: This recipe’s medium difficulty stems from the assembly of the spring rolls, which requires some practice to perfect the rolling technique.
  • Category: Perfect as an appetizer or snack, these spring rolls can also serve as a light main course paired with a simple salad.
  • Cuisine: Rooted in Asian culinary tradition, these spring rolls reflect a fusion of flavors found in Vietnamese and Thai dishes, known for their fresh ingredients and bold tastes.
  • Cost: The ingredient costs are reasonable, with fresh vegetables and herbs from your local market, making it a budget-friendly option.
  • Season: These spring rolls are fantastic all year round but especially shine in warm weather, ideal for summer gatherings.
  • Occasion: Great for parties, potlucks, or a casual family dinner, these spring rolls are both fun and sociable.

Why You’ll Love This Recipe

Indulging in these Beef Spring Rolls with Peanut Lime Sauce is a treat for the senses. The savory essence of the seasoned beef, combined with fresh, crunchy vegetables, delivers a delightful flavor explosion in each bite. The creamy peanut sauce introduces a zesty kick that contrasts beautifully with the richness of the meat, making every mouthful unforgettable. Enjoy them warm or at room temperature, as they stand out in flavor regardless of how they’re served.

Preparation is an absolute breeze. The first step is mixing together the classic flavors of garlic, ginger, and soy sauce, which can be quickly combined with ground beef in a hot pan. The fresh vegetable fillings require minimal chopping, and rolling the spring rolls is a satisfying process that can be accomplished by anyone with a touch of patience. Each step of the process brings you closer to enjoying this delectable dish.

These spring rolls are not only delicious, but they also offer health benefits. Packed with fresh vegetables such as carrots, lettuce, and herbs, they supply essential vitamins and minerals. The peanut sauce is a great source of protein and healthy fats, making this dish enjoyable without guilt.

Perfect for gatherings or celebrations, these beef spring rolls become a social centerpiece, inviting guests to share and converse over a delightful culinary creation. The vibrant colors and enticing aromas generate excitement, transforming your dining table into a festive feast.

Lastly, creating these Beef Spring Rolls with Peanut Lime Sauce is a cost-effective meal option. Most ingredients can be sourced locally and are budget-friendly, making them a fantastic choice for home cooks looking to impress without breaking the bank.

Historical Background and Cultural Significance

The tradition of spring rolls can be traced back to ancient China, where rice paper was first used to wrap a variety of fillings, serving as a convenient meal for farmers and laborers. Initially filled with seasonal vegetables and meat, these rolls symbolize the bounty of the harvest and the creativity of local cuisine. As culinary practices spread throughout Asia, various nations adopted and adapted the spring roll to reflect their unique flavors and cultures.

In Vietnamese cuisine, for example, fresh spring rolls, known as “gỏi cuốn,” are often filled with shrimp, pork, and an array of herbs, served with dipping sauces. Meanwhile, in Thailand, crispy fried spring rolls are popular, highlighting the contrast between the crunchy exterior and savory filling. This popular Asian dish has evolved significantly, with each region imprinting its cultural identity onto the recipe.

The evolution of the beef spring roll has seen numerous adaptations over time, such as integrating different types of protein, seasonal vegetables, and distinctive sauces. Each ingredient holds significance, with beef often symbolizing wealth and abundance in many Asian cultures. Culinary traditions surrounding spring rolls emphasize communal preparation and sharing, reinforcing their role in social gatherings.

Regional variations abound, incorporating local ingredients and cooking styles. From crispy fried versions in Thailand to the fresh and healthy counterparts in Vietnam, each adaptation showcases the versatility of this beloved dish. The beauty of spring rolls lies in their ability to adapt while retaining their essence as a favorite among many.

Ingredient Deep Dive

– Beef: Ground beef is often the meat of choice for spring rolls, adding a rich flavor complimented by various spices. It offers high protein content, iron, and essential vitamins, making it a nutritious addition. When selecting beef, look for fresh and lean options for a healthier meal. Store it in the refrigerator for up to two days, or freeze for longer storage. If beef isn’t suitable, ground turkey or chicken can serve as great alternatives.

– Rice Paper: Essential for wrapping, rice paper gives spring rolls their signature translucent look. Gluten-free and made from rice flour, they are perfect for those with dietary restrictions. When selecting rice paper, choose thin, high-quality sheets for the best results. Store them in a cool, dry place, and use them promptly because moisture can compromise their integrity. If unavailable, other gluten-free wraps or lettuce leaves can serve as substitutes.

– Fresh Vegetables: Incorporating fresh vegetables such as carrots, lettuce, and herbs brings vibrant colors and nutrients. They not only enhance the visual appeal but also contribute fiber and essential vitamins. Choose crisp, fresh produce, and store them in the refrigerator to maintain their quality. Adapt the filling based on seasonality, swapping for ingredients like cucumber or bell peppers when desired.

– Peanut Sauce: This rich, creamy sauce is made from peanut butter, lime juice, and complementary flavors. It’s a great source of healthy fats and protein, while lime juice adds a refreshing tang. Opt for natural peanut butter without additives for a healthier alternative. Homemade sauce can be stored in the refrigerator for up to a week, and it’s easy to scale up the recipe for larger gatherings.

Common Mistakes to Avoid

  • Overfilling the spring rolls can lead to tearing when rolling; use a moderate amount of filling to ensure a tight wrap.
  • Not soaking the rice paper long enough results in an inflexible wrap; soak until just pliable for the best texture.
  • Rushing the cooling process of the cooked beef can cause residual heat to make the wrappers soggy; allow to cool thoroughly.
  • Using unwashed vegetables can lead to grit and undesired textures; always wash produce before adding to rolls.
  • Rolling too tightly can constrict the filling, making them hard to bite into; allow for some space when wrapping them.
  • Not season the filling adequately can result in bland flavors; taste and adjust seasoning before assembly.
  • Neglecting to cover assembled rolls can dry them out; keep wrapped in a damp cloth until serving.
  • Using cold sauce can dull flavors; allow peanut lime sauce to come to room temperature for a more robust taste.
  • Skipping garnishes can make servings visually unappealing; consider cilantro or lime wedges to add freshness.
  • Not enjoying them fresh; while they can be stored, spring rolls are best consumed within a few hours of preparation for optimal texture and flavor.

Essential Techniques

– Rolling: Mastering the rolling technique is crucial for the perfect spring roll. Start with a damp rice paper on a clean surface, add your filling, and fold in the sides before rolling. Practice makes perfect, so don’t get discouraged if your first few attempts aren’t picture-perfect. Ensure your filling is evenly distributed for an even roll.

– Soaking Rice Paper: Soaking rice paper properly is essential to achieving the right texture; too little time results in a brittle wrap, while soaking too long makes it impossible to handle. Dip rice paper in warm water for about 10-15 seconds until it’s just pliable but not soggy. Lay it flat on your work surface to begin assembling your rolls.

– Preparing Peanut Sauce: For the best flavor in your peanut sauce, mix peanut butter with lime juice, sugar, soy sauce, and water until smooth. Adjust the proportions to suit your taste; if you prefer a spicier kick, consider adding sriracha or chili paste. Allow the sauce to sit for a few minutes to let the flavors meld before serving.

Pro Tips for Perfect Beef Spring Rolls

– Choose high-quality ingredients for richer flavors, particularly in your beef and fresh vegetables; freshness is key to vibrant spring rolls.
– Experiment with different filling combinations for diverse flavors; adding herbs like mint or cilantro can elevate the dish.
– Store rolled spring rolls in a single layer, covered with a damp towel to prevent drying out, ensuring they stay fresh until served.
– When frying, ensure oil is hot enough, about 350°F, for a perfect, golden exterior; test with a small piece before frying the entire batch.
– Consider prepping components in advance; you can prepare the beef and cut vegetables a day ahead to speed up assembly.
– Use a sharp knife for cutting your spring rolls; a clean cut gives a professional presentation and enhances visual appeal.
– Serve with various dipping sauces for a flavor party; consider sweet chili sauce or a soy-ginger mix for complementary tastes.

Variations and Adaptations

– Regional variations can take center stage; swap beef for shrimp or tofu for a delightful twist that maintains the spring roll essence.
– Seasonal adaptations can highlight local produce, such as using asparagus in spring or roasted bell peppers in winter to celebrate seasonal abundance.
– Dietary modifications include creating vegan options free of animal products and gluten-free by substituting rice noodles for the filling.
– Flavor variations can come from experimenting with spices; consider adding five-spice powder or a hint of curry for unexpected yet delicious results.
– Texture modifications can boast crunch; add fried shallots or sliced nuts for added bite and mouthfeel contrast.
– Presentation alternatives could involve creating a platter with assorted sauces and fresh herbs for an interactive dining experience that encourages sharing.

Serving and Presentation Guide

Serve your Beef Spring Rolls on a large, vibrant plate, allowing the colors to pop against the backdrop. Consider garnishing with fresh lime wedges and cilantro sprigs for an added touch of color and flavor. Plating them vertically can dazzle onlookers, showing off their intricate fillings.

When garnishing, think about texture alongside color; crushed peanuts or sesame seeds sprinkled on top can enhance both visual and flavor appeal. Offer a selection of dipping sauces in individual small bowls placed around the platter for easy access and a visually appealing setup.

For temperature considerations, spring rolls are best served fresh; however, they can be enjoyed at room temperature, making them versatile for settings where guests are mingling. Portion control is easily managed by cutting each roll in half diagonally, showcasing the colorful filling inside, making for smaller, shareable bites.

Wine and Beverage Pairing

For wine pairings, consider a light white wine such as Sauvignon Blanc or a slightly sweet Riesling, both of which complement the freshness and spice of the spring rolls beautifully. A light, sparkling wine can also offer a refreshing contrast that cleanses the palate between bites.

For non-alcoholic alternatives, a ginger-infused sparkling water provides a refreshing crunch, while herbal iced teas such as mint or jasmine bring an earthy balance to the dish. If you enjoy coffee or tea, opt for a mild green tea served warm; its light flavor profile will complement the spring rolls without overpowering them.

Consider serving drinks chilled, especially if dining outside on a warm day; keeping the beverages cool enhances the overall experience. Presentation counts, so use attractive glassware that complements your spring rolls for a complete dining aesthetic.

Storage and Shelf Life

To store leftover spring rolls, keep them in an airtight container in the refrigerator. When stored properly, they can last for up to two days; however, the texture may not be as delightful as when fresh. For best results, separate layers with parchment paper to prevent sticking.

The ideal temperature for storing spring rolls is refrigeration, keeping between 32°F to 40°F. Signs of spoilage include a noticeable change in color or texture, such as a slimy exterior. If any off smells develop, it’s best to discard them for safety reasons.

When reheating, it’s best to avoid microwaving as it can result in a soggy texture; instead, consider warming in a preheated oven for 5-7 minutes until heated through, preserving some crispness. If freezing the spring rolls, wrap them individually in plastic wrap before placing them in airtight containers; they can last up to a month this way.

Make Ahead Strategies

To prepare effectively, consider prepping the filling in advance. Cook and season the beef ahead of time, and store it in the fridge for up to three days. This allows for quick assembly when the time comes to enjoy your rolls.

You can also cut vegetables a day ahead; keep them in sealed containers with a moist paper towel to preserve freshness. For assembling, consider preparing rice paper just before rolling to prevent sticking and tearing.

Consider assessing the quality impact of prepped ingredients; while the base filling can be pre-made, adding fresh herbs and vegetables at the last moment will maintain crispness. When reheating, focus on quick heating methods to ensure they don’t dry out, allowing for a satisfying texture upon serving.

Scaling Instructions

Scaling this recipe is straightforward; simply adjust ingredient quantities based on how many rolls you wish to create. Halving the recipe can make for a quick appetizer, while doubling or tripling scales up for gatherings or events.

For doubling, keep an eye on the cooking time; you might need to batch-cook the beef if your pan is small. Adjust the seasoning proportionally to maintain flavor balance, especially when working with spices or sauces.

Equipment adjustments are minimal; using larger mixing bowls or pans can accommodate increased ingredients comfortably, ensuring no splatters. When storing scaled spring rolls, consider larger containers to prevent them from sticking together.

Timing modifications can play a role; assembly will take longer with larger quantities, so allow for additional prep time based on your cooking schedule.

Nutritional Deep Dive

When considering macros, each spring roll filled with beef offers a respectable protein source, which is vital for muscle repair and energy. The inclusion of fresh vegetables means added fiber content, which promotes digestive health.

Micronutrient analysis reveals that incorporating various vegetables contributes essential vitamins like A, C, and K alongside minerals such as potassium and calcium. The peanuts in the peanut sauce offer healthy fats known for cardiovascular benefits, while lime juice can boost overall hydration and digestion.

For health benefits, this dish balances broth with fresh produce, making it a sustainable choice in your diet. Dietary considerations are also vital; adjust portions based on activity level, ensuring optimal fuel for your body through balanced meals.

For weight management, maintaining an adequate serving size with spring rolls can make as a satisfying yet lower-calorie option in your meal rotation, especially if served with plenty of fresh veggies.

Dietary Adaptations

For those who require gluten-free options, ensure to use certified gluten-free soy sauce and check rice paper brands. This will accommodate those with celiac disease or gluten sensitivity without sacrificing flavor.

Dairy-free spring rolls can always incorporate substitutes in sauces; use coconut milk instead of any dairy elements for creaminess in dips. Combining the coconut flavor complements the peanut sauce beautifully.

Vegan adaptations replace beef with plant-based proteins like tempeh or mushrooms, appealing to a wider audience. Adding textures like grilled eggplant or zucchini can introduce heartiness without meat.

Low-carb or Keto diets can adjust by eliminating rice paper and opting for large lettuce leaves as wrappers. This maintains the freshness without added carbs. Alternatively, a cauliflower rice filling serves as an excellent substitute.

Paleo followers can enjoy this recipe by using whole food ingredients, ensuring all sauces are gluten-free and sugar-free. Simple ingredient swaps can help achieve dietary goals without compromising on taste.

Troubleshooting Guide

For texture issues, if spring rolls are too soggy after being stored, ensure they are wrapped tightly in a damp towel before refrigerating. This prevents excess moisture buildup.

When flavor balance is off, remember to taste your fillings periodically. Adding a splash of lime or a pinch of salt can enhance overall flavor significantly. Adjust seasonings as needed during preparation.

Temperature problems can arise; if filling is cold, it can lead to a gummy texture. Allow ingredients to come to room temperature before wrapping to achieve the best results.

For equipment challenges, ensure to use non-stick cookware for frying to prevent sticking and ensure even cooking. Preheated pans offer optimal heat distribution.

If ingredient substitutions are causing concern, always aim to replicate similar flavor profiles; for instance, if you lack soy sauce, use tamari or coconut aminos. These can yield a comparable taste.

Timing concerns are also critical; rushing through the soaking process can yield tough rice papers. Always allow adequate time for soaking, usually around 10-15 seconds should suffice for pliability.

Recipe Success Stories

Feedback from the community highlights how versatile beef spring rolls can be. Many readers have shared their successes with flavor variations, experimenting with different proteins and sauces.

Adapting traditional flavors has resulted in a fusion of cultures, inspiring stories of fresh takes and spin-offs stemming from the original recipe. The photography tips shared among readers have increased interest, showcasing vibrant colors and textures achieved at home.

Community suggestions highlight the creativity encouraged through this dish, often leading to collaborative cooking experiences with friends and families. These success stories will inspire new cooks to try creating their variations and sharing their results as well.

Frequently Asked Questions

How do I prevent my spring rolls from sticking together?

To prevent sticking, ensure you layer the rolled spring rolls carefully on a large platter and separate each one with a damp paper towel. This method keeps them moist without clumping together.

Can I freeze leftovers?

Yes, you can freeze the rice paper rolls. Wrap each one tightly in plastic wrap and place them in an airtight container. They can last up to a month in the freezer. When ready to eat, allow them to thaw in the fridge and serve cold or reheat.

What dipping sauce can I use besides peanut sauce?

Other delicious dipping sauces include sweet chili sauce, soy ginger sauce, or a simple vinegar-based dipping sauce. Experiment with various sauces to find your favorite pairing!

What can I substitute for beef in this recipe?

If you’d like a vegetarian option, try crumbled tofu, tempeh, shredded carrots, or mushrooms. Each alternative brings its flavors while maintaining the roll’s characteristic texture.

How can I make the filling spicier?

To add spice to your filling, consider including chili garlic sauce, diced jalapeños, or crushed red pepper flakes. Adjust the quantity to your heat preference for the perfect kick!

How long can I keep the peanut sauce in the fridge?

Your peanut sauce can be stored in an airtight container in the refrigerator for up to a week. Just give it a stir to combine before serving again!

Can I prepare spring rolls in advance?

Yes! You can prepare and fill spring rolls a few hours ahead of serving. Keep them covered with a damp cloth until you’re ready to serve to maintain moisture.

What is the best way to eat spring rolls?

For the best experience, dip each spring roll into your favorite sauce, take a bite, and savor the blend of flavors. They are meant to be enjoyed fresh and shared!

Is there a vegetarian option for this recipe?

Absolutely! Replace the beef with a mix of vegetables like mushrooms, tofu, and carrots for a delightful vegetarian spring roll. Use firm tofu to maintain structure while rolling.

Are there any other sauces I can try?

Yes, you can try a sesame-soy sauce, hoisin sauce, or a spicy vinegar mix for a different flavor experience! Feel free to experiment to find the perfect match for your taste.

Additional Resources

For those interested in exploring similar flavors, check out our other recipes featuring Asian-inspired sauces or dishes. Techniques for making homemade sauces can help you level up your flavor variety at home.

Consider exploring how to make different types of spring rolls, including those with vegetarian ingredients or even dessert spring rolls, to expand your cooking repertoire. Understanding ingredient nuances can enhance your culinary discovery as you dive deeper into this style of cuisine.

For equipment recommendations, ensure you have sharp knives and thorough cutting boards, helping ease the preparation process. Seasonal variations are easily adaptable, especially with fresh produce, so don’t hesitate to adjust your fillings based on what’s available locally.

Join the Conversation

Engage with our community by sharing your photos and experiences of making Beef Spring Rolls with Peanut Lime Sauce! Share your tips and tricks on our social media pages and connect with other food lovers.

Photography tips can help you showcase your creations beautifully, encouraging more discussions on what works best in making perfect spring rolls. Reader reviews inspire others to try new ingredients, prompting flavorful discussions and suggestions.

Join the conversation, start posting variations of the recipe, and let’s build a community around our shared love for delicious food, cooking, and creativity!

The Recipe

Beef Spring Rolls with Peanut Lime Sauce

Serves: 4

Prep Time: 30 mins

Cook Time: 15 mins

Total Time: 45 mins

Kitchen Equipment Needed

  • Sharp knife
  • Cutting board
  • Large frying pan
  • Large platter for serving
  • Bowl for soaking rice paper

Ingredients

  • 1 pound ground beef
  • 1 tablespoon soy sauce
  • 1 tablespoon minced garlic
  • 1 tablespoon minced ginger
  • 1 cup carrots, julienned
  • 1 cup lettuce, shredded
  • 1/2 cup fresh herbs (basil, cilantro)
  • 8-10 rice papers
  • For the Peanut Lime Sauce: 1/2 cup peanut butter, 2 tablespoons lime juice, 1 tablespoon soy sauce, 1 tablespoon honey, 1-2 tablespoons water to adjust consistency

Directions

  1. In a large frying pan, cook the ground beef over medium heat until fully browned. Drain excess fat and mix in minced garlic, ginger, and soy sauce.
  2. While the beef cools, prepare the filling by julienning the carrots and shredding the lettuce.
  3. Make the peanut sauce by whisking together peanut butter, lime juice, soy sauce, honey, and water until smooth.
  4. Soak the rice paper in warm water for about 10–15 seconds until pliable.
  5. Lay the soaked rice paper on a flat surface. Add a small amount of beef and vegetables to the center and carefully fold in the sides, then roll from bottom to top, sealing tightly.
  6. Place on a platter and cover with a damp cloth until ready to serve. Repeat until all filling is used.
  7. Serve with peanut lime sauce on the side for dipping.

Recipe Notes

  • For added heat, consider adding sliced jalapeños in the filling.
  • Experiment with different dipping sauces to find your favorite.
  • Store leftover spring rolls in an airtight container in the refrigerator, preferably consumed within 2 days.

Indulge in Creamy Shrimp and Lobster Ravioli Delight

Shrimp and Lobster Ravioli – Creamy & Delicious

⚖️
Difficulty
Moderate

⏲️
Prep Time
30 mins

🕒
Cook Time
15 mins

⏱️
Total Time
45 mins

🍽️
Servings
4

Indulge in the ultimate seafood delight with our Shrimp and Lobster Ravioli! This creamy and delicious dish brings together the rich flavors of succulent shrimp and tender lobster encased in delicate pasta, making it the perfect centerpiece for any dinner gathering. Imagine twirling your fork around luscious, velvety sauce while enjoying the perfect bite of seafood and pasta combined. Each mouthful bursts with flavor, inviting you into a world of culinary bliss that dances on your palate.

This dish is not just about taste; it’s an experience that captures the essence of fine dining right in your kitchen. The contrast of the delicate pasta and the hearty sauce creates a dish that is both comforting and indulgent. Casually elegant, Shrimp and Lobster Ravioli is a dish that can elevate your weeknight dinner or impress your guests at a dinner party. Whether you serve it with a simple salad or a glass of crisp white wine, this pasta delight is sure to please.

Quick Recipe Highlights

  • Flavor Profile: The savory sweetness of lobster complements the mild brininess of shrimp, while the creamy sauce brings everything together with a touch of richness.
  • Texture: The ravioli boasts a soft, tender shell filled with luscious seafood, topped with a creamy, slightly garlicky sauce for a delightful contrast.
  • Aroma: The aroma of fresh seafood blended with herbs creates an enticing scent, enhancing the overall dining experience.
  • Visual Appeal: With its vibrant color contrast of creamy white sauce and golden-brown pasta, this dish presents beautifully on any table.
  • Skill Level Needed: This recipe requires moderate cooking skills, including pasta-making and sauce preparation.
  • Special Equipment: A pasta machine can ease the rolling of dough, while a large pot and sauté pan are essential for simmering and plating.

Recipe Overview

  • Difficulty Level: The moderate difficulty comes from preparing homemade ravioli, ensuring the pasta is properly filled and sealed.
  • Category: This dish fits comfortably within the category of Italian cuisine and is a prime example of a gourmet entrée.
  • Cuisine: Rooted in Italian cooking traditions, ravioli often features seafood fillings, reflecting the coastal culinary heritage.
  • Cost: Ingredients like lobster can increase the overall cost, making this dish more suitable for special occasions or weekend indulgences.
  • Season: Ideal for any season, but particularly wonderful during seafood season when shrimp and lobster are at their freshest.
  • Occasion: Perfect for romantic dinners, celebratory gatherings, or anytime you want to treat yourself and others to something special.

Why You’ll Love This Recipe

The taste and texture of shrimp and lobster ravioli are a symphony of flavors that not only satisfy your palate but also offer a unique experience. The fresh seafood filling is enhanced by aromatic herbs, resulting in ravioli that burst with flavor as you chew. The creamy sauce further elevates the dish, enveloping each piece in richness, making every bite comforting and indulgent.

One of the standout features of this recipe is its convenience. Once you’ve mastered the dough and filling, preparing delicious ravioli can become a staple in your cooking repertoire. You can even make a large batch and freeze them for quick meals later on, allowing you the luxury of fine dining without the fuss on a busy weeknight.

Nutritionally, shrimp and lobster are high in protein and rich in essential fatty acids, making this dish not only comforting but beneficial. The inclusion of herbs and garlic in the sauce adds not just to flavor but also to the heart-healthy benefits of the dish.

Socially, shrimp and lobster ravioli provide the perfect opportunity for entertaining; there’s something inherently sophisticated yet relaxed about serving homemade pasta. It pairs well with various sides, making it adaptable for dinners with close friends or more formal celebrations.

Lastly, while it may feel extravagant, this recipe showcases how you can create gourmet cuisine at home without needing expensive restaurant bills, especially when you learn to source quality seafood on a budget.

Historical Background and Cultural Significance

The origin of ravioli dates back to the Middle Ages in Italy, signifying the nation’s long-standing love affair with pasta. Its various iterations have evolved over centuries, with regions developing their own unique takes on fillings and sauces. In coastal regions, including the Amalfi Coast, seafood became a popular ingredient, leading to the shrimp and lobster variation we enjoy today.

Culturally, seafood ravioli represents the resourcefulness of Italian cooks who utilized local ingredients to create satisfying, hearty meals. The variations showcase the emphasis on fresh, seasonal produce, illustrating how Italian cuisine celebrates regionality.

The evolution of this recipe reflects a balance between traditional practices and modern culinary techniques. Today, home cooks can create versions that cater to contemporary tastes while still respecting the original techniques that have been passed down through generations.

Regional variations of shrimp and lobster ravioli abound, including adaptations incorporating local spices or herbs that reflect the climate and culture of the area. This diversity showcases how a simple dish can be beautifully transformed across different Italian contexts.

Ingredient Deep Dive

For the shrimp in this recipe, they represent a crucial part of coastal cuisines around the world. Shrimp have been beloved for centuries due to their delicate flavor and versatility in cooking. Rich in protein and low in calories, they offer essential nutrients while being easy to prepare. When selecting shrimp, look for ones with a mild scent of the sea, firm texture, and translucent shell. For storage, keep shrimp raw and in the coldest part of the refrigerator for no longer than 2 days, or freeze them for longer preservation.

Lobster is a delicacy often reserved for special occasions. Its sweet, tender meat complements many dishes, particularly in pasta. Lobster is not only delicious but also contains important vitamins and minerals that support overall health. When purchasing, choose lobsters that are lively and firm; for storage, keep it alive in a cooler, or if cooked, refrigerate for up to 3 days. Lobster can also be substituted with other shellfish for cost-efficiency, although the flavor won’t be quite the same.

The pasta used for ravioli is equally significant in this recipe. Traditionally made from flour and eggs, homemade pasta offers a superior texture compared to store-bought. It’s important to choose high-quality flour, such as Tipo “00”, for the best results. When making pasta, resting it before rolling helps develop the gluten for elasticity. Store leftover dough in the refrigerator, and it can last for a few days.

Cream is the foundation of the sauce, adding creaminess and richness that brings the dish together. Heavy cream is preferred for its high-fat content, which helps create a luscious texture. It’s essential to use fresh cream, and any leftover can be stored in the refrigerator for about a week. You could substitute with a lighter cream or non-dairy alternatives, but this will alter the dish’s richness.

Common Mistakes to Avoid

  • Using pre-made pasta: While convenient, it often lacks the flavor and texture of fresh homemade pasta. Make the effort for the best results.
  • Overfilling ravioli: An overflowing filling can cause the pasta to burst during cooking. Ensure a moderate amount of filling to keep ravioli intact.
  • Not sealing ravioli properly: Ensure edges are sealed firmly to prevent leakage during cooking. A little egg wash around the edge can help.
  • Overcooking the pasta: Fresh pasta cooks quickly; be vigilant to maintain the perfect al dente texture.
  • Rushing the dough: Kneading the pasta dough is crucial for elasticity. Take your time to properly knead and rest before rolling.
  • Sauce too thick or thin: Aim for a balance in sauce consistency. Adjust with pasta water as needed to achieve velvetiness.
  • Ignoring seasoning: Properly seasoning each component enhances flavors; don’t neglect salt in the pasta and filling.
  • Freezing ravioli improperly: Lay ravioli in single layers on a baking sheet before freezing to prevent sticking.
  • Not tasting while cooking: Continuously taste and adjust seasoning as needed for the best flavor in the sauce and filling.
  • Inadequate garnish: A simple sprinkle of fresh herbs or Parmesan elevates the dish aesthetically and flavor-wise.

Essential Techniques

Making perfect pasta dough is foundational to a successful shrimp and lobster ravioli. The importance of a well-made dough cannot be overstated; it provides the framework for the filling. To master this, focus on the correct ratio of flour to eggs and knead thoroughly. Common pitfalls include not allowing the dough to rest, which can hinder its elasticity. Look for a smooth texture that yields to pressure yet springs back.

Filling and sealing ravioli is another crucial technique. Ensuring even distribution of the filling guarantees that each piece cooks uniformly and prevents leaking. Use a piping bag or teaspoon for a consistent filling amount. Sealing is equally important; press the edges tightly to avoid air pockets. A visual cue for success is to see a slight sheen on the pasta when properly rolled and shaped.

Pro Tips for Perfect Shrimp and Lobster Ravioli

Start with high-quality seafood for optimum flavor; fresh shrimp and lobster yield the best results. Be mindful of the cooking time for the filling as overcooked seafood can become tough. Experiment with the sauce by incorporating fresh herbs for extra fragrance and depth of flavor. Pairing with a splash of lemon juice brightens the dish and enhances the seafood flavors.

Utilize an egg wash around the edges of your ravioli before sealing; this creates a stronger bond and prevents leaks. When cooking, add the ravioli to boiling water in small batches to maintain temperature and prevent sticking. For the sauce, remember to add a bit of the pasta cooking water to achieve the desired creaminess.

Consider garnishing the dish with freshly grated Parmesan and herbs to impress visually and tastefully. Finally, allow the dish to rest briefly before serving, which lets flavors mingle and enhances the overall dining experience.

Variations and Adaptations

The beauty of shrimp and lobster ravioli lies in its versatility. You can adapt it to showcase different seafood, such as crab or scallops, for a twist suitable for different occasions. Seasonal adaptations could include vegetables like zucchini or asparagus in the filling for a fresh summer touch. Opt for gluten-free pasta for a lighter, gluten-sensitive modification while still enjoying the traditional flavors.

Veggie or vegan preparations can utilize plant-based fillings made from cashews and spinach, providing an engaging alternative for those with dietary restrictions. Play with sauces as well; adding a bit of spice with chili flakes or incorporating a tomato base can offer a unique flavor profile. You may also change the texture by incorporating crunchy toppings like toasted breadcrumbs or nuts for added depth.

Presentation can also be altered, showcasing the ravioli in stylish bowls with drizzles of sauce and thoughtful garnishes. This modern approach can transform the dish from homey comfort food to gourmet cuisine, perfect for entertaining guests.

Serving and Presentation Guide

Plating shrimp and lobster ravioli can elevate your dining experience. Start with a large spoonful of sauce as a base on the plate, neatly arranging the ravioli on top. Use a gentle touch so as not to break the pasta. Garnish with a sprinkle of freshly chopped herbs or microgreens to add vibrant color and contrast.

Consider adding a drizzle of high-quality olive oil or a balsamic glaze for an extra layer of flavor and visually appealing finish. Traditional accompaniments like a side salad dressed lightly with vinaigrette can balance the richness of the ravioli. If you’re adding a protein like grilled shrimp or scallops on top, arrange them artfully for an exquisite touch.

Temperature plays a vital role; serve the ravioli piping hot right after cooking to maximize flavor. For portion control, consider using a scale or measuring cup to serve even amounts, ensuring guests are satisfied without excessive waste.

Wine and Beverage Pairing

For an exquisite dining experience, a crisp white wine such as Pinot Grigio or Sauvignon Blanc pairs beautifully with shrimp and lobster ravioli. These wines typically offer zesty notes that complement the seafood while balancing the creaminess of the sauce. If you prefer a richer choice, try a buttery Chardonnay that echoes the dish’s luxurious feel.

For non-alcoholic alternatives, opt for sparkling water with a slice of lemon or a non-alcoholic sparkling wine that matches the celebratory vibe. If coffee or tea is more suitable for your gathering, a mild herbal tea can cleanse the palate following the richness of the meal, providing a refreshing finish.

Temperature considerations are important; white wine should be served chilled, which accentuates its refreshing qualities, while sparkling options should be ice-cold to provide a crisp feel when paired with food.

Storage and Shelf Life

Proper storage is key to maintaining the quality of shrimp and lobster ravioli. If you have leftovers, cool them completely and store in an airtight container in the refrigerator, where they can last for up to 3 days. If you’ve made and cooked a larger batch, consider freezing the uncooked ravioli. Lay them out on a baking sheet until solid, then transfer to a freezer-safe bag, where they’ll last for up to 3 months.

Reheating leftovers can be done gently on the stovetop with a splash of water or sauce to maintain moisture. Avoid reheating in the microwave, as this can cause the pasta to dry out. Check for signs of spoilage in perishable ingredients like shrimp and lobster before consumption, ensuring that they smell fresh and do not have a slimy texture.

Make Ahead Strategies

To get a jump start on your shrimp and lobster ravioli, consider preparing the dough and seafood filling ahead of time. The dough can be made a few hours in advance; just wrap it tightly in plastic wrap and keep it in the fridge. Similarly, the filling can be prepared a day ahead, allowing the flavors to meld.

When it’s time to cook, roll out the ravioli and boil fresh. If you’re batching, consider assembling and freezing some dough filled with shrimp and lobster for whenever the craving strikes; you can cook from frozen without needing additional preparation.

For the sauce, make it in advance and reheat gently on the stove while adding a splash of cooking water. This method ensures you won’t sacrifice flavor and brings the dish together with minimized stress.

Scaling Instructions

If you need to adjust the quantity of shrimp and lobster ravioli, scaling recipes is straightforward. Halving the ingredients is simple for a smaller serving, while doubling or tripling follows the same ratios. Just be mindful of cooking time, as increasing the number of ravioli may require additional water and slightly longer boiling time.

Ensure your cooking equipment can accommodate the scale; a larger pot may be necessary when cooking double batches to maintain the appropriate boil. Additionally, if you’re storing larger quantities, utilize larger containers that seal properly to maintain freshness.

Finally, always taste during the scaling process to ensure seasoning remains balanced, as flavors can behave differently with larger amounts and may need minor adjustments.

Nutritional Deep Dive

With shrimp and lobster ravioli, you’re treating yourself to a dish rich in protein while providing key vitamins and minerals. Shrimp, for instance, is low in calories yet high in nutrients such as selenium and vitamin B12, supporting heart health and energy metabolism.

Lobster brings added value with omega-3 fatty acids contributing to cognitive function and inflammation reduction. When combined in this dish, they create a meal that is both satisfying and nutritious. However, keep an eye on portion sizes given the richness of the cream sauce, which can add to calorie totals significantly.

Recognizing that balance is important, consider enjoying this dish as an occasional treat rather than an everyday meal to maintain overall dietary equilibrium. With thoughtful portion sizes and sides, you can relish the flavors without compromising health goals.

Dietary Adaptations

For those needing gluten-free options, consider using gluten-free pasta or homemade alternatives made from almond flour or rice flour. Ensure other ingredients, particularly sauces and fillings, are gluten-free as well for overall consistency.

If dairy-free options are desired, substitute heavy cream with full-fat coconut milk or a plant-based cream alternative that will retain texture and comfort. Adjust seasonings to enhance the flavors since dairy can often mask subtle notes.

For a vegan twist, consider using a filling made from silken tofu blended with herbs and spices to mimic seafood texture, accompanied by a plant-based creamy sauce. Lean modified recipes can still portray a rich and enjoyable dining experience for all dietary needs.

Low-carb and keto alternatives could involve using zucchini noodles or cauliflower-based ravioli. These options maintain a lighter version of the dish while focusing on flavor and satisfaction.

Troubleshooting Guide

If you encounter texture issues, such as your ravioli being too tough, revisiting your dough’s resting process can help; under-rested dough may lead to resilience. Ensure your pasta is stretchy and not overly dry before rolling. Overcooked filling can yield a rubbery texture, so be cautious with cooking times and method.

When flavor balance is off, assess seasoning levels; seafood must be well-seasoned to shine through. Adding a pinch of salt or a squeeze of lemon can elevate the flavors significantly.

If temperature problems arise, be wary of overcooked ravioli; they should float to the top of the boiling water when nearing completion; overcooking can lead to undesirable results. Use a thermometer for precise timing on sauces, particularly creamy ones that can break if heated too high.

For equipment challenges, a slow burner can complicate boiling times. Ensure a high flame and use enough water to maintain boiling for larger batches. Lastly, using fresh ingredients is vital for optimal quality; substitute thawed frozen seafood with fresh items for the best flavor experience.

Recipe Success Stories

Community feedback emphasizes the delight found in making shrimp and lobster ravioli at home. Many readers describe newfound confidence in their cooking skills, finding the process both rewarding and enjoyable. Adaptations shared by readers often provide new twists on the traditional recipe, illustrating its versatility and wide appeal.

Through stunning photography, many showcase the beautiful presentation of their finished dishes, inspiring others to recreate the dish in various styles. Suggestions shared within the community offer tips on local ingredient sourcing which empower cooks to personalize their ravioli experiences.

Adaptation stories tell of families bonding over pasta-making sessions, creating traditions surrounding the preparation of this gourmet meal. The camaraderie and creativity involved in crafting shrimp and lobster ravioli truly make it a beloved recipe in many kitchens.

Frequently Asked Questions

How do I store leftover ravioli?

Store leftover shrimp and lobster ravioli in an airtight container in the refrigerator for up to 3 days, or freeze uncooked ravioli for up to 3 months. Reheat gently to maintain texture.

Can I use frozen shrimp and lobster?

Yes! Just ensure they are thawed properly before cooking. Thaw them overnight in the refrigerator for best results.

What can I substitute for lobster?

Crab meat or scallops can be tasty substitutes, providing similar flavors and textures in your ravioli.

Is this recipe gluten-free?

This recipe is not gluten-free unless specifically adapted using gluten-free pasta. Consider alternatives such as rice flour-based dough or store-bought gluten-free options.

How do I prevent the ravioli from sticking?

Dust the ravioli with flour or semolina before cooking and avoid overcrowding the pot when boiling. A splash of olive oil in the cooking water can also help.

Can I make this ravioli ahead of time?

Absolutely! Prepare and fill the ravioli, then freeze them uncooked for a future meal. Cook from frozen when ready.

What sauce pairs best with this dish?

A creamy garlic herb sauce accentuates the seafood flavors beautifully, but you could also try a light tomato-based sauce for a tangy option.

How can I enhance the flavor of the sauce?

Integrate fresh herbs like basil or parsley, or a splash of fresh lemon juice to brighten the sauce while complementing the seafood.

Is this recipe suitable for special occasions?

Yes, shrimp and lobster ravioli is ideal for special occasions or romantic dinners due to its gourmet nature and impressive presentation.

What’s the best wine pairing for this dish?

A crisp Chardonnay or a zesty Sauvignon Blanc complements the creamy flavors and enhances the seafood. Sparkling water with lemon works well too.

Additional Resources

To dive deeper into making the perfect shrimp and lobster ravioli, explore other related recipes that highlight seafood, such as seafood pasta bake or shrimp scampi. Supplement your newfound pasta skills with technique guides covering various cooking methods, including how to roll out pasta and the principles of filling and sealing.

Also, look into ingredient information about selecting fresh seafood—what to look for when buying—and equipment recommendations to enhance your kitchen tools for pasta making. Lastly, explore seasonal variations using local produce to provide different flavors and nutrition in your dishes.

Join the Conversation

We encourage you to share your experiences and photos of your shrimp and lobster ravioli! Join us on social media platforms and engage with our community by posting your culinary success stories. Your feedback helps inspire others and enhances our collective knowledge about delightful dishes.

Don’t forget to comment on your variations or adaptations—you may find new ideas from fellow food lovers! Engaging in this community continues to enrich our cooking adventures and motivates us all to try wonderful dishes like shrimp and lobster ravioli at home.

The Recipe

Shrimp and Lobster Ravioli

Serves: 4

Prep Time: 30 mins

Cook Time: 15 mins

Total Time: 45 mins

Kitchen Equipment Needed

  • Pasta machine or rolling pin
  • Mixing bowls
  • Sauté pan
  • Large pot
  • Sharp knife or pastry cutter

Ingredients

  • 2 cups all-purpose flour
  • 3 large eggs
  • 1/2 lb shrimp, peeled and deveined
  • 1/2 lb lobster meat, cooked and chopped
  • 1 cup heavy cream
  • 1 clove garlic, minced
  • 1/4 cup grated Parmesan cheese
  • Salt and pepper, to taste
  • Fresh parsley, for garnish

Directions

  1. In a mixing bowl, combine flour and eggs until a rough dough forms. Knead for about 10 minutes until smooth. Wrap in plastic wrap and let it rest for 30 minutes.
  2. For the filling, mix shrimp, lobster, garlic, salt, and pepper in a bowl. Set aside.
  3. Roll out the dough into thin sheets using a pasta machine, cutting into squares. Place a teaspoon of filling in the center of each square.
  4. Moisten the edges with water, fold over and seal by pressing tightly. Repeat until all filling is used.
  5. Bring a large pot of salted water to boil. Cook ravioli until they float, roughly 3-4 minutes. Drain.
  6. In a sauté pan, heat heavy cream and Parmesan cheese until slightly thickened. Add the ravioli and gently toss to coat.
  7. Serve hot, garnished with fresh parsley and additional Parmesan if desired.

Recipe Notes

  • Frozen ravioli can be cooked directly without defrosting.
  • To add depth to the sauce, consider sautéing onions or shallots before adding the cream.
  • Herbs like basil or thyme can be added for additional flavor.