Delectable Spaghetti with Braised Beef and Tomato Sauce Recipe

Spaghetti with Braised Beef and Tomato Sauce: A Hearty Italian Dish

⚖️
Difficulty
Intermediate

⏲️
Prep Time
30 mins

🕒
Cook Time
2 hours

⏱️
Total Time
2 hours 30 mins

🍽️
Servings
4

Indulging in a plate of Spaghetti with Braised Beef and Tomato Sauce is like embarking on a comforting culinary journey to the heart of Italy. The braised beef, simmered to tender perfection, melds beautifully with a richly flavored tomato sauce creating a dish that’s both hearty and satisfying. As the flavors deepen during the cooking process, anticipation builds, promising a delightful experience with every bite. Imagine twirling your fork around perfectly al dente spaghetti, each strand blanketed in a luscious sauce – it’s a meal that evokes warmth and happiness, reminiscent of family gatherings and cozy dinners at home.

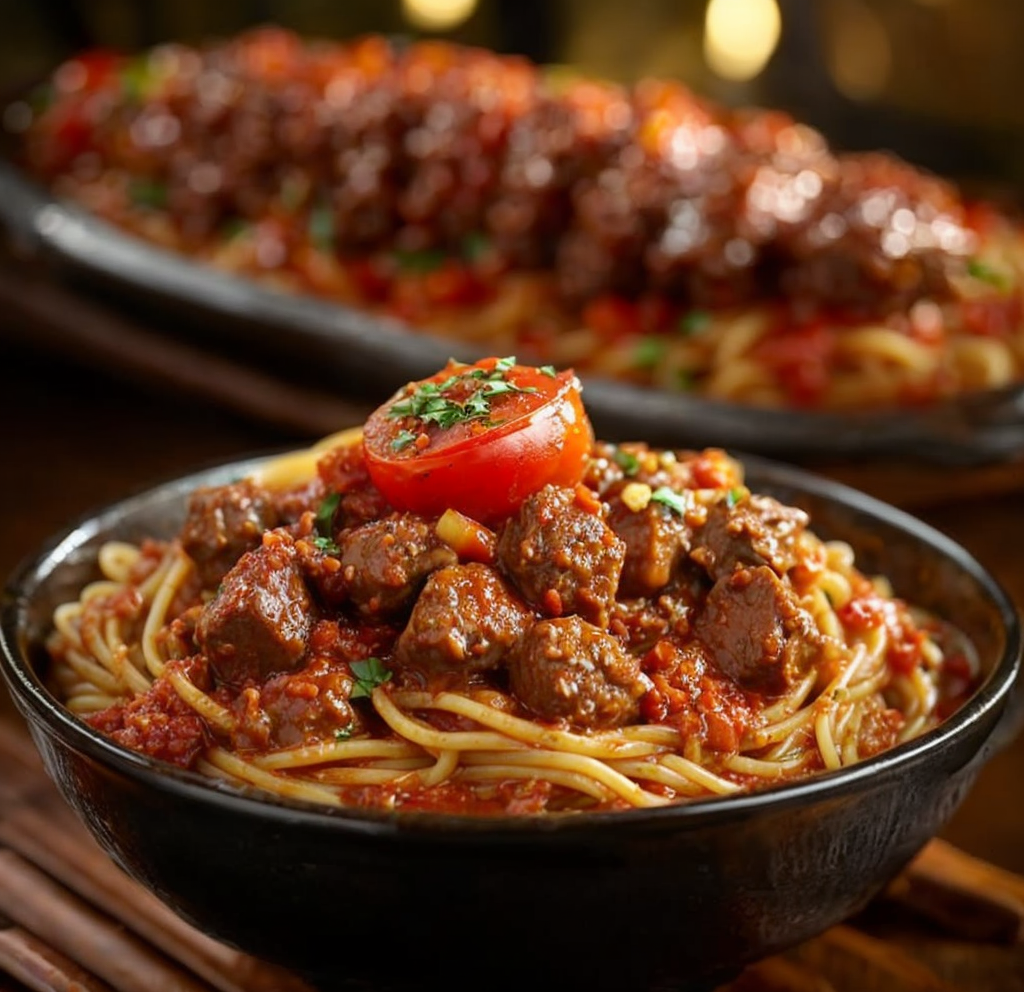
The balance of the savory beef and sweet, tangy tomatoes creates a flavor profile that dances on the palate. Aromatic herbs and garlic enhance the sauce, making every mouthful a delightful adventure. The dish is not only a feast for the taste buds but also a visual delight, with vibrant accents of red sauce coated on perfectly cooked spaghetti – a classic presentation that invites everyone to gather around the table. This recipe is not just about filling your stomach; it’s a heartfelt dish designed to nourish the soul.

Quick Recipe Highlights

  • Flavor Profile: Rich, savory beef paired with tangy tomato and aromatic herbs creates a masterful balance.
  • Texture: Tender braised beef complements the al dente spaghetti, offering a satisfying contrast.
  • Aroma: The fragrance of slowly simmering tomatoes and herbs fills the kitchen, inviting everyone in.
  • Visual Appeal: The vibrant red sauce over golden spaghetti looks absolutely mouthwatering on the plate.
  • Skill Level Needed: A moderate skill level is required, mainly for braising and sauce preparation.
  • Special Equipment: A heavy-bottomed pot or Dutch oven is essential for even cooking.

Recipe Overview

  • Difficulty Level: With some intermediate techniques involved, this recipe is perfect for those looking to enhance their cooking skills.
  • Category: This dish falls into the category of comfort food, making it ideal for family dinners and gatherings.
  • Cuisine: Rooted in Italian culinary tradition, this dish showcases the rich flavors and rustic ingredients of the region.
  • Cost: The ingredients are generally affordable, making this a cost-effective meal for families.
  • Season: This dish shines in the colder months when hearty meals are particularly comforting.
  • Occasion: Ideal for family gatherings, holiday feasts, or any time you want to impress your guests.

Why You’ll Love This Recipe

The deep, rich flavor and luscious texture of this Spaghetti with Braised Beef and Tomato Sauce make it an unforgettable dish. The combination of tender beef, fresh herbs, and a tangy tomato base creates a symphony of flavors that is truly satisfying. As it cooks slowly, the beef absorbs all the wonderful spices, melding perfectly with the sauce. This is comfort food at its best, perfect for a cozy evening or family gathering.

Preparing this recipe offers great convenience; you can make it ahead of time, allowing the flavors to develop even further. This dish is perfect for meal prepping, and leftovers taste even better the next day. Simply reheat and enjoy, making it an excellent option for busy weeknights when you want something homemade yet easy.

From a nutritional standpoint, this dish is both filling and nourishing. The braised beef provides high-quality protein, while the tomatoes offer essential vitamins, minerals, and antioxidants. Pairing this meal with a fresh salad boosts nutritional value and adds a refreshing crunch that complements the hearty pasta.

Social occasions are elevated with this amazing dish that sparks conversation and brings people together. Whether it’s a Sunday family dinner or a casual get-together with friends, Spaghetti with Braised Beef is sure to impress and evoke smiles and laughter around the table.

Cost-effectiveness is another strong point; this dish uses affordable ingredients that offer a lot of flavors. It’s an accessible recipe perfect for anyone looking to create a delicious, warm, and hearty meal on a budget, ensuring no one walks away hungry.

Historical Background and Cultural Significance

The origins of Spaghetti with Braised Beef and Tomato Sauce are deeply rooted in Italy’s rich culinary heritage. Traditionally, pasta has been a staple food in Italian households, believed to date back to the 12th century. The combination of pasta with a hearty sauce reflects the Italian ethos of using local, seasonal ingredients to create nourishing and flavorful meals.

In Italian culture, the dish holds special significance, often appearing during family celebrations and gatherings. This recipe embodies the Italian philosophy of “la dolce vita,” or “the sweet life,” showcasing the importance of food as a means of bringing people together to enjoy life’s simple pleasures.

Over time, variations of this recipe have evolved, leading to regional differences where each area puts its unique twist on the classic. For instance, in southern Italy, you might find a spicier version with added chili, while northern Italy often incorporates richer cream bases into their sauces.

Notably, this dish’s popularity has also spread worldwide, becoming a beloved meal in homes across the globe. International adaptations often embrace local flavors, ensuring that Spaghetti with Braised Beef and Tomato Sauce remains an enduring symbol of comfort and familial love across cultures.

Ingredient Deep Dive

Beef: A quintessential ingredient, braising beef is both an art and a science. Originating from the need to utilize tougher cuts, this slow-cooking method ensures tenderness. Nutritionally, beef is an excellent source of iron and protein, essential for muscle repair and energy. When selecting beef, look for well-marbled cuts for optimum flavor, and remember to store it properly in the fridge to maintain freshness.

Tomatoes: The cornerstone of the sauce, tomatoes bring acidity and sweetness to this dish. Historically, tomatoes were introduced to Europe from the Americas in the late 15th century, and they’ve since become a staple in Italian cuisine. For health benefits, tomatoes are rich in lycopene, an antioxidant linked to numerous health benefits. When selecting tomatoes, opt for bright red firm ones, and store them at room temperature to preserve flavor.

Common Mistakes to Avoid

  • Skipping the browning process: Not browning the beef properly can lead to a less flavorful dish as this step develops rich flavors.
  • Rushing the braising time: Braising requires patience; too short of a cooking time can result in tough meat instead of tender, melt-in-your-mouth beef.
  • Using low-quality ingredients: The success of this dish hinges on the quality of its base ingredients—make sure to use high-quality tomatoes and beef.
  • Overcooking or undercooking pasta: Properly testing the spaghetti for doneness ensures the perfect al dente texture, while overcooked pasta can become mushy.
  • Neglecting to season adequately: Seasoning throughout the cooking process ensures a well-balanced flavor; don’t just season at the end.
  • Not allowing it to rest: Letting the dish sit for a few minutes after cooking enhances the flavor integration.
  • Using a small pot for braising: A large pot is necessary for even cooking; overcrowding can prevent proper browning.
  • Serving immediately: Allowing the dish to rest after cooking enhances the flavors as they meld together.

Essential Techniques

Braising is an essential technique for this recipe, involving cooking meat slowly in a bit of liquid. This method transforms tougher cuts into tender morsels and infuses the dish with deep flavors. To master braising, ensure that the meat is sufficiently seared before adding the liquid, and maintain a low temperature throughout the cooking process. Be patient and avoid lifting the lid frequently, which can let heat escape.

Another vital skill is al dente cooking; achieving the perfect pasta texture can elevate your dish. To master this, refer to package instructions but taste the pasta a minute or two before the suggested time. It should be firm yet tender, and rinsing it afterward can wash away the starch, so it’s best to avoid it.

Pro Tips for Perfect Spaghetti with Braised Beef

1. Always use fresh ingredients, especially herbs, to enhance the overall flavor of the dish.
2. Adjust seasoning throughout the cooking process to find the perfect balance before serving.
3. For an added layer of flavor, consider adding wine while braising the beef.
4. Don’t skip the resting time after cooking—the flavors will continue to develop.
5. Consider using a slow cooker for hands-free braising, allowing you to go about your day while your meal cooks.
6. Use homemade stock for a more complex flavor profile in your sauce.
7. Experiment with adding vegetables to the sauce for additional nutrients and textures.
8. Finally, garnish with fresh basil or Parmesan cheese just before serving for a touch of color and flavor.

Variations and Adaptations

Explore the regional variations of this classic dish. In Sicily, for example, you may come across dishes that incorporate capers and olives, enhancing the sauce with briny notes. For a seasonal twist, consider adding roasted autumn vegetables into the mix, like butternut squash or mushrooms for a more earthy flavor during colder months.

Dietary modifications are also easy to implement. If you’re looking for a gluten-free option, opt for gluten-free pasta made from rice or quinoa. For a lighter dish, try using zoodles or veggie noodles that reduce the carb count. If you prefer a vegetarian version, replace the beef with lentils or mushrooms for a hearty alternative.

Flavor variations can be achieved by introducing additional spices like red pepper flakes for heat or fresh lemon zest for brightness. Texture modifications could include adding a crunchy topping, such as breadcrumbs or toasted nuts, creating a delightful contrast. Finally, for a touch of elegance, consider serving the dish on a bed of sautéed greens or with a side of garlic bread.

Serving and Presentation Guide

Plating techniques can significantly elevate your Spaghetti with Braised Beef. Twirl the spaghetti into nests for an elegant presentation and top with generous spoonfuls of sauce. Garnish with fresh herbs such as basil or parsley for a vibrant contrast. For a rustic touch, serve it directly from the cooking pot and let everyone help themselves.

Consider traditional accompaniments such as garlic bread or a crisp side salad to balance the hearty pasta. Modern serving suggestions include pairing with a light, chilled white wine that complements the flavors beautifully. Temperature considerations are paramount; serve the dish hot for maximum flavor and enjoyment, ensuring that leftovers are reheated gently to preserve texture.

Maintaining portion control is also significant; consider serving it in smaller, shareable dishes for a family-style meal that encourages camaraderie at the table.

Wine and Beverage Pairing

When it comes to pairing wine with Spaghetti with Braised Beef, look for a full-bodied red, such as a Chianti or Sangiovese. These wines have enough acidity to cut through the richness of the sauce while complementing the flavors beautifully. For a non-alcoholic alternative, consider sparkling water with a splash of lemon or a refreshing iced tea.

If coffee or tea is more your style, a robust espresso can work exceptionally well, particularly after the meal as a digestif. Temperature considerations for white wine should lean towards slightly chilled, while red wines should be served at room temperature to express their full flavors.

Storage and Shelf Life

Proper storage methods for leftovers are key to enjoying your Spaghetti with Braised Beef long after it’s made. Store in an airtight container in the refrigerator for up to 3-4 days. Make sure to allow the dish to cool before sealing to prevent condensation. For reheating, do so gently on the stovetop or in the microwave, adding a splash of water or broth to maintain moisture.

If you want to extend the shelf life further, consider freezing the dish. It can be frozen for up to 3 months; portions freeze well in airtight containers or freezer bags. Allow thawing in the refrigerator overnight before reheating. Be sure to inspect for any signs of spoilage before consuming, such as off smells or discoloration.

Make Ahead Strategies

Preparing your Spaghetti with Braised Beef ahead of time can save you valuable minutes on busy days. Start by braising the beef and making the sauce a day in advance. Allow it to cool before storing it in the refrigerator; allowing the flavors to meld overnight improves the dish’s overall taste.

When ready to serve, simply boil your spaghetti and heat the ready-made sauce gently on the stovetop. Additionally, consider prepping any side dishes ahead of time so that everything is ready to enjoy together. Quality is not compromised when reheating, as long as proper temperature control is maintained to ensure safety and enhance flavor.

Scaling Instructions

Scaling your Spaghetti with Braised Beef recipe is simple. If halving the recipe, ensure you adjust the cooking time accordingly, as smaller amounts may cook more quickly. Conversely, if you plan to double or triple your recipe, consider using a larger pot to accommodate the increased quantity without overcrowding, which can affect cooking efficiency.

Timing modifications are also necessary; larger batches may require additional time for the beef to become tender. Use a meat thermometer to check doneness if doubling or tripling, and ensure that all portions are stored in sizes that are manageable for reheating.

Nutritional Deep Dive

When counting macros, keep in mind that Spaghetti with Braised Beef is protein-rich due to the beef. The average serving contains a good balance of carbohydrates from the pasta, making it suitable for an energy-boosting meal. However, portion control is essential for those managing caloric intake.

Tomatoes provide essential vitamins such as Vitamin C and K, while the herbs involved contribute antioxidants. For anyone with dietary considerations, analyzing the nutritional value of the ingredients utilized can aid in making informed decisions about substitutions and serving sizes to maintain a healthy balance.

Dietary Adaptations

Creating a version of Spaghetti with Braised Beef that caters to different dietary needs is straightforward. For those seeking a gluten-free option, substitute standard pasta with gluten-free varieties made from rice or vegetables – zoodles can work marvelously here.

If you’re adhering to a dairy-free lifestyle, the recipe can easily be modified by omitting any cheese garnishes. Vegan adaptations are possible too; replace beef with hearty lentils or jackfruit cooked in the same braising method to absorb flavors without meat. Keto followers can shift to a low-carb pasta alternative while maintaining the integrity of the sauce.

Other diets like Paleo can utilize fresh vegetables as a base rather than pasta, while gluten-free and low-FODMAP options can accommodate sensitive individuals. Being aware of these modifications allows flexibility and inclusiveness in meal planning.

Troubleshooting Guide

For those struggling with texture issues, such as overcooked pasta, begin timing your spaghetti thoughtfully. Ideally, taste test a minute or two before the package instructs, aiming for al dente. Conversely, undercooked meat can indicate insufficient braising time; ensure an adequate simmer to help the fibers break down.

Flavor imbalances can arise if not enough seasoning is added throughout cooking. Remember to adjust as you go and taste frequently to ensure that every element is well-balanced. If you’re experiencing temperature problems when serving, consider reheating gently over the stove to distribute warmth evenly.

Ingredient substitutions can also cause unexpected results. When altering key elements, maintain an awareness of cooking times and moisture content within the recipe. Lastly, if timing concerns arise during a busy preparation, creating a prep timeline can alleviate stress while enhancing efficiency.

Recipe Success Stories

The feedback from the community regarding Spaghetti with Braised Beef and Tomato Sauce has been overwhelmingly positive. Many home cooks have shared their experiences with enjoying the dish at family gatherings, whereby it quickly becomes a favorite recipe amongst all generations. The versatility in flavors and ease of preparation has made it a repeat dish in households across the globe.

Readers have also relayed interesting variation successes, swapping proteins while maintaining the sauce base. These adaptations have resulted in newfound favorites, sparking creativity in the kitchen. A number of photographers have shared beautifully plated renditions, showcasing how garnishing choices and plating techniques can elevate the dish’s appeal.

Incorporating seasonal elements has also been a great way to connect with the local produce while enhancing the meal. As one reader mentioned, embracing whatever is fresh at the market has led to delightful surprises in flavor and texture that make each preparation a unique celebration.

Finally, the community engagement surrounding this dish promises continued innovations and shared culinary adventures, reminding us that cooking thrives on creativity and collaboration among fellow food lovers.

Frequently Asked Questions

1. Can I use another type of meat for this recipe? Yes! While beef is traditional, you can easily substitute with pork, chicken, or even more plant-based proteins like lentils or jackfruit for a vegetarian version. Ensure to adjust the cooking time based on the protein choice to yield optimal tenderness.

2. How do I store leftovers? Store leftovers in an airtight container in the refrigerator for up to four days. It’s best to let the dish cool down before sealing to maintain freshness and quality.

3. Can I freeze this dish? Absolutely! Spaghetti with Braised Beef can be frozen for up to three months. Divide into meal-sized portions and store in airtight freezer bags or containers for best results.

4. What can I serve alongside this dish? Common accompaniments include garlic bread, roasted vegetables, or a fresh side salad. These not only complement the main dish but also provide different textures and flavors.

5. How do I know when the beef is tender? The beef is done when effortlessly pulled apart with a fork. Test for tenderness during the last hour of cooking to gauge if additional time is necessary.

6. What’s the best way to reheat leftovers? Reheat gently on the stovetop with a splash of water or broth to retain moisture, ensuring your meal stays flavorful and doesn’t dry out.

7. Can I use jarred sauce instead of making my own? While homemade sauce is highly recommended for taste, jarred sauces are a convenient alternative. If opting for jarred, consider enhancing it with fresh herbs and spices to improve flavor.

8. How can I adapt this recipe for a slow cooker? To adapt for a slow cooker, follow the browning process on the stovetop and then transfer to the slow cooker with the sauce. Cook on low for 6-7 hours or high for 3-4 hours for perfectly tender beef.

9. What type of pasta is best for this dish? Traditional spaghetti is commonly used, but you can substitute with your preferred pasta type. Just ensure to cook it al dente to maintain texture when combined with the sauce.

10. How do I prevent the sauce from being too watery? If the sauce is too thin, allow it to simmer uncovered to reduce liquid content. You can also incorporate a bit of tomato paste for added richness and thickness.

11. Can I make this recipe ahead of time? Yes! The braised beef sauce can be made ahead of time and stored in the refrigerator. When ready to serve, cook fresh pasta and heat the sauce for a quick meal.

12. What are good substitutions for fresh herbs? If fresh herbs aren’t available, consider dry herbs such as oregano, basil, or thyme, adjusting quantities to about one-third of fresh measurements.

Additional Resources

To further delve into the world of Italian cuisine, exploring related recipes like Pasta Primavera or Fettuccine Alfredo can broaden your culinary repertoire. Technique guides on braising or fresh pasta-making can enhance your cooking skillset as well.

Ingredient information is essential, so consider learning more about the seasonality of tomatoes and beef cuts to optimize your dish. Also, investing in quality kitchen tools will only result in better cooking experiences—think heavy-bottomed pots and sharp knives.

Seasonal variations can inspire creativity; adapting recipes based on what’s in-season can elevate your meals. Whether it’s fresh summer tomatoes or hearty winter roots, being attuned to seasonal ingredients ensures long-lasting enjoyment.

Join the Conversation

We encourage you to share your experiences and photos on social media by tagging our community. Your photography tips could inspire others to enhance their plating skills. Writing reviews and community engagement not only helps build our culinary family but also enriches our shared cooking experiences.

Variations you’ve tried or personal twists have the potential to spark creativity in others. Join the conversation and help us cultivate a vibrant community of home chefs from around the world, sharing our love for great food and culinary journeys.

The Recipe

Spaghetti with Braised Beef and Tomato Sauce

Serves: 4

Prep Time: 30 mins

Cook Time: 2 hours

Total Time: 2 hours 30 mins

Kitchen Equipment Needed

  • Heavy-bottomed pot or Dutch oven
  • Wooden spoon
  • Sharp knife
  • Cutting board
  • Measuring cups and spoons

Ingredients

  • 1 ½ lbs beef chuck, cut into chunks
  • 2 tbsp olive oil
  • 1 onion, chopped
  • 2 cloves garlic, minced
  • 1 can (28 oz) diced tomatoes
  • 2 cups beef broth
  • 1 tsp dried oregano
  • 1 tsp dried basil
  • Salt and pepper to taste
  • 12 oz spaghetti
  • Grated Parmesan for serving

Directions

  1. Heat olive oil in a heavy-bottomed pot over medium-high heat. Brown the beef chunks on all sides, then remove and set aside.
  2. Add chopped onion and garlic to the pot; sauté until softened.
  3. Return the browned beef to the pot and add diced tomatoes, beef broth, oregano, basil, salt, and pepper. Bring to a boil.
  4. Reduce heat to low, cover, and simmer for 2 hours or until beef is fork-tender.
  5. Cook spaghetti according to package instructions until al dente. Drain and set aside.
  6. Once the beef is tender, shred it gently in the sauce; serve it over the cooked spaghetti with a sprinkling of Parmesan cheese.

Recipe Notes

  • Feel free to adjust the herbs to your liking or add fresh basil at the end for a burst of flavor.
  • For a spicy kick, add red pepper flakes to the sauce during cooking.
  • This recipe can be made ahead and tastes better the next day!

Delicious Sweet Potato Honeybun Cookies for Fall Baking Bliss

Sweet Potato Honeybun Cookies: A Delightful Treat for Any Occasion

⚖️
Difficulty
Easy

⏲️
Prep Time
15 mins

🕒
Cook Time
20 mins

⏱️
Total Time
35 mins

🍽️
Servings
24 cookies

Sweet Potato Honeybun Cookies are a delicious twist on classic cookies, combining the earthy sweetness of sweet potatoes with the warm, comforting flavor of honey. These cookies are not only soft and chewy but also packed with nutrients, making them a perfect treat for any time of the day. The unique combination of flavors creates a delightful taste experience that will keep you and your family coming back for more.

As you take a bite, the rich honey glaze perfectly complements the natural sweetness of the sweet potato, providing a comforting warmth that is reminiscent of homemade goodness. The vibrant orange color of the sweet potatoes adds visual appeal, making these cookies not only tasty but also beautiful on any dessert platter. Perfect for family gatherings, school bake sales, or cozy evenings at home, these cookies are sure to impress and delight all who try them.

Quick Recipe Highlights

  • Flavor Profile: The sweet potato brings a rich, earthy taste, while honey provides a lovely sweetness that balances beautifully.
  • Texture: Soft and chewy with a hint of crispness on the edges, these cookies create a delightful mouthfeel.
  • Aroma: The inviting blend of baked sweet potatoes and honey wafts through the kitchen, creating an irresistible aroma.
  • Visual Appeal: The vibrant color of the orange sweet potato against the golden honey glaze makes for a stunning presentation.
  • Skill Level Needed: Ideal for beginners, these cookies require minimal techniques, making them accessible to all.
  • Special Equipment: A simple mixing bowl and a baking sheet are all you need to create these delicious treats.

Recipe Overview

  • Difficulty Level: Sweet Potato Honeybun Cookies are classified as easy, making them perfect for novice bakers and experienced chefs alike.
  • Category: These cookies fall into the dessert category, serving as a delightful end to any meal or a sweet snack throughout the day.
  • Cuisine: Their warm flavors are deeply rooted in American dessert traditions, showcasing the use of sweet potatoes in comforting recipes.
  • Cost: The ingredients are readily available and budget-friendly, making this recipe economical for home cooks.
  • Season: Fall is the perfect season for sweet potato desserts, taking advantage of the harvest season for fresh produce.
  • Occasion: Whether it’s a holiday gathering, a birthday party, or just a cozy evening at home, these cookies fit any occasion.

Why You’ll Love This Recipe

The taste and texture of Sweet Potato Honeybun Cookies are truly irresistible. The natural sweetness of the sweet potatoes harmonizes with the honey, creating a cookie that is not overly sweet yet incredibly satisfying. Each cookie provides a lovely chewy texture, giving a delightful bite that leaves you wanting more. Pairing these cookies with a warm beverage enhances their comforting nature, making each bite a moment to savor.

Convenience is another reason to love this recipe. With only 15 minutes of prep time and minimal equipment required, you can whip up a batch of these cookies in no time. Once baked, they store well and can be conveniently packaged for gifts or outings, making them an excellent choice for busy schedules while delivering homemade goodness effortlessly.

Nutritionally, sweet potatoes are packed with vitamins and minerals, including vitamin A, which is crucial for your health. By adding this superfood to your cookies, you’re not only indulging your sweet tooth, but also providing your body with essential nutrients. This makes Sweet Potato Honeybun Cookies a guilt-free indulgence that you can enjoy with peace of mind.

These cookies are perfect for social gatherings and entertaining. Their unique flavors will spark conversations and compliments, while the beautiful presentation will elevate any dessert table. They are an excellent way to share joy with friends and family, creating memories that will last long after the cookies are gone.

Lastly, Sweet Potato Honeybun Cookies are cost-effective. The ingredients are typically inexpensive and often already on hand, making this a budget-friendly baking project. So, whether you are looking to impress guests, treat your family, or simply satisfy your own cravings, this recipe delivers both flavor and value.

Historical Background and Cultural Significance

Sweet potatoes have a rich history in culinary traditions across various cultures. Native to Central and South America, they have been cultivated for thousands of years and were a staple food source for indigenous peoples. As European settlers arrived in the Americas, they adopted sweet potatoes into their diets, recognizing their versatility and nutritional benefits.

In the United States, sweet potatoes are especially significant in Southern cuisine, where they are celebrated in both savory and sweet dishes. This cultural importance is magnified during Thanksgiving, where sweet potato dishes hold a revered place on dinner tables. Incorporating sweet potatoes into desserts showcases their adaptability and the creativity of home cooks who aim to infuse traditional recipes with seasonal ingredients.

The evolution of Sweet Potato Honeybun Cookies reflects the changing tastes and preferences in baking. Over the years, recipes have transformed to include various types of flours, sweeteners, and flavorings, adapting to health trends while remaining true to their roots. This adaptation highlights the evolution of cookies from simple snacks to gourmet treats that fit into today’s awareness of nutrition and flavor.

Regional variations of sweet potato desserts across the U.S. highlight the diverse culinary landscape. From sweet potato pies in the South to casseroles topped with marshmallows, each region has adapted this humble tuber into its treats, creating unique culinary expressions. Sweet Potato Honeybun Cookies serve as a bridge, combining diverse influences into a singular, delightful cookie experience.

Ingredient Deep Dive

The main ingredient in Sweet Potato Honeybun Cookies is the sweet potato itself. This nutritious root vegetable is not only delicious but also carries significant cultural history, especially in American cuisine. Sweet potatoes are rich in vitamins A and C, along with fiber and antioxidants. When selecting sweet potatoes, look for firm ones with smooth skins, avoiding any that are soft or have blemishes. For storage, they should be kept in a cool, dark place to maintain freshness, and if you’re short on sweet potatoes, pumpkin puree makes for an excellent substitution in this recipe.

Honey serves as the primary sweetener and glaze for these cookies. Renowned for its natural sweetness and distinct flavor, honey has been used as a sweetener for centuries across numerous cultures. It adds a unique depth to the cookies, enhancing their flavor profile. Choosing raw honey can maximize health benefits, as it retains its natural enzymes. When baking, always consider the temperature of honey; too high heat can alter its flavor. Honey should be stored in a sealed container at room temperature, maintaining its quality for quite some time.

Flour is the foundation of any cookie, providing structure. All-purpose flour is commonly used but can be replaced with gluten-free options like almond or coconut flour to cater to dietary restrictions. When selecting flour, ensure you keep it in an airtight container to avoid moisture absorption and maintain freshness. Always measure flour correctly; too much can lead to dry cookies. Using whole wheat flour can add a nutty flavor while increasing fiber content.

Butter provides richness and flavor to the cookies, contributing to their chewy texture. For those who prefer a dairy-free option, substitute with coconut oil or vegan butter, which still delivers rich flavor and texture. When using butter, be sure to soften it at room temperature for optimal mixing. Storing butter in the refrigerator will maintain freshness, while leftover cookies should be stored in an airtight container to prevent drying.

Lastly, spices like cinnamon and nutmeg are essential for enhancing the cookies’ warmth and aroma. These spices have long-standing cultural significance, often linked to celebratory meals and seasonal baking. When selecting spices, consider freshness to ensure maximum flavor. Store spices in a dark, cool place to maintain their potency, and for added warmth, experiment with incorporating ginger or allspice to broaden the flavor profile of your cookies.

Common Mistakes to Avoid

  • Adding Too Much Flour: Using too much flour can lead to dry cookies. Always measure accurately, spooning flour into the measuring cup and leveling it off.
  • Overmixing: Mixing the batter too much can result in tough cookies. Mix just until the ingredients are combined for a tender texture.
  • Baking at Inconsistent Temperatures: Ensure your oven is properly preheated to avoid uneven baking. An oven thermometer can help verify the correct temperature.
  • Using Cold Ingredients: Using cold butter can make mixing difficult and may affect the cookie’s texture. Let butter come to room temperature before use.
  • Not Cooling the Cookies: Allowing cookies to cool too long on the baking sheet can result in over-baking. Transfer to a wire rack shortly after removing from the oven.
  • Skipping the Chilling Process: For even distribution of flavors and better texture, chilling the dough for 30 minutes before baking can be beneficial.
  • Poor Storage: Storing cookies in an unsealed container can cause them to dry out. Use a sealable container to maintain moisture.
  • Ignoring Ingredient Quality: Using low-quality ingredients, especially honey and sweet potatoes, can affect the overall flavor. Opt for fresh, high-quality items.
  • Not Tasting the Batter: Before baking, tasting the dough can help adjust sweetness or spice levels, ensuring that the final product meets your preferences.
  • Assuming Baking Time is Universal: Every oven has its quirks; check cookies a minute or two before the suggested baking time to prevent over-baking.

Essential Techniques

One essential technique for making Sweet Potato Honeybun Cookies is properly creaming butter and sugar. This process aerates the butter, leading to a light and fluffy texture in the cookies. To master this technique, use room temperature butter and beat it with sugar until it is light in color and fluffy in texture. A common pitfall is to skip this step, resulting in dense cookies. Look for the mixture to be pale and increased in volume for success.

Another crucial technique is measuring your ingredients accurately. Cooking is a science, and precise measurements can greatly affect the outcome of your cookies. Use a kitchen scale for the most consistent results, especially for flour. A common mistake is to scoop flour directly from the bag, which can lead to using too much. For a visual cue, the flour should mound slightly but not be overflowing the measuring cup when using the spooning method.

Pro Tips for Perfect Sweet Potato Honeybun Cookies

Start with room temperature ingredients, especially butter and eggs, to ensure even mixing and better consistency.

If you want an extra burst of sweetness, drizzle a bit more honey on top of the cookies right before baking for a caramelized effect.

For added texture, consider folding in chopped nuts or chocolate chips to the batter before baking. This adds an interesting crunch to the chewy cookies.

Always let your baked cookies cool completely on a wire rack before storing them to maintain their texture and prevent them from becoming soggy.

Experiment with different spices such as cardamom or ginger-based on your personal taste preferences for a unique twist to the traditional flavor.

For a visually appealing touch, sprinkle a pinch of sea salt on top of the cookies right after they come out of the oven; this enhances flavor and adds a professional look.

If you prefer a less sweet cookie, reduce the amount of honey slightly, as the sweet potato adds natural sweetness.

Try using different types of honey, such as wildflower or clover, to explore diverse flavor notes that could enhance your cookies.

Lastly, keep in mind to check your cookies during baking time rather than relying solely on the clock; ovens can vary widely in temperature efficiency.

Variations and Adaptations

Sweet Potato Honeybun Cookies can be easily adapted for various dietary needs. For a gluten-free option, substitute all-purpose flour with almond flour or a gluten-free baking blend. This maintains the texture while accommodating those with gluten sensitivities.

Seasonally, you could incorporate pumpkin spice into the mix, turning these cookies into Pumpkin Sweet Potato Honeybuns perfect for autumn festivities. Alternatively, during the summer, consider adding chopped dried fruits like apricots or cranberries for a refreshing twist.

For those with dietary restrictions, a dairy-free version can be created by using coconut oil instead of butter while still keeping the cookies rich and delicious. Additionally, substituting maple syrup for honey creates a vegan-friendly cookie that retains the sweet flavor.

Flavor variations include adding a dash of cocoa powder to create a chocolatey version, or mixing in different extracts, such as vanilla or almond, to provide complexity. Texture modifications like adding oats can bring a hearty feel to the cookies, making them even more satisfying.

Finally, for presentation, consider cutting the cookies into fun shapes using cookie cutters or drizzling a homemade glaze over the top as a final garnish to wow your guests at any event.

Serving and Presentation Guide

When serving Sweet Potato Honeybun Cookies, consider using a simple yet attractive platter to showcase their vibrant colors. Arrange the cookies in an overlapping pattern to create visual interest and allow for easy access. For a decorative touch, you can dust them with powdered sugar or drizzle with a honey glaze right before serving.

Garnishing ideas include pairing these cookies with a scoop of vanilla ice cream or a dollop of whipped cream, creating an impressive dessert plate. Traditional accompaniments can include coffee or spice teas, which enhance the warmth of the cookies’ flavors.

Modern serving suggestions may introduce elements like pairing them with a fresh fruit compote or tangy yogurt dips, adding a refreshing contrast to the sweetness. When considering temperature, these cookies can be enjoyed warm or at room temperature. For portion control, consider presenting them as mini cookies for smaller bites—ideal for gatherings.

Wine and Beverage Pairing

When it comes to wine pairings for Sweet Potato Honeybun Cookies, a late-harvest Riesling complements the natural sweetness beautifully, with its fruity notes enhancing the flavors of honey and sweet potatoes. Alternatively, a light Pinot Noir can provide a delightful contrast with its acidity.

For non-alcoholic alternatives, try pairing with a warm spiced apple cider that echoes the fall flavors inherent in the cookies. Additionally, a chai tea offers spice and warmth, enhancing the treat’s comforting qualities.

Coffee lovers will enjoy a rich cup brewed with dark roast beans, providing a bold flavor to balance the sweetness of the cookies. For the best experience, serve beverages warm, allowing the aromatic notes to complement the nature of the cookies.

Storage and Shelf Life

Proper storage of Sweet Potato Honeybun Cookies is essential for maximum freshness. Store them in an airtight container at room temperature for up to one week. To maintain their chewy texture, consider placing a slice of bread in the container to absorb moisture.

If you want to extend their shelf life, consider freezing the cookies. Place them in a freezer-safe bag provided with a layer of parchment paper between each cookie to prevent sticking. They can be frozen for up to three months. To thaw, leave them at room temperature or warm them in the oven for a few minutes before serving.

Signs of spoilage include an off smell or a change in texture; discarded cookies ensure safe eating. For reheating, a warm oven works well to restore freshness—just 5 minutes at 350°F (175°C) should do the trick.

Make Ahead Strategies

One effective strategy for preparing Sweet Potato Honeybun Cookies ahead of time is to mix the dough and store it in the refrigerator for up to 48 hours before baking. This allows flavors to meld and can even enhance the cookie’s taste.

You can also consider portioning out the dough into balls and freezing them raw. When you’re ready to bake, simply place the frozen dough balls directly onto a baking sheet and add a couple of extra minutes to the baking time. This provides a quick, last-minute treat without sacrificing flavor.

When making them ahead of time, be mindful of leaving the cookies fresh, where adding fresh elements like a drizzle of glaze just before serving can help maintain their appeal. Consider assembling a batch for a gathering—freeze beforehand, knowing they’ll taste freshly baked when warmed for guests.

Scaling Instructions

If you wish to halve the Sweet Potato Honeybun Cookies recipe, simply divide all ingredients by two, resulting in approximately 12 cookies instead of 24. Adjust your baking time slightly, as smaller batches may bake faster.

Doubling or tripling the recipe is straightforward; however, ensure your mixing bowl can accommodate the increased volume without spilling. For larger batches, consider baking in multiple sheets at once, rotating them halfway through for even baking.

Timing modifications may also be necessary for larger batches, as baking might take slightly longer. Keep an eye on the cookies, checking for doneness based on the visual cues shared earlier.

Storage considerations should include appropriately sized containers, ensuring there’s enough space to maintain the cookies’ texture after baking.

Nutritional Deep Dive

In terms of nutritional breakdown, Sweet Potato Honeybun Cookies provide a beneficial serving of carbohydrates, primarily from the sweet potatoes and flour. They contain healthy sources of energy, with sweet potatoes contributing to the overall macro balance with fiber, keeping you satisfied.

Regarding micronutrient analysis, sweet potatoes stand out for their high vitamin A content, crucial for eye health and immune function. Additionally, honey adds antioxidants, helping reduce inflammation and promote overall well-being.

These cookies offer substantial health benefits, particularly when made with whole food ingredients. They can be part of a balanced diet when enjoyed in moderation, ensuring that you satisfy sweet cravings without overindulging in processed sugars.

From a dietary consideration, with careful substitutions, these cookies can cater to various dietary preferences or restrictions, such as gluten-free, vegan, or low-carb, ensuring that more people can enjoy this delightful treat.

Portion analysis is also vital; a standard serving size of one cookie provides enough sweetness without excessive calorie intake, making these cookies a smart choice for those looking to balance their indulgences with healthful eating.

Dietary Adaptations

Making Sweet Potato Honeybun Cookies gluten-free is simple with the use of almond flour or a gluten-free flour blend. This keeps the texture delectable while broadening accessibility for those with gluten allergies or intolerances.

For a dairy-free option, simply swap out butter for coconut oil or a plant-based butter alternative, ensuring the flavor remains rich without compromising dietary preferences. These substitutions allow for a delicious treat without dairy concerns.

For vegan adaptations, use maple syrup in place of honey, and replace eggs with flaxseed meal mixed with water; this adds moisture while providing structure. The final product will still maintain the soft chewiness characteristic of traditional cookies.

Low-carb enthusiasts can utilize almond flour and erythritol as a sweetener, transforming these cookies into a suitable treat for keto diets without sacrificing taste.

Additionally, respect the nuances of various cultures. For example, for a Paleo modification, simply remove the sweeteners and rely on natural sweet potatoes for flavor, while ensuring no processed ingredients are involved.

Troubleshooting Guide

Addressing texture issues in Sweet Potato Honeybun Cookies often stems from ingredient ratios; if they’re too dry, adding more sweet potato or a touch of coconut oil can improve moisture.

Flavor balance problems could arise if insufficient sweetness is present. Taste the batter before baking to adjust the amount of honey according to preference and the sweet potato’s inherent sweetness.

Temperature problems may occur if the oven is not preheated correctly. Always ensure your oven is the appropriate temperature before placing the cookies inside to avoid under or overbaking.

Common equipment challenges include using cookie sheets that are not non-stick. Line your baking trays with parchment paper to ensure easy release and consistent baking results.

Ingredient substitutions could lead to unexpected results; knowing your alternative ingredients and how they react in baking can prevent mishaps. For instance, swapping honey for a liquid sweetener could alter the moisture level of your dough significantly.

Timing concerns often manifest in underbaked or overbaked cookies. Check cookies for doneness a bit earlier than the suggested time, given that each oven has unique idiosyncrasies influencing bake times.

Recipe Success Stories

Community feedback has been overwhelmingly positive for these Sweet Potato Honeybun Cookies. Numerous readers have shared their success stories about playing with spices and other nuts to customize their cookies, sparking creativity in the kitchen.

Variations inspired by favorites like adding dark chocolate pieces or walnuts have received rave reviews, celebrating the versatility of these cookies and encouraging readers to share their own adaptations on social media.

Photography tips shared in community forums underscore that capturing the vibrant colors of the cookie amidst a cozy home setting enhances the appeal, inviting other bakers to give it a try.

Readers have also suggested using these cookies as a base for ice cream sandwiches, providing an innovative way to elevate this simple recipe into something extraordinary that delights on hot days.

Finally, readers have expressed how these cookies have become a staple in their households, often baking multiple batches to have on hand for both snacks and desserts, proving that adaptability fits well into various lifestyles.

Frequently Asked Questions

Can I use canned sweet potatoes instead of fresh?

Yes, canned sweet potatoes can be used, but be sure to drain them well to avoid excess moisture. Fresh sweet potatoes provide a richer flavor, but canned is a convenient alternative if you’re short on time.

How do I know when my cookies are done baking?

Your cookies are done when the edges are lightly golden but the center is still a bit soft. They will firm up as they cool on the baking sheet.

Can I make these cookies ahead of time?

Absolutely! You can prepare the dough and refrigerate it for up to 48 hours before baking. Alternatively, shape the cookies and freeze them for an even longer storage option.

What if I don’t have honey?

If you don’t have honey, maple syrup or agave nectar can serve as perfect alternatives. Both will provide a similar sweetness and flavor profile, though they may slightly alter the cookie’s texture.

How should I store my cookies?

Store your cookies in an airtight container at room temperature for up to a week. For extended freshness, consider freezing them in a sealed bag between layers of parchment paper.

Are there vegan options for this recipe?

Yes, by substituting honey with maple syrup and using coconut oil instead of butter, you can create a delicious vegan version without compromising on taste.

Can I add nuts or chocolate to the cookies?

Definitely! Chopped nuts, chocolate chips, or dried fruit can be added to the dough for additional flavor and texture. Just be sure to adjust the amounts based on your preferences.

What drinks go well with these cookies?

Sweet Potato Honeybun Cookies pair excellently with coffee, tea, or warm cider, enhancing the cozy taste experience. The flavors complement each other beautifully, making every bite a pleasure.

Are these cookies gluten-free?

If you use a gluten-free flour blend, you can easily adapt this recipe to be gluten-free without losing the wonderful flavor and feel of the cookies.

Can I use a different sweet potato variety?

While orange-fleshed sweet potatoes are most common, white or purple varieties can also be used. Just be aware that the flavor and sweetness levels may vary slightly.

How do I make my cookies chewy?

To ensure chewy cookies, measure your flour accurately and avoid overbaking. Using brown sugar in place of granulated sugar can also enhance the chewiness.

Additional Resources

For those who enjoy baking, you may find related recipes like Pumpkin Spice Cookies or Carrot Cake Cookies enticing. Both utilize seasonal flavors, much like the Sweet Potato Honeybun Cookies, and offer delightful variations for different occasions.

If you’re keen on honing your technique, be sure to explore guides on cookie texture and perfecting your mixing methods for a successful baking journey, ensuring consistent results every time.

Understanding the nutritional content of ingredients is essential; research sweet potato benefits or how different flours impact your baking to make informed choices.

Equipment recommendations, particularly for baking sheets and mixers, can greatly influence your baking experience. A non-stick baking sheet or a stand mixer may be worth considering for smooth and successful baking.

Lastly, seasonal variations are an exciting way to celebrate culinary diversity; feel free to share your personal favorite recipes using seasonal ingredients that can inspire others in their kitchens!

Join the Conversation

We invite you to share your creations and experiences with Sweet Potato Honeybun Cookies on social media. Engaging with fellow baking enthusiasts fosters a sense of community and provides a wealth of inspiration for future baking adventures.

Consider contributing photography tips to help others capture the beauty of their culinary delights. Showcasing your finished products helps celebrate individual creativity while inviting constructive feedback for improvement.

Recipe reviews serve as fantastic engagement; sharing personal twists and taste notes encourages an exchange of ideas that enriches the baking process for everyone involved.

Join the discussion around variations and adaptations, sharing insights on how you’ve modified the recipe to fit your preferences or dietary needs, what worked well, and what you might have tried differently.

Remember, your voice matters, and together we make the kitchen a place of innovation and joy. Spread the warmth of good food and connection with every bite shared.

The Recipe

Sweet Potato Honeybun Cookies

Serves: 24 cookies

Prep Time: 15 mins

Cook Time: 20 mins

Total Time: 35 mins

Kitchen Equipment Needed

  • Mixing bowl
  • Baking sheet
  • Parchment paper
  • Electric mixer
  • Measuring cups and spoons

Ingredients

  • 1 cup mashed sweet potatoes (cooked and cooled)
  • 1/2 cup honey
  • 1/4 cup butter, softened
  • 1 cup all-purpose flour
  • 1 teaspoon baking powder
  • 1/2 teaspoon cinnamon
  • 1/4 teaspoon nutmeg
  • 1/4 teaspoon salt
  • 1 teaspoon vanilla extract

Directions

  1. Preheat your oven to 350°F (175°C) and line a baking sheet with parchment paper.
  2. In a mixing bowl, cream together the softened butter and honey until light and fluffy.
  3. Add the mashed sweet potatoes and vanilla extract, mixing until combined.
  4. In a separate bowl, whisk together the flour, baking powder, cinnamon, nutmeg, and salt.
  5. Gradually add the dry ingredients to the wet mixture, stirring until just combined.
  6. Drop tablespoon-sized portions of dough onto the prepared baking sheet, spacing them about 2 inches apart.
  7. Bake for 15-20 minutes, or until the edges are lightly golden.
  8. Let the cookies cool on the baking sheet for 5 minutes before transferring to a wire rack to cool completely.

Recipe Notes

  • For added sweetness, drizzle extra honey over the cookies after baking.
  • These cookies can be stored in an airtight container for up to a week.
  • You can freeze the dough for later use; simply shape into balls and freeze before baking.

Irresistible Mini Biscoff Cheesecakes: A Perfect Dessert Delight

Delicious Mini Biscoff Cheesecakes: Bite-Sized Bliss

⚖️
Difficulty
Moderate

⏲️
Prep Time
20 mins

🕒
Cook Time
30 mins

⏱️
Total Time
50 mins

🍽️
Servings
12 servings

Indulge in the sweetness of Mini Biscoff Cheesecakes, where creamy, rich flavors collide with the warm, spiced notes of Biscoff cookies. These delightful treats are perfect for any occasion, offering a unique twist on traditional cheesecake. Each mini cheesecake is a harmonious blend of velvety cream cheese, luscious caramel, and the iconic taste of Biscoff, all nestled in a buttery cookie crust. Whether served at a party or enjoyed as an evening treat, these cheesecakes will surely captivate your taste buds.

Imagine sinking your spoon into these delightful little desserts and tasting the creamy filling that melts in your mouth. The crust provides a satisfying crunch that perfectly complements the smooth cheesecake, making every bite a delightful contrast of textures. The aroma of caramelized sugar combined with the spicy notes of cinnamon fills the air, inviting everyone to indulge. These Mini Biscoff Cheesecakes are more than just dessert; they’re a miniature experience of joy and satisfaction.

Quick Recipe Highlights

  • Flavor Profile: Mini Biscoff Cheesecakes boast a unique combination of creamy, sweet cheesecake and caramel notes with a hint of spiciness from the Biscoff cookies.
  • Texture: The cheesecakes feature a smooth and creamy filling set against a crunchy and buttery cookie crust, providing a delightful mouthfeel.
  • Aroma: They offer a heavenly aroma of caramel with subtle hints of cinnamon and brown sugar that will fill your kitchen as they bake.
  • Visual Appeal: These mini cheesecakes are visually stunning, with golden caramel swirls on top and perfectly baked crust edges, creating an irresistible presentation.
  • Skill Level Needed: This recipe is suitable for those with moderate baking skills, as it requires attention to detail and some patience during preparation and assembly.
  • Special Equipment: You will need a muffin tin and cupcake liners to create the mini cheesecakes, along with a mixing bowl and an electric mixer for the filling.

Recipe Overview

  • Difficulty Level: Although classified as moderate, this recipe is manageable for most bakers, making it a great choice for those who want to expand their baking repertoire.
  • Category: These mini cheesecakes fall into the dessert category, perfect for gatherings, celebrations, or simply satisfying your sweet tooth.
  • Cuisine: This recipe embraces a modern twist on classic American desserts, incorporating the renowned European Biscoff flavor that adds an elegant touch.
  • Cost: With an average estimated cost of around $15, these delightful treats are budget-friendly while still delivering gourmet taste.
  • Season: Enjoy these cheesecakes year-round, but they shine during festive gatherings, holidays, and special occasions.
  • Occasion: Ideal for parties, potlucks, or as a sweet finishing touch to dinners, these Mini Biscoff Cheesecakes are suitable for any event.

Why You’ll Love This Recipe

The taste and texture of Mini Biscoff Cheesecakes is enough to make anyone swoon. With a creamy texture that seems to float on your tongue, combined with the subtle crunch from the Biscoff crust, each bite is a delightful experience. The balance of sweetness and spice strikes the perfect note, appealing to those who love rich desserts without being overwhelmingly sweet.

One of the most significant advantages of this recipe is its convenience. The preparation time is relatively short, allowing you to whip up a batch quickly, yet the cheesecakes taste as if they’ve been laboriously crafted over hours. Additionally, they can be easily made ahead of time, making them a perfect choice for busy hostesses or those who simply want to prepare for an upcoming gathering in advance.

Nutritionally, these mini cheesecakes provide the joy of indulgence without the guilt. While they feature cream cheese, you can opt for reduced-fat versions or incorporate Greek yogurt for added protein, making them a more wholesome dessert option. The presence of Biscoff cookies also adds a unique element, a treat that feels special and indulgent.

Hosting friends or family? These Mini Biscoff Cheesecakes serve as an eye-catching and unique dessert that guests will rave about. They offer the chance for fun, engaging conversations and Instagrammable moments. Their individual serving portions mean everyone can enjoy their own decadent experience alongside other desserts without feeling guilty for taking seconds.

Cost-effectiveness is one of the many appealing aspects of this recipe. With a small list of ingredients and simple instructions, you can create a beautiful dessert that feels luxurious without breaking the bank. Each cheesecake serves as a small, affordable treat that tastes far more sophisticated than it costs. This sweetness is exactly what any home baker looks for when crafting special dessert creations.

Historical Background and Cultural Significance

Cheesecakes have a long and rich history dating back to ancient Greece, where the earliest known recipe can be traced to around 2000 B.C. This creamy and indulgent dessert evolved over centuries, crossing borders and adapting to various cultures. The classic American cheesecake, with its rich cream cheese filling, came into popularity in the 20th century and has since spawned numerous variations, including the beloved Mini Biscoff Cheesecakes.

The cultural significance of cheesecake goes beyond flavors; it represents celebration and community. Traditionally served at gatherings and special occasions, cheesecakes signify indulgence and hospitality. The introduction of Biscoff cookies into this classic dessert brings an international flair, reflecting an appreciation for diverse flavors and culinary traditions, particularly from Belgium, where Biscoff originated.

Over the years, the cheesecake recipe has evolved and adapted to different preferences, resulting in mini interpretations like the Mini Biscoff Cheesecakes. This adaptation allows for easy portioning and individual servings, making it a popular choice for gatherings where guests appreciate personal desserts. The original depth of flavor remains intact, achieving a perfect balance of creamy and crunchy delights.

Regional variations have emerged with each culture adding its touch, such as introducing tropical fruits, chocolate ganache, or alternative crusts. The Mini Biscoff Cheesecake highlights this adaptability, incorporating a much-loved European cookie to create a modern classic that appeals to both traditionalists and adventurous foodies alike.

Ingredient Deep Dive

Biscoff cookies are a defining ingredient of this recipe. Originating from Belgium, these caramelized biscuits feature a unique texture that’s both crunchy and crumbly. Their warming spice notes, predominantly cinnamon, enhance the flavor profile of these mini cheesecakes by adding an aromatic complexity. Nutritionally, Biscoff cookies contain fewer calories than traditional cookies, making them an excellent choice for lighter desserts. When selecting Biscoff, choose fresh packages to ensure proper texture and flavor for the crust. Store unopened packages in a cool, dry place and consider crumbling extra cookies to use as a garnish.

The second pivotal ingredient is cream cheese. This smooth and tangy dairy product serves as the cheesecake’s primary filling and symbolizes creaminess. Cream cheese brings richness to this dessert and acts as a fantastic canvas for flavor. It contains significant amounts of protein, calcium, and vitamins A and B12. Opt for full-fat or low-fat varieties based on dietary preferences. When storing cream cheese, remember to keep it well-covered in the refrigerator and used within a few weeks of opening for best flavors. Substituting with Greek yogurt can add a protein boost while shifting the flavor profile slightly, making it a healthier alternative.

Common Mistakes to Avoid

  • Overmixing the Cream Cheese: Overmixing can incorporate too much air, leading to cracks during baking. Mix until just combined for a smooth texture.
  • Not Soften Cream Cheese: Cold cream cheese doesn’t blend well, resulting in lumps. Always let it sit at room temperature before mixing.
  • Skipping the Cooling Process: Allowing cheesecakes to cool gradually prevents cracking. Rushing this step can compromise the final look and texture.
  • Overbaking the Cheesecakes: Overbaking leads to a dried-out texture. Keep a close eye on baking time and remove them when just set.
  • Using Subpar Ingredients: The flavor of this dessert hinges on high-quality ingredients. Avoid generic brands and opt for premium cream cheese and cookies.
  • Misjudging the Baking Temperature: Even a small discrepancy in temperature can affect baking results. Use an oven thermometer for accuracy.
  • Incorrectly Filling the Muffin Tin: Overfilling can cause the cheesecakes to overflow. Use a small ice cream scoop for even portions.
  • Not Chilling Before Serving: Chilling mini cheesecakes enhances their flavors and ensures the best texture. Room-temperature cheesecakes won’t be as delightful.
  • Skipping the Cupcake Liners: Without liners, cheesecakes can be difficult to remove. Always line the tin to prevent sticking.
  • Neglecting to Test Doneness: Relying purely on baking time can lead to errors. Use a toothpick to check; it should come out clean when the cheesecakes are done.

Essential Techniques

One essential technique is to ensure your ingredients are at room temperature. This step is critical as it allows for better incorporation and a smoother final product. When ingredients are too cold, they won’t blend well, leading to lumps. To master this, take the cream cheese out of the fridge an hour before you plan to start mixing.

Baking in a water bath is another technique that can greatly improve the texture of your mini cheesecakes. Placing the muffin tin in a water bath allows for gradual and even baking, reducing the chances of cracking. To achieve this, wrap the muffin tin with aluminum foil and place it inside a larger dish filled with hot water during baking.

Pro Tips for Perfect Mini Biscoff Cheesecakes

1. **Chill Before Serving:** Allow the cheesecakes to chill in the fridge for at least four hours for the best flavor and texture before serving.

2. **Garnish Creatively:** Top with whipped cream, drizzled caramel, or crushed Biscoff cookies to elevate the presentation and enhance flavors.

3. **Ensure Even Baking:** Rotate the muffin tin halfway through the baking time to ensure even baking, especially if your oven has hot spots.

4. **Use Heavy Duty Liner:** Opt for heavy-duty cupcake liners for easier removal and to prevent the cheesecake from sticking.

5. **Taste Test:** Don’t skip tasting the filling before baking. This allows you to adjust sugar levels as needed to match your preference.

6. **Avoid Direct Heat:** If possible, use an oven thermometer to check the temperature to avoid direct heat, which can lead to cracking.

7. **Preheat Thoroughly:** Preheat the oven for at least 20 minutes to reach the desired baking temperature consistently for the smoothest results.

8. **Keep Extras:** Store any leftover cheesecakes in an airtight container in the fridge to prolong their shelf life while maintaining flavor.

Variations and Adaptations

While the classic Mini Biscoff Cheesecake is heavenly on its own, regional variations can enhance its appeal. For instance, incorporating seasonal pumpkin puree during fall adds a delicious twist, transforming Creamy Biscoff Cheesecakes into a festive treat. Alternatively, during summer, adding fresh berries as a topping can provide a refreshing berry-flavored variation.

For those with dietary restrictions, gluten-free Biscoff cookies are available, allowing anyone to enjoy these treats without guilt. You can also modify the texture by experimenting with different crusts, such as chocolate graham crackers or almond flour, resulting in unique flavor profiles.

If you want to surprise your guests, consider flavor variations such as adding a hint of espresso to the cheesecake filling or swirling in some Nutella for a delightful chocolatey finish. The possibilities are endless, making this recipe versatile for different tastes.

Presentation can also be adapted; instead of using muffin tins, you could serve the cheesecake in mini mason jars for a charming rustic look. This not only changes the visual appeal but also enhances the interactive experience for guests.

Serving and Presentation Guide

The key to serving Mini Biscoff Cheesecakes lies in thoughtful presentation. Start by gently removing each cheesecake from its liner and placing it on a chilled plate. For an elegant touch, dust with powdered sugar or drizzle some caramel sauce on top before serving.

Garnishing ideas include fresh mint leaves or seasonal fruits that not only add color but also provide contrasting flavors. Traditional accompaniments can include a scoop of vanilla ice cream for a delightful temperature contrast.

Modern serving suggestions include creating mini dessert charcuterie boards where various dessert options are presented together, allowing guests to mix and match. Pay attention to temperature settings when serving; these cheesecakes are best served chilled.

Finally, don’t forget portion control; smaller servings are forward-thinking, especially for events with multiple dessert offerings. Providing small forks or spoons creates a friendly and accessible dessert experience for your guests.

Wine and Beverage Pairing

Pairing wines with Mini Biscoff Cheesecakes can elevate the dessert experience significantly. A sweet dessert wine like Riesling or a late-harvest Sauvignon Blanc complements the sweetness of the cheesecake and amplifies the caramel undertones of the Biscoff cookies.

If you prefer non-alcoholic options, consider pairing with creamy chai or spiced apple cider, as their warming spices harmonize beautifully with the cheesecake’s flavors. For coffee lovers, a rich espresso or a smooth cappuccino can create a delightful contrast to the sweet and creamy textures.

Temperature is crucial when serving desserts alongside beverages. The cheesecakes should be served chilled, while the wine may be slightly cooler than room temperature. Try to create balance; if the dessert is rich, choose a lighter drink that won’t overwhelm the palate.

Storage and Shelf Life

To ensure the best quality, store Mini Biscoff Cheesecakes in an airtight container in the refrigerator, where they will stay fresh for up to five days. Make sure they are properly chilled before sealing the container to avoid condensation that may lead to sogginess.

If you wish to keep them for longer, consider freezing them. Wrap each cheesecake individually in plastic wrap and place them in a freezer-safe container. They can be frozen for up to three months. When ready to enjoy, thaw in the refrigerator overnight rather than at room temperature to maintain texture and flavor.

Signs of spoilage include a sour smell or changes in texture. If any cheesecakes appear to have formed ice crystals or freezer burn, it’s best to discard them. If reheating is necessary, do so gently to avoid compromising the delicious creaminess.

Make Ahead Strategies

One of the best strategies for making Mini Biscoff Cheesecakes is to prepare them the day before your event. Assemble the cheesecakes and let them cool in the refrigerator overnight to allow the flavors to meld beautifully and provide a smoother texture. This method saves time and ensures they are perfectly chilled for serving.

Storage between steps is essential, especially in warmer weather. Keep the cheesecake filling chilled while you prepare the crust to prevent it from becoming too soft. For assembling, filling the crusts can be done an hour ahead, and they should be refrigerated until ready to serve.

Consider fresh element additions right before serving. Toppings like whipped cream or fresh fruit create a delightful finishing touch and maintain their freshness longer than other components when added ahead of time.

Scaling Instructions

If you want to halve the recipe, simply divide all ingredient measurements by two. This approach works well for those who wish to make fewer servings without sacrificing quality or flavor.

Doubling or tripling the recipe is also easy. Ensure you have enough muffin tins and bakers in your kitchen. Keep track of baking times as they may slightly change with increased volume of batter.

For larger gatherings, consider using larger cake pans, but remember that the bake time will vary based on the thickness of the cake. Additionally, ensure proper storage considerations; use extra fridge space for bigger batches and plan your chilling times accordingly.

Nutritional Deep Dive

Examining the macros of Mini Biscoff Cheesecakes reveals a balance of carbohydrates, proteins, and fats. Each cheesecake averages around 220 calories, making it a satisfying yet manageable indulgence. With 10g of protein per serving from the cream cheese, it offers a nutritional boost compared to other desserts.

Micronutrient analysis shows they provide calcium, vitamin A, and essential fats, supporting overall health in moderation. These cheesecakes fit well within a balanced diet, allowing for enjoyment without significant guilt.

For dietary considerations, focusing on portion control is crucial. Reducing serving sizes can help manage calorie intake while still enjoying desserts. If you’re conscious of weight management, pairing with fruit can offer additional fiber and nutrients while keeping the indulgence satisfying.

Dietary Adaptations

Making these Mini Biscoff Cheesecakes gluten-free is simple by using gluten-free Biscoff cookies or alternative cookie brands that provide similar flavors. Adjusting the crust to use almond flour also works for paleo diets.

Dairy-free versions can emerge using cashew cream blended into a smooth consistency to mimic the creaminess of cream cheese. This adaptation maintains the flavor profile while ensuring inclusivity for vegan lifestyles.

For those on low-carb diets, experimenting with sugar-free cookies can reduce carbohydrates significantly, while using low-carb sweeteners to maintain sweetness in the batter offers a satisfying solution.

The keto diet can also work with these cheesecakes by minimizing the sugar content and opting for nut-based crusts, creating delicious bites without excess carbs.

Troubleshooting Guide

Texture issues often arise when cream cheese is not softened adequately, leading to gummy or lumpy cheesecakes. Ensure cream cheese is at room temperature to avoid this. If your cheesecakes are overly dense, it may be due to overmixing; ensure you incorporate ingredients just until combined.

For flavor balance, adjust sweetness as per your preference; tasting the mixture before baking allows you to correct it. If they taste bland, a touch of vanilla extract can enhance the flavor.

Oven temperature problems may lead to uneven baking or cracks; utilize an oven thermometer for precision and adjust cooking times accordingly.

Ingredient substitutions may also affect your final results; stay loyal to the main recipe to ensure success, especially when changing crucial components like cream cheese for firmer-textured alternatives.

Recipe Success Stories

Community feedback highlights how these Mini Biscoff Cheesecakes have become a hit at family gatherings. One reader noted how their friends couldn’t stop complimenting the unique Biscoff flavor, leading to recipe requests.

Variation successes have emerged, with some having experimented with chocolate and berry additions. These adaptations have turned into family traditions, shared and cherished over time.

Readers often dive into substitution stories, sharing recommendations based on dietary restrictions. Many have found ways to replace sugar and flour seamlessly, enhancing their overall dessert experience.

Photography tips shared by successful bakers reveal how a simple high-contrast plate can enhance the visual appeal of the cheesecakes, leading to mouthwatering social media posts!

Frequently Asked Questions

Can I use different flavored cookies for the crust?

Absolutely! While Biscoff cookies offer a unique flavor, feel free to experiment with chocolate graham, vanilla wafers, or even gluten-free options for a personalized touch.

How long can I store these cheesecakes?

Mini Biscoff Cheesecakes can be stored in the refrigerator for up to five days. For longer storage, consider freezing them for about three months.

Can I make these without eggs?

Yes! You can substitute eggs with flax eggs or applesauce to keep the recipe egg-free. The texture may vary slightly, but they will still be delicious.

What’s the best way to thaw frozen cheesecakes?

The best method of thawing frozen cheesecakes is in the refrigerator overnight. This will maintain their creamy consistency without compromising flavor.

Can I make a full-sized cheesecake instead of mini ones?

Yes, you can indeed convert this recipe into a full-sized cheesecake by adjusting the baking time in a springform pan. Keep an eye on the baking process for best results.

What can I use instead of Biscoff cookies?

If Biscoff cookies are unavailable, ginger snaps or speculoos cookies could work as a good alternative, offering similar flavors and textures.

How do I ensure they won’t crack while baking?

To prevent cracking, avoid overmixing the batter and allow the cheesecakes to cool gradually. A water bath can also help maintain moisture during baking.

Can I customize the flavor of the filling?

Of course! You can add extracts, candies, or even fruit purees to the cheesecake filling for added variety and flavor enhancements.

Are these cheesecakes suitable for freezing?

Yes, just make sure to wrap individual cheesecakes properly in plastic wrap before placing them in a freezer-safe container for best results.

How can I make these dairy-free?

For a dairy-free version, substitute cream cheese with cashew cream or a commercial vegan cream cheese alternative to still enjoy creamy goodness.

Additional Resources

Explore related recipes such as Mini Chocolate Cheesecakes or Pumpkin Spice Cheesecakes for additional indulgences that will complement your dessert table. Learning about essential baking techniques can also enhance your skills; consider techniques like creating flavored ganaches or mastering quick cheesecakes without baking.

Ingredient information about Biscoff cookies will guide your shopping to ensure you find the best quality products, enhancing your baking creations. Equipment recommendations for baking can save you time and effort, ensuring you have all the necessary tools for future recipes.

If you’re looking for seasonal variations, our blog also includes tips on crafting holiday-themed desserts, integrating seasonal flavors into your baking repertoire.

Join the Conversation

We invite you to join our community on social media and share your experiences making Mini Biscoff Cheesecakes! Whether it’s showcasing your beautiful photos or sharing variations you’ve tried, we love to see how you make it your own.

Engage with us through recipe reviews and feedback to help others discover this delightful treat, or suggest your takes on the recipe. Let’s create a vibrant cooking community where we can inspire and learn from each other!

The Recipe

Mini Biscoff Cheesecakes

Serves: 12 servings

Prep Time: 20 mins

Cook Time: 30 mins

Total Time: 50 mins

Kitchen Equipment Needed

  • Muffin tin
  • Cupcake liners
  • Mixing bowl
  • Electric mixer
  • Spatula
  • Measuring cups and spoons

Ingredients

  • 24 Biscoff cookies, crushed (for crust)
  • 1/2 cup unsalted butter, melted (for crust)
  • 16 oz cream cheese, softened
  • 1/2 cup granulated sugar
  • 1/4 cup sour cream
  • 2 large eggs
  • 1 tsp vanilla extract
  • 1/3 cup Biscoff spread (for filling)
  • Additional Biscoff cookies for garnish (optional)

Directions

  1. Preheat the oven to 325°F (163°C) and line a muffin tin with cupcake liners.
  2. In a mixing bowl, combine crushed Biscoff cookies and melted butter until well combined.
  3. Press the mixture into the bottom of each cupcake liner to form the crust.
  4. In another bowl, beat the cream cheese and sugar together until smooth and creamy.
  5. Add sour cream, eggs, and vanilla extract, mixing until just combined.
  6. Fold in Biscoff spread until evenly distributed in the batter.
  7. Pour the cheesecake batter over the prepared crust in each cupcake liner, filling each halfway.
  8. Bake for 25-30 minutes or until set and slightly jiggly in the center.
  9. Remove from the oven and let cool completely before refrigerating for at least 4 hours.

Recipe Notes

  • For best results, allow the cheesecakes to chill overnight before serving.
  • Feel free to top with whipped cream and crumbled Biscoff cookies before serving for extra flavor and texture.
  • If using a full-sized cheesecake pan, baking time may need adjustment; check periodically after 40 minutes.

Savor Grilled Chicken Sausages with Crispy Seasoned Potatoes Today!

Grilled Chicken Sausages & Crispy Seasoned Potatoes: A Flavorful Delight

⚖️
Difficulty
Easy

⏲️
Prep Time
15 mins

🕒
Cook Time
30 mins

⏱️
Total Time
45 mins

🍽️
Servings
4

The beloved combination of grilled chicken sausages and crispy seasoned potatoes warms the heart and satisfies the palate with a burst of flavors. This dish is not only affordable to prepare but also easy to customize according to preferences, making it an excellent choice for family dinners or casual gatherings. The grilled sausages deliver a smoky taste, perfectly complemented by the inviting aroma of seasoned potatoes, enhancing the experience for everyone at the table.

In just a short time, you can whip up a delicious meal from scratch that is perfectly crispy on the outside and fluffy inside. The bright presentation of the golden potatoes paired with savory sausages creates an appetizing visual feast that will entice any food lover. Plus, this recipe is versatile enough to be enjoyed in any season, making it a year-round favorite.

Quick Recipe Highlights

  • Flavor Profile: This dish features the smoky essence of grilled chicken sausages combined with the herbaceous notes from seasoned potatoes, creating an unforgettable taste sensation.
  • Texture: The contrast between the juicy sausage and crispy potatoes adds an exciting mouthfeel that makes every bite enjoyable.
  • Aroma: The enticing aroma of grilling sausages alongside the mix of spices on the potatoes will surely capture the attention of your family and friends.
  • Visual Appeal: The golden brown color of the crispy potatoes alongside the beautifully grilled sausages creates a vibrant and tempting plate.
  • Skill Level Needed: Easy enough for beginners but still engages seasoned cooks, making it a perfect recipe for all skill levels.
  • Special Equipment: A grill and a large baking sheet are essential to achieving perfect results.

Recipe Overview

  • Difficulty Level: This easy recipe involves simple techniques, making it perfect for anyone looking to impress without the stress.
  • Category: Ideal for a main course or a tasty barbecue option, this meal fits perfectly into any casual dining situation.
  • Cuisine: Drawing from classic grilled dishes, this recipe incorporates global flavors with a focus on hearty, comforting ingredients.
  • Cost: Local ingredients are used, making it budget-friendly while allowing you to produce a gourmet experience.
  • Season: Whether in summer at the grill or during cozy winter nights, this dish appeals in any weather.
  • Occasion: Perfect for gatherings, picnics, or a casual weeknight dinner, it fits any schedule.

Why You’ll Love This Recipe

This mouthwatering dish offers a delightful mix of taste and texture, giving you that satisfying crunch when biting into crispy seasoned potatoes paired with the juicy, well-seasoned grilled chicken sausages. The combination provides a hearty meal that feels indulgent yet is easy to prepare. You can also throw in your favorite sauces or spices for customization, ensuring that every serving feels unique and tailored to your taste.

The convenience of this recipe makes it a top choice for busy home cooks. With minimal prep required and a straightforward cooking process, you’ll spend less time in the kitchen and more time enjoying meals with your loved ones. The efficiency of this one-pan dish allows you to focus on other tasks without sacrificing the quality of your meal.

Moreover, health-conscious diners can enjoy the nutritional benefits of high-protein chicken sausages alongside nutrient-rich potatoes. This dish can easily fit into a balanced diet by simply adjusting the seasonings and cooking methods to your preferences.

Enjoying this grilled chicken sausage and crispy seasoned potatoes meal is also a great way to gather friends and family together. Nothing beats sharing a delicious meal outdoors, especially during barbecues and summer evenings. This dish encourages lively conversation and laughter, making every meal more special.

Lastly, the cost-effectiveness of this recipe makes it accessible. Using simple ingredients that can easily be found in your pantry minimizes the expense while still delivering on taste and satisfaction, creating a win-win for those on a budget.

Historical Background and Cultural Significance

Grilled sausages have a rich cultural history that can be traced back to ancient times, but the charm of homemade sausages has kept it relevant today. Each culture has its trademark spices and preparation methods that reflect its regional flavors, making sausages a versatile dish enjoyed across the globe.

In many European countries, sausages are a staple, deeply intertwined with traditions. For instance, Germany is famous for its bratwurst, often enjoyed at festive gatherings. The development of chicken sausages has emerged as a healthier alternative in recent years, allowing people to enjoy this treat guilt-free, especially appealing to health-conscious diners.

The recipe for grilled chicken sausages and crispy seasoned potatoes represents the evolution of comfort foods, where traditional meets modern, with roots in outdoor gatherings becoming a hallmark of casual dining in various cultures. Potatoes, as a globally loved ingredient, complete this dish, transforming it into a satisfying meal across many culinary backgrounds.

Regional variations of sausage dishes add to its cultural significance, allowing each community to take part in the sausage-making tradition while adding unique flair through their local spices and cooking methods. The enduring popularity reflects its comforting nature, suitable for both intimate dinners and festive parties.

Ingredient Deep Dive

Chicken Sausages: Chicken sausages are a popular protein choice thanks to their lower fat content compared to traditional pork sausages. Originating from various culinary traditions, these sausages offer versatility with many flavor options such as Italian herbs or smoky paprika. When selecting chicken sausages, opt for those made from high-quality meat without fillers or excessive sodium for optimal health benefits.

Potatoes: Potatoes are a kitchen staple in numerous cultures, celebrated for their adaptability and texture. Rich in vitamins C and B6, they are a nutritious option that can be enjoyed in various forms. When choosing potatoes for this recipe, look for firm, smooth-skinned ones, and store them in a cool, dark place for freshness.

Common Mistakes to Avoid

  • Overcooking the sausages can lead to dry textures; always monitor the grill.
  • Not preheating the grill can prevent achieving those beautiful grill marks.
  • Using old potatoes can result in a less favorable texture; always inspect your ingredients.
  • Not seasoning the potatoes adequately may lead to bland flavors; feel free to get creative with spices.
  • Cutting potatoes too small can cause them to burn quickly; ensure uniform sizes for even cooking.
  • Skipping the resting time after grilling the sausages can affect the juiciness; let them sit to lock in moisture.
  • Rushing the cooking process can lead to unevenly cooked ingredients; patience is key for this recipe.
  • Neglecting to check the internal temperature of the sausages can pose health risks, so always use a thermometer.

Essential Techniques

Grilling chicken sausages is an essential skill for this dish. It’s important to cook them over medium heat to create a charred, flavorful exterior while ensuring the interior is thoroughly cooked. Mastering this technique involves turning the sausages occasionally and checking with a meat thermometer for a safe temperature of 165°F.

For achieving crispy seasoned potatoes, the key is the right cutting method and ensuring the potatoes are coated evenly with oil and seasonings. Slicing them into uniform pieces allows for consistent cooking, while preheating the baking sheet can help achieve that perfect crisp on the outside without sacrificing tenderness inside.

Pro Tips for Perfect Grilled Chicken Sausages & Crispy Seasoned Potatoes

– Pre-soak wooden skewers if using them to prevent burning during grilling.
– Use a mix of spices for the potatoes; garlic powder and paprika work wonderfully together to add a burst of flavor.
– Allow the potatoes to sit cut to absorb seasonings, arranging them in a single layer for even cooking.
– For added texture, finish the potatoes under the broiler for a minute or two after baking.
– Experiment with different types of chicken sausages for a variety of flavors—spicy, sweet, or herbal.
– Consider making your own seasoning mix to elevate the overall flavor of the dish even further.
– To enhance smokiness, add wood chips to your grill while cooking.
– For garnishing, consider fresh herbs like parsley or cilantro to add vibrant color and freshness.

Variations and Adaptations

When it comes to regional variations, consider using local sausage flavors or specific herbs used in your area. For seasonal adaptations, feel free to add vegetables like bell peppers or zucchini to the grilling process for a more colorful platter.

For those making dietary modifications, use turkey sausages to reduce calories, or opt for sweet potatoes instead of regular ones for a nutrient boost. Flavor variations can be introduced through diverse spice blends; try curry powder or chili flakes for a twist.

Texture modifications can include parboiling the potatoes before the oven to create a fluffier inside while still obtaining a crispy exterior. Presentation alternatives could involve skewering sausages and potatoes for fun and easy serving at gatherings.

Serving and Presentation Guide

Plating plays a crucial role in making your meal visually appealing. Use large white plates to enhance color contrast, stacking the sausages neatly next to a portion of seasoned potatoes. Consider garnishing with fresh chopped herbs or serving the dish with a dipping sauce alongside for added flair.

When garnishing, a sprinkle of paprika or fresh parsley elevates the presentation significantly. Traditional accompaniments like creamy coleslaw or fresh salad can complement the meal beautifully, while modern servings might include whole-grain rolls or specialty mustard.

Temperature plays an essential role in enjoyed textures; serve the dish warm off the grill for maximum flavor. For portion control, consider serving smaller portions on appetizer plates at gatherings, allowing guests to savor every bite while encouraging mingling.

Wine and Beverage Pairing

For wine pairings, consider a light white wine such as Sauvignon Blanc or a chilled rosé, both of which can beautifully complement the smoky flavors of grilled chicken sausages. If you prefer red wine, a light Pinot Noir works well without overpowering the meal.

For non-alcoholic alternatives, consider serving sparkling water with lemon or iced tea, offering a refreshing contrast to the hearty dish. If your meal includes spicy elements, a light lager or ale can also balance out the flavors effectively.

Coffee or tea may not be traditional but can offer a unique tasting experience when served after the meal. Make sure to serve beverages chilled for best enjoyment, especially during warmer seasons.

Storage and Shelf Life

Proper storage is vital for maintaining the quality of your leftover grilled chicken sausages and seasoned potatoes. Store them in airtight containers in the refrigerator, where they can last for about 3-4 days. Ensure that the dish is completely cooled before sealing to prevent moisture buildup.

For reheating, gently warm them in the oven or a microwave, but if possible, utilize the oven to restore crispness to the potatoes. Signs of spoilage include off smells or a change in texture, so always check before consuming leftovers.

If you want to freeze, portion the meal in freezer-safe containers. Keep in mind that while the sausages can freeze well, potatoes may lose some texture when thawed, so consider freezing them separately or using a different vegetable that freezes better.

Make Ahead Strategies

To make meal prep easier, consider preparing the chicken sausages in advance. You can marinate or season them the night before and store them in the refrigerator, allowing the flavors to penetrate deeper. The potatoes can also be pre-cut and stored in water to prevent browning until you’re ready to cook.

Time your cooking process, allowing the sausages to rest while cooking the potatoes, thus condensing overall preparation time. Always assess the quality of ingredients if you’re making them ahead of time, ensuring freshness for the best results.

Reheating and incorporating fresh elements such as herbs right before serving can enhance flavors and presentation. It’s essential to maintain the integrity of the dish’s components when assembling a prepped meal.

Scaling Instructions

If you’re looking to halve the recipe, reduce the ingredient amounts proportionally and adjust cooking times for the sausages and potatoes accordingly. This still yields flavorful results for a smaller gathering.

For scaling up, ensure to adjust your equipment. A larger baking sheet or an extra grill may be necessary to ensure even cooking when doubling or tripling the recipe. Cooking in batches is advisable to maintain quality, particularly when frying or grilling.

Monitor the cooking time, especially for larger quantities, as they may take a little longer to achieve that desirable char and crispness.

Nutritional Deep Dive

Analyzing the nutritional content reveals this dish to be high in protein, thanks to the chicken sausages, promoting muscle health and satiety. Per serving, you can gather substantial dietary fiber from potatoes, vital for digestive health.

In evaluating micronutrients, chicken sausages provide essential B vitamins while potatoes are rich in potassium and vitamin C, making the meal not just delicious but also health-conscious. Moderation in portion size is encouraged, especially if one aims for weight management.

For those balancing carbs and fats, using sweet potatoes can lower the glycemic index and introduce complex carbohydrates, which are better for sustained energy levels.

Dietary Adaptations

To adapt this recipe for gluten-free diners, ensure the sausages are labeled gluten-free and use gluten-free seasoning blends. Dairy-free adjustments can also easily be made by avoiding creamy dips or sides.

For vegan variations, consider substituting the sausage with plant-based sausage options available in stores and exploring an alternative to potatoes, such as roasted cauliflower, to maintain the flavor and texture.

Low-carb and keto enthusiasts can reduce carbs by omitting potatoes altogether. Opt for zucchini or mushrooms instead. For Paleo dieters, focus on using fresh, unprocessed sausage brands and simple seasonings like fresh herbs.

Troubleshooting Guide

If you encounter texture issues, such as dry sausages, ensure they are cooked at the correct temperature and time. A meat thermometer will be your best friend to check internal temperature accurately.

Balance flavor problems by tasting before serving; adjust seasonings if needed throughout the cooking process. Adding a splash of broth or wine can help enhance flavors if the dish appears too bland.

For temperature concerns, remember to adjust cooking times based on the thickness of sausages and pan size. Monitor carefully to prevent burning or uneven cooking on grills that may have hot spots.

Ingredient substitutions might not yield the same flavor; always test with small amounts first to assess compatibility. Timing discrepancies can arise when scaling; it’s vital to adjust cooking time between batches for consistency.

Recipe Success Stories

Readers have shared numerous successes with this recipe, noting how it has become a staple in their homes. From family dinners to summer barbecues, everyone enjoys the burst of flavors and ease of preparation.

Several adaptations featured reader suggestions that introduced their variations, incorporating elements like spicy jalapeño chicken sausages or using locally sourced herbs for seasoning. These changes not only enhanced personal enjoyment but also built community engagement through shared cooking experiences.

Photography tips have emerged, with many showcasing their plated meals on social media. The vibrant colors and appealing presentations encourage others to try the recipe, creating a buzz around this delightful dish.

Frequently Asked Questions

Can I use frozen chicken sausages?

Yes! Just ensure to completely thaw them before grilling to achieve even cooking and better flavor absorption.

What if I want to cook the potatoes differently?

You can also boil them lightly before seasoning and roasting if you prefer a softer texture or use an air fryer for a healthier alternative.

How do I store leftovers?

Store leftovers in airtight containers in the fridge for 3-4 days. You can also freeze them and reheat when needed.

What dipping sauces pair well?

Mustard, barbecue sauce, or a yogurt-based dip are fantastic complements to the dish, adding an exciting layer of flavor.

Can I substitute other meats for chicken?

Absolutely! Turkey, pork, or tempeh sausages can serve as excellent alternatives while still providing unique taste profiles.

How can I make this dish spicier?

Add crushed red pepper flakes to the potatoes or choose spicy chicken sausages to elevate the heat in the recipe.

Is this recipe suitable for meal prep?

Yes, it is an excellent choice for meal prep. You can prepare both components in advance and store them separately for quick reheating.

What side dishes work best with this?

Salads, coleslaw, or grilled veggies make great side dishes to accompany the flavors of grilled chicken sausages and seasoned potatoes.

How can I make this dish vegan-friendly?

Choose plant-based sausages and substitute potatoes with roasted cauliflower or another vegetable to maintain a satisfying meal.

Can I grill the potatoes?

Definitely! Parboil them slightly, season, and use a grill basket or wrap in foil to cook them alongside the sausages on the grill.

Additional Resources

Explore related recipes that bring together hearty meats and vibrant vegetables. Check out our technique guides for grilling and roasting to enhance your cooking skills, and for thorough ingredient insights, examine our articles on selecting sausages and potatoes.

Don’t forget to dive into seasonal variations that keep the dish fresh, particularly when local produce is in season. With these resources, you’ll find everything you need to master this delicious recipe.

Join the Conversation

We’d love to hear your thoughts! Share your grilling experiences on social media, tag us in your photographs, and don’t hesitate to leave your reviews. Your feedback helps cultivate a vibrant community of fellow food lovers, encouraging everyone to explore and enjoy variations of this delightful recipe. The joy of cooking is doubled when shared!

The Recipe

Grilled Chicken Sausages & Crispy Seasoned Potatoes

Serves: 4

Prep Time: 15 mins

Cook Time: 30 mins

Total Time: 45 mins

Kitchen Equipment Needed

  • Grill
  • Baking sheet
  • Meat thermometer
  • Mixing bowl

Ingredients

  • 4 chicken sausages
  • 4 medium-sized potatoes, diced
  • 3 tablespoons olive oil
  • 1 teaspoon garlic powder
  • 1 teaspoon paprika
  • 1 teaspoon salt
  • 1/2 teaspoon black pepper

Directions

  1. Preheat the grill to medium heat.
  2. In a mixing bowl, toss diced potatoes with olive oil, garlic powder, paprika, salt, and pepper.
  3. Spread the seasoned potatoes in a single layer on a baking sheet.
  4. Place the baking sheet on the grill and roast for about 20-25 minutes, stirring occasionally until crispy.
  5. While the potatoes are cooking, grill the chicken sausages for 8-10 minutes, turning occasionally until fully cooked through.
  6. Once done, remove both items from the grill, let the sausages rest for a few minutes, and serve together on a platter.

Recipe Notes

  • Feel free to adjust the seasoning to your preference.
  • Leftovers can be stored in an airtight container for 3-4 days.
  • Experiment with different types of sausages for diverse flavors.

Irresistible Blueberry Lime Cheesecake Cupcakes You’ll Love to Bake

Irresistible Blueberry Lime Cheesecake Cupcakes Recipe 💜🧁

⚖️
Difficulty
Medium

⏲️
Prep Time
30 mins

🕒
Cook Time
20 mins

⏱️
Total Time
50 mins

🍽️
Servings
12 cupcakes

Indulge in the delightful combination of sweet blueberries and zesty lime with our Irresistible Blueberry Lime Cheesecake Cupcakes. These charming little treats are not just visually appealing; they bring an incredible burst of flavors that dance on your palate. The creamy cheesecake filling paired with the refreshing brightness of lime juice creates a beautiful harmony, making each bite a heavenly experience. Perfect for any occasion, whether it’s a sunny picnic or a cozy evening at home, these cupcakes are bound to impress and satisfy your cravings.

As you prepare to make these cheesecake cupcakes, picture the soft and fluffy texture that contrasts with the smooth, rich filling. The addition of crushed blueberries gives a lovely pop of color and flavor, while the lime adds an uplifting twist, ensuring that your taste buds are treated to an unforgettable experience. These cupcakes not only satisfy your dessert desires but also add a splash of vibrant colors to your table, making them an eye-catching centerpiece for gatherings or celebrations.

Quick Recipe Highlights

  • Flavor Profile: A perfect balance of creamy cheesecake contrasted with the tartness of fresh blueberries and zesty lime.
  • Texture: Soft, moist cupcakes with a rich and luscious cheesecake center that melts in your mouth.
  • Aroma: Delightful, fruity aromas of berries and citrus fill the kitchen as they bake.
  • Visual Appeal: Stunning blueberry swirls and a bright lime garnish create a feast for the eyes.
  • Skill Level Needed: Moderately easy, perfect for home bakers looking to impress.
  • Special Equipment: Standard muffin tin, electric mixer, and cupcake liners.

Recipe Overview

  • Difficulty Level: Medium, requiring basic baking skills and attention to detail for layering flavors.
  • Category: Dessert; a sweet treat suitable for celebrations, casual gatherings, or everyday indulgence.
  • Cuisine: Inspired by American dessert traditions, incorporating playful flavors from cheesecake and fruit desserts.
  • Cost: Generally low-cost ingredients, making it an economical choice for delicious homemade treats.
  • Season: Best enjoyed in late spring or summer when blueberries are in season and fresh limes are vibrant.
  • Occasion: Perfect for birthdays, brunches, potlucks, or simply a delightful afternoon snack.

Why You’ll Love This Recipe

These Blueberry Lime Cheesecake Cupcakes are a taste sensation, marrying the richness of cheesecake with the tartness of lime and the sweetness of ripe blueberries. The creamy filling is expertly balanced, and the acidity of lime enhances the overall flavor, making each bite a symphony of taste. The lightness of the cupcakes allows the robust flavors of the filling to shine without being overly heavy, making them a perfect seasonal dessert.

Convenience is key in this recipe; you can whip up a batch in under an hour, making them ideal for impromptu gatherings or dessert cravings. The straightforward instructions and minimal baking time allow busy bakers to navigate through this recipe with ease, ensuring a stress-free baking experience while achieving gourmet results.

Nutritionally, these cupcakes provide a delightful treat without compromising on health. Blueberries are packed with antioxidants, while Greek yogurt or cream cheese in the filling offers essential nutrients, making these cupcakes a guilt-free indulgence.

In social settings, these cupcakes are showstoppers. Their vibrant colors and individual servings make them an attractive option for sharing, and their taste profile encourages engagement—everyone will want to know your secret recipe. These cupcakes can transform a simple gathering into a memorable culinary event.

Cost-effectiveness is another reason why this recipe stands out. Most ingredients are pantry staples or easy to find, making it accessible for any home baker. Whipping up a delightful batch of Blueberry Lime Cheesecake Cupcakes won’t break the bank, providing a delicious return on your investment.

Historical Background and Cultural Significance

The origin of cheesecake can be traced back to ancient Greece, where it was served to athletes during the first Olympic Games in 776 BC. The concept of combining sweet cheese with fruits has evolved over centuries, spreading through various cultures before becoming the beloved dessert we know today. Blueberries and limes, while not traditional ingredients in classic recipes, have become popular modern adaptations that showcase local freshness.

In American culture, the cheesecake has been adapted to fit diverse tastes and occasions, leading to the popularization of mini cheesecakes, which allow for individual servings at social events. The incorporation of seasonal fruits such as blueberries elevates the appeal, making this dessert suitable for summer festivities.

The evolution of recipes to include lighter ingredients and innovative combinations highlights a shift toward health-conscious baking. This Blueberry Lime Cheesecake Cupcake represents a modern take on traditional cheesecake, appealing to both the nostalgic and the contemporary baker.

Regional variations of cheesecake exist throughout the United States, from the dense New York style to the lighter versions found in the Midwest. Integrating flavors like blueberry and lime contributes to an ever-evolving dessert landscape, showcasing the creativity and adaptability of home bakers everywhere.

Ingredient Deep Dive

Blueberries are a defining ingredient in this recipe, celebrated not only for their sweet taste but also for their impressive nutritional profile. Rich in antioxidants and essential vitamins, they are frequently called a superfood. When selecting blueberries, opt for firm, plump ones with a deep blue hue, and store them in the refrigerator, ideally in a breathable container to prolong freshness. You can also freeze blueberries for later use, making them a versatile ingredient in your pantry.

Limes, with their bright acidity, play a crucial role in balancing the sweetness of the cheesecake. The zest and juice are both essential here, providing a vibrant punch of flavor. Fresh limes are preferable, and they can be stored at room temperature or in the refrigerator to keep them juicy. If you run out of fresh limes, bottled lime juice can serve as a substitute, though fresh offers the best flavor.

Cream cheese, essential for the cheesecake filling, is rich and creamy, contributing to the luscious texture. Choosing high-quality, full-fat cream cheese will give you the best results. Store cream cheese tightly wrapped in the refrigerator, and use it within a week or two for optimal freshness. If you need a lighter version, consider using Neufchâtel cheese as a substitute, though it will yield a slightly different texture.

The flour and sugar in the cupcake batter provide the foundation for the texture and sweetness of these delightful treats. Opt for all-purpose flour for versatility, and granulated sugar for the right sweetness level. For a healthier option, you can partially substitute whole wheat flour and use alternatives like coconut sugar for a different flavor profile.

Common Mistakes to Avoid

  • Overmixing the batter: This can lead to dense cupcakes rather than light, fluffy ones. Mix just until combined.
  • Using stale ingredients: Always check the expiration dates on baking powder, baking soda, and dairy products to ensure freshness.
  • Not preheating your oven: This step is vital for even baking, so make sure your oven is ready before you place the cupcakes inside.
  • Skipping the cooling step: Allow the cupcakes to cool completely before filling them to avoid melting the cheesecake filling.
  • Incorrectly measuring ingredients: Use proper measuring cups and spoons for accuracy, especially for dry ingredients.
  • Overcrowding the pan: Ensure to leave enough space between cupcakes in the muffin tin for even baking and proper rising.
  • Choosing low-quality cream cheese: Opt for full-fat cream cheese for the best texture and flavor in the cheesecake filling.
  • Omitting the lime zest: The zest is essential for flavor depth; don’t skip this step!
  • Skipping the cupcake liners: Liners help in easy removal and presentation of cupcakes, so make sure to use them.
  • Not adjusting baking times: Ovens may vary, so check for doneness a few minutes before the recommended time to prevent overbaking.

Essential Techniques

Using the correct mixing technique for your batter is important to achieve the right texture in your Blueberry Lime Cheesecake Cupcakes. Start by creaming the butter and sugar until light and fluffy; this helps to create air pockets that will expand during baking, leading to a soft cupcake. Avoid overmixing once you add the dry ingredients; just gently fold them in until they disappear to prevent a dense texture.

Incorporating the lime juice and zest is a crucial step that enhances flavor. Zesting before juicing ensures you get the maximum amount of flavor from the lime. Use a microplane for the zest, taking care to avoid the bitter white pith. When adding the zest and juice to the batter, fold them in gently to maintain the lightness of the mixture.

Don’t overlook the importance of cooling. Allow the cupcakes to chill fully before adding the cheesecake filling. This cooling period not only sets the structure of the cupcake but also prevents any melting or leaking when you fill them with the cheesecake mixture.

Pro Tips for Perfect Irresistible Blueberry Lime Cheesecake Cupcakes

Start with room temperature ingredients for a smoother batter and more evenly mixed cheesecake filling. This will help everything blend seamlessly, reducing lumps and ensuring great texture.

When filling the cupcake liners, use a piping bag to make it easier and less messy. This ensures a consistent amount of filling in each cupcake, making them visually appealing.

For added visual impact, consider topping each cupcake with a fresh blueberry and a sprig of mint after frosting. This not only enhances presentation but also offers a refreshing contrast.

Allow the cupcakes to chill in the refrigerator for at least an hour after filling. This helps to set the cheesecake filling properly and enhances the overall flavors, making the cupcakes even more delightful.

Experiment with different citrus flavors. If you want to switch it up from lime, lemon zest and juice work beautifully with blueberries as well.

Bake a test cupcake if using a new oven. Different ovens can have variances in heating, and a test cupcake will help you gauge the right cooking time for the remaining batch.

Variations and Adaptations

Consider creating a no-bake version of these Blueberry Lime Cheesecake Cupcakes. Simply prepare the cheesecake filling and layer it in jars with crushed graham crackers and blueberries for a refreshing summertime treat.

Try other fruit combinations by swapping blueberries for raspberries or strawberries. Each fruit will impart its unique flavor profile while still complementing the tanginess of lime beautifully.

For gluten-free adaptations, substitute all-purpose flour with a gluten-free blend. Many blends will function similarly, ensuring that your cupcakes will still rise, remain tender, and taste great.

Change the texture by adjusting the cupcake base; incorporate a chocolate cupcake or vanilla sponge recipe as a base, creating a different flavor experience while keeping the cheesecake centerpiece intact.

Customizing the frosting is also an option. Try a light whipped cream topping flavored with lime zest for a lighter finish or a traditional cream cheese frosting for added richness and indulgence.

Serving and Presentation Guide

To elevate the presentation of your cupcakes, consider using a decorative serving platter to display them proudly at gatherings. Rotate the platter for even visibility, allowing each guest to admire the visual feast of colors.

Garnish each cupcake with a sprinkle of lime zest, a fresh blueberry, or a mint leaf to enhance the aesthetic appeal. These small touches create eye-catching desserts that will draw guests in.

Temperature is important for enjoyment. Serve the cupcakes chilled after refrigerating to ensure the filling is firm yet creamy, presenting the best texture when eaten.

For portion control, use a standard ice cream scoop when filling cupcake liners. This ensures each serving is uniform, making it easier to manage servings for events and gatherings.

Pair the cupcakes with a refreshing beverage such as iced tea or lemonade to complement their flavors while adding a festive touch to your serving setup.

Wine and Beverage Pairing

A light sparkling wine such as Prosecco beautifully complements the fruity flavors of Blueberry Lime Cheesecake Cupcakes. The bubbles elevate the flavors, creating a delightful pairing experience.

For a non-alcoholic option, consider serving these cupcakes with a homemade limeade. The brightness of the citrus will echo the flavors in the cupcakes while providing a refreshing drink option for all guests.

If you prefer coffee, a lightly brewed iced coffee will also pair well. The slight bitterness of coffee can balance the sweetness of the cupcakes, making for a balanced dessert experience.

Ensure your beverages are served at the correct temperatures to maximize refreshment and enjoyment during your dessert serving.

Storage and Shelf Life

To store your Blueberry Lime Cheesecake Cupcakes, keep them in an airtight container in the refrigerator. This will help maintain their freshness while keeping the cheesecake filling firm.

Consume the cupcakes within 3-5 days for optimal flavor and texture. After this time, the quality may start to decline, especially the freshness of the fruit.

If you wish to freeze the cupcakes, do so before adding the filling. Wrap them individually in plastic wrap and then place them in a freezer-safe bag. They can be frozen for up to 3 months.

When ready to enjoy your frozen cupcakes, thaw them in the refrigerator overnight. After thawing, fill them with the cheesecake mixture and enjoy fresh cupcakes again.

Signs of spoilage include an off smell or a noticeable change in texture. If you observe mold or any discoloration, discard the cupcakes immediately for safety.

Make Ahead Strategies

You can prepare your Blueberry Lime Cheesecake Cupcakes ahead of time by baking the cupcakes and storing them in an airtight container for up to two days before adding the cheesecake filling.

Alternatively, you can prepare the cheesecake filling a day in advance and store it separately in the refrigerator. This will reduce the workload on the day you plan to serve them.

When planning ahead, ensure that you have the necessary storage containers available for both cupcakes and filling. This ensures freshness and easy assembly when it’s time to serve.

To enhance quality, add fresh elements like fruit toppings just before serving to create a visually appealing dessert that’s as fresh as possible.

Scaling Instructions

Halving the recipe is straightforward; simply divide all ingredient quantities by two. Adjust the baking time slightly to ensure cupcakes remain moist and fluffy.

Doubling or tripling the recipe? Ensure to use larger pans or multiple trays and rotate them during baking. This helps achieve uniform baking across all cupcakes.

Keep equipment adjustments in mind. If you’re using a different size muffin pan, check for corresponding baking times as different sizes can affect how quickly they cook through.

Monitor timing modifications closely when scaling; the overall bake time may change slightly due to increased volume or heat distribution in the oven.

When storing larger batches, consider using larger containers or prepping in stages to ensure freshness and avoid overcrowding, which can lead to spoilage.

Nutritional Deep Dive

Each Blueberry Lime Cheesecake Cupcake offers a delightful mix of macronutrients. The balance of carbohydrates from the cupcake base and creaminess from the cheesecake filling contributes to a satisfying treat.

Micronutrient analysis shows an abundance of vitamins and antioxidants from the blueberries, which promote good health and support the immune system. Lime adds extra vitamin C, boosting health benefits further.

Including these cupcakes in a balanced diet can offer occasional indulgences without guilt. Allowing yourself a treat can link enjoyment with healthy eating habits rather than deprivation.

For weight management, enjoy serving sizes that allow you to indulge without overindulging. Consider the balance of the nutritional value within your overall daily intake to maintain a healthy lifestyle.

The versatility of ingredients can easily adjust macros further; using whole-grain flour instead of all-purpose flour adds fiber, while experimenting with sugar alternatives can lower calorie content.

Dietary Adaptations

For those seeking gluten-free options, swapping all-purpose flour with a certified gluten-free alternative ensures that everyone can enjoy these delightful treats without issue.

If you need dairy-free options, use a vegan cream cheese alternative for the filling and adjust the recipe accordingly. Coconut oil can replace butter in the cupcake batter to maintain moisture.

Vegans can enjoy these cupcakes by substituting traditional ingredients—using flax eggs instead of regular eggs, almond milk in place of dairy, and a plant-based cream cheese.

For low-carb adaptations, a sugar substitute like erythritol can replace granulated sugar, along as utilizing almond flour for a gluten-free flour alternative, keeping carbs low while still offering delicious flavors.

Keto enthusiasts can further adapt with low-carb sweeteners and focus on wholesome, low-carb ingredients to enjoy cupcakes that align with their dietary goals without feeling deprived.

Troubleshooting Guide

If your cupcakes come out dry, it may be a sign of overbaking. Keep an eye on them during the last few minutes of baking and test for doneness with a skewer.

When experiencing flavor imbalance, a pinch of salt in the batter can help enhance sweetness and balance acidity, perfecting the overall flavor profile of your cupcakes.

If you notice the cheesecake filling leaking out, ensure the cupcakes have cooled completely before adding the filling. Consider using a thicker filling next time for a sturdier consistency.

If your cheesecake did not set properly, review the chilling process. If it was rushed, allow more time in the refrigerator or adjust recipe ratios for better texture.

If the cupcake tops dome too much, try lowering the oven temperature slightly and baking for a longer time. This helps them rise gradually without becoming overly domed.

Recipe Success Stories

Community feedback has been incredibly positive, with many bakers sharing their modifications and personal touches. Readers have reported successful adaptations, including different fruit combinations and even gluten-free variations, broadening the appeal of these cupcakes.

Several bakers have shared tips on social media, showcasing their creative presentations. Some have taken it a step further, encouraging friends and family to help in the baking process, promoting a fun bonding activity.

A few have even mentioned how their children enjoyed helping make these cupcakes, using it as an opportunity to teach baking fundamentals and share family time in the kitchen, creating lasting memories.

Photographers and food bloggers have been particularly expressive about the visual impact these cupcakes have. The stunning contrast of colors translates beautifully to social media feeds, as they highlight their delicious creations.

Through the sharing of these success stories, a community of home bakers has formed, where enthusiasm for baking continues to grow, fostering connection over sweet treats.

Frequently Asked Questions

Can I use frozen blueberries instead of fresh?

Yes, frozen blueberries can be used in this recipe. Just ensure they are thawed and drained before incorporating them into the batter to prevent excess moisture.

How do I know when the cupcakes are done baking?

You can check for doneness by inserting a toothpick into the center of a cupcake; if it comes out clean or with a few moist crumbs, they are ready.

Can I make these cupcakes dairy-free?

Yes! Use plant-based cream cheese for the filling and substitute butter with coconut oil or a dairy-free alternative in the cupcake base.

How should I store leftovers?

Store any leftover cupcakes in an airtight container in the refrigerator for up to 3-5 days or freeze them for longer-term storage.

Can I make these cupcakes ahead of time?

Absolutely! You can bake the cupcakes a day in advance and store them in the refrigerator. Just fill with the cheesecake mixture shortly before serving.

What if my cheesecake filling is too runny?

If your filling is runny, consider adding a bit more cream cheese or allowing it to chill longer in the fridge to firm up before filling the cupcakes.

Can I substitute other fruits for blueberries?

Yes, you can use raspberries, strawberries, or blackberries in place of blueberries, each providing its unique flavor while blending well with lime.

Is it necessary to use cupcake liners?

While optional, cupcake liners help with easy removal and maintain a clean presentation, so it’s recommended to use them for best results.

Can I use a different citrus besides lime?

Absolutely! Lemons or even oranges can be used in place of lime for a different flavor twist while keeping the delicious fruity profile.

What’s the best way to reheat these cupcakes?

For best results, let them sit at room temperature to return to almost a normal state. If you want them warm, you can microwave for short increments (10-15 seconds).

Additional Resources

For those who love baking, exploring related recipes can expand your dessert repertoire. Consider trying other cupcake recipes, like chocolate or lemon desserts, to complement your newfound favorites.

Technique guides specific to mastering cupcakes or cheese-based desserts offer valuable insights. These resources help refine your skills, elevating your baking game further.

Learn more about various baking ingredients, like the benefits of using organic versus conventional products. Understanding what goes into your baking can enhance the quality of your final output.

Invest in quality baking equipment, as it can greatly affect the outcome of your recipes. Updated tools can improve efficiency in the kitchen and ensure success with even the most intricate recipes.

Seasonal variations can inspire fantastic adaptations of this recipe. Think of incorporating seasonal fruits or flavors, bringing a fresh twist to the classic blueberry lime flavor.

Join the Conversation

Engage with your community by sharing your baking experiences on social media. Inviting friends to replicate the Blueberry Lime Cheesecake Cupcake recipe can create a shared love for baking.

Invite others to share their photography tips or insights, creating a network of inspiration as bakers come together to celebrate their achievements and variations.

Encourage discussions around the variations you’ve tried, fostering creativity and innovation in the kitchen. Exchanging tips and tricks can empower each other to elevate the art of baking together.

Through comments and feedback, inspire others to share their favorite adaptations of this recipe, making the conversation around delectable desserts dynamic and inclusive.

Share your success stories to motivate new bakers, proving that anyone can create beautiful and delicious treats with a little practice and creativity.

The Recipe

Irresistible Blueberry Lime Cheesecake Cupcakes

Serves: 12 cupcakes

Prep Time: 30 mins

Cook Time: 20 mins

Total Time: 50 mins

Kitchen Equipment Needed

  • Muffin tin
  • Cupcake liners
  • Electric mixer
  • Measuring cups and spoons
  • Mixing bowls
  • Cooling rack
  • Piping bag

Ingredients

  • 1 cup all-purpose flour
  • 1/2 cup granulated sugar
  • 1/2 cup unsalted butter, softened
  • 2 large eggs
  • 1 tsp vanilla extract
  • 1 tsp baking powder
  • 1/2 tsp salt
  • 1 cup fresh blueberries
  • 1 cup cream cheese
  • 1/2 cup Greek yogurt or sour cream
  • 1/4 cup powdered sugar
  • Juice and zest of 1 lime

Directions

  1. Preheat your oven to 350°F (175°C) and line the muffin tin with cupcake liners.
  2. In a mixing bowl, cream together the butter and granulated sugar until light and fluffy.
  3. Add in the eggs, one at a time, mixing well after each addition. Stir in the vanilla extract.
  4. In another bowl, whisk together the flour, baking powder, and salt.
  5. Gradually add the dry mixture to the wet ingredients, mixing until just combined.
  6. Gently fold in the blueberries, being careful not to crush them.
  7. Fill each cupcake liner about 2/3 full with the batter and bake for 18-20 minutes or until a toothpick comes out clean.
  8. Allow cupcakes to cool completely on a wire rack.
  9. In another bowl, beat together cream cheese, Greek yogurt, powdered sugar, lime juice, and zest until smooth.
  10. Fill a piping bag with the cheesecake filling and gently fill the cooled cupcakes.
  11. Chill in the refrigerator for at least 1 hour before serving.

Recipe Notes

  • You can substitute lime with lemon for a different flavor.
  • For a more decadent treat, add whipped cream on top of each filled cupcake.
  • Store leftover cupcakes in the refrigerator for up to 5 days.
  • Feel free to adjust the sweetness to your preference.