Lemon Salmon with Crispy Potatoes and Broccoli: A Flavorful Delight

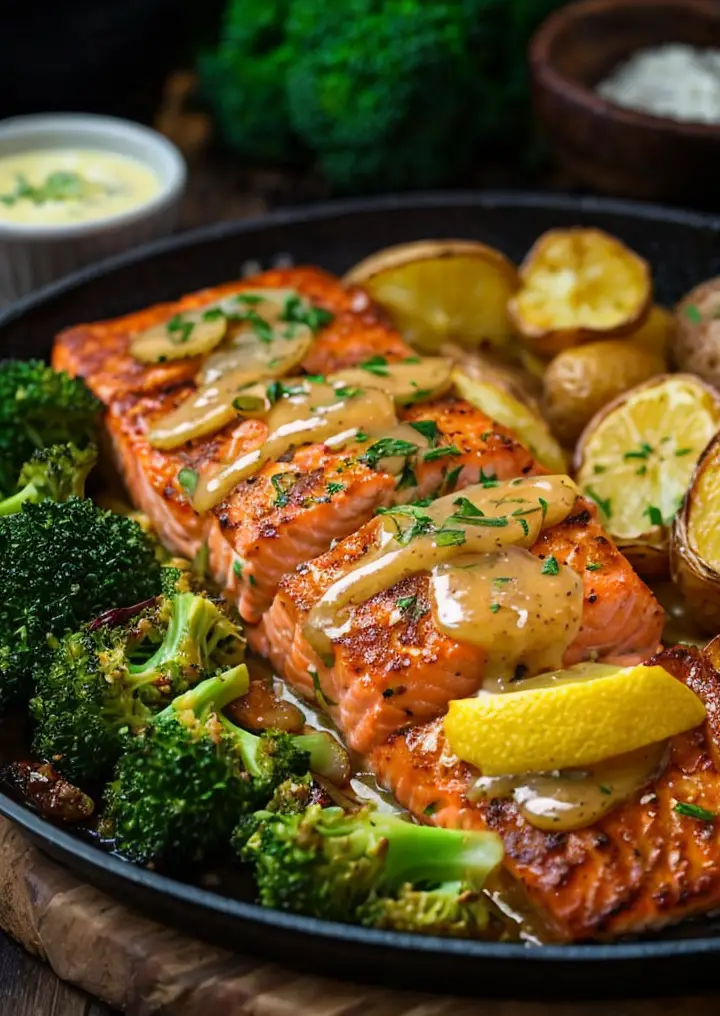
Lemon Salmon with Crispy Potatoes and Broccoli: A Deliciously Healthy Dinner

⚖️
Difficulty
Easy

⏲️
Prep Time
15 mins

🕒
Cook Time
25 mins

⏱️
Total Time
40 mins

🍽️
Servings
4

Imagine a vibrant plate filled with succulent lemon salmon, perfectly crisped potatoes, and steamed broccoli artfully arranged to catch the eye. The lively flavors invite you to dive in, offering a refreshing burst of citrus that dances on your palate while the texture of the salmon melts tenderly in your mouth. This Lemon Salmon with Crispy Potatoes and Broccoli is not only visually appealing but also a culinary delight that combines nutrition with flavor, making it a go-to recipe for family dinners and gatherings.

Each bite brings together the delightful taste of pan-seared salmon, drizzled with a zesty lemon butter sauce, paired with golden, crisp potatoes that offer a satisfying crunch. The broccoli adds a nutritious green element, rounding off the meal with its fresh taste and crunchy texture. This dish perfectly balances health and taste, ensuring that you and your loved ones enjoy every bite.

Quick Recipe Highlights

  • Flavor Profile: A delightful mix of zesty lemon and savory salmon harmonizes with the crispy potatoes and tender broccoli.
  • Texture: The creamy salmon contrasts beautifully with crunchy potatoes and tender, crisp broccoli.
  • Aroma: Inviting lemon scents merged with fresh herbs enhance the delectable aroma of this dish.
  • Visual Appeal: A colorful presentation of bright greens, golden yellows, and rich pinks creates an irresistible plate.
  • Skill Level Needed: This dish is suitable for all skill levels, making it accessible for novice cooks and experienced chefs alike.
  • Special Equipment: A non-stick skillet and a baking sheet are essential for achieving the perfect crisp on the potatoes.

Recipe Overview

  • Difficulty Level: This lemon salmon recipe is easy to follow, making it perfect for beginner cooks. With clear steps, the dish comes together smoothly.
  • Category: This meal fits beautifully into dinner categories, ideal for family gatherings or a satisfying weeknight meal.
  • Cuisine: Rooted in Mediterranean influences, thanks to its use of olive oil, lemon, and fresh veggies, this recipe embraces wholesome flavors.
  • Cost: With affordable ingredients that are easily accessible, this dish offers great value without compromising on flavor or nutrition.
  • Season: Lemon Salmon is a fantastic year-round dish that can be enjoyed in any season, particularly during spring and summer for its freshness.
  • Occasion: This recipe is perfect for various occasions, from casual family dinners to more upscale gatherings.

Why You’ll Love This Recipe

The taste of Lemon Salmon with Crispy Potatoes and Broccoli is utterly compelling. The rich, buttery flavor of the salmon blends beautifully with the acidity of the lemon, enhancing the fresh, savory elements without overpowering them. Each bite is a rich combination of flavors that appeals to both children and adults. The texture remains varied throughout the dish, from the crunch of the potatoes to the softness of the fish, offering an exciting eating experience.

Convenience is another major selling point of this meal. With a total preparation and cooking time of just 40 minutes, you can serve a wholesome dinner without spending all evening in the kitchen. The simplicity of the steps allows for a relaxed cooking experience, making it perfect for busy weeknights when you still want something impressive to serve.

Health benefits abound in this recipe. Salmon is an excellent source of Omega-3 fatty acids, which are essential for heart health. Broccoli adds vitamins K and C to the mix, forming a meal that is not only delicious but also nourishing. Including crispy potatoes provides necessary carbohydrates, making this dish a balanced option for anyone seeking nutritious meals.

There’s a social aspect wrapped up in this recipe as well. Preparing and sharing this meal can be a delightful experience with family or friends. The vibrant colors and flavors invite conversation and enjoyment at the dinner table, fostering a sense of community and togetherness.

Cost-effectiveness makes this recipe an even more desirable option. With ingredients that are not only budget-friendly but also versatile, you can use leftovers for other meals throughout the week. With just a few simple ingredients, you’re able to create a gourmet-quality dish at home.

Historical Background and Cultural Significance

The origins of salmon as a staple food trace back to ancient cultures along coastal regions. These societies understood the importance of nutritious seafood as part of their daily sustenance and traditions. The infusion of lemon in cooking has Mediterranean roots, where the balance of acidity is valued to elevate flavors in various dishes.

Culturally, fish dishes are often celebrated in numerous cuisines around the world. Salmon’s rich taste and versatility have made it a prime candidate for countless adaptations and variations. The balance of lemon and salmon reflects the typical Mediterranean focus on fresh, wholesome ingredients and seasonal produce.

Over the years, the recipe for lemon salmon has evolved into different forms, incorporating various herbs and spices, adapting to regional preferences and ingredient availability. This dish reflects the dynamic nature of cooking, where traditional recipes meet contemporary tastes and preferences, continuing to evolve with time.

Regional variations abound, with different culinary traditions incorporating local flavors and techniques into salmon recipes. From Asian-style grilled salmon infused with ginger and sesame to Scandinavian preparations that celebrate dill, there are endless possibilities to explore within this beloved dish.

Ingredient Deep Dive

Salmon: Salmon is not just a delicious fish; it has cultural significance spanning many ancient civilizations. Known for its rich flavor and high nutrient content, it serves as a symbol of prosperity in many indigenous populations. Nutritionally, salmon is high in Omega-3 fatty acids, protein, and essential vitamins. When selecting salmon, look for firm, shiny fillets and avoid those with dark spots. For storage, keep it refrigerated for up to two days or freeze it for longer preservation.

Potatoes: Potatoes have a rich history, first cultivated in Peru and later spreading globally. They are a versatile staple in many diets, praised for their affordability and satiety. Potatoes are a great source of carbohydrates, Vitamin C, and potassium. Choose potatoes that are smooth and firm to the touch, avoiding any soft or sprouting ones. For freshness, store them in a cool, dark place. You can substitute regular potatoes with sweet potatoes for a twist on the dish.

Broccoli: Broccoli, part of the cruciferous family, boasts an interesting history rooted in the Mediterranean. Known for its cancer-fighting properties, it holds significant nutritional value, being rich in vitamins C, K, and fiber. When selecting broccoli, look for tight, dark green florets and avoid any with yellowing. Store broccoli in the refrigerator for up to a week, and consider blanching it before freezing to retain its color and nutrients.

Common Mistakes to Avoid

  • Choosing the wrong cut of salmon: Opt for fresh salmon fillets, avoiding frozen or previously thawed, which may alter texture and taste.
  • Overcooking the salmon: Salmon should be cooked to a medium level, resulting in a juicy texture rather than dry and flaky.
  • Skipping seasoning: Proper seasoning enhances the flavors; don’t shy away from salt, pepper, and even a dash of garlic for added depth.
  • Ignoring potato size: Ensure potato pieces are uniform in size for even cooking; larger pieces will take longer to crisp up.
  • Not preheating the skillet: Cook the salmon on a preheated skillet to achieve that sought-after crust; a cold pan can ruin texture.
  • Overcrowding the pan: If too many ingredients are in one pan, they may steam instead of crisp; it’s better to cook in batches if necessary.
  • Rushing the cooking process: Give the ingredients time to develop flavors and achieve a perfect caramelization.
  • Neglecting to zest the lemon: Lemon zest enhances the flavor profile significantly, so incorporate it for an added brightness.
  • Removing the broccoli too early: Broccoli should be steamed just until tender but still vibrant; overcooking can lead to mushiness.
  • Forgetting about resting time: Allowing salmon to rest after cooking helps to redistribute the juices for a more tender bite.

Essential Techniques

Pan-searing salmon: This technique is essential for creating a beautifully browned exterior while maintaining moist, flaky flesh inside. Start by ensuring your skillet is hot, and place the salmon skin-side down for the best results. Avoid moving it too much, allowing a crust to form. The visual cue for doneness includes a change in color from dark pink to a lighter hue as it cooks through.

Making crispy potatoes: To achieve the ultimate crispiness, it’s crucial to cut potatoes into even pieces and boil them briefly before frying. After boiling, ensure you dry them thoroughly; excess moisture can lead to sogginess. Flash frying them in hot oil creates a delightful texture. Use visual cues such as a golden color and audible crunch before removing from the heat.

Pro Tips for Perfect Lemon Salmon with Crispy Potatoes and Broccoli

Utilize fresh ingredients for the best flavor; fresh salmon and seasonal vegetables can elevate your dish significantly.
Consider marinating the salmon in lemon juice and herbs for an extra flavor boost; even 30 minutes will impart a lovely aroma.
Opt for Yukon gold potatoes; their creamy texture is ideal for achieving crispy golden results.
Experiment with different herbs, such as dill or parsley, for varied flavor profiles; these herbs pair wonderfully with salmon.
For a twist, add garlic cloves while roasting potatoes to infuse beautiful depth and fragrance.
Cook the broccoli separately to maintain ideal texture; overcooked broccoli can be unappealing and lose essential nutrients.
Ensure to rest the salmon before cutting; this redistributes the juices, leading to a more flavorful and moist piece.
Don’t waste citrus: use leftover lemon zest in other dishes to make the most of your ingredients.

Variations and Adaptations

Regional variations: Explore miso-marinated salmon for a Japanese twist or an herb-crusted version for a Mediterranean flair. These adaptations introduce exciting new flavor profiles to your dish.

Seasonal adaptations: Swap out broccoli for seasonal greens like asparagus in the spring or Brussels sprouts in the fall; these changes keep the dish fresh and exciting year-round.

Dietary modifications: Make this meal entirely gluten-free by ensuring that no processed sauces are included. You can also replace the potatoes with a low-carb alternative like cauliflower for a keto-friendly version.

Flavor variations: For spice lovers, add a pinch of chili flakes to the lemon butter sauce or marinade; this brings in a delightful heat that complements the richness of the salmon.

Texture modifications: Instead of oven-roasting, try grilling the salmon and potatoes for a smoky flavor and excitement in texture, enhancing the overall dish.

Presentation alternatives: For a gourmet touch, serve the dish on a large platter, drizzling the lemon butter over the whole meal for an upscale dining experience.

Serving and Presentation Guide

When plating, ensure you create a thoughtful arrangement of salmon, where each fillet slightly overlaps on one side. Accompany with the crispy potatoes on one side and a generous heap of broccoli on the other. Garnish with freshly chopped herbs, such as parsley or dill, for pop and aroma. A lemon wedge on the side brightens the presentation and allows diners to customize the flavor.

Consider using white or colorful plates that contrast with the vibrant colors of the dish, enhancing visual appeal. For an added flourish, drizzle a bit of the lemon butter sauce over the potatoes and broccoli just before serving for a glossy finish.

Temperature is crucial; serve the salmon immediately upon cooking to ensure it maintains its juicy texture. Plate and serve while hot for the best possible experience. Portion control is also essential; aim for about 4-6 ounces of salmon per person, with a generous serving of vegetables to create a balanced plate.

Wine and Beverage Pairing

For wine pairings, a crisp Sauvignon Blanc or a light Pinot Grigio complements the lemony salmon beautifully, cut through richness, enhancing the fresh flavors of the dish. A chilled Chardonnay can also work wonderfully, contributing a creamy finish that pairs well with salmon.

Non-alcoholic alternatives include sparkling water infused with citrus for a refreshing touch, making the meal feel bright and lively. Herbal teas, particularly chamomile or green tea, can also work well, echoing the freshness of the dish.

If you’re looking to serve coffee with the meal, a light roast with citrus notes can sync delightfully with the lemon flavors. Make sure all beverages are served chilled or at the appropriate temperatures to enhance the overall dining experience.

Storage and Shelf Life

To maximize the longevity of your Lemon Salmon with Crispy Potatoes and Broccoli, store any leftovers in airtight containers. Refrigerate them promptly after cooling for up to three days. Ensure that the salmon is stored separately from potatoes and broccoli, as they can absorb moisture and ruin texture.

For longer storage, consider freezing the salmon separately; it can last up to three months in the freezer. Reheat gently in the oven or on a stovetop to avoid overcooking. Be cautious with reheating broccoli, as it can become mushy; it’s best enjoyed freshly cooked.

Check for any signs of spoilage before consuming leftovers; salmon should not have an off smell, and the texture should remain firm. If potatoes have turned overly soft or mushy, it’s best to discard them for safety.

Make Ahead Strategies

To create a stress-free dinner, consider prepping the ingredients the day before. Cut the potatoes and broccoli, and store them in the fridge. Pre-marinate the salmon in lemon juice and herbs overnight for optimal flavor enhancement, allowing each bite to be infused with zest.

On the day of serving, all you need to do is cook the components. This reduces preparation time significantly and allows you to focus on bringing together the dish with perfection.

Another tip is to roast the potatoes in advance, allowing them to cool and then reheating them quickly in the oven to retain their crunch. As for the salmon, avoid cooking it until just before serving to guarantee freshness and quality.

Fresh elements like herbs or citrus can be added just before serving, ensuring they retain brightness and vibrancy, enhancing the meal’s freshness.

Scaling Instructions

Scaling your Lemon Salmon recipe up or down is easy! To halve the recipe, simply divide all ingredient quantities by two, adjusting cooking times as necessary to ensure that everything cooks evenly.

When doubling or tripling the dish, consider the size of your cooking equipment; you may need to cook in batches, especially for the salmon and potatoes to avoid overcrowding the pan.

Timing will adjust slightly since larger portions may require a bit longer in the oven or skillet, or may need to be done in steps to achieve that perfect crisp. Also, keep in mind that if you scale the recipe, tasting while cooking becomes crucial, as increased ingredients might require further seasoning.

Storing considerations are essential; more servings may mean larger containers, and ensuring you properly cool and store for future meals is important to maintain quality.

Nutritional Deep Dive

Analyzing the nutrition of Lemon Salmon with Crispy Potatoes and Broccoli reveals a well-rounded meal. A standard serving typically yields approximately 400-500 calories, depending on portion sizes. The salmon provides high-quality protein essential for tissue repair and muscle growth while delivering healthy fats.

For macronutrient breakdown, expect 30-35 grams of protein and a balanced amount of carbs, primarily from the potatoes which contribute around 45 grams. The combination of broccoli adds substantial dietary fiber, keeping the meal filling and aiding digestive health.

In terms of micronutrients, this dish provides significant vitamins such as B vitamins from the salmon, Vitamin C from the broccoli, and potassium and fiber from the potatoes. This makes it a valuable meal for overall health and wellbeing, supporting various bodily functions.

Consider portioning carefully if weight management is a focus. This recipe can be easily adjusted with more veggies and less oil to lower calorie count while keeping the flavor intact.

Dietary Adaptations

This Lemon Salmon recipe can easily be tailored to fit various dietary needs. For gluten-free diners, simply ensure that no sauces or additional ingredients contain gluten, making the dish safe for those with sensitivities.

Dairy-free eaters can skip any butter in the recipe and replace it with olive oil, providing a plant-based alternative while keeping the dish flavorful. For vegan adaptations, consider swapping salmon for a plant-based protein like marinated tofu or grilled eggplant.

A low-carb or keto-friendly version can be achieved by replacing potatoes with cauliflower or zucchini noodles, while still maintaining a satisfying, hearty aspect to the meal.

Paleo diet followers can indulge by ensuring the use of minimally processed ingredients and avoiding any dairy or grains.

Flavor variations can offer different twists on the recipe too; try spicing up the salmon with Cajun seasoning, or using different herbs to suit various dietary preferences.

Troubleshooting Guide

Encountering texture issues with salmon? If it appears dry, it may have been overcooked; use a thermometer to ensure it stays at 145°F internally for optimal doneness.

For flavor balance, if the dish feels lacking, consider adjusting seasoning levels, particularly salt and herbs, as they can enhance the overall flavor profile significantly.

If there are temperature problems, preheating your cooking surfaces is crucial; a cold oven or skillet can lead to uneven cooking results, affecting both texture and taste.

If you run into equipment challenges like a sticky pan, ensure it’s properly seasoned or use non-stick cookware for best results; this change will improve both cooking and clean-up.

Ingredient substitutions might lead to something unexpected; if an herb or spice is replaced, ensure it’s complimentary to the dish to preserve balance.

Lastly, if timing concerns arise, we recommend preparing all ingredients in advance to streamline cooking; it’s key for maintaining freshness and efficiency.

Recipe Success Stories

Community feedback on the Lemon Salmon with Crispy Potatoes and Broccoli has been overwhelmingly positive, with many sharing their successful adaptations. Whether it be through experimenting with different spices or side dishes, readers have personalized the recipe to great effect.

Several readers have shared success stories involving variations such as using sweet potatoes in place of standard ones, adding an element of sweetness that complements the salmon beautifully.

Adaptation tales often highlight readers’ creative substitutions for dietary restrictions, such as swapping the salmon for chickpeas, resulting in a delightful vegan alternative that still carries the essence of the original dish.

Photography tips from readers suggest using bright, natural light to capture the dish’s vibrant colors, with creative angles that highlight the meal’s freshness and to engage the audience on social media.

With this recipe, many families have reported it becoming a weekly staple, lauding its ease and the wholesome nature of the meal which satisfies cravings without guilt.

Frequently Asked Questions

1. Can I use frozen salmon for this recipe? Absolutely! Just be sure to thaw it completely before cooking for the best texture and flavor.

2. What are the best types of salmon for this dish? Both wild-caught and farmed salmon varieties work beautifully, with sockeye and king salmon being particularly flavorful.

3. How can I make the potatoes extra crispy? Boil them first, then dry and roast them at a high temperature to create the perfect crisp.

4. Can I prepare this dish in advance? While it’s best served fresh, you can prep the ingredients ahead of time and simply assemble before cooking.

5. What can I substitute for broccoli? Asparagus, green beans, or Brussels sprouts are great alternatives that cook similarly.

6. How do I reheat the leftovers without compromising quality? Gently reheating in the oven or on a skillet will preserve the texture much better than a microwave.

7. Is this dish suitable for meal prep? Yes! It actually reheats well and maintains a good taste, making it perfect for healthy meal prep.

8. Can I add other vegetables? Yes! Carrots, bell peppers, or zucchini would also pair well with this dish.

9. What’s the best way to store this meal? Store leftover potatoes, salmon, and broccoli in separate airtight containers to maintain freshness.

10. How can I boost the flavor further? Consider adding fresh herbs or items such as capers to intensify the sauce flavors.

Additional Resources

For those looking to expand their culinary repertoire, check out similar recipes that highlight fish, such as Garlic Butter Shrimp or Mediterranean Baked Cod. These options incorporate delightful seafood flavors with easy preparation, making them wonderful additions to any meal rotation.

Consider technique guides on how to properly handle and cook fish, as well as ingredient information that dives deeper into the nutritional aspects of seafood.

Enhance your kitchen with equipment recommendations such as quality non-stick pans or essential knives for efficient food prep.

To keep your meals exciting throughout the year, explore seasonal variations that maximize flavor and freshness while aligning with citrus seasons and available produce.

Join the Conversation

We invite you to share your Lemon Salmon success stories on social media! Tag us in your photos and let your community know how you personalized the recipe to fit your style.

Reception stories and reviews offer a glimpse into how others enjoyed the dish and provide great tips for those looking to try it for the first time.

Engage with fellow cooking enthusiasts and exchange suggestions or variations; together, we can celebrate all things culinary!

Your unique adaptations can inspire those around you, creating a community that values delicious and healthy cooking.

The Recipe

Lemon Salmon with Crispy Potatoes and Broccoli

Serves: 4

Prep Time: 15 mins

Cook Time: 25 mins

Total Time: 40 mins

Kitchen Equipment Needed

  • Non-stick skillet
  • Baking sheet
  • Pot for boiling
  • Cutting board
  • Sharp knife

Ingredients

  • 4 salmon fillets
  • 2 medium Yukon gold potatoes, cut into wedges
  • 2 cups broccoli florets
  • 2 tablespoons olive oil
  • 2 tablespoons unsalted butter
  • Juice and zest of 1 lemon
  • Salt and pepper, to taste
  • Fresh herbs (optional, for garnish)

Directions

  1. Preheat the oven to 425°F (220°C).
  2. Boil the potato wedges for 5 minutes, then drain and dry thoroughly.
  3. Spread the potato wedges on a baking sheet, toss with olive oil, salt, and pepper, then roast for 20 minutes until crispy.
  4. Meanwhile, heat a non-stick skillet over medium heat with butter.
  5. Season salmon fillets with salt and pepper; when the skillet is hot, add salmon skin-side down.
  6. Cook for 4-5 minutes, then carefully flip and cook for another 3-4 minutes until just cooked through.
  7. In the last few minutes, steam or blanch the broccoli until bright green and tender.
  8. Drizzle lemon juice and zest over the salmon just before serving.
  9. Plate salmon with crispy potatoes and broccoli; garnish with fresh herbs if desired.

Recipe Notes

  • For added flavor, marinate the salmon in lemon juice and herbs for 30 minutes prior to cooking.
  • Feel free to use any seasonal vegetables or adjust vegetables according to preferences.
  • This dish reheats well, making it self a great option for meal prep.

Easy BBQ Chicken and Sweet Potato Foil Packets Recipe

BBQ Chicken and Sweet Potato Foil Packets – Easy Dinner Recipe

⚖️
Difficulty
Easy

⏲️
Prep Time
15 mins

🕒
Cook Time
30 mins

⏱️
Total Time
45 mins

🍽️
Servings
4

BBQ Chicken and Sweet Potato Foil Packets are the perfect solution for a busy weeknight dinner. These flavorful packets bring together juicy chicken and sweet potatoes, infused with your favorite barbecue sauce. You can pop them into the oven or on the grill for a hassle-free meal that’s ready in no time. The simplicity of preparing this dish in foil means minimal cleanup, allowing you to enjoy delicious food while saving time on the more tedious kitchen tasks.

This recipe not only satiates your hunger but also tantalizes your taste buds. The combination of smoky barbecue flavors with the natural sweetness of sweet potatoes creates a delightful flavor profile. Imagine biting into tender chicken, with the juices mingling perfectly with the sweet potato—pure bliss! It’s a wholesome meal that can easily accommodate various dietary preferences, making it an excellent addition to your recipe arsenal.

Quick Recipe Highlights

  • Flavor Profile: Bold barbecue sauce meets sweet and earthy sweet potatoes for a well-balanced taste.
  • Texture: The chicken is tender while the sweet potatoes become soft and slightly caramelized.
  • Aroma: Rich, smoky barbecue aromas fill the air, accompanied by the sweet scent of roasted sweet potatoes.
  • Visual Appeal: Vibrant orange from the sweet potatoes contrasts beautifully with the charred chicken for an eye-catching dish.
  • Skill Level Needed: Requires basic cooking skills; perfect for novice cooks and seasoned chefs alike.
  • Special Equipment: You’ll need aluminum foil, a baking sheet or grill, and basic cooking utensils.

Recipe Overview

  • Difficulty Level: This dish is easy to prepare and does not require any complex cooking techniques, making it accessible to everyone.
  • Category: Ideal for a quick weeknight dinner or a casual outdoor barbecue gathering.
  • Cuisine: Celebrates American barbecue flavors while incorporating a healthy twist with sweet potatoes.
  • Cost: The ingredients are commonly found and budget-friendly, making it a cost-effective meal option.
  • Season: BBQ Chicken and Sweet Potato Foil Packets are perfect during spring and summer when outdoor grilling is popular.
  • Occasion: Suitable for family dinners, picnics, or casual get-togethers.

Why You’ll Love This Recipe

One of the most appealing aspects of BBQ Chicken and Sweet Potato Foil Packets is the incredible taste and texture. Juicy chicken drenched in sweet and tangy barbecue sauce plays harmoniously with roasted sweet potatoes, which add a creamy richness to each bite. The contrasting flavors create a delightful fusion that satisfies even the pickiest eaters and ensures every family member comes back for seconds.

Convenience is another significant benefit of this recipe. The preparation is as simple as chopping the vegetables and marinating the chicken. By wrapping the ingredients in foil, you create a self-contained cooking environment that offers great results without needing constant attention. This makes it an ideal choice for those who appreciate delicious homemade meals without the labor-intensive process.

Nutritionally, this dish stands out as a wholesome option. Chicken provides a lean source of protein, while sweet potatoes are packed with vitamins A and C, along with dietary fiber. This delicious combination helps keep you full while nourishing your body with essential nutrients, making it suitable for a health-conscious diet.

Apart from being delicious and nutritious, BBQ Chicken and Sweet Potato Foil Packets are social and entertaining-friendly. They can serve as a centerpiece during gatherings, inviting guests to dig in and share their cooking experiences. Each foil pack is an individual portion, resulting in a casual yet engaging dining experience where everyone can enjoy their unique flavors.

Finally, this recipe shines in terms of cost-effectiveness. The ingredients are easy to find and won’t break the bank. This dish is perfect for families looking to prepare an affordable, satisfying meal in a pinch, allowing you to enjoy delicious food without overspending.

Historical Background and Cultural Significance

BBQ cuisine has deep roots in American history, originating from indigenous cooking methods that involved slow-cooking meat over an open flame. Over the centuries, barbecue has evolved, adopting various regional styles and flavors influenced by cultural migration. Today, barbecue is celebrated across the nation, with each region boasting its unique take on the classic dish.

The cultural importance of barbecue extends beyond just the food itself; it represents community, celebration, and togetherness. Families and friends gather around grills during summer holidays, sharing laughter and stories while enjoying their flavorful creations. BBQ food often symbolizes relaxation and leisure, making it a cherished staple in American culinary traditions.

This recipe also highlights the evolution of barbecue, where fusion cooking meets traditional methods. The combination of sweet potatoes adds a modern twist, integrating healthy, seasonal ingredients while preserving the depth of authentic barbecue flavor. This evolution showcases how recipes can adapt over time, catering to changing tastes and dietary preferences.

Additionally, regional variations of barbecue keep the tradition vibrant. From tangy mustard-based sauces in South Carolina to sweet and thick sauces from Texas, everyone has their favorite. This recipe’s emphasis on versatility allows you to explore these barbecue styles and incorporate unique flavors that celebrate this diverse culinary heritage.

Ingredient Deep Dive

– Chicken: This versatile protein is a staple in various global cuisines, providing an excellent source of lean protein. When selecting chicken, opt for organic or free-range options to ensure quality and taste. Nutritionally, chicken is low in fat and high in essential nutrients, making it a great choice for healthy meals. Store it properly in the fridge or freezer to maintain freshness, and feel free to substitute with turkey for a lighter option.

– Sweet Potatoes: Belonging to the morning glory family, sweet potatoes are rich in vitamins A and C and dietary fiber. Their natural sweetness beautifully complements savory dishes. When selecting sweet potatoes, look for firm, smooth-skinned ones without blemishes. Store them in a cool, dark place to avoid sprouting. If necessary, you can substitute with regular potatoes or butternut squash.

– Barbecue Sauce: This condiment is a significant component that brings the dish’s flavor to life, often made from tomatoes, vinegar, and spices. Numerous regional styles offer diverse flavors, from sweet to tangy. Choose a sauce that matches your taste preference, and for a healthier option, consider making your own. Store barbecue sauce in the fridge after opening, and remember you can adapt it with herbs or fruit for unique flavors.

Common Mistakes to Avoid

  • Not preheating the grill or oven: Preheating is crucial for even cooking.
  • Using low-quality barbecue sauce: Invest in a good sauce to enhance the flavor.
  • Overcrowding foil packets: Ensure there’s enough space for heat circulation for thorough cooking.
  • Neglecting marination time: Allowing chicken to marinate lets flavors develop more significantly.
  • Cutting chicken before resting: Let the chicken rest before slicing to retain its juices.
  • Ignoring cooking times: Use a meat thermometer to avoid undercooking or overcooking chicken.
  • Forgetting to seal foil packets well: Seal tightly to lock in moisture and flavors.
  • Chopping vegetables unevenly: Uniform cuts ensure even cooking and better texture.
  • Not checking for doneness: Always check your chicken and sweet potatoes with a fork or thermometer.
  • Using the wrong type of foil: Non-stick aluminum foil is ideal for easy cleanup.

Essential Techniques

Cooking in foil is a key technique that helps trap moisture, preventing ingredients from drying out. To master this, ensure that each packet is securely sealed, capturing as much steam as possible during cooking. Visual cues for success include steam escaping when initially cooking, which indicates that the ingredients are cooking correctly.

Marinating chicken enhances flavor and tenderness. For best results, allow it to marinate for at least 30 minutes, or even overnight for robust flavor development. The key to mastering marination lies in balancing the right amount of acid and seasoning. Look for a well-distributed coating over the chicken as a sign of proper marination.

Grilling or baking your foil packets requires a good heat source for evenly cooked chicken. It’s essential to find a temperature that allows the chicken to reach an internal temperature of 165°F without burning the contents. Pay attention to flare-ups if grilling, and adjust the packet location to avoid direct flames.

Pro Tips for Perfect BBQ Chicken and Sweet Potato Foil Packets

1. Choose high-quality protein and fresh vegetables for the best taste.
2. Experiment with different barbecue sauces for varying flavor profiles.
3. Add herbs like rosemary or thyme for a fresh flavor kick.
4. Ensure even slices of sweet potatoes for uniform cooking.
5. Use a thermometer to check the doneness of the chicken perfectly.
6. Double up on foil if using thinner sheets for added strength.
7. Let the packets rest for a few minutes post-cooking for enhanced flavors.
8. Get creative with additional vegetables like bell peppers or onions.

Variations and Adaptations

Regional variations of BBQ Chicken and Sweet Potato Foil Packets can introduce support local tastes. For instance, use a tomato-based southern BBQ sauce or a mustard-based sauce from the Carolinas for distinct flavor experiences.

Seasonal adaptations can also be incorporated. In the fall, consider adding hearty root vegetables or Brussels sprouts, whereas in summer, zucchini and corn can add freshness.

For dietary modifications, substitute the chicken with firm tofu or tempeh for a vegan option or even use jackfruit for a plant-based BBQ alternative.

Flavor variations may include smokiness by adding smoked paprika or chili powder, while texture modifications can involve adding nuts or seeds for crunch.

In terms of presentation, consider serving the foil packets on a wooden board for a rustic look, or brighten them up with colorful edible flowers or fresh herbs.

Serving and Presentation Guide

For an impressive serving, remove the foil packets carefully, allowing steam to escape. Serve them on a rustic wooden board or colorful plates. Garnish with freshly chopped herbs to enhance their visual appeal.

Traditionally, these foil packets are paired well with coleslaw or a light green salad. Modern suggestions include serving them with a side of buttered rice or quinoa for a complete meal.

Temperature considerations are crucial; serve the foil packets warm to preserve flavors. Portion control can be achieved by removing only what is needed and keeping the rest in foil until you’re ready to serve.

Wine and Beverage Pairing

Pair BBQ Chicken and Sweet Potato Foil Packets with a fruity red wine such as Zinfandel or a light-bodied wine like Pinot Noir, which complements the smoky flavors. For non-alcoholic alternatives, consider refreshing iced tea or lemonade, both of which provide a sweet contrast to the savory dish.

Temperature considerations for wines demand serving them slightly chilled to enhance flavor profiles without overwhelming spices. For tea, serve it chilled with a sprig of mint to maintain freshness.

Storage and Shelf Life

When it comes to storage, ensure that leftover foil packets are cooled down before transferring them to airtight containers. Store them in the refrigerator for up to 3 to 4 days. For longer storage, consider freezing individual servings; they typically last for up to three months in the freezer.

To reheat, using an oven or air fryer works best to maintain the original texture. Always check for signs of spoilage, such as off-smells or discoloration, before consuming leftovers.

Make Ahead Strategies

To optimize preparation time, consider making the foil packets in advance. Assemble your chicken and sweet potatoes a few hours before cooking to allow flavors to meld. Store them in the refrigerator until you’re ready to cook.

Quality is generally not impacted if you carefully prepare and refrigerate the packets. Assembling in advance allows for quick cooking on busy nights or during gatherings.

For reheating, make sure to add a splash of water or extra barbecue sauce to maintain moisture before cooking, ensuring that flavors are preserved.

Scaling Instructions

Halving the recipe is straightforward; simply adjust the ingredient portions while remembering to keep the cooking time similar.

For larger gatherings, doubling or tripling the recipe is effective. Ensure to use larger foil sheets and increase the baking time slightly, as larger packets may require additional minutes in the oven or on the grill.

Make sure you have sufficient cooking equipment, as a large number of packets may necessitate multiple baking sheets or grates. Timing might need adjustments, particularly if cooking in batches, so monitor the doneness levels accurately.

Nutritional Deep Dive

The macro breakdown of this recipe features high lean protein content from the chicken and complex carbohydrates from the sweet potatoes. A single serving provides a substantial amount of dietary fiber essential for digestive health.

In terms of micronutrients, sweet potatoes are rich in vitamins A and C, which contribute to a healthy immune system. Chicken contributes essential B vitamins for energy metabolism.

For those considering health benefits, this recipe supports weight management by combining lean protein with fiber-rich complex carbohydrates that encourage satiety.

Portion analysis is key to maintaining balance in one’s diet, and in sharing this meal, individual portions can help manage serving sizes and promote mindful eating.

Dietary Adaptations

To make this dish gluten-free, simply substitute any sauces that may contain gluten and ensure no cross-contamination occurs during preparation.

For dairy-free options, it already naturally fits into those dietary restrictions, making it suitable for those avoiding dairy products.

Vegans can replace chicken with marinated tofu or tempeh slices, ensuring that the BBQ flavor is still present.

For low-carb or keto diets, feel free to replace sweet potatoes with cauliflower, which will yield a similar preparation method while keeping carb counts low.

Paleo followers can enjoy this dish as is, focusing on whole food ingredients. Low-FODMAP adaptations can be made by skipping any high-FODMAP vegetables or sauces.

Troubleshooting Guide

Texture issues can arise if sweet potatoes are not cut evenly, resulting in some being overcooked while others remain hard. Ensure uniform cuts for consistency in cooking.

For flavor balance, if too much barbecue flavor overwhelms the chicken, consider adding additional herbs or spices to enhance the overall profile.

Temperature problems may stem from an uneven grill or oven, impacting cooking time. Rotate packets halfway through cooking for even results.

Equipment challenges often include having thin foil that might tear, so using double layers can help avoid issues during cooking.

Ingredient substitutions can also lead to unexpected results, so always consider best practices for swapping out flavors. Timing concerns during busy dinner hours might require having items prepped in advance for efficiency.

Recipe Success Stories

We’ve seen numerous community feedback praising the flavor combination and ease of preparation of this recipe. Many readers have shared their stories of family gatherings where these packets stole the show.

Variation successes have flourished, with some readers sharing their innovative ingredients, such as adding pineapple for a tropical twist or using grilled vegetables for added nutrition.

Adaptation stories also abound, with families adjusting the recipe to cater to dietary needs while still finding it delicious, proving the recipe’s versatility and appeal across different communities.

Photographic tips are shared among readers, helping inspire others with attractive plating and presentation ideas to showcase their dinner creations on social media channels.

Frequently Asked Questions

Can I use frozen chicken for this recipe?

Yes, but ensure to thaw it completely before marinating to allow for even flavor absorption and ensure it cooks thoroughly during preparation.

What other vegetables can I add to the foil packets?

You can include a variety of vegetables, such as bell peppers, onions, zucchini, or even corn for added flavor and texture. Just make sure to cut them to a similar size for even cooking.

Can I bake these packets in the oven?

Absolutely! Preheat your oven to 400°F (200°C) and cook the packets on a baking sheet for 25-30 minutes until the chicken is cooked through and sweet potatoes are tender.

How can I make these vegan?

Replace the chicken with marinated tofu or tempeh and ensure your barbecue sauce is free of animal products. Add in extra vegetables for a satisfying meal.

What’s the best way to store leftovers?

Cool the leftover packets and store them in airtight containers. They can last in the fridge for about 3-4 days or can be frozen for up to three months.

Can I use store-bought barbecue sauce?

Yes, feel free to use any store-bought barbecue sauce that you enjoy. You can also spice it up with additional herbs or spices to customize the flavor.

How do I know when the chicken is fully cooked?

The internal temperature should reach 165°F (75°C). A meat thermometer is a handy tool to ensure safety and proper cooking.

What can I serve with these foil packets?

Side dishes that pair well include coleslaw, green salads, or grilled corn. You can also add a side of rice or quinoa for a more substantial meal.

Can I prep these packets in advance?

Yes! You can assemble them a few hours before cooking. Just keep them refrigerated until you are ready to cook for best results.

How do I prevent the packets from sticking?

Using non-stick aluminum foil is ideal, or be sure to spray regular foil with a cooking spray before adding the ingredients to avoid sticking.

What’s the best method to reheat leftovers?

The best method is to use an oven or air fryer, which helps to keep the chicken tender while rewarming. Avoid microwaving if possible, as that can dry it out.

Additional Resources

For those looking to expand their culinary repertoire, consider exploring related recipes that feature grilling and foil cooking. Technique guides on marinating proteins or preparing vegetables can also enhance your skills.

Ingredient information about sweet potatoes and chicken offers valuable insights into their nutritional benefits and best preparation methods. For equipment recommendations, investing in quality cookware can elevate your cooking experience.

Seasonal variations based on ingredient availability can inspire creative adjustments to the dish, creating a new twist on a beloved recipe.

Join the Conversation

We invite you to share your cooking experiences on social media! Posting your beautiful photogenic plates encourages community engagement, allowing others to be inspired by your creativity.

Photography tips and tricks can help improve your food photography skills, showcasing your delicious creations in the best light. Recipe reviews and feedback provide valuable insights to others who are eager to try out BBQ Chicken and Sweet Potato Foil Packets.

Feel free to suggest adaptations or variations you have tried, contributing to a growing community of food lovers and recipe enthusiasts who discover new ways to enjoy this dish.

The Recipe

BBQ Chicken and Sweet Potato Foil Packets

Serves: 4

Prep Time: 15 mins

Cook Time: 30 mins

Total Time: 45 mins

Kitchen Equipment Needed

  • Aluminum foil
  • Baking sheet or grilling grate
  • Meat thermometer

Ingredients

  • 4 boneless, skinless chicken breasts
  • 2 large sweet potatoes, cut into 1-inch cubes
  • 1 cup of your favorite barbecue sauce
  • 1 tablespoon olive oil
  • Salt and pepper to taste
  • Optional: Fresh herbs for garnish

Directions

  1. Preheat the grill or oven to 400°F (200°C).
  2. In a large bowl, combine the sweet potatoes with olive oil, salt, and pepper.
  3. Cut four large pieces of aluminum foil, about 12 inches long. In the center of each piece, place a chicken breast and pour over the barbecue sauce.
  4. Add the seasoned sweet potatoes around the chicken, then fold the foil into packets, sealing tightly.
  5. Place the foil packets on the grill or baking sheet and cook for 25-30 minutes, or until the chicken is thoroughly cooked and sweet potatoes are tender.
  6. Carefully remove from the heat, let rest for a few minutes, then unwrap and serve, garnishing with fresh herbs if desired.

Recipe Notes

  • Adjust the barbecue sauce amount based on your taste preference.
  • Add other vegetables according to seasonal availability.
  • If cooking on a grill, keep an eye out for flare-ups.

Succulent Braised Lamb Shanks with Delectable Vegetables Recipe

Braised Lamb Shanks with Vegetables: A Comfort Food Delight

⚖️
Difficulty
Moderate

⏲️
Prep Time
30 mins

🕒
Cook Time
2 hours

⏱️
Total Time
2.5 hours

🍽️
Servings
4 servings

If you’re looking for a dish that embodies the heart of home cooking, look no further than this Braised Lamb Shanks with Vegetables. This recipe brings together succulent lamb shanks, tender root vegetables, and aromatic herbs, all simmered to perfection. The melt-in-your-mouth texture of the lamb is complemented by the richness of the braising liquid, creating a comforting dish that warms the soul. Perfect for chilly evenings, this hearty meal not only fills your stomach but also satisfies your spirit, making it a wonderful addition to any family’s dinner table.

With its rich flavors and superb aroma, Braised Lamb Shanks with Vegetables dazzles the senses with each bite. The savory notes of garlic and rosemary permeate the air while the lamb slowly cooks, drawing everyone into the kitchen with tantalizing anticipation. This dish truly embodies the essence of home-cooked meals and is perfect for both family gatherings and dinner parties, leaving everyone clamoring for seconds. The vibrant colors of the vegetables alongside the tender meat present a feast for the eyes, making this dish as visually appealing as it is delicious.

Quick Recipe Highlights

  • Flavor Profile: Rich, savory flavors with a hint of sweetness from the vegetables.
  • Texture: Melt-in-your-mouth tenderness of the lamb paired with the slight crunch of root vegetables.
  • Aroma: Inviting scents of herbs, garlic, and roasted meat fill the kitchen.
  • Visual Appeal: Beautiful, colorful presentation with bright root vegetables contrasting against the deep brown lamb.
  • Skill Level Needed: A moderate skill level is required to master braising techniques, but nothing too daunting for an eager home cook.
  • Special Equipment: A heavy-bottomed pot or Dutch oven for the best results.

Recipe Overview

  • Difficulty Level: This recipe falls into the moderate category due to its length and specific cooking techniques such as braising and multi-step preparations. However, the results are well worth the effort.
  • Category: This dish can be categorized under comfort food, perfect for family dinners or special occasions.
  • Cuisine: Rooted in Mediterranean culinary traditions, this dish showcases the use of aromatic herbs and slow-cooked meats.
  • Cost: Approximate costs can vary but expect to spend around $20 for a serving of four, considering quality ingredients for an unforgettable meal.
  • Season: Best enjoyed during the fall and winter months, when hearty meals are most comforting, but delicious any time of year.
  • Occasion: A perfect centerpiece for holiday dinners, festive gatherings, or cozy family nights.

Why You’ll Love This Recipe

Eating this Braised Lamb Shanks with Vegetables is a delightful experience for your taste buds. The combination of tender lamb and sweet, caramelized vegetables creates a complex yet balanced flavor profile that is satisfying and deeply rewarding. The intensity of the lamb, complemented by the earthiness of root vegetables, ensures each bite bursts with flavor. This dish perfectly demonstrates how braising brings out the best in ingredients, transforming the ordinary into the extraordinary.

Convenience is another major benefit of this recipe. Although it does require some time to prepare, much of that is passive as the lamb simmers away, allowing you to attend to other tasks or simply relax. Furthermore, it cooks in one pot, minimizing cleanup and letting you enjoy more time with loved ones. The result is an elegant meal that feels special without overwhelming your schedule.

Nutritionally, lamb is a great source of high-quality protein, vitamins, and minerals. When paired with nutrient-dense vegetables like carrots, potatoes, and onions, this dish becomes not only a comfort classic but also a wholesome option for your family. You can feel good knowing you’re feeding them an important selection of nutrients while still satisfying their cravings.

Sharing a meal like Braised Lamb Shanks with Vegetables enables you to create treasured memories with your friends and family. The communal aspect of gathering around a table to enjoy a beautifully presented dish enhances the enjoyment of the meal and the warmth of the occasion, providing an inviting atmosphere that nurtures connections.

In terms of cost, this dish is an exceptionally good value considering the quality of ingredients used and the satisfying results. With lamb being a pricier protein, the meal still works out economically when serving multiple people. The ability to freeze leftovers for later meals also adds to the dish’s appeal, ensuring you can enjoy this delicious recipe again without additional effort.

Historical Background and Cultural Significance

The tradition of braising meats can be traced back through many cultures, with lamb being a staple in Mediterranean and Middle Eastern cuisines. Historically, preparing lamb has played a significant role in celebrations, festivals, and everyday family life. The method of slow cooking lamb in liquid allows the flavors to meld beautifully, resulting in a dish that is as culturally rich as it is delicious.

In many Mediterranean households, lamb is viewed as a symbol of abundance and celebration. Dishes like Braised Lamb Shanks are often served during significant occasions, enhancing the flavor and warmth of gatherings with family and friends. The historic practice of slow cooking also aligns with cultural values of patience and attention to detail when cooking, producing superior culinary experiences.

Over time, the braising method has evolved, adapting to local ingredients and tastes, giving rise to various regional variations such as Moroccan tagines or Italian osso buco. Each version carries its unique twist, showcasing local herbs, spices, and cooking techniques that reflect the richness of the culture from which it originates.

Today, while recipes may vary, lamb shanks continue to represent opportunities for families to come together to create tradition and connection through cooking. Enjoying a dish like this Braised Lamb Shanks with Vegetables is not just about nourishment but is also about celebrating heritage and shared moments around the dining table.

Ingredient Deep Dive

Lamb shanks are a quintessential ingredient in many braising recipes, prized for their flavor and tenderness. Historically, they represent a sustainable cut of meat, often used in traditional dishes due to their fat content and connective tissue that break down during slow cooking. Nutritionally, lamb is an excellent source of protein, iron, and essential B vitamins, making it an integral part of balanced diets worldwide.

When selecting lamb shanks, always look for cuts that are firm and pink, with a decent amount of marbling to ensure juiciness. Storage is crucial; if not cooking immediately, refrigerate them tightly wrapped or freeze for longer preservation. For those seeking alternatives, beef shanks could provide similar richness but will slightly alter the dish’s intended flavor profile.

Root vegetables such as carrots, parsnips, and potatoes are commonly used to complement braised dishes. They not only absorb the flavors of the meat but also provide essential nutrients like fiber, vitamins, and minerals. Selecting vibrant, fresh vegetables will enhance the dish’s flavor and visual appeal, while proper storage in a cool, dark place will maintain their freshness for an extended period.

For substitutions, feel free to incorporate seasonal vegetables or test various herbs to personalize the flavor. Experimentation can lead to delightful new twists on this classic dish while ensuring that you include nutritious ingredients that suit your taste.

Common Mistakes to Avoid

  • Not seasoning adequately: Failing to season the lamb before browning can lead to bland results. Always ensure you use enough salt and pepper to enhance flavors.
  • Browning the meat insufficiently: Skipping the browning stage results in a lack of depth in flavor. Take the time to properly brown all sides of the lamb shanks in hot oil.
  • Overcrowding the pot: If you add too many shanks at once, they may steam instead of brown. Cook in batches if necessary to avoid this issue.
  • Choosing the wrong cut: Using lean lamb cuts will lead to dryness; always opt for shanks or similar cuts that are better for braising.
  • Not allowing enough cooking time: Rushing the braising process will leave the meat tough. Ensure it simmers long enough to become tender.
  • Insufficient liquid: Not adding enough liquid can lead to burning or insufficient braising. Always check that there is enough broth or wine covering the meat.
  • Ignoring herb selection: Using dried herbs instead of fresh can diminish flavor quality. Fresh herbs offer vibrant flavor to the dish.
  • Forgetting to skim fat: If you do not skim the excess fat off the surface during cooking, your sauce can become greasy, impacting texture.
  • Not letting the meat rest: Failing to rest the meat after cooking can lead to tough texture. Allow it to sit for a few minutes to lock in juices.
  • Not adjusting flavors at the end: Always taste and adjust seasoning before serving to elevate the dish’s final flavor.

Essential Techniques

Braising is a key technique in the recipe for Braised Lamb Shanks with Vegetables. This cooking method involves first browning the meat in hot oil to develop rich flavors and then cooking it slowly in a covered pot with a small amount of liquid. Mastering braising is essential as it allows tougher cuts of meat like lamb shanks to become wonderfully tender. To ensure success, invest time in browning the lamb and controlling the simmering temperature for even cooking.

Another important technique is preparing the vegetables correctly. A rough chop can create different textures and cooking times, impacting the final dish’s outcome. To master this, practice uniform cutting to ensure even cooking, and sauté them briefly before braising to layer the flavor. Pay attention to visual cues such as browning and wafting aromas to signal readiness and doneness throughout the process.

Pro Tips for Perfect Braised Lamb Shanks with Vegetables

1. Always allow the lamb shanks to come to room temperature before searing for even cooking.
2. Use a shallow pot to allow liquid to cover the meat adequately while enabling steam circulation.
3. Incorporate a variety of root vegetables for a nuanced sweetness and added nutrition.
4. Opt for high-quality broth or stock to enhance the dish’s overall flavor.
5. After browning, deglaze the pot with wine or broth to capture all the fond before adding the shanks.
6. Monitor the pot during braising and adjust liquid levels as necessary to ensure thorough cooking.
7. Consider marinating the shanks a night prior in red wine for deeper flavors.
8. When served with mashed potatoes, the creamy texture beautifully balances the richness of the lamb.

Variations and Adaptations

For those seeking regional variations, consider exploring recipes that incorporate different spices such as cumin or coriander, which evoke Middle Eastern flavors. Seasonal adaptations can also be made; in spring, substitute root vegetables with asparagus and peas for a fresh twist.

Dietary modifications could substitute the lamb with beef or even a plant-based protein like jackfruit, although this may alter the flavor and texture considerably. If you prefer a less fatty cut, choose leaner shoulder or leg meat, but adjust cooking times accordingly.

For flavor variations, integrating a dash of balsamic vinegar or citrus zest in the braising liquid introduces a delightful brightness that plays well against the richness of the lamb. Texture modifications can be met by including grains like barley to the braise for a heartier dish.

Finally, consider presentation alternatives such as serving the dish in individual cocottes for an elegant dinner or garnishing with fresh herbs like parsley or mint for a pop of color.

Serving and Presentation Guide

When serving Braised Lamb Shanks, consider plating techniques that highlight the dish’s rustic charm. Arrange the shank at an angle to showcase its tenderness, surrounded by a vibrant vegetable medley and a drizzle of the braising sauce.

For garnishing, fresh herbs like rosemary or parsley not only enhance flavor but also add striking visual appeal. Traditional accompaniments might include creamy mashed potatoes or couscous, both providing a sensational base.

Modern serving suggestions could include topping with crispy shallots or serving alongside a fresh salad of arugula for a brightness that contrasts with the rich lamb.

Remember to serve the dish warm, and maintain proper portion control based on the meals you plan. Acknowledging guests’ preferences ensures everyone enjoys their meal to the fullest.

Wine and Beverage Pairing

When it comes to wine pairings, a full-bodied red wine such as Cabernet Sauvignon or a Syrah complements the rich flavors of braised lamb beautifully. The wine’s tannins balance the fat in the lamb while enhancing the overall dining experience.

For non-alcoholic alternatives, consider serving a bold pomegranate juice or a spiced apple cider served warm, both of which imbue the meal with festive flavors.

If you enjoy coffee or tea, a dark roast or herbal tea can also provide complementary flavor notes that resonate with the dish, especially when served warm.

Make sure to serve your beverages at their optimal temperatures; red wines should be slightly below room temperature, while ciders and teas can be enjoyed warm for maximum enjoyment.

Storage and Shelf Life

Storage methods for Braised Lamb Shanks are straightforward. Once cooled, place leftovers in airtight containers and refrigerate where they will keep well for 3-4 days. Ensure the lamb is stored in its braising liquid to maintain moisture and flavor.

For ideal freezing, portion the shanks in suitable containers and ensure they are tightly sealed to avoid freezer burn. The dish can be frozen for up to 3 months.

Signs of spoilage include off-putting smells or discoloration, indicating that the dish has expired and should not be consumed. For reheating, thaw overnight in the fridge, then heat gently on the stovetop or in the oven, ensuring it reaches a safe temperature throughout before serving.

Make Ahead Strategies

One of the appealing elements of Braised Lamb Shanks is how well it lends itself to make-ahead strategies. Consider prepping ingredient components, such as chopping vegetables and measuring spices, a day ahead to streamline the cooking process.

You can braise the lamb in advance, allowing the flavors to deepen overnight in the refrigerator. Unfortunately, the initial flavor is often better when stored for a day, allowing for a more robust flavor profile.

Following up with assembly at meal time saves effort if you have guests, presenting a home-cooked meal with little active cooking time. Fresh elements such as herbs or a squeeze of lemon can be added just before serving to brighten flavors for a freshly made follow-through.

Scaling Instructions

Scaling your Braised Lamb Shanks recipe is simple and can help cater to larger gatherings. To halve the recipe, use two lamb shanks and adjust the quantity of vegetables accordingly.

Doubling or tripling the recipe requires expanding your braising apparatus; a larger Dutch oven might be necessary to ensure each shank cooks evenly. Consider timing modifications, as larger volumes might require slightly longer cooking without compromising tenderness.

Finally, ensure storage considerations are in place; larger batches can be stored similarly but may require additional containers for efficient storage and reheating later.

Nutritional Deep Dive

Reviewing the macro breakdown reveals that Braised Lamb Shanks are rich in protein, essential fats, and some carbohydrates primarily from the vegetables. Each portion provides substantial energy, making it a wholesome meal option for families.

Micronutrient analysis showcases the abundance of vital vitamins and minerals associated with the different components of the dish. Lamb provides a robust amount of iron, while root vegetables afford dietary fiber, potassium, and vitamins A and C.

Health benefits abound, particularly from the protein, which serves not only as energy but also aids muscle growth and repair. Moreover, the combination of ingredients promotes satiety, influencing portion control and weight management effectively.

For those monitoring dietary considerations, this dish can be adjusted further using leaner cuts or increasing the vegetable component for lower fat consumption. Keeping wellness in mind while enjoying such a hearty recipe encourages moderation and balance.

Dietary Adaptations

If you are considering a gluten-free adaptation of the recipe, simply ensure any broth or stock used is certified gluten-free. Other than that, the ingredients are naturally gluten-free, making this dish a great option for those with gluten sensitivities.

For a dairy-free variation, avoid any cream-based sides and stick to fresh herbs or olive oil for drizzling. Exploring vegan options would entail swapping out lamb for a robust vegetable option like mushrooms or using jackfruit for an alternative protein source.

Low-carb enthusiasts can focus on the protein and use cauliflower mash instead of traditional sides, ensuring a compliant meal. Keto and paleo diets can also benefit from this recipe by ensuring that the braising liquid remains low in sugar and using only allowable ingredients.

For more specific diets like Low-FODMAP, you can eliminate onion and garlic from the recipe while still achieving hearty flavor through the herbs and spices that integrate well with the overall dish.

Troubleshooting Guide

If your Braised Lamb Shanks come out tough, this can usually be attributed to not allowing enough cooking time or using a leaner cut of meat. Ensure that the cooking time is adhered to and that you’re using a well-marbled cut for the best results.

Flavor balance is critical; if the dish comes out too salty or bland, try adjusting seasoning gradually while it simmers. A splash of vinegar can help adjust overly strong or fatty flavors.

In cases where the sauce appears too thin, allow it to cook uncovered for a while, allowing the liquid to reduce and thicken naturally.

Equipment challenges can happen; if your pot cannot maintain a consistent simmer, consider adjusting the stovetop’s heat to ensure even cooking.

If you’re using an unfamiliar herb or spice, trial and error can help hone in on the quantities that fit your palate, making taste-testing essential.

Timeliness is key; if you notice that your braising process is taking longer than necessary, simply monitor the liquid level and overall heat to maintain consistency throughout the cooking journey.

Recipe Success Stories

Community feedback has consistently praised this Braised Lamb Shanks recipe for its depth of flavor and incredible aroma. Many readers have expressed how they appreciate the time spent during cooking as it brings the family closer together, creating a warm atmosphere perfect for bonding.

Several home cooks have reported success with variation adaptations, using seasonal vegetables or different cuts of meat successfully while maintaining the integrity of the dish. These stories showcase the versatility within the recipe, allowing diners to enjoy a meal tailored to personal tastes and preferences.

Photography tips shared by readers have also been encouraging, emphasizing the importance of proper plating techniques that showcase the meal’s rich textures and colors.

Overall, the recipe serves as a canvas, inviting home cooks to interpret and adapt it while creating lasting memories around the table.

Frequently Asked Questions

1. Can I use boneless lamb instead of shanks?

While boneless lamb can suffice, shanks are preferred for their flavor and natural tenderness thanks to the connective tissues that break down during braising. If you choose boneless, plan for shorter cooking times.

2. How do I know when the lamb is done?

The lamb is done when it feels tender to the fork and begins to fall off the bone. Using a meat thermometer, it should reach an internal temperature of about 145°F.

3. Can I make this dish ahead of time?

Yes! Braised Lamb Shanks benefit from sitting overnight; you can refrigerate them and reheat them without losing flavor. The flavors deepen after resting, making it a great make-ahead dish.

4. What should I serve with braised lamb shanks?

Traditional accompaniments include mashed potatoes, polenta, or a fresh salad to balance the richness of the lamb. Optional sides could include roasted vegetables for added nutrition.

5. Can I freeze leftovers?

Absolutely! Allow the lamb and sauce to cool completely, then transfer them to airtight containers or freezer bags. It can be stored in the freezer for up to three months.

6. What type of wine should I use for braising?

Any good quality dry red wine works well for braising, such as Cabernet Sauvignon or Merlot. Avoid wines labeled as ‘cooking wine’ since they often contain artificial flavors and high sodium.

7. Can I use other proteins in this recipe?

Yes, you can use beef or even pork shanks as alternatives to lamb. Adjust cooking times if using different proteins, as they have different textures and fat contents.

8. What’s the best way to reheat braised lamb shanks?

The best method to reheat braised lamb shanks is in a covered pot over low heat. Allow the dish to warm gradually, adding a splash of broth if needed to maintain moisture.

9. What should I do if the sauce is too thin?

If your sauce turns out to be too thin, remove the shanks, uncover the pot, and simmer the sauce for a few minutes to allow it to reduce and thicken.

10. Are braised lamb shanks gluten-free?

Yes, as long as you ensure that your broth or stock is gluten-free. The ingredients in the recipe can be gluten-free without altering the dish’s essence entirely.

Additional Resources

To enhance your culinary skills, consider exploring related recipes such as those for classic risottos or hearty stews. Technique guides on braising and slow cooking would also provide great insights into mastering similar recipes.

Consider bookmarking ingredient information that focuses on choosing quality lamb or seasonal vegetables to ensure fresh flavors in your cooking. Additionally, equipment recommendations, including Dutch ovens, will aid in achieving optimal results in braising.

Lastly, explore seasonal variations to adapt this dish throughout the year, showcasing the rich diversity of flavors available with changing seasons.

Join the Conversation

We encourage you to share your own cooking experiences and culinary adventures with Braised Lamb Shanks. Connect with us on social media and showcase your favorite photos of the dish.

Don’t hesitate to leave a review or comment about how this recipe turned out for you. Engaging with others in the recipe community can provide inspiration and modifications that enhance the dish even further.

If you’ve adapted the recipe in unique ways, share your success stories. This collaborative spirit enriches the culinary journey, ensuring that everyone enjoys the benefits of great food through shared wisdom.

The Recipe

Braised Lamb Shanks with Vegetables

Serves: 4 servings

Prep Time: 30 mins

Cook Time: 2 hours

Total Time: 2.5 hours

Kitchen Equipment Needed

  • Dutch oven or heavy-bottomed pot
  • Cutting board
  • Sharp knife
  • Wooden spoon
  • Meat thermometer

Ingredients

  • 4 lamb shanks, trimmed
  • 2 tablespoons olive oil
  • 2 onions, chopped
  • 4 garlic cloves, minced
  • 4 carrots, cut into chunks
  • 2 parsnips, cut into chunks
  • 4 cups beef broth
  • 1 cup red wine
  • 2 sprigs of fresh rosemary
  • 2 sprigs of fresh thyme
  • Salt and pepper to taste

Directions

  1. Preheat the oven to 325°F (160°C).
  2. In a large Dutch oven, heat olive oil over medium-high heat. Season the lamb shanks with salt and pepper, then sear them in the pot until browned on all sides. Remove and set aside.
  3. Add onions and garlic to the pot, cooking until softened. Then add the carrots and parsnips, cooking for an additional 5 minutes.
  4. Pour in the red wine, scraping the bottom of the pot to deglaze. Allow it to simmer for 2-3 minutes.
  5. Return the lamb shanks to the pot, add the broth, rosemary, and thyme. Bring to a gentle simmer.
  6. Cover the pot and transfer it to the oven. Braise for 2 hours until the lamb is fork-tender.
  7. Remove from the oven, let rest for 10 minutes, then serve with the vegetables and sauce.

Recipe Notes

  • For a deeper flavor, marinate the lamb overnight in red wine.
  • Feel free to adapt vegetables based on the season.
  • If the sauce is too thin, simmer uncovered at the end to reduce it.

Deliciously Juicy Peach Raspberry Cake for Every Occasion

Juicy Peach Raspberry Cake: A Summer Dessert Delight

⚖️
Difficulty
Medium

⏲️
Prep Time
20 mins

🕒
Cook Time
40 mins

⏱️
Total Time
1 hour

🍽️
Servings
8

Indulge in the sweet, sun-kissed flavors of summer with our Juicy Peach Raspberry Cake. This delightful cake features layers of ripe peaches and tart raspberries enveloped in a moist, buttery cake, creating a perfect balance of flavors. Each slice is a celebration of summer’s bounty, making it a must-try for any dessert lover.

As you bite into this cake, the juicy peaches release their natural sweetness, harmoniously complemented by the tangy raspberry undertones. This cake not only delivers a burst of flavors but also offers a beautiful presentation, showcasing vibrant colors that will impress your guests at any gathering. Whether for a picnic, birthday party, or just a lazy Sunday afternoon, this cake is sure to delight and satisfy.

Quick Recipe Highlights

  • Flavor Profile: The combination of juicy peaches and tart raspberries creates a cake that is both sweet and slightly tart, making each bite refreshing.
  • Texture: This cake boasts a light and fluffy texture, with juicy pieces of fruit that add bursts of moisture throughout.
  • Aroma: The aroma of fresh peaches and raspberries baking in the oven is intoxicating, filling your kitchen with a sweet, inviting scent.
  • Visual Appeal: Topped with a vibrant raspberry glaze, this cake is both stunning and irresistible, showcasing a beautiful gradient of colors.
  • Skill Level Needed: This recipe is approachable for bakers of all levels, making it a fantastic project for both novice and experienced cooks.
  • Special Equipment: Basic baking tools are required, such as mixing bowls, a cake pan, and an electric mixer for a smooth batter.

Recipe Overview

  • Difficulty Level: This Juicy Peach Raspberry Cake is classified as medium in difficulty, as it involves mixing cake batter and preparing the fruit layer, but with careful attention, even beginners can master it.
  • Category: This dessert fits beautifully into the category of cake and can be served at any gathering or special occasion.
  • Cuisine: The recipe draws inspiration from classic American baking, blending seasonal fruits commonly found in summer recipes.
  • Cost: With accessible ingredients, this cake is cost-effective, making it an economical choice for gatherings.
  • Season: Late summer, when peaches and raspberries are at their peak, is the best time to enjoy this cake, allowing for the freshest flavors.
  • Occasion: Perfect for summer barbecues, birthday celebrations, or a sweet treat at a picnic, this cake is versatile for many occasions.

Why You’ll Love This Recipe

This Juicy Peach Raspberry Cake is not just about looking delicious; it tantalizes your taste buds with a unique combination of flavors that details the essence of summer. The sweetness of ripe peaches, balanced with the tartness of fresh raspberries, creates a harmony you won’t forget.

Preparation for this cake is straightforward, allowing you to enjoy more time with friends and family rather than spending hours in the kitchen. This cake comes together quickly, making it a perfect option for anyone looking for convenience without sacrificing flavor.

Nutritionally, peaches are a good source of vitamins A and C, while raspberries offer antioxidants beneficial for your health. This cake provides a touch of indulgence while still being a bit kinder on your dietary goals.

The social aspect of baking this cake brings people together, from the mixing of ingredients to the final presentation. It’s perfect for sharing, whether you’re hosting a gathering or simply treating loved ones to a homemade dessert.

Lastly, this Juicy Peach Raspberry Cake proves to be real value for money. Whether bought from a bakery or prepared at home, it’s a delicious way to use seasonal produce and enjoy a rewarding dessert.

Historical Background and Cultural Significance

The origins of peach desserts date back to ancient Persia, where the fruit was celebrated for its sweetness. As peaches spread to Europe and then to America, they became a staple in many households, especially in southern cuisine, where recipes often highlight seasonal harvests.

Raspberries have a storied history too, cultivated since the Roman Empire. Their tartness complements sweet foods, making them a favored choice for desserts across various cultures. The combination of peaches and raspberries is a beautiful representation of the union of fruits from different backgrounds brought together in one delightful cake.

Over time, the recipe for peach and raspberry desserts has evolved, incorporating different techniques and amendments to suit modern palates. Layer cakes became popular in the 18th century, offering bakers creative freedom in combining flavors such as these.

Various regional variations also exist around this delightful duo, from cobblers in the south to savoury jams in the Pacific Northwest, showing the versatility and love for these fruits.

Ingredient Deep Dive

Peaches, a key ingredient in this cake, are often called “the fruit of the gods” for their sweetness and nectar-like flavor. Rich in vitamins, they aid in digestion and skin health, providing a sense of indulgence with nutritional value. When selecting peaches, opt for those that are firm yet slightly soft to the touch, indicating ripeness. Store them at room temperature until ripe, then transfer them to the refrigerator.

Raspberries add a vibrant color and tangy flavor to this cake. Known for their antioxidant properties, raspberries are a healthy addition to any dessert. When choosing raspberries, look for plump, firm berries with a deep red color. These delicate fruits should be used fresh or can be frozen; ensure they are carefully washed and dried before use to prevent mold.

Common Mistakes to Avoid

  • Overmixing the batter: This can lead to a dense cake rather than a fluffy one. Mix until ingredients are just combined.
  • Using unripe fruit: Unripe peaches or raspberries may not yield the sweetness expected. Always choose ripe, flavorful fruit.
  • Not greasing the pan properly: A well-greased pan ensures the cake releases easily. Use butter or baking spray generously.
  • Ignoring room temperature ingredients: Cold ingredients can affect the mixing process. Let eggs and dairy come to room temperature before using.
  • Not preheating the oven: Always preheat your oven to the correct temperature to ensure even baking.
  • Using the wrong baking pan size: Different pan sizes can affect baking times and results. Make sure to use the size specified in the recipe.
  • Neglecting to cool the cake properly: Allowing the cake to cool too quickly can cause it to crack. Let it cool in the pan for a few minutes before transferring.
  • Not tasting the batter: Always do a quick taste of your batter for seasoning and sweetness before baking, as it can affect your final cake.
  • Skipping the glaze: The raspberry glaze not only adds flavor but also enhances the cake’s appearance. Always include it for the best presentation.
  • Forgetting to check for doneness: Always use a toothpick or cake tester in the center to ensure the cake is fully baked before removing it from the oven.

Essential Techniques

One key technique in cake making is proper creaming of the butter and sugar. This step incorporates air, yielding a light and fluffy texture. To master this, ensure your butter is at room temperature and cream it with the sugar until it appears light in color and fluffy.

Another important technique is folding in the fruit. This gently incorporates the fruit without deflating the batter, preserving the cake’s lightness. Use a spatula to fold carefully, rotating the bowl as you go; this method keeps the batter airy while distributing the fruit evenly.

Pro Tips for Perfect Juicy Peach Raspberry Cake

1. For enhanced flavor, consider marinating the fruit in a bit of sugar for 30 minutes before incorporating it into the batter.

2. Experiment with adding spices like cinnamon or nutmeg to the batter for extra depth of flavor.

3. Keep your eggs and butter at room temperature for best mixing results; they’ll combine more smoothly.

4. Ensure that you do not open the oven door frequently while baking, as this can cause the cake to sink.

5. If you prefer a layered cake, consider making two thinner layers instead of one thick one for easier assembly and serving.

6. Allow the cake to cool completely before glazing to avoid the glaze melting into the cake.

Variations and Adaptations

Regional variations of this cake may use locally available fruits, such as blackberries or strawberries, instead of raspberries. Each variant brings its unique flavor while maintaining the essence of the recipe.

Seasonal adaptations can be achieved by incorporating spices like pumpkin pie spice in the fall or citrus zest in the winter for brightness. These variations offer exciting twists on the classic cake.

For those with dietary restrictions, this cake can be easily modified. Substitute traditional flour with gluten-free alternatives for a gluten-free version, or use coconut oil instead of butter for a dairy-free adaptation.

Serving and Presentation Guide

To effectively plate your Juicy Peach Raspberry Cake, consider using a decorative serving plate. Slice the cake into even pieces and arrange them in a circular shape, placing a mint leaf or extra berries on top for a pop of color. Watercoloring effects can be achieved by drizzling additional raspberry glaze on the plate beside each slice.

Traditional accompaniments may include vanilla ice cream or a dollop of whipped cream to enhance the dessert. For modern flair, consider a scoop of sorbet or a sprinkle of edible flowers for garnish.

Wine and Beverage Pairing

When deciding on a wine pairing, a light and fruity rosé complements the flavors of the cake beautifully, enhancing the fruity notes without overwhelming the palate. Opt for a sparkling wine if you prefer a fizz, as it also accentuates the freshness of the dessert.

For non-alcoholic alternatives, consider iced tea with a hint of lemon or a refreshing homemade lemonade. These beverages help cleanse the palate and carry through the fresh fruit flavors of the cake.

Storage and Shelf Life

To store this cake, wrap it tightly in plastic wrap and place it in an airtight container. When stored this way, it can last for about 3-4 days at room temperature or up to a week in the refrigerator.

If you notice any signs of spoilage, such as mold or an off-smell, it’s best to discard the cake. When reheating, ensure you do so gently in the microwave or toaster oven to retain moisture.

Make Ahead Strategies

If you’re preparing this cake in advance, you can bake the cake layers a day or two ahead. Wrap them well and store in the refrigerator until you’re ready to glaze and serve.

Consider preparing the raspberry glaze ahead of time as well; store it in a sealed container in the fridge. Just warm it slightly before drizzling over the cake for a fresh presentation.

Scaling Instructions

If you wish to half the recipe, simply reduce all ingredients proportionally. For doubling or tripling, adjust the ingredient amounts accordingly, but watch your baking time as larger cakes may take longer to bake than indicated in the recipe.

When scaling, also ensure your baking pans can accommodate the increased quantity, as different sizes may require precise timing adjustments to achieve even baking.

Nutritional Deep Dive

This cake’s macros primarily come from the sugar content and fruit, with a moderate calorie count. When portioned correctly, it can fit into a balanced diet while satisfying your sweet tooth.

Vitamin and mineral content is enhanced through the addition of peaches and raspberries, each contributing beneficial nutrients like fiber and antioxidants which aid in overall health.

Dietary Adaptations

For gluten-free adaptations, substitute regular flour with a gluten-free blend, keeping the measurements consistent. This ensures that the cake still rises and maintains its structure.

Dairy-free alternatives can be easily made by using almond milk and coconut oil in place of regular milk and butter. This version still retains the flavor while being suitable for those with lactose intolerance.

Troubleshooting Guide

If your cake comes out too dry, it could be due to overmixing or baking for too long. Always keep an eye on your cake towards the end of the bake time to avoid this issue.

Finding your cake too sweet? Adjust the sugar content next time and consider adding a pinch of salt to balance flavors.

Recipe Success Stories

Many readers reported delightful results when they shared their take on the Juicy Peach Raspberry Cake, highlighting how incorporating fresh local ingredients really elevated the flavors. These community feedback stories have inspired even more variations and unique adaptations.

Some bakers shared creative tips such as topping the cake with fresh fruit before serving, adding an extra burst of freshness while enhancing its aesthetic appeal.

Frequently Asked Questions

Can I use frozen peaches or raspberries?
Frozen fruit can be used, though it may release more moisture into the batter; ensure to adjust the baking time accordingly to account for added liquidity.

How can I know when my cake is done?
Insert a toothpick into the center, and if it comes out clean or with a few moist crumbs, your cake is done. If the batter sticks, give it a few more minutes in the oven.

Can I substitute other fruits?
Absolutely! Try incorporating other fruits like strawberries, blueberries, or even a mix for a delicious variation while keeping the same ratios.

How should I store leftovers?
Wrap the cake in plastic wrap and store in an airtight container to keep it fresh for several days. Alternatively, slice and freeze portions for longer storage.

Is this cake suitable for dietary restrictions?
Yes! The recipe can be easily modified to accommodate gluten-free and dairy-free diets with appropriate substitutions.

How do I prevent the bottom from burning?
Line your baking pan with parchment paper and don’t open the oven door too many times while baking.

What can I serve with this cake?
This cake pairs beautifully with vanilla ice cream, whipped cream, or a flavorful sorbet to complement the peach and raspberry flavors.

How do I enhance the raspberry flavor in the glaze?
Consider adding more fresh raspberries or a splash of raspberry extract to deepen the flavor in your glaze.

Can I make this cake ahead of time?
Yes! The cake layers can be baked in advance, wrapped tightly, and stored in the fridge until you’re ready to glaze and serve.

What variations can I try?
The possibilities are endless! Try adding nuts, chocolate chips, or swapping fruits based on the season for a unique twist.

Additional Resources

To further enjoy peach and raspberry desserts, check out our collections of summer recipes, including peach cobbler and raspberry parfaits, both of which celebrate these delightful fruits.

For tips on mastering cake baking techniques, visit our guides on mixing, folding, and layering to enhance your baking skills in the kitchen.

Join the Conversation

We invite you to share your creations and tips on social media, tagging your photos with our hashtag to join our community of enthusiastic bakers. Your feedback can inspire others on their baking journeys!

The Recipe

Juicy Peach Raspberry Cake

Serves: 8

Prep Time: 20 mins

Cook Time: 40 mins

Total Time: 1 hour

Kitchen Equipment Needed

  • Mixing bowls
  • Cake pan (9-inch)
  • Electric mixer
  • Spatula
  • Measuring cups and spoons

Ingredients

  • 2 cups all-purpose flour
  • 1 ½ cups sugar
  • 1 cup unsalted butter, softened
  • 4 large eggs
  • 1 cup peach puree (fresh or canned)
  • 1 cup fresh raspberries
  • 2 tsp baking powder
  • ¼ tsp salt
  • 1 tsp vanilla extract
  • Raspberry glaze for topping

Directions

  1. Preheat your oven to 350°F (175°C) and grease your cake pan.
  2. In a mixing bowl, cream together the butter and sugar until light and fluffy.
  3. Beat in the eggs one at a time, mixing well after each addition.
  4. Add the peach puree and vanilla extract, mixing until smooth.
  5. In another bowl, whisk together the flour, baking powder, and salt.
  6. Gradually add the dry ingredients to the wet mixture, mixing until just combined.
  7. Gently fold in the raspberries, ensuring they are evenly distributed without crushing them.
  8. Pour the batter into the prepared cake pan and level the top with a spatula.
  9. Bake in the preheated oven for 35 to 40 minutes, or until a toothpick comes out clean.
  10. Allow the cake to cool in the pan for 10 minutes before transferring to a wire rack to cool completely.
  11. Once cooled, top with raspberry glaze before serving.

Recipe Notes

  • For a richer flavor, you can add a dash of almond extract along with the vanilla.
  • Be creative with the glaze; you can substitute with other berries for different flavors.

Delicious Grilled Surf and Turf Skewers with Chimichurri Recipe

Grilled Surf and Turf Skewers with Chimichurri: A Flavorful Feast

⚖️
Difficulty
Medium

⏲️
Prep Time
20 mins

🕒
Cook Time
15 mins

⏱️
Total Time
35 mins

🍽️
Servings
4

Grilled Surf and Turf Skewers with Chimichurri is a culinary delight that brings together the best of both worlds: succulent steak and juicy shrimp. This recipe captures rich flavors from the grill, perfectly complemented by the zesty and vibrant chimichurri sauce. Each skewer offered in this recipe tells a story of summer evenings, barbecue gatherings, and a celebration of bold tastes that leave a lasting impression.

The balance of tender steak with the slight sweetness of grilled shrimp creates a mouthwatering contrast. When drizzled with the bright, herby chimichurri, these skewers become an irresistible centerpiece to any meal. As you savor each bite, the smoky aroma fills the air, enticing everyone to partake in this banquet of flavors. Whether served at a family gathering or a fancy dinner party, these grilled skewers will surely impress your guests.

Quick Recipe Highlights

  • Flavor Profile: The savory umami of beef, the sweetness of shrimp, and the zesty tang of chimichurri create an explosive flavor combination.
  • Texture: Juicy and succulent, the tender meat paired with slightly crisp but succulent shrimp gives a delightful mouthfeel.
  • Aroma: The grilling process enhances the smoky aroma, complemented by vibrant herbaceous notes from the chimichurri.
  • Visual Appeal: The colorful skewers display a vibrant mix of greens, reds, and browns, making it a feast for the eyes.
  • Skill Level Needed: This recipe requires basic grilling skills but is manageable for beginners with careful attention.
  • Special Equipment: A sturdy grill, skewers, and a blender or food processor for the chimichurri are essential for this recipe.

Recipe Overview

  • Difficulty Level: This recipe is considered medium difficulty, allowing home cooks to develop their grilling techniques while creating something visually impressive.
  • Category: These skewers make an excellent main course, perfect for summer barbecues or as part of a festive meal.
  • Cuisine: The dish boasts Argentinian influences with the chimichurri sauce that adds a rustic flair to this surf and turf classic.
  • Cost: The approximate cost ranges from $20 to $30, depending on the quality of the steak and shrimp chosen.
  • Season: Summer is the best time to enjoy this dish, as outdoor grilling adds to the overall experience.
  • Occasion: Ideal for outdoor gatherings, parties, or intimate dinners when you want to impress your guests.

Why You’ll Love This Recipe

This grilled surf and turf skewers recipe offers unique taste and texture appeal. The combination of steak and shrimp provides a variety of flavors that cater to diverse palates. The chimichurri sauce adds a refreshing twist that enhances the overall dish.

The convenience of meal prep is another standout feature of this recipe. Each step is straightforward, making it easy for both novice and experienced cooks to recreate this dish at home. You can marinate the ingredients ahead of time, allowing the flavors to meld beautifully before grilling.

Nutritionally, this recipe offers a balanced meal with protein-rich steak and shrimp. Combined with the fresh herbs in chimichurri, it promotes health and wellness without sacrificing flavor.

From a social perspective, these skewers are perfect for entertaining. They invite sharing and conversation, making your gathering more enjoyable. Everyone can customize their skewers and drizzle as much chimichurri as desired, adding a personal touch.

Lastly, this dish promises cost-effectiveness and accessibility. By utilizing simple, readily available ingredients, you can create a gourmet experience without breaking the bank while impressing family and friends with your culinary skills.

Historical Background and Cultural Significance

The origin of surf and turf can be traced back to the culinary traditions of combining land and sea proteins, celebrating the bountiful resources offered by nature. This grilling method emphasizes communal cooking, typical of festive occasions around the world.

Culturally, chimichurri originates from Argentina and is integral to its grilling tradition. The use of herbs showcases the country’s agricultural richness, while the sauce elevates grilled meats in various Latin American cuisines.

Over the years, the concept of surf and turf has evolved, often featuring various meats and seafood unique to different regions. The grilling technique continues to be a favored method for cooking, bringing people together around a shared meal.

Regional variations of surf and turf exist, including lobster paired with steak in New England or prawns with beef in Southern BBQ cuisine. Each preparation reflects the cultural heritage and local ingredients available, making it a versatile dish loved by many.

Ingredient Deep Dive

The primary ingredient in grilled surf and turf is steak. Steak has a long history in various culinary traditions, representing wealth and indulgence. Grilled to perfection, it provides essential protein and iron, with tips to look for marbling and freshness when selecting.

Shrimp, another key ingredient, is celebrated in coastal cuisines worldwide. Rich in protein and low in calories, they are an excellent choice for balanced meals. When choosing shrimp, freshness is paramount; look for those that are firm and have a mild ocean scent.

Chimichurri sauce, composed of fresh herbs and vinegar, carries many health benefits. It’s a low-calorie option that enhances the flavor of grilled meats. Selecting fresh herbs like parsley and cilantro ensures a vibrant taste, while proper storage in the refrigerator maximizes its lifespan.

Common Mistakes to Avoid

  • Over-soaking the skewers: If using wooden skewers, always soak them in water for at least 30 minutes to prevent burning. If they burn, the food will become charred and lose flavor.
  • Undercooking or overcooking the seafood: Shrimp cook very quickly; it’s important to monitor them carefully to ensure they are tender but not rubbery.
  • Insufficient marinating time: For maximum flavor, allow the proteins to marinate for at least 30 minutes to soak up the chimichurri’s spices and acidity.
  • Neglecting to preheat the grill: Failing to preheat can lead to uneven cooking and sticking. A hot grill ensures that the proteins sear properly.
  • Improperly skewering the ingredients: Make sure to place meat and seafood close together for even cooking; avoiding gaps will prevent them from drying out.
  • Skipping quality ingredients: The best flavors come from high-quality steak and fresh seafood, so choose ingredients carefully for superior results.
  • Not resting the meat before serving: Allowing grilled steak to rest for a few minutes ensures the juices redistribute throughout, making for a juicier bite.
  • Ignoring chimichurri variations: Experiment with flavors by adjusting ingredient ratios to suit your taste. Limiting yourself can hinder your culinary creativity.
  • Overcrowding the grill: This can cause uneven cooking and prevent that lovely char. Ensure ample space for heat circulation when grilling.
  • Forgetting garnish: A final sprinkle of fresh herbs or a squeeze of lemon can elevate flavor and presentation.

Essential Techniques

Mastering grilling is crucial for perfect surf and turf skewers. Begin by prepping your grill, ensuring grates are clean and well-oiled to prevent sticking and achieve optimal grill marks. Pay attention to the grill temperature—direct heat is essential for searing the meat and shrimp without overcooking.

Another important technique is marinating. This process not only enhances flavors but also tenderizes the meat. Ensure the marinade coats evenly, and let it sit for a sufficient amount of time for deeper flavor integration.

Understanding how to skewer properly is vital for even cooking. Alternate pieces of steak and shrimp closely without overcrowding them. This arrangement promotes consistent cooking and showcases each ingredient beautifully once plated.

Pro Tips for Perfect Grilled Surf and Turf Skewers

Start with high-quality steak, such as ribeye or sirloin, for the best flavor. Consider the cut of meat carefully; fattier cuts will remain juicier during grilling.

Preheat your grill to a high temperature before starting. This helps achieve beautiful grill marks and prevents the meat and shrimp from sticking.

If possible, allow the ingredients to come to room temperature before grilling. Cold ingredients can lead to uneven cooking, while room temperature will help in achieving that perfect sear.

Use a meat thermometer to check steak doneness, aiming for medium-rare at an internal temperature of 135°F (57°C). For shrimp, look for them to turn pink and opaque for a perfect cook.

Customize the chimichurri by adding fresh herbs or spice adjustments according to your taste profile. This will differentiate your dish and build on the traditional chimichurri flavor.

Rest your skewers for a few minutes after grilling. This continues the cooking process and helps the juices redistribute, yielding a more succulent bite.

Garnish with fresh herbs or a squeeze of lime for an extra flavor boost before serving. This small addition enhances the dish’s overall freshness and presentation.

Variations and Adaptations

Consider incorporating different proteins for a personalized touch. Lobster or scallops can take the place of shrimp, providing a luxurious upgrade to your surf and turf skewers while remaining true to the overall theme.

Seasonal ingredients can also enhance your skewers. Introduce bell peppers, zucchini, or cherry tomatoes to celebrate summer’s bounty, balancing flavors with fresh veggies and adding visual appeal.

For dietary modifications, place tofu or tempeh instead of shrimp or steak for a delightful vegetarian flair, ensuring everyone can enjoy this dish.

Flavor variations can be achieved by experimenting with marinades—ideas like garlic soy or teriyaki will yield a completely different taste.

Texture modifications, such as adding crispy bacon bits on the skewers, can provide a pop of flavor and texture contrast that is sure to be a crowd-pleaser.

Present your skewers on a rustic wooden board, garnished with extra chimichurri and colorful vegetables. This stylish approach fosters an inviting atmosphere around your dining table.

Serving and Presentation Guide

To beautifully plate your grilled surf and turf skewers, lay them flat on a large platter. Balance their arrangement for an appealing look, angling each skewer diagonally for visual interest.

Garnish with freshly chopped herbs or slices of lemon strategically around the platter to enhance both aesthetics and flavor. This also helps to indicate freshness to your guests.

Consider traditional accompaniments like crusty bread or rice to round out the meal. These dishes pair well with your skewers and complement the chimichurri flavor.

Modern serving suggestions include individual skewers on mini plates for more intimate gatherings, delivering a gourmet dining experience chilled out with friends.

Maintain temperature considerations by serving the skewers right off the grill when they are at their peak flavor and tenderness. This enhances the overall enjoyment of the dish.

Portion control is vital; aim for 2-3 skewers per person, allowing room for side dishes, maximizing guest satisfaction without overwhelming them.

Wine and Beverage Pairing

Pair your grilled surf and turf skewers with a glass of full-bodied red wine, such as Malbec or Cabernet Sauvignon, which harmonizes splendidly with the richness of the steak while complementing the sweetness of the shrimp.

For a refreshing non-alcoholic alternative, consider pairing with a citrus-infused sparkling water or lemonade. These options will cleanse the palate between bites and keep the meal light and invigorating.

If you enjoy coffee, a rich espresso served after the meal melds well with the smoky, savory flavor of the meat, providing a satisfying end to your dining experience.

Temperature considerations are essential; whites should be chilled, while reds are best served at room temperature, enhancing their natural flavors and aromas.

Serving suggestions might include chilled beer, particularly a hoppy IPA, which offers a refreshing contrast to the grilled flavors and enriches the casual dining atmosphere of this dish.

Storage and Shelf Life

To store leftover grilled surf and turf skewers, place them in an airtight container in the refrigerator. Enjoy them within 1-2 days for the best quality and flavor.

Temperature requirements are crucial; ensure the skewers have cooled to room temperature before sealing the container to avoid condensation, which can cause spoilage.

Use clear, glass containers to visually assess the contents. If you’re short on space, consider vacuum sealing any leftovers for optimal freshness.

Signs of spoilage include an off-putting odor or a change in textures, like slime on the shrimp or change in color of the steak. Always check for these before consuming any leftovers.

Reheating instructions advise that leftovers can be reheated in an oven or microwave but opt for the oven to preserve the crispy edges and flavor integrity.

Freezing guidelines include sealing the skewers in a freezer-safe bag if you do not consume them within the recommended fridge timeframe. They can last for up to 3 months in the freezer.

Make Ahead Strategies

For best results, marinate all ingredients ahead of time. A marinade can sit in the refrigerator for several hours or overnight, enhancing flavor depth considerably.

Store skewers between steps easily by preparing them the day before. This will streamline your cooking process on the day of serving, allowing you to focus on grilling.

Quality impact assessment is essential; marinated proteins retain moisture and flavor, ultimately resulting in a better-textured end product. Ensure you are adequately prepared for maximum efficiency.

Assembly tips involve pre-cutting vegetables and skewering the proteins earlier in the day, ensuring you’re set for quick grilling when guests arrive.

When reheating, you can easily toss fresh herbs onto the skewers as they warm up, allowing for that fresh dimension reminiscent of the original dish during serving.

Add fresh elements when storing leftovers, such as a drizzle of extra chimichurri before serving to revive flavors and counter any horseradish effects that might arise from storage.

Scaling Instructions

If you’re halving the recipe, adjust your marinade accordingly, cutting the ingredients—which can enhance overall flavor without compromising quality.

Doubling or tripling the dish requires careful attention to skewering and cooking in batches. Grill in stages to prevent overcrowding and uneven cooking.

Equipment adjustments might involve using larger skewers or multiple grill surfaces, allowing enough space to accommodate more food without sacrificing quality.

Timing modifications should reflect the larger quantities; be prepared for an extended cooking period, keeping in mind that larger batches may also require more ambient heat.

Storage considerations become vital in larger meals. Be sure to have ample containers on hand to prevent spillage and extend the lifespan of your leftovers.

Nutritional Deep Dive

This recipe offers considerable macro breakdown, boasting grams of protein from both steak and shrimp, making it an outstanding option for protein lovers looking to build muscle.

Micronutrient analysis indicates that ingredients such as garlic and parsley enhance the immune system while providing antioxidants, adding nutritional value that complements the dish.

Among the health benefits featured are the heart-healthy fats found in olive oil, often included in the chimichurri, which supports cardiovascular health when consumed in moderation.

Dietary considerations allow this recipe to fit well with various diets, such as high-protein plans or those focused on whole foods. Balance with veggies for a full spectrum.

Portion analysis shows one skewer typically contains under 200 calories, making it a great choice for those watching their intake without sacrificing flavor.

Weight management tips include mindful eating while enjoying these skewers; savoring flavors leads to better meal satisfaction and discourages overeating.

Dietary Adaptations

For a gluten-free version, ensure that any sauces or marinades are certified gluten-free. Chimichurri is naturally gluten-free, making this adaptation straightforward.

A dairy-free option emerges naturally, as this recipe does not call for any dairy products, allowing those with lactose sensitivities to enjoy without concern.

For a vegan alternative, replace steak with plant-based proteins such as portobello mushrooms and opt for tofu or tempeh to replace shrimp, providing protein without the meat.

Low-carb dieters can delight in this recipe by doubling up on zucchini or other vegetables instead of starch-based side dishes, maintaining full flavor without the carbs.

Keto enthusiasts will enjoy the high-fat content from the oils used in the chimichurri, which ramps up flavor while keeping carbs at bay through careful ingredient selections.

Paleo versions take advantage of this dish’s natural ingredients, staying away from grains and refined sugars, allowing diners to enjoy hearty flavors while adhering to this clean eating approach.

For low-FODMAP diets, replace ingredients like garlic with garlic-infused oil for chimichurri, preserving flavor without inducing digestive discomfort.

Other specific diets, such as vegetarian-heavy meal plans, can lean on vegetable-centric skewers or grilled fruits to present innovative presentation adaptations without sacrificing fulfillment.

Troubleshooting Guide

If texture issues arise, such as an overly tough steak, you may have cooked it too long or used a lean cut. To counter this, ensure the meat is of high quality and check for tenderness as it cooks.

Flavor balance could go awry if too much seasoning is used. Adjust as necessary, using more chimichurri to round out overpowering aromas while introducing an even taste.

If temperature problems occur, such as overcooking, invest in a meat thermometer to monitor internal temperatures. This will help to achieve perfect doneness without guessing.

Common equipment challenges include grill flare-ups. Control these by reducing the flames and moving skewers to lower heat sections of the grill or adding a water pan nearby for better regulation.

Ingredient substitutions, though effective, must not overpower the dish. Keep the foundation as close as possible—adding unique flavors may lead to unbalanced dishes that compromise on traditional tastes.

Timing concerns can negatively impact the cooking process. Plan ahead, allowing enough time for marination and grilling to achieve optimal flavors and presentations.

Recipe Success Stories

The community feedback for this dish has been overwhelmingly positive, with many praising its versatility and ease of preparation. Users have reported memorable family gatherings centered around these skewers.

Variation successes shine particularly when using seasonal produce or different protein combinations, leading to stunning dishes that continue to receive compliments and requests for the recipe.

Adaptation stories highlight how individuals have transformed this recipe to suit their dietary preferences, maintaining the integrity and enjoyment of the final dish.

Reader suggestions often nestle in with photography tips, encouraging the use of colorful garnishes and beautiful plating that elevate the skewers beyond just a meal to an Instagram-worthy feast.

Each story reinforces the concept of community around food, inspiring creative expression and shared experiences that stem from a simple yet delightful grilled dish.

Frequently Asked Questions

Can I prepare the chimichurri in advance? Yes, chimichurri can be prepared up to a week in advance. Store it in an airtight container in the refrigerator to maintain its freshness.

What types of meat can I use for surf and turf skewers? While steak and shrimp are traditional, you can also experiment with chicken, pork, or even tofu for vegetarian options.

How should I store leftovers? Place remaining skewers in an airtight container and refrigerate for up to 2 days. Consider repurposing leftovers in salads or as fillings for tacos.

What drinks pair well with grilled surf and turf? Full-bodied red wines like Malbec and IPAs are excellent choices that complement the hearty flavors of the skewers beautifully.

How can I make the skewers spicier? Consider adding chili flakes or using spicy marinades to infuse heat into the skewers before grilling.

Are there suitable vegetarian adaptations for this recipe? Absolutely! Substitute the steak and shrimp with portobello mushrooms and assorted seasonal vegetables to maintain a hearty flavor without animal products.

Is this recipe kid-friendly? Most children enjoy the fun of skewers. Offer milder marinades and avoid overly spicy chimichurri to cater to young taste buds.

How long can I marinate the proteins? Ideally, marinate for 30 minutes to 8 hours for maximum flavor. Avoid marinating Proteins too long, as they might become mushy.

What if I don’t have a grill? You can make these skewers in the oven using the broil function or on a stovetop grill pan, with an eye on cooking times.

Can I freeze the skewers for later use? Yes, you can freeze uncooked skewers for up to 3 months. Thaw them in the fridge overnight before cooking.

Additional Resources

Explore related recipes for your next grilling adventure, such as Grilled Vegetable Skewers or Garlic Lemon Butter Shrimp, both of which beautifully complement grilled meats.

Delve into technique guides on mastering marinades and grill temperatures for barbecue success. These resources empower home cooks to elevate their outdoor cooking experiences.

For ingredient information, check out guides on selecting high-quality meats and seafood, ensuring that every meal is substantial and satisfying.

Consider equipment recommendations focusing on grill safety and maintenance; learning how to care for your gear extends its lifespan, enhancing your outdoor cooking.

Take advantage of seasonal variations in recipes and ingredients to bring freshness to the table, inspiring culinary creativity throughout the year.

Join the Conversation

Engage with our community by sharing your experiences with Grilled Surf and Turf Skewers. Post your successes, challenges, and variations on social media with the hashtag #GrilledSurfAndTurf.

Photography tips are also welcome! Capture the essence of your skewers and showcase your creativity—select natural lighting and colorful backgrounds to enhance visual impact.

Recipe reviews allow everyone to broaden their culinary horizons, providing feedback on variations and flavor tweaks that others can try.

Community engagement thrives through your shared stories, showing how this dish adapts to diverse tastes while fostering personal connections around food.

Feel encouraged to share your own variations of this classic dish, inspiring fellow food lovers with new combinations that keep the grilling tradition alive and thriving.

The Recipe

Grilled Surf and Turf Skewers with Chimichurri

Serves: 4

Prep Time: 20 mins

Cook Time: 15 mins

Total Time: 35 mins

Kitchen Equipment Needed

  • Grill
  • Skewers (wooden or metal)
  • Blender or food processor for chimichurri
  • Meat thermometer

Ingredients

  • 1 lb steak (ribeye or sirloin), cut into 1-inch cubes
  • 1 lb shrimp, peeled and deveined
  • Salt and black pepper to taste
  • 1 cup chimichurri sauce (see recipe below)

Directions

  1. Prepare chimichurri sauce by blending parsley, garlic, olive oil, red wine vinegar, and red pepper flakes until combined. Set aside.
  2. In a large bowl, toss the steak cubes and shrimp with salt, pepper, and half of the chimichurri sauce. Let marinate for at least 30 minutes.
  3. Preheat your grill to medium-high heat. Thread steak and shrimp alternately onto skewers.
  4. Grill skewers for about 3-5 minutes on each side for steak, ensuring the shrimp is opaque and cooked through.
  5. Remove skewers from the grill and let rest for a few minutes. Drizzle remaining chimichurri sauce over skewers before serving.

Recipe Notes

  • Feel free to substitute shrimp with lobster or chicken for variations.
  • Adjust the heat of the chimichurri by changing the amount of red pepper flakes.
  • For a more robust flavor profile, marinate proteins overnight.