Spring Chicken Casserole

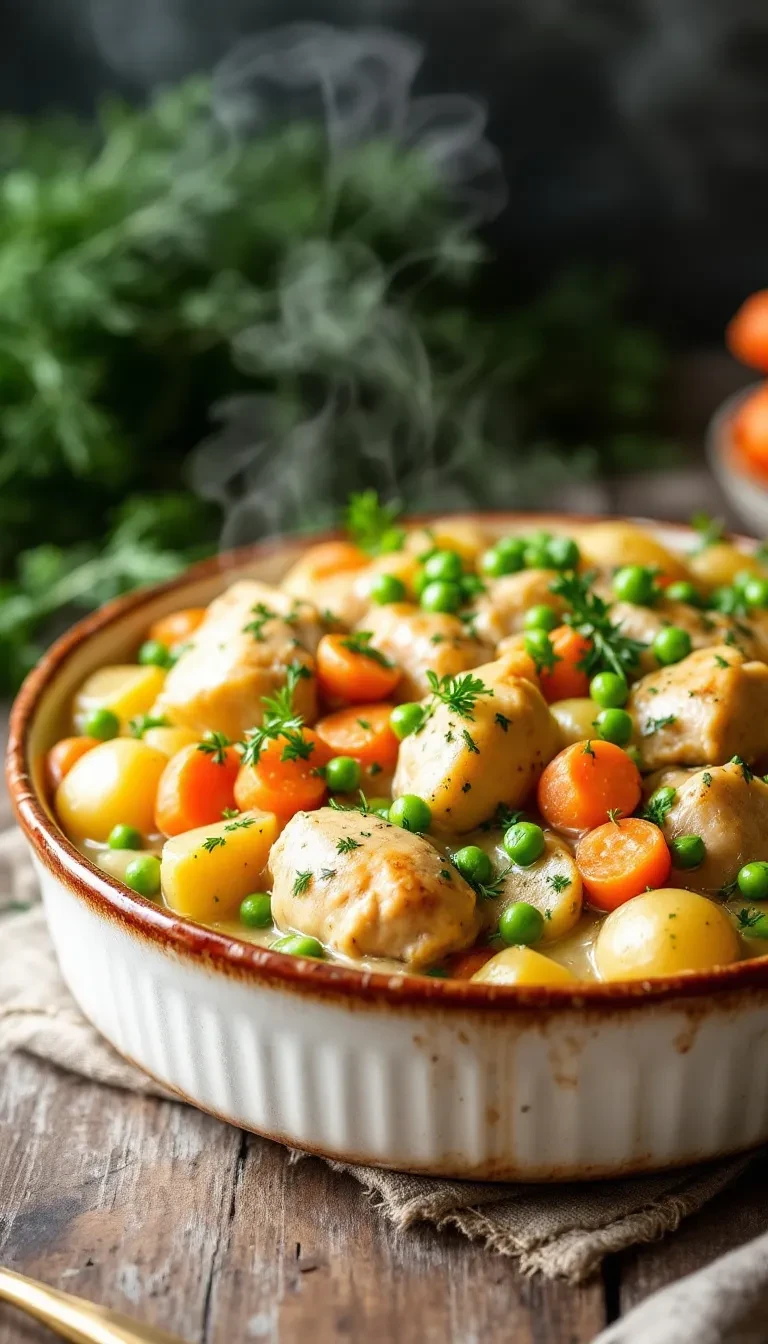
Spring Chicken Casserole: A Fresh & Comforting One-Dish Wonder

There’s something magical about the shift from winter’s heavy stews to spring’s lighter, brighter flavors. But let’s be honest—sometimes, even in spring, we crave that cozy, comforting feeling only a casserole can deliver. Enter this Spring Chicken Casserole, a dish that bridges the gap between hearty and fresh, packed with tender chicken, seasonal veggies, and a creamy, herb-infused sauce. It’s the kind of meal that feels like a hug but won’t weigh you down.

I first made this casserole on a rainy April evening when my kids were begging for mac and cheese (again), and I needed a way to sneak in some greens. To my surprise, they devoured every bite—even the asparagus! Now, it’s a staple in our rotation, perfect for busy weeknights or lazy Sunday suppers. Plus, it’s a fantastic way to use up leftover chicken or those farmers’ market finds. If you’re looking for more spring-inspired dishes, check out our Spring Salad Recipes for lighter pairings.

Why You’ll Love This Spring Chicken Casserole

This isn’t just another casserole—it’s a celebration of spring’s best flavors. Here’s why it’ll become a favorite:

  • One-dish wonder: Less cleanup, more time to enjoy the longer evenings.
  • Versatile: Swap veggies based on what’s in season (or your fridge).
  • Crowd-pleaser: Equally at home on a weeknight table or a potluck spread.
  • Meal-prep friendly: Tastes even better as leftovers!

Key Ingredients & Substitutions

This recipe is flexible, but here’s what gives it that springtime spark:

  • Chicken: Rotisserie chicken saves time, or use leftover baked chicken.
  • Asparagus & peas: Feel free to sub green beans or zucchini.
  • Fresh herbs: Dill or tarragon adds a bright, seasonal touch.
  • Light cream sauce: A splash of white wine (or broth) deepens the flavor.

How to Make Spring Chicken Casserole

This dish comes together in under an hour—here’s how:

  1. Sauté the veggies: Cook onions, garlic, and asparagus until just tender.
  2. Make the sauce: Whisk in flour, broth, and cream for a silky base.
  3. Combine & bake: Fold in chicken and peas, top with breadcrumbs, and bake until golden.
  4. Garnish & serve: Sprinkle with fresh herbs and lemon zest for a pop of freshness.

Pro Tips for the Best Casserole

Want to take it up a notch? Try these tricks:

  • Toast the breadcrumbs with a little butter for extra crunch.
  • Add a handful of spinach for extra greens (they’ll wilt right in).
  • For a gluten-free version, use cornstarch and gluten-free breadcrumbs.

Frequently Asked Questions

Can I make this Spring Chicken Casserole ahead? Absolutely! Assemble it (unbaked) up to a day in advance—just add 5–10 minutes to the baking time.

What’s the best chicken to use? Rotisserie chicken is my shortcut hero, but leftover grilled or poached chicken works too. Check out our guide to juicy chicken breasts for tips.

Can I freeze this casserole? Yes, but freeze it before baking. Thaw overnight in the fridge, then bake as directed.

How do I prevent a soggy casserole? Don’t overcook the veggies before baking, and pat them dry if they’re watery (looking at you, zucchini!).

What wine pairs well with this dish? A crisp Sauvignon Blanc or Pinot Grigio complements the herbs beautifully. For non-alcoholic options, try sparkling water with lemon.

Can I use frozen vegetables? Yes! Thaw and drain them well to avoid excess moisture. Frozen peas work especially well.

There you have it—a Spring Chicken Casserole that’s as adaptable as it is delicious. Whether you’re feeding a family, meal prepping, or just craving a taste of the season, this dish delivers comfort without the heaviness. Serve it with a simple spring salad or crusty bread, and savor every bite of this cozy-yet-fresh masterpiece. Happy cooking!

Print
clock clock iconcutlery cutlery iconflag flag iconfolder folder iconinstagram instagram iconpinterest pinterest iconfacebook facebook iconprint print iconsquares squares iconheart heart iconheart solid heart solid icon

Spring Chicken Casserole

  • Author: Chef Jamie Oliver

Description

A light and flavorful chicken casserole packed with fresh spring vegetables, tender chicken, and a creamy herb sauce. Perfect for a cozy family dinner or entertaining guests.


Ingredients

Scale

For the Crust:

  • For the Chicken:
  • 1.5 lbs boneless, skinless chicken thighs, cut into bite-sized pieces
  • 1 tbsp olive oil
  • 1 tsp salt
  • 1/2 tsp black pepper
  • 1 tsp dried thyme
  • For the Vegetables:
  • 1 cup baby carrots, halved
  • 1 cup asparagus, cut into 2-inch pieces
  • 1 cup frozen peas
  • 1 small leek, thinly sliced
  • 2 cloves garlic, minced
  • For the Sauce:
  • 1 cup chicken broth
  • 1/2 cup heavy cream
  • 1 tbsp Dijon mustard
  • 1 tbsp fresh parsley, chopped
  • 1 tbsp fresh dill, chopped
  • For the Topping:
  • 1 cup panko breadcrumbs
  • 1/4 cup grated Parmesan cheese
  • 1 tbsp melted butter

Instructions

1. Prepare the Crust:

  1. 1. Preheat oven to 375°F (190°C).
  2. 2. In a large skillet, heat olive oil over medium-high heat. Add chicken pieces and season with salt, pepper, and thyme. Cook until browned, about 5-6 minutes. Remove and set aside.
  3. 3. In the same skillet, add carrots, asparagus, leek, and garlic. Sauté for 3-4 minutes until slightly softened.
  4. 4. Stir in chicken broth, heavy cream, Dijon mustard, parsley, and dill. Bring to a simmer and cook for 2 minutes.
  5. 5. Return the chicken to the skillet and add frozen peas. Stir to combine.
  6. 6. Transfer the mixture to a greased 9×13-inch baking dish.
  7. 7. In a small bowl, mix panko breadcrumbs, Parmesan cheese, and melted butter. Sprinkle evenly over the casserole.
  8. 8. Bake for 25-30 minutes until the topping is golden brown and the casserole is bubbly.
  9. 9. Let rest for 5 minutes before serving.

Notes

For a lighter version, substitute half-and-half for the heavy cream. You can also use chicken breasts instead of thighs, but reduce cooking time slightly to prevent dryness. Leftovers can be stored in the refrigerator for up to 3 days.

Classic Lemon Pound Cake

Classic Lemon Pound Cake: A Slice of Sunshine in Every Bite

There’s something magical about a Classic Lemon Pound Cake—the way its golden crust gives way to a moist, buttery crumb, infused with just the right amount of zesty lemon. It’s the kind of dessert that feels like a hug from your grandmother, comforting yet bright enough to lift your spirits on even the cloudiest days. Whether you’re serving it at a spring brunch, pairing it with afternoon tea, or sneaking a midnight slice (no judgment here!), this cake is a timeless crowd-pleaser.

I first fell in love with pound cake as a kid, watching my mom bake it in her well-loved Bundt pan. The aroma of butter and vanilla would fill the house, and by the time the cake cooled, I’d already be hovering with a fork. Years later, I added a lemon twist to her recipe, and now it’s my go-to when I need a dessert that’s simple but special. The secret? Fresh lemon zest and a tangy glaze that soaks into every nook. Trust me, one bite and you’ll understand why this Classic Lemon Pound Cake deserves a permanent spot in your recipe box.

Why You’ll Love This Classic Lemon Pound Cake

This isn’t just any pound cake—it’s a balance of rich, citrusy, and melt-in-your-mouth goodness. Here’s why it stands out:

  • Bright yet comforting: The lemon adds freshness without overpowering the buttery base.
  • Easy to make: No fancy techniques—just a bowl, a whisk, and patience while it bakes.
  • Versatile: Serve it plain, with berries, or toasted with a dollop of whipped cream.
  • Crowd-friendly: Equally at home at a picnic or a dinner party.

How to Make Classic Lemon Pound Cake

Ingredients You’ll Need

  • 1½ cups (3 sticks) unsalted butter, room temperature
  • 3 cups granulated sugar
  • 5 large eggs
  • 3 cups all-purpose flour
  • ½ teaspoon baking powder
  • ½ teaspoon salt
  • 1 cup whole milk
  • Zest of 2 lemons
  • ¼ cup fresh lemon juice
  • 1 teaspoon vanilla extract

Step-by-Step Instructions

  1. Prep: Preheat oven to 325°F (165°C). Grease and flour a 10-inch Bundt pan or two loaf pans.
  2. Cream butter and sugar: Beat butter and sugar for 5 minutes until light and fluffy. Add eggs one at a time, mixing well after each.
  3. Dry ingredients: Whisk flour, baking powder, and salt in a separate bowl.
  4. Combine: Alternate adding dry ingredients and milk to the butter mixture, starting and ending with flour. Stir in lemon zest, juice, and vanilla.
  5. Bake: Pour batter into pan(s) and bake for 60–70 minutes, or until a toothpick comes out clean.
  6. Glaze (optional): Mix 1 cup powdered sugar with 2 tablespoons lemon juice and drizzle over cooled cake.

Tips for the Perfect Pound Cake

Want bakery-level results? Here’s what I’ve learned over the years:

  • Room-temperature ingredients are key for even mixing.
  • Don’t overmix after adding flour—stop as soon as it’s incorporated.
  • Let it cool in the pan for 15 minutes before turning it out to prevent crumbling.
  • Wrap leftovers in parchment paper to keep them moist (if they last that long!).

For more baking inspiration, try my Easy Blueberry Muffins or this Decadent Vanilla Bean Cheesecake.

Variations to Try

Love this recipe? Mix it up with these twists:

  • Lemon-blueberry: Fold in 1 cup fresh blueberries with the flour.
  • Citrus blend: Swap half the lemon zest for orange or lime.
  • Gluten-free: Use a 1:1 gluten-free flour blend (like Bob’s Red Mill).

Frequently Asked Questions

Can I freeze lemon pound cake?

Absolutely! Wrap slices tightly in plastic and freeze for up to 3 months. Thaw at room temperature.

Why did my pound cake sink in the middle?

This usually happens if the cake is underbaked or the oven temperature is too low. Use an oven thermometer to check accuracy.

Can I use bottled lemon juice?

Fresh is best for flavor, but bottled works in a pinch. Skip the zest if using bottled juice, though—it lacks brightness.

How do I prevent a dry pound cake?

Measure flour correctly (spoon and level, don’t scoop!) and avoid overbaking. The cake should pull slightly from the pan’s edges when done.

What’s the best pan for pound cake?

A heavy Bundt pan or loaf pan works well. Light-colored metal distributes heat evenly; dark pans may brown too quickly.

Can I make this into cupcakes?

Yes! Bake in lined muffin tins for 20–25 minutes. Check out my Lemon Cupcakes for a tailored recipe.

There you have it—a Classic Lemon Pound Cake that’s as joyful to make as it is to eat. Whether you’re baking it for a special occasion or just because, this recipe is a little reminder that sometimes the simplest things bring the most happiness. Now, go preheat that oven and let the citrusy magic begin!

Print
clock clock iconcutlery cutlery iconflag flag iconfolder folder iconinstagram instagram iconpinterest pinterest iconfacebook facebook iconprint print iconsquares squares iconheart heart iconheart solid heart solid icon

Classic Lemon Pound Cake

  • Author: Baking Enthusiast

Description

A moist and tender lemon pound cake with a bright citrus flavor, perfect for tea time or dessert. This classic recipe features a buttery crumb and a zesty lemon glaze for extra sweetness.


Ingredients

Scale

For the Crust:

  • For the cake:
  • 1 1/2 cups unsalted butter, softened
  • 3 cups granulated sugar
  • 5 large eggs, room temperature
  • 3 cups all-purpose flour
  • 1/2 teaspoon baking powder
  • 1/2 teaspoon salt
  • 1 cup whole milk
  • Zest of 2 lemons
  • 1/4 cup fresh lemon juice
  • 1 teaspoon vanilla extract
  • For the glaze:
  • 1 cup powdered sugar
  • 2 tablespoons fresh lemon juice
  • 1 tablespoon milk
  • 1/2 teaspoon vanilla extract

Instructions

1. Prepare the Crust:

  1. Preheat oven to 325°F (165°C). Grease and flour a 10-inch Bundt pan.
  2. In a large bowl, cream butter and sugar until light and fluffy (about 5 minutes).
  3. Add eggs one at a time, beating well after each addition.
  4. In a separate bowl, whisk together flour, baking powder, and salt.
  5. Gradually add the dry ingredients to the butter mixture, alternating with milk. Begin and end with flour mixture.
  6. Stir in lemon zest, lemon juice, and vanilla extract until fully combined.
  7. Pour batter into prepared pan and smooth the top.
  8. Bake for 60-75 minutes, or until a toothpick inserted comes out clean.
  9. Cool in pan for 15 minutes, then transfer to a wire rack to cool completely.
  10. For the glaze: Whisk powdered sugar, lemon juice, milk, and vanilla until smooth. Drizzle over cooled cake.

Notes

For extra lemon flavor, poke small holes in the warm cake and brush with a lemon syrup (equal parts lemon juice and sugar, heated until dissolved). Store covered at room temperature for up to 3 days.

Lemon Butter Garlic Shrimp and Grits

Lemon Butter Garlic Shrimp and Grits: A Bright, Comforting Classic

There’s something magical about the way buttery shrimp, zesty lemon, and creamy grits come together—like a cozy hug with a sunny disposition. This Lemon Butter Garlic Shrimp and Grits recipe is my go-to when I crave comfort food that feels a little fancy but comes together in under 30 minutes. (Because let’s be real: some nights, even takeout feels like too much effort.)

I first fell in love with shrimp and grits during a trip to Charleston, where it’s practically a religion. But back home in my tiny kitchen, I wanted a version that balanced richness with freshness—cue the lemon and garlic! It’s a dish that’s equally at home on a weeknight table or a weekend brunch spread. Plus, it’s forgiving. Burned the garlic? Add a squeeze more lemon. Grits too thick? A splash of broth saves the day. For more Southern-inspired twists, check out my Creamy Cheesy Grits recipe—it’s a game-changer.

Why You’ll Love This Lemon Butter Garlic Shrimp and Grits

This isn’t just another shrimp and grits recipe. Here’s what makes it special:

  • Bright & Balanced: Lemon cuts through the richness, while garlic adds depth.
  • Quick & Adaptable: Uses pantry staples and swaps easily (no heavy cream? Milk works!).
  • Crowd-Pleasing: Fancy enough for guests, easy enough for solo Netflix dinners.

How to Make Lemon Butter Garlic Shrimp and Grits

Ingredients You’ll Need

  • 1 lb shrimp, peeled and deveined
  • 1 cup stone-ground grits (or quick grits in a pinch)
  • 4 tbsp butter, divided
  • 3 garlic cloves, minced
  • 1 lemon (zest + juice)
  • 2 cups chicken or vegetable broth
  • 1/2 cup grated Parmesan
  • Salt, pepper, and a pinch of red pepper flakes
  • Fresh parsley for garnish

Step-by-Step Instructions

  1. Cook the grits: Bring broth to a boil, whisk in grits, and simmer for 20 minutes (or 5–7 for quick grits). Stir in 2 tbsp butter and Parmesan.
  2. Sauté the shrimp: In a skillet, melt remaining butter over medium heat. Add garlic and shrimp, cooking until pink (2–3 minutes per side). Squeeze lemon juice over the top.
  3. Serve: Spoon grits into bowls, top with shrimp, and garnish with lemon zest, parsley, and a crack of black pepper.

Tips for the Best Shrimp and Grits

Don’t overcook the shrimp! They’re done when opaque and curled into a “C” shape.
Use fresh lemon juice—bottled lacks that vibrant punch. (Trust me, I’ve tried.)
• For extra silkiness, swap half the broth with cream—like in this Decadent Truffle Grits recipe.

Frequently Asked Questions

Can I use frozen shrimp? Absolutely! Thaw overnight in the fridge or under cold water.

What’s the best grits-to-liquid ratio? For creamy grits, use a 1:4 ratio (1 cup grits to 4 cups liquid).

Can I make this gluten-free? Yes! Just ensure your broth is GF. Check out Bon Appétit’s gluten-free guide for more tips.

How do I store leftovers? Keep shrimp and grits separate; reheat with a splash of broth to revive the grits.

Can I add veggies? Sautéed spinach or bell peppers would be delicious.

What wine pairs well? A crisp Sauvignon Blanc complements the lemon beautifully—here’s my pairing guide.

Whether you’re channeling coastal vacation vibes or just need a quick dinner that tastes like you fussed, this Lemon Butter Garlic Shrimp and Grits delivers. It’s the kind of meal that makes you pause mid-bite, sigh happily, and think, “Yeah, I’ve got this.” (Even if the rest of your day says otherwise.) For more quick, soul-warming recipes, try my 15-Minute Cajun Shrimp next—it’s another weeknight hero.

Print
clock clock iconcutlery cutlery iconflag flag iconfolder folder iconinstagram instagram iconpinterest pinterest iconfacebook facebook iconprint print iconsquares squares iconheart heart iconheart solid heart solid icon

Lemon Butter Garlic Shrimp and Grits

  • Author: Chef Emily Carter

Description

A Southern-inspired dish featuring succulent shrimp sautéed in a rich lemon butter garlic sauce, served over creamy, cheesy grits. Perfect for brunch or a comforting dinner.


Ingredients

Scale

For the Crust:

  • For the Shrimp:
  • 1 lb large shrimp, peeled and deveined
  • 3 tbsp unsalted butter
  • 4 cloves garlic, minced
  • 1/4 cup fresh lemon juice
  • 1 tsp lemon zest
  • 1/4 tsp red pepper flakes
  • Salt and black pepper to taste
  • 2 tbsp fresh parsley, chopped
  • For the Grits:
  • 1 cup stone-ground grits
  • 4 cups water or chicken broth
  • 1/2 cup heavy cream
  • 1/2 cup sharp cheddar cheese, shredded
  • 2 tbsp unsalted butter
  • Salt and black pepper to taste

Instructions

1. Prepare the Crust:

  1. Prepare the Grits:
  2. 1. In a medium saucepan, bring water or chicken broth to a boil.
  3. 2. Slowly whisk in the grits and reduce heat to low. Simmer for 20-25 minutes, stirring occasionally, until thickened.
  4. 3. Stir in heavy cream, cheddar cheese, and butter. Season with salt and pepper. Keep warm.
  5. Cook the Shrimp:
  6. 1. In a large skillet, melt butter over medium heat.
  7. 2. Add minced garlic and sauté for 30 seconds until fragrant.
  8. 3. Add shrimp, lemon juice, lemon zest, and red pepper flakes. Cook for 2-3 minutes per side until shrimp turn pink.
  9. 4. Season with salt and black pepper. Garnish with fresh parsley.
  10. Serve:
  11. 1. Spoon creamy grits into bowls and top with lemon butter garlic shrimp.
  12. 2. Drizzle with extra sauce from the skillet if desired.

Notes

For extra richness, substitute half the water with milk when cooking grits. Adjust red pepper flakes for desired spice level. Fresh lemon juice is highly recommended for the best flavor.

Millionaire Pie – The Best No-Bake Dessert!

If you love easy, creamy, and absolutely delicious desserts, then this Millionaire Pie is for you! It’s a no-bake pie loaded with sweet pineapple, crunchy pecans, and fluffy whipped topping, all in a buttery graham cracker crust. The best part? It takes just 10 minutes to prepare!

This pie is light, refreshing, and perfect for any occasion—whether it’s a potluck, holiday, summer BBQ, or just a sweet treat for yourself.


Why You’ll Love This Recipe

No-Bake & Super Easy – Just mix, pour, and chill!
Sweet & Creamy – A dreamy filling with tropical flavors.
Perfect for Any Occasion – A hit at holidays, BBQs, and family gatherings.
Make-Ahead Friendly – Tastes even better after chilling overnight!


Ingredients You’ll Need

For the Filling:

  • 1 (8 oz) package cream cheese (softened)
  • 1 (14 oz) can sweetened condensed milk
  • 1 (8 oz) tub Cool Whip (or homemade whipped cream)
  • 1 (20 oz) can crushed pineapple (drained well)
  • ½ cup shredded sweetened coconut
  • ½ cup chopped pecans
  • ¼ cup lemon juice
  • 1 teaspoon vanilla extract

For the Crust:

  • 1 pre-made graham cracker crust (or homemade)
  • Extra pecans, coconut, and cherries for garnish

How to Make Millionaire Pie

Step 1: Prepare the Filling

  1. In a large bowl, beat the cream cheese until smooth and fluffy.
  2. Add sweetened condensed milk, lemon juice, and vanilla extract. Mix until well combined.
  3. Gently fold in Cool Whip, drained pineapple, coconut, and pecans until evenly distributed.

Step 2: Assemble the Pie

  1. Pour the filling into the graham cracker crust, spreading it evenly.
  2. Smooth the top with a spatula.

Step 3: Chill & Serve

  1. Refrigerate for at least 4 hours (overnight is best) to set.
  2. Garnish with extra pecans, shredded coconut, and maraschino cherries before serving.

Tips for the Best Millionaire Pie

Drain the pineapple well – Too much juice will make the filling runny.
Use fresh lemon juice – It enhances the flavor and balances the sweetness.
Let it chill overnight – The flavors meld together for the best texture and taste.
Want a firmer texture? – Add ½ cup more Cool Whip for extra stability.


Variations & Add-Ins

Make It Extra Tropical 🌴

  • Add ½ cup chopped maraschino cherries to the filling.
  • Mix in ½ cup chopped bananas for a banana-pineapple twist!

Lighter Version 🍃

  • Use light cream cheese and fat-free Cool Whip to cut calories.

Chocolate Lover’s Version 🍫

  • Sprinkle in mini chocolate chips or drizzle with chocolate syrup.

How to Store Millionaire Pie

Refrigerating

  • Store in the fridge for up to 4 days in an airtight container.

Freezing

  • Freeze for up to 2 months. Let thaw in the fridge before serving.

FAQs About Millionaire Pie

Q: Can I make this without nuts?
A: Absolutely! Just leave out the pecans or swap them for crushed graham crackers for a little crunch.

Q: Can I use homemade whipped cream instead of Cool Whip?
A: Yes! Whip 1 cup heavy cream + 2 tablespoons powdered sugar until fluffy and use in place of Cool Whip.

Q: Why is my pie runny?
A: Make sure the pineapple is well-drained and that you let the pie chill long enough to set properly.

Q: Can I make this in mini pie crusts?
A: Yes! Divide the filling into mini graham cracker crusts for individual servings.

Q: What can I use instead of a graham cracker crust?
A: Try an Oreo crust, shortbread crust, or Nilla wafer crust for a fun twist!


Final Thoughts

Millionaire Pie is one of the easiest, creamiest, and most delicious no-bake desserts you’ll ever make! With its sweet, tangy, and nutty flavors, it’s a guaranteed crowd-pleaser.

Try it out and let me know how you like it! What’s your favorite no-bake dessert? Let’s chat in the comments! 🥧✨

Print
clock clock iconcutlery cutlery iconflag flag iconfolder folder iconinstagram instagram iconpinterest pinterest iconfacebook facebook iconprint print iconsquares squares iconheart heart iconheart solid heart solid icon

Millionaire Pie – The Best No-Bake Dessert!

  • Author: Chef Ema

Description

Millionaire Pie is the perfect no-bake dessert that’s rich, creamy, and bursting with flavor. With a buttery graham cracker crust, a sweet and fluffy filling, and topped with chopped nuts and coconut, this pie will make you feel like a million bucks!


Ingredients

Scale

For the Crust:

  • 1 1/2 cups graham cracker crumbs
  • 1/4 cup granulated sugar
  • 1/2 cup unsalted butter, melted

For the Filling:

  • 8 oz cream cheese, softened
  • 1 can (14 oz) sweetened condensed milk
  • 1/2 cup pineapple juice (reserved from canned pineapple)
  • 1 tsp vanilla extract
  • 1 cup shredded coconut
  • 1/2 cup chopped pecans (or walnuts)
  • 1 cup Cool Whip (or whipped topping)

For the Topping:


  • 1/2 cup chopped pecans (or walnuts)
  • 1/4 cup shredded coconut (optional)

Instructions

1. Prepare the Crust:

  1. In a medium bowl, combine graham cracker crumbs, sugar, and melted butter.
  2. Mix until the mixture resembles wet sand.
  3. Press the mixture into the bottom of a 9-inch pie pan to form an even crust.
  4. Refrigerate the crust while preparing the filling to allow it to firm up.

2. Make the Filling:

  1. In a large bowl, beat the cream cheese with a hand mixer until smooth and creamy.
  2. Add the sweetened condensed milk, pineapple juice, and vanilla extract. Beat until everything is well combined.
  3. Gently fold in the shredded coconut and chopped pecans.
  4. Carefully fold in the Cool Whip until smooth and fluffy.

3. Assemble the Pie:

  1. Pour the creamy filling into the chilled graham cracker crust and spread it evenly.
  2. Smooth the top with a spatula.

4. Add the Toppings:

  1. Sprinkle the top of the pie with chopped pecans and shredded coconut for extra flavor and crunch.

5. Chill & Serve:


  1. Refrigerate the pie for at least 4 hours, or overnight, to allow the flavors to set and meld together.
  2. Once chilled, slice and serve this delicious, creamy pie!

Notes

This Millionaire Pie is an easy, no-bake dessert that’s sure to impress with its creamy, tropical flavors and satisfying crunch. Perfect for any occasion, or just when you need a sweet treat!


#NoBakeDessert #MillionairePie #EasyPieRecipe #SummerDesserts #SweetTreats

Quick & Easy One-Pot Teriyaki Noodles – A Fast & Flavorful Meal

If you’re looking for a quick, easy, and insanely delicious dinner, these One-Pot Teriyaki Noodles are exactly what you need! Tender noodles simmered in a savory, sweet, and slightly tangy teriyaki sauce, packed with fresh veggies, and ready in under 30 minutes—this is the ultimate weeknight meal.

The best part? Everything cooks in one pot, which means minimal cleanup and maximum flavor. Serve it as a meatless main dish or add your favorite protein like chicken, shrimp, beef, or tofu for a complete meal!


Why You’ll Love This Recipe

One-Pot Wonder – Less cleanup, more flavor!
Ready in 25 Minutes – Perfect for busy weeknights.
Customizable – Works with any veggies & proteins.
Better Than Takeout – Fresh, homemade, and full of flavor!


Ingredients You’ll Need

For the Noodles:

  • 8 oz linguine, ramen, or lo mein noodles
  • 1 tablespoon sesame oil
  • 2 cloves garlic (minced)
  • 1 teaspoon fresh ginger (grated)
  • 1 cup broccoli florets
  • 1 bell pepper (thinly sliced)
  • 1 medium carrot (julienned or shredded)
  • ½ cup snap peas or edamame

For the Teriyaki Sauce:

  • ¼ cup soy sauce (low sodium recommended)
  • 2 tablespoons honey or brown sugar
  • 1 tablespoon rice vinegar
  • 1 tablespoon hoisin sauce (optional, for extra depth)
  • 1 teaspoon sesame oil
  • ½ teaspoon red pepper flakes (optional, for a little heat)
  • 1 tablespoon cornstarch + 2 tablespoons water (to thicken)

For Garnish:

  • 2 green onions (chopped)
  • 1 teaspoon sesame seeds
  • Sriracha or chili flakes (for spice lovers!)

How to Make One-Pot Teriyaki Noodles

Step 1: Sauté the Aromatics & Veggies

  1. Heat 1 tablespoon sesame oil in a large pot over medium heat.
  2. Add garlic and ginger, stirring for 30 seconds until fragrant.
  3. Toss in broccoli, bell pepper, carrots, and snap peas, cooking for 3-4 minutes until slightly tender.

Step 2: Add Noodles & Sauce

  1. Pour in 2 ½ cups of water or broth and bring to a boil.
  2. Add noodles, stirring occasionally to prevent sticking.
  3. Once the noodles soften, pour in the soy sauce, honey, rice vinegar, hoisin sauce, and sesame oil.
  4. Simmer for 5-7 minutes, until the noodles are tender and most of the liquid is absorbed.

Step 3: Thicken & Finish

  1. Mix 1 tablespoon cornstarch with 2 tablespoons water and stir into the pot.
  2. Cook for another 1-2 minutes until the sauce thickens.
  3. Remove from heat and toss everything together to coat evenly.

Step 4: Garnish & Serve

  • Sprinkle with green onions, sesame seeds, and chili flakes for extra flavor.
  • Serve hot and enjoy your quick homemade teriyaki noodles!

Tips for the Best Teriyaki Noodles

Use Fresh Noodles – If using fresh ramen or lo mein, reduce the cook time.
Don’t Overcook the Veggies – Keep them slightly crisp for the best texture.
Want More Sauce? – Double the teriyaki sauce ingredients for an extra saucy dish!
Need a Protein Boost? – Add grilled chicken, shrimp, beef, or tofu.


Variations & Add-Ins

Make It Spicy 🌶

  • Add ½ teaspoon sriracha or chili paste to the sauce.
  • Sprinkle with extra red pepper flakes.

Swap the Protein 🍗

  • Try shredded rotisserie chicken, shrimp, beef strips, or tofu for extra heartiness.

Gluten-Free Option 🌱

  • Use gluten-free tamari instead of soy sauce.
  • Swap out wheat noodles for rice noodles or zucchini noodles.

How to Store & Reheat

Storing Leftovers

  • Keep in an airtight container in the fridge for up to 3 days.

Reheating

  • Stovetop: Heat in a pan with a splash of water until warm.
  • Microwave: Warm in 30-second intervals, stirring in between.

Freezing

  • These noodles are best fresh but can be frozen for up to 2 months.
  • Thaw overnight and reheat as directed.

FAQs About One-Pot Teriyaki Noodles

Q: Can I use different noodles?
A: Absolutely! Lo mein, spaghetti, udon, or ramen all work great.

Q: What can I use instead of hoisin sauce?
A: Try extra soy sauce with a splash of honey for similar depth.

Q: Can I make this ahead of time?
A: Yes! Just store in the fridge and reheat when ready to eat.

Q: What sides go well with this dish?
A: A simple cucumber salad, miso soup, or egg rolls make great pairings.

Q: How do I make the sauce even thicker?
A: Add an extra teaspoon of cornstarch mixed with water and simmer longer.


Final Thoughts

This One-Pot Teriyaki Noodles recipe is the perfect balance of sweet, savory, and satisfying—plus, it’s super easy to make in under 30 minutes! Whether you keep it vegetarian or add your favorite protein, it’s guaranteed to be a hit.

Try it out and let me know how you like it! What’s your favorite way to enjoy teriyaki noodles? Let’s chat in the comments! 🍜✨

Print
clock clock iconcutlery cutlery iconflag flag iconfolder folder iconinstagram instagram iconpinterest pinterest iconfacebook facebook iconprint print iconsquares squares iconheart heart iconheart solid heart solid icon

Quick & Easy One-Pot Teriyaki Noodles – A Fast & Flavorful Meal

  • Author: Chef Ema

Description

This Quick & Easy One-Pot Teriyaki Noodles is a simple, flavorful dish that comes together in just a few minutes. With savory teriyaki sauce, tender noodles, and a burst of fresh vegetables, this one-pot wonder is perfect for busy weeknights!


Ingredients

Scale

Quick & Easy One-Pot Teriyaki Noodles 🍜🍲

This Quick & Easy One-Pot Teriyaki Noodles is a simple, flavorful dish that comes together in just a few minutes. With savory teriyaki sauce, tender noodles, and a burst of fresh vegetables, this one-pot wonder is perfect for busy weeknights!


Ingredients:

For the Noodles & Sauce:

  • 8 oz noodles (spaghetti, ramen, or your choice of pasta)
  • 1/4 cup soy sauce (low-sodium, if preferred)
  • 3 tbsp honey or brown sugar
  • 2 tbsp rice vinegar
  • 2 tbsp sesame oil
  • 2 tbsp water
  • 1 tbsp cornstarch (for thickening)
  • 1 tsp garlic powder
  • 1/2 tsp ginger powder (optional, for added flavor)

For the Vegetables:

  • 1 cup sliced bell peppers (red, yellow, or green)
  • 1/2 cup carrots, julienned or thinly sliced
  • 1/2 cup green onions, chopped
  • 1/4 cup sesame seeds (optional, for garnish)

Instructions

1. Cook the Noodles:

  1. In a large pot, bring water to a boil and cook the noodles according to the package instructions. Drain and set aside.

2. Make the Teriyaki Sauce:

  1. While the noodles are cooking, in a medium bowl, whisk together soy sauce, honey (or brown sugar), rice vinegar, sesame oil, water, garlic powder, and ginger powder.
  2. In a small bowl, mix cornstarch with a tablespoon of water to create a slurry. Add this to the sauce and stir until well combined.

3. Sauté the Vegetables:

  1. In the same pot used for the noodles, heat a small amount of oil over medium heat.
  2. Add sliced bell peppers, carrots, and green onions to the pot. Sauté for 2-3 minutes, just until they are tender yet still vibrant.

4. Combine the Noodles & Sauce:

  1. Add the cooked noodles to the pot with the vegetables.
  2. Pour the teriyaki sauce over the noodles and vegetables, stirring until everything is evenly coated. Let it simmer for about 2-3 minutes until the sauce thickens and everything is heated through.

5. Garnish & Serve:


  1. Remove from heat and sprinkle with sesame seeds (if using).
  2. Serve hot and enjoy this delicious, quick, and easy one-pot teriyaki noodles!

Notes

This Quick & Easy One-Pot Teriyaki Noodles is perfect for a busy night, bringing big flavor with minimal effort. You’ll love the perfect balance of sweet and savory in every bite!


#OnePotMeals #TeriyakiNoodles #QuickDinner #EasyRecipes #WeeknightMeals