No-Bake Strawberry Cheesecake Cups

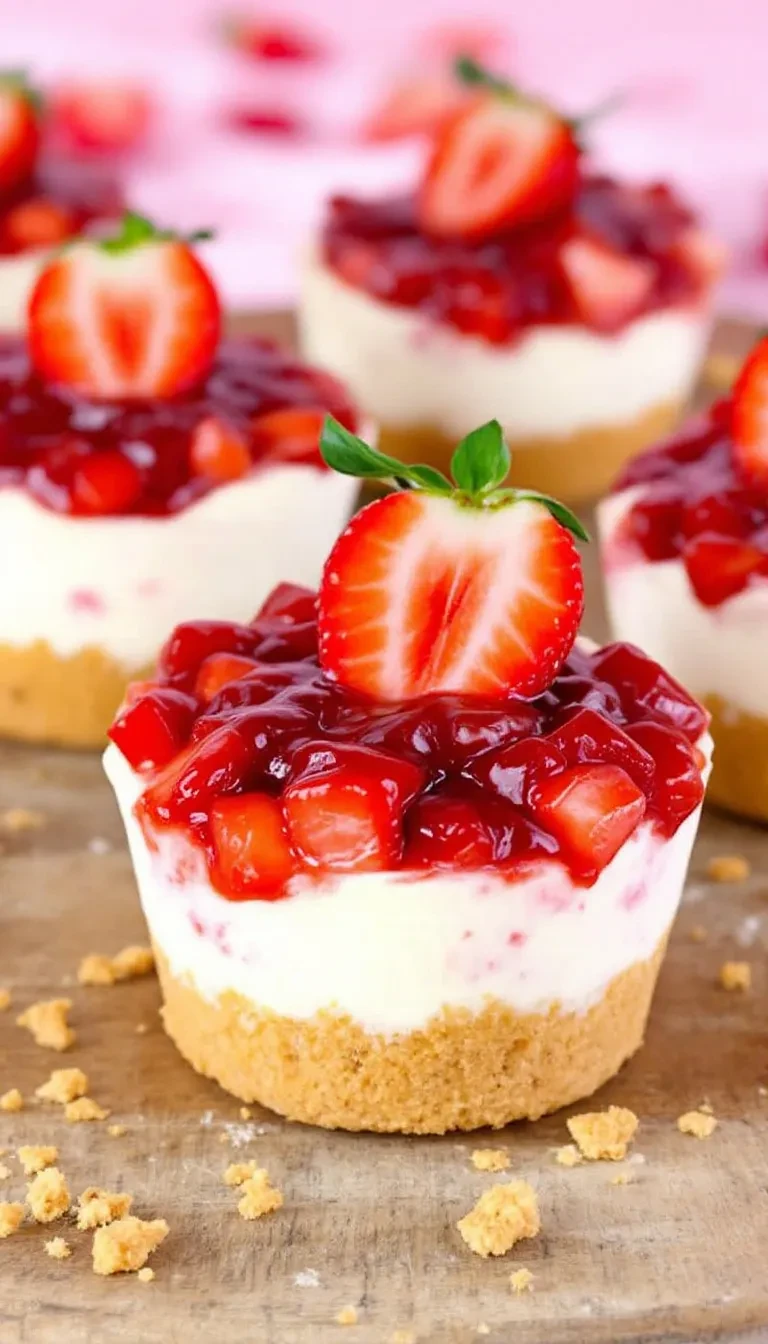
No-Bake Strawberry Cheesecake Cups: A Dreamy Dessert in Minutes

There’s something magical about the combination of creamy cheesecake and fresh strawberries—especially when it comes together in minutes, no oven required. These No-Bake Strawberry Cheesecake Cups are my go-to when I need a fuss-free dessert that still feels indulgent. Whether you’re hosting a last-minute girls’ night, packing a sweet treat for a picnic, or just craving something light yet satisfying, these little cups deliver every time.

As a mom of two, I’ve learned that simplicity is key. Between school runs and work deadlines, I don’t always have time for elaborate baking sessions. That’s why no-bake desserts like this one are my secret weapon. Plus, the individual servings mean no fighting over who got the bigger slice (we’ve all been there!). The best part? You can customize them with your favorite toppings—think blueberries, crushed cookies, or even a drizzle of chocolate. Trust me, once you try these, you’ll wonder how you ever lived without them.

Why You’ll Love These No-Bake Strawberry Cheesecake Cups

If you’re still on the fence, here’s why this recipe deserves a spot in your dessert rotation:

  • No oven, no stress: Perfect for hot summer days or tiny kitchens.
  • Ready in 20 minutes: Faster than ordering takeout!
  • Kid-friendly: Let little hands help with layering.
  • Gluten-free option: Swap graham crackers for almond flour crust.

How to Make No-Bake Strawberry Cheesecake Cups

This recipe is as easy as 1-2-3, but here’s a pro tip: Chill your mixing bowl beforehand for extra-fluffy cheesecake filling. Here’s what you’ll need:

Ingredients

  • 1 cup graham cracker crumbs (or gluten-free alternative)
  • 3 tbsp melted butter
  • 8 oz cream cheese, softened
  • 1/2 cup powdered sugar
  • 1 tsp vanilla extract
  • 1 cup whipped cream
  • 1 cup fresh strawberries, diced
  • Extra strawberries for garnish

Instructions

  1. Prep the crust: Mix graham cracker crumbs with melted butter. Press 2 tbsp into each cup.
  2. Make the filling: Beat cream cheese, powdered sugar, and vanilla until smooth. Fold in whipped cream.
  3. Layer & chill: Divide filling among cups, top with strawberries, and refrigerate for 1 hour.

For a fun twist, try swapping strawberries for other seasonal fruits like peaches or raspberries. You can also prep these the night before—just add fresh berries right before serving to keep them juicy.

Recipe Tips for Perfect Cheesecake Cups

Want to take these from great to unforgettable? Here’s what I’ve learned after making these dozens of times:

  • Room temp cream cheese is key: No lumps = silky smooth filling.
  • Use a piping bag: For Instagram-worthy layers, pipe the filling instead of spooning.
  • Freeze for firmer texture: 30 minutes in the freezer works if you’re short on time.

If you love no-bake treats as much as I do, you’ll adore these No-Bake Energy Bites for a healthier snack option.

Frequently Asked Questions

Can I use frozen strawberries?
Yes! Thaw and drain them well to avoid watery filling.

How long do these cheesecake cups last?
3 days in the fridge—if they last that long!

Can I make these dairy-free?
Absolutely! Use coconut cream and vegan cream cheese.

What’s the best way to crush graham crackers?
A food processor or rolling pin works great—or buy pre-crushed crumbs.

Can I turn this into a full-sized cheesecake?
Sure! Just press the crust into a 9-inch pan and double the filling. Check out Food Network’s guide for baking-free tips.

Why is my filling runny?
Over-whipped cream or under-chilled bowls can cause this. Chill everything first!

There you have it—a dessert that’s as easy to make as it is delicious. These No-Bake Strawberry Cheesecake Cups remind me that sometimes, the simplest things bring the most joy. Whether you’re treating yourself after a long day or sharing them with loved ones, every bite feels like a little celebration. For more berry-inspired recipes, try my Strawberry Spinach Salad to balance out the sweetness. Now, who’s ready to grab a spoon?

Print
clock clock iconcutlery cutlery iconflag flag iconfolder folder iconinstagram instagram iconpinterest pinterest iconfacebook facebook iconprint print iconsquares squares iconheart heart iconheart solid heart solid icon

No-Bake Strawberry Cheesecake Cups

  • Author: Dessert Delights

Description

Creamy no-bake cheesecake layered with fresh strawberries and a buttery graham cracker crust, served in individual cups for a perfect single-serving dessert.


Ingredients

Scale

For the Crust:

  • For the crust:
  • 1 1/2 cups graham cracker crumbs
  • 1/4 cup granulated sugar
  • 6 tbsp unsalted butter, melted
  • For the cheesecake filling:
  • 16 oz cream cheese, softened
  • 1/2 cup powdered sugar
  • 1 tsp vanilla extract
  • 1 cup heavy whipping cream
  • For the strawberry topping:
  • 2 cups fresh strawberries, diced
  • 2 tbsp granulated sugar
  • 1 tsp lemon juice

Instructions

1. Prepare the Crust:

  1. 1. In a medium bowl, mix graham cracker crumbs, 1/4 cup sugar, and melted butter until combined.
  2. 2. Press 2 tablespoons of the mixture into the bottom of each serving cup (about 8 cups total).
  3. 3. In a large bowl, beat cream cheese, powdered sugar, and vanilla until smooth.
  4. 4. In a separate bowl, whip heavy cream until stiff peaks form, then fold into cream cheese mixture.
  5. 5. Divide cheesecake filling evenly among cups, smoothing the tops.
  6. 6. In another bowl, toss strawberries with 2 tbsp sugar and lemon juice, then spoon over cheesecake layer.
  7. 7. Refrigerate for at least 4 hours or overnight before serving.

Notes

For a neater presentation, pipe the cheesecake filling using a piping bag. Substitute raspberries or blueberries if strawberries aren’t available.

Old-Fashioned Lemon Loaf Cake

Old-Fashioned Lemon Loaf Cake: A Zesty Slice of Nostalgia

There’s something undeniably comforting about an Old-Fashioned Lemon Loaf Cake. Maybe it’s the way the bright citrus scent fills your kitchen as it bakes, or how the tender crumb melts in your mouth with just the right balance of sweet and tangy. Whatever the reason, this cake is a timeless classic—one that feels like a warm hug from Grandma’s recipe box.

I first fell in love with this loaf during a rainy afternoon at my aunt’s house. She served it with a dollop of whipped cream and a steaming cup of Earl Grey, and I swear, it tasted like sunshine. Since then, I’ve tweaked her recipe to perfection, ensuring it’s moist, lemony, and downright irresistible. Whether you’re craving a simple dessert, a brunch showstopper, or a sweet gift for a friend, this loaf cake is your answer. Plus, it’s easier to make than you might think!

Why You’ll Love This Old-Fashioned Lemon Loaf Cake

This isn’t just any lemon loaf—it’s the kind that sticks in your memory. Here’s why:

  • Perfectly balanced flavor: Tangy lemon glaze meets a subtly sweet, buttery crumb.
  • Moist texture: Thanks to sour cream (or yogurt), every bite is tender.
  • Simple ingredients: No fancy tools or hard-to-find items—just pantry staples.
  • Versatile: Enjoy it plain, with berries, or even toasted with a smear of butter.

How to Make Old-Fashioned Lemon Loaf Cake

Ingredients You’ll Need

  • 1 ½ cups all-purpose flour
  • 1 tsp baking powder
  • ½ tsp salt
  • ½ cup unsalted butter, softened
  • 1 cup granulated sugar
  • 2 large eggs
  • ½ cup sour cream (or Greek yogurt)
  • 2 tbsp lemon zest
  • ¼ cup fresh lemon juice
  • 1 tsp vanilla extract

Step-by-Step Instructions

  1. Prep: Preheat oven to 350°F (175°C). Grease a 9×5-inch loaf pan and line it with parchment paper.
  2. Dry ingredients: Whisk flour, baking powder, and salt in a bowl.
  3. Cream butter and sugar: Beat butter and sugar until light and fluffy. Add eggs one at a time, then mix in sour cream, lemon zest, juice, and vanilla.
  4. Combine: Gently fold dry ingredients into the wet mixture until just combined.
  5. Bake: Pour batter into the pan and bake for 50–60 minutes, or until a toothpick comes out clean.
  6. Glaze: Optional—drizzle with a mix of powdered sugar and lemon juice while warm.

Tips for the Best Lemon Loaf Cake

Want bakery-level results? Here’s how:

  • Room-temperature ingredients: They blend more evenly for a smoother batter.
  • Don’t overmix: Fold gently to avoid a dense loaf.
  • Fresh lemons: Bottled juice won’t give the same vibrant flavor.
  • Cool before slicing: Let it rest 10 minutes in the pan, then transfer to a wire rack.

For more citrusy inspiration, try our Lemon Blueberry Scones or Orange Poppyseed Muffins.

Variations to Try

Mix it up with these fun twists:

  • Lemon-blueberry: Fold in 1 cup fresh blueberries.
  • Lavender-lemon: Add 1 tsp culinary lavender to the dry ingredients.
  • Gluten-free: Swap flour for a 1:1 gluten-free blend (like Bob’s Red Mill).

Frequently Asked Questions

Can I freeze lemon loaf cake? Yes! Wrap slices tightly and freeze for up to 3 months.

Why did my loaf sink in the middle? Overmixing or underbaking are likely culprits.

Can I use bottled lemon juice? Fresh is best, but bottled works in a pinch.

How do I store lemon loaf cake? Keep it airtight at room temp for 3 days or refrigerate for up to a week.

Can I make this dairy-free? Substitute butter with coconut oil and sour cream with coconut yogurt.

What’s the best way to zest lemons? Use a fine grater or microplane, avoiding the bitter white pith.

There you have it—a loaf cake that’s as delightful to bake as it is to eat. Whether you’re serving it at a bridal shower, packing it for a picnic, or sneaking a midnight slice (no judgment here), this Old-Fashioned Lemon Loaf Cake is sure to become a staple. Happy baking, and don’t forget to share your creations with us on social—we love seeing your kitchen wins!

Print
clock clock iconcutlery cutlery iconflag flag iconfolder folder iconinstagram instagram iconpinterest pinterest iconfacebook facebook iconprint print iconsquares squares iconheart heart iconheart solid heart solid icon

Old-Fashioned Lemon Loaf Cake

  • Author: Classic Baking Co.

Description

A moist, tangy lemon loaf cake with a sweet glaze that’s perfect for afternoon tea or as a dessert. This old-fashioned recipe uses simple ingredients for a timeless flavor.


Ingredients

Scale

For the Crust:

  • For the cake:
  • 1 1/2 cups all-purpose flour
  • 1 teaspoon baking powder
  • 1/4 teaspoon salt
  • 1/2 cup unsalted butter, softened
  • 1 cup granulated sugar
  • 2 large eggs
  • 1/2 cup whole milk
  • 2 tablespoons fresh lemon zest
  • 1/4 cup fresh lemon juice
  • For the glaze:
  • 1 cup powdered sugar
  • 2 tablespoons fresh lemon juice
  • 1 teaspoon lemon zest

Instructions

1. Prepare the Crust:

  1. Preheat oven to 350°F (175°C). Grease a 9×5-inch loaf pan and line with parchment paper.
  2. In a medium bowl, whisk together flour, baking powder, and salt. Set aside.
  3. In a large bowl, cream butter and sugar until light and fluffy (about 3 minutes).
  4. Beat in eggs one at a time, then stir in lemon zest and juice.
  5. Alternately add flour mixture and milk, beginning and ending with flour mixture. Mix until just combined.
  6. Pour batter into prepared pan and bake for 45-55 minutes until a toothpick comes out clean.
  7. Cool in pan for 15 minutes, then transfer to a wire rack.
  8. For the glaze: Whisk powdered sugar and lemon juice until smooth. Drizzle over cooled cake and sprinkle with zest.
  9. Let glaze set for 30 minutes before slicing.

Notes

For extra lemon flavor, poke holes in the warm cake with a skewer and brush with lemon syrup before glazing. Store covered at room temperature for up to 3 days.

Classic Deviled Eggs with a Twist

Classic Deviled Eggs with a Twist: A Crowd-Pleasing Favorite

There’s something undeniably nostalgic about deviled eggs. Whether they’re gracing a holiday table, a summer picnic, or a casual potluck, these creamy, tangy bites are always the first to disappear. But what if we told you the classic version could get even better? Today, we’re sharing our take on Classic Deviled Eggs with a Twist—featuring a smoky hint of paprika, crispy bacon crumbles, and just a touch of honey for balance. Trust us, your guests will beg for the recipe.

I’ll never forget the first time I brought these to a family gathering. My aunt, a self-proclaimed deviled egg purist, took one bite and immediately asked, “What did you do to these?” (Spoiler: She now requests them for every reunion.) The secret? A few simple upgrades that elevate the traditional recipe without overshadowing its comforting familiarity. Whether you’re a seasoned cook or a beginner, these eggs are foolproof—and they’re the perfect way to add a little flair to your next gathering.

Why You’ll Love These Classic Deviled Eggs with a Twist

Deviled eggs are a staple for a reason—they’re easy, versatile, and universally loved. But here’s why this version stands out:

  • Smoky depth: A dash of smoked paprika adds warmth without overpowering.
  • Sweet & savory balance: A drizzle of honey cuts through the tanginess beautifully.
  • Crunchy surprise: Crispy bacon or chives add texture and a burst of flavor.
  • Make-ahead friendly: Prep the filling the night before for stress-free entertaining.

How to Make Classic Deviled Eggs with a Twist

Ingredients You’ll Need

  • 6 large eggs, hard-boiled and peeled
  • 3 tbsp mayonnaise
  • 1 tsp Dijon mustard
  • 1 tsp honey (or maple syrup)
  • ½ tsp smoked paprika, plus extra for garnish
  • Salt and pepper to taste
  • 2 slices cooked bacon, crumbled (or fresh chives for a vegetarian option)

Step-by-Step Instructions

  1. Prep the eggs: Slice each boiled egg in half lengthwise. Gently pop out the yolks into a bowl and arrange the whites on a serving plate.
  2. Make the filling: Mash the yolks with a fork, then stir in mayonnaise, mustard, honey, smoked paprika, salt, and pepper until smooth.
  3. Fill the whites: Spoon or pipe the yolk mixture back into the egg whites. Pro tip: Use a zip-top bag with the corner snipped for easy piping!
  4. Garnish & serve: Sprinkle with extra paprika and bacon crumbles (or chives). Chill for 15 minutes if time allows, then enjoy!

Tips for the Best Deviled Eggs

Want to avoid rubbery eggs or bland filling? Here’s how:

  • Perfect hard-boiled eggs: Cover eggs with cold water, bring to a boil, then turn off the heat and let sit for 10 minutes. Transfer to ice water to stop cooking. For more tips, check out our guide to perfect hard-boiled eggs.
  • Creamier filling: For extra smoothness, blend the yolk mixture in a food processor.
  • Variations: Try adding a pinch of curry powder, a dollop of sriracha, or crumbled feta for fun twists.

Frequently Asked Questions

Can I make deviled eggs ahead of time?
Yes! Store the filling and whites separately in the fridge for up to 24 hours. Assemble just before serving.

How long do deviled eggs last?
They’re best eaten within 2 days. Keep them chilled and covered to prevent drying out.

What’s the best way to pipe deviled eggs?
A piping bag with a star tip looks elegant, but a spoon or plastic bag works just fine.

Can I use Greek yogurt instead of mayo?
Absolutely! For a lighter version, swap half the mayo with Greek yogurt.

Why are my deviled eggs watery?
Overcooked eggs or excess moisture in the filling can cause this. Pat the yolks dry before mixing.

What pairs well with deviled eggs?
They’re great alongside fresh salads, grilled meats, or as part of a brunch spread.

Whether you’re hosting a party or just craving a nostalgic snack, these Classic Deviled Eggs with a Twist are sure to delight. The combination of creamy filling, smoky paprika, and crispy bacon is downright irresistible—and the best part? They’re as fun to make as they are to eat. For more crowd-pleasing appetizers, explore our easy party recipes, or learn about the science of perfect eggs from Serious Eats. Now, go forth and devil those eggs like a pro!

Print
clock clock iconcutlery cutlery iconflag flag iconfolder folder iconinstagram instagram iconpinterest pinterest iconfacebook facebook iconprint print iconsquares squares iconheart heart iconheart solid heart solid icon

Classic Deviled Eggs with a Twist

  • Author: Chef Jamie

Description

A modern take on the classic deviled eggs, featuring a creamy filling with a hint of spice and a crunchy topping for added texture. Perfect for parties or as a tasty appetizer.


Ingredients

Scale

For the Crust:

  • For the eggs:
  • 6 large eggs
  • 1/4 cup mayonnaise
  • 1 teaspoon Dijon mustard
  • 1/2 teaspoon white vinegar
  • Salt and pepper to taste
  • For the topping:
  • 2 tablespoons finely chopped chives
  • 1/4 teaspoon smoked paprika
  • 1 tablespoon crispy fried onions (crushed)

Instructions

1. Prepare the Crust:

  1. 1. Place eggs in a saucepan and cover with cold water. Bring to a boil, then cover and remove from heat. Let sit for 10 minutes.
  2. 2. Transfer eggs to an ice bath to cool completely, then peel carefully.
  3. 3. Slice eggs in half lengthwise and remove yolks. Place yolks in a bowl.
  4. 4. Mash yolks with mayonnaise, Dijon mustard, white vinegar, salt, and pepper until smooth.
  5. 5. Spoon or pipe the yolk mixture back into the egg white halves.
  6. 6. Sprinkle with chopped chives, smoked paprika, and crushed crispy fried onions.
  7. 7. Chill for at least 30 minutes before serving.

Notes

For a spicier version, add a dash of hot sauce to the yolk mixture. The crispy fried onions can be substituted with bacon bits for a different flavor profile.

Old-Fashioned Peach Cobbler

Old-Fashioned Peach Cobbler: A Timeless Dessert for Every Occasion

There’s something undeniably comforting about an Old-Fashioned Peach Cobbler. The sweet, juicy peaches bubbling beneath a golden, buttery crust—it’s the kind of dessert that feels like a warm hug from Grandma. Whether you’re serving it at a summer barbecue, a cozy family dinner, or just because you deserve a little sweetness, this classic recipe never fails to delight.

I remember the first time I made this cobbler. It was a humid July afternoon, and my kitchen smelled like heaven. My kids hovered around the oven, impatiently waiting for that first bite. When we finally dug in, the buttery topping crumbled perfectly, and the syrupy peaches melted in our mouths. It was love at first bite. And the best part? It’s incredibly simple to make, even if you’re not a seasoned baker. If you’re craving a dessert that’s equal parts nostalgic and delicious, this Old-Fashioned Peach Cobbler is your answer.

Why You’ll Love This Old-Fashioned Peach Cobbler

This isn’t just any cobbler—it’s the kind of dessert that brings people together. Here’s why it’s a must-try:

  • Simple Ingredients: No fancy pantry staples required—just fresh peaches, butter, sugar, and flour.
  • Effortless Prep: Mix, pour, and bake. Even beginners can nail this recipe.
  • Versatile: Serve it warm with vanilla ice cream or cold with whipped cream. It’s delicious either way!
  • Crowd-Pleaser: Perfect for potlucks, holidays, or just because.

How to Make Old-Fashioned Peach Cobbler

Ingredients You’ll Need

  • 6 cups fresh peaches, peeled and sliced (or canned peaches in a pinch)
  • 1 cup granulated sugar
  • 1/2 cup unsalted butter, melted
  • 1 cup all-purpose flour
  • 1 cup milk
  • 1 tbsp baking powder
  • 1 tsp vanilla extract
  • 1/2 tsp cinnamon (optional, but highly recommended)

Step-by-Step Instructions

  1. Preheat & Prep: Preheat your oven to 375°F (190°C) and melt the butter in a 9×13-inch baking dish while the oven heats.
  2. Mix the Batter: In a bowl, whisk together flour, sugar, baking powder, and milk until smooth. Stir in vanilla.
  3. Layer the Peaches: Arrange peach slices evenly over the melted butter in the baking dish.
  4. Pour & Bake: Pour the batter over the peaches (do not stir!) and sprinkle with cinnamon. Bake for 40–45 minutes until golden and bubbly.
  5. Serve Warm: Let cool slightly, then scoop into bowls and top with ice cream or whipped cream.

Tips for the Best Peach Cobbler

Want to take your cobbler to the next level? Try these pro tips:

  • Use Ripe Peaches: The sweeter the peaches, the better the flavor. If they’re not in season, frozen peaches work too!
  • Don’t Overmix: A few lumps in the batter are fine—overmixing can make the topping tough.
  • Add a Crunch: Sprinkle coarse sugar on top before baking for a delightful crunch.
  • Make It Ahead: Assemble the cobbler and refrigerate overnight, then bake when ready.

For more fruity dessert inspiration, check out our Easy Berry Crisp Recipe or this Simple Apple Pie Bars.

Frequently Asked Questions

Can I use canned peaches for Old-Fashioned Peach Cobbler?

Absolutely! Drain them well and pat dry to avoid excess liquid.

How do I store leftover peach cobbler?

Cover and refrigerate for up to 3 days. Reheat in the oven or microwave before serving.

Can I freeze peach cobbler?

Yes! Bake, cool completely, then freeze for up to 3 months. Thaw and reheat in the oven.

What’s the best way to peel peaches?

Blanch them in boiling water for 30 seconds, then transfer to ice water. The skins will slip right off!

Can I use a different fruit?

Definitely! Try apples, berries, or cherries—adjust sugar based on sweetness.

Why is my cobbler soggy?

Too much liquid from the peaches or underbaking can cause sogginess. Drain peaches well and bake until golden.

There you have it—a foolproof Old-Fashioned Peach Cobbler that’s as easy to make as it is delicious. Whether you’re reminiscing about childhood summers or creating new memories with loved ones, this dessert is sure to become a staple in your recipe collection. So grab those peaches, preheat the oven, and get ready for a slice of pure comfort. Happy baking!

Print
clock clock iconcutlery cutlery iconflag flag iconfolder folder iconinstagram instagram iconpinterest pinterest iconfacebook facebook iconprint print iconsquares squares iconheart heart iconheart solid heart solid icon

Old-Fashioned Peach Cobbler

  • Author: Grandma's Kitchen

Description

A classic Southern dessert with juicy peaches and a buttery biscuit topping, perfect for summer gatherings. Bakes to golden perfection with caramelized edges.


Ingredients

Scale

For the Crust:

  • For the peach filling:
  • 6 cups fresh peaches, peeled and sliced (about 8 medium)
  • 3/4 cup granulated sugar
  • 1/4 cup light brown sugar, packed
  • 1 tablespoon lemon juice
  • 1 teaspoon vanilla extract
  • 2 tablespoons cornstarch
  • 1/2 teaspoon ground cinnamon
  • 1/4 teaspoon ground nutmeg
  • For the cobbler topping:
  • 1 1/2 cups all-purpose flour
  • 1/2 cup granulated sugar
  • 1 1/2 teaspoons baking powder
  • 1/2 teaspoon salt
  • 6 tablespoons cold unsalted butter, cubed
  • 1/2 cup whole milk
  • 1 teaspoon coarse sugar (for sprinkling)

Instructions

1. Prepare the Crust:

  1. 1. Preheat oven to 375°F (190°C). Grease a 9×13-inch baking dish.
  2. 2. Make filling: In a large bowl, toss peaches with sugars, lemon juice, vanilla, cornstarch, cinnamon, and nutmeg until coated. Pour into prepared dish.
  3. 3. Make topping: Whisk flour, sugar, baking powder, and salt in a bowl. Cut in butter with pastry cutter until mixture resembles coarse crumbs.
  4. 4. Stir in milk just until dough forms (will be sticky). Drop spoonfuls over peaches, leaving gaps for steam.
  5. 5. Sprinkle coarse sugar over dough. Bake 40-45 minutes until golden and bubbling at edges.
  6. 6. Cool 15 minutes before serving. Best with vanilla ice cream.

Notes

• For firmer filling, let sit 10 minutes after mixing to draw out juices.
• Substitute 2 (15oz) cans peaches (drained) if fresh unavailable.
• Dough will spread during baking – don’t over-smooth topping.

No-Bake Strawberry Cheesecake

No-Bake Strawberry Cheesecake: A Creamy Dreamy Summer Dessert

There’s something magical about a no-bake dessert, especially when it involves strawberries and cheesecake. Picture this: a buttery graham cracker crust, a velvety smooth cream cheese filling, and a luscious strawberry topping that tastes like sunshine. The best part? You don’t even need to turn on your oven. This No-Bake Strawberry Cheesecake is the answer to your summer dessert prayers—easy, refreshing, and utterly irresistible.

Whether you’re hosting a backyard BBQ, celebrating a special occasion, or just treating yourself (because why not?), this recipe is a crowd-pleaser. I first made it for a last-minute potluck, and let’s just say the empty dish came home with compliments instead of leftovers. It’s that good. Plus, it’s a fantastic make-ahead dessert, so you can spend less time in the kitchen and more time enjoying the moment. Ready to dive into strawberry heaven? Let’s go!

Why You’ll Love This No-Bake Strawberry Cheesecake

If you’re still on the fence about making this dessert, here are a few reasons it’ll become your new go-to:

  • No oven required: Perfect for hot summer days when baking feels like a chore.
  • Quick and easy: Just mix, chill, and enjoy—no fancy techniques needed.
  • Customizable: Swap strawberries for blueberries, raspberries, or even a drizzle of chocolate.
  • Crowd favorite: Creamy, fruity, and just sweet enough to satisfy every palate.

How to Make No-Bake Strawberry Cheesecake

This recipe is as simple as it gets, but a few pro tips will ensure your cheesecake turns out perfect every time. Here’s the step-by-step breakdown:

Ingredients You’ll Need

  • 2 cups graham cracker crumbs
  • 1/2 cup melted butter
  • 16 oz cream cheese, softened
  • 1 cup powdered sugar
  • 1 tsp vanilla extract
  • 1 cup heavy whipping cream
  • 2 cups fresh strawberries, sliced
  • 1/4 cup strawberry jam (for glaze)

Step-by-Step Instructions

  1. Make the crust: Mix graham cracker crumbs and melted butter, then press into a 9-inch springform pan. Chill for 15 minutes.
  2. Whip the filling: Beat cream cheese, powdered sugar, and vanilla until smooth. In a separate bowl, whip the heavy cream to stiff peaks, then fold into the cream cheese mixture.
  3. Assemble: Spread the filling over the crust and smooth the top. Refrigerate for at least 4 hours (or overnight).
  4. Add the topping: Before serving, arrange sliced strawberries on top and brush with warmed strawberry jam for a glossy finish.

Tips for the Perfect No-Bake Cheesecake

A few extra tricks to ensure your cheesecake is flawless:

  • Use full-fat cream cheese for the creamiest texture.
  • Let the cream cheese soften at room temperature to avoid lumps.
  • Chill the bowl and beaters before whipping the cream—it’ll help it hold its shape.
  • For a lighter version, try Greek yogurt in place of some cream cheese.

Frequently Asked Questions

Can I use frozen strawberries? Yes, but thaw and drain them first to avoid a watery topping.

How long does no-bake cheesecake last? Up to 3 days in the fridge, though it’s best enjoyed within 24 hours.

Can I make this gluten-free? Absolutely! Swap graham crackers for gluten-free cookies or almond flour.

Why is my cheesecake filling runny? It may not have chilled long enough—give it at least 4 hours.

Can I use a different fruit? Of course! Blueberries, peaches, or even mango would be delicious.

Do I need a springform pan? It helps for easy slicing, but a regular pie dish works too.

There you have it—a No-Bake Strawberry Cheesecake that’s as easy to make as it is delicious. Whether you’re serving it at a party or savoring a slice on a quiet evening, this dessert is sure to bring a little joy. For more no-fuss sweet ideas, check out our summer dessert roundup. Happy baking (or not baking)!

Print
clock clock iconcutlery cutlery iconflag flag iconfolder folder iconinstagram instagram iconpinterest pinterest iconfacebook facebook iconprint print iconsquares squares iconheart heart iconheart solid heart solid icon

No-Bake Strawberry Cheesecake

  • Author: Baking Enthusiast

Description

A creamy, dreamy no-bake strawberry cheesecake with a buttery graham cracker crust and fresh strawberry topping. Perfect for summer gatherings or when you want a fuss-free dessert!


Ingredients

Scale

For the Crust:

  • For the crust:
  • 1 1/2 cups graham cracker crumbs
  • 1/4 cup granulated sugar
  • 6 tablespoons unsalted butter, melted
  • For the filling:
  • 16 oz cream cheese, softened
  • 1 cup powdered sugar
  • 1 teaspoon vanilla extract
  • 1 cup heavy whipping cream, chilled
  • For the topping:
  • 2 cups fresh strawberries, sliced
  • 1/4 cup granulated sugar
  • 1 tablespoon lemon juice
  • 1 teaspoon cornstarch dissolved in 1 tablespoon water

Instructions

1. Prepare the Crust:

  1. 1. Make the crust: In a bowl, mix graham cracker crumbs, sugar, and melted butter until combined.
  2. 2. Press mixture firmly into the bottom of a 9-inch springform pan. Chill for 30 minutes.
  3. 3. Make the filling: Beat cream cheese until smooth. Add powdered sugar and vanilla, beat until creamy.
  4. 4. In a separate bowl, whip heavy cream to stiff peaks. Gently fold into cream cheese mixture.
  5. 5. Spread filling over chilled crust. Smooth top with a spatula. Refrigerate for 4 hours.
  6. 6. Make the topping: In a saucepan, combine strawberries, sugar, and lemon juice. Cook over medium heat for 5 minutes.
  7. 7. Stir in cornstarch mixture and cook until thickened, about 2 minutes. Cool completely before spreading over cheesecake.
  8. 8. Chill assembled cheesecake for at least 2 more hours before serving.

Notes

For best results, use full-fat cream cheese and make sure all ingredients are at room temperature (except the heavy cream). The cheesecake can be made 1 day ahead – store covered in refrigerator.