Southern Strawberry Shortcake with Buttermilk Biscuits

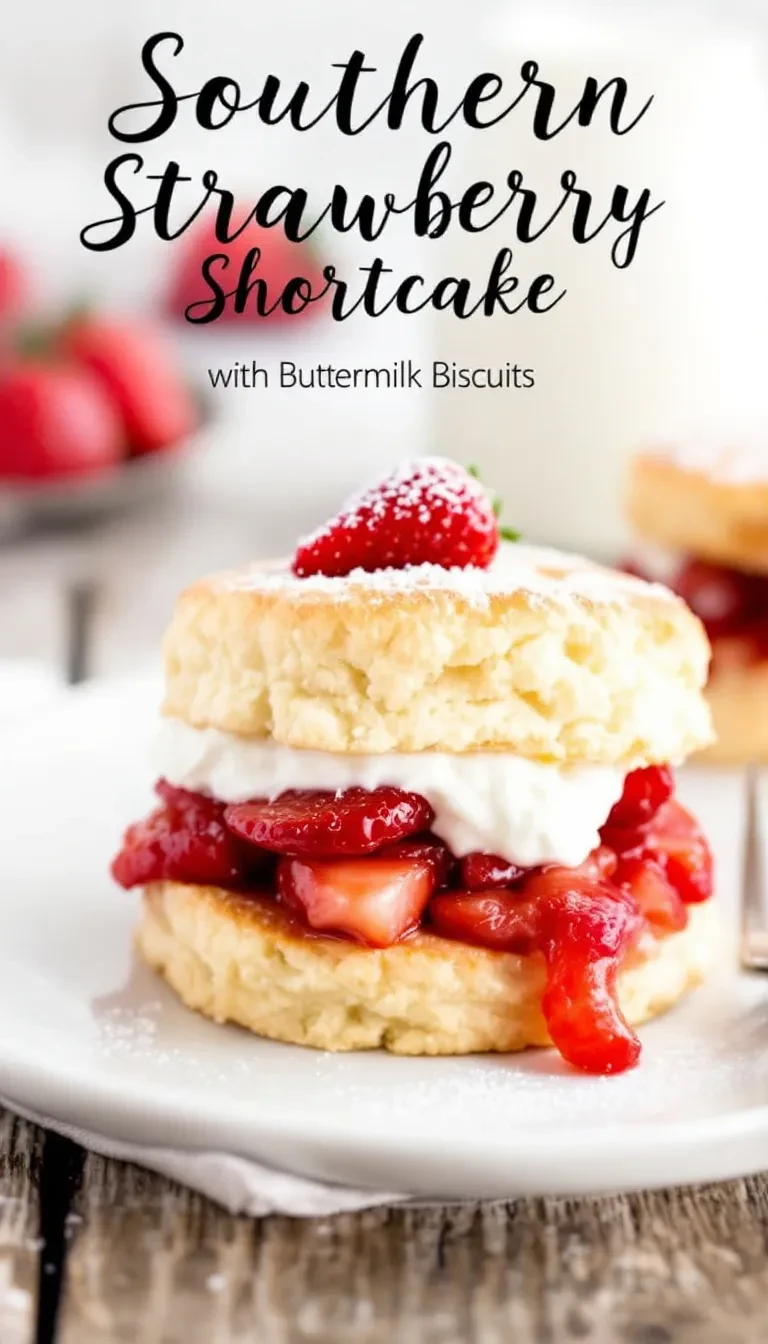
Southern Strawberry Shortcake with Buttermilk Biscuits: A Sweet Slice of Summer

There’s something magical about the first bite of Southern Strawberry Shortcake with Buttermilk Biscuits—the way the tender, flaky biscuit soaks up the sweet strawberry juices, the pillowy whipped cream melting just slightly on your tongue. It’s a dessert that tastes like sunshine, picnics, and lazy afternoons on the porch. If you’ve ever had a less-than-perfect shortcake (dry biscuits, bland berries, or worse—store-bought sponge cakes masquerading as the real deal), let me assure you: this recipe is the redemption you deserve.

Growing up in Georgia, my grandmother made this dessert every June when the strawberries were at their peak. She’d pat out her biscuits by hand, never bothering with a rolling pin, and pile them high with macerated berries that practically glistened. I’ve tweaked her recipe over the years—adding a touch more sugar to the biscuits, a splash of vanilla to the cream—but the soul of it remains the same. Whether you’re serving it at a backyard BBQ or just treating yourself on a Tuesday, this Southern Strawberry Shortcake is a little bite of joy.

Why You’ll Love This Southern Strawberry Shortcake

This isn’t just any strawberry shortcake. Here’s what makes it special:

  • Flaky, buttery biscuits: Made with tangy buttermilk for tenderness and a hint of richness.
  • Juicy, flavorful strawberries: Macerated with sugar to draw out their natural sweetness.
  • Pillowy whipped cream: Lightly sweetened and vanilla-kissed for the perfect finish.
  • No fuss, all flavor: Easier than pie (literally) but just as impressive.

How to Make Southern Strawberry Shortcake with Buttermilk Biscuits

Ingredients You’ll Need

  • For the biscuits: All-purpose flour, sugar, baking powder, salt, cold butter, buttermilk
  • For the strawberries: Fresh strawberries, granulated sugar, lemon juice
  • For the whipped cream: Heavy cream, powdered sugar, vanilla extract

Step-by-Step Instructions

  1. Prep the strawberries: Hull and slice them, then toss with sugar and lemon juice. Let sit for at least 30 minutes to macerate.
  2. Make the biscuits: Whisk dry ingredients, cut in cold butter, then stir in buttermilk. Pat out and cut into rounds.
  3. Bake: Until golden brown, about 12–15 minutes at 425°F.
  4. Whip the cream: Beat until soft peaks form, then sweeten lightly.
  5. Assemble: Split warm biscuits, pile on strawberries, and top with whipped cream.

Pro Tips for the Best Shortcake

Want to take your shortcake to the next level? Try these tricks:

  • Keep everything cold: Chill your butter and buttermilk for the flakiest biscuits.
  • Don’t overwork the dough: Handle it gently to avoid tough biscuits.
  • Use ripe berries: The sweeter the strawberries, the better the syrup.
  • Serve immediately: Biscuits are best fresh, but you can prep components ahead.

Variations & Serving Ideas

While this classic version is perfection, here are a few fun twists:

  • Add a splash of bourbon to the strawberries for a grown-up kick.
  • Swap in peaches or blueberries when strawberries aren’t in season.
  • Drizzle with chocolate sauce if you’re feeling indulgent.

Pair it with a glass of Southern sweet tea or a scoop of vanilla ice cream for extra decadence. Looking for more summer desserts? Try my Peach Cobbler with Cinnamon Crust or Lemon Blueberry Pound Cake.

Frequently Asked Questions

Can I use frozen strawberries for strawberry shortcake?
Fresh is best, but in a pinch, thawed frozen strawberries (well-drained) will work.

How do I store leftover strawberry shortcake?
Keep components separate and assemble just before serving. Biscuits stale quickly!

Can I make the biscuits ahead of time?
Yes! Bake them, then reheat for 5 minutes in a 350°F oven before serving.

What’s the secret to fluffy whipped cream?
Use chilled cream and a cold bowl—whip just until soft peaks form.

Can I use store-bought biscuits?
You can, but homemade buttermilk biscuits make all the difference. Trust me!

How long should strawberries macerate?
At least 30 minutes, but up to 2 hours for maximum syrup.

There you have it—the ultimate Southern Strawberry Shortcake with Buttermilk Biscuits, just like Grandma used to make (with a few sneaky upgrades). It’s the kind of dessert that turns a regular day into something special, one sweet, messy bite at a time. Whether you’re sharing it with loved ones or savoring it solo, I hope it brings you as much joy as it’s brought me over the years. Now, who’s ready to dig in?

Print
clock clock iconcutlery cutlery iconflag flag iconfolder folder iconinstagram instagram iconpinterest pinterest iconfacebook facebook iconprint print iconsquares squares iconheart heart iconheart solid heart solid icon

Southern Strawberry Shortcake with Buttermilk Biscuits

  • Author: Southern Comfort Kitchen

Description

A classic Southern dessert featuring fluffy buttermilk biscuits layered with sweet macerated strawberries and freshly whipped cream. Perfect for summer gatherings!


Ingredients

Scale

For the Crust:

  • For the buttermilk biscuits:
  • 2 cups all-purpose flour
  • 1 tablespoon baking powder
  • 1/4 teaspoon baking soda
  • 1 tablespoon granulated sugar
  • 1 teaspoon salt
  • 6 tablespoons cold unsalted butter, cubed
  • 3/4 cup cold buttermilk
  • For the strawberry filling:
  • 1.5 lbs fresh strawberries, hulled and sliced
  • 1/3 cup granulated sugar
  • 1 teaspoon lemon juice
  • For the whipped cream:
  • 1 cup heavy whipping cream
  • 2 tablespoons powdered sugar
  • 1 teaspoon vanilla extract

Instructions

1. Prepare the Crust:

  1. 1. Preheat oven to 450°F (230°C). Line a baking sheet with parchment paper.
  2. 2. Make biscuits: Whisk together flour, baking powder, baking soda, sugar, and salt in a large bowl.
  3. 3. Cut in cold butter using a pastry cutter until mixture resembles coarse crumbs.
  4. 4. Stir in buttermilk until just combined (do not overmix).
  5. 5. Turn dough onto floured surface, pat into 1-inch thick rectangle, and cut into 6 squares.
  6. 6. Bake for 12-15 minutes until golden brown. Cool completely.
  7. 7. Prepare strawberries: Mix sliced strawberries with sugar and lemon juice. Let macerate for 30 minutes.
  8. 8. Make whipped cream: Beat heavy cream, powdered sugar, and vanilla until stiff peaks form.
  9. 9. Assemble: Split biscuits, layer with strawberries and juice, then top with whipped cream.

Notes

For best results, use cold ingredients and handle the biscuit dough minimally. The biscuits can be made 1 day ahead – store in airtight container at room temperature. Macerate strawberries just before serving.

Baked Chicken and Rice with Fresh Herbs

Baked Chicken and Rice with Fresh Herbs: A One-Pan Wonder

There’s something magical about a dish that comes together effortlessly yet tastes like you spent hours in the kitchen. This Baked Chicken and Rice with Fresh Herbs is exactly that—a comforting, aromatic meal that fills your home with the scent of garlic, thyme, and golden chicken crisping to perfection. Whether you’re juggling a hectic weeknight or hosting a last-minute dinner, this recipe is your trusty sidekick. Plus, it’s all made in one pan, because who wants to scrub a mountain of dishes?

I first stumbled upon this recipe during a chaotic phase when my toddler declared war on anything green. Desperate for a win, I tossed chicken, rice, and a handful of fresh herbs into a baking dish, crossed my fingers, and prayed. The result? A dish so flavorful and tender that even my tiny food critic asked for seconds (and didn’t flinch at the parsley!). Now, it’s a staple in our home, and I’m thrilled to share it with you. Ready to fall in love with dinner again?

Why You’ll Love This Baked Chicken and Rice

This dish isn’t just delicious—it’s a game-changer for busy lives. Here’s why:

  • One-pan wonder: Minimal cleanup means more time for yourself (or Netflix).
  • Versatile: Swap herbs based on what’s in your fridge or garden.
  • Crowd-pleaser: Perfect for picky eaters and fancy enough for guests.
  • Meal prep hero: Leftovers taste even better the next day.

How to Make Baked Chicken and Rice with Fresh Herbs

Ingredients You’ll Need

  • 4 bone-in, skin-on chicken thighs (or breasts for a leaner option)
  • 1 cup long-grain white rice (like jasmine or basmati)
  • 2 cups chicken broth (homemade or store-bought)
  • 3 cloves garlic, minced
  • 1 lemon, zested and juiced
  • 2 tbsp fresh thyme, chopped
  • 2 tbsp fresh parsley, chopped
  • 1 tsp smoked paprika
  • Salt and pepper to taste
  • 2 tbsp olive oil

Step-by-Step Instructions

  1. Preheat & prep: Heat your oven to 375°F (190°C). Pat the chicken dry and season generously with salt, pepper, and smoked paprika.
  2. Sear the chicken: In a large oven-safe skillet, heat olive oil over medium-high heat. Sear the chicken skin-side down until golden (about 5 minutes). Flip and cook 2 more minutes. Remove and set aside.
  3. Toast the rice: In the same skillet, add rice and garlic. Stir for 1–2 minutes until fragrant. Pour in broth, lemon juice, and half the herbs, scraping up any browned bits.
  4. Bake: Nestle the chicken back into the skillet, skin-side up. Cover tightly with foil and bake for 30 minutes. Uncover and bake 10 more minutes until rice is tender and chicken is cooked through.
  5. Garnish & serve: Sprinkle with remaining herbs and lemon zest. Let rest 5 minutes before serving.

Tips for the Best Baked Chicken and Rice

Want to elevate this dish even further? Try these pro tips:

  • Herb swap: No thyme? Rosemary or oregano work beautifully.
  • Crispy skin hack: Broil for 2–3 minutes at the end for extra crunch.
  • Veggie boost: Stir in peas or diced carrots with the rice for added nutrition.

For more easy one-pan meals, check out our One-Pan Lemon Garlic Salmon or Creamy Tuscan Chicken.

Pairing Suggestions

This dish pairs wonderfully with a crisp green salad or roasted vegetables. For wine lovers, a chilled Sauvignon Blanc complements the herbal notes perfectly. Need dessert inspiration? Try our 5-Ingredient Berry Crisp.

Frequently Asked Questions

Can I use brown rice instead of white?
Yes, but you’ll need to adjust the liquid and cooking time. Brown rice typically requires more broth and 10–15 extra minutes of baking. Check out this guide for more on rice varieties.

How do I store leftovers?
Store in an airtight container in the fridge for up to 3 days. Reheat in the oven at 350°F to keep the rice fluffy.

Can I make this dairy-free?
Absolutely! This recipe is naturally dairy-free—just ensure your broth is dairy-free if store-bought.

What herbs work best?
Thyme, parsley, and rosemary are classics, but tarragon or chives add fun twists.

Can I use boneless chicken?
Yes, but reduce baking time by 5–7 minutes to prevent drying out.

Is this recipe gluten-free?
Yes, as long as your broth is gluten-free. Always check labels!

There you have it—a dish that’s as forgiving as it is flavorful. Whether you’re cooking for one or a full house, this Baked Chicken and Rice with Fresh Herbs promises to deliver comfort without the fuss. So grab that skillet, channel your inner home chef, and let the oven do the heavy lifting. Happy cooking!

Print
clock clock iconcutlery cutlery iconflag flag iconfolder folder iconinstagram instagram iconpinterest pinterest iconfacebook facebook iconprint print iconsquares squares iconheart heart iconheart solid heart solid icon

Baked Chicken and Rice with Fresh Herbs

  • Author: Chef Maria

Description

A comforting one-pan meal featuring tender baked chicken thighs nestled over fragrant herbed rice. Perfect for weeknight dinners with minimal cleanup!


Ingredients

Scale

For the Crust:

  • For the chicken:
  • 4 bone-in, skin-on chicken thighs
  • 1 tsp salt
  • 1/2 tsp black pepper
  • 1 tsp paprika
  • 2 tbsp olive oil
  • For the rice:
  • 1 cup long-grain white rice
  • 2 cups chicken broth
  • 3 garlic cloves (minced)
  • 1 small onion (diced)
  • 1 tsp dried thyme
  • 1/2 tsp salt
  • For garnish:
  • 1/4 cup fresh parsley (chopped)
  • 2 tbsp fresh dill (chopped)
  • 1 lemon (cut into wedges)

Instructions

1. Prepare the Crust:

  1. 1. Preheat oven to 375°F (190°C).
  2. 2. Season chicken thighs with salt, pepper and paprika on both sides.
  3. 3. Heat olive oil in large oven-safe skillet over medium-high heat. Brown chicken skin-side down for 5-6 minutes until golden, then flip and cook 2 more minutes. Remove chicken and set aside.
  4. 4. In same skillet, sauté onion for 3 minutes until soft. Add garlic and cook 30 seconds until fragrant.
  5. 5. Stir in rice, thyme, and salt until rice is lightly toasted (about 2 minutes).
  6. 6. Pour in chicken broth and scrape up any browned bits. Bring to a simmer.
  7. 7. Nestle chicken thighs into rice (skin-side up) with any accumulated juices.
  8. 8. Cover tightly with foil or lid and bake for 35 minutes.
  9. 9. Remove cover and bake 10 more minutes to crisp chicken skin.
  10. 10. Let rest 5 minutes, then garnish with fresh herbs and lemon wedges before serving.

Notes

For crispier skin, broil for 2-3 minutes at the end. Substitute brown rice by increasing liquid to 2.5 cups and baking time to 50 minutes covered.

Lemon Cream Pie Bars with Graham Crust


Lemon Cream Pie Bars with Graham Crust: A Zesty, No-Fuss Dessert

There’s something magical about the bright, tangy flavor of lemon in a dessert—it’s like sunshine on a plate. If you’re anything like me, the moment warmer weather hits, you start craving those refreshing citrusy treats that feel light yet indulgent. That’s where these Lemon Cream Pie Bars with Graham Crust come in. They’re the perfect balance of creamy, sweet, and tart, all nestled into a buttery graham cracker base that’s impossible to resist.

I first fell in love with this recipe when I needed a quick yet impressive dessert for a last-minute backyard gathering. I wanted something that felt special but didn’t require hours in the kitchen. These bars delivered—big time. The graham cracker crust is a breeze to whip up (no rolling pins required!), and the luscious lemon filling comes together in minutes. Plus, they’re sliceable, portable, and guaranteed to disappear fast. Whether you’re serving them at a picnic, potluck, or just treating yourself, these bars are a must-try.

Why You’ll Love These Lemon Cream Pie Bars

If you need more convincing (though one bite will do the trick), here’s why these bars deserve a spot in your recipe rotation:

  • No-bake filling: The creamy lemon layer sets in the fridge, so no oven babysitting!
  • Perfect texture: The graham crust is crisp, while the filling is velvety-smooth.
  • Make-ahead friendly: These bars actually taste better after chilling overnight.
  • Crowd-pleasing: Even non-lemon lovers (do they exist?) can’t resist these.

How to Make Lemon Cream Pie Bars with Graham Crust

Ingredients You’ll Need

  • For the crust: Graham cracker crumbs, melted butter, sugar, and a pinch of salt.
  • For the filling: Cream cheese, sweetened condensed milk, fresh lemon juice and zest, and vanilla extract.
  • Optional garnish: Whipped cream, lemon slices, or extra graham crumbs.

Step-by-Step Instructions

  1. Prep the crust: Mix graham crumbs, melted butter, sugar, and salt, then press into a lined pan. Bake for 10 minutes at 350°F, then cool.
  2. Make the filling: Beat cream cheese until smooth, then blend in condensed milk, lemon juice, zest, and vanilla.
  3. Assemble: Pour filling over the cooled crust and smooth the top. Chill for at least 4 hours (overnight is best).
  4. Serve: Slice into bars and garnish if desired. Store leftovers in the fridge.

Pro Tips for the Best Bars

Want to take these bars to the next level? Here are my secrets:

  • Use fresh lemon juice—bottled just doesn’t deliver the same vibrant flavor.
  • Let the cream cheese soften fully to avoid lumps in your filling.
  • For a chocolate twist, add a layer of melted chocolate over the crust before adding the lemon filling.

Frequently Asked Questions

Can I use a different crust for these lemon bars?

Absolutely! Shortbread or vanilla wafer crumbs work well too. Check out our guide to no-bake crusts for more ideas.

How long do lemon cream pie bars last in the fridge?

They’ll stay fresh for up to 5 days if covered tightly. The crust may soften slightly over time.

Can I freeze these bars?

Yes! Freeze them in an airtight container for up to 2 months. Thaw in the fridge before serving.

Why is my filling not setting?

If your bars are too soft, you may need to chill them longer (overnight is ideal) or add a bit more lemon juice to help firm up the texture.

Can I use lime instead of lemon?

Definitely! Lime or even orange zest and juice would make delicious variations. For more citrus inspiration, try our citrus dessert roundup.

Are these lemon bars gluten-free?

They can be! Just use gluten-free graham crackers (like Simple Mills) and ensure all other ingredients are GF.

Whether you’re a lemon dessert devotee or just looking for a simple, sunny treat to brighten your day, these Lemon Cream Pie Bars with Graham Crust are sure to hit the spot. They’re the kind of recipe that feels like a hug—comforting, familiar, and always welcome. So grab your lemons and your mixing bowl, and let’s make something delicious together. Don’t be surprised if this becomes your new go-to dessert for every occasion (or no occasion at all—you deserve it!).


Print
clock clock iconcutlery cutlery iconflag flag iconfolder folder iconinstagram instagram iconpinterest pinterest iconfacebook facebook iconprint print iconsquares squares iconheart heart iconheart solid heart solid icon

Lemon Cream Pie Bars with Graham Crust

  • Author: Baking Enthusiast

Description

These Lemon Cream Pie Bars feature a buttery graham cracker crust topped with a luscious lemon cream filling. Perfectly tangy and sweet, they’re an easy no-bake dessert for any occasion.


Ingredients

Scale

For the Crust:

  • For the crust:
  • 1 1/2 cups graham cracker crumbs
  • 1/3 cup granulated sugar
  • 6 tablespoons unsalted butter, melted
  • For the filling:
  • 1 (14 oz) can sweetened condensed milk
  • 3/4 cup fresh lemon juice (about 4 lemons)
  • 1 tablespoon lemon zest
  • 1 (8 oz) package cream cheese, softened
  • 1 teaspoon vanilla extract
  • For the topping:
  • 1 cup heavy whipping cream
  • 2 tablespoons powdered sugar
  • Lemon slices or zest for garnish (optional)

Instructions

1. Prepare the Crust:

  1. 1. Line an 8×8-inch baking pan with parchment paper, leaving an overhang for easy removal.
  2. 2. In a medium bowl, mix graham cracker crumbs, sugar, and melted butter until combined.
  3. 3. Press the mixture firmly into the prepared pan to form an even crust. Chill in the refrigerator for 30 minutes.
  4. 4. In a large bowl, beat the cream cheese until smooth. Add sweetened condensed milk, lemon juice, lemon zest, and vanilla extract. Mix until fully combined and creamy.
  5. 5. Pour the filling over the chilled crust and spread evenly. Refrigerate for at least 4 hours or until set.
  6. 6. Before serving, whip the heavy cream and powdered sugar until stiff peaks form. Spread over the chilled lemon layer.
  7. 7. Garnish with lemon slices or zest if desired. Cut into squares and serve chilled.

Notes

For a firmer filling, refrigerate overnight. Store leftovers covered in the refrigerator for up to 5 days. For a stronger lemon flavor, add an extra tablespoon of lemon zest.

Spring Garden Quiche with Asparagus and Spinach

Spring Garden Quiche with Asparagus and Spinach: A Fresh Seasonal Delight

There’s something magical about spring produce—the crisp snap of asparagus, the tender leaves of spinach, and the bright flavors that seem to whisper, “Welcome back, sunshine!” This Spring Garden Quiche with Asparagus and Spinach is my love letter to the season, a dish that’s as versatile as it is delicious. Whether you’re hosting a brunch, packing a picnic, or simply treating yourself to a cozy meal, this quiche delivers with its flaky crust, creamy filling, and garden-fresh veggies.

I first fell in love with quiche during a trip to a tiny French café, where the buttery aroma wafting from the kitchen was impossible to resist. Since then, I’ve made it my mission to create a version that’s equally irresistible but packed with spring’s bounty. The best part? It’s forgiving. Forget the stress of perfect pie crusts (store-bought works wonderfully here) or exact measurements—quiche is all about embracing imperfection and savoring every bite. Serve it warm with a side salad, or enjoy it cold the next day (if there’s any left!).

Why You’ll Love This Spring Garden Quiche

This quiche isn’t just pretty—it’s practical, too! Here’s why it’ll become a staple in your spring rotation:

  • Seasonal flavors: Asparagus and spinach shine, but you can swap in peas, leeks, or even ramps.
  • Meal-prep friendly: Make it ahead for easy breakfasts or lunches.
  • Crowd-pleaser: Perfect for Easter, Mother’s Day, or any brunch gathering.
  • Customizable: Add crumbled bacon, goat cheese, or herbs like chives or tarragon.

How to Make Spring Garden Quiche with Asparagus and Spinach

This recipe is straightforward, but here are a few tips for quiche success:

  1. Blind-bake the crust: Pre-bake it for 10 minutes to avoid a soggy bottom (a tragedy in the quiche world!).
  2. Sauté the veggies: Cook the asparagus and spinach briefly to remove excess moisture.
  3. Whisk thoroughly: Combine eggs, cream, and seasonings well for a silky texture.
  4. Don’t overbake: The center should jiggle slightly—it’ll set as it cools.

Recipe: Spring Garden Quiche with Asparagus and Spinach

Prep time: 20 mins | Cook time: 40 mins | Serves: 6

Ingredients

  • 1 store-bought or homemade pie crust
  • 1 cup asparagus, chopped into 1-inch pieces
  • 1 cup fresh spinach, roughly chopped
  • 4 large eggs
  • 1 cup heavy cream (or half-and-half for a lighter version)
  • 1/2 cup shredded Gruyère or Swiss cheese
  • 1/4 tsp nutmeg (trust me on this!)
  • Salt and pepper to taste

Instructions

  1. Preheat oven to 375°F (190°C). Roll out the pie crust and fit it into a 9-inch pie dish. Prick the bottom with a fork, line with parchment, and fill with pie weights or dried beans. Blind-bake for 10 minutes.
  2. In a skillet, sauté asparagus over medium heat for 3 minutes. Add spinach and cook until wilted. Set aside.
  3. In a bowl, whisk eggs, cream, nutmeg, salt, and pepper until smooth.
  4. Sprinkle cheese over the pre-baked crust, then layer the veggies. Pour the egg mixture over the top.
  5. Bake for 30–35 minutes, until the edges are golden and the center is just set. Let cool for 10 minutes before slicing.

Serving Suggestions

Pair this quiche with a simple spring salad or roasted potatoes for a heartier meal. A drizzle of hot honey or a dollop of herbed crème fraîche takes it to the next level!

Frequently Asked Questions

Can I make this quiche ahead of time?
Absolutely! Bake it, let it cool, and refrigerate for up to 3 days. Reheat slices in the oven or enjoy cold.

What’s the best cheese for quiche?
Gruyère is classic, but cheddar, feta, or goat cheese work well too. For more ideas, check out our cheese pairing guide.

Can I freeze this quiche?
Yes! Wrap tightly and freeze for up to 2 months. Thaw overnight in the fridge before reheating.

How do I prevent a soggy crust?
Blind-baking is key. For extra insurance, brush the pre-baked crust with a beaten egg white before adding fillings.

Is quiche gluten-free?
Use a gluten-free pie crust and ensure all other ingredients are GF.

Can I use milk instead of cream?
Yes, but the texture will be less rich. For a dairy-free version, try coconut milk (the canned kind).

As the days grow longer and the farmers’ markets burst with color, this Spring Garden Quiche is my go-to for celebrating the season’s simplicity and abundance. It’s a reminder that the best meals often come from tossing together what’s fresh, trusting your instincts, and savoring the joy of sharing good food. If you’re craving more spring inspiration, try our Lemon Berry Tart or Herb-Roasted Chicken. Happy cooking, and here’s to sunny days ahead!

Print
clock clock iconcutlery cutlery iconflag flag iconfolder folder iconinstagram instagram iconpinterest pinterest iconfacebook facebook iconprint print iconsquares squares iconheart heart iconheart solid heart solid icon

Spring Garden Quiche with Asparagus and Spinach

  • Author: The Seasonal Chef

Description

A light and flavorful quiche packed with fresh spring vegetables like asparagus and spinach, nestled in a flaky homemade crust. Perfect for brunch or a light dinner.


Ingredients

Scale

For the Crust:

  • For the crust:
  • 1 1/4 cups all-purpose flour
  • 1/2 teaspoon salt
  • 1/2 cup unsalted butter, chilled and cubed
  • 34 tablespoons ice water
  • For the filling:
  • 1 tablespoon olive oil
  • 1 small onion, finely diced
  • 1 cup asparagus, trimmed and cut into 1-inch pieces
  • 2 cups fresh spinach, roughly chopped
  • 4 large eggs
  • 1 cup whole milk
  • 1/2 cup heavy cream
  • 1/2 teaspoon salt
  • 1/4 teaspoon black pepper
  • 1/4 teaspoon nutmeg
  • 1 cup shredded Gruyère cheese

Instructions

1. Prepare the Crust:

  1. Prepare the crust: In a food processor, pulse flour and salt. Add chilled butter and pulse until mixture resembles coarse crumbs.
  2. Add ice water 1 tablespoon at a time, pulsing until dough comes together. Form into a disk, wrap in plastic, and chill for 30 minutes.
  3. Preheat oven to 375°F (190°C). Roll out dough on a floured surface and transfer to a 9-inch pie dish. Trim edges and prick bottom with a fork. Line with parchment and pie weights, then blind bake for 15 minutes. Remove weights and bake 5 more minutes. Cool slightly.
  4. Make the filling: Heat olive oil in a skillet over medium heat. Sauté onion for 3 minutes, then add asparagus and cook for 4 minutes. Stir in spinach until wilted. Remove from heat.
  5. In a bowl, whisk eggs, milk, cream, salt, pepper, and nutmeg. Spread vegetable mixture in crust, sprinkle with cheese, then pour egg mixture over top.
  6. Bake for 35-40 minutes until center is set and top is golden. Let cool 10 minutes before slicing.

Notes

For a crispier crust, brush the pre-baked shell with egg wash before adding filling. Substitute Swiss cheese if Gruyère is unavailable. Leftovers keep refrigerated for 3 days.

Glazed Carrot Bundt Cake with Cream Cheese Swirl

Glazed Carrot Bundt Cake with Cream Cheese Swirl: A Showstopper Dessert

There’s something undeniably magical about a Bundt cake—its elegant shape, the way it effortlessly commands attention on a dessert table, and the promise of a tender, moist crumb inside. Now, imagine that classic beauty combined with the cozy flavors of spiced carrot cake and a luscious cream cheese swirl, all finished with a glossy glaze. That’s exactly what this Glazed Carrot Bundt Cake with Cream Cheese Swirl delivers. Whether you’re hosting a spring brunch, celebrating a birthday, or simply treating yourself (because why not?), this cake is a guaranteed crowd-pleaser.

I first stumbled upon the idea for this recipe after a particularly chaotic week. My garden had gifted me an abundance of carrots, and my sweet tooth was begging for something beyond the usual muffins. A Bundt pan caught my eye, and the rest was history. What I love most about this cake is how it balances richness and warmth—the earthy sweetness of carrots, the warmth of cinnamon and nutmeg, and the tangy cream cheese swirl that cuts through it all. Plus, that glaze? It’s the edible equivalent of a shiny red bow on a gift. Trust me, one slice and you’ll be hooked.

Why You’ll Love This Glazed Carrot Bundt Cake

This isn’t just another carrot cake—it’s a experience. Here’s why it’ll become your new favorite:

  • Moist and flavorful: Grated carrots and a touch of applesauce keep the crumb tender.
  • Cream cheese surprise: A marbled swirl adds tangy contrast to the spiced cake.
  • Easy elegance: The Bundt shape makes it look fancy with zero decorating skills required.
  • Perfect for any occasion: Brunch, potlucks, or a Tuesday pick-me-up—it fits right in.

Key Ingredients & Tips

Before you preheat the oven, here are a few pro tips to ensure success:

  • Carrots: Finely grate them for even distribution (no one wants a chunky bite!).
  • Cream cheese swirl: Soften the cream cheese to room temp to avoid lumps.
  • Spices: Freshly ground nutmeg makes a world of difference—try it!
  • Bundt pan prep: Grease every nook with butter and flour to prevent sticking.

For more Bundt cake inspiration, check out our Lemon Blueberry Bundt Cake—another reader favorite!

How to Make Glazed Carrot Bundt Cake with Cream Cheese Swirl

Ready to bake? Follow these steps for a flawless cake:

  1. Prep: Preheat oven to 350°F (175°C). Grease a 10-cup Bundt pan thoroughly.
  2. Dry ingredients: Whisk flour, baking powder, cinnamon, nutmeg, and salt in a bowl.
  3. Wet ingredients: Beat eggs, sugar, oil, applesauce, and vanilla until smooth.
  4. Combine: Gradually mix dry ingredients into wet, then fold in carrots.
  5. Swirl: Alternate spoonfuls of batter and cream cheese mixture in the pan, then swirl with a knife.
  6. Bake: 45–50 minutes, until a tester comes out clean. Cool completely before glazing.

For a deeper dive into spice blends, King Arthur Baking’s guide is a fantastic resource.

Serving & Storage Tips

This cake tastes even better the next day as the flavors meld! Store it covered at room temperature for up to 3 days or refrigerate for up to 5. The glaze can be added just before serving to keep it pristine. Pair it with a cup of Homemade Chai Tea Latte for the ultimate cozy moment.

Frequently Asked Questions

Can I use pre-shredded carrots?
I recommend freshly grated carrots—they’re juicier and lend better texture.

How do I prevent the cake from sticking to the pan?
Grease every crevice with softened butter and a dusting of flour, or use a non-stick baking spray with flour.

Can I make this cake ahead?
Absolutely! Bake it 1–2 days in advance and add the glaze before serving.

What’s the best way to drizzle the glaze?
Use a squeeze bottle or a zip-top bag with the corner snipped for precision.

Can I freeze this Bundt cake?
Yes! Wrap unglazed cake tightly in plastic and freeze for up to 2 months. Thaw overnight before glazing.

Can I substitute the cream cheese swirl?
For a dairy-free option, try a coconut cream cheese alternative, though the flavor will vary slightly.

There you have it—a cake that’s as fun to make as it is to eat. Whether you’re sharing it with friends or savoring a slice solo (no judgment here!), this Glazed Carrot Bundt Cake with Cream Cheese Swirl is bound to become a cherished recipe in your collection. Happy baking!

Print
clock clock iconcutlery cutlery iconflag flag iconfolder folder iconinstagram instagram iconpinterest pinterest iconfacebook facebook iconprint print iconsquares squares iconheart heart iconheart solid heart solid icon

Glazed Carrot Bundt Cake with Cream Cheese Swirl

  • Author: Baking Enthusiast

Description

A moist and flavorful carrot cake baked in a Bundt pan, featuring a rich cream cheese swirl and topped with a sweet glaze. Perfect for any occasion!


Ingredients

Scale

For the Crust:

  • For the Cake:
  • 2 cups all-purpose flour
  • 2 teaspoons baking powder
  • 1 teaspoon baking soda
  • 1 teaspoon ground cinnamon
  • 1/2 teaspoon ground nutmeg
  • 1/2 teaspoon salt
  • 1 cup granulated sugar
  • 1 cup packed brown sugar
  • 1 cup vegetable oil
  • 4 large eggs
  • 2 teaspoons vanilla extract
  • 3 cups grated carrots
  • 1/2 cup crushed pineapple, drained
  • 1/2 cup chopped walnuts (optional)
  • For the Cream Cheese Swirl:
  • 8 oz cream cheese, softened
  • 1/4 cup granulated sugar
  • 1 large egg
  • 1 teaspoon vanilla extract
  • For the Glaze:
  • 1 cup powdered sugar
  • 2 tablespoons milk
  • 1/2 teaspoon vanilla extract

Instructions

1. Prepare the Crust:

  1. Preheat oven to 350°F (175°C). Grease and flour a 10-inch Bundt pan.
  2. In a large bowl, whisk together flour, baking powder, baking soda, cinnamon, nutmeg, and salt.
  3. In another bowl, beat granulated sugar, brown sugar, oil, eggs, and vanilla until smooth.
  4. Gradually add the dry ingredients to the wet mixture, mixing until just combined.
  5. Fold in grated carrots, crushed pineapple, and walnuts (if using). Set aside.
  6. For the cream cheese swirl: Beat cream cheese, sugar, egg, and vanilla until smooth.
  7. Pour half of the carrot cake batter into the prepared Bundt pan. Spoon cream cheese mixture over the batter, then top with remaining cake batter.
  8. Bake for 50-60 minutes, or until a toothpick inserted comes out clean.
  9. Cool in the pan for 15 minutes, then invert onto a wire rack to cool completely.
  10. For the glaze: Whisk powdered sugar, milk, and vanilla until smooth. Drizzle over cooled cake.

Notes

For best results, ensure cream cheese is at room temperature before mixing. Store cake in the refrigerator if not serving immediately.