No-Bake Strawberry Cheesecake

No-Bake Strawberry Cheesecake: A Lush, Effortless Dessert for Any Occasion

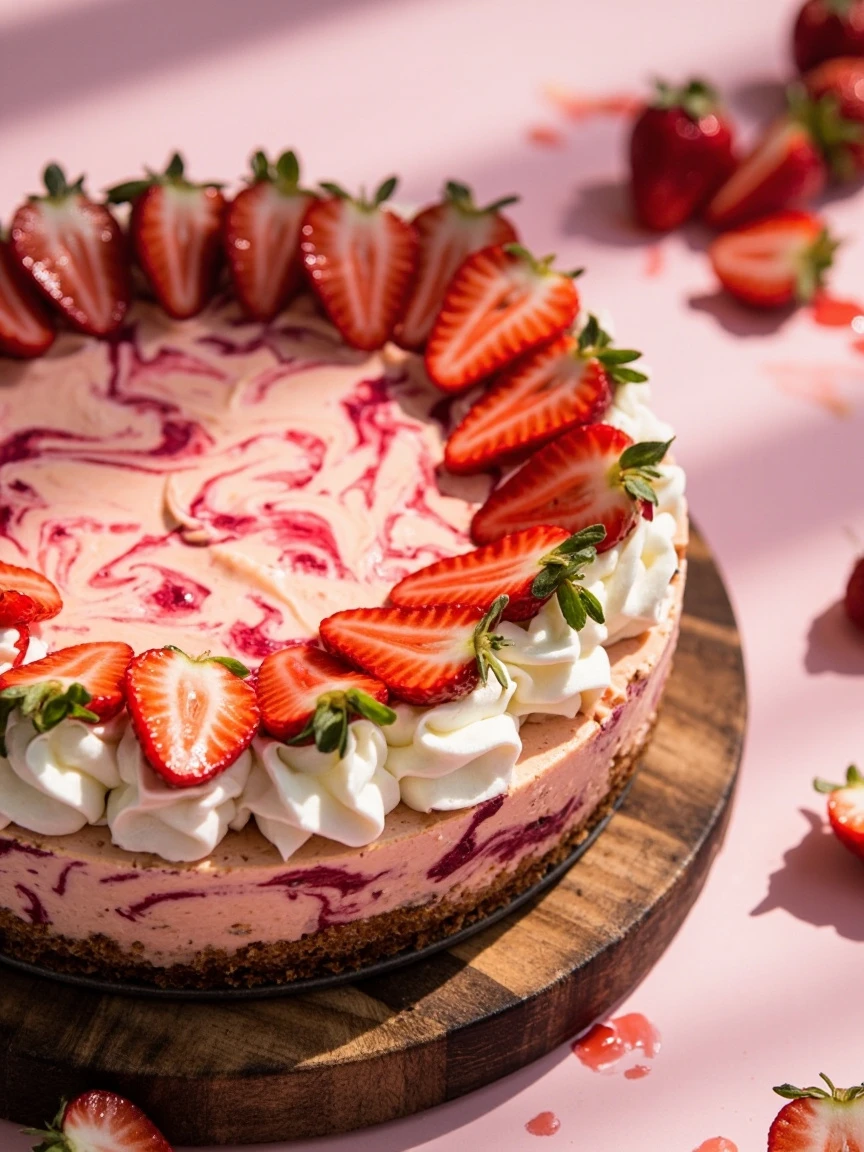
There’s something magical about a no-bake cheesecake—especially when it’s crowned with juicy, ripe strawberries. Whether you’re dodging oven heat on a summer afternoon or simply craving a fuss-free dessert, this No-Bake Strawberry Cheesecake is your golden ticket. Creamy, tangy, and just sweet enough, it’s the kind of treat that feels indulgent without demanding hours in the kitchen. Plus, let’s be honest: anything that lets us skip the wait for it to cool dance is a win in my book.

I first fell for this recipe during a chaotic week when my oven decided to retire mid-cookie bake (RIP, old friend). Desperate for a dessert to bring to a friend’s BBQ, I threw together a graham cracker crust, a cloud-like filling, and a pile of strawberries—and voilà! The result was so good, it’s now my go-to for potlucks, birthdays, and those I need something sweet NOW moments. The best part? It’s nearly impossible to mess up. Even if your crust crumbles a little (we’ve all been there), a press of the fingers fixes everything. No stress, just strawberries and joy.

Why You’ll Love This No-Bake Strawberry Cheesecake

This recipe isn’t just easy—it’s packed with perks that’ll make it a staple in your dessert rotation:

  • No oven required: Perfect for hot days or tiny kitchens.
  • Make-ahead magic: Chill it overnight for stress-free entertaining.
  • Customizable: Swap strawberries for blueberries, raspberries, or even a drizzle of chocolate.
  • Crowd-pleaser: Kids and adults alike will beg for seconds.

How to Make No-Bake Strawberry Cheesecake

Ingredients You’ll Need

  • 2 cups graham cracker crumbs
  • ½ cup melted butter
  • 16 oz cream cheese, softened
  • 1 cup powdered sugar
  • 1 tsp vanilla extract
  • 1 cup heavy whipping cream
  • 2 cups fresh strawberries, sliced
  • ¼ cup strawberry jam (for glaze)

Step-by-Step Instructions

  1. Prep the crust: Mix graham cracker crumbs and melted butter until combined. Press firmly into a 9-inch springform pan. Chill for 15 minutes.
  2. Make the filling: Beat cream cheese, powdered sugar, and vanilla until smooth. In a separate bowl, whip the heavy cream to stiff peaks, then fold it gently into the cream cheese mixture.
  3. Layer and chill: Spread the filling over the crust. Arrange strawberry slices on top. Warm the strawberry jam slightly and brush it over the berries for a glossy finish. Refrigerate for at least 4 hours (or overnight).

Tips for the Perfect No-Bake Cheesecake

Want to take your cheesecake from great to Can I get your recipe? status? Try these pro tips:

  • Room temperature cream cheese is key—no lumps allowed!
  • Chill your bowl before whipping the cream for faster peaks.
  • Use a springform pan for easy slicing and serving.
  • For a gluten-free version, swap graham crackers for gluten-free crumbs.

Variations to Try

This recipe is a canvas for creativity! Here are some delicious twists:

  • Lemon zest in the filling for a bright tang.
  • Chocolate crust by adding cocoa powder to the crumbs.
  • Mixed berry topping with raspberries and blackberries.

Frequently Asked Questions

Can I use frozen strawberries? Yes! Thaw and pat them dry to avoid extra moisture.

How long does no-bake cheesecake last? Up to 3 days in the fridge—if it lasts that long!

Can I make this dairy-free? Absolutely! Use coconut whipped cream and vegan cream cheese.

Why is my cheesecake too soft? It may need more chilling time—give it at least 4 hours.

Can I freeze no-bake cheesecake? Yes! Wrap tightly and freeze for up to 1 month. Thaw in the fridge overnight.

What’s the best way to slice strawberries? Use a sharp knife and slice just before serving to keep them fresh.

There you have it—a No-Bake Strawberry Cheesecake that’s as forgiving as it is delicious. Whether you’re celebrating a special occasion or just treating yourself after a long day, this dessert is here to make life sweeter (without turning on the oven). If you’re craving more no-bake inspiration, check out our favorite no-bake desserts for days when even the microwave feels like too much work. Now, go grab those strawberries and whip up something wonderful!

Print
clock clock iconcutlery cutlery iconflag flag iconfolder folder iconinstagram instagram iconpinterest pinterest iconfacebook facebook iconprint print iconsquares squares iconheart heart iconheart solid heart solid icon

No-Bake Strawberry Cheesecake

  • Author: Baking Enthusiast

Description

A creamy, dreamy no-bake strawberry cheesecake with a buttery graham cracker crust and fresh strawberry topping. Perfect for summer gatherings!


Ingredients

Scale

For the Crust:

  • For the crust:
  • 1 1/2 cups graham cracker crumbs
  • 1/4 cup granulated sugar
  • 6 tablespoons unsalted butter, melted
  • For the filling:
  • 16 oz cream cheese, softened
  • 1 cup powdered sugar
  • 1 teaspoon vanilla extract
  • 1 cup heavy whipping cream, whipped to stiff peaks
  • For the topping:
  • 2 cups fresh strawberries, sliced
  • 1/4 cup granulated sugar
  • 1 teaspoon lemon juice
  • 1/2 cup strawberry jam (for glaze)

Instructions

1. Prepare the Crust:

  1. 1. Prepare the crust: In a bowl, mix graham cracker crumbs, sugar, and melted butter until combined.
  2. 2. Press the mixture firmly into the bottom of a 9-inch springform pan. Chill for 30 minutes.
  3. 3. Make the filling: Beat cream cheese, powdered sugar, and vanilla until smooth.
  4. 4. Gently fold in whipped cream until fully incorporated.
  5. 5. Spread the filling over the chilled crust. Smooth the top and refrigerate for 4 hours.
  6. 6. Prepare the topping: Toss strawberries with sugar and lemon juice. Let sit for 15 minutes.
  7. 7. Warm strawberry jam slightly and brush over chilled cheesecake.
  8. 8. Arrange macerated strawberries on top. Chill for another 30 minutes before serving.

Notes

For best results, use full-fat cream cheese and chill the cheesecake overnight. Fresh strawberries can be replaced with other berries.

Spring Chicken Casserole

Spring Chicken Casserole: A Fresh Twist on Comfort Food

There’s something magical about the moment spring whispers its arrival—the days grow longer, the air smells like rain and blossoms, and suddenly, all I crave are meals that feel lighter but still cozy. That’s where this Spring Chicken Casserole comes in. Imagine tender chicken, vibrant seasonal veggies, and a creamy herb-infused sauce, all baked to golden perfection. It’s the kind of dish that bridges the gap between winter comfort and spring freshness, and honestly? My family begs for it year-round.

As a mom of two (and a self-proclaimed casserole enthusiast), I’m always on the hunt for recipes that are equal parts delicious and practical. This one checks every box: it’s a one-pan wonder, packed with protein and veggies, and flexible enough to adapt to whatever’s in your fridge. Plus, leftovers taste even better the next day—if you’re lucky enough to have any! Whether you’re meal-prepping for the week or hosting a casual dinner, this casserole is a crowd-pleaser with minimal fuss. (P.S. If you love easy, veggie-packed meals, you’ll adore my One-Pan Lemon Herb Salmon too!)

Why You’ll Love This Spring Chicken Casserole

Here’s why this recipe earns a permanent spot in my rotation:

  • One-pan simplicity: Less cleanup = more time for sunset walks or that Netflix show you’ve been saving.
  • Seasonal flexibility: Swap asparagus for green beans or add mushrooms if you’re feeling fancy.
  • Meal-prep hero: Assemble it ahead, refrigerate, and bake when needed—perfect for busy weeknights.
  • Comfort without heaviness: Lighter than winter casseroles but still satisfying.

How to Make Spring Chicken Casserole

Ingredients You’ll Need

  • 1.5 lbs boneless, skinless chicken thighs (or breasts)
  • 2 cups fresh asparagus, chopped
  • 1 cup baby carrots, halved
  • 1 leek, thinly sliced (or sub 1 small onion)
  • 3 cloves garlic, minced
  • 1 cup chicken broth (low-sodium if preferred)
  • 1/2 cup heavy cream or Greek yogurt
  • 1 tbsp fresh thyme (or 1 tsp dried)
  • 1/2 cup grated Parmesan
  • Salt, pepper, and a pinch of red pepper flakes

Step-by-Step Instructions

  1. Prep the veggies: Preheat oven to 375°F. Toss asparagus, carrots, leek, and garlic with 1 tbsp olive oil, salt, and pepper. Spread in a 9×13 baking dish.
  2. Brown the chicken: Season chicken with salt, pepper, and thyme. Sear in a skillet over medium-high heat for 2–3 minutes per side (it’ll finish cooking in the oven). Arrange over veggies.
  3. Make the sauce: Whisk broth, cream, and Parmesan in a bowl. Pour over chicken and veggies.
  4. Bake: Cover with foil and bake for 25 minutes. Uncover, sprinkle extra Parmesan, and bake 10 more minutes until bubbly and golden.

Tips for the Best Casserole

Want to take this dish to the next level? Here are my pro tips:

  • Don’t skip the sear: Browning the chicken adds depth of flavor. (Trust me, it’s worth the extra pan!)
  • Go fresh with herbs: Spring is all about bright flavors—fresh thyme or tarragon work beautifully.
  • Add a crunch: Top with toasted breadcrumbs or sliced almonds before baking for texture.

Frequently Asked Questions

Can I use frozen vegetables in this casserole?
Yes! Just thaw and pat them dry to avoid excess moisture. For more freezer-friendly ideas, try my Freezer-Friendly Veggie Lasagna.

How do I store leftovers?
Keep in an airtight container for up to 3 days. Reheat in the oven at 350°F for best results.

Can I make this dairy-free?
Absolutely! Swap cream for coconut milk and omit Parmesan or use nutritional yeast. Check out dairy substitutes for more ideas.

What sides pair well with this?
A simple arugula salad or crusty bread (to sop up the sauce!) are my go-tos.

Can I use turkey instead of chicken?
Yes—just adjust cooking time as needed. Turkey cooks faster than chicken thighs.

Is this casserole gluten-free?
It is! Just ensure your broth and other ingredients are certified GF if needed.

Whether you’re welcoming spring with open arms or just need a reliable dinner that feels like a hug, this casserole delivers. It’s the kind of recipe that reminds me why I love cooking—nourishing, adaptable, and always better when shared. (Pro tip: Double the batch and gift one to a neighbor—they’ll adore you for it.) Now, who’s ready to dig in?

Print
clock clock iconcutlery cutlery iconflag flag iconfolder folder iconinstagram instagram iconpinterest pinterest iconfacebook facebook iconprint print iconsquares squares iconheart heart iconheart solid heart solid icon

Spring Chicken Casserole

  • Author: Chef Emily Wilson

Description

A light and flavorful chicken casserole packed with fresh spring vegetables, tender chicken, and a creamy herb sauce. Perfect for weeknight dinners or potlucks.


Ingredients

Scale

For the Crust:

  • For the casserole:
  • 1.5 lbs boneless, skinless chicken breasts, cubed
  • 2 cups baby potatoes, halved
  • 1 cup carrots, sliced
  • 1 cup asparagus, cut into 1-inch pieces
  • 1/2 cup frozen peas
  • 1 small leek, thinly sliced
  • 2 cloves garlic, minced
  • For the sauce:
  • 1.5 cups chicken broth
  • 1/2 cup heavy cream
  • 2 tbsp all-purpose flour
  • 1 tbsp Dijon mustard
  • 1 tsp dried thyme
  • 1 tsp dried rosemary
  • 1/2 tsp salt
  • 1/4 tsp black pepper
  • For topping:
  • 1/2 cup panko breadcrumbs
  • 1/4 cup grated Parmesan cheese
  • 1 tbsp melted butter

Instructions

1. Prepare the Crust:

  1. 1. Preheat oven to 375°F (190°C). Grease a 9×13 inch baking dish.
  2. 2. In a large skillet over medium heat, brown chicken cubes for 5-6 minutes until lightly golden. Transfer to baking dish.
  3. 3. In same skillet, sauté potatoes, carrots, and leek for 5 minutes. Add garlic and cook 1 minute more. Spread over chicken.
  4. 4. Add asparagus and peas to baking dish, distributing evenly.
  5. 5. Whisk together sauce ingredients in a bowl until smooth. Pour evenly over casserole.
  6. 6. Mix topping ingredients and sprinkle over casserole.
  7. 7. Bake uncovered for 35-40 minutes until bubbly and topping is golden.
  8. 8. Let stand 5 minutes before serving.

Notes

Substitute any spring vegetables you prefer – zucchini, green beans or mushrooms work well. For a crispy topping, broil for last 2-3 minutes of baking time.

Classic Lemon Pound Cake

Classic Lemon Pound Cake: A Sunny, Buttery Treat for Every Occasion

There’s something undeniably comforting about a Classic Lemon Pound Cake. Its tender crumb, rich buttery flavor, and that sunny burst of citrus make it a dessert that feels both nostalgic and fresh. Whether you’re serving it at a spring brunch, pairing it with afternoon tea, or sneaking a slice as a midnight snack (no judgment here!), this cake is a timeless crowd-pleaser.

I’ll never forget the first time I baked this cake for my grandmother. She was a stickler for tradition, and her eyes lit up when she took that first bite—just like hers used to taste. That’s the magic of pound cake: simple ingredients, perfected over generations. And with a generous drizzle of lemon glaze? Pure happiness. If you’re looking for a foolproof recipe that delivers every time, you’ve found it.

Why You’ll Love This Classic Lemon Pound Cake

This isn’t just any pound cake. Here’s what makes it special:

  • Bright, balanced flavor: Zesty lemon cuts through the richness for a perfect harmony.
  • Moist texture: Sour cream ensures it stays deliciously tender for days.
  • Versatile: Dress it up with berries, whipped cream, or enjoy it plain.
  • Easy to make: No fancy techniques—just a bowl, a whisk, and love.

How to Make Classic Lemon Pound Cake

Ingredients You’ll Need

  • 1 ½ cups (3 sticks) unsalted butter, softened
  • 3 cups granulated sugar
  • 5 large eggs, room temperature
  • 3 cups all-purpose flour
  • ½ tsp baking powder
  • ½ tsp salt
  • 1 cup sour cream
  • Zest and juice of 2 lemons
  • 1 tsp vanilla extract

Step-by-Step Instructions

  1. Prep: Preheat oven to 325°F (165°C). Grease and flour a 10-inch Bundt pan.
  2. Cream butter & sugar: Beat butter and sugar until light and fluffy (about 5 minutes).
  3. Add eggs: Incorporate one at a time, mixing well after each.
  4. Dry ingredients: Whisk flour, baking powder, and salt in a separate bowl.
  5. Combine: Alternate adding dry ingredients and sour cream to the batter. Stir in lemon zest, juice, and vanilla.
  6. Bake: Pour into pan and bake for 75–85 minutes, or until a toothpick comes out clean.
  7. Cool & glaze: Let cool in pan for 15 minutes, then invert onto a rack. Drizzle with lemon glaze once fully cooled.

Tips for the Best Pound Cake

Want bakery-level results? Here’s how:

  • Room-temperature ingredients: They blend more evenly for a smoother batter.
  • Don’t overmix: Stop as soon as the flour disappears to avoid a dense cake.
  • Check for doneness early: Ovens vary—start testing at 70 minutes.
  • Storage: Keep it fresh under a cake dome or wrapped tightly for up to 4 days.

Pairing Ideas

This cake shines on its own, but if you’re feeling fancy:

  • Serve with whipped cream and fresh berries.
  • Pair with a cup of Earl Grey tea for a cozy afternoon.
  • Toast slices and top with vanilla ice cream for a decadent twist.

Frequently Asked Questions

Can I use bottled lemon juice?
Fresh is best for flavor, but bottled works in a pinch—just skip the zest.

Why did my cake sink in the middle?
Usually from underbaking or opening the oven door too early. Use an oven thermometer for accuracy!

Can I freeze lemon pound cake?
Absolutely! Wrap slices tightly in plastic and freeze for up to 3 months.

What’s the best way to zest a lemon?
A microplane grater works wonders—just avoid the bitter white pith.

Can I make this in loaf pans?
Yes! Divide batter between two 9×5-inch pans and bake for 50–60 minutes.

How do I prevent a dry pound cake?
Measure flour correctly (spoon & level) and don’t overbake. The sour cream helps, too!

There you have it—the ultimate Classic Lemon Pound Cake, ready to brighten your table and your day. Whether you’re baking it for a special occasion or just because, this recipe is a keeper. Share a slice with someone you love (or keep it all for yourself—we won’t tell). For more citrusy inspiration, try our Lemon Blueberry Bundt Cake next! Happy baking!

Print
clock clock iconcutlery cutlery iconflag flag iconfolder folder iconinstagram instagram iconpinterest pinterest iconfacebook facebook iconprint print iconsquares squares iconheart heart iconheart solid heart solid icon

Classic Lemon Pound Cake

  • Author: Baking Enthusiast

Description

A moist and tender lemon pound cake with a bright citrus flavor, perfect for any occasion. This classic recipe features a buttery crumb and a sweet lemon glaze for extra zing.


Ingredients

Scale

For the Crust:

  • For the cake:
  • 1 1/2 cups unsalted butter, softened
  • 3 cups granulated sugar
  • 5 large eggs, room temperature
  • 3 cups all-purpose flour
  • 1/2 teaspoon baking powder
  • 1/2 teaspoon salt
  • 1 cup whole milk
  • 2 tablespoons lemon zest
  • 1/4 cup fresh lemon juice
  • 1 teaspoon vanilla extract
  • For the glaze:
  • 1 cup powdered sugar
  • 2 tablespoons fresh lemon juice
  • 1 tablespoon milk
  • 1/2 teaspoon lemon zest

Instructions

1. Prepare the Crust:

  1. 1. Preheat oven to 325°F (165°C). Grease and flour a 10-inch Bundt pan.
  2. 2. In a large bowl, cream butter and sugar until light and fluffy (about 5 minutes).
  3. 3. Add eggs one at a time, beating well after each addition.
  4. 4. In a separate bowl, whisk together flour, baking powder, and salt.
  5. 5. Alternately add flour mixture and milk to butter mixture, beginning and ending with flour.
  6. 6. Stir in lemon zest, lemon juice, and vanilla extract until just combined.
  7. 7. Pour batter into prepared pan and bake for 60-70 minutes or until a toothpick comes out clean.
  8. 8. Cool in pan for 15 minutes, then invert onto a wire rack to cool completely.
  9. 9. For the glaze: Whisk all ingredients until smooth. Drizzle over cooled cake.

Notes

For best results, use fresh lemon juice and zest. Cake can be stored at room temperature for 3 days or frozen for up to 3 months. The glaze may be omitted for a less sweet option.

Crockpot Glazed Baby Carrots with Brown Sugar and Butter

Crockpot Glazed Baby Carrots with Brown Sugar and Butter

There’s something magical about a dish that effortlessly transitions from a busy weeknight side to a star player at holiday gatherings. These Crockpot Glazed Baby Carrots with Brown Sugar and Butter are exactly that—simple, sweet, and packed with cozy flavor. Whether you’re juggling work, kids, or just life’s endless to-do list, this recipe is your golden ticket to a stress-free, crowd-pleasing dish.

I first stumbled upon this recipe during one of those chaotic evenings when time was scarce, but the craving for something comforting was strong. The slow cooker did all the heavy lifting while I tackled everything else, and the result? Tender, caramelized carrots bathed in a buttery brown sugar glaze. It’s the kind of dish that makes you feel like you’ve mastered adulting—even if the rest of your day says otherwise. Plus, it pairs beautifully with everything from roasted chicken to holiday ham. If you love easy, flavorful sides, this one’s for you.

Why You’ll Love These Glazed Baby Carrots

This recipe is a game-changer for so many reasons. Here’s why it’s a must-try:

  • Effortless prep: Just toss everything in the crockpot and let it work its magic.
  • Crowd-pleasing flavor: Sweet, buttery, and slightly caramelized—everyone loves these carrots!
  • Versatile: Perfect for weeknight dinners or holiday feasts.
  • Kid-friendly: Even picky eaters can’t resist the sweet glaze.

How to Make Crockpot Glazed Baby Carrots

This recipe is as straightforward as it gets, but here’s a step-by-step breakdown to ensure perfection every time.

Ingredients You’ll Need

  • 2 lbs baby carrots
  • 1/4 cup unsalted butter, melted
  • 1/3 cup brown sugar
  • 1/2 tsp salt
  • 1/4 tsp black pepper
  • 1/2 tsp cinnamon (optional for extra warmth)
  • 1 tbsp fresh parsley, chopped (for garnish)

Step-by-Step Instructions

  1. Prep the carrots: Rinse the baby carrots and pat them dry. No peeling required—yay for less work!
  2. Combine ingredients: In your crockpot, add the carrots, melted butter, brown sugar, salt, pepper, and cinnamon (if using). Toss to coat evenly.
  3. Cook: Cover and cook on LOW for 4-5 hours or HIGH for 2-3 hours, stirring occasionally.
  4. Garnish and serve: Sprinkle with fresh parsley before serving for a pop of color and freshness.

Recipe Tips & Variations

Want to switch things up? Here are a few ideas:

  • Add a splash of orange juice for a citrusy twist—it brightens up the sweetness.
  • Swap brown sugar for maple syrup for a deeper, richer flavor.
  • Throw in some pecans during the last 30 minutes for a delightful crunch.

If you love easy slow cooker sides, you’ll adore our Crockpot Garlic Mashed Potatoes—another hands-off winner!

FAQs About Crockpot Glazed Carrots

Can I use regular carrots instead of baby carrots?

Absolutely! Just slice them into uniform pieces so they cook evenly.

How do I store leftovers?

Store in an airtight container in the fridge for up to 4 days. Reheat gently in the microwave or on the stovetop.

Can I make these ahead of time?

Yes! Prepare them a day in advance and reheat before serving. The glaze thickens as it cools, so add a splash of water when reheating.

What pairs well with glazed carrots?

They’re fantastic with Slow Cooker Honey Glazed Ham or roasted chicken.

Can I freeze these carrots?

Freezing isn’t recommended—the texture can become mushy upon thawing.

Why add cinnamon?

It adds a subtle warmth that complements the brown sugar beautifully, but it’s optional if you prefer a simpler flavor.

There you have it—a foolproof, delicious side dish that practically makes itself. Whether you’re hosting a holiday dinner or just need an easy veggie for Tuesday night, these Crockpot Glazed Baby Carrots with Brown Sugar and Butter will never let you down. For more slow cooker inspiration, check out our favorite slow cooker sides or explore more crockpot ideas. Happy cooking!

Print
clock clock iconcutlery cutlery iconflag flag iconfolder folder iconinstagram instagram iconpinterest pinterest iconfacebook facebook iconprint print iconsquares squares iconheart heart iconheart solid heart solid icon

Crockpot Glazed Baby Carrots with Brown Sugar and Butter

  • Author: Home Cook Delights

Description

Tender baby carrots slow-cooked to perfection in a sweet and buttery brown sugar glaze. This effortless crockpot side dish pairs beautifully with roasted meats or holiday dinners.


Ingredients

Scale

For the Crust:

  • For the Carrots:
  • 2 lbs baby carrots
  • 1/2 cup water
  • For the Glaze:
  • 1/2 cup packed brown sugar
  • 1/4 cup unsalted butter, melted
  • 1 tsp ground cinnamon
  • 1/2 tsp salt
  • 1/4 tsp ground nutmeg
  • For Garnish:
  • 2 tbsp chopped fresh parsley

Instructions

1. Prepare the Crust:

  1. 1. Add baby carrots and water to the crockpot, spreading them evenly.
  2. 2. In a small bowl, whisk together brown sugar, melted butter, cinnamon, salt, and nutmeg until smooth.
  3. 3. Pour glaze mixture over carrots and stir gently to coat.
  4. 4. Cover and cook on LOW for 4-5 hours or HIGH for 2-3 hours, stirring once halfway.
  5. 5. Before serving, transfer carrots to a serving dish using a slotted spoon. Drizzle with remaining glaze from the pot.
  6. 6. Garnish with fresh parsley and serve warm.

Notes

For a thicker glaze: After cooking, transfer liquid to a saucepan and simmer for 3-5 minutes until reduced. Pour back over carrots before serving. Can substitute honey for brown sugar if preferred.

Crockpot Glazed Baby Carrots with Brown Sugar and Butter

Crockpot Glazed Baby Carrots with Brown Sugar and Butter

There’s something magical about a dish that effortlessly transitions from a weeknight side to a holiday showstopper—and these Crockpot Glazed Baby Carrots with Brown Sugar and Butter do just that. Picture tender, buttery carrots coated in a caramelized brown sugar glaze, simmered low and slow until they’re melt-in-your-mouth perfect. Whether you’re juggling a busy schedule or prepping for a festive gathering, this recipe is your golden ticket to a stress-free, crowd-pleasing side dish.

As a mom who’s constantly balancing work, meal prep, and the occasional kitchen mishap (who else has burned a pan of roasted veggies?), I adore recipes that let me “set it and forget it.” The slow cooker does all the heavy lifting here, freeing you up to tackle life’s chaos—or just sneak in a little extra self-care. Plus, with just a handful of pantry staples, this dish is as budget-friendly as it is delicious. Trust me, even the pickiest eaters at your table will be reaching for seconds!

Why You’ll Love These Glazed Carrots

This recipe checks all the boxes for a perfect side dish:

  • Effortless: Dump everything in the Crockpot and let it work its magic.
  • Versatile: Fits right in at Thanksgiving or alongside a simple weeknight protein like Slow Cooker Honey Garlic Chicken.
  • Crowd-Pleasing: The sweet-and-savory glaze appeals to kids and adults alike.
  • Make-Ahead Friendly: Reheats beautifully for meal prep.

How to Make Crockpot Glazed Baby Carrots

Ingredients You’ll Need

  • 2 lbs baby carrots (or whole carrots peeled and cut into uniform pieces)
  • 1/4 cup unsalted butter, melted
  • 1/3 cup brown sugar, packed
  • 1/4 cup honey or maple syrup
  • 1 tsp cinnamon
  • 1/2 tsp salt
  • 1/4 tsp black pepper
  • 1 tbsp fresh parsley, chopped (optional, for garnish)

Step-by-Step Instructions

  1. Prep the Crockpot: Lightly grease your slow cooker insert with butter or cooking spray.
  2. Combine Ingredients: Add the carrots, melted butter, brown sugar, honey, cinnamon, salt, and pepper to the Crockpot. Toss gently to coat.
  3. Cook: Cover and cook on LOW for 4–5 hours or HIGH for 2–3 hours, stirring once halfway through.
  4. Serve: Transfer to a serving dish, garnish with parsley, and enjoy! For a thicker glaze, simmer uncovered for the last 15 minutes.

Tips for the Best Glazed Carrots

Want to take this dish to the next level? Try these pro tips:

  • Uniform Sizing: If using whole carrots, cut them into similar-sized pieces for even cooking.
  • Add a Kick: A pinch of cayenne or a splash of orange juice adds a fun twist.
  • Fresh Herbs: Swap parsley for thyme or rosemary for a more savory note.
  • Storage: Leftovers keep in the fridge for up to 4 days. Reheat gently on the stove with a splash of water.

Frequently Asked Questions

Can I use frozen carrots instead of fresh?

Yes! Thaw them first and reduce the cook time by 1–2 hours to avoid mushiness.

What can I substitute for brown sugar?

Coconut sugar or pure maple syrup works well, though the flavor will vary slightly.

How do I prevent the glaze from being too watery?

Remove the lid for the last 30 minutes of cooking to thicken the sauce, or add a cornstarch slurry (1 tsp cornstarch + 1 tbsp water).

Can I make this recipe vegan?

Absolutely! Use plant-based butter and swap honey for agave syrup.

What pairs well with these glazed carrots?

They’re fantastic with Garlic Herb Pork Tenderloin or a holiday roast. For more ideas, check out Food Network’s Thanksgiving sides roundup.

Can I prep this dish ahead of time?

Yes! Assemble everything in the Crockpot insert the night before, refrigerate, then cook as directed (add 30 extra minutes if starting cold).

There you have it—a foolproof, flavor-packed side dish that’s as easy as it is impressive. Whether you’re serving it at a holiday feast or just sprucing up Tuesday night’s dinner, these Crockpot Glazed Baby Carrots with Brown Sugar and Butter are sure to become a staple in your recipe rotation. And if you’re like me, you’ll love that it leaves you with one less dish to stress over and more time to savor the little moments around the table. Happy slow cooking!

Print
clock clock iconcutlery cutlery iconflag flag iconfolder folder iconinstagram instagram iconpinterest pinterest iconfacebook facebook iconprint print iconsquares squares iconheart heart iconheart solid heart solid icon

Crockpot Glazed Baby Carrots with Brown Sugar and Butter

  • Author: Home Cook Extraordinaire

Description

Tender baby carrots slow-cooked to perfection in a sweet and buttery brown sugar glaze. This effortless crockpot side dish is a crowd-pleaser for holidays and weeknight dinners alike.


Ingredients

Scale

For the Crust:

  • For the carrots:
  • 2 lbs baby carrots
  • 1/2 cup water
  • For the glaze:
  • 1/2 cup packed brown sugar
  • 1/4 cup unsalted butter, melted
  • 1 tsp ground cinnamon
  • 1/2 tsp salt
  • 1/4 tsp ground nutmeg
  • For garnish:
  • 2 tbsp chopped fresh parsley

Instructions

1. Prepare the Crust:

  1. 1. Place baby carrots and water in a 4-qt or larger crockpot.
  2. 2. In a small bowl, whisk together brown sugar, melted butter, cinnamon, salt, and nutmeg until smooth.
  3. 3. Pour glaze mixture over carrots and stir gently to coat.
  4. 4. Cover and cook on LOW for 4-5 hours or HIGH for 2-3 hours, stirring once halfway through.
  5. 5. When carrots are fork-tender, transfer to a serving dish using a slotted spoon.
  6. 6. If desired, reduce remaining cooking liquid in a saucepan over medium heat for 2-3 minutes to thicken, then drizzle over carrots.
  7. 7. Garnish with fresh parsley before serving.

Notes

For extra flavor, add 1/4 tsp ground ginger or 1 tbsp orange zest to the glaze. Leftovers keep refrigerated for 3-4 days. Can substitute regular carrots cut into 2-inch pieces.