Spring Chicken Casserole

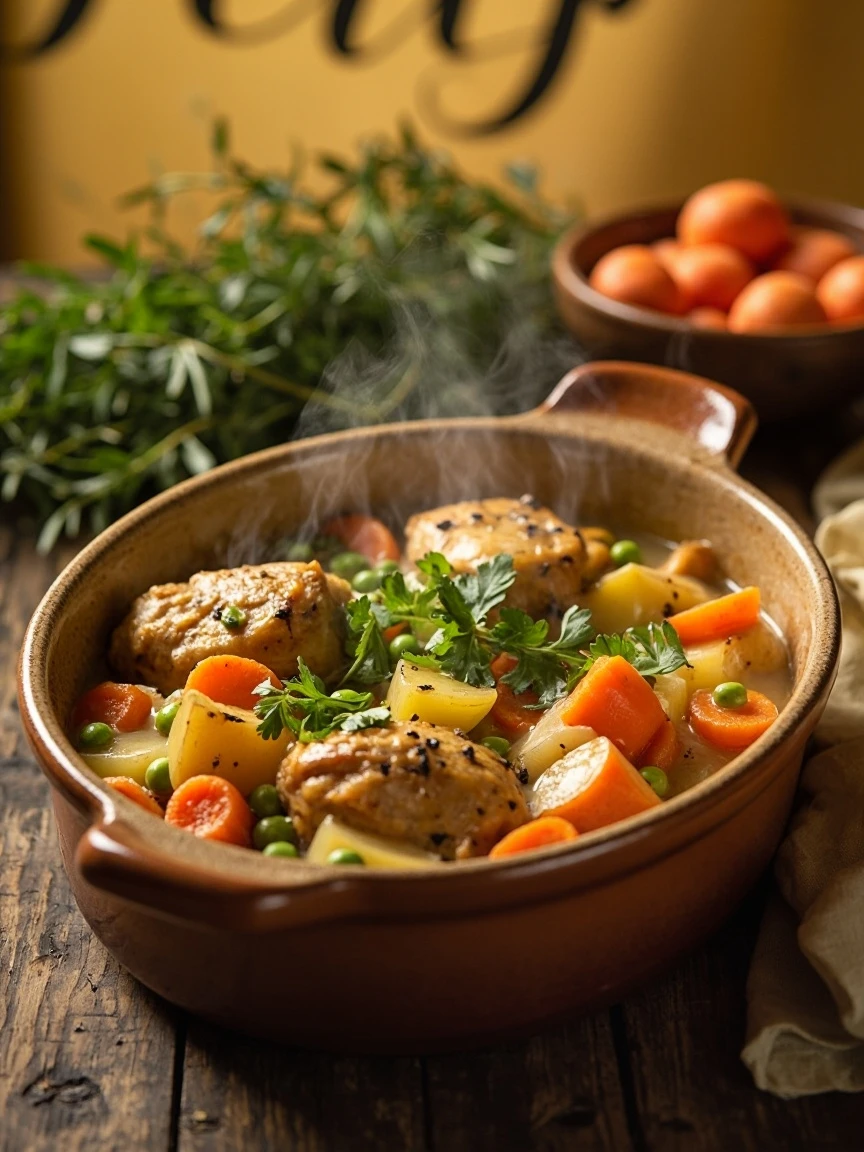
Spring Chicken Casserole: A Fresh, Comforting One-Pan Meal

There’s something magical about the shift from winter’s heavy stews to spring’s lighter, brighter flavors. This Spring Chicken Casserole is the perfect bridge between the two—comforting enough to satisfy that cozy craving but packed with fresh veggies that sing of the season. Whether you’re juggling a busy weeknight or hosting a casual dinner with friends, this dish is here to save the day (and your sanity).

I first stumbled upon this recipe when my garden overflowed with early spring produce—asparagus, peas, and tender baby carrots—begging to be used. Paired with juicy chicken and a creamy, herb-infused sauce, it quickly became a family favorite. The best part? It’s a one-pan wonder, meaning less cleanup and more time to enjoy those longer, sunnier evenings. If you’re looking for a meal that feels both nourishing and celebratory, this casserole is your answer.

Why You’ll Love This Spring Chicken Casserole

This dish is a triple threat: easy, versatile, and downright delicious. Here’s why it’ll earn a permanent spot in your rotation:

  • One-pan simplicity: Sauté, bake, and serve—all in the same dish.
  • Seasonal flexibility: Swap in whatever spring veggies you have on hand.
  • Crowd-pleaser: Kids and adults alike gobble it up (trust me on this).
  • Meal-prep friendly: Tastes even better as leftovers the next day.

How to Make Spring Chicken Casserole

Ingredients You’ll Need

  • 1.5 lbs boneless, skinless chicken thighs or breasts
  • 2 cups fresh asparagus, chopped
  • 1 cup peas (fresh or frozen)
  • 1 leek, thinly sliced
  • 3 cloves garlic, minced
  • 1 cup chicken broth
  • 1/2 cup heavy cream or coconut milk for dairy-free
  • 1 tbsp fresh thyme
  • Salt and pepper to taste

Step-by-Step Instructions

  1. Preheat & Prep: Heat oven to 375°F. Season chicken with salt and pepper.
  2. Sauté: In an oven-safe skillet, brown chicken over medium heat. Remove and set aside.
  3. Veggie Love: In the same pan, sauté leeks, garlic, and asparagus until softened.
  4. Simmer: Stir in broth, cream, and thyme. Return chicken to the pan.
  5. Bake: Transfer to the oven for 25–30 minutes, until chicken is cooked through.
  6. Finish: Sprinkle peas on top and bake 5 more minutes. Serve warm!

Tips for the Best Casserole

Want to take this dish to the next level? Here are my pro tips:

  • Herb swap: Try tarragon or dill instead of thyme for a different flavor twist.
  • Crispy topping: Add a sprinkle of breadcrumbs or grated Parmesan before baking.
  • Make it ahead: Assemble up to a day in advance and bake when ready.

If you love easy, veggie-packed meals, you’ll adore my One-Pot Spring Pasta—it’s another weeknight hero!

Pairing Suggestions

This casserole pairs beautifully with a crisp green salad or crusty bread to soak up the sauce. For wine lovers, a light Pinot Grigio complements the dish perfectly.

Frequently Asked Questions

Can I use frozen vegetables in this Spring Chicken Casserole?
Absolutely! Frozen peas, carrots, or even a medley work well—just add them straight from the freezer.

How do I store leftovers?
Keep in an airtight container for up to 3 days. Reheat in the oven or microwave.

Can I make this dairy-free?
Yes! Swap heavy cream for coconut milk or cashew cream.

What other proteins work here?
Try turkey cutlets or even white beans for a vegetarian twist.

Can I freeze this casserole?
Freeze before baking for best results. Thaw overnight before cooking.

What’s the best pan to use?
A deep cast-iron skillet or ceramic baking dish works perfectly.

As the days grow warmer and the farmer’s markets burst with color, this Spring Chicken Casserole is my go-to for turning simple ingredients into something special. It’s proof that comfort food can be both wholesome and vibrant—just like the season itself. If you’re craving more spring-inspired meals, check out my Lemon Herb Salmon for another light yet satisfying option. Happy cooking!

Print
clock clock iconcutlery cutlery iconflag flag iconfolder folder iconinstagram instagram iconpinterest pinterest iconfacebook facebook iconprint print iconsquares squares iconheart heart iconheart solid heart solid icon

Spring Chicken Casserole

  • Author: Chef Jamie Oliver

Description

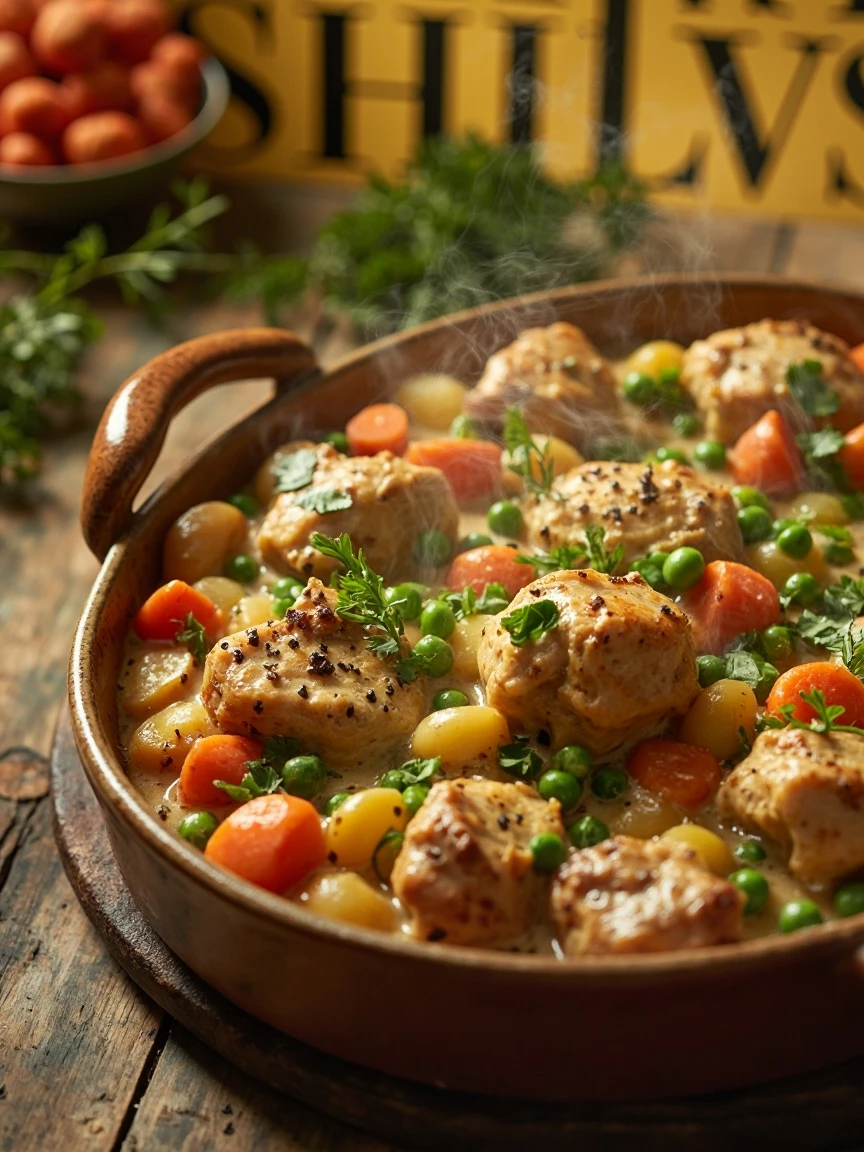
A light and flavorful chicken casserole packed with fresh spring vegetables, tender chicken, and a creamy herb sauce. Perfect for a cozy family dinner or entertaining guests.


Ingredients

Scale

For the Crust:

  • For the Chicken:
  • 1.5 lbs boneless, skinless chicken thighs, cut into bite-sized pieces
  • 2 tbsp olive oil
  • 1 tsp salt
  • 1/2 tsp black pepper
  • 1 tsp dried thyme
  • For the Vegetables:
  • 1 cup baby carrots, halved
  • 1 cup asparagus, cut into 2-inch pieces
  • 1 cup baby potatoes, quartered
  • 1/2 cup frozen peas
  • 1/2 cup pearl onions, peeled
  • For the Sauce:
  • 2 cloves garlic, minced
  • 1 cup chicken broth
  • 1/2 cup heavy cream
  • 1 tbsp Dijon mustard
  • 1 tbsp fresh parsley, chopped
  • 1 tbsp fresh dill, chopped
  • 1 tbsp cornstarch (optional, for thickening)

Instructions

1. Prepare the Crust:

  1. 1. Preheat oven to 375°F (190°C).
  2. 2. In a large bowl, toss chicken pieces with olive oil, salt, pepper, and thyme until evenly coated.
  3. 3. Heat a large oven-safe skillet over medium-high heat. Add chicken and cook until browned on all sides, about 5-7 minutes. Remove chicken and set aside.
  4. 4. In the same skillet, add carrots, potatoes, and pearl onions. Cook for 5 minutes, stirring occasionally.
  5. 5. Add garlic and cook for 30 seconds until fragrant.
  6. 6. Pour in chicken broth, scraping up any browned bits from the bottom of the pan.
  7. 7. Stir in heavy cream and Dijon mustard. Bring to a simmer.
  8. 8. Return chicken to the skillet. Add asparagus and frozen peas, stirring gently to combine.
  9. 9. If a thicker sauce is desired, mix cornstarch with 1 tbsp water and stir into the casserole.
  10. 10. Transfer skillet to the preheated oven and bake for 25-30 minutes, until chicken is cooked through and vegetables are tender.
  11. 11. Remove from oven and sprinkle with fresh parsley and dill before serving.

Notes

For a lighter version, substitute half-and-half for the heavy cream. This casserole pairs beautifully with crusty bread or over rice. Leftovers can be stored in an airtight container in the refrigerator for up to 3 days.

Luma Style Visual

Classic Lemon Pound Cake

Classic Lemon Pound Cake: A Sunshine-Soaked Slice of Comfort

There’s something magical about a Classic Lemon Pound Cake—the way its golden crust glistens with a sugary glaze, the tender crumb that melts on your tongue, and that bright, citrusy aroma that fills your kitchen like a hug from summer itself. Whether you’re serving it at a brunch, pairing it with afternoon tea, or sneaking a midnight slice (no judgment here!), this timeless dessert never fails to delight. It’s the kind of recipe that feels both fancy and familiar, like your favorite sweater but in cake form.

I’ll never forget the first time I baked this cake for my grandmother. She was a stickler for tradition, and her eyebrow arched skeptically when I mentioned adding a lemon twist to her beloved pound cake. But one bite in, she grinned and said, Well, isn’t that a little ray of sunshine? Now, it’s a staple in my home, especially on days when life feels a bit gray. The secret? Plenty of real lemon zest and a buttery batter that’s as simple to make as it is irresistible. Trust me: this is the kind of recipe you’ll pass down with pride.

Why You’ll Love This Classic Lemon Pound Cake

This isn’t just any cake—it’s a mood lifter, a crowd-pleaser, and a baking project that’s wonderfully forgiving. Here’s why it’ll become your go-to:

  • Bright, balanced flavor: Fresh lemon zest and juice give it a tangy kick, while the rich butter keeps it indulgent.
  • Simple ingredients: No fussy techniques or exotic pantry items—just staples like eggs, flour, and sugar.
  • Versatile: Serve it plain, dusted with powdered sugar, or drizzled with a lemon glaze for extra zing.
  • Freezer-friendly: Wrap slices tightly, and they’ll keep for up to 3 months (if they last that long!).

How to Make Classic Lemon Pound Cake

Ingredients You’ll Need

  • 1 ½ cups (3 sticks) unsalted butter, softened
  • 3 cups granulated sugar
  • 5 large eggs, room temperature
  • 3 cups all-purpose flour
  • ½ tsp baking powder
  • ¼ tsp salt
  • 1 cup whole milk
  • Zest of 2 lemons
  • ¼ cup fresh lemon juice
  • 1 tsp vanilla extract

Step-by-Step Instructions

  1. Prep: Preheat oven to 325°F (165°C). Grease and flour a 10-inch Bundt pan or two 9×5-inch loaf pans.
  2. Cream butter & sugar: In a stand mixer, beat butter and sugar on medium speed for 5 minutes until light and fluffy.
  3. Add eggs: Beat in eggs one at a time, scraping the bowl after each.
  4. Dry ingredients: Whisk flour, baking powder, and salt in a separate bowl. Alternately add the flour mixture and milk to the batter, starting and ending with flour.
  5. Flavor it: Stir in lemon zest, juice, and vanilla. Pour batter into prepared pan(s).
  6. Bake: 60–70 minutes for Bundt, 50–55 minutes for loaves, or until a toothpick comes out clean. Cool in pan for 15 minutes, then transfer to a wire rack.

Pro Tips for the Perfect Pound Cake

Want bakery-level results? Here’s what I’ve learned from (many!) trials:

  • Room temp matters: Cold eggs or butter can cause curdling. Take them out 1–2 hours ahead.
  • Don’t overmix: Once you add flour, mix just until combined to avoid a dense texture.
  • Zest smartly: Use a Microplane for fine zest—no bitter white pith!
  • Test early: Ovens vary. Start checking 5–10 minutes before the timer goes off.

Variations to Try

Love this recipe? Mix it up with these twists:

  • Lemon-blueberry: Fold in 1 cup fresh blueberries (tossed in 1 tbsp flour) before baking.
  • Glazed: Whisk 1 cup powdered sugar with 2 tbsp lemon juice and drizzle over cooled cake.
  • Herb-infused: Add 1 tbsp finely chopped thyme or lavender for a floral note.

Classic Lemon Pound Cake FAQs

Can I use bottled lemon juice?

Fresh is best for vibrant flavor, but in a pinch, bottled works—just skip the preservatives.

Why did my cake sink in the middle?

Usually from underbaking or opening the oven door too soon. Use an oven thermometer to check accuracy!

Can I make it ahead?

Absolutely! Wrap cooled cake tightly in plastic—it tastes even better the next day.

How do I store lemon pound cake?

Keep it at room temp for 3 days or freeze for up to 3 months.

Can I use cake flour?

Yes! Swap 1:1 for a slightly softer crumb, per King Arthur Baking.

What’s the best way to zest lemons?

Grate only the yellow outer layer—the white pith underneath is bitter.

There you have it: a Classic Lemon Pound Cake that’s as joyful to bake as it is to eat. Whether you’re celebrating a special occasion or just treating yourself to a moment of sweetness, this cake is a reminder that sometimes, the simplest things bring the brightest joy. Now, go preheat that oven—your future self (and anyone lucky enough to snag a slice) will thank you!

Print
clock clock iconcutlery cutlery iconflag flag iconfolder folder iconinstagram instagram iconpinterest pinterest iconfacebook facebook iconprint print iconsquares squares iconheart heart iconheart solid heart solid icon

Classic Lemon Pound Cake

  • Author: Baking Enthusiast

Description

A moist and tender lemon pound cake with a bright citrus flavor, perfect for tea time or dessert. This classic recipe features a buttery crumb and a sweet lemon glaze for extra zing.


Ingredients

Scale

For the Crust:

  • For the cake:
  • 1 1/2 cups (3 sticks) unsalted butter, softened
  • 3 cups granulated sugar
  • 5 large eggs, room temperature
  • 3 cups all-purpose flour
  • 1/2 teaspoon baking powder
  • 1/2 teaspoon salt
  • 1 cup whole milk
  • Zest of 2 lemons
  • 1/4 cup fresh lemon juice
  • 1 teaspoon vanilla extract
  • For the glaze:
  • 1 cup powdered sugar
  • 23 tablespoons fresh lemon juice
  • 1 teaspoon lemon zest (optional)

Instructions

1. Prepare the Crust:

  1. Preheat oven to 325°F (165°C). Grease and flour a 10-inch bundt pan.
  2. In a large bowl, cream butter and sugar until light and fluffy (about 5 minutes).
  3. Add eggs one at a time, beating well after each addition.
  4. In a separate bowl, whisk together flour, baking powder, and salt.
  5. Alternately add flour mixture and milk to butter mixture, beginning and ending with flour.
  6. Stir in lemon zest, lemon juice, and vanilla extract until just combined.
  7. Pour batter into prepared pan and bake for 60-75 minutes or until a toothpick comes out clean.
  8. Cool in pan for 15 minutes, then invert onto a wire rack to cool completely.
  9. For glaze: Whisk powdered sugar and lemon juice until smooth. Drizzle over cooled cake.
  10. Sprinkle with additional lemon zest if desired before serving.

Notes

For best results, use room temperature ingredients. Cake can be stored at room temperature for 3 days or frozen for up to 3 months. The glaze can be made thicker or thinner by adjusting the lemon juice amount.

Luma Style Visual

Spring Chicken Casserole

Spring Chicken Casserole: A Fresh and Comforting One-Pan Wonder

There’s something magical about the transition from winter to spring—the days grow longer, the air smells like blooming flowers, and suddenly, all I crave are meals that feel both cozy and bright. That’s where this Spring Chicken Casserole comes in. It’s the kind of dish that bridges the gap between hearty comfort food and the lighter, veggie-packed meals we start yearning for as the seasons change. Imagine tender chicken, vibrant spring vegetables, and a creamy herb-infused sauce, all baked to golden perfection. It’s like a hug in a baking dish!

As a mom of two, I’m always on the hunt for recipes that are as easy to make as they are delicious. This casserole checks all the boxes: minimal prep, one-pan convenience, and leftovers that taste even better the next day (if there are any leftovers, that is). Whether you’re feeding a crowd or just meal-prepping for the week, this dish is a lifesaver. Plus, it’s flexible—swap in whatever spring veggies you have on hand, or add a sprinkle of cheese for extra indulgence. Want more easy weeknight ideas? Check out my quick family dinners roundup for inspiration!

Why You’ll Love This Spring Chicken Casserole

This recipe isn’t just delicious—it’s packed with perks that make it a standout:

  • One-pan wonder: Less cleanup means more time to enjoy that extra slice of banana bread for dessert.
  • Seasonal flexibility: Use asparagus, peas, leeks, or any spring veggie you adore.
  • Meal-prep friendly: Reheats like a dream for lunches or busy nights.
  • Crowd-pleaser: Perfect for potlucks or cozy family dinners.

How to Make Spring Chicken Casserole

Ingredients You’ll Need

  • 2 lbs boneless, skinless chicken thighs (or breasts)
  • 1 cup diced carrots
  • 1 cup fresh asparagus, chopped
  • 1 leek, thinly sliced (or sub ½ onion)
  • 3 cloves garlic, minced
  • 1 cup chicken broth
  • ½ cup heavy cream or Greek yogurt
  • 1 tbsp fresh thyme (or 1 tsp dried)
  • Salt and pepper to taste
  • 1 cup shredded mozzarella (optional but highly recommended)

Step-by-Step Instructions

  1. Preheat & prep: Heat oven to 375°F (190°C). Lightly grease a 9×13-inch baking dish.
  2. Sauté the veggies: In a skillet, sauté carrots, asparagus, and leeks until slightly softened. Add garlic and thyme, stirring for 1 minute until fragrant.
  3. Layer it up: Arrange chicken in the baking dish, then scatter the veggie mixture on top. Pour broth and cream evenly over everything.
  4. Bake: Cover with foil and bake for 25 minutes. Uncover, add cheese if using, and bake for another 15–20 minutes until bubbly and golden.
  5. Rest & serve: Let it sit for 5 minutes before serving—trust me, it’s worth the wait!

Recipe Tips and Tricks

Here’s how to make this casserole your own:

  • Shortcut it: Use pre-chopped veggies or rotisserie chicken to save time.
  • Make it creamy: Stir in a spoonful of roux for a thicker sauce.
  • Go dairy-free: Swap cream for coconut milk and skip the cheese.
  • Add crunch: Top with breadcrumbs or crushed crackers before baking.

Frequently Asked Questions

Can I use frozen vegetables in this casserole?

Absolutely! Just thaw and pat them dry to avoid excess moisture.

How long does spring chicken casserole last in the fridge?

Store it airtight for up to 3–4 days. Reheat in the oven or microwave.

Can I freeze this chicken casserole?

Yes! Freeze before baking, then thaw overnight and cook as directed.

What sides go well with this dish?

Try a crisp spring salad or crusty bread to soak up the sauce.

Can I make this casserole gluten-free?

Easily! Use cornstarch instead of flour to thicken the sauce.

What’s the best chicken cut for casseroles?

Thighs stay juicier, but breasts work too—just don’t overcook them! For more tips, see USDA guidelines on safe poultry handling.

Whether you’re welcoming spring with open arms or just need a reliable dinner that feels like a warm embrace, this Spring Chicken Casserole is here to deliver. It’s the kind of recipe that’ll earn a permanent spot in your rotation—simple enough for Tuesday nights but special enough for Sunday suppers. So grab your favorite baking dish, toss in those seasonal veggies, and let the oven do the rest. Happy cooking, friends!

Print
clock clock iconcutlery cutlery iconflag flag iconfolder folder iconinstagram instagram iconpinterest pinterest iconfacebook facebook iconprint print iconsquares squares iconheart heart iconheart solid heart solid icon

Spring Chicken Casserole

  • Author: Chef Jamie Oliver

Description

A light and flavorful chicken casserole packed with fresh spring vegetables and herbs, perfect for a comforting yet seasonal meal.


Ingredients

Scale

For the Crust:

  • For the chicken:
  • 1.5 lbs boneless, skinless chicken thighs (cut into bite-sized pieces)
  • 2 tbsp olive oil
  • 1 tsp salt
  • 1 tsp black pepper
  • For the vegetables:
  • 1 cup baby carrots (halved)
  • 1 cup asparagus (cut into 2-inch pieces)
  • 1 cup peas (fresh or frozen)
  • 1 leek (thinly sliced)
  • 2 cloves garlic (minced)
  • For the sauce:
  • 2 cups chicken broth
  • 1/2 cup heavy cream
  • 1 tbsp Dijon mustard
  • 1 tbsp fresh thyme (chopped)
  • 1 tbsp fresh parsley (chopped)
  • 1 tbsp cornstarch (mixed with 2 tbsp water)
  • For garnish:
  • 1/4 cup grated Parmesan cheese
  • Fresh parsley (chopped)

Instructions

1. Prepare the Crust:

  1. 1. Preheat oven to 375°F (190°C).
  2. 2. In a large skillet, heat olive oil over medium-high heat. Season chicken with salt and pepper, then brown on all sides (about 5 minutes). Transfer to a plate.
  3. 3. In the same skillet, add leeks and garlic. Sauté for 2 minutes until fragrant.
  4. 4. Add carrots and cook for 3 minutes, then stir in asparagus and peas.
  5. 5. Pour in chicken broth, heavy cream, Dijon mustard, thyme, and parsley. Bring to a simmer.
  6. 6. Stir in cornstarch slurry and cook until slightly thickened (about 2 minutes).
  7. 7. Return chicken to the skillet and mix well. Transfer everything to a casserole dish.
  8. 8. Sprinkle with Parmesan cheese and bake uncovered for 25-30 minutes until bubbly.
  9. 9. Garnish with fresh parsley before serving.

Notes

For a lighter version, substitute heavy cream with half-and-half. Leftovers can be refrigerated for up to 3 days. Reheat gently on the stovetop with a splash of broth.

Classic Lemon Pound Cake

Classic Lemon Pound Cake: A Sunshine-Soaked Dessert for Every Occasion

There’s something magical about a Classic Lemon Pound Cake—the way its golden crust gives way to a tender, buttery crumb, infused with just the right amount of zesty lemon. Whether you’re serving it at a spring brunch, pairing it with afternoon tea, or sneaking a slice as a midnight treat, this cake is a timeless crowd-pleaser. It’s the kind of recipe that feels like a hug from your grandma, if your grandma happened to be a pastry chef with a penchant for citrus.

I first fell in love with pound cake as a kid, when my mom would bake it on lazy Sundays. The aroma of butter and vanilla would fill the house, and by the time the cake cooled (or, let’s be honest, *mostly* cooled), we’d all be hovering around the kitchen counter. This lemon version is a happy twist on that childhood favorite—bright, tangy, and just sweet enough. Plus, it’s surprisingly simple to make, even if you’re not a baking pro. Trust me, if I can do it without setting off the smoke alarm, so can you!

Why You’ll Love This Classic Lemon Pound Cake

This isn’t just any pound cake. Here’s what makes it special:

  • Bright, balanced flavor: Fresh lemon zest and juice give it a vibrant kick without overpowering the rich butteriness.
  • Perfect texture: Dense yet moist, with a delicate crumb that holds up to glazes or a dusting of powdered sugar.
  • Versatile: Serve it plain, with berries, or toasted and slathered with lemon curd (here’s my easy lemon curd recipe for inspiration).
  • Freezer-friendly: Bake ahead and freeze slices for impromptu cravings or last-minute guests.

How to Make Classic Lemon Pound Cake

Ingredients You’ll Need

  • 1 ½ cups (3 sticks) unsalted butter, softened
  • 3 cups granulated sugar
  • 5 large eggs, room temperature
  • 3 cups all-purpose flour
  • ½ tsp baking powder
  • ½ tsp salt
  • 1 cup whole milk
  • Zest of 2 lemons
  • ¼ cup fresh lemon juice
  • 1 tsp vanilla extract

Step-by-Step Instructions

  1. Prep: Preheat oven to 325°F (165°C). Grease and flour a 10-inch Bundt pan or two loaf pans.
  2. Cream butter and sugar: In a stand mixer, beat butter and sugar for 5 minutes until light and fluffy. Scrape the bowl occasionally.
  3. Add eggs: Beat in eggs one at a time, mixing well after each.
  4. Dry ingredients: Whisk flour, baking powder, and salt in a separate bowl. Alternate adding the flour mixture and milk to the batter, starting and ending with flour.
  5. Flavor it: Stir in lemon zest, juice, and vanilla. Pour batter into the prepared pan(s).
  6. Bake: Bake for 60–70 minutes (or 45–55 for loaves) until a toothpick comes out clean. Cool in the pan for 15 minutes, then transfer to a wire rack.

Pro Tips for the Best Pound Cake

Room-temperature ingredients are key for even mixing. Cold eggs or butter can cause curdling.
Don’t overmix after adding flour—gluten development can make the cake tough.
Use fresh lemons for zest and juice; bottled juice lacks brightness.
Try a lemon glaze (1 cup powdered sugar + 2 tbsp lemon juice) for extra zing!

FAQs About Classic Lemon Pound Cake

Can I use bottled lemon juice?

Fresh is best for vibrant flavor, but in a pinch, bottled juice works. Reduce the sugar slightly to balance the tartness.

Why did my pound cake sink in the middle?

This usually happens if the cake is underbaked or the oven temperature is too low. Use an oven thermometer to check accuracy!

How long does lemon pound cake stay fresh?

Wrapped tightly, it keeps for 3–4 days at room temperature or up to a week in the fridge. For longer storage, freeze slices for up to 3 months.

Can I make this gluten-free?

Yes! Swap the all-purpose flour for a 1:1 gluten-free blend. For best results, add ½ tsp xanthan gum if your mix doesn’t include it.

What’s the secret to a moist pound cake?

Proper creaming of butter/sugar and not overbaking are crucial. For extra moisture, brush the cooled cake with simple syrup (equal parts sugar and water, heated until dissolved).

Can I add blueberries or poppy seeds?

Absolutely! Toss 1 cup of blueberries or 2 tbsp poppy seeds with 1 tbsp flour before folding into the batter to prevent sinking.

There you have it—a Classic Lemon Pound Cake that’s as dependable as it is delicious. Whether you’re baking it for a special occasion or just because, this recipe is bound to become a staple. And if you’re like me, you’ll soon find excuses to make it year-round (because who says lemon is just for summer?). For more citrusy inspiration, check out my roundup of sunny citrus desserts or this guide to pound cake science from Serious Eats. Now, go preheat that oven—your future self (and anyone within sniffing distance) will thank you!

Print
clock clock iconcutlery cutlery iconflag flag iconfolder folder iconinstagram instagram iconpinterest pinterest iconfacebook facebook iconprint print iconsquares squares iconheart heart iconheart solid heart solid icon

Classic Lemon Pound Cake

  • Author: Baking Enthusiast

Description

A moist and tender lemon pound cake with a bright citrus flavor, perfect for any occasion. This classic recipe features a buttery crumb and a sweet lemon glaze for extra zing.


Ingredients

Scale

For the Crust:

  • For the cake:
  • 1 1/2 cups (3 sticks) unsalted butter, softened
  • 3 cups granulated sugar
  • 5 large eggs, room temperature
  • 3 cups all-purpose flour
  • 1/2 teaspoon baking powder
  • 1/2 teaspoon salt
  • 1 cup whole milk, room temperature
  • Zest of 2 lemons
  • 1/4 cup fresh lemon juice
  • 1 teaspoon vanilla extract
  • For the glaze:
  • 1 cup powdered sugar
  • 23 tablespoons fresh lemon juice
  • 1 teaspoon lemon zest (optional)

Instructions

1. Prepare the Crust:

  1. 1. Preheat oven to 325°F (165°C). Grease and flour a 10-inch bundt pan.
  2. 2. In a large bowl, cream butter and sugar until light and fluffy (about 5 minutes).
  3. 3. Add eggs one at a time, beating well after each addition.
  4. 4. In a separate bowl, whisk together flour, baking powder, and salt.
  5. 5. Alternately add flour mixture and milk to butter mixture, beginning and ending with flour.
  6. 6. Stir in lemon zest, lemon juice, and vanilla extract until just combined.
  7. 7. Pour batter into prepared pan and bake for 60-75 minutes or until a toothpick comes out clean.
  8. 8. Cool in pan for 15 minutes, then transfer to a wire rack to cool completely.
  9. 9. For the glaze: Whisk powdered sugar and lemon juice until smooth. Drizzle over cooled cake.
  10. 10. Optional: Sprinkle with additional lemon zest for garnish.

Notes

For best results, use room temperature ingredients. Cake can be stored at room temperature for 3 days or frozen for up to 3 months. The glaze can be adjusted for thickness by adding more lemon juice (thinner) or powdered sugar (thicker).

Crockpot Glazed Baby Carrots with Brown Sugar and Butter

Crockpot Glazed Baby Carrots with Brown Sugar and Butter

There’s something magical about a dish that’s both simple and showstopping—especially when it comes to holiday meals or busy weeknights. These Crockpot Glazed Baby Carrots with Brown Sugar and Butter are exactly that: tender, sweet, and dripping with a glossy, buttery glaze that makes them irresistible. Whether you’re hosting Thanksgiving, prepping for a potluck, or just craving a veggie side that feels like a hug, this recipe delivers.

As a mom of two, I’m always on the hunt for dishes that require minimal effort but still earn rave reviews. (Because let’s be honest, standing over a stove isn’t always in the cards.) That’s why I adore this slow-cooker version of glazed carrots. Just toss everything in, set it, and forget it—until your kitchen smells like caramelized goodness. Plus, baby carrots are naturally sweet, so when paired with brown sugar and butter, they transform into something downright decadent. Even picky eaters can’t resist!

Why You’ll Love These Glazed Carrots

If you need more convincing (though the words “brown sugar” and “butter” should do the trick), here’s why this recipe is a winner:

  • Effortless elegance: Perfect for holidays or impressing guests without stress.
  • Kid-approved: The sweetness wins over even the veggie-averse.
  • Meal-prep friendly: Make them ahead and reheat without losing flavor.
  • Versatile: Pair with slow-cooker ham or weeknight roasted chicken.

How to Make Crockpot Glazed Baby Carrots

Ingredients You’ll Need

  • 2 lbs baby carrots (no peeling required!)
  • ½ cup brown sugar, packed
  • ¼ cup unsalted butter, melted
  • ½ tsp salt
  • ¼ tsp black pepper
  • 1 tsp cinnamon (optional but heavenly)
  • ¼ cup water or orange juice for extra brightness

Step-by-Step Instructions

  1. Layer the carrots: Place baby carrots in your slow cooker.
  2. Mix the glaze: Whisk together brown sugar, melted butter, salt, pepper, and cinnamon. Pour over carrots, tossing gently.
  3. Add liquid: Pour in water or orange juice to prevent drying.
  4. Cook: Cover and cook on HIGH for 2–3 hours or LOW for 4–5, stirring once halfway.
  5. Serve: Transfer to a dish, drizzle with extra glaze, and garnish with fresh parsley if desired.

Tips for the Best Glazed Carrots

Want to take these carrots to the next level? Try these tricks:

  • Fresh herbs: A sprinkle of thyme or rosemary adds a savory contrast.
  • Citrus zest: Orange or lemon zest brightens the sweetness.
  • Double the glaze: Because more is more when it comes to butter and sugar.
  • Crispy bacon: Crumble on top for a salty crunch (trust me).

For more easy side dishes, check out our creamy garlic mashed potatoes—they’re a match made in comfort-food heaven!

FAQs About Crockpot Glazed Carrots

Can I use regular carrots instead of baby carrots?

Absolutely! Just slice them into uniform sticks so they cook evenly.

How do I store leftovers?

Keep them in an airtight container in the fridge for up to 4 days. Reheat in the microwave or a skillet with a splash of water.

Can I make these carrots vegan?

Yes! Swap butter for coconut oil or vegan butter, and use maple syrup instead of brown sugar if preferred.

What pairs well with glazed carrots?

They’re fantastic with roasted turkey or balsamic pork tenderloin.

Can I freeze glazed carrots?

Technically yes, but the texture may soften. Freeze without glaze and reheat with fresh glaze for best results.

Why add cinnamon?

It adds warmth and depth—like a cozy sweater for your carrots! Omit if you prefer pure sweetness.

There you have it: a side dish that’s as easy as it is delicious. Whether it’s a holiday centerpiece or a Tuesday night dinner, these Crockpot Glazed Baby Carrots with Brown Sugar and Butter will steal the show. And the best part? You’ll have more time to enjoy the moment (or sneak a second helping). Happy cooking!

Print
clock clock iconcutlery cutlery iconflag flag iconfolder folder iconinstagram instagram iconpinterest pinterest iconfacebook facebook iconprint print iconsquares squares iconheart heart iconheart solid heart solid icon

Crockpot Glazed Baby Carrots with Brown Sugar and Butter

  • Author: Home Cook Delights

Description

Tender baby carrots slow-cooked to perfection in a sweet and buttery brown sugar glaze. This easy crockpot side dish is perfect for holidays or weeknight dinners.


Ingredients

Scale

For the Crust:

  • For the carrots:
  • 2 lbs baby carrots
  • 1/2 cup water
  • For the glaze:
  • 1/2 cup packed brown sugar
  • 1/4 cup unsalted butter, melted
  • 1 tsp ground cinnamon
  • 1/2 tsp ground nutmeg
  • 1/4 tsp salt
  • For garnish:
  • 2 tbsp chopped fresh parsley

Instructions

1. Prepare the Crust:

  1. 1. Place baby carrots in the crockpot and add water.
  2. 2. In a small bowl, mix together brown sugar, melted butter, cinnamon, nutmeg, and salt until well combined.
  3. 3. Pour the glaze mixture over the carrots and stir to coat evenly.
  4. 4. Cover and cook on LOW for 4-5 hours or HIGH for 2-3 hours, stirring once halfway through.
  5. 5. When carrots are tender, transfer to a serving dish using a slotted spoon.
  6. 6. If desired, reduce remaining liquid in crockpot on HIGH for 10 minutes to thicken, then drizzle over carrots.
  7. 7. Garnish with fresh parsley before serving.

Notes

For extra flavor, add 1 tbsp orange zest to the glaze. Leftovers can be stored in an airtight container in the refrigerator for up to 4 days. Reheat gently in microwave.