No-Bake Strawberry Cheesecake Cups


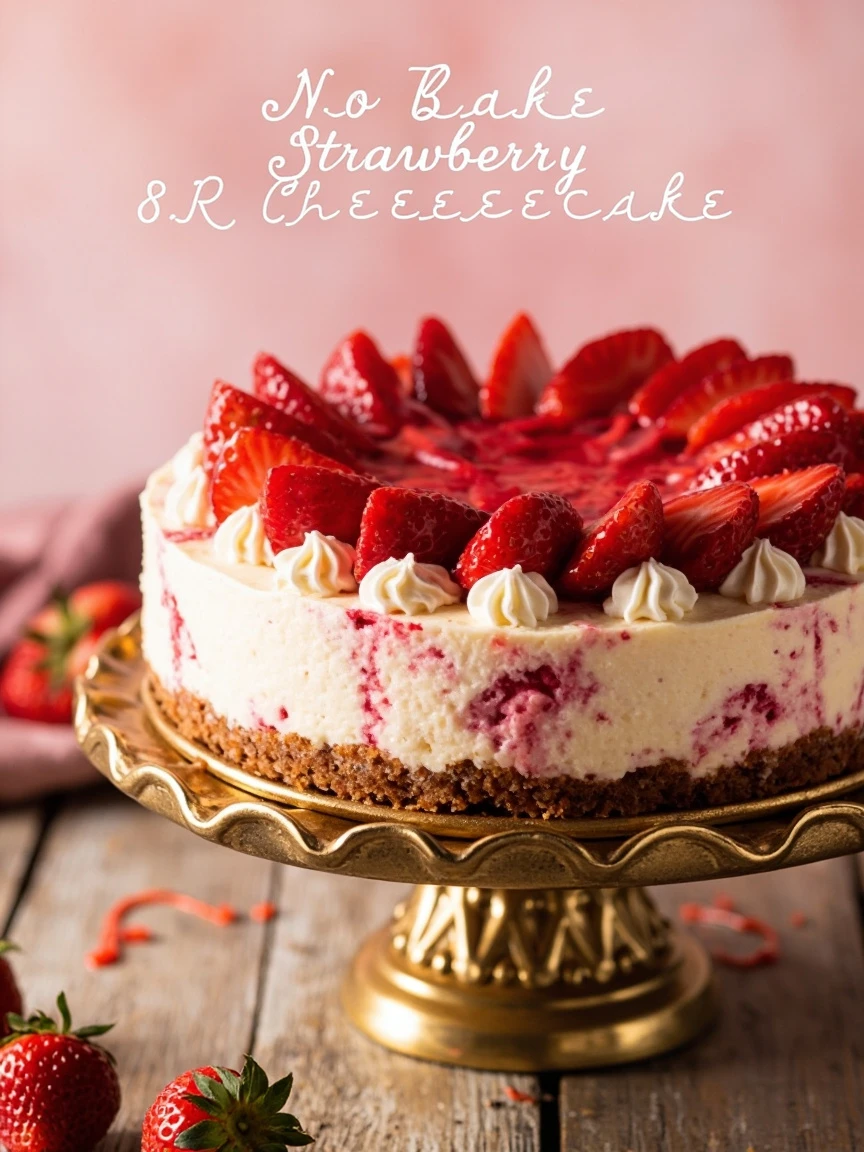
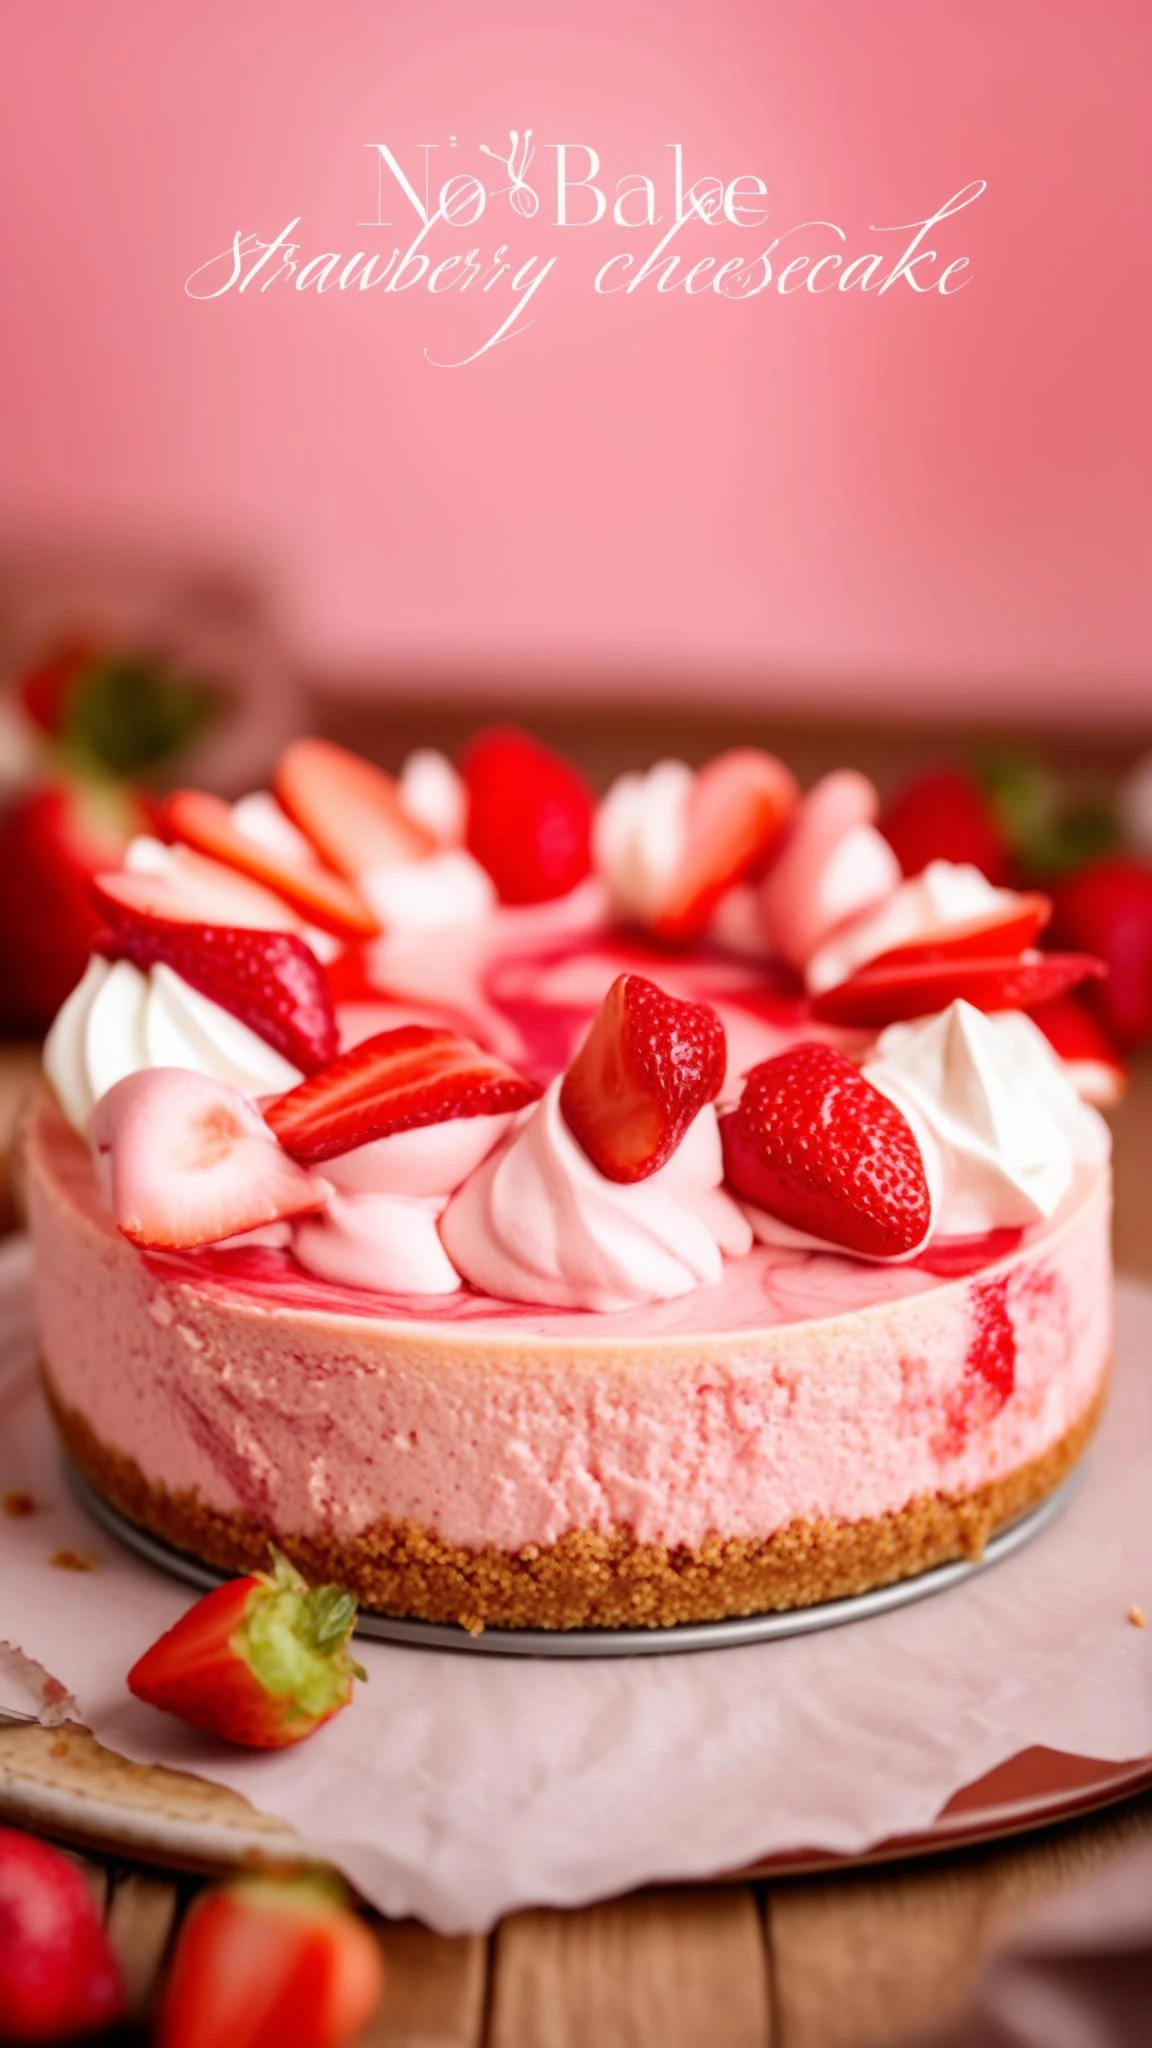
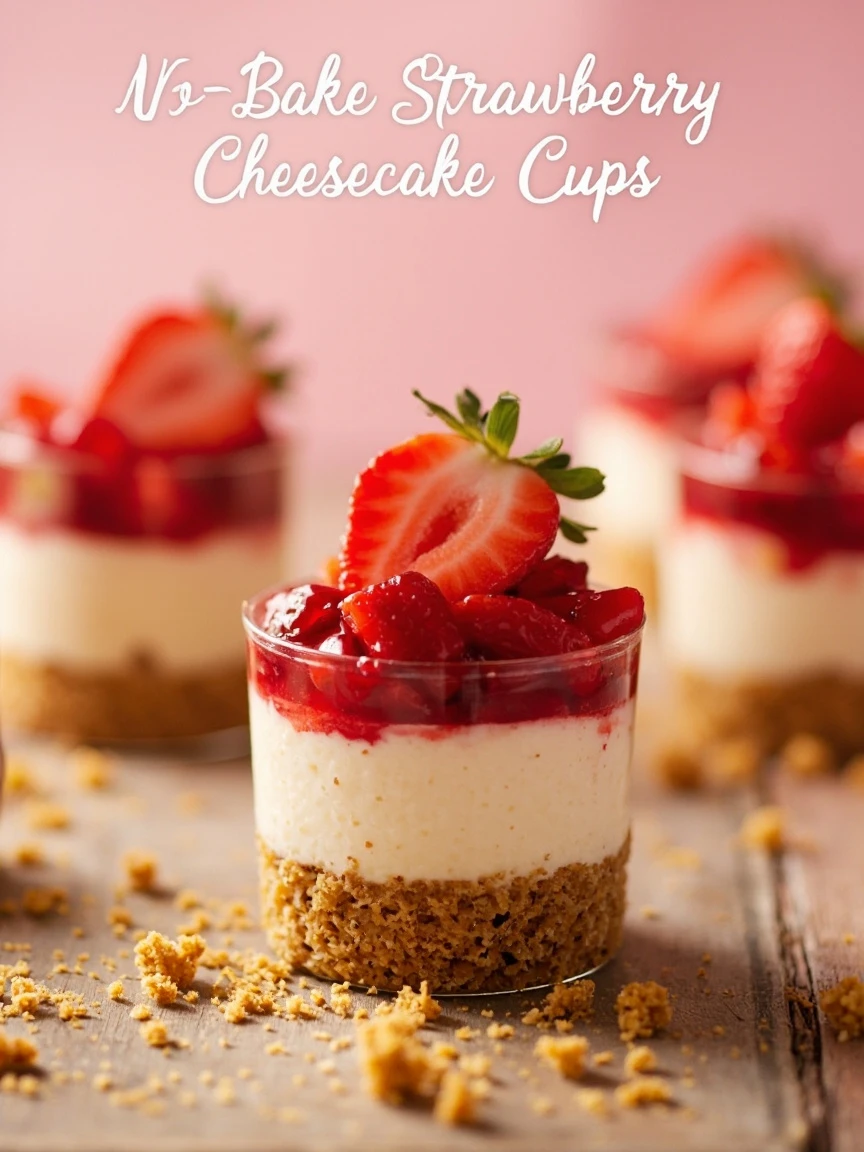
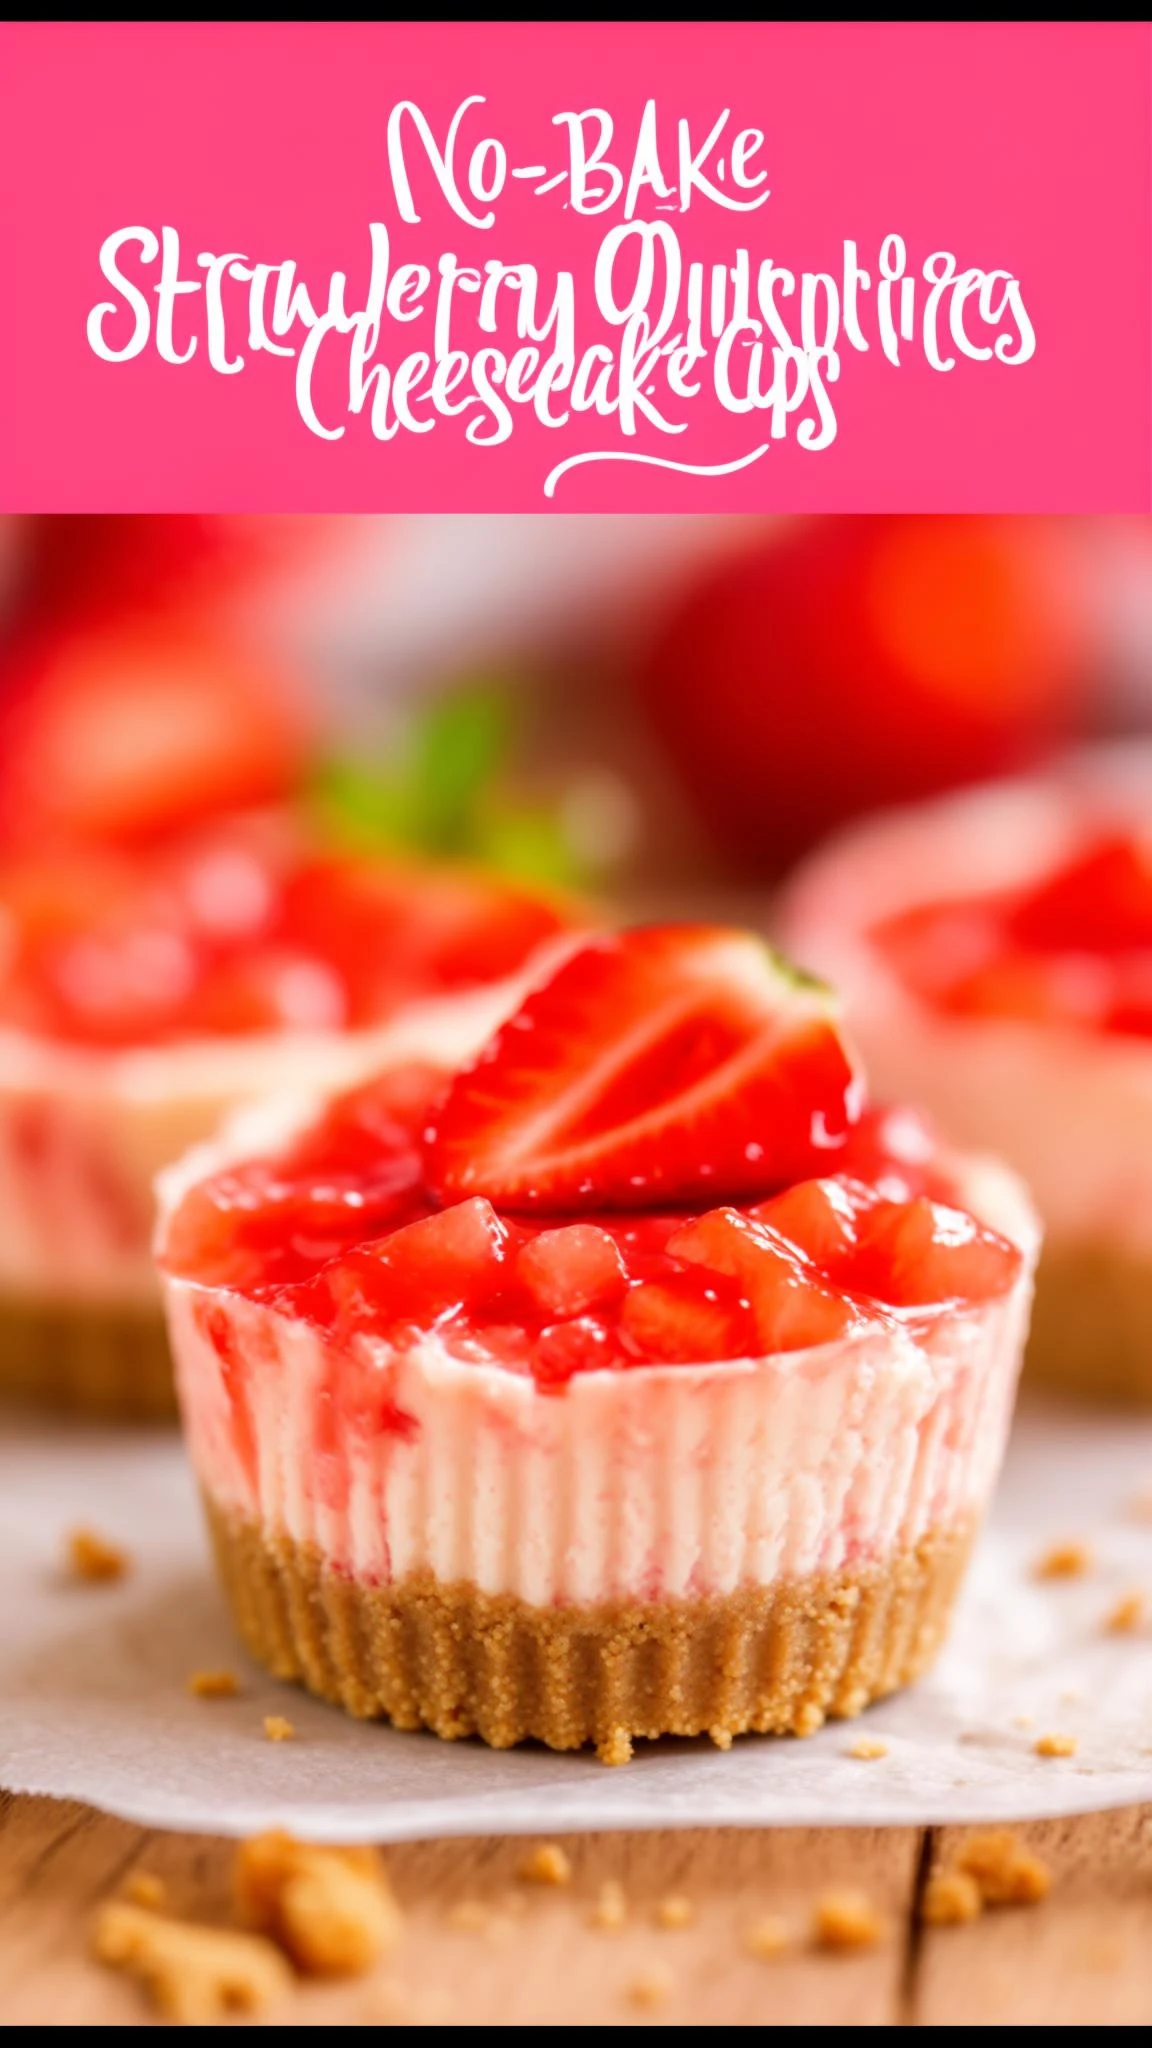
No-Bake Strawberry Cheesecake Cups: A Quick & Dreamy Dessert

There’s something magical about a no-bake dessert that feels indulgent yet effortless—especially when strawberries are involved. These No-Bake Strawberry Cheesecake Cups are my go-to when I need a little sweetness without the fuss. Imagine: a buttery graham cracker crust, velvety cream cheese filling, and juicy strawberries piled high. No oven required, just pure joy in every bite.

I first made these for a last-minute girls’ night, and let’s just say they disappeared faster than my willpower near a chocolate stash. Whether you’re hosting a summer BBQ, craving a midnight treat, or just want to brighten a weekday, these individual cups are here to save the day. Plus, they’re customizable—swap strawberries for blueberries or drizzle with chocolate for fun twists!

Why You’ll Love These Cheesecake Cups

If you’re still on the fence, here’s why these will become your new obsession:

  • No oven, no stress: Perfect for hot days or lazy bakers.
  • Portable perfection: Great for picnics or parties—no slicing required!
  • Kid-friendly: Let little hands help with layering.
  • Make-ahead magic: Chill overnight for even easier prep.

How to Make No-Bake Strawberry Cheesecake Cups

Ingredients You’ll Need

  • 1 ½ cups graham cracker crumbs
  • 6 tbsp melted butter
  • 16 oz cream cheese, softened
  • 1 cup powdered sugar
  • 1 tsp vanilla extract
  • 1 cup heavy whipping cream
  • 2 cups fresh strawberries, diced

Step-by-Step Instructions

  1. Prep the crust: Mix graham cracker crumbs with melted butter. Press 2 tbsp into each cup.
  2. Whip the filling: Beat cream cheese, powdered sugar, and vanilla until smooth. In another bowl, whip the cream to stiff peaks, then fold into the cream cheese mixture.
  3. Layer & chill: Divide filling among cups, top with strawberries, and refrigerate for at least 2 hours.

Tips for the Best Cheesecake Cups

For foolproof success, keep these in mind:

  • Use room-temperature cream cheese to avoid lumps.
  • Want a lighter texture? Substitute Greek yogurt for half the cream cheese.
  • Short on time? Skip homemade crust and use pre-made cookie crumbs.

Frequently Asked Questions

Can I use frozen strawberries?

Yes! Thaw and drain them well to avoid excess moisture.

How long do these cheesecake cups last?

Up to 3 days in the fridge—if they last that long!

Can I make these dairy-free?

Absolutely! Swap in vegan cream cheese and coconut cream.

What other fruits work well?

Blueberries, raspberries, or even mango would be delicious.

Can I freeze them?

Freeze without toppings for up to 1 month. Thaw overnight before serving.

Why is my filling runny?

Overmixing or under-whipping the cream can cause this. Chill longer to firm up.

There you have it—a dessert that’s as easy to make as it is to love. These No-Bake Strawberry Cheesecake Cups are proof that sometimes the simplest things bring the most happiness. Whip up a batch, share them (or don’t), and savor every creamy, berry-filled bite. For more no-fuss treats, check out our favorite no-bake desserts to satisfy any sweet tooth!


Luma Style Visual
Print
clock clock iconcutlery cutlery iconflag flag iconfolder folder iconinstagram instagram iconpinterest pinterest iconfacebook facebook iconprint print iconsquares squares iconheart heart iconheart solid heart solid icon

No-Bake Strawberry Cheesecake Cups

  • Author: Dessert Delights

Description

Creamy no-bake strawberry cheesecake served in individual cups with a buttery graham cracker crust and fresh strawberry topping. Perfect for summer gatherings!


Ingredients

Scale

For the Crust:

  • For the crust:
  • 1 1/2 cups graham cracker crumbs
  • 1/4 cup granulated sugar
  • 6 tablespoons unsalted butter, melted
  • For the filling:
  • 16 oz cream cheese, softened
  • 1/2 cup granulated sugar
  • 1 teaspoon vanilla extract
  • 1 cup heavy whipping cream
  • For the topping:
  • 2 cups fresh strawberries, diced
  • 1/4 cup strawberry jam
  • 1 tablespoon lemon juice

Instructions

1. Prepare the Crust:

  1. 1. Make the crust: In a bowl, mix graham cracker crumbs, sugar, and melted butter until combined.
  2. 2. Press 2 tablespoons of mixture firmly into the bottom of each serving cup. Chill for 15 minutes.
  3. 3. Make the filling: Beat cream cheese and sugar until smooth. Add vanilla.
  4. 4. In another bowl, whip heavy cream to stiff peaks, then fold into cream cheese mixture.
  5. 5. Pipe or spoon filling over chilled crusts. Refrigerate for at least 2 hours.
  6. 6. Make topping: Combine strawberries, jam and lemon juice. Spoon over cheesecakes before serving.

Notes

For best results, chill glasses before assembling. Can be made 1 day ahead – add strawberry topping just before serving. Substitute other berries when strawberries aren’t in season.

Old-Fashioned Lemon Loaf Cake


Old-Fashioned Lemon Loaf Cake: A Zesty Slice of Nostalgia

There’s something magical about the simplicity of an Old-Fashioned Lemon Loaf Cake. Whether it’s the sunny aroma of citrus filling your kitchen or the first bite of that tender, buttery crumb, this cake feels like a hug from Grandma—if Grandma had a penchant for zesty desserts. It’s the kind of recipe that never goes out of style, perfect for lazy Sunday brunches, afternoon tea with friends, or even as a sweet little gift wrapped in parchment and twine.

I first fell in love with this loaf cake during a rainy spring afternoon when my neighbor, Mrs. Thompson, brought over a still-warm slice. One taste and I was hooked—bright lemon flavor, a delicate glaze, and just the right amount of sweetness. It’s since become my go-to when I need a pick-me-up or want to impress without stress. Best of all? It’s incredibly easy to make, requiring just a bowl, a whisk, and a handful of pantry staples. Let’s bake some sunshine together!

Why You’ll Love This Old-Fashioned Lemon Loaf Cake

This isn’t just any lemon loaf—it’s a timeless classic with a few secrets for perfection:

  • Bright, balanced flavor: Tangy but not puckering, sweet but not cloying.
  • Moist texture: Thanks to a touch of sour cream (or yogurt, if you’re improvising).
  • Versatile: Fancy it up with blueberries or keep it pure and simple.
  • Freezer-friendly: Stash slices for future you (or unexpected guests).

How to Make Old-Fashioned Lemon Loaf Cake

Ingredients You’ll Need

  • 1 ½ cups all-purpose flour
  • 1 tsp baking powder
  • ½ tsp salt
  • ½ cup unsalted butter, softened
  • 1 cup granulated sugar
  • 2 large eggs
  • ½ cup sour cream (or plain yogurt)
  • 2 tbsp lemon zest
  • ¼ cup fresh lemon juice

Step-by-Step Instructions

  1. Prep: Preheat oven to 350°F (175°C). Grease a 9×5-inch loaf pan and line with parchment paper.
  2. Dry mix: Whisk flour, baking powder, and salt in a bowl.
  3. Cream butter & sugar: Beat butter and sugar until fluffy, about 3 minutes. Add eggs one at a time.
  4. Combine: Alternate adding dry ingredients and sour cream, then fold in lemon zest and juice.
  5. Bake: Pour batter into the pan and bake for 50–55 minutes, until a toothpick comes out clean.
  6. Glaze (optional): Mix 1 cup powdered sugar with 2 tbsp lemon juice and drizzle over cooled cake.

Tips for the Perfect Lemon Loaf

Want bakery-level results? Here’s how:

  • Zest smartly: Use organic lemons and avoid the bitter white pith.
  • Room temp matters: Cold ingredients don’t blend as smoothly.
  • Don’t overbake: The loaf should spring back lightly when touched.
  • Patience pays: Let it cool completely before slicing (or the crumb will tear).

For more citrusy inspiration, try our Lemon Blueberry Scones or Citrus Olive Oil Cake.

FAQs About Old-Fashioned Lemon Loaf Cake

Can I use bottled lemon juice?

Fresh is best for vibrant flavor, but in a pinch, bottled works—just skip the zest.

How do I store lemon loaf cake?

Keep it airtight at room temp for 3 days or freeze for up to 3 months.

Can I make this gluten-free?

Yes! Swap in a 1:1 gluten-free flour blend like King Arthur’s.

Why did my loaf sink in the middle?

Overmixing or underbaking are likely culprits. Check your oven temp with a thermometer!

Can I add poppy seeds?

Absolutely—fold in 2 tbsp with the dry ingredients for a classic twist.

What’s the best way to zest a lemon?

Use a microplane and rotate the lemon—stop when you hit the white layer.

Whether you’re savoring a slice with your morning coffee or sharing it at a potluck, this Old-Fashioned Lemon Loaf Cake is a little reminder that the best things in life are often the simplest. If you loved this recipe, you might also adore our Classic Vanilla Pound Cake—because sometimes, tradition tastes like home.


Luma Style Visual
Print
clock clock iconcutlery cutlery iconflag flag iconfolder folder iconinstagram instagram iconpinterest pinterest iconfacebook facebook iconprint print iconsquares squares iconheart heart iconheart solid heart solid icon

Old-Fashioned Lemon Loaf Cake

  • Author: Classic Baking Co.

Description

A moist, buttery lemon loaf cake with a sweet-tart glaze that soaks into every crumb. This nostalgic recipe features fresh lemon zest and juice for maximum citrus flavor with a tender crumb texture reminiscent of vintage bakery treats.


Ingredients

Scale

For the Crust:

  • For the cake:
  • 1 1/2 cups all-purpose flour
  • 1 teaspoon baking powder
  • 1/4 teaspoon salt
  • 1/2 cup unsalted butter, softened
  • 1 cup granulated sugar
  • 2 large eggs
  • 1 tablespoon lemon zest (about 2 lemons)
  • 1/2 cup whole milk
  • 2 tablespoons fresh lemon juice
  • For the glaze:
  • 1 cup powdered sugar
  • 23 tablespoons fresh lemon juice
  • 1 teaspoon lemon zest

Instructions

1. Prepare the Crust:

  1. Preheat oven to 350°F (175°C). Grease a 9×5-inch loaf pan and line with parchment paper.
  2. Whisk together flour, baking powder, and salt in a medium bowl. Set aside.
  3. In a large bowl, beat butter and sugar until light and fluffy (about 3 minutes).
  4. Add eggs one at a time, beating well after each addition. Mix in lemon zest.
  5. Alternately add flour mixture and milk to butter mixture, beginning and ending with flour. Stir in lemon juice.
  6. Pour batter into prepared pan and bake for 45-55 minutes until a toothpick comes out clean.
  7. Cool in pan for 10 minutes, then transfer to a wire rack.
  8. While warm, poke holes all over the cake with a skewer. Whisk glaze ingredients and pour over cake.
  9. Let glaze set for 30 minutes before slicing.

Notes

For best results, use room temperature ingredients. The glaze will soak into the cake better when applied warm. Store covered at room temperature for up to 3 days. Freezes well for up to 1 month.

Classic Deviled Eggs with a Twist

Classic Deviled Eggs with a Twist: A Crowd-Pleasing Favorite

There’s something undeniably comforting about a platter of deviled eggs. Whether it’s a family gathering, a summer picnic, or just a cozy night in, these little bites of creamy, tangy goodness never fail to disappear fast. But what if we told you the classic deviled egg could be even better? Enter our Classic Deviled Eggs with a Twist—a recipe that keeps the nostalgic flavor you love but adds a smoky, crunchy upgrade with crispy bacon and fresh chives.

I’ll admit, I used to be intimidated by making deviled eggs. The peeling! The filling! The fear of over-seasoning! But after years of trial and error (and a few hilarious kitchen mishaps), I’ve cracked the code (pun intended) to perfect deviled eggs every time. This version is foolproof, packed with flavor, and guaranteed to make you the star of any potluck. Plus, it’s a great way to use up those leftover hard-boiled eggs from Easter or Sunday meal prep.

Why You’ll Love These Classic Deviled Eggs with a Twist

Deviled eggs are a timeless appetizer, but this recipe takes them to the next level. Here’s why you’ll adore them:

  • Perfect texture: Creamy yolks mixed with just the right amount of mayo and mustard.
  • Flavor boost: Smoky bacon and fresh chives add a delicious contrast.
  • Easy to customize: Swap toppings for pickled jalapeños, smoked paprika, or even avocado.
  • Crowd-friendly: Always a hit at parties, brunches, or even as a snack.

How to Make Classic Deviled Eggs with a Twist

Ingredients You’ll Need

  • 6 large eggs, hard-boiled and peeled
  • 3 tbsp mayonnaise
  • 1 tsp Dijon mustard
  • 1 tsp apple cider vinegar
  • Salt and pepper to taste
  • 2 slices cooked bacon, crumbled
  • 1 tbsp fresh chives, finely chopped
  • Paprika for garnish (optional)

Step-by-Step Instructions

  1. Prep the eggs: Slice the hard-boiled eggs in half lengthwise. Gently remove the yolks and place them in a bowl.
  2. Make the filling: Mash the yolks with a fork, then mix in mayonnaise, Dijon mustard, vinegar, salt, and pepper until smooth.
  3. Fill the eggs: Spoon or pipe the yolk mixture back into the egg white halves.
  4. Add the twist: Top each egg with crumbled bacon and chives. Sprinkle with paprika if desired.
  5. Serve and enjoy: Chill for 15 minutes before serving for the best flavor.

Tips for the Best Deviled Eggs

Want to avoid rubbery eggs or bland filling? Here are my tried-and-true tips:

  • Perfect hard-boiled eggs: Place eggs in a pot, cover with cold water, bring to a boil, then turn off heat and let sit for 10 minutes. Transfer to an ice bath immediately.
  • Smooth filling: For extra creaminess, blend the yolk mixture in a food processor.
  • Make ahead: Prep the eggs and filling separately, then assemble just before serving to keep them fresh.

If you love easy appetizers, you’ll also adore our Quick Caprese Skewers—another no-fuss crowd-pleaser!

Frequently Asked Questions

Can I make deviled eggs ahead of time?

Yes! Store the filling and egg whites separately in the fridge for up to 24 hours, then assemble before serving.

What’s the best way to peel hard-boiled eggs?

Tap the egg gently on the counter, then roll it to crack the shell. Peel under cool running water for easier removal.

Can I use Greek yogurt instead of mayo?

Absolutely! Greek yogurt adds a tangy twist and lightens up the recipe.

How long do deviled eggs last in the fridge?

They’re best eaten within 2 days. Keep them covered to prevent drying out.

What other toppings work well?

Try pickled onions, hot sauce, or even a sprinkle of everything bagel seasoning!

Why are they called “deviled” eggs?

The term dates back to the 18th century, referring to spicy or zesty foods. Learn more about the history of deviled eggs on Smithsonian Magazine.

There you have it—the ultimate Classic Deviled Eggs with a Twist that’s sure to become a staple in your recipe collection. Whether you’re serving them at a party or sneaking a few as a midnight snack (no judgment here!), these little bites are always a hit. For more easy appetizers, check out our 5-Minute Guacamole or Garlic Parmesan Wings. Happy cooking!

Luma Style Visual
Print
clock clock iconcutlery cutlery iconflag flag iconfolder folder iconinstagram instagram iconpinterest pinterest iconfacebook facebook iconprint print iconsquares squares iconheart heart iconheart solid heart solid icon

Classic Deviled Eggs with a Twist

  • Author: Chef Jamie

Description

A modern take on the classic deviled eggs, featuring a creamy filling with a hint of Dijon mustard and a sprinkle of smoked paprika for an extra kick. Perfect for parties or as a savory snack.


Ingredients

Scale

For the Crust:

  • For the eggs:
  • 6 large eggs
  • 1/4 cup mayonnaise
  • 1 teaspoon Dijon mustard
  • 1/2 teaspoon white vinegar
  • Salt and pepper to taste
  • For garnish:
  • Smoked paprika
  • Fresh chives, finely chopped

Instructions

1. Prepare the Crust:

  1. 1. Place eggs in a single layer in a saucepan and cover with enough water that there’s about 1 inch of water above the eggs.
  2. 2. Heat on high until water begins to boil, then cover, turn the heat to low, and cook for 1 minute.
  3. 3. Remove from heat and leave covered for 14 minutes, then rinse under cold water continuously for 1 minute.
  4. 4. Crack egg shells and carefully peel under cool running water. Dry the peeled eggs with a paper towel.
  5. 5. Slice the eggs in half lengthwise, removing yolks to a medium bowl, and placing the whites on a serving platter.
  6. 6. Mash the yolks with a fork and add mayonnaise, Dijon mustard, vinegar, salt, and pepper. Mix well.
  7. 7. Fill the egg whites evenly with the yolk mixture.
  8. 8. Garnish with smoked paprika and chopped chives.
  9. 9. Chill for at least 30 minutes before serving.

Notes

For a spicier version, add a dash of hot sauce to the yolk mixture. The eggs can be made up to a day in advance; store covered in the refrigerator.

Old-Fashioned Peach Cobbler

Old-Fashioned Peach Cobbler: A Timeless Dessert for Every Occasion

There’s something undeniably comforting about an Old-Fashioned Peach Cobbler. The way the sweet, juicy peaches bubble beneath a golden, buttery crust—it’s like a hug in dessert form. Whether you’re serving it at a summer barbecue, a family reunion, or just because it’s Tuesday, this classic treat never goes out of style. And the best part? It’s incredibly easy to make, even if you’re not a seasoned baker.

I still remember the first time I made this cobbler. It was a sweltering July afternoon, and my grandmother handed me a basket of ripe peaches from her tree. “Don’t overthink it,” she said, patting my shoulder. “Just let the fruit shine.” That’s the beauty of an old-fashioned recipe—it doesn’t need fancy techniques or exotic ingredients. Just good fruit, a simple batter, and a little patience while it bakes to perfection. Now, every time I pull this cobbler out of the oven, I’m transported back to that sticky-sweet summer day.

Why You’ll Love This Old-Fashioned Peach Cobbler

This dessert is a crowd-pleaser for so many reasons. Here’s why it’s earned a permanent spot in my recipe box:

  • Minimal effort, maximum flavor: No pie crust to roll out—just a dump-and-bake batter that magically rises around the fruit.
  • Versatile: Serve it warm with vanilla ice cream, cold with whipped cream, or straight from the pan (no judgment here).
  • Adaptable: Swap peaches for other seasonal fruits like blackberries or apples.
  • Nostalgic: Tastes like the cobblers your grandma used to make—simple, wholesome, and full of love.

How to Make Old-Fashioned Peach Cobbler

Ingredients You’ll Need

  • 6 cups fresh peaches, peeled and sliced (about 6–7 medium peaches)
  • 1 cup granulated sugar, divided
  • 1/2 tsp ground cinnamon
  • 1 cup all-purpose flour
  • 1 1/2 tsp baking powder
  • 1/2 tsp salt
  • 1/2 cup unsalted butter, melted
  • 3/4 cup milk
  • 1 tsp vanilla extract

Step-by-Step Instructions

  1. Prep the peaches: Toss sliced peaches with 1/2 cup sugar and cinnamon. Let sit for 15 minutes to draw out juices.
  2. Make the batter: Whisk flour, remaining 1/2 cup sugar, baking powder, and salt. Stir in melted butter, milk, and vanilla until just combined.
  3. Layer and bake: Pour batter into a greased 9×13-inch baking dish. Spoon peaches and their juices evenly over the batter. Bake at 375°F for 45–50 minutes until golden.
  4. Serve warm: Let cool slightly, then scoop into bowls and top with vanilla ice cream.

Pro Tips for the Best Cobbler

Want to take your cobbler from good to great? Try these tricks:

  • Peach selection: Use ripe but firm peaches for the best texture. Overripe fruit can make the cobbler soggy.
  • Skin hack: Don’t love peeling peaches? Score an “X” on the bottom, blanch in boiling water for 30 seconds, then plunge into ice water—the skins will slip right off.
  • Butter boost: For extra richness, brush the baked crust with melted butter and sprinkle with turbinado sugar before serving.

Frequently Asked Questions

Can I use canned peaches?

Yes! Drain two 15-oz cans of peaches and reduce added sugar to 1/4 cup since canned fruit is often sweeter. Check out USDA guidelines for fruit substitutions.

How do I store leftovers?

Cover and refrigerate for up to 3 days. Reheat in the oven or microwave before serving.

Can I freeze peach cobbler?

Absolutely! Freeze baked cobbler (cooled completely) for up to 3 months. Thaw overnight in the fridge and reheat at 350°F for 20 minutes.

Why does my cobbler sink in the middle?

This happens if the batter is overmixed or the oven temperature is too low. Mix until just combined, and use an oven thermometer to verify heat accuracy.

What’s the difference between cobbler and crisp?

Cobblers have a biscuit or cake-like topping, while crisps use an oat-based streusel. Try our apple crisp recipe to taste the difference!

Can I make this gluten-free?

Yes! Substitute a 1:1 gluten-free flour blend and ensure your baking powder is GF-certified. For more gluten-free desserts, see Beyond Celiac’s tips.

There you have it—the ultimate Old-Fashioned Peach Cobbler, just like the one your family will request year after year. It’s the kind of dessert that turns an ordinary meal into a celebration, and honestly, isn’t that what good cooking is all about? So grab those peaches, preheat your oven, and get ready to make some memories (and maybe a little mess) along the way. Happy baking!

Luma Style Visual
Print
clock clock iconcutlery cutlery iconflag flag iconfolder folder iconinstagram instagram iconpinterest pinterest iconfacebook facebook iconprint print iconsquares squares iconheart heart iconheart solid heart solid icon

Old-Fashioned Peach Cobbler

  • Author: Grandma's Kitchen

Description

A classic Southern dessert with juicy peaches and a buttery biscuit topping, perfect for summer gatherings. This cobbler bakes into a golden, bubbly masterpiece with tender fruit beneath a lightly crisp crust.


Ingredients

Scale

For the Crust:

  • For the peach filling:
  • 6 cups fresh peaches, peeled and sliced (about 8 medium peaches)
  • 3/4 cup granulated sugar
  • 1/4 cup light brown sugar, packed
  • 1 tablespoon lemon juice
  • 1 teaspoon vanilla extract
  • 2 tablespoons cornstarch
  • 1/2 teaspoon ground cinnamon
  • 1/4 teaspoon ground nutmeg
  • 1/8 teaspoon salt
  • For the cobbler topping:
  • 1 1/2 cups all-purpose flour
  • 1/2 cup granulated sugar
  • 1 1/2 teaspoons baking powder
  • 1/2 teaspoon salt
  • 1/2 cup unsalted butter, cold and cubed
  • 1/2 cup whole milk
  • 1 teaspoon vanilla extract
  • For garnish:
  • 1 tablespoon coarse sugar (optional)
  • Vanilla ice cream (for serving)

Instructions

1. Prepare the Crust:

  1. 1. Preheat oven to 375°F (190°C). Grease a 9×13-inch baking dish.
  2. 2. Make the filling: In a large bowl, gently toss peaches with sugars, lemon juice, vanilla, cornstarch, cinnamon, nutmeg, and salt until evenly coated. Pour into prepared dish.
  3. 3. Make the topping: Whisk flour, sugar, baking powder, and salt in a bowl. Cut in butter with a pastry cutter until mixture resembles coarse crumbs.
  4. 4. Stir in milk and vanilla just until dough comes together (do not overmix). Drop spoonfuls over peaches, leaving small gaps for steam.
  5. 5. Sprinkle with coarse sugar if using. Bake 40-45 minutes until topping is golden and filling bubbles at edges.
  6. 6. Cool 15 minutes before serving warm with vanilla ice cream.

Notes

For firmer filling, let peaches macerate with sugars for 30 minutes before baking. Substitute 6 cups frozen peaches (thawed) if fresh aren’t available. Store leftovers covered at room temperature for up to 2 days.

No-Bake Strawberry Cheesecake

No-Bake Strawberry Cheesecake: A Creamy Dreamy Summer Dessert

There’s something magical about a no-bake dessert, especially when it involves strawberries and cheesecake. Picture this: a buttery graham cracker crust, a velvety smooth filling, and a luscious strawberry topping—all without turning on your oven. Whether you’re dodging summer heat or just craving a fuss-free treat, this No-Bake Strawberry Cheesecake is your new best friend.

I first made this recipe for a last-minute girls’ night, and let’s just say it was love at first bite. The best part? It’s nearly impossible to mess up. No cracking, no water baths, just pure strawberry bliss. Plus, it’s a fantastic make-ahead dessert for potlucks, birthdays, or those days when you need a little extra sweetness. If you’re a fan of easy, creamy desserts (and really, who isn’t?), this one’s for you.

Why You’ll Love This No-Bake Strawberry Cheesecake

This dessert checks all the boxes:

  • No oven required—perfect for hot days or tiny kitchens.
  • Only 20 minutes of hands-on time—the fridge does the heavy lifting.
  • Customizable—swap strawberries for blueberries, raspberries, or even a drizzle of chocolate.
  • Crowd-pleaser—kids and adults alike will beg for seconds.

How to Make No-Bake Strawberry Cheesecake

Ingredients You’ll Need

  • 2 cups graham cracker crumbs
  • ½ cup melted butter
  • 16 oz cream cheese, softened
  • 1 cup powdered sugar
  • 1 tsp vanilla extract
  • 1 cup heavy whipping cream
  • 2 cups fresh strawberries, sliced
  • ¼ cup strawberry jam (for glaze)

Step-by-Step Instructions

  1. Make the crust: Mix graham cracker crumbs and melted butter, then press into a 9-inch springform pan. Chill for 10 minutes.
  2. Whip the filling: Beat cream cheese, powdered sugar, and vanilla until smooth. In a separate bowl, whip the heavy cream to stiff peaks, then fold into the cream cheese mixture.
  3. Assemble: Spread the filling over the crust and smooth the top. Refrigerate for at least 4 hours (or overnight).
  4. Add the topping: Before serving, arrange strawberry slices on top. Warm the strawberry jam slightly and brush over the berries for a glossy finish.

Tips for the Perfect No-Bake Cheesecake

Here’s how to avoid common pitfalls:

  • Softened cream cheese is key—cold cream cheese will leave lumps.
  • Don’t overmix the filling—fold gently to keep it light and airy.
  • Chill time matters—4 hours minimum, but overnight is even better.
  • Use fresh strawberries—frozen berries can make the topping watery.

For more no-bake dessert inspiration, try my No-Bake Chocolate Peanut Butter Bars—they’re another crowd favorite!

Frequently Asked Questions

Can I use frozen strawberries for the topping?

Fresh strawberries work best, but if you must use frozen, thaw and pat them dry to prevent excess moisture.

How long does no-bake cheesecake last in the fridge?

Up to 3 days, though it’s rarely around that long! Cover it tightly to prevent odors.

Can I make this gluten-free?

Absolutely! Swap graham crackers for gluten-free cookies or almond flour crust.

Why is my cheesecake filling runny?

It likely needed more chilling time or the cream wasn’t whipped enough. Pop it back in the fridge for another hour.

Can I use a different fruit?

Of course! Blueberries, raspberries, or even mango would be delicious. Check out these summer fruit desserts for ideas.

Is there a lighter version?

For a lighter option, try reduced-fat cream cheese and swap heavy cream for whipped coconut cream (more info here).

There you have it—a dessert that’s as easy to make as it is to devour. Whether you’re celebrating a special occasion or just treating yourself, this No-Bake Strawberry Cheesecake is guaranteed to bring smiles. And if you’re anything like me, you’ll be making it on repeat all summer long. Happy no-baking!

Luma Style Visual
Print
clock clock iconcutlery cutlery iconflag flag iconfolder folder iconinstagram instagram iconpinterest pinterest iconfacebook facebook iconprint print iconsquares squares iconheart heart iconheart solid heart solid icon

No-Bake Strawberry Cheesecake

  • Author: Sweet Treats Kitchen

Description

A creamy, dreamy no-bake strawberry cheesecake with a buttery graham cracker crust and fresh strawberry topping. Perfect for summer gatherings!


Ingredients

Scale

For the Crust:

  • For the crust:
  • 1 1/2 cups graham cracker crumbs
  • 1/4 cup granulated sugar
  • 6 tablespoons unsalted butter, melted
  • For the filling:
  • 16 oz cream cheese, softened
  • 1 cup powdered sugar
  • 1 teaspoon vanilla extract
  • 1 cup heavy whipping cream, chilled
  • For the topping:
  • 2 cups fresh strawberries, sliced
  • 1/4 cup strawberry jam
  • 1 tablespoon water

Instructions

1. Prepare the Crust:

  1. 1. Make the crust: In a bowl, mix graham cracker crumbs, sugar, and melted butter until combined.
  2. 2. Press mixture firmly into the bottom of a 9-inch springform pan. Chill for 30 minutes.
  3. 3. Make the filling: Beat cream cheese until smooth. Add powdered sugar and vanilla, beating until creamy.
  4. 4. In a separate bowl, whip heavy cream to stiff peaks. Gently fold into cream cheese mixture.
  5. 5. Spread filling over chilled crust. Smooth top with a spatula. Refrigerate for 4+ hours.
  6. 6. Make the topping: Combine jam and water in a saucepan over low heat until melted. Cool slightly.
  7. 7. Arrange strawberry slices on cheesecake. Brush with jam glaze. Chill 30 minutes before serving.

Notes

For best results, use full-fat cream cheese. Cheesecake sets better when chilled overnight. Substitute other berries if desired.