Classic Deviled Eggs with a Twist

Classic Deviled Eggs with a Twist: A Creamy, Zesty Upgrade

There’s something undeniably comforting about a platter of deviled eggs. Whether it’s a holiday gathering, a summer picnic, or just a Tuesday afternoon snack, these little flavor bombs never fail to delight. But what if we told you the classic version could be even better? Our Classic Deviled Eggs with a Twist recipe keeps the creamy, tangy goodness you love while adding a subtle kick and a sprinkle of magic. Think smoky paprika, a hint of Dijon, and just the right amount of crunch.

I first fell in love with deviled eggs at my grandma’s Easter brunches—her secret was a dash of cayenne and a tiny bit of sweet relish. Over the years, I’ve tweaked her recipe (sorry, Grandma!) to balance richness, acidity, and texture. The result? A crowd-pleaser that’s as easy to make as it is to devour. Whether you’re a deviled egg purist or an adventurous foodie, this twist will have you reaching for seconds. Plus, they’re gluten-free, keto-friendly, and perfect for meal prep. Win-win!

Why You’ll Love These Classic Deviled Eggs with a Twist

Deviled eggs are the ultimate versatile dish, and this version takes them to the next level. Here’s why they’ll become your new go-to:

  • Creamier filling: A touch of Greek yogurt (or mayo) makes them luxuriously smooth.
  • Bold flavor: Dijon mustard and apple cider vinegar add depth.
  • Crunchy finish: Topped with crispy bacon or pickled onions for texture.
  • Easy to customize: Swap toppings for smoked salmon, avocado, or sriracha.

How to Make Classic Deviled Eggs with a Twist

Ingredients You’ll Need

  • 6 large eggs, hard-boiled and peeled
  • 3 tbsp mayonnaise (or Greek yogurt for a lighter option)
  • 1 tsp Dijon mustard
  • 1 tsp apple cider vinegar
  • ¼ tsp smoked paprika, plus extra for garnish
  • Salt and pepper to taste
  • Optional toppings: crumbled bacon, chives, pickled jalapeños

Step-by-Step Instructions

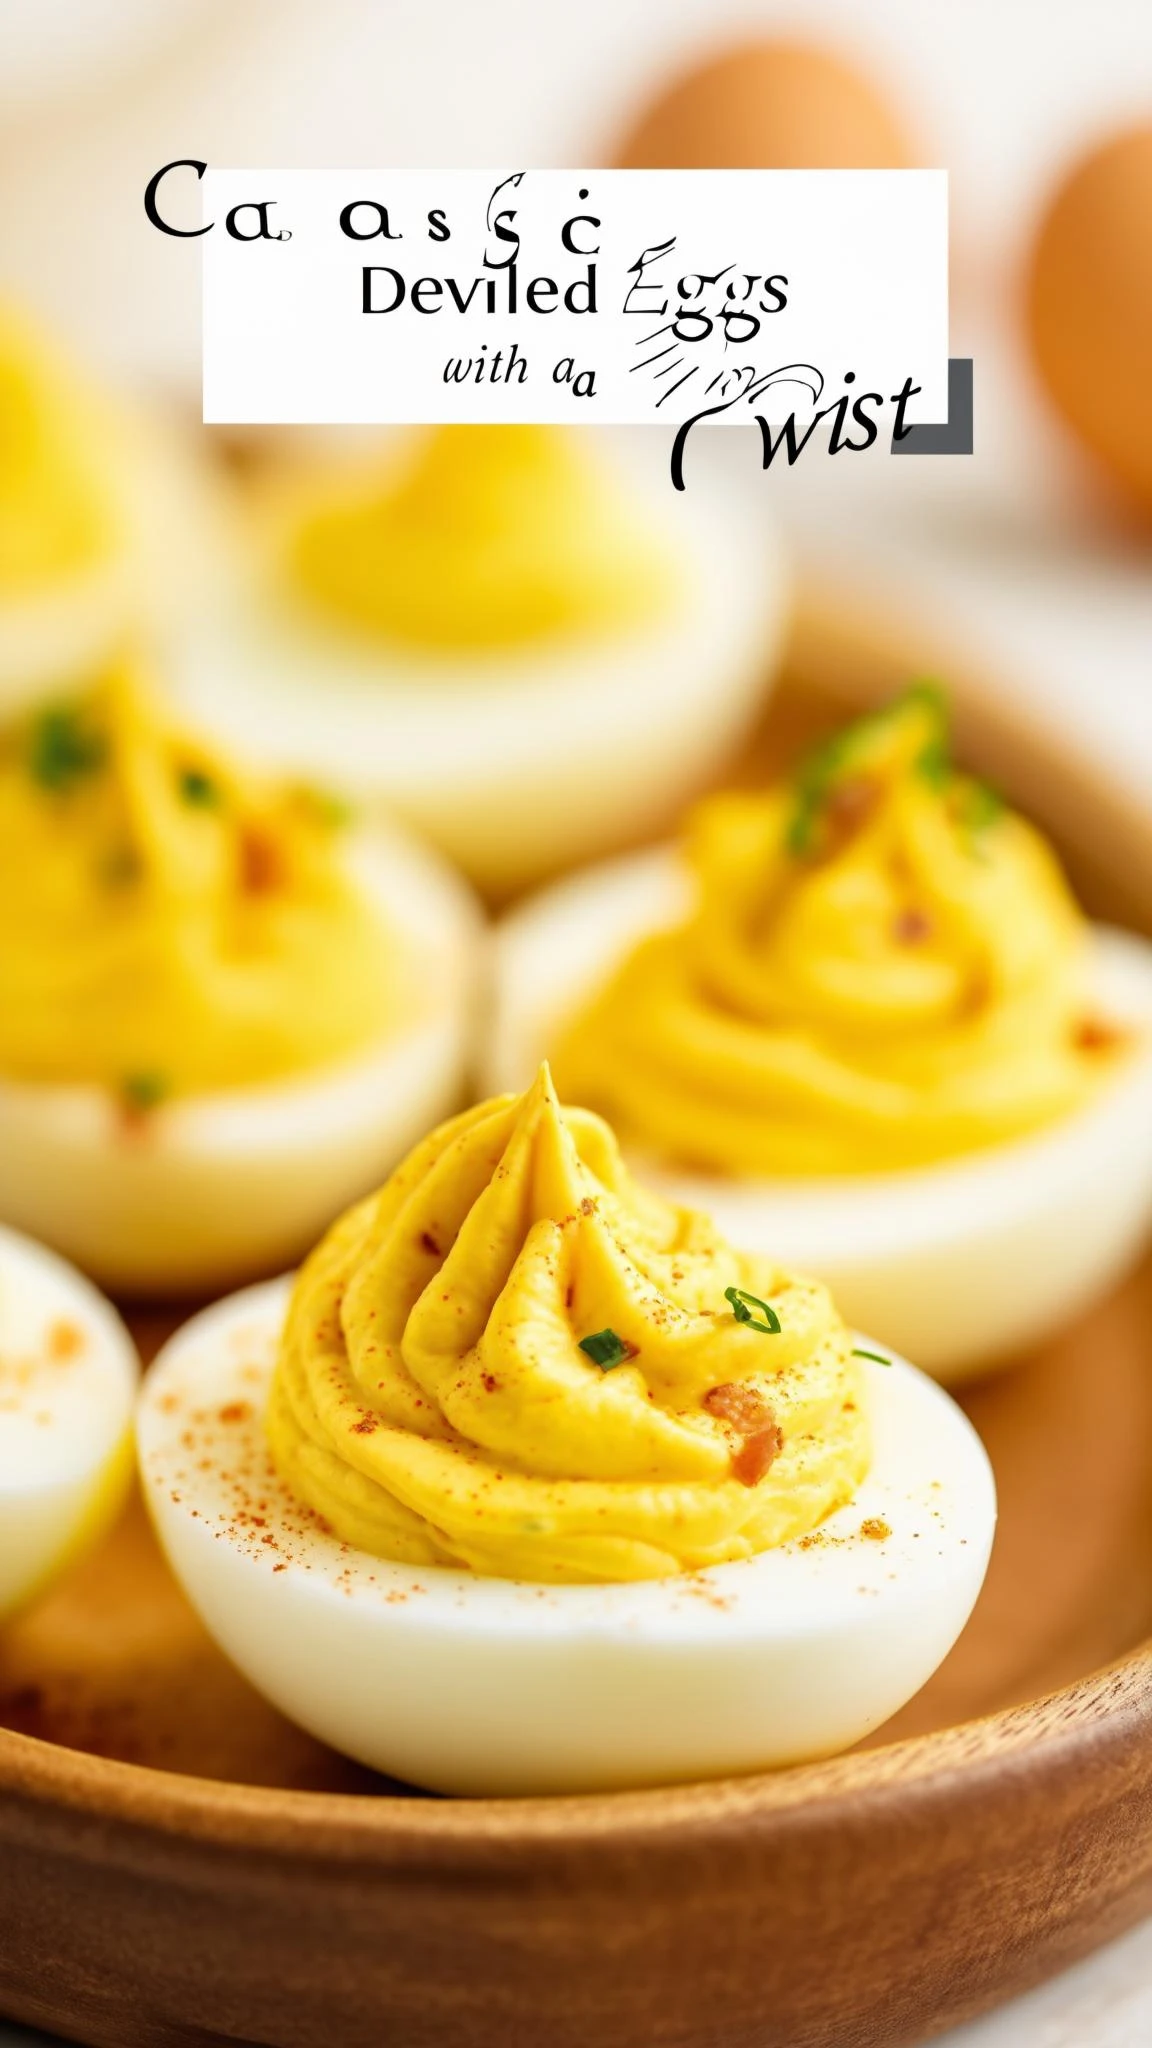
  1. Prep the eggs: Slice each boiled egg in half lengthwise. Gently pop out the yolks into a bowl.
  2. Make the filling: Mash the yolks with mayo, Dijon, vinegar, paprika, salt, and pepper until smooth.
  3. Fill the whites: Spoon or pipe the filling back into the egg whites.
  4. Garnish: Sprinkle with extra paprika and add your favorite toppings.
  5. Chill: Refrigerate for 30 minutes before serving for the best texture.

Tips for Perfect Deviled Eggs Every Time

Want foolproof deviled eggs? Here’s what I’ve learned from (many) trial and error moments:

  • Easy peeling: Use older eggs—they peel more cleanly than fresh ones.
  • No overboiling: Cook eggs for exactly 10 minutes to avoid rubbery whites.
  • Pipe like a pro: Use a zip-top bag with the corner snipped for neat filling.
  • Make ahead: Prep the filling and store it separately for up to 2 days.

For more egg-cellent ideas, check out our guide to easy brunch recipes or these healthy snack swaps.

Creative Variations to Try

Once you’ve mastered the basics, play with flavors! Here are a few favorites:

  • Spicy Sriracha: Mix 1 tsp sriracha into the filling.
  • Herb Garden: Fold in fresh dill, chives, or tarragon.
  • Avocado Lime: Replace mayo with mashed avocado and lime juice.

Need more inspiration? The Serious Eats guide has brilliant twists.

Frequently Asked Questions

How long can deviled eggs sit out?

For food safety, don’t leave them unrefrigerated for more than 2 hours.

Can I make deviled eggs ahead of time?

Yes! Assemble them up to 24 hours in advance—just add toppings before serving.

What’s the best way to hard-boil eggs?

Cover eggs with cold water, bring to a boil, then turn off heat and let sit for 10 minutes.

Are deviled eggs healthy?

They’re high in protein and healthy fats—especially if you use Greek yogurt.

How do I store leftover deviled eggs?

Keep them in an airtight container in the fridge for up to 3 days.

Can I freeze deviled eggs?

Freezing isn’t recommended—the texture turns rubbery.

There you have it—the ultimate Classic Deviled Eggs with a Twist that’s sure to impress. Whether you stick to the traditional recipe or jazz it up with bold flavors, these little bites are always a hit. Next time you’re asked to bring a dish to a potluck, you’ll know exactly what to make. And if you’re like me, you might just sneak a few extras for yourself. Happy cooking!

Luma Style Visual
Print
clock clock iconcutlery cutlery iconflag flag iconfolder folder iconinstagram instagram iconpinterest pinterest iconfacebook facebook iconprint print iconsquares squares iconheart heart iconheart solid heart solid icon

Classic Deviled Eggs with a Twist

  • Author: Chef Emily

Description

A modern take on the classic deviled eggs, featuring a creamy filling with a hint of Dijon mustard and a sprinkle of smoked paprika for an extra kick. Perfect for parties or as an elegant appetizer.


Ingredients

Scale

For the Crust:

  • For the eggs:
  • 6 large eggs
  • 1/4 cup mayonnaise
  • 1 teaspoon Dijon mustard
  • 1/2 teaspoon white vinegar
  • Salt and pepper to taste
  • For garnish:
  • Smoked paprika
  • Fresh chives, finely chopped

Instructions

1. Prepare the Crust:

  1. 1. Place the eggs in a single layer in a saucepan and cover with water. Bring to a boil over medium-high heat.
  2. 2. Once boiling, remove from heat, cover, and let sit for 10 minutes.
  3. 3. Transfer the eggs to an ice bath to cool completely, then peel them.
  4. 4. Slice the eggs in half lengthwise and carefully remove the yolks.
  5. 5. In a bowl, mash the yolks with mayonnaise, Dijon mustard, vinegar, salt, and pepper until smooth.
  6. 6. Spoon or pipe the yolk mixture back into the egg white halves.
  7. 7. Garnish with a sprinkle of smoked paprika and chopped chives.
  8. 8. Chill for at least 30 minutes before serving.

Notes

For a spicier version, add a dash of hot sauce to the yolk mixture. The eggs can be prepared up to a day in advance and stored in the refrigerator.

Old-Fashioned Peach Cobbler

Old-Fashioned Peach Cobbler: A Timeless Dessert for Every Occasion

There’s something magical about the scent of warm peaches and cinnamon wafting through the kitchen—a nostalgic aroma that instantly transports me back to my grandmother’s farmhouse table. Her Old-Fashioned Peach Cobbler was the stuff of legends: buttery, golden crust hugging tender, syrupy peaches, always served with a scoop of vanilla ice cream melting into the crevices. It wasn’t just dessert; it was a love letter to summer, to simplicity, and to the joy of sharing food with people you cherish.

If you’ve ever hesitated to make cobbler because it seems too fussy, let me reassure you: this recipe is as forgiving as it is delicious. Unlike finicky pies, cobblers embrace imperfections. The dough doesn’t need rolling, the fruit doesn’t demand precision, and even if your crust cracks or your peaches are extra juicy, the result is still heavenly. Whether you’re hosting a backyard BBQ, craving comfort on a rainy day, or just need a dessert that feels like a hug, this Old-Fashioned Peach Cobbler is your answer. Bonus? It’s ready in under an hour!

Why You’ll Love This Old-Fashioned Peach Cobbler

This recipe is a keeper for so many reasons:

  • Minimal Effort, Maximum Flavor: No fancy techniques—just layer, bake, and enjoy.
  • Adaptable: Use fresh or frozen peaches, swap spices, or add berries for a twist.
  • Crowd-Pleasing: Equally at home at potlucks or quiet weeknight dinners.
  • Comfort in Every Bite: That buttery crust and caramelized fruit? Pure nostalgia.

How to Make Old-Fashioned Peach Cobbler

Ingredients You’ll Need

  • 6 cups peeled, sliced peaches (about 8 medium peaches)
  • 1 cup granulated sugar, divided
  • 1/2 tsp cinnamon
  • 1 tbsp lemon juice
  • 1 cup all-purpose flour
  • 1 1/2 tsp baking powder
  • 1/2 tsp salt
  • 1/2 cup unsalted butter, melted
  • 3/4 cup milk

Step-by-Step Instructions

  1. Prep the Peaches: Toss sliced peaches with 1/2 cup sugar, cinnamon, and lemon juice. Let sit for 15 minutes to release juices.
  2. Make the Batter: Whisk flour, remaining 1/2 cup sugar, baking powder, and salt. Stir in melted butter and milk until just combined.
  3. Layer & Bake: Pour batter into a greased 9×13-inch baking dish. Spoon peaches and their juices over the top. Bake at 375°F for 40–45 minutes until golden and bubbly.
  4. Serve Warm: Let cool slightly, then dish up with vanilla ice cream or whipped cream.

Tips for the Best Peach Cobbler

Want to elevate your cobbler game? Try these pro tips:

  • Peach Perfection: For the best flavor, use ripe but firm peaches. Overripe ones can make the cobbler soggy.
  • Spice It Up: Add a pinch of nutmeg or cardamom to the peaches for extra warmth.
  • Crust Hack: For a crispier top, sprinkle coarse sugar over the batter before baking.
  • Make-Ahead: Assemble the cobbler up to 4 hours ahead and refrigerate until ready to bake.

Frequently Asked Questions

Can I use canned peaches for peach cobbler?
Yes! Drain canned peaches well and reduce added sugar by half since they’re already sweetened.

How do I store leftover peach cobbler?
Cover and refrigerate for up to 3 days. Reheat in the oven or microwave before serving.

Can I freeze peach cobbler?
Absolutely! Bake, cool completely, then freeze for up to 3 months. Thaw overnight in the fridge and reheat.

Why is my cobbler dough soggy?
This usually happens if the peaches were overly juicy. Try tossing them with 1 tbsp of flour next time.

What’s the difference between cobbler and crisp?
Cobblers have a biscuit-like topping, while crisps use a crunchy oat or streusel layer. Both are delicious!

Can I make peach cobbler gluten-free?
Yes! Swap the flour for a 1:1 gluten-free blend and ensure your baking powder is GF.

There you have it—a dessert that’s as easy to make as it is to love. Whether you’re serving it at a summer picnic or sneaking a midnight bite straight from the pan (no judgment here), this Old-Fashioned Peach Cobbler is a reminder that the best recipes are the ones that bring people together. Looking for more fruit-filled inspiration? Try our Blueberry Crumble or Apple Crisp next. And if you’re curious about peach varieties, Serious Eats has a fantastic guide. Now, go grab those peaches—your future self (and everyone at your table) will thank you!

Luma Style Visual
Print
clock clock iconcutlery cutlery iconflag flag iconfolder folder iconinstagram instagram iconpinterest pinterest iconfacebook facebook iconprint print iconsquares squares iconheart heart iconheart solid heart solid icon

Old-Fashioned Peach Cobbler

  • Author: Grandma's Kitchen

Description

A classic Southern dessert with juicy peaches and a buttery biscuit-like topping that bakes to golden perfection. Serve warm with vanilla ice cream for the ultimate comfort food experience.


Ingredients

Scale

For the Crust:

  • For the peach filling:
  • 6 cups fresh peaches, peeled and sliced (about 8 medium peaches)
  • 3/4 cup granulated sugar
  • 1/4 cup light brown sugar, packed
  • 1 tablespoon lemon juice
  • 1 teaspoon vanilla extract
  • 1/4 teaspoon ground cinnamon
  • 1/8 teaspoon ground nutmeg
  • 2 tablespoons cornstarch
  • For the cobbler topping:
  • 1 1/2 cups all-purpose flour
  • 1/2 cup granulated sugar
  • 1 1/2 teaspoons baking powder
  • 1/2 teaspoon salt
  • 1/2 cup unsalted butter, cold and cubed
  • 1/2 cup whole milk
  • 1 teaspoon vanilla extract
  • For garnish:
  • 1 tablespoon coarse sugar (optional)
  • Vanilla ice cream (for serving)

Instructions

1. Prepare the Crust:

  1. Preheat oven to 375°F (190°C). Grease a 9×13-inch baking dish.
  2. Make the peach filling: In a large bowl, combine peaches, granulated sugar, brown sugar, lemon juice, vanilla, cinnamon, and nutmeg. Toss to coat and let sit for 15 minutes.
  3. Drain peach juices into a small saucepan. Whisk in cornstarch until smooth. Cook over medium heat, stirring constantly, until thickened (2-3 minutes). Remove from heat and fold back into peaches.
  4. Pour peach mixture into prepared baking dish and bake for 10 minutes.
  5. Make the topping: Whisk flour, sugar, baking powder, and salt in a medium bowl. Cut in butter with a pastry cutter until mixture resembles coarse crumbs.
  6. Stir in milk and vanilla just until dough comes together (do not overmix).
  7. Drop spoonfuls of dough over hot peaches (it will spread during baking). Sprinkle with coarse sugar if using.
  8. Bake 35-40 minutes until topping is golden and peaches are bubbling. Cool 15 minutes before serving with ice cream.

Notes

For best results, use ripe but firm peaches. Frozen peaches (thawed and drained) may be substituted. Leftovers keep covered at room temperature for 2 days or refrigerated for 5 days. Reheat gently before serving.

No-Bake Strawberry Cheesecake

No-Bake Strawberry Cheesecake: A Creamy Dream Without the Oven

There’s something magical about a dessert that comes together without turning on the oven—especially when it’s as luscious as this No-Bake Strawberry Cheesecake. Picture this: a buttery graham cracker crust, a velvety cream cheese filling, and a glossy strawberry topping that tastes like summer in every bite. Whether you’re dodging the heat, short on time, or just craving a fuss-free treat, this recipe is your new best friend.

I first made this cheesecake for a last-minute potluck, and let’s just say it disappeared faster than my toddler’s patience at bedtime. The best part? No one believed it was no-bake! It’s the kind of dessert that feels indulgent but won’t leave you sweating over a water bath or praying to the baking gods for a crack-free top. Plus, strawberries are practically nature’s candy—sweet, vibrant, and packed with nostalgia. If you’ve ever struggled with traditional cheesecake (hello, sinking middles), this recipe is your redemption.

Why You’ll Love This No-Bake Strawberry Cheesecake

Here’s why this dessert deserves a permanent spot in your recipe rotation:

  • No oven required: Perfect for hot days or tiny kitchens.
  • Make-ahead magic: Tastes even better after chilling overnight.
  • Customizable: Swap strawberries for blueberries, raspberries, or even a drizzle of chocolate.
  • Crowd-pleaser: Equally at home at a BBQ or a bridal shower.

How to Make No-Bake Strawberry Cheesecake

Ingredients You’ll Need

  • For the crust: Graham crackers, melted butter, and a pinch of sugar.
  • For the filling: Cream cheese, powdered sugar, vanilla extract, and whipped cream.
  • For the topping: Fresh strawberries, sugar, and a splash of lemon juice.

Step-by-Step Instructions

  1. Crush the graham crackers into fine crumbs (a food processor or rolling pin works). Mix with melted butter and press into a pie dish.
  2. Beat the cream cheese until smooth, then add powdered sugar and vanilla. Fold in whipped cream gently.
  3. Spread the filling over the crust and chill for at least 4 hours (overnight is ideal).
  4. Make the topping: Simmer strawberries, sugar, and lemon juice until jammy. Cool slightly before pouring over the cheesecake.

Tips for the Perfect No-Bake Cheesecake

Want to avoid common pitfalls? Here’s my hard-earned wisdom:

  • Softened cream cheese is key: Cold cream cheese = lumpy filling. Let it sit on the counter for 30 minutes.
  • Don’t overmix the filling: Fold the whipped cream gently to keep it airy.
  • Chill time isn’t optional: Patience pays off with a sliceable texture.

For more no-bake dessert inspiration, check out my No-Bake Chocolate Peanut Butter Bars—they’re another crowd favorite!

Frequently Asked Questions

Can I use frozen strawberries for the topping?

Absolutely! Thaw and drain them first to avoid excess liquid. Frozen berries work great in a pinch.

How long does no-bake cheesecake last in the fridge?

Up to 3 days, though it’s rarely around that long! Cover it tightly with plastic wrap.

Can I make this gluten-free?

Yes! Swap graham crackers for gluten-free cookies or almond flour crust. Check out FDA guidelines for gluten-free tips.

Why is my filling too soft?

It might need more chilling time, or the whipped cream was overfolded. Pop it back in the fridge for another hour.

Can I use low-fat cream cheese?

Technically yes, but full-fat gives the best texture and flavor. Save the light stuff for your morning bagel.

What’s the best way to slice cheesecake cleanly?

Dip a sharp knife in hot water, wipe it dry, and slice gently. Repeat between cuts for picture-perfect pieces.

There you have it—a No-Bake Strawberry Cheesecake that’s as easy to make as it is to love. Whether you’re celebrating a special occasion or just treating yourself (because let’s be real, Tuesdays count too), this dessert delivers all the creamy, fruity goodness without the baking stress. For more berry-filled ideas, try my Strawberry Lemonade Cupcakes or browse USDA fruit recommendations to keep things fresh. Now, who’s ready for a slice?

Luma Style Visual
Print
clock clock iconcutlery cutlery iconflag flag iconfolder folder iconinstagram instagram iconpinterest pinterest iconfacebook facebook iconprint print iconsquares squares iconheart heart iconheart solid heart solid icon

No-Bake Strawberry Cheesecake

  • Author: Dessert Delights

Description

A creamy, dreamy no-bake strawberry cheesecake with a buttery graham cracker crust and fresh strawberry topping. Perfect for summer gatherings!


Ingredients

Scale

For the Crust:

  • For the crust:
  • 1 1/2 cups graham cracker crumbs
  • 1/4 cup granulated sugar
  • 6 tablespoons unsalted butter, melted
  • For the filling:
  • 16 oz cream cheese, softened
  • 1 cup powdered sugar
  • 1 teaspoon vanilla extract
  • 1 cup heavy whipping cream, chilled
  • For the topping:
  • 2 cups fresh strawberries, sliced
  • 1/4 cup granulated sugar
  • 1 tablespoon lemon juice
  • 1 teaspoon cornstarch mixed with 1 tablespoon water

Instructions

1. Prepare the Crust:

  1. 1. Make the crust: Mix graham cracker crumbs, sugar, and melted butter. Press firmly into a 9-inch springform pan. Chill for 30 minutes.
  2. 2. Prepare filling: Beat cream cheese until smooth. Add powdered sugar and vanilla, mixing well.
  3. 3. In a separate bowl, whip heavy cream to stiff peaks. Gently fold into cream cheese mixture.
  4. 4. Spread filling over chilled crust. Smooth top and refrigerate for at least 4 hours (overnight is best).
  5. 5. Make topping: Combine strawberries, sugar, and lemon juice in a saucepan. Cook over medium heat for 5 minutes.
  6. 6. Add cornstarch slurry and cook 2 more minutes until thickened. Cool completely before spreading over cheesecake.
  7. 7. Garnish with fresh strawberries before serving.

Notes

For a firmer crust, bake at 350°F for 8 minutes before adding filling. Substitute other berries for variation. Keep refrigerated until serving.

Spring Chicken Casserole

Spring Chicken Casserole: A Fresh, Comforting One-Pan Wonder

There’s something magical about the shift from winter’s heavy stews to spring’s lighter, brighter flavors. As the days grow longer and the farmers’ markets burst with fresh produce, I find myself craving meals that feel both comforting and rejuvenating. That’s where this Spring Chicken Casserole comes in—a dish that’s as easy to make as it is delicious, combining tender chicken, seasonal veggies, and a creamy herb-infused sauce. It’s the kind of meal that makes busy weeknights feel a little more special, without requiring hours in the kitchen.

If you’re like me, you’ve probably faced the eternal question: What’s for dinner? one too many times. This casserole is my answer to that dilemma. It’s versatile (hello, leftover veggies!), forgiving (no perfection required), and universally loved—even by picky eaters. Plus, it’s a fantastic way to celebrate spring’s bounty. Think crisp asparagus, sweet peas, and earthy mushrooms all baked together in one glorious dish. Whether you’re serving it for a family dinner or bringing it to a potluck, this casserole is sure to earn a permanent spot in your recipe rotation.

Why You’ll Love This Spring Chicken Casserole

This isn’t just another casserole—it’s a celebration of spring on a plate. Here’s why it’s a must-try:

  • One-pan simplicity: Less cleanup, more time to enjoy the season.
  • Adaptable: Swap in whatever veggies you have on hand.
  • Crowd-pleaser: Creamy, savory, and packed with fresh flavors.
  • Meal-prep friendly: Tastes even better the next day!

How to Make Spring Chicken Casserole

Ingredients You’ll Need

  • 2 lbs boneless, skinless chicken thighs (or breasts)
  • 1 cup asparagus, chopped
  • 1 cup fresh peas
  • 8 oz mushrooms, sliced
  • 1 small onion, diced
  • 3 cloves garlic, minced
  • 1 cup chicken broth
  • 1/2 cup heavy cream (or Greek yogurt for a lighter option)
  • 1 tbsp fresh thyme
  • 1 tsp lemon zest (for a bright finish)
  • Salt and pepper to taste

Step-by-Step Instructions

  1. Preheat your oven to 375°F (190°C) and lightly grease a 9×13 baking dish.
  2. Sauté the veggies: In a large skillet, cook onions, garlic, and mushrooms until softened. Add asparagus and peas, cooking for another 2–3 minutes.
  3. Brown the chicken: Season chicken with salt, pepper, and thyme, then sear in the same skillet until golden (about 3 minutes per side).
  4. Combine everything: Transfer the chicken and veggies to the baking dish. Pour in chicken broth and cream, then sprinkle with lemon zest.
  5. Bake: Cover with foil and bake for 25 minutes. Remove the foil and bake for another 10–15 minutes until bubbly and golden.

Tips for the Perfect Casserole

Want to take this dish to the next level? Here are my pro tips:

  • Fresh herbs make a difference: Swap dried thyme for fresh if you can—it adds a vibrant flavor.
  • Don’t overcook the chicken: It will continue cooking in the oven, so just sear it until lightly browned.
  • Add a crunchy topping: Sprinkle with breadcrumbs or crushed crackers before baking for extra texture.

For more cozy one-pan meals, try my Creamy Tuscan Chicken or this Lemon Garlic Salmon Bake.

Frequently Asked Questions

Can I use frozen vegetables in this casserole?

Absolutely! Frozen peas or mixed veggies work well—just thaw and drain them first to avoid excess moisture.

How do I store leftovers?

Keep them in an airtight container in the fridge for up to 3 days. Reheat in the oven or microwave.

Can I make this casserole dairy-free?

Yes! Swap the heavy cream for coconut milk or a dairy-free alternative like cashew cream.

What sides pair well with this dish?

Try a simple green salad, crusty bread, or garlic herb roasted potatoes.

Can I prepare this ahead of time?

Yes! Assemble the casserole (without baking) and refrigerate for up to 24 hours. Add 5–10 minutes to the baking time.

Is this recipe gluten-free?

It is! Just ensure your broth and cream are gluten-free certified. For a thicker sauce, use cornstarch instead of flour.

There you have it—a springtime dish that’s as easy to love as it is to make. Whether you’re cooking for a busy weeknight or a leisurely Sunday dinner, this Spring Chicken Casserole brings warmth and freshness to the table. For more seasonal inspiration, check out Simply Recipes’ spring favorites. Now, go enjoy that extra sunlight and a delicious meal!

Luma Style Visual
Print
clock clock iconcutlery cutlery iconflag flag iconfolder folder iconinstagram instagram iconpinterest pinterest iconfacebook facebook iconprint print iconsquares squares iconheart heart iconheart solid heart solid icon

Spring Chicken Casserole

  • Author: Chef Jamie Oliver

Description

A light and flavorful chicken casserole packed with fresh spring vegetables, tender chicken, and a creamy herb sauce. Perfect for a comforting yet seasonal meal.


Ingredients

Scale

For the Crust:

  • For the Chicken:
  • 1.5 lbs boneless, skinless chicken thighs (cut into bite-sized pieces)
  • 1 tbsp olive oil
  • 1 tsp salt
  • 1/2 tsp black pepper
  • 1 tsp dried thyme
  • For the Vegetables:
  • 1 cup baby carrots (halved)
  • 1 cup asparagus (cut into 2-inch pieces)
  • 1 cup baby potatoes (quartered)
  • 1/2 cup frozen peas
  • 1 small leek (sliced)
  • For the Sauce:
  • 2 tbsp butter
  • 2 tbsp all-purpose flour
  • 1.5 cups chicken broth
  • 1/2 cup heavy cream
  • 1 tbsp fresh parsley (chopped)
  • 1 tsp lemon zest
  • 1/2 tsp garlic powder

Instructions

1. Prepare the Crust:

  1. 1. Preheat oven to 375°F (190°C).
  2. 2. In a large bowl, toss chicken pieces with olive oil, salt, pepper, and thyme until evenly coated.
  3. 3. Heat a large oven-safe skillet over medium-high heat. Add chicken and cook until lightly browned (about 5 minutes). Remove and set aside.
  4. 4. In the same skillet, melt butter over medium heat. Whisk in flour to create a roux, cooking for 1 minute.
  5. 5. Gradually whisk in chicken broth until smooth. Bring to a simmer and stir in heavy cream, parsley, lemon zest, and garlic powder.
  6. 6. Return chicken to the skillet. Add carrots, potatoes, and leek, stirring to coat in sauce.
  7. 7. Cover and bake for 25 minutes. Add asparagus and peas, then bake uncovered for 10 more minutes.
  8. 8. Let rest for 5 minutes before serving. Garnish with extra parsley if desired.

Notes

For a lighter version, substitute half-and-half for heavy cream. Leftovers keep well refrigerated for up to 3 days. If using frozen vegetables, add them directly without thawing.

Classic Lemon Pound Cake

Classic Lemon Pound Cake: A Sunshine-Soaked Slice of Comfort

There’s something magical about a Classic Lemon Pound Cake—the way its golden crust gives way to a tender, citrus-kissed crumb, the buttery aroma that fills your kitchen as it bakes, and the sheer joy of that first tangy-sweet bite. Whether you’re serving it at a spring brunch, pairing it with afternoon tea, or sneaking a midnight slice (no judgment here!), this cake is a timeless crowd-pleaser. It’s the kind of recipe that feels like a hug from your grandma, if your grandma happened to be a pastry chef with a penchant for zesty flavors.

I’ll admit: I’ve burned my fair share of pound cakes over the years. (One particularly tragic attempt involved forgetting the timer and a smoke alarm duet.) But this recipe? It’s foolproof. With simple ingredients and a method that’s as straightforward as it is satisfying, you’ll wonder why you ever bothered with boxed mixes. Plus, it’s versatile—swap the lemon for orange or lime, add a handful of blueberries, or drizzle it with lavender glaze for a twist. But today, we’re keeping it classic, because some things just don’t need improving.

Why You’ll Love This Classic Lemon Pound Cake

This isn’t just any pound cake. Here’s what makes it special:

  • Bright, balanced flavor: Fresh lemon zest and juice give it a vibrant kick, while the rich butter and sugar keep it indulgent.
  • Perfect texture: Dense yet moist, with that signature crackly top every pound cake lover craves.
  • Easy to customize: Top with a simple glaze, dust with powdered sugar, or serve with fresh berries and whipped cream.
  • Freezer-friendly: Bake ahead and freeze slices for impromptu cravings or last-minute guests.

How to Make Classic Lemon Pound Cake

Ingredients You’ll Need

  • 1 ½ cups (3 sticks) unsalted butter, softened
  • 3 cups granulated sugar
  • 5 large eggs, room temperature
  • 3 cups all-purpose flour
  • ½ tsp baking powder
  • ½ tsp salt
  • 1 cup whole milk
  • Zest of 2 lemons
  • ¼ cup fresh lemon juice
  • 1 tsp vanilla extract

Step-by-Step Instructions

  1. Prep: Preheat oven to 325°F. Grease and flour a 10-inch Bundt pan or two 9×5-inch loaf pans.
  2. Cream butter and sugar: In a stand mixer, beat butter and sugar for 5 minutes until light and fluffy. Scrape the bowl often.
  3. Add eggs: Beat in eggs one at a time, mixing well after each.
  4. Dry ingredients: Whisk flour, baking powder, and salt in a separate bowl.
  5. Combine: Alternately add dry ingredients and milk to the batter, starting and ending with flour. Mix until just combined.
  6. Flavor it: Stir in lemon zest, juice, and vanilla.
  7. Bake: Pour batter into prepared pan(s). Bake for 60–75 minutes (less for loaves) until a toothpick comes out clean.
  8. Cool: Let cool in the pan for 15 minutes, then transfer to a wire rack.

Pro Tips for Pound Cake Perfection

Want bakery-level results? Here’s what I’ve learned:

  • Room temp matters: Cold ingredients don’t emulsify as well, leading to a denser cake.
  • Don’t overmix: Once you add the flour, mix until just combined to avoid toughness.
  • Zest smartly: Use a microplane to avoid bitter white pith. For extra flavor, rub the zest into the sugar before creaming.
  • Test early: Ovens vary—start checking at 55 minutes to prevent overbaking.

Serving Suggestions

This cake shines on its own, but here are a few ways to dress it up:

Frequently Asked Questions

Can I use bottled lemon juice?
Fresh is best for flavor, but in a pinch, bottled works—just skip the preservatives.

How do I store lemon pound cake?
Keep it airtight at room temp for 3 days, in the fridge for a week, or freeze for up to 3 months.

Why did my cake sink in the middle?
Usually from underbaking, overmixing, or opening the oven door too early. Use an oven thermometer to check accuracy!

Can I make this in a regular cake pan?
Yes, but reduce baking time. A 9×13-inch pan will take about 40–50 minutes.

What’s the secret to a moist pound cake?
Don’t skimp on butter or eggs, and avoid overbaking. Some bakers swear by adding a tablespoon of sour cream.

Can I double the recipe?
Absolutely! Double all ingredients and split between two pans. Baking time may increase slightly.

There you have it—the Classic Lemon Pound Cake of your dreams. Whether you’re baking it for a special occasion or just because Tuesdays deserve dessert, this recipe is a keeper. The beauty of pound cake is its simplicity, its reliability, and the way it seems to make everything feel a little sweeter. So go ahead: preheat that oven, zest those lemons, and get ready to fall in love with every buttery, citrusy bite. And if you’re looking for more comforting classics, try our Vanilla Bean Pound Cake next—it’s another reader favorite!

Luma Style Visual
Print
clock clock iconcutlery cutlery iconflag flag iconfolder folder iconinstagram instagram iconpinterest pinterest iconfacebook facebook iconprint print iconsquares squares iconheart heart iconheart solid heart solid icon

Classic Lemon Pound Cake

  • Author: Baking Enthusiast

Description

A moist and tender lemon pound cake with a bright citrus flavor, perfect for tea time or dessert. This classic recipe features a buttery crumb and a sweet lemon glaze for extra zing.


Ingredients

Scale

For the Crust:

  • For the cake:
  • 1 1/2 cups (3 sticks) unsalted butter, softened
  • 3 cups granulated sugar
  • 5 large eggs, room temperature
  • 3 cups all-purpose flour
  • 1/2 teaspoon baking powder
  • 1/2 teaspoon salt
  • 1 cup whole milk
  • Zest of 2 lemons
  • 1/4 cup fresh lemon juice
  • 1 teaspoon vanilla extract
  • For the glaze:
  • 1 cup powdered sugar
  • 2 tablespoons fresh lemon juice
  • 1 tablespoon milk
  • 1/2 teaspoon vanilla extract

Instructions

1. Prepare the Crust:

  1. Preheat oven to 325°F (165°C). Grease and flour a 10-inch bundt pan.
  2. In a large bowl, cream butter and sugar until light and fluffy (about 5 minutes).
  3. Add eggs one at a time, beating well after each addition.
  4. In a separate bowl, whisk together flour, baking powder, and salt.
  5. Alternately add flour mixture and milk to butter mixture, beginning and ending with flour.
  6. Stir in lemon zest, lemon juice, and vanilla until just combined.
  7. Pour batter into prepared pan and bake for 60-75 minutes, or until a toothpick comes out clean.
  8. Cool in pan for 15 minutes, then invert onto a wire rack to cool completely.
  9. For the glaze: Whisk all ingredients until smooth. Drizzle over cooled cake.

Notes

For best results, use room temperature ingredients. Cake can be stored at room temperature for 3 days or frozen for up to 3 months. For extra lemon flavor, poke holes in warm cake and brush with lemon syrup before glazing.