Herb Roasted Chicken with Baby Potatoes

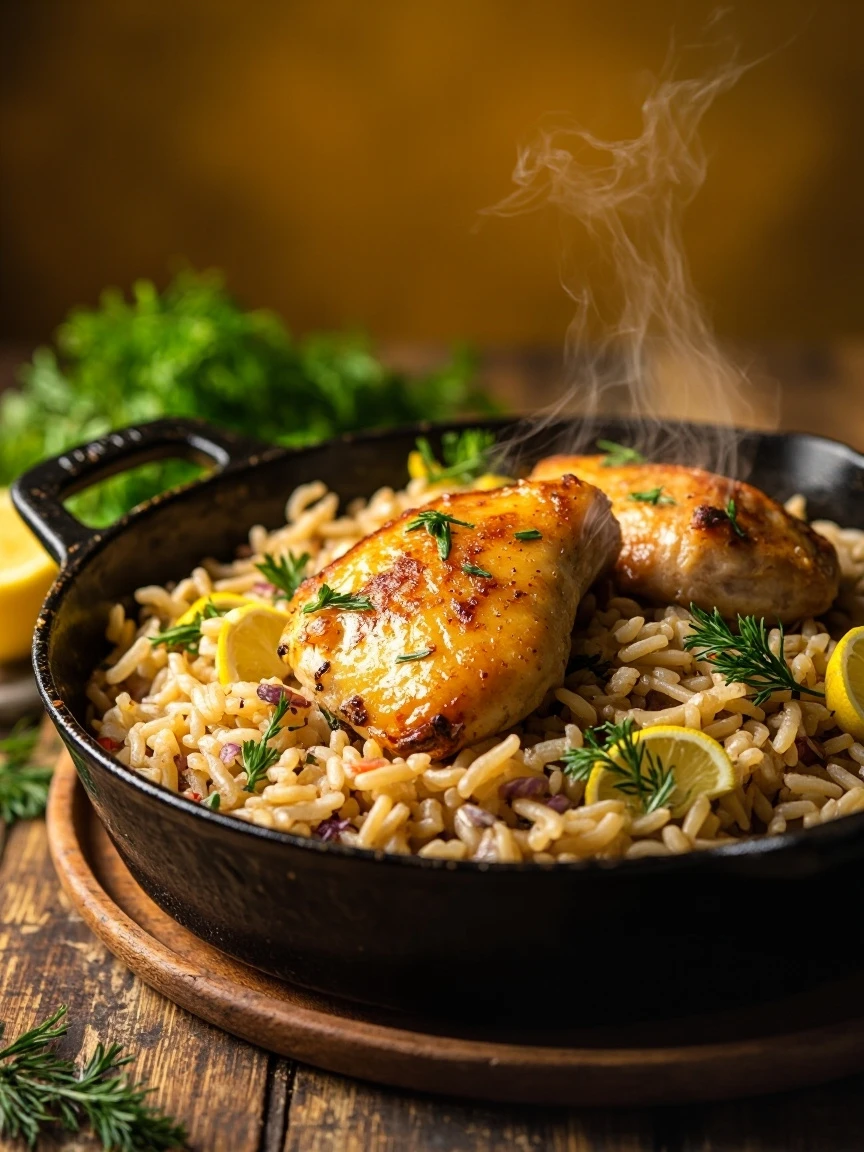
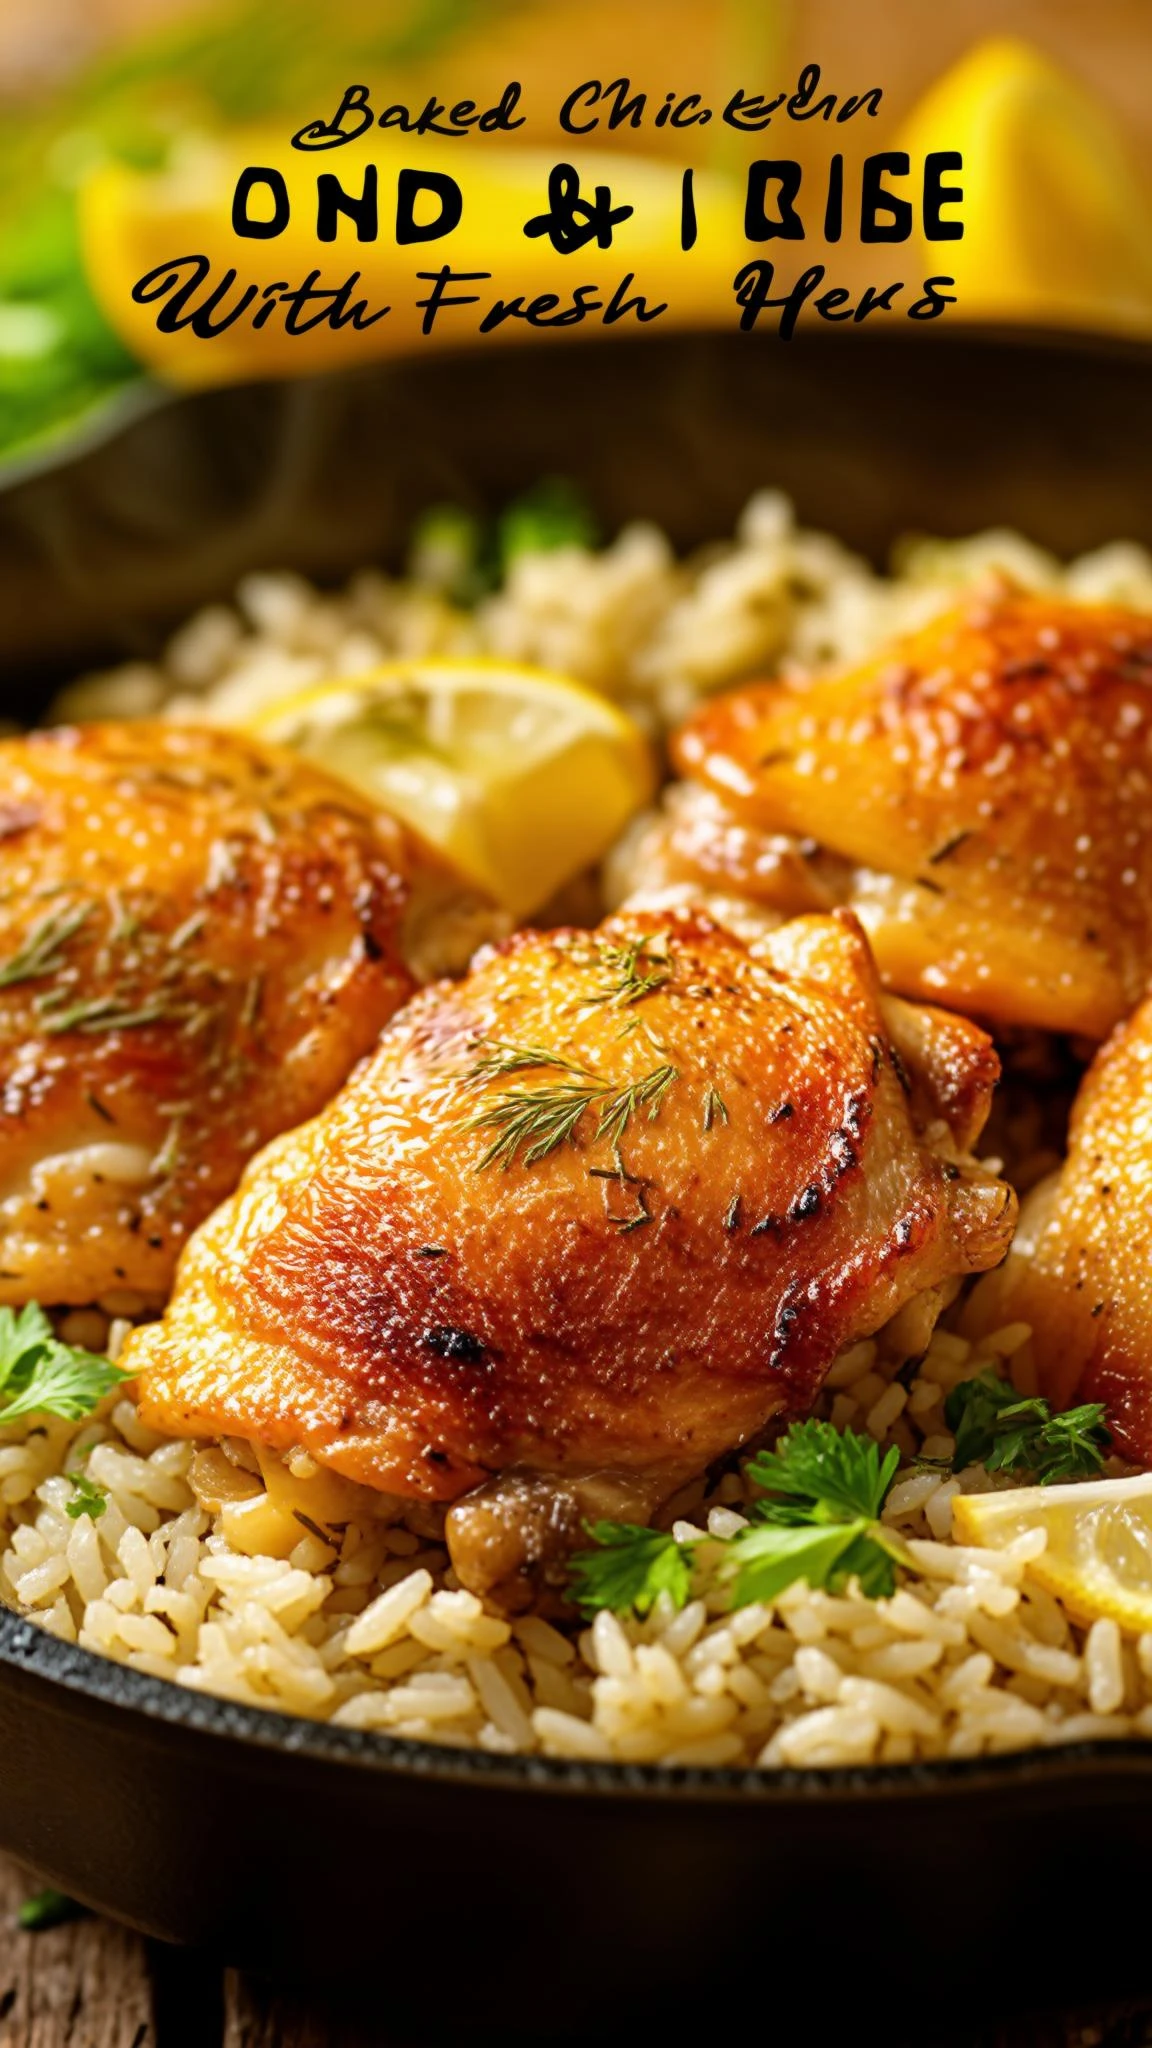
Herb Roasted Chicken with Baby Potatoes: A Cozy One-Pan Wonder

There’s something almost magical about the aroma of herb-roasted chicken wafting through the kitchen. It’s the kind of meal that feels like a warm hug—comforting, familiar, and effortlessly satisfying. Whether you’re juggling a hectic weeknight or hosting a laid-back Sunday supper, this Herb Roasted Chicken with Baby Potatoes is your golden ticket to a delicious, no-fuss dinner. The chicken emerges with crackly skin and juicy meat, while the potatoes soak up all those savory juices, turning crispy-edged and tender-hearted. (And let’s be honest: fewer dishes to wash is always a win.)

I first stumbled on this recipe during a particularly chaotic season of life—new baby, work deadlines, and a fridge that seemed perpetually empty. One evening, I tossed a handful of herbs, a drizzle of olive oil, and whatever potatoes I had into a pan with chicken thighs, and voilà: dinner salvation. Since then, it’s become my go-to for busy days and impromptu gatherings alike. The best part? It’s endlessly adaptable. Swap rosemary for thyme, add a squeeze of lemon, or throw in some carrots—it’s all fair game. Here’s how to make it your own.

Why You’ll Love This Herb Roasted Chicken with Baby Potatoes

This dish isn’t just delicious—it’s practically designed for real life. Here’s why it’s a keeper:

  • One-pan wonder: Minimal cleanup means more time for… well, anything else.
  • Weeknight hero: Ready in under an hour, with mostly hands-off cooking.
  • Crowd-pleaser: Picky kids, hungry partners, and even your in-laws will ask for seconds.
  • Budget-friendly: Chicken thighs and potatoes are affordable staples.

How to Make Herb Roasted Chicken with Baby Potatoes

Ingredients You’ll Need

  • 4 bone-in, skin-on chicken thighs (or drumsticks)
  • 1.5 lbs baby potatoes, halved
  • 3 tbsp olive oil
  • 2 tbsp fresh rosemary (or 1 tbsp dried)
  • 3 garlic cloves, minced
  • 1 tsp smoked paprika
  • Salt and pepper to taste
  • Optional: lemon wedges, for serving

Step-by-Step Instructions

  1. Prep the oven: Preheat to 425°F (220°C).
  2. Season the chicken: Pat thighs dry, then rub with olive oil, rosemary, garlic, paprika, salt, and pepper.
  3. Toss the potatoes: In the same bowl, coat potatoes with residual oil and herbs.
  4. Roast: Arrange chicken skin-side up on a sheet pan, scatter potatoes around it, and bake for 35–40 minutes until chicken reaches 165°F and potatoes are golden.
  5. Rest and serve: Let chicken rest 5 minutes. Squeeze lemon over everything if desired.

Pro Tips for the Best Results

Want to level up your roast? Here’s how:

  • Dry the skin: Patting chicken dry ensures maximum crispiness.
  • Space it out: Avoid overcrowding the pan for even browning.
  • Herb hack: No fresh herbs? Use 1 tsp dried Italian seasoning instead.
  • Veggie boost: Add carrots or Brussels sprouts for extra color and nutrition.

Pairings and Variations

This dish pairs beautifully with a simple garlic Parmesan roasted broccoli or a crisp green salad. For a twist, try:

  • Mediterranean style: Add olives and artichokes.
  • Spicy kick: Sprinkle with red pepper flakes before roasting.
  • Creamy finish: Drizzle with lemon-herb sauce (a Food Network favorite).

Frequently Asked Questions

Can I use chicken breasts instead?
Yes, but reduce cooking time to 25–30 minutes to avoid dryness.

How do I store leftovers?
Keep in an airtight container for up to 3 days. Reheat in the oven for best texture.

Can I make this ahead?
Prep the chicken and potatoes separately up to 24 hours in advance, then roast when ready.

Why won’t my chicken skin get crispy?
Ensure the skin is dry before seasoning, and don’t cover the pan while roasting.

What herbs work best?
Rosemary, thyme, sage, or oregano—or a mix! Dried herbs are fine in a pinch.

Can I use sweet potatoes?
Absolutely! Adjust roasting time as needed (they may cook faster).

At the end of a long day, few things beat the simplicity and heartiness of this Herb Roasted Chicken with Baby Potatoes. It’s the kind of meal that feels both nourishing and effortless—a little reminder that good food doesn’t have to be complicated. Whether you’re cooking for one or feeding a family, this recipe is sure to earn a permanent spot in your rotation. (And if you’re anything like me, you’ll be sneaking an extra potato—or three—straight from the pan.) For more easy weeknight wins, try our Creamy Tuscan Chicken next. Happy roasting!

Print
clock clock iconcutlery cutlery iconflag flag iconfolder folder iconinstagram instagram iconpinterest pinterest iconfacebook facebook iconprint print iconsquares squares iconheart heart iconheart solid heart solid icon

Herb Roasted Chicken with Baby Potatoes

  • Author: Chef Maria

Description

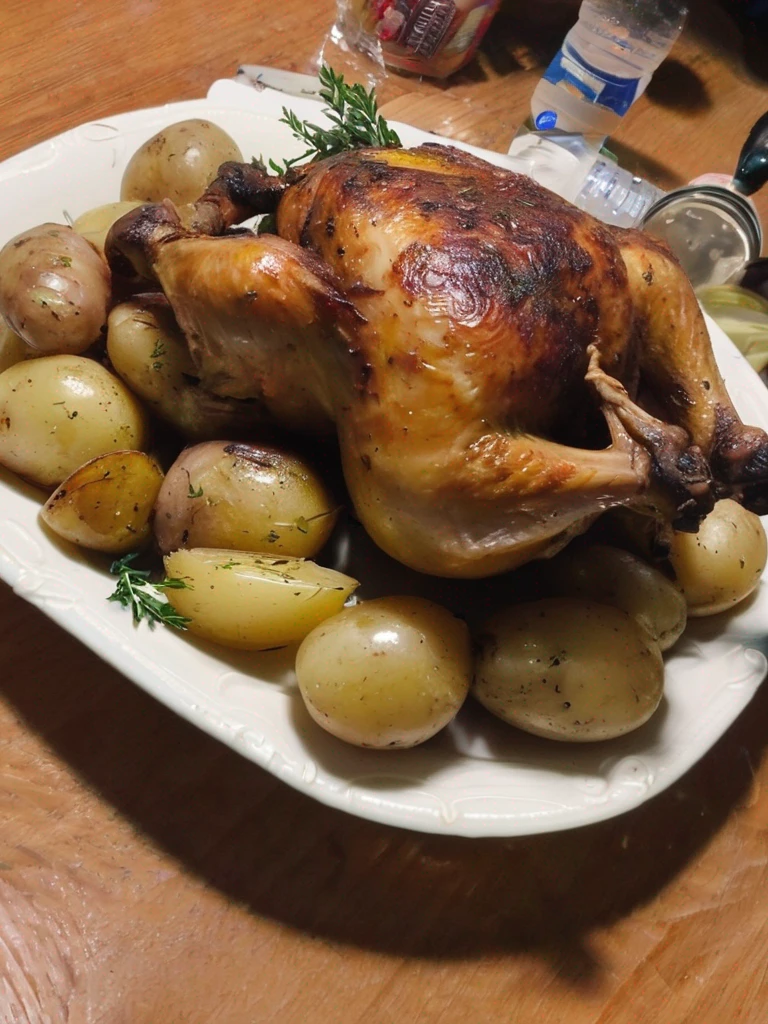
A succulent whole chicken roasted to golden perfection with aromatic herbs and tender baby potatoes. This one-pan dish delivers crispy skin, juicy meat, and flavorful potatoes with minimal effort.


Ingredients

Scale

For the Crust:

  • For the chicken:
  • 1 whole chicken (34 lbs)
  • 2 tbsp olive oil
  • 1 tbsp kosher salt
  • 1 tsp black pepper
  • 1 tbsp fresh thyme leaves
  • 1 tbsp chopped fresh rosemary
  • 4 garlic cloves, minced
  • 1 lemon, quartered
  • For the potatoes:
  • 1.5 lbs baby potatoes, halved
  • 2 tbsp olive oil
  • 1 tsp salt
  • 1/2 tsp black pepper
  • 1 tsp garlic powder
  • 1 tbsp chopped fresh parsley

Instructions

1. Prepare the Crust:

  1. 1. Preheat oven to 425°F (220°C).
  2. 2. Pat chicken dry with paper towels. Rub with 2 tbsp olive oil, then season inside and out with salt, pepper, thyme, rosemary, and minced garlic.
  3. 3. Stuff cavity with lemon quarters and tie legs together with kitchen twine.
  4. 4. In a bowl, toss potatoes with 2 tbsp olive oil, salt, pepper, and garlic powder.
  5. 5. Arrange potatoes in a single layer in a large roasting pan. Place chicken on top, breast-side up.
  6. 6. Roast for 1 hour 15 minutes, or until internal temperature reaches 165°F (74°C) at the thickest part of the thigh.
  7. 7. Let chicken rest 15 minutes before carving. Toss potatoes with fresh parsley and serve.

Notes

For crispier skin, pat the chicken very dry before seasoning. If potatoes aren’t browned enough after cooking, remove chicken and broil potatoes for 2-3 minutes. Leftovers keep refrigerated for 3 days.

Cheesy Asparagus Casserole

Cheesy Asparagus Casserole: A Comforting Side Dish Everyone Will Love

There’s something magical about a dish that’s both elegant and comforting—like this Cheesy Asparagus Casserole. Picture tender asparagus spears smothered in a velvety cheese sauce, topped with buttery breadcrumbs, and baked until golden. It’s the kind of side dish that steals the spotlight at holiday dinners but is simple enough for a cozy weeknight meal. Whether you’re serving it alongside roasted chicken or as part of your Easter spread, this casserole is guaranteed to earn compliments.

As a mom of two picky eaters, I’m always looking for ways to sneak more veggies into our meals. This casserole does the trick! The creamy cheese sauce mellows the asparagus’s earthy flavor, and the crispy topping adds just the right crunch. Plus, it’s a great way to use up seasonal asparagus when it’s at its peak. (Pro tip: If your kids turn up their noses at “green things,” call it “cheesy noodle-less lasagna”—works every time!)

Why You’ll Love This Cheesy Asparagus Casserole

This dish is a winner for so many reasons:

  • Easy to make: No fancy techniques—just mix, bake, and enjoy.
  • Crowd-pleaser: Perfect for potlucks or holiday gatherings.
  • Versatile: Swap the cheese or add bacon for a twist.
  • Meal-prep friendly: Assemble ahead and bake when ready.

How to Make Cheesy Asparagus Casserole

Ingredients You’ll Need

  • 1 lb fresh asparagus, trimmed
  • 2 tbsp butter
  • 2 tbsp flour
  • 1 cup milk
  • 1 cup shredded cheddar cheese
  • ½ cup grated Parmesan
  • ½ cup breadcrumbs
  • 1 tsp garlic powder
  • Salt and pepper to taste

Step-by-Step Instructions

  1. Prep the asparagus: Blanch the spears in boiling water for 2 minutes, then plunge into ice water to keep them bright green.
  2. Make the sauce: Melt butter in a saucepan, whisk in flour, then slowly add milk until thickened. Stir in cheeses until smooth.
  3. Assemble: Arrange asparagus in a baking dish, pour cheese sauce over it, and sprinkle with breadcrumbs.
  4. Bake: At 375°F for 20–25 minutes until bubbly and golden.

Recipe Tips & Variations

Want to mix it up? Try these ideas:

  • Add crispy bacon or ham for a heartier version.
  • Swap cheddar for Gruyère or Monterey Jack.
  • Use gluten-free breadcrumbs and flour if needed.

For more cheesy inspiration, check out our Creamy Spinach Dip—it’s another crowd favorite!

Pairing Suggestions

This casserole pairs beautifully with Garlic Herb Roasted Chicken or classic pot roast. For a vegetarian meal, serve it with crusty bread and a simple salad.

Frequently Asked Questions

Can I use frozen asparagus?
Yes, but thaw and pat it dry first to avoid excess moisture.

How do I store leftovers?
Cover and refrigerate for up to 3 days. Reheat in the oven for best texture.

Can I make this ahead?
Absolutely! Assemble the casserole (unbaked) and refrigerate overnight.

What’s the best cheese for asparagus casserole?
Cheddar adds richness, but Swiss or fontina work well too.

How do I prevent a soggy casserole?
Don’t skip blanching the asparagus—it removes excess water.

Can I freeze cheesy asparagus casserole?
Freezing isn’t recommended—the sauce may separate when reheated.

There you have it—a dish that’s as easy to love as it is to make. Whether you’re craving comfort food or need a reliable side for your next gathering, this Cheesy Asparagus Casserole delivers every time. And if you’re looking for more veggie-packed recipes, don’t miss our Roasted Brussels Sprouts or this guide to cooking asparagus from Simply Recipes. Now, go grab that baking dish—it’s time to get cheesy!

Print
clock clock iconcutlery cutlery iconflag flag iconfolder folder iconinstagram instagram iconpinterest pinterest iconfacebook facebook iconprint print iconsquares squares iconheart heart iconheart solid heart solid icon

Cheesy Asparagus Casserole

  • Author: The Savory Spoon

Description

A creamy, cheesy asparagus casserole with a crispy breadcrumb topping. Perfect as a side dish or vegetarian main course.


Ingredients

Scale

For the Crust:

  • For the casserole:
  • 2 lbs fresh asparagus, trimmed and cut into 2-inch pieces
  • 3 tbsp unsalted butter
  • 3 tbsp all-purpose flour
  • 1 1/2 cups whole milk
  • 1 cup heavy cream
  • 1 tsp Dijon mustard
  • 1/2 tsp garlic powder
  • 1/4 tsp nutmeg
  • 1 1/2 cups sharp cheddar cheese, shredded
  • 1/2 cup Parmesan cheese, grated
  • For the topping:
  • 1 cup panko breadcrumbs
  • 2 tbsp melted butter
  • 1/4 tsp paprika
  • 2 tbsp fresh parsley, chopped

Instructions

1. Prepare the Crust:

  1. Preheat oven to 375°F (190°C). Grease a 9×13-inch baking dish.
  2. Blanch asparagus in boiling water for 2 minutes, then transfer to ice water. Drain and pat dry.
  3. Melt butter in saucepan over medium heat. Whisk in flour to create a roux, cooking for 1 minute.
  4. Gradually whisk in milk and cream until smooth. Bring to a simmer, stirring constantly.
  5. Add Dijon mustard, garlic powder, nutmeg, and 1/2 tsp salt. Cook until thickened (about 3 minutes).
  6. Remove from heat and stir in cheddar and Parmesan cheeses until melted.
  7. Arrange asparagus in baking dish and pour cheese sauce evenly over top.
  8. Combine topping ingredients and sprinkle over casserole.
  9. Bake for 25-30 minutes until bubbly and golden brown.
  10. Let rest 5 minutes before serving.

Notes

For extra crispiness, broil the topping for 1-2 minutes at the end. Can substitute Gruyère for cheddar if preferred. Leftovers keep refrigerated for 3 days.

Crockpot Glazed Baby Carrots with Brown Sugar and Butter


Crockpot Glazed Baby Carrots with Brown Sugar and Butter

There’s something magical about a dish that practically cooks itself while filling your home with the warm, comforting aroma of brown sugar and butter. These Crockpot Glazed Baby Carrots are exactly that—a fuss-free, crowd-pleasing side dish that’s as perfect for a busy Tuesday night as it is for a holiday feast. Whether you’re juggling work, kids, or just life in general, this recipe is here to make your day a little easier (and a lot more delicious).

I first stumbled upon this recipe when I needed a last-minute side dish for a potluck. With zero time to spare, I tossed a handful of ingredients into my slow cooker and crossed my fingers. To my surprise, the carrots turned out tender, glossy, and packed with just the right balance of sweetness and richness. Since then, they’ve become a staple in my kitchen, and I’m thrilled to share them with you. Plus, if you love easy slow cooker recipes, you’ll adore my Crockpot Honey Garlic Chicken—another hands-off winner!

Why You’ll Love These Glazed Baby Carrots

If you’re still on the fence about adding this recipe to your rotation, here’s why it’s a must-try:

  • Effortless: Just toss everything in the slow cooker and let it work its magic.
  • Versatile: Pair them with roasted meats, holiday ham, or even weeknight pasta.
  • Crowd-pleasing: Kids and adults alike gobble them up—no veggie leftovers here!
  • Budget-friendly: Baby carrots are affordable and available year-round.

How to Make Crockpot Glazed Baby Carrots

Ready to whip up this simple yet impressive dish? Here’s everything you need to know.

Ingredients

  • 1 lb baby carrots
  • 3 tbsp unsalted butter, melted
  • 1/4 cup brown sugar
  • 1/2 tsp salt
  • 1/4 tsp black pepper
  • 1/2 tsp cinnamon (optional, but adds warmth)
  • 1 tbsp fresh parsley, chopped (for garnish)

Instructions

  1. Add the baby carrots to your slow cooker.
  2. In a small bowl, whisk together the melted butter, brown sugar, salt, pepper, and cinnamon (if using). Pour over the carrots and toss to coat.
  3. Cover and cook on LOW for 3–4 hours or HIGH for 1.5–2 hours, stirring once halfway through.
  4. Once tender, transfer to a serving dish, garnish with fresh parsley, and enjoy!

Recipe Tips & Tricks

Want to take these glazed carrots to the next level? Here are a few pro tips:

  • Fresh vs. baby carrots: If you prefer, slice whole carrots into uniform sticks for a similar result.
  • Add a splash: A tablespoon of orange juice or bourbon adds a fun twist to the glaze.
  • Double the batch: These reheat beautifully, so make extra for meal prep!

For more slow cooker inspiration, check out my Slow Cooker Mashed Potatoes—the perfect pairing for these carrots.

FAQs

Can I use frozen baby carrots?

Yes, but thaw and pat them dry first to avoid excess moisture in the glaze.

How do I store leftovers?

Keep them in an airtight container in the fridge for up to 4 days. Reheat gently in the microwave or on the stovetop.

Can I make these carrots ahead of time?

Absolutely! Cook as directed, then reheat before serving. Add a splash of water if the glaze thickens too much.

What can I substitute for brown sugar?

Maple syrup or honey works well, though the flavor will vary slightly. For a deeper taste, try dark brown sugar.

Are these carrots freezer-friendly?

They can be frozen, but the texture may soften upon thawing. Enjoy them fresh for the best results.

Can I add other spices?

Definitely! A pinch of nutmeg, ginger, or even a dash of cayenne adds a fun kick.

There you have it—a side dish so simple, so flavorful, and so reliable that it might just become your new secret weapon. Whether you’re serving it alongside a weeknight roast or a holiday centerpiece, these Crockpot Glazed Baby Carrots with Brown Sugar and Butter are sure to steal the show. Happy slow cooking, friends!

Print
clock clock iconcutlery cutlery iconflag flag iconfolder folder iconinstagram instagram iconpinterest pinterest iconfacebook facebook iconprint print iconsquares squares iconheart heart iconheart solid heart solid icon

Crockpot Glazed Baby Carrots with Brown Sugar and Butter

  • Author: Home Cook Delights

Description

These tender baby carrots are slow-cooked to perfection in a sweet and buttery brown sugar glaze, making them the perfect side dish for any meal. The crockpot does all the work, leaving you with a delicious and hassle-free dish.


Ingredients

Scale

For the Crust:

  • For the carrots:
  • 2 lbs baby carrots
  • For the glaze:
  • 1/2 cup unsalted butter, melted
  • 1/2 cup brown sugar, packed
  • 1/4 cup honey
  • 1 tsp ground cinnamon
  • 1/2 tsp salt
  • 1/4 tsp ground nutmeg
  • For garnish:
  • 1 tbsp fresh parsley, chopped (optional)

Instructions

1. Prepare the Crust:

  1. 1. Place the baby carrots in the crockpot.
  2. 2. In a medium bowl, whisk together the melted butter, brown sugar, honey, cinnamon, salt, and nutmeg until well combined.
  3. 3. Pour the glaze mixture over the carrots in the crockpot, stirring gently to coat evenly.
  4. 4. Cover and cook on LOW for 4-5 hours or on HIGH for 2-3 hours, stirring occasionally, until the carrots are tender.
  5. 5. Once cooked, transfer the glazed carrots to a serving dish and garnish with fresh parsley if desired.
  6. 6. Serve warm and enjoy!

Notes

For a thicker glaze, remove the lid during the last 30 minutes of cooking to allow some of the liquid to evaporate. You can also substitute maple syrup for honey if preferred.

Southern Strawberry Shortcake with Buttermilk Biscuits

Southern Strawberry Shortcake with Buttermilk Biscuits: A Sweet Slice of Summer

There’s something magical about the first bite of Southern Strawberry Shortcake with Buttermilk Biscuits—the way the tender, flaky biscuit soaks up the sweet strawberry juices, the billowy whipped cream melting just slightly on top. It’s a dessert that tastes like sunshine, porch swings, and the kind of lazy afternoons we all crave. Whether you’re serving it at a backyard barbecue or sneaking a midnight snack straight from the fridge (no judgment here), this recipe is a love letter to summer.

Growing up in the South, strawberry shortcake wasn’t just a dessert; it was a celebration. My grandmother would pile high bowls of berries macerated with sugar, their ruby-red syrup pooling at the bottom, and sandwich them between her famous buttermilk biscuits. No spongy store-bought cakes here—just honest, buttery layers that crumble at the slightest pressure. This version stays true to those roots, with a few modern tweaks to make it foolproof. Trust me, once you try homemade biscuits as the base, there’s no going back.

Why You’ll Love This Strawberry Shortcake

This isn’t just any strawberry shortcake—it’s the best strawberry shortcake. Here’s why:

  • Flaky, tender biscuits: The buttermilk adds tang and keeps them irresistibly soft.
  • Juicy, sweet strawberries: Macerating them with sugar amplifies their natural flavor.
  • Easy to customize: Swap in blueberries, peaches, or even a drizzle of bourbon for fun twists.
  • Perfect for crowds: Assemble it ahead or let everyone build their own.

How to Make Southern Strawberry Shortcake

Ingredients You’ll Need

  • 2 cups fresh strawberries, hulled and sliced
  • 1/4 cup granulated sugar (for berries)
  • 2 cups all-purpose flour
  • 1 tbsp baking powder
  • 1/2 tsp salt
  • 1/2 cup cold unsalted butter, cubed
  • 3/4 cup buttermilk (plus extra for brushing)
  • 1 cup heavy cream, whipped
  • 1 tsp vanilla extract

Step-by-Step Instructions

  1. Macerate the strawberries: Toss sliced berries with sugar and let sit for 30 minutes until syrupy.
  2. Make the biscuits: Whisk dry ingredients, cut in butter until pea-sized, then stir in buttermilk. Pat into a 1-inch thick round, cut into wedges, and bake at 425°F for 12–15 minutes.
  3. Whip the cream: Beat heavy cream with vanilla until soft peaks form.
  4. Assemble: Split warm biscuits, layer with berries and cream, and devour immediately.

Pro Tips

For the flakiest biscuits, handle the dough as little as possible—overmixing makes them tough. And if you’re feeling fancy, try adding a sprinkle of lemon zest to the berries (a trick I learned from Bon Appétit). Need more biscuit inspiration? Check out my Southern Buttermilk Biscuits guide for extra tips.

Frequently Asked Questions

Can I use frozen strawberries?

Yes, but thaw and drain them first to avoid excess liquid. Fresh is best for texture!

How do I store leftovers?

Keep components separate in the fridge for up to 2 days. Biscuits can be reheated in the oven.

Can I make gluten-free biscuits?

Absolutely! Swap in a 1:1 gluten-free flour blend like King Arthur’s.

What’s the secret to fluffy whipped cream?

Chill your bowl and beaters first, and don’t overwhip—stop at soft peaks.

Can I use store-bought biscuits?

You can, but homemade takes this from good to unforgettable. Try my 5-ingredient biscuit recipe for a shortcut.

How far ahead can I prep this?

Biscuits are best day-of, but you can macerate berries and whip cream 4 hours ahead.

There you have it—the ultimate Southern Strawberry Shortcake with Buttermilk Biscuits, ready to steal the show at your next gathering (or Tuesday night dessert). It’s the kind of recipe that feels like a hug, simple yet deeply satisfying. And if you’re anything like me, you’ll be scraping the plate clean, savoring every last crumb and drop of syrup. For more summer dessert ideas, don’t miss my Southern Peach Cobbler—it’s another crowd-pleaser. Now, go grab those strawberries and let’s bake some happiness!

Luma Style Visual
Print
clock clock iconcutlery cutlery iconflag flag iconfolder folder iconinstagram instagram iconpinterest pinterest iconfacebook facebook iconprint print iconsquares squares iconheart heart iconheart solid heart solid icon

Southern Strawberry Shortcake with Buttermilk Biscuits

  • Author: Southern Kitchen Classics

Description

A classic Southern dessert featuring tender buttermilk biscuits layered with sweet macerated strawberries and freshly whipped cream. Perfect for summer gatherings!


Ingredients

Scale

For the Crust:

  • For the buttermilk biscuits:
  • 2 cups all-purpose flour
  • 1 tablespoon baking powder
  • 1/4 teaspoon baking soda
  • 1 teaspoon salt
  • 1 tablespoon granulated sugar
  • 6 tablespoons cold unsalted butter, cubed
  • 3/4 cup cold buttermilk
  • For the strawberry filling:
  • 1.5 lbs fresh strawberries, hulled and sliced
  • 1/3 cup granulated sugar
  • 1 teaspoon lemon juice
  • For the whipped cream:
  • 1 cup heavy whipping cream
  • 2 tablespoons powdered sugar
  • 1 teaspoon vanilla extract

Instructions

1. Prepare the Crust:

  1. 1. Preheat oven to 450°F (230°C). Line a baking sheet with parchment paper.
  2. 2. Make the biscuits: In a large bowl, whisk together flour, baking powder, baking soda, salt, and sugar.
  3. 3. Cut in cold butter using a pastry cutter or fingers until mixture resembles coarse crumbs.
  4. 4. Stir in buttermilk just until dough comes together (do not overmix).
  5. 5. Turn dough onto floured surface, pat into 1-inch thick rectangle, and fold over 3 times.
  6. 6. Cut into 6 rounds using a 2.5-inch biscuit cutter and place on prepared baking sheet.
  7. 7. Bake for 12-15 minutes until golden brown. Let cool slightly.
  8. 8. Make strawberry filling: Combine strawberries, sugar, and lemon juice in a bowl. Let macerate for 30 minutes.
  9. 9. Make whipped cream: Whip cream, powdered sugar, and vanilla to stiff peaks.
  10. 10. Assemble: Split warm biscuits, layer with strawberries and juice, then top with whipped cream.

Notes

For best results, use very cold ingredients for the biscuits. The dough can be made ahead and refrigerated for up to 2 days before baking. Leftovers should be stored separately and assembled just before serving.

Baked Chicken and Rice with Fresh Herbs

Baked Chicken and Rice with Fresh Herbs: A Simple, Flavorful One-Pan Wonder

There’s something undeniably comforting about a meal that comes together in one pan, filling your kitchen with the irresistible aroma of herbs and golden chicken. This Baked Chicken and Rice with Fresh Herbs is exactly that—a fuss-free, hearty dish that feels like a warm hug after a long day. Whether you’re juggling work, kids, or just life’s endless to-do list, this recipe is here to save your weeknight dinners without sacrificing flavor.

I first stumbled upon this dish during a particularly chaotic week when takeout menus were piling up on my counter. Determined to reset, I threw together what I had: chicken thighs, rice, and a handful of fresh herbs from my garden (or, let’s be honest, the slightly wilted ones in my fridge). The result? A dish so delicious and forgiving, it’s now in my regular rotation. The rice soaks up all the savory juices from the chicken, while the herbs add a bright, fresh finish that makes it feel special. Plus, cleanup is a breeze—because who has time for extra dishes?

Why You’ll Love This Baked Chicken and Rice

This recipe is a winner for so many reasons. Here’s why it’ll become a staple in your home too:

  • One-pan magic: Less mess, more flavor—everything cooks together in a single dish.
  • Perfectly tender chicken: Baking ensures juicy, flavorful meat every time.
  • Customizable: Swap herbs based on what’s in season or your mood.
  • Meal prep friendly: Makes great leftovers for lunches or quick dinners later in the week.

How to Make Baked Chicken and Rice with Fresh Herbs

Ingredients You’ll Need

  • 4 bone-in, skin-on chicken thighs (or breasts if preferred)
  • 1 cup long-grain white rice (like jasmine or basmati)
  • 2 cups chicken broth (low-sodium for better control)
  • 1 small onion, finely diced
  • 3 cloves garlic, minced
  • 2 tbsp olive oil
  • 1 tbsp fresh thyme leaves
  • 1 tbsp fresh rosemary, chopped
  • Salt and pepper to taste
  • Lemon wedges for serving (optional but recommended!)

Step-by-Step Instructions

  1. Preheat & Prep: Preheat your oven to 375°F (190°C). Heat olive oil in a large oven-safe skillet or Dutch oven over medium heat.
  2. Sear the Chicken: Season chicken with salt and pepper, then sear skin-side down for 5–6 minutes until golden. Flip and cook for 2 more minutes. Remove and set aside.
  3. Sauté Aromatics: In the same skillet, sauté onion until soft (about 3 minutes). Add garlic and cook for 30 seconds until fragrant.
  4. Add Rice & Herbs: Stir in rice, thyme, and rosemary, coating it with the oil and aromatics. Pour in chicken broth and bring to a simmer.
  5. Bake: Nestle the chicken back into the skillet, skin-side up. Cover and bake for 30–35 minutes until rice is tender and chicken is cooked through.
  6. Rest & Serve: Let it rest for 5 minutes, then fluff the rice with a fork. Garnish with extra herbs and lemon wedges.

Tips for the Best Baked Chicken and Rice

Want to take this dish to the next level? Here are my tried-and-true tips:

  • Don’t skip the sear: Browning the chicken first adds depth of flavor and crispy skin.
  • Use fresh herbs: They make all the difference! Dried herbs can work in a pinch (use 1/3 the amount).
  • Check for doneness: Chicken should reach 165°F internally, and rice should be tender but not mushy.
  • Add veggies: Toss in peas, carrots, or spinach for extra nutrition and color.

For more easy one-pan meals, check out my One-Pan Lemon Garlic Salmon or this cozy Creamy Tuscan Chicken.

Frequently Asked Questions

Can I use boneless chicken for this recipe?

Yes! Boneless chicken thighs or breasts work, but reduce baking time by 5–10 minutes to prevent drying out.

What’s the best rice for baked chicken and rice?

Long-grain white rice (like jasmine or basmati) is ideal. Avoid short-grain or instant rice, as they can become too sticky.

Can I make this dish ahead of time?

Absolutely! Assemble everything in the skillet, cover, and refrigerate for up to 24 hours before baking. Add 5–10 extra minutes to the cook time if starting cold.

How do I store leftovers?

Store in an airtight container in the fridge for up to 3 days. Reheat in the microwave or oven with a splash of broth to keep it moist.

Can I freeze baked chicken and rice?

Yes, though the rice texture may soften slightly. Freeze in portions for up to 2 months. Thaw overnight in the fridge before reheating.

What herbs pair well with chicken and rice?

Thyme, rosemary, parsley, and sage are classics. For a twist, try tarragon or dill! Learn more about cooking with fresh herbs.

There you have it—a dish that’s as easy to make as it is satisfying to eat. Whether you’re cooking for a crowd or just treating yourself, this Baked Chicken and Rice with Fresh Herbs delivers every time. Pair it with a crisp green salad or some roasted vegetables, and you’ve got a meal that feels both nourishing and indulgent. Happy cooking!

Luma Style Visual
Print
clock clock iconcutlery cutlery iconflag flag iconfolder folder iconinstagram instagram iconpinterest pinterest iconfacebook facebook iconprint print iconsquares squares iconheart heart iconheart solid heart solid icon

Baked Chicken and Rice with Fresh Herbs

  • Author: Chef Maria

Description

A comforting one-pan meal featuring tender baked chicken thighs nestled over fragrant herbed rice. Perfect for weeknight dinners with minimal cleanup!


Ingredients

Scale

For the Crust:

  • For the chicken:
  • 4 bone-in, skin-on chicken thighs
  • 1 tsp salt
  • 1/2 tsp black pepper
  • 1 tsp paprika
  • 2 tbsp olive oil
  • For the rice:
  • 1 cup long-grain white rice
  • 2 cups chicken broth
  • 1 small onion, diced
  • 2 garlic cloves, minced
  • 1 tbsp fresh thyme leaves
  • 1 tbsp fresh rosemary, chopped
  • 1/2 tsp salt
  • 1/4 tsp black pepper
  • For garnish:
  • 2 tbsp fresh parsley, chopped
  • 1 lemon, cut into wedges

Instructions

1. Prepare the Crust:

  1. 1. Preheat oven to 375°F (190°C).
  2. 2. Season chicken thighs with salt, pepper, and paprika on both sides.
  3. 3. Heat olive oil in a large oven-safe skillet over medium-high heat. Sear chicken skin-side down for 5-6 minutes until golden brown. Flip and cook 2 more minutes. Remove chicken and set aside.
  4. 4. In the same skillet, sauté onion for 3 minutes until softened. Add garlic and cook 30 seconds until fragrant.
  5. 5. Stir in rice, thyme, rosemary, salt, and pepper. Pour in chicken broth and bring to a simmer.
  6. 6. Nestle chicken thighs into the rice mixture, skin-side up. Cover tightly with foil or a lid.
  7. 7. Bake for 35 minutes. Remove cover and bake 5 more minutes to crisp chicken skin.
  8. 8. Let rest 5 minutes. Garnish with parsley and serve with lemon wedges.

Notes

For crispier skin, broil for 2-3 minutes after baking. Substitute dried herbs if fresh aren’t available (use 1/3 the amount). Leftovers keep well refrigerated for 3 days.