Quick & Easy One-Pot Teriyaki Noodles Recipe

Quick & Easy One-Pot Teriyaki Noodles Recipe

Ever had one of those nights where you’re staring into the fridge, willing dinner to magically appear? Yeah, me too. That’s why this Quick & Easy One-Pot Teriyaki Noodles Recipe is my weeknight superhero. In just 20 minutes, you’ll have a savory, slightly sweet, and utterly satisfying meal that’s as easy to make as it is delicious. No piles of dishes, no complicated steps—just one pot and a handful of pantry staples. It’s the kind of meal that makes you feel like you’ve got your life together, even if the laundry pile suggests otherwise.

Teriyaki noodles are my go-to when I need something comforting but don’t want to sacrifice flavor for speed. The beauty of this dish? It’s endlessly adaptable. Swap in whatever veggies you have on hand, add tofu or chicken, or keep it simple with just noodles and sauce. Plus, that glossy, sticky-sweet teriyaki glaze clings to every strand of noodle, making each bite irresistible. If you’re a fan of quick fixes like my 15-Minute Garlic Butter Shrimp Pasta, you’ll love this one just as much.

Why You’ll Love These Teriyaki Noodles

This recipe is a game-changer for busy cooks, and here’s why:

  • One-pot wonder: Less cleanup = more time for Netflix.
  • Pantry-friendly: Uses ingredients you likely already have.
  • Customizable: Works with any protein or veggies.
  • Kid-approved: Sweet, savory, and slurpable (my 8-year-old’s stamp of approval).

How to Make One-Pot Teriyaki Noodles

Ingredients You’ll Need

  • 8 oz noodles (udon, ramen, or spaghetti)
  • 2 tbsp sesame oil (or olive oil in a pinch)
  • 3 garlic cloves, minced
  • 1 tbsp grated ginger
  • 1/4 cup soy sauce (low-sodium works too)
  • 2 tbsp honey or brown sugar
  • 1 tbsp rice vinegar
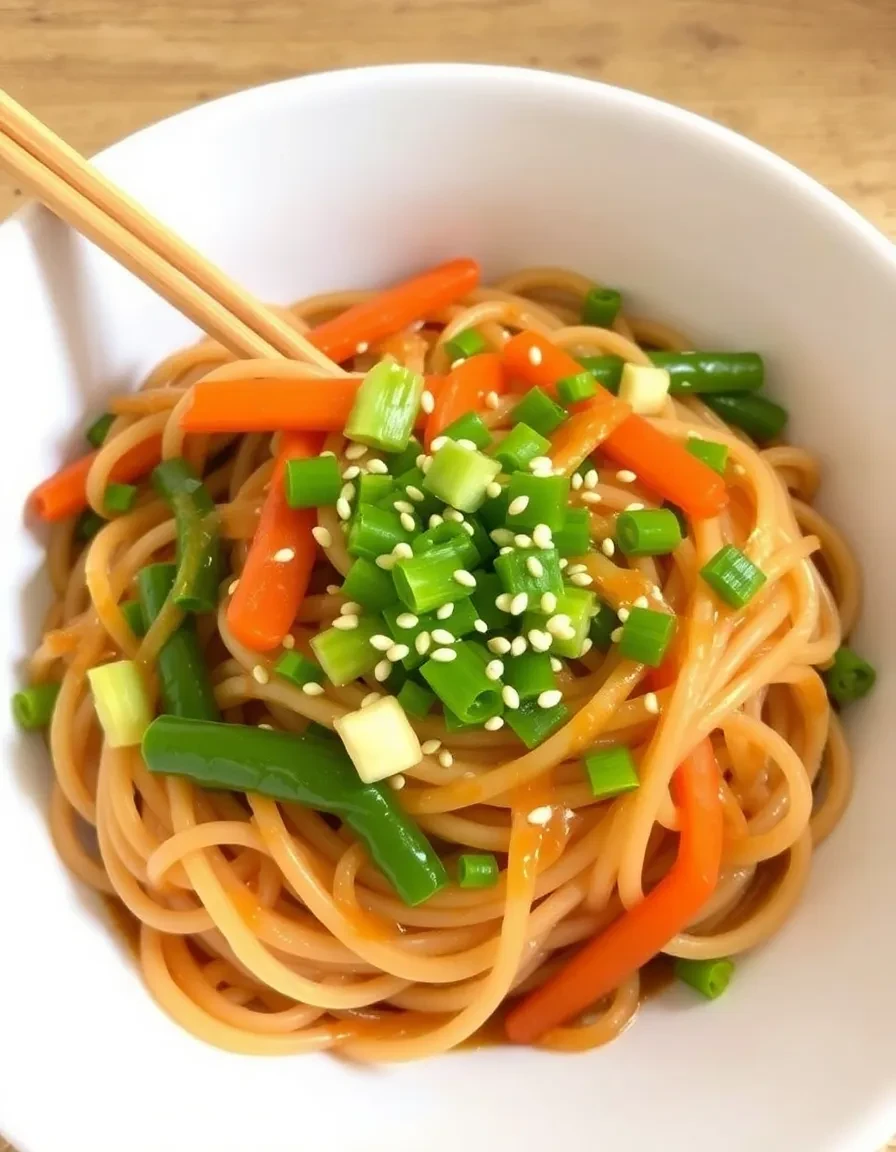
  • 1 cup mixed veggies (bell peppers, carrots, snap peas)
  • Optional: 1 cup cooked chicken, shrimp, or tofu
  • Garnish: green onions, sesame seeds

Step-by-Step Instructions

  1. Sauté the aromatics: Heat oil in a large pot over medium heat. Add garlic and ginger, stirring for 30 seconds until fragrant (don’t let them burn—trust me, I’ve learned the hard way).
  2. Build the sauce: Pour in soy sauce, honey, and rice vinegar. Stir until the honey dissolves, then add 2 cups of water.
  3. Cook the noodles: Add noodles and veggies directly to the pot. Simmer for 8–10 minutes, stirring occasionally, until noodles are tender and sauce thickens.
  4. Finish strong: Toss in cooked protein if using, then garnish with green onions and sesame seeds. Serve immediately!

Tips for the Best Teriyaki Noodles

Want to take this dish to the next level? Here are my pro tips:

  • For extra depth, add a splash of umami-rich ingredients like fish sauce or mirin.
  • Short on time? Use pre-shredded coleslaw mix instead of chopping veggies.
  • Love spice? A drizzle of sriracha or sprinkle of red pepper flakes adds heat.

Frequently Asked Questions

Can I use frozen veggies?

Absolutely! Toss them in during the last 5 minutes of cooking.

How do I store leftovers?

Keep them in an airtight container for up to 3 days. The noodles may soak up sauce, so add a splash of water when reheating.

What noodles work best?

Udon or ramen are ideal, but spaghetti or even soba noodles (a personal favorite) work too.

Is this recipe gluten-free?

Use tamari instead of soy sauce and gluten-free noodles to make it GF.

Can I make it ahead?

The sauce can be prepped 2 days in advance—just store it separately until cooking.

What’s a good protein addition?

Try crispy tofu (like in my Crispy Tofu Bowl) or shredded rotisserie chicken.

There you have it—a meal that’s faster than takeout and twice as satisfying. Whether you’re feeding a crowd or just need a no-fuss dinner for yourself, these teriyaki noodles deliver every time. Now, go forth and conquer that weeknight chaos (or at least pretend to, one delicious bite at a time).

Marry Me Chicken

Marry Me Chicken: The Creamy, Dreamy Dish That Steals Hearts

Picture this: a golden skillet filled with tender chicken breasts swimming in a luscious, creamy sauce flecked with sun-dried tomatoes and fragrant herbs. The aroma alone is enough to make someone weak in the knees—hence the name Marry Me Chicken. Legend has it that this dish is so irresistible, it could inspire a proposal (or at least a very enthusiastic second date). Whether you’re cooking for a special someone or just treating yourself, this recipe is guaranteed to feel like a warm hug on a plate.

I first stumbled upon this recipe during a cozy girls’ night in, and let me tell you, it was love at first bite. The combination of garlic, Parmesan, and a touch of heat from red pepper flakes creates magic. Plus, it’s surprisingly simple to make, even on busy weeknights. Serve it over pasta, mashed potatoes, or crusty bread to soak up every last drop of that heavenly sauce. Trust me, your family—or your date—will be begging for seconds.

Why You’ll Love Marry Me Chicken

This dish isn’t just delicious—it’s also versatile and forgiving. Here’s why it’s a keeper:

  • Quick & Easy: Ready in under 30 minutes, perfect for last-minute dinners.
  • Crowd-Pleasing: Picky eaters and foodies alike will adore the rich flavors.
  • Meal Prep Friendly: The sauce reheats beautifully for leftovers.
  • Impressively Elegant: Looks and tastes like you spent hours in the kitchen.

How to Make Marry Me Chicken

Ingredients You’ll Need

  • 4 boneless, skinless chicken breasts
  • 1 tbsp olive oil
  • 3 garlic cloves, minced
  • 1 cup heavy cream
  • ½ cup chicken broth
  • ½ cup grated Parmesan cheese
  • ⅓ cup sun-dried tomatoes, chopped
  • 1 tsp Italian seasoning
  • ½ tsp red pepper flakes (optional)
  • Fresh basil for garnish

Step-by-Step Instructions

  1. Sear the Chicken: Heat olive oil in a large skillet over medium-high heat. Season chicken with salt and pepper, then cook for 5–6 minutes per side until golden. Remove and set aside.
  2. Make the Sauce: In the same skillet, sauté garlic for 30 seconds until fragrant. Stir in cream, broth, Parmesan, sun-dried tomatoes, Italian seasoning, and red pepper flakes. Simmer for 3–4 minutes until slightly thickened.
  3. Finish & Serve: Return chicken to the skillet, spooning sauce over it. Cook for another 2–3 minutes until heated through. Garnish with fresh basil and serve hot.

Tips for the Best Marry Me Chicken

Want to take this dish to the next level? Try these pro tips:

  • For extra flavor, use the oil from the sun-dried tomatoes instead of plain olive oil.
  • If the sauce is too thick, add a splash of broth. Too thin? Let it simmer a bit longer.
  • Swap chicken breasts for thighs if you prefer darker meat—just adjust cooking time.
  • Pair with a crisp white wine like Sauvignon Blanc for a perfect match.

Frequently Asked Questions

Can I make Marry Me Chicken ahead of time?
Yes! Prepare the dish, then store it in the fridge for up to 2 days. Reheat gently on the stove with a splash of broth to loosen the sauce.

What can I substitute for heavy cream?
Half-and-half or whole milk will work, but the sauce won’t be as rich. For a dairy-free option, try coconut cream.

Is Marry Me Chicken gluten-free?
Absolutely! Just ensure your broth and Parmesan are gluten-free. Serve with gluten-free pasta or rice.

Can I freeze leftovers?
Freezing isn’t recommended—the cream sauce may separate when thawed. Enjoy it fresh or refrigerated.

What sides go well with this dish?
Try it with garlic Parmesan asparagus or a simple arugula salad.

How spicy is Marry Me Chicken?
The red pepper flakes add mild heat—omit them if you prefer a totally mild dish.

There you have it—the ultimate Marry Me Chicken recipe that’s equal parts comforting and swoon-worthy. Whether you’re cooking to impress or just craving something indulgent, this dish delivers every time. Don’t be surprised if it becomes a regular in your dinner rotation. After all, good food is one of life’s simplest and most profound joys. Now, who’s bringing the wine?

Creamy Ranch Chicken


Creamy Ranch Chicken: A Weeknight Dinner Hero

There’s something magical about a dish that’s both ridiculously easy and irresistibly delicious—enter Creamy Ranch Chicken. Picture this: juicy chicken breasts smothered in a velvety, herb-packed sauce with just the right amount of tang. It’s the kind of meal that feels like a warm hug after a long day, yet it’s simple enough to whip up on even the busiest weeknights. (No judgment if you eat it straight from the skillet—we’ve all been there.)

As a mom of two and a self-proclaimed “lazy gourmet,” I’m always on the hunt for recipes that deliver big flavor with minimal effort. This one checks all the boxes: pantry-friendly ingredients, one-pan convenience, and that nostalgic ranch taste we all love. Plus, it’s versatile! Serve it over pasta, mashed potatoes, or even zucchini noodles for a lighter twist. Trust me, this dish will earn a permanent spot in your dinner rotation—just like it did in mine after my picky 7-year-old declared it “better than chicken nuggets.” (High praise, indeed.)

Why You’ll Love This Creamy Ranch Chicken

Here’s why this recipe is a game-changer:

  • 30-minute magic: From fridge to table faster than takeout.
  • Pantry MVP: Uses staples like chicken broth and cream cheese—no fancy shopping required.
  • Crowd-pleaser: Kids and adults alike go wild for that ranch flavor.
  • Meal prep friendly: The sauce reheats like a dream for lunches.

How to Make Creamy Ranch Chicken

Ingredients You’ll Need

  • 4 boneless, skinless chicken breasts
  • 1 packet (1 oz) ranch seasoning mix
  • 2 tbsp olive oil
  • 1 cup chicken broth
  • 4 oz cream cheese, cubed
  • 1/2 cup heavy cream
  • 1 tsp garlic powder
  • Fresh parsley for garnish

Step-by-Step Instructions

  1. Sear the chicken: Heat oil in a skillet over medium-high. Season chicken with half the ranch mix, then cook 5–6 minutes per side until golden. Remove and set aside.
  2. Make the sauce: In the same skillet, whisk broth, cream cheese, cream, garlic powder, and remaining ranch mix. Simmer 3–4 minutes until smooth.
  3. Finish & serve: Return chicken to the skillet, spooning sauce over it. Cook 2–3 more minutes until chicken reaches 165°F. Garnish with parsley.

Pro Tips for the Best Creamy Ranch Chicken

Don’t rush the sear: A golden crust = big flavor. (Channel your inner Julia Child and resist moving the chicken too soon!)
Customize it: Add crispy bacon, mushrooms, or spinach for extra oomph.
Thicken it up: If your sauce is too thin, mix 1 tsp cornstarch with 1 tbsp water and stir in.
Leftover hack: Shred the chicken and toss with pasta for a next-day ranch Alfredo.

Creamy Ranch Chicken FAQs

Can I use Greek yogurt instead of heavy cream?
Yes! Use plain, full-fat Greek yogurt for a tangier twist—just stir it in at the end to prevent curdling.

What’s the best side dish for ranch chicken?
Try roasted potatoes, steamed green beans, or this easy Garlic Parmesan Pasta.

How long does creamy ranch chicken last in the fridge?
Store in an airtight container for up to 3 days. Reheat gently with a splash of broth.

Can I make this in a slow cooker?
Absolutely! Add all ingredients (except cream) and cook on LOW 4–5 hours. Stir in cream before serving.

Is there a dairy-free version?
Swap cream cheese for dairy-free cream cheese and use coconut cream instead of heavy cream.

What’s the best ranch seasoning brand?
I prefer Hidden Valley’s mix, but homemade blends work too (check out this DIY ranch seasoning recipe).

Whether you’re craving comfort food or need a no-fuss dinner that actually excites your taste buds, this Creamy Ranch Chicken delivers every time. It’s the kind of recipe that reminds us weeknight meals don’t have to be boring—just flavorful, fast, and full of love. Now, who’s ready to grab a skillet and dig in?


Buttermilk Spring Pea Salad

Buttermilk Spring Pea Salad: A Fresh & Creamy Spring Delight

There’s something magical about spring produce—the crisp snap of sugar snap peas, the tender sweetness of fresh peas, and the bright pop of herbs that make every bite feel like a celebration. This Buttermilk Spring Pea Salad is my love letter to the season, combining creamy, tangy buttermilk dressing with the freshest peas and a handful of crunchy veggies for a dish that’s as refreshing as a sunny afternoon.

I first made this salad for a backyard picnic last year, and it quickly became a staple in my spring recipe rotation. It’s the kind of dish that disappears fast at potlucks (trust me, I’ve seen it happen). The best part? It comes together in under 20 minutes, making it perfect for busy weeknights or last-minute gatherings. Whether you’re serving it alongside grilled chicken or enjoying it as a light lunch, this salad brings a burst of spring to every forkful.

Why You’ll Love This Buttermilk Spring Pea Salad

This salad is a winner for so many reasons. Here’s why it’ll become your new go-to:

  • Bright & Fresh: Packed with seasonal peas, radishes, and herbs, it tastes like spring in a bowl.
  • Creamy & Tangy: The buttermilk dressing adds richness without weighing it down.
  • Quick & Easy: No cooking required—just chop, whisk, and toss!
  • Versatile: Serve it as a side, add grilled protein, or scoop it up with crackers.

How to Make Buttermilk Spring Pea Salad

This recipe is as simple as it gets, but a few tips will ensure it turns out perfectly every time.

Ingredients You’ll Need

  • 2 cups fresh spring peas (or frozen, thawed)
  • 1 cup sugar snap peas, thinly sliced
  • 4 radishes, thinly sliced
  • 1/4 cup red onion, finely diced
  • 1/4 cup fresh dill, chopped
  • 1/2 cup buttermilk
  • 2 tbsp mayonnaise
  • 1 tbsp lemon juice
  • 1 tsp honey
  • Salt & pepper to taste

Step-by-Step Instructions

  1. Prep the veggies: In a large bowl, combine peas, snap peas, radishes, red onion, and dill.
  2. Make the dressing: Whisk together buttermilk, mayo, lemon juice, honey, salt, and pepper until smooth.
  3. Toss & chill: Pour the dressing over the veggies and gently toss. Refrigerate for at least 15 minutes to let flavors meld.
  4. Serve & enjoy: Garnish with extra dill and a sprinkle of flaky salt before serving.

Recipe Tips & Variations

Want to mix it up? Here are a few fun twists:

  • Add crunch: Toss in toasted almonds or sunflower seeds for extra texture.
  • Make it heartier: Stir in crumbled feta or diced avocado.
  • Swap the herbs: Mint or chives work beautifully in place of dill.

If you love fresh, easy salads, you’ll adore this Spring Vegetable Pasta—it’s another seasonal favorite!

Frequently Asked Questions

Can I use frozen peas?

Absolutely! Just thaw them first and pat dry to avoid excess moisture.

How long does this salad keep?

It’s best within 1–2 days, stored in an airtight container in the fridge.

Can I make it dairy-free?

Yes! Swap buttermilk for almond milk + 1 tsp vinegar, and use vegan mayo.

What pairs well with this salad?

Try it with Grilled Lemon Chicken or crusty bread.

Can I prep it ahead?

Yes! Just keep the dressing separate until ready to serve.

Is this salad kid-friendly?

The sweet peas and creamy dressing usually win over little ones—just go light on the onions.

There you have it—a salad that’s as easy to make as it is delicious. Every bite is a reminder of why spring cooking is so special: simple ingredients, vibrant flavors, and meals that bring people together. If you’re looking for more spring inspiration, check out this guide to seasonal spring recipes from Serious Eats. Now, go grab those peas and enjoy!

Print
clock clock iconcutlery cutlery iconflag flag iconfolder folder iconinstagram instagram iconpinterest pinterest iconfacebook facebook iconprint print iconsquares squares iconheart heart iconheart solid heart solid icon

Buttermilk Spring Pea Salad

  • Author: Chef Emily Waters

Description

A refreshing and vibrant salad featuring sweet spring peas tossed in a creamy buttermilk dressing with fresh herbs and crisp vegetables. Perfect for picnics or as a light side dish.


Ingredients

Scale

For the Crust:

  • For the salad:
  • 2 cups fresh spring peas (or frozen, thawed)
  • 1 cup sugar snap peas, thinly sliced
  • 1/2 cup radishes, thinly sliced
  • 1/4 cup red onion, finely diced
  • 2 tablespoons fresh mint, chopped
  • 2 tablespoons fresh dill, chopped
  • For the dressing:
  • 1/3 cup buttermilk
  • 2 tablespoons mayonnaise
  • 1 tablespoon lemon juice
  • 1 teaspoon honey
  • 1/2 teaspoon garlic powder
  • 1/4 teaspoon salt
  • 1/4 teaspoon black pepper

Instructions

1. Prepare the Crust:

  1. 1. In a large bowl, combine spring peas, sugar snap peas, radishes, red onion, mint, and dill.
  2. 2. In a separate small bowl, whisk together buttermilk, mayonnaise, lemon juice, honey, garlic powder, salt, and pepper until smooth.
  3. 3. Pour the dressing over the salad and toss gently to coat all ingredients evenly.
  4. 4. Cover and refrigerate for at least 30 minutes before serving to allow flavors to meld.
  5. 5. Stir gently before serving and adjust seasoning if needed.

Notes

For best results, use fresh peas when in season. If using frozen peas, thaw completely and pat dry before using. Salad can be made up to 8 hours in advance – store covered in refrigerator.

Herb Roasted Chicken with Baby Potatoes

Herb Roasted Chicken with Baby Potatoes: A Cozy One-Pan Wonder

There’s something undeniably comforting about a golden, herb-roasted chicken emerging from the oven, its aroma mingling with the buttery scent of baby potatoes. It’s the kind of meal that feels like a warm hug—simple yet deeply satisfying, whether you’re feeding a crowd or just craving a nourishing weeknight dinner. As someone who’s juggled more than a few chaotic evenings (hello, burnt garlic bread incidents), I can confidently say this dish is a lifesaver. It’s forgiving, flavorful, and requires minimal cleanup—a trifecta of wins.

What I love most about this Herb Roasted Chicken with Baby Potatoes is how effortlessly it adapts. Swap rosemary for thyme? Sure. Toss in carrots or parsnips? Absolutely. It’s a canvas for whatever herbs or veggies you have on hand. Plus, the potatoes soak up all the savory juices from the chicken, becoming little pockets of crispy-on-the-outside, fluffy-on-the-inside perfection. If you’ve ever wondered how to make a meal that’s both rustic and elegant—this is it. Bonus: Your kitchen will smell like a French bistro for hours.

Why You’ll Love This Herb Roasted Chicken

This recipe isn’t just delicious—it’s practical magic. Here’s why it’s a forever favorite:

  • One-pan wonder: Less mess, more flavor. Everything cooks together on a single sheet pan.
  • Weeknight hero: Prep takes 15 minutes, then the oven does the work.
  • Leftover-friendly: Shred extra chicken for salads, soups, or these easy chicken tacos.
  • Crowd-pleaser: Equally at home on a Tuesday or at a Sunday dinner party.

How to Make Herb Roasted Chicken with Baby Potatoes

Ingredients You’ll Need

  • 1 whole chicken (3–4 lbs), patted dry
  • 1.5 lbs baby potatoes, halved
  • 3 tbsp olive oil, divided
  • 2 tbsp fresh rosemary, chopped (or thyme, sage, or a mix)
  • 4 garlic cloves, minced
  • 1 lemon, sliced
  • Salt and pepper to taste

Step-by-Step Instructions

  1. Prep the chicken: Rub 1 tbsp olive oil all over the chicken, then season generously with salt, pepper, and half the herbs. Stuff the cavity with lemon slices and garlic.
  2. Toss the potatoes: In a bowl, mix potatoes with remaining olive oil, herbs, salt, and pepper. Spread them around the chicken on a sheet pan.
  3. Roast: Bake at 425°F for 50–60 minutes, until chicken reaches 165°F internally and potatoes are crispy. Baste halfway with pan juices.
  4. Rest and serve: Let chicken rest 10 minutes before carving. Serve with potatoes and a sprinkle of fresh herbs.

Pro Tips for the Best Roasted Chicken

Want that perfect crispy skin and juicy meat? Here’s what I’ve learned from (many) trials and errors:

  • Dry the skin: Patting the chicken dry before seasoning ensures crispiness.
  • Room temp start: Let the chicken sit out for 20 minutes before roasting for even cooking.
  • Herb hack: No fresh herbs? Use 1 tsp dried herbs per tablespoon fresh.
  • Veggie boost: Add carrots, onions, or fennel for extra flavor—like this veggie medley.

Frequently Asked Questions

Can I use chicken thighs instead?

Absolutely! Reduce cooking time to 35–40 minutes for bone-in thighs.

How do I store leftovers?

Keep in an airtight container for up to 3 days. Reheat in the oven at 350°F to maintain crispiness.

What sides pair well with this dish?

Try a simple green salad or roasted Brussels sprouts.

Can I make this ahead?

Prep the chicken and potatoes up to 6 hours in advance; store separately in the fridge until roasting.

Why are my potatoes soggy?

Crowding the pan traps steam. Use a larger pan or roast potatoes on a separate tray if needed.

Can I freeze herb roasted chicken?

Yes! Freeze carved chicken and potatoes (without garnishes) for up to 2 months. Thaw overnight before reheating.

There you have it—a dish that’s as versatile as it is delicious. Whether you’re cooking to unwind after a long day or hosting friends who’ll rave about your culinary skills (you’re welcome), this Herb Roasted Chicken with Baby Potatoes delivers every time. Now, go forth and enjoy that golden, herby goodness—preferably with a glass of wine and zero guilt about the minimal cleanup.

Print
clock clock iconcutlery cutlery iconflag flag iconfolder folder iconinstagram instagram iconpinterest pinterest iconfacebook facebook iconprint print iconsquares squares iconheart heart iconheart solid heart solid icon

Herb Roasted Chicken with Baby Potatoes

  • Author: Chef Maria Bennett

Description

A succulent whole chicken roasted to golden perfection with aromatic herbs and tender baby potatoes. This one-pan wonder delivers crispy skin, juicy meat, and flavorful potatoes infused with garlic and rosemary.


Ingredients

Scale

For the Crust:

  • For the chicken:
  • 1 whole chicken (34 lbs)
  • 3 tbsp olive oil
  • 1 tbsp kosher salt
  • 2 tsp black pepper
  • 1 tbsp fresh thyme leaves
  • 1 tbsp chopped fresh rosemary
  • 4 garlic cloves, minced
  • 1 lemon, halved
  • For the potatoes:
  • 1.5 lbs baby potatoes, halved
  • 2 tbsp olive oil
  • 1 tsp salt
  • 1/2 tsp black pepper
  • 3 sprigs fresh rosemary
  • 4 garlic cloves, smashed

Instructions

1. Prepare the Crust:

  1. 1. Preheat oven to 425°F (220°C).
  2. 2. Pat chicken dry with paper towels. Rub entire surface with olive oil.
  3. 3. Combine salt, pepper, thyme, rosemary and minced garlic. Rub mixture all over chicken, including under the skin.
  4. 4. Place lemon halves in chicken cavity. Truss legs with kitchen twine.
  5. 5. Toss potatoes with olive oil, salt, pepper, rosemary sprigs and smashed garlic in roasting pan.
  6. 6. Place chicken breast-side up on top of potatoes.
  7. 7. Roast for 1 hour 15 minutes or until internal temperature reaches 165°F (74°C) at thickest part of thigh.
  8. 8. Let chicken rest 15 minutes before carving. Serve with roasted potatoes.

Notes

For extra crispy skin, pat the chicken very dry before seasoning. Let the seasoned chicken sit uncovered in refrigerator for 4-12 hours before roasting. Substitute dried herbs if fresh aren’t available (use 1/3 amount).