Spring Roll Bowl with Peanut Sauce


Spring Roll Bowl with Peanut Sauce: A Fresh & Flavorful Meal

There’s something magical about the way a spring roll captures the essence of fresh, vibrant flavors—crunchy veggies, tender noodles, and that irresistible peanut sauce. But let’s be honest: rolling them can be a bit… finicky. Enter the Spring Roll Bowl with Peanut Sauce, your new favorite way to enjoy all those delicious flavors without the fuss. This deconstructed version is just as satisfying, packed with texture, and ready in a fraction of the time.

I first fell in love with this bowl on a chaotic weeknight when I craved something light yet filling. (You know those days when takeout sounds tempting, but your fridge is full of good intentions?) This dish came together with what I had on hand—crisp cucumbers, shredded carrots, and a jar of peanut butter that’s been in my pantry longer than I’d like to admit. The result? A meal so good, it’s now in my regular rotation. Whether you’re meal-prepping or need a quick dinner, this bowl is here to save the day.

Why You’ll Love This Spring Roll Bowl

If you’re looking for a meal that’s equal parts nutritious, delicious, and easy, this bowl checks all the boxes. Here’s why it’s a winner:

  • No rolling required: Skip the delicate wrapping and pile everything into a bowl instead.
  • Customizable: Swap in your favorite veggies or proteins—tofu, shrimp, or leftover chicken all work beautifully.
  • Meal-prep friendly: Prep the components ahead for quick lunches or dinners all week.
  • That peanut sauce: Creamy, tangy, and just a little sweet, it ties everything together perfectly.

How to Make a Spring Roll Bowl with Peanut Sauce

This recipe is more of a template than a rigid rulebook. Use what you love, and don’t stress about perfection—the best bowls are the ones that make you happy.

Ingredients You’ll Need

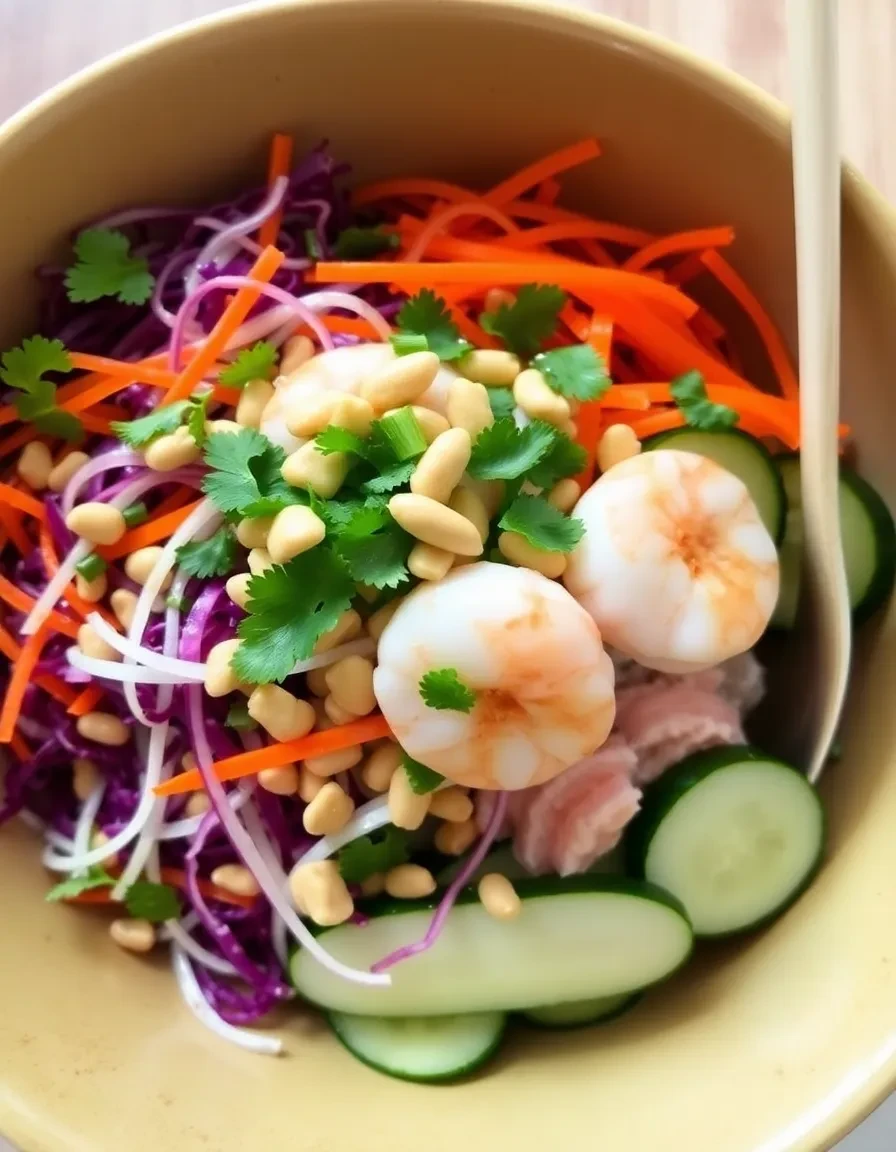
  • For the bowl: Rice noodles, shredded cabbage, carrots, cucumber, bell pepper, fresh herbs (mint, cilantro, or basil), and optional protein like tofu or shrimp.
  • For the peanut sauce: Creamy peanut butter, soy sauce (or tamari for gluten-free), lime juice, honey or maple syrup, garlic, ginger, and a splash of water to thin.

Step-by-Step Instructions

  1. Prep the noodles: Cook rice noodles according to package instructions, then rinse under cold water to stop the cooking process.
  2. Chop the veggies: Thinly slice or shred all your vegetables for maximum crunch.
  3. Make the sauce: Whisk together peanut butter, soy sauce, lime juice, honey, minced garlic, and grated ginger. Thin with water until pourable.
  4. Assemble: Divide noodles among bowls, top with veggies, herbs, and protein. Drizzle generously with peanut sauce.

Tips for the Best Spring Roll Bowl

  • Double the sauce: Trust me, you’ll want extra for drizzling or dipping.
  • Add crunch: Toasted peanuts or sesame seeds add a lovely texture.
  • Keep it fresh: If meal-prepping, store dressing separately to keep veggies crisp.

For more Asian-inspired dishes, try my Easy Vegetable Stir-Fry or this Hearty Miso Soup.

Frequently Asked Questions

Can I make this spring roll bowl ahead of time?

Absolutely! Store components separately in the fridge for up to 3 days. Add sauce just before serving.

What’s a good substitute for peanut butter?

Almond butter or sunflower seed butter work well for a nut-free version.

Is this bowl gluten-free?

Yes, if you use tamari instead of soy sauce and gluten-free rice noodles.

Can I add meat to this bowl?

Definitely! Grilled chicken, shrimp, or even leftover rotisserie chicken are great additions.

How do I store leftovers?

Keep ingredients separate in airtight containers. The sauce may thicken—just thin with a little water when ready to use.

What other veggies can I use?

Try shredded kale, edamame, or avocado for extra variety. For more veggie-packed meals, check out this Rainbow Buddha Bowl.

There you have it—a Spring Roll Bowl with Peanut Sauce that’s as flexible as it is flavorful. Whether you’re craving something light for lunch or a fuss-free dinner, this bowl delivers every time. For more sauce inspiration, Serious Eats has a great roundup of variations. Now, go grab those chopsticks and dig in!


Sweet and Savory Pineapple Chicken and Rice Recipe

Sweet and Savory Pineapple Chicken and Rice Recipe

There’s something magical about the way sweet and savory flavors dance together in a dish—especially when it involves juicy chicken, caramelized pineapple, and fluffy rice. This Sweet and Savory Pineapple Chicken and Rice Recipe is my go-to when I want a meal that feels like a vacation but comes together faster than takeout. It’s the kind of dish that makes my family pause mid-bite to say, “Oh wow, this is GOOD.” And honestly? That’s the best compliment a home cook can get.

If you’re tired of the same old chicken dinners (we’ve all been there), this recipe is your ticket to breaking the monotony. The pineapple adds a bright, tropical touch, while soy sauce and garlic keep things deeply flavorful. Plus, it’s a one-pan wonder, meaning fewer dishes and more time to savor that extra glass of wine or, let’s be real, finally tackling that pile of laundry. (Or not. No judgment here.)

Why You’ll Love This Pineapple Chicken and Rice

This dish isn’t just delicious—it’s also packed with perks that make it a weeknight hero:

  • One-pan wonder: Less cleanup = more happiness.
  • Balanced flavors: Sweet pineapple meets savory soy sauce for a crave-worthy combo.
  • Meal-prep friendly: Tastes even better as leftovers (hello, lunch tomorrow!).
  • Kid-approved: The subtle sweetness wins over even picky eaters.

How to Make Sweet and Savory Pineapple Chicken and Rice

Ingredients You’ll Need

  • 1 lb boneless, skinless chicken thighs (or breasts), cubed
  • 1 cup fresh pineapple chunks (or canned, drained)
  • 1 cup jasmine rice (or basmati)
  • 2 tbsp soy sauce (or tamari for gluten-free)
  • 1 tbsp honey or brown sugar
  • 2 cloves garlic, minced
  • 1 tbsp ginger, grated
  • 1 red bell pepper, diced
  • 1½ cups chicken broth
  • 1 tbsp olive oil
  • Green onions and sesame seeds for garnish

Step-by-Step Instructions

  1. Sear the chicken: Heat oil in a large skillet over medium-high heat. Add chicken and cook until browned, about 5 minutes. Remove and set aside.
  2. Sauté the aromatics: In the same pan, add garlic, ginger, and bell pepper. Cook for 2 minutes until fragrant.
  3. Combine everything: Stir in rice, pineapple, soy sauce, honey, and broth. Return chicken to the pan.
  4. Simmer: Bring to a boil, then reduce heat to low. Cover and cook for 18–20 minutes, or until rice is tender.
  5. Garnish and serve: Fluff with a fork, top with green onions and sesame seeds, and enjoy!

Tips for the Best Pineapple Chicken and Rice

Want to take this dish to the next level? Here are my pro tips:

  • Use fresh pineapple if possible—it’s brighter and less syrupy than canned. (But canned works in a pinch!)
  • Don’t skip the ginger. It adds a zesty kick that balances the sweetness.
  • Let it rest. After cooking, leave the lid on for 5 minutes to let the rice absorb any extra liquid.

Fun story: The first time I made this, my husband—who claims to dislike fruit in savory dishes—went back for thirds. Now it’s in our regular rotation, especially when we need a taste of sunshine in the middle of a hectic week.

Pairing Suggestions

This dish is fantastic on its own, but if you’re feeling fancy, try it with:

Frequently Asked Questions

Can I use brown rice instead of white? Yes! Adjust the cooking time to 40–45 minutes and add more broth as needed.

How do I store leftovers? Keep them in an airtight container for up to 3 days. Reheat with a splash of broth to revive the rice.

Is this pineapple chicken recipe gluten-free? It is if you use tamari instead of soy sauce!

Can I add other veggies? Absolutely—try snap peas, broccoli, or even zucchini for extra crunch.

What’s the best cut of chicken for this dish? Thighs stay juicier, but breasts work too—just don’t overcook them.

Can I make this in a rice cooker? You bet! Sauté the chicken and veggies first, then transfer everything to the cooker with the liquid.

Whether you’re craving a taste of the tropics or just need a break from the usual dinner routine, this Sweet and Savory Pineapple Chicken and Rice Recipe delivers. It’s proof that a little sweetness (and a lot of flavor) can turn an ordinary night into something special. Now, who’s ready to dig in?

Sausage and Sweet Potatoes with Honey Garlic Sauce

Sausage and Sweet Potatoes with Honey Garlic Sauce: A Weeknight Wonder

There’s something magical about the combination of savory sausage, caramelized sweet potatoes, and a sticky-sweet honey garlic sauce that makes this dish feel like a hug on a plate. Whether you’re juggling work, kids, or just life’s endless to-do list, this recipe is here to save your dinner routine—without sacrificing flavor. It’s the kind of meal that looks like you fussed, but secretly comes together in under 45 minutes (shh, I won’t tell).

I first stumbled upon this combo during one of those “what’s left in the fridge?” nights, and it’s been in my rotation ever since. The sweetness of the potatoes balances the richness of the sausage, while the honey garlic sauce ties everything together with a glossy, irresistible finish. Plus, it’s a one-pan wonder, which means fewer dishes—a win in my book! If you’re a fan of cozy, fuss-free meals, you’ll love this as much as my family does. (Even my picky eater asks for seconds.)

Why You’ll Love This Sausage and Sweet Potatoes Recipe

This dish checks all the boxes: easy, flavorful, and adaptable. Here’s why it’s a keeper:

  • One-pan magic: Less cleanup, more time to relax.
  • Sweet and savory perfection: The honey garlic sauce is *chef’s kiss*.
  • Meal-prep friendly: Tastes even better as leftovers.
  • Versatile: Swap sausage for chicken or tofu, or add veggies like Brussels sprouts.

How to Make Sausage and Sweet Potatoes with Honey Garlic Sauce

Ingredients You’ll Need

  • 1 lb smoked sausage (or Italian sausage), sliced
  • 2 medium sweet potatoes, cubed
  • 1 tbsp olive oil
  • 3 cloves garlic, minced
  • 3 tbsp honey
  • 1 tbsp soy sauce
  • 1 tsp apple cider vinegar
  • ½ tsp smoked paprika (optional, for depth)
  • Salt and pepper to taste
  • Fresh parsley or green onions for garnish

Step-by-Step Instructions

  1. Roast the sweet potatoes: Toss cubed sweet potatoes with olive oil, salt, and pepper. Spread on a baking sheet and roast at 400°F for 20 minutes.
  2. Brown the sausage: In a skillet over medium heat, cook sausage slices until browned (about 5 minutes). Remove and set aside.
  3. Make the sauce: In the same skillet, sauté garlic for 30 seconds, then stir in honey, soy sauce, vinegar, and paprika. Simmer for 2 minutes until slightly thickened.
  4. Combine everything: Add roasted sweet potatoes and sausage to the skillet, tossing to coat in the sauce. Garnish with fresh herbs and serve!

Tips for the Best Results

Want to take this dish to the next level? Try these pro tips:

  • Cut uniform cubes: Keep sweet potato pieces similar in size for even roasting.
  • Don’t skip the vinegar: It balances the sweetness and adds brightness.
  • Spice it up: Add red pepper flakes or sriracha for heat.
  • Double the sauce: Trust me, you’ll want extra for drizzling.

For more easy one-pan dinners, check out our One-Pan Chicken and Veggies or Garlic Butter Shrimp.

Pairing Suggestions

This dish is hearty enough to stand alone, but if you’re craving sides, try:

  • A simple avocado salad for freshness.
  • Crusty bread to soak up the sauce (because why not?).
  • A crisp white wine like Sauvignon Blanc or Pinot Grigio.

Frequently Asked Questions

Can I use regular potatoes instead of sweet potatoes?

Absolutely! Yukon gold or red potatoes work well—just adjust roasting time as needed.

How do I store leftovers?

Keep in an airtight container in the fridge for up to 3 days. Reheat in a skillet or microwave.

Is this recipe gluten-free?

Yes, if you use gluten-free soy sauce or coconut aminos.

Can I make this ahead for meal prep?

Definitely! Roast the sweet potatoes and cook the sausage in advance, then assemble with sauce when ready to eat.

What type of sausage is best?

Smoked sausage (like kielbasa) adds depth, but Italian sausage or chicken sausage work too. For more sausage inspiration, see Simply Recipes’ sausage guide.

Can I add other vegetables?

Yes! Bell peppers, onions, or Brussels sprouts roast beautifully alongside the sweet potatoes.

There you have it—a dish that’s as easy to make as it is delicious. Whether you’re cooking for a crowd or just need a no-fuss dinner, this Sausage and Sweet Potatoes with Honey Garlic Sauce is sure to become a favorite. It’s the kind of meal that feels special without the effort, and honestly, isn’t that what we all need more of? Now go grab that skillet and treat yourself to something tasty tonight.

Creamy Chicken and Corn Pasta with Bacon

Creamy Chicken and Corn Pasta with Bacon: A Comforting Weeknight Favorite

There’s something magical about a pasta dish that’s creamy, hearty, and packed with flavor—especially when it comes together in under 30 minutes. This Creamy Chicken and Corn Pasta with Bacon is the kind of meal that feels like a warm hug after a long day. Whether you’re juggling work, kids, or just life’s endless to-do list, this recipe is here to save your dinner plans without sacrificing taste or comfort.

Imagine tender chunks of chicken, sweet corn, and crispy bacon all tossed in a velvety sauce that clings perfectly to al dente pasta. It’s the kind of dish that’ll have everyone at the table asking for seconds. Plus, it’s versatile! Swap in seasonal veggies, use leftover rotisserie chicken, or even make it spicy with a dash of red pepper flakes. The best part? You probably already have most of the ingredients in your pantry or fridge. If you love easy, satisfying meals, you’ll adore this creamy pasta recipe as much as I do!

Why You’ll Love This Creamy Chicken and Corn Pasta

This dish checks all the boxes: quick, flavorful, and family-friendly. Here’s why it’s a winner:

  • Quick & Easy: Ready in 30 minutes—perfect for busy weeknights.
  • Comfort Food Upgrade: Creamy, smoky, and slightly sweet flavors that feel indulgent.
  • Pantry-Friendly: Uses simple ingredients you likely already have.
  • Versatile: Swap proteins or veggies based on what’s in your fridge.

How to Make Creamy Chicken and Corn Pasta with Bacon

Ingredients You’ll Need

  • 8 oz pasta (penne or fettuccine work great)
  • 4 slices bacon, chopped
  • 1 lb chicken breast, diced
  • 1 cup sweet corn (fresh, frozen, or canned)
  • 2 cloves garlic, minced
  • 1 cup heavy cream
  • ½ cup grated Parmesan cheese
  • Salt, pepper, and a pinch of red pepper flakes (optional)
  • Fresh parsley for garnish

Step-by-Step Instructions

  1. Cook the Pasta: Boil pasta according to package instructions. Reserve ½ cup pasta water before draining.
  2. Crisp the Bacon: In a large skillet, cook bacon until crispy. Remove and set aside, leaving the drippings in the pan.
  3. Sauté the Chicken: Cook chicken in the bacon fat until golden and cooked through. Season with salt and pepper.
  4. Add Corn & Garlic: Stir in corn and garlic, cooking for 2 minutes until fragrant.
  5. Make the Sauce: Pour in heavy cream and Parmesan, stirring until smooth. Add pasta water as needed to thin the sauce.
  6. Combine & Serve: Toss in cooked pasta and bacon. Garnish with fresh parsley and extra Parmesan.

Tips for the Best Creamy Pasta

Want to take this dish to the next level? Try these pro tips:

  • Don’t Skip the Pasta Water: The starchy water helps the sauce cling to the noodles.
  • Use Fresh Corn in Season: It adds a burst of sweetness. Frozen works great too!
  • Prep Ahead: Cook bacon and chicken in advance for even faster assembly.
  • Make It Spicy: Add a pinch of red pepper flakes for a subtle kick.

If you’re a fan of creamy pasta dishes, you’ll also love this Garlic Parmesan Pasta for another quick dinner idea.

Frequently Asked Questions

Can I use milk instead of heavy cream?

Yes, but the sauce won’t be as rich. For a lighter option, try half-and-half or evaporated milk.

What pasta works best for this recipe?

Short pastas like penne or fusilli hold the sauce well, but fettuccine or linguine also work.

Can I make this creamy chicken pasta ahead?

Absolutely! Store it in the fridge for up to 3 days. Reheat with a splash of milk to loosen the sauce.

Is there a substitute for bacon?

Try pancetta or smoked turkey bacon for a similar smoky flavor. For a vegetarian option, skip it and use a bit of smoked paprika.

Can I add other vegetables?

Definitely! Spinach, mushrooms, or bell peppers would be delicious additions.

How do I prevent the sauce from curdling?

Keep the heat low when adding dairy, and stir constantly. For more tips, check out this guide to creamy pasta sauces.

There you have it—a creamy, dreamy pasta dish that’s as easy to make as it is delicious. Whether you’re cooking for a crowd or just treating yourself, this Creamy Chicken and Corn Pasta with Bacon is sure to become a regular in your rotation. Pair it with a crisp salad or garlic bread, and dinner is served! And if you’re looking for more cozy recipes, don’t miss this roundup of comfort food favorites.

Crispy Honey Garlic Salmon Bites – 25 Minutes

Crispy Honey Garlic Salmon Bites – 25 Minutes

Ever have one of those nights where you’re staring into the fridge, willing dinner to magically appear? You want something fast, flavorful, and—let’s be honest—something that doesn’t involve another sad bowl of cereal. Enter these Crispy Honey Garlic Salmon Bites, your new 25-minute weeknight hero. With golden, crispy edges, a sticky-sweet glaze, and the perfect balance of savory garlic, this dish is here to rescue you from takeout menus and mealtime monotony.

I first stumbled upon this recipe during a chaotic Wednesday when my toddler declared broccoli “too green” and my patience was running thinner than the last slice of bread in the bag. I needed a win, and these salmon bites delivered. They’re forgiving (no fancy knife skills required), packed with protein, and—bonus—they’re kid-approved. Plus, that honey garlic sauce? It’s the kind of flavor that makes you sneak an extra bite straight from the pan. (No judgment here.)

Why You’ll Love These Salmon Bites

This recipe isn’t just fast—it’s a game-changer for busy cooks. Here’s why:

  • Weeknight-friendly: Ready in 25 minutes flat, from fridge to plate.
  • Minimal cleanup: One skillet, one bowl, and you’re done.
  • Versatile: Serve over rice, quinoa, or even tucked into tacos.
  • Healthy-ish: Salmon’s omega-3s + a glaze you can feel good about.

How to Make Crispy Honey Garlic Salmon Bites

Ingredients You’ll Need

  • 1 lb salmon fillet, skin removed, cut into 1-inch cubes
  • 2 tbsp cornstarch (for that irresistible crispiness)
  • 3 tbsp honey
  • 3 garlic cloves, minced
  • 2 tbsp soy sauce (or tamari for gluten-free)
  • 1 tbsp rice vinegar
  • 1 tsp sesame oil
  • 1 tbsp olive oil
  • Green onions & sesame seeds for garnish

Step-by-Step Instructions

  1. Coat the salmon: Toss salmon cubes with cornstarch until evenly coated. This is the secret to crispy edges!
  2. Pan-fry: Heat olive oil in a skillet over medium-high. Cook salmon bites for 2–3 minutes per side until golden. Remove from pan.
  3. Make the sauce: In the same skillet, add garlic, honey, soy sauce, rice vinegar, and sesame oil. Simmer 1–2 minutes until slightly thickened.
  4. Glaze & serve: Return salmon to the pan, toss in sauce, and garnish with green onions and sesame seeds. Devour immediately!

Recipe Tips & Tricks

Don’t overcrowd the pan: Cook salmon in batches if needed—steamy salmon won’t crisp up.
Swap the sweetener: Maple syrup works if you’re out of honey (though the flavor will be slightly deeper).
Spice it up: Add a pinch of red pepper flakes to the sauce for a kick.
Leftovers? Store in an airtight container for up to 2 days—though they’re best fresh!

What to Serve With Salmon Bites

Pair these bites with garlic butter rice for ultimate comfort, or keep it light with a crunchy Asian cucumber salad. For more quick seafood ideas, check out our 15-minute shrimp stir-fry.

Frequently Asked Questions

Can I use frozen salmon? Yes! Thaw completely and pat dry—excess moisture is the enemy of crispiness.

Is there a substitute for cornstarch? Arrowroot powder or tapioca starch will work in a pinch.

How do I know when salmon is cooked? The internal temperature should reach 145°F, or the flesh will flake easily.

Can I bake these instead? Absolutely! Bake at 400°F for 12–15 minutes, then toss with sauce.

What if my sauce is too thick? Stir in 1–2 tsp of water or broth to thin it.

Can I make this with chicken? Yes! Swap salmon for chicken breast cubes and adjust cooking time as needed.

There you have it—a dinner that’s faster than delivery and twice as satisfying. These salmon bites are proof that great flavor doesn’t need hours in the kitchen. Whether you’re cooking for one or feeding a crowd, this recipe is bound to earn a permanent spot in your rotation. Now, go forth and conquer that skillet! (And maybe hide a few extra bites for yourself—you deserve it.)