Mini Bloomin Pearl Onions

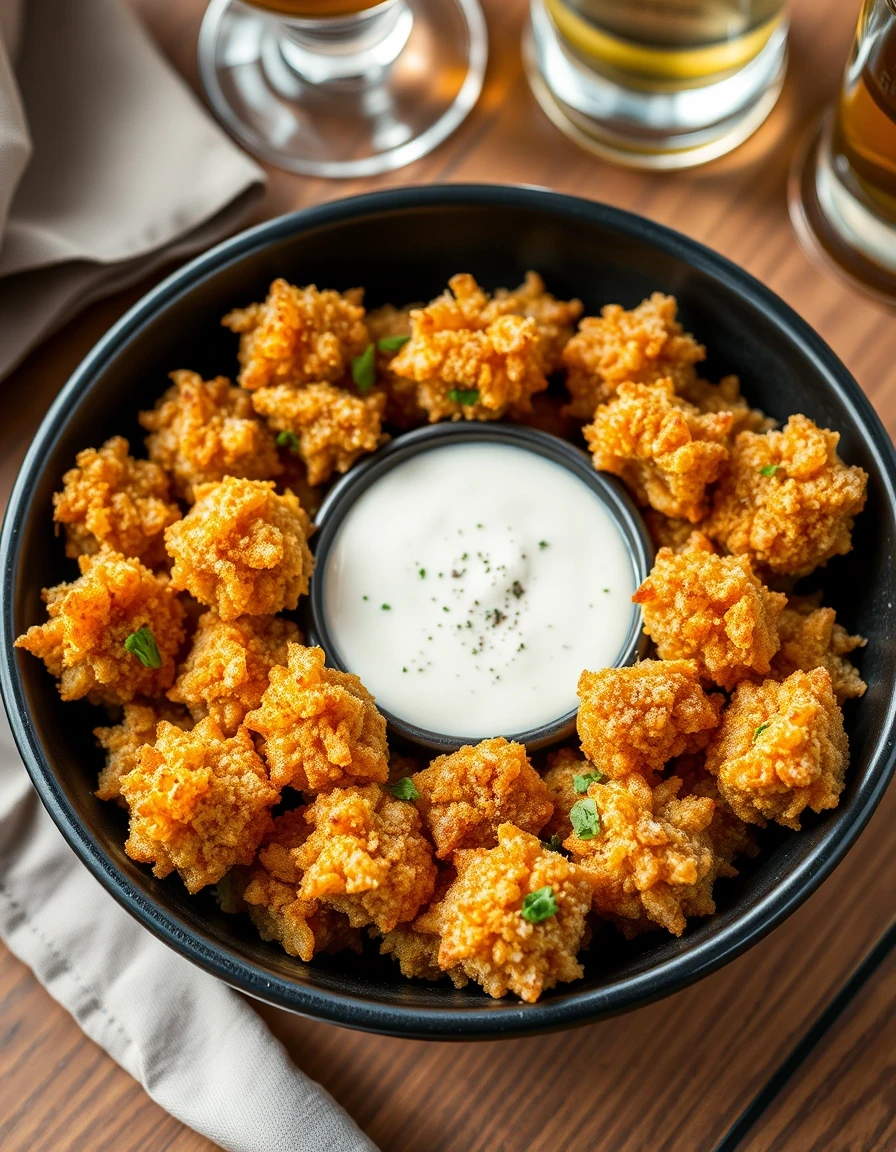
Mini Bloomin Pearl Onions: A Bite-Sized Twist on a Classic Appetizer

There’s something undeniably fun about food that’s both delicious and playful. If you’ve ever indulged in a bloomin’ onion at your favorite steakhouse, you know exactly what I mean—that crispy, golden, petal-like exterior with a tender, savory center is downright addictive. But let’s be honest: making a full-sized bloomin’ onion at home can feel a little intimidating (not to mention messy!). That’s where these Mini Bloomin Pearl Onions come in. They’re bite-sized, easy to handle, and just as satisfying—perfect for game day, parties, or even a cozy night in with a side of your favorite dipping sauce.

I first stumbled upon the idea for these little gems while prepping for a girls’ night in. I wanted something shareable, crunchy, and a little unexpected—without the hassle of deep-frying a giant onion. Pearl onions, with their naturally sweet flavor and petite size, were the perfect solution. After a few test batches (and a couple of happy taste-testers), I landed on this simple yet impressive recipe. Whether you’re a seasoned home cook or just dipping your toes into frying, these mini bloomin’ onions are sure to be a hit. Plus, they pair beautifully with a cold beer or a glass of sparkling wine—because why not make snack time a little fancy?

Why You’ll Love These Mini Bloomin Pearl Onions

If you need a little more convincing (though I doubt you will after the first bite!), here’s why this recipe deserves a spot in your appetizer rotation:

  • Perfect for sharing: No knives or forks needed—just grab and dip!
  • Quick to make: Unlike their full-sized counterpart, these cook in just minutes.
  • Customizable: Swap out the spices or dipping sauce to match your mood.
  • Crowd-pleaser: Kids and adults alike go crazy for these crispy little bites.

How to Make Mini Bloomin Pearl Onions

Ingredients You’ll Need

  • 1 lb pearl onions (peeled)
  • 1 cup buttermilk
  • 1 cup all-purpose flour
  • 1 tsp paprika
  • 1 tsp garlic powder
  • 1/2 tsp cayenne pepper (optional)
  • 1 tsp salt
  • Vegetable oil (for frying)

Step-by-Step Instructions

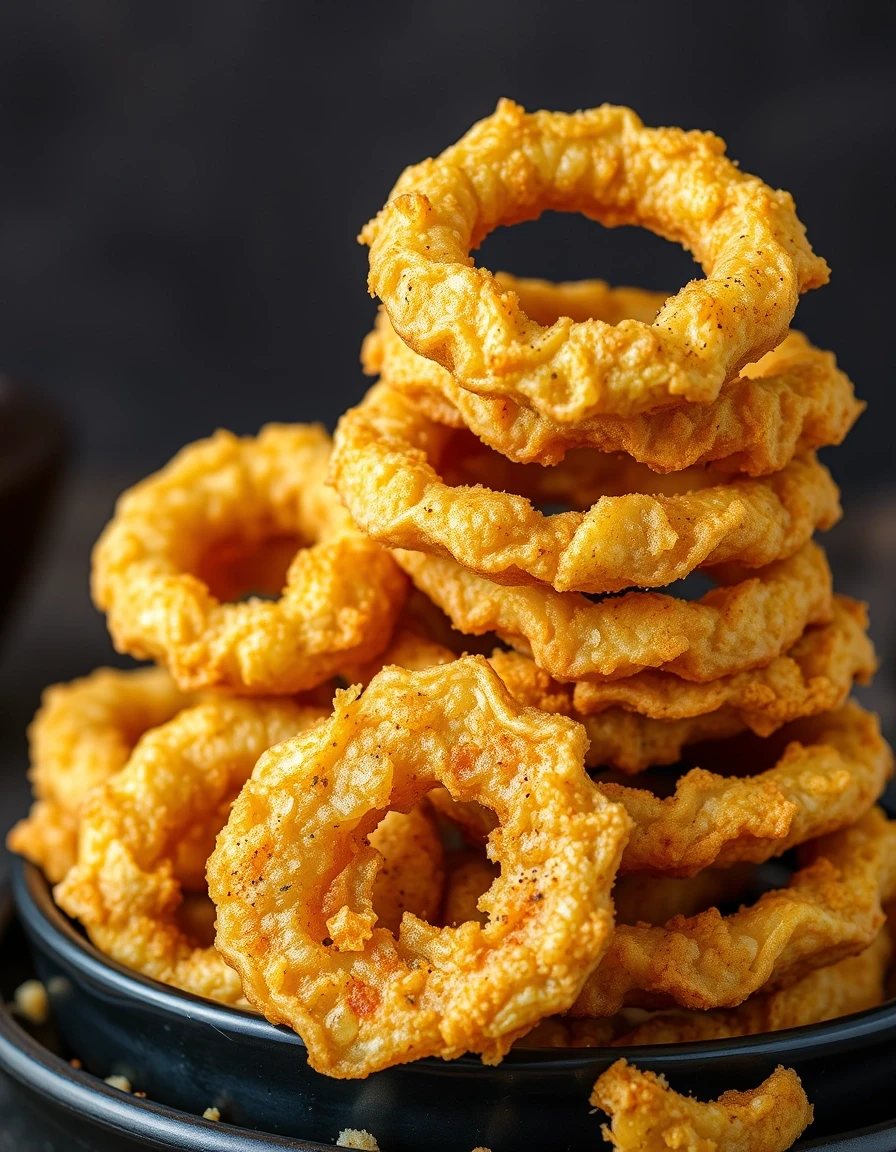
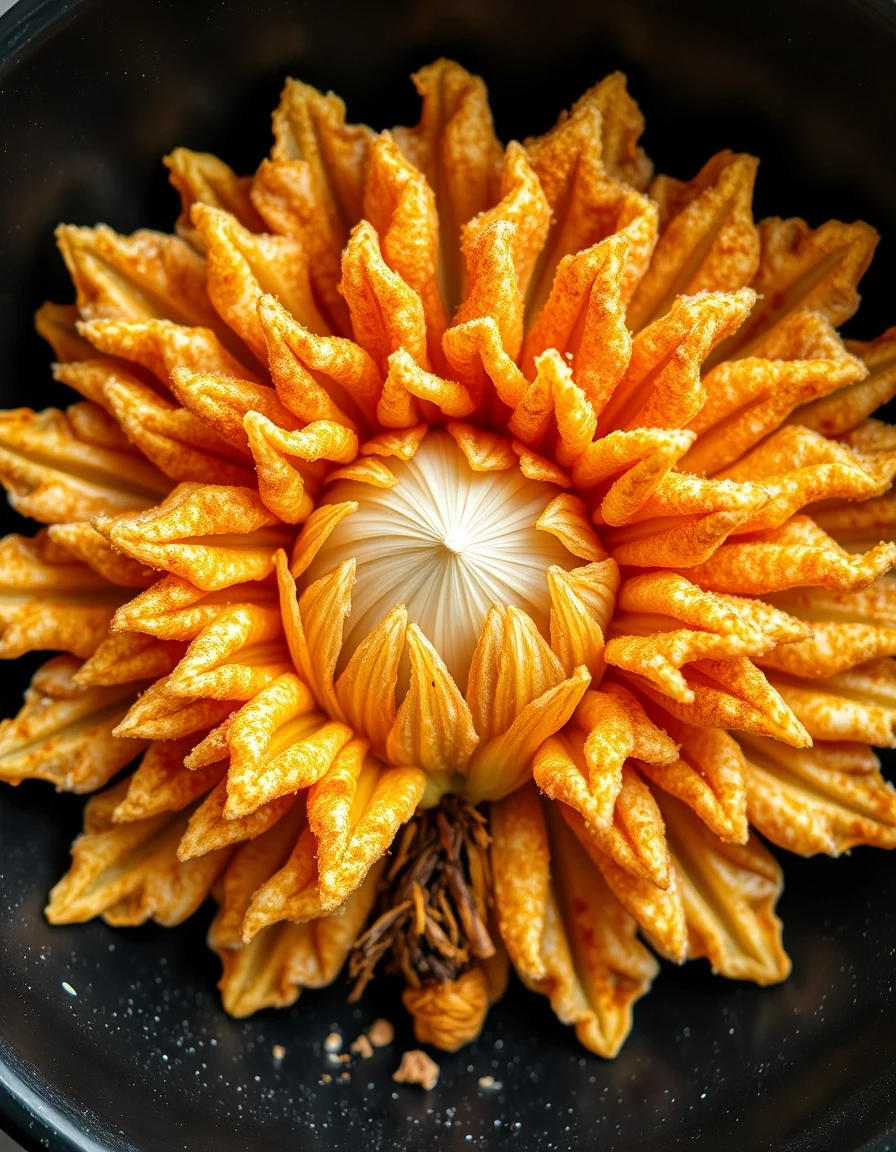
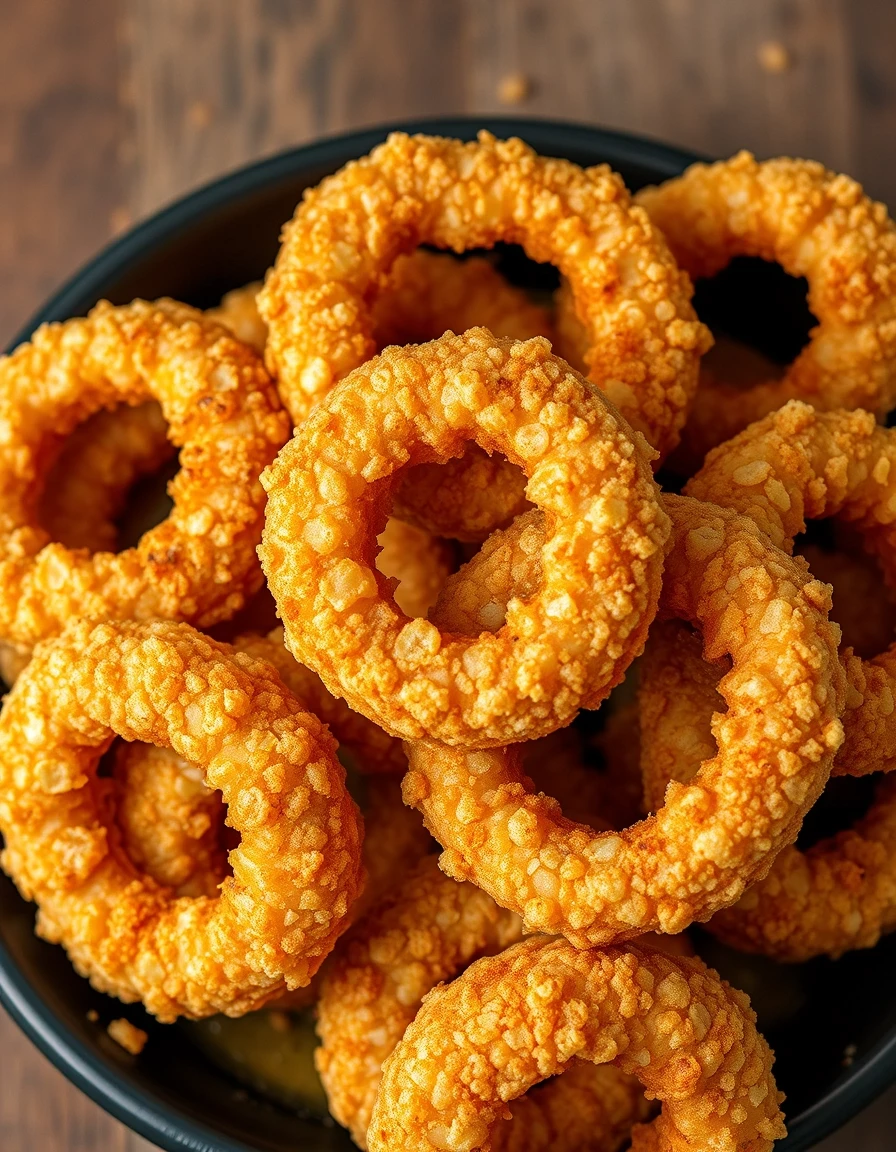
  1. Prep the onions: After peeling, slice off the root end of each onion, then make vertical cuts from the top down, stopping about 1/4 inch from the base to create “petals.”
  2. Soak: Place the onions in a bowl of buttermilk and let them soak for at least 15 minutes (this helps tenderize them and ensures the coating sticks).
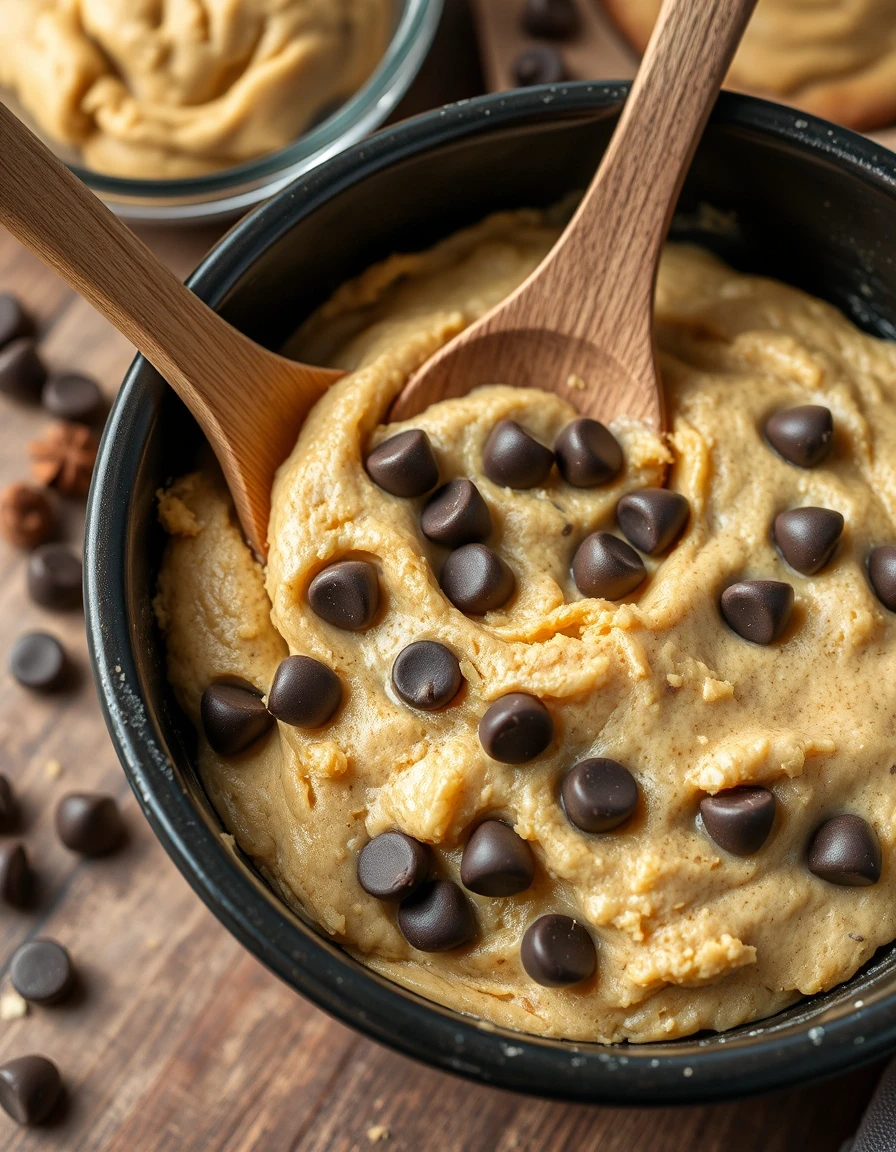
  3. Coat: In a separate bowl, mix flour, paprika, garlic powder, cayenne, and salt. Remove onions from buttermilk, shake off excess, and dredge in the flour mixture.
  4. Fry: Heat oil in a deep skillet to 375°F. Fry onions in batches for 2–3 minutes until golden brown. Drain on paper towels.
  5. Serve: Enjoy immediately with ranch, spicy mayo, or your favorite dip!

Tips for the Best Mini Bloomin Onions

Want to take your mini bloomin’ onions to the next level? Here are a few pro tips:

  • Peeling hack: To make peeling pearl onions easier, blanch them in boiling water for 30 seconds, then transfer to ice water—the skins will slip right off!
  • Double-dip: For extra crunch, dip the onions back into the buttermilk and flour mixture a second time before frying.
  • Air fryer option: For a lighter version, spray coated onions with oil and air fry at 400°F for 10–12 minutes, flipping halfway.

Frequently Asked Questions

Can I make mini bloomin onions ahead of time?
While they’re best fresh, you can prep the onions (peel and cut) a day in advance and store them in the fridge in buttermilk.

What’s the best dipping sauce for bloomin onions?
Classic ranch or spicy remoulade are my go-tos, but try this sriracha mayo for a kick!

Can I use frozen pearl onions?
Yes! Thaw them completely and pat dry before using to avoid excess moisture.

How do I store leftovers?
Store in an airtight container in the fridge for up to 2 days. Reheat in the oven or air fryer to restore crispiness.

Can I bake instead of fry?
Absolutely! Bake at 425°F on a greased sheet for 15–20 minutes, flipping once.

What’s a good substitute for buttermilk?
Mix 1 cup milk with 1 tbsp lemon juice or vinegar and let it sit for 5 minutes.

There you have it—a fun, fuss-free way to enjoy the flavors of a bloomin’ onion without the commitment (or the giant fryer mess!). Whether you’re hosting friends or just treating yourself, these Mini Bloomin Pearl Onions are sure to bring a smile to your table. For more easy party snacks, check out my 3-ingredient appetizers or this pearl onion peeling guide from Serious Eats. Happy snacking!

Print
clock clock iconcutlery cutlery iconflag flag iconfolder folder iconinstagram instagram iconpinterest pinterest iconfacebook facebook iconprint print iconsquares squares iconheart heart iconheart solid heart solid icon

Mini Bloomin Pearl Onions

  • Author: Chef Inspired

Description

A delightful twist on the classic bloomin’ onion, these mini versions use sweet pearl onions for a bite-sized appetizer that’s crispy, flavorful, and perfect for sharing.


Ingredients

Scale

For the Crust:

  • For the onions:
  • 1 pound pearl onions, peeled
  • 1 cup buttermilk
  • 1 teaspoon hot sauce
  • For the coating:
  • 1 cup all-purpose flour
  • 1/2 cup cornstarch
  • 1 tablespoon paprika
  • 1 teaspoon garlic powder
  • 1 teaspoon onion powder
  • 1/2 teaspoon cayenne pepper
  • 1 teaspoon salt
  • 1/2 teaspoon black pepper
  • For frying:
  • Vegetable oil, for deep frying
  • For the dipping sauce:
  • 1/2 cup mayonnaise
  • 2 tablespoons ketchup
  • 1 tablespoon horseradish
  • 1/2 teaspoon paprika
  • 1/4 teaspoon garlic powder
  • 1/4 teaspoon salt
  • 1/4 teaspoon black pepper

Instructions

1. Prepare the Crust:

  1. 1. Prepare the onions: In a bowl, whisk together buttermilk and hot sauce. Add peeled pearl onions, ensuring they’re fully submerged. Cover and refrigerate for at least 1 hour, or overnight for best results.
  2. 2. Make the coating: In another bowl, combine flour, cornstarch, paprika, garlic powder, onion powder, cayenne, salt, and black pepper. Mix well.
  3. 3. Heat oil: In a deep fryer or heavy-bottomed pot, heat vegetable oil to 375°F (190°C).
  4. 4. Coat the onions: Remove onions from buttermilk, allowing excess to drip off. Dredge in the flour mixture, pressing gently to adhere. Shake off excess.
  5. 5. Fry the onions: Working in batches, carefully lower onions into hot oil. Fry for 2-3 minutes until golden brown and crispy. Remove with a slotted spoon and drain on paper towels.
  6. 6. Make the sauce: While onions fry, whisk together mayonnaise, ketchup, horseradish, paprika, garlic powder, salt, and pepper in a small bowl.
  7. 7. Serve immediately with the dipping sauce on the side.

Notes

For easier peeling, blanch pearl onions in boiling water for 30 seconds, then transfer to ice water. The skins will slip right off. If you prefer a milder flavor, reduce the amount of cayenne pepper in the coating.

When these came out of the oven, my hubby couldn’t help but eat 6 all own his own!

When These Came Out of the Oven, My Hubby Couldn’t Help But Eat 6 All on His Own!

There’s something magical about a recipe that makes your loved ones forget all about moderation. You know the kind—the one where the first bite leads to a second, and before you know it, half the batch has vanished. That’s exactly what happened when I pulled these golden, buttery delights out of the oven. My husband, who usually has impeccable self-control around sweets, shamelessly polished off six before I could even snap a photo for the blog!

If you’ve ever needed a guaranteed crowd-pleaser—whether for a cozy family breakfast, a potluck, or just because—this recipe is your golden ticket. It’s simple, forgiving, and packed with that nostalgic comfort we all crave. Plus, it’s the kind of dish that’ll have your people hovering around the kitchen, sneaking bites and pretending they’re “just taste-testing.” Spoiler: They won’t stop at one.

Why You’ll Love This Recipe

This isn’t just another baked good—it’s a memory-maker. Here’s why it’s earned a permanent spot in my recipe box:

  • Irresistibly buttery with the perfect hint of sweetness.
  • Easy to customize—add chocolate chips, nuts, or a drizzle of glaze.
  • Quick to prepare (no fancy techniques required!).
  • Kid-approved (and let’s be honest, adult-approved too).

How to Make These Addictive Treats

Ingredients You’ll Need

  • 2 cups all-purpose flour
  • 1/2 cup granulated sugar
  • 1 tbsp baking powder
  • 1/2 tsp salt
  • 1/2 cup unsalted butter, melted
  • 3/4 cup whole milk
  • 1 tsp vanilla extract
  • 1 large egg

Step-by-Step Instructions

  1. Preheat your oven to 375°F (190°C) and grease a baking sheet.
  2. In a large bowl, whisk together the flour, sugar, baking powder, and salt.
  3. In another bowl, mix the melted butter, milk, vanilla, and egg until smooth.
  4. Pour the wet ingredients into the dry ingredients and stir until just combined (don’t overmix!).
  5. Drop spoonfuls of dough onto the baking sheet and bake for 12–15 minutes, or until golden.
  6. Let cool slightly—or don’t, because warm is heavenly.

Tips for the Best Results

Want to take these from great to unforgettable? Try these pro tips:

  • Use room-temperature ingredients for a smoother batter.
  • Fold in extras like blueberries or cinnamon for a fun twist.
  • Don’t peek! Opening the oven too early can cause uneven baking.

For more baking inspiration, check out my guide to perfect muffins every time or this science of baking deep dive from King Arthur Baking.

Frequently Asked Questions

Can I make these gluten-free? Absolutely! Swap the all-purpose flour for a 1:1 gluten-free blend.

How do I store leftovers? Keep them in an airtight container for up to 3 days (if they last that long!).

Can I freeze the dough? Yes! Portion it into balls and freeze for up to 3 months. Bake straight from frozen, adding a few extra minutes.

Why did mine turn out dense? Overmixing is the usual culprit—stir until just combined.

Can I use buttermilk instead? Definitely! It adds a lovely tang and tenderness.

What’s the best way to reheat them? A quick 10-second zap in the microwave or a warm oven brings them back to life.

There you have it—the recipe that turned my usually disciplined husband into a shameless snack thief. Whether you’re baking for a lazy Sunday morning or a last-minute gathering, these little bites of joy never disappoint. And hey, if someone in your family “accidentally” eats half the batch? Consider it the highest compliment. Happy baking!

Print
clock clock iconcutlery cutlery iconflag flag iconfolder folder iconinstagram instagram iconpinterest pinterest iconfacebook facebook iconprint print iconsquares squares iconheart heart iconheart solid heart solid icon

When these came out of the oven, my hubby couldn’t help but eat 6 all on his own!

  • Author: Anonymous Home Cook

Description

These irresistible treats are so delicious that they disappear quickly! Perfectly crispy on the outside and soft on the inside, they’re a family favorite that will have everyone reaching for more.


Ingredients

Scale

For the Crust:

  • For the dough:
  • 2 cups all-purpose flour
  • 1/2 cup granulated sugar
  • 1 tsp baking powder
  • 1/2 tsp salt
  • 1/2 cup unsalted butter, melted
  • 1 large egg
  • 1 tsp vanilla extract
  • For the filling:
  • 1/2 cup brown sugar
  • 1 tsp ground cinnamon
  • 2 tbsp unsalted butter, softened
  • For the glaze:
  • 1 cup powdered sugar
  • 2 tbsp milk
  • 1/2 tsp vanilla extract

Instructions

1. Prepare the Crust:

  1. Preheat oven to 350°F (175°C) and line a baking sheet with parchment paper.
  2. In a large bowl, whisk together flour, granulated sugar, baking powder, and salt.
  3. Add melted butter, egg, and vanilla extract to the dry ingredients. Mix until a soft dough forms.
  4. In a small bowl, combine brown sugar, cinnamon, and softened butter to make the filling.
  5. Roll out the dough into a rectangle on a floured surface. Spread the filling evenly over the dough.
  6. Roll the dough tightly into a log and slice into 12 equal pieces.
  7. Place the slices on the prepared baking sheet and bake for 20-25 minutes, or until golden brown.
  8. While the treats cool, whisk together powdered sugar, milk, and vanilla extract to make the glaze.
  9. Drizzle the glaze over the warm treats and serve immediately.

Notes

Store leftovers in an airtight container for up to 3 days. Reheat in the microwave for 10 seconds to restore softness.

How To Make Perfect, Extra Crispy Homemade Onion Rings From Scratch


How To Make Perfect, Extra Crispy Homemade Onion Rings From Scratch

There’s something undeniably magical about biting into a golden, extra crispy onion ring—the kind that shatters with the perfect crunch, revealing a sweet, tender onion inside. Whether you’re serving them as a side for burgers, stacking them high for game day, or just treating yourself to a little indulgence, homemade onion rings are a game-changer. And here’s the best part: you don’t need a deep fryer or any fancy equipment to make them restaurant-worthy at home.

I’ll admit, my first attempt at onion rings was… well, let’s just say they were more “soggy” than “snappy.” But after years of tweaking (and maybe a few stubborn kitchen meltdowns), I’ve cracked the code for the crispiest, most irresistible rings. The secret? A double-dredge technique, the right oil temperature, and one unexpected pantry staple that guarantees crunch. Trust me, once you try this method, you’ll never go back to the freezer aisle again.

Why You’ll Love These Homemade Onion Rings

These aren’t just any onion rings—they’re the kind that’ll have everyone asking for your recipe. Here’s why they’re a must-make:

  • Unbeatable crunch: Thanks to a crispy panko breadcrumb coating.
  • Sweet & tender onions: No raw, overpowering bites here.
  • Easy to customize: Add smoked paprika, cayenne, or grated Parmesan to the breading.
  • Better than takeout: Fresh, hot, and free of mystery ingredients.

How To Make Extra Crispy Onion Rings (Step-by-Step)

Ingredients You’ll Need

  • 2 large sweet onions (like Vidalia)
  • 1 cup buttermilk (or milk + 1 tbsp vinegar)
  • 1 cup all-purpose flour
  • 1 cup panko breadcrumbs
  • 1 tsp garlic powder
  • 1 tsp smoked paprika (optional)
  • Oil for frying (vegetable or peanut oil works best)

The Secret to Crispy Success

The key is the double-dredge method: dip rings in flour, then buttermilk, then flour again, and finally panko. This creates layers that crisp up beautifully. For extra insurance, let the coated rings rest on a wire rack for 10 minutes before frying—this helps the coating adhere.

Another pro tip? Use a thermometer to monitor oil temperature (ideal is 375°F). Too cool, and your rings will be greasy; too hot, and they’ll burn before cooking through.

Serving Suggestions

Pair these onion rings with a zesty burger sauce or cool ranch dip. They’re also fantastic alongside homemade burgers or piled atop a crunchy salad for contrast.

Frequently Asked Questions

Can I bake onion rings instead of frying?
Yes! Arrange breaded rings on a parchment-lined sheet, spray with oil, and bake at 425°F for 15–20 minutes, flipping halfway. They’ll be lighter but still crispy.

What’s the best onion for onion rings?
Sweet onions (Vidalia, Walla Walla) are ideal—they caramelize beautifully and aren’t too pungent.

How do I keep onion rings crispy after frying?
Place them on a wire rack (not paper towels) to prevent steaming. For large batches, keep them warm in a 200°F oven.

Can I make onion rings gluten-free?
Swap flour for GF flour blend and use gluten-free panko breadcrumbs.

Why do my onion rings fall apart when frying?
The coating may be too thin. Ensure each ring is fully coated in each layer, and let them rest before frying.

How long do homemade onion rings last?
They’re best eaten immediately, but leftovers can be reheated in an air fryer for 3–4 minutes.

There you have it—the ultimate guide to onion rings that’ll rival your favorite diner’s. Whether it’s a summer cookout or a cozy night in with a movie, these crispy golden rings are always a good idea. And if you’re craving more crunchy favorites, try my oven-baked zucchini fries next. Happy frying!


Print
clock clock iconcutlery cutlery iconflag flag iconfolder folder iconinstagram instagram iconpinterest pinterest iconfacebook facebook iconprint print iconsquares squares iconheart heart iconheart solid heart solid icon

Perfect, Extra Crispy Homemade Onion Rings From Scratch

  • Author: The Crispy Kitchen

Description

Learn how to make irresistibly crispy homemade onion rings with this foolproof recipe. These golden rings feature a light, crunchy coating that stays crisp for hours, paired with sweet onion slices for the ultimate snack or side dish.


Ingredients

Scale

For the Crust:

  • For the Onions:
  • 2 large sweet onions (Vidalia or Walla Walla preferred)
  • 1 cup buttermilk
  • 1 tbsp hot sauce (optional)
  • For the Dry Coating:
  • 1.5 cups all-purpose flour
  • 1/2 cup cornstarch
  • 2 tsp paprika
  • 1 tsp garlic powder
  • 1 tsp onion powder
  • 1.5 tsp salt
  • 1/2 tsp black pepper
  • For the Wet Batter:
  • 1 cup buttermilk
  • 1 large egg
  • 1 tbsp hot sauce
  • For Frying:
  • 4 cups neutral oil (vegetable, canola, or peanut)

Instructions

1. Prepare the Crust:

  1. 1. Prep Onions: Peel onions and slice into 1/2-inch thick rings. Separate rings and discard small center pieces.
  2. 2. First Soak: In a bowl, mix 1 cup buttermilk with hot sauce. Add onion rings, ensuring all are submerged. Let soak 30 minutes at room temperature.
  3. 3. Make Dry Mix: Whisk together flour, cornstarch, paprika, garlic powder, onion powder, salt, and pepper in a shallow dish.
  4. 4. Make Wet Batter: In another bowl, whisk 1 cup buttermilk, egg, and hot sauce until smooth.
  5. 5. Double Coat: Remove onion rings from buttermilk soak. First dredge in dry mix, shaking off excess. Then dip in wet batter, letting excess drip off. Finally, coat again in dry mix, pressing gently to adhere.
  6. 6. Heat Oil: In a heavy pot or Dutch oven, heat oil to 375°F (190°C). Use a thermometer for accuracy.
  7. 7. Fry: Working in batches, fry rings 2-3 minutes until golden brown, flipping once. Don’t overcrowd the pot.
  8. 8. Drain: Transfer to a wire rack set over a baking sheet. Sprinkle immediately with salt.
  9. 9. Serve hot with your favorite dipping sauce.

Notes

• For extra crispiness, let coated rings rest 5 minutes before frying.
• Maintain oil temperature between 365-375°F for best results.
• Leftovers can be reheated in a 400°F oven for 5 minutes to regain crispness.

Air Fryer Blooming Onion Recipe


Air Fryer Blooming Onion Recipe: Crispy, Fun & Healthier Than Fried!

There’s something undeniably fun about a blooming onion—the crispy petals, the savory dip, the way it turns a humble veggie into a showstopping appetizer. But let’s be honest: deep-frying at home can feel messy, intimidating, and, well, a little greasy. That’s where this Air Fryer Blooming Onion Recipe comes in! With all the crunch and flavor of the classic, but way less oil (and way more confidence for the cook), it’s a game-changer for snack time.

I first tried making a blooming onion years ago for a game-day party. Let’s just say… it didn’t bloom. The petals stuck together, the oil spattered everywhere, and my smoke detector became the uninvited guest of honor. Fast-forward to my air fryer era, and suddenly, this intimidating appetizer became approachable—even for weeknights! Whether you’re hosting friends, treating the family, or just craving something crispy, this recipe is your ticket to golden, restaurant-worthy goodness without the fuss.

Why You’ll Love This Air Fryer Blooming Onion

If you’re on the fence about trying this recipe, here’s why it’s a must-make:

  • Healthier than deep-fried: Uses just a fraction of the oil for the same satisfying crunch.
  • Foolproof blooming: Simple cutting tips ensure those petals fan out perfectly.
  • Quick cook time: Ready in under 20 minutes—no waiting for a vat of oil to heat up.
  • Versatile dipping: Pair with spicy mayo, ranch, or even a tangy homemade BBQ sauce.

How to Make an Air Fryer Blooming Onion

Ingredients You’ll Need

  • 1 large sweet onion (like Vidalia)
  • 1/2 cup all-purpose flour
  • 1 tsp paprika
  • 1/2 tsp garlic powder
  • 1/2 tsp salt
  • 1/4 tsp black pepper
  • 1 egg
  • 1/4 cup milk
  • Cooking spray or 1 tbsp olive oil

Step-by-Step Instructions

  1. Prep the onion: Trim the top (stem end) about 1/2 inch, leaving the root intact. Peel the onion, then place it root-side down. Make 12–16 vertical cuts from the top down, stopping 1/2 inch from the root to keep it intact.
  2. Soak & coat: Gently spread the petals apart. In one bowl, mix flour and spices. In another, whisk egg and milk. Dip the onion in the egg mix, then the flour mix, pressing to coat between petals.
  3. Air fry: Spritz with oil and air fry at 375°F for 10–12 minutes until golden. For extra crispiness, spritz again halfway through.

Tips for the Perfect Bloom

Want to avoid my early onion fail days? Here’s what I’ve learned:

  • Choose the right onion: Large, round sweet onions work best—they’re easier to cut and milder in flavor.
  • Use a sharp knife: A dull blade can crush the petals instead of slicing cleanly.
  • Don’t skip the soak: Letting the onion sit in ice water for 10 minutes after cutting helps the petals open up.
  • Double-dip for extra crunch: For a thicker coating, repeat the egg and flour steps.

Air Fryer Blooming Onion FAQs

Can I use gluten-free flour?

Yes! A 1:1 gluten-free flour blend works well. For extra crispiness, add 1 tbsp cornstarch to the mix.

Why won’t my onion bloom?

Usually, it’s because the cuts aren’t deep enough or the root isn’t left intact. Check out this guide for visual help.

Can I make this in advance?

Prep the onion up to 2 hours ahead (store in the fridge), but air fry just before serving for maximum crispiness.

What’s the best dipping sauce?

Try my creamy avocado dressing or a classic spicy mayo (mix mayo with hot sauce and a squeeze of lemon).

Can I use an oven instead?

Yes! Bake at 400°F on a rack for 20–25 minutes, flipping halfway. It won’t be as crispy, though.

How do I store leftovers?

Reheat in the air fryer at 350°F for 3–5 minutes. Avoid microwaving—it turns soggy fast.

There you have it—a blooming onion that’s as fun to make as it is to eat! Whether you’re serving it up for a party or just treating yourself (no judgment here), this air fryer version lets you enjoy all the crunch without the cleanup. Pair it with your favorite dip, maybe a refreshing margarita, and dig in while it’s hot. Happy air frying!


Print
clock clock iconcutlery cutlery iconflag flag iconfolder folder iconinstagram instagram iconpinterest pinterest iconfacebook facebook iconprint print iconsquares squares iconheart heart iconheart solid heart solid icon

Air Fryer Blooming Onion

  • Author: Chef Alex

Description

A crispy, golden blooming onion made healthier in the air fryer with a flavorful seasoned coating and a delicious dipping sauce. Perfect as an appetizer or party snack!


Ingredients

Scale

For the Crust:

  • For the Onion:
  • 1 large sweet onion (Vidalia or Texas Sweet preferred)
  • 1 cup buttermilk
  • 1 teaspoon hot sauce (optional)
  • For the Coating:
  • 1 cup all-purpose flour
  • 1/2 cup cornstarch
  • 1 teaspoon paprika
  • 1 teaspoon garlic powder
  • 1 teaspoon onion powder
  • 1/2 teaspoon cayenne pepper
  • 1 teaspoon salt
  • 1/2 teaspoon black pepper
  • For the Dipping Sauce:
  • 1/2 cup mayonnaise
  • 2 tablespoons ketchup
  • 1 tablespoon horseradish
  • 1/2 teaspoon paprika
  • 1/4 teaspoon garlic powder
  • 1/4 teaspoon salt

Instructions

1. Prepare the Crust:

  1. 1. Prepare the Onion: Peel the onion and cut about 1/2 inch off the top. Leave the root end intact. Place the onion cut-side down and make vertical cuts (about 1/2 inch apart) from the top down, stopping about 1/2 inch from the root to keep the onion intact.
  2. 2. Soak the Onion: In a bowl, whisk together buttermilk and hot sauce (if using). Place the onion in the mixture, ensuring it’s fully coated. Let it soak for at least 30 minutes.
  3. 3. Make the Coating: In another bowl, mix flour, cornstarch, paprika, garlic powder, onion powder, cayenne, salt, and black pepper.
  4. 4. Coat the Onion: Remove the onion from the buttermilk, letting excess drip off. Dredge in the flour mixture, ensuring all petals are coated. Shake off excess.
  5. 5. Air Fry: Preheat the air fryer to 375°F (190°C). Lightly spray the onion with cooking oil. Place in the air fryer basket and cook for 10-12 minutes until golden and crispy.
  6. 6. Make the Sauce: While the onion cooks, mix mayonnaise, ketchup, horseradish, paprika, garlic powder, and salt in a small bowl.
  7. 7. Serve: Carefully remove the onion from the air fryer and serve immediately with the dipping sauce.

Notes

For extra crispiness, spray the onion lightly with oil halfway through cooking. If petals stick together, gently separate them after coating. Adjust spices to taste.

Air Fryer Onion Rings


Crispy Air Fryer Onion Rings: A Guilt-Free Snack You’ll Crave

There’s something undeniably comforting about biting into a perfectly crispy onion ring—the crunch, the sweetness of the onion, that hint of savory seasoning. But let’s be honest: deep-fried versions, while delicious, often leave us feeling weighed down. Enter the air fryer, your kitchen’s secret weapon for achieving that same satisfying crunch with a fraction of the oil. Whether you’re hosting game night, craving a burger upgrade, or just need a veggie-packed snack, these Air Fryer Onion Rings are about to become your new obsession.

I first tested this recipe during a late-night snack attack (we’ve all been there). My husband joked that our air fryer deserved its own shrine after one bite. What I love most? Unlike traditional frying, there’s no lingering grease smell, and cleanup takes seconds. Plus, you can customize the seasoning—add smoked paprika for depth or a pinch of cayenne for heat. Ready to make onion rings that’ll rival your favorite diner’s? Let’s get cooking!

Why You’ll Love These Air Fryer Onion Rings

  • Healthier: 75% less oil than deep-fried versions
  • Foolproof: No messy splatters or thermometer required
  • Versatile: Pair with burgers, salads, or eat straight from the basket
  • Kid-approved: A sneaky way to get picky eaters to enjoy veggies

How to Make Air Fryer Onion Rings

Ingredients You’ll Need

  • 1 large sweet onion (Vidalia works great!)
  • 1 cup buttermilk (or almond milk + 1 tbsp vinegar for dairy-free)
  • 1 cup panko breadcrumbs
  • ½ cup all-purpose flour
  • 1 tsp garlic powder
  • ½ tsp smoked paprika
  • Salt and pepper to taste
  • Cooking spray (optional)

Step-by-Step Instructions

  1. Prep the onions: Slice onion into ½-inch rings and separate layers. Soak in buttermilk for 15 minutes (this tenderizes and adds flavor).
  2. Create your coating station: Mix flour and spices in one bowl, pour buttermilk into another, and place panko in a third.
  3. Bread like a pro: Dip each ring in flour (shake off excess), then buttermilk, then panko. Press crumbs gently to adhere.
  4. Air fry: Arrange rings in a single layer (no overlapping!) at 375°F for 8–10 minutes, flipping halfway. Spritz lightly with oil if extra crispiness is desired.

Pro Tips for the Best Onion Rings

Double-dip for extra crunch: After the first coating, repeat the buttermilk and panko steps. This trick, borrowed from my Air Fryer Fried Chicken recipe, creates an irresistible shatter-crisp exterior.

Don’t skip the soak: Buttermilk not only adds tang but also softens the onion’s bite. Short on time? Even a 5-minute soak helps. For more air fryer veggie inspiration, try my Crispy Air Fryer Zucchini.

Air Fryer Onion Rings FAQs

Can I use regular breadcrumbs instead of panko?
Panko’s lighter texture yields crispier results, but regular breadcrumbs work in a pinch—just add 1–2 minutes to cooking time.

How do I store leftovers?
Store in an airtight container for up to 2 days. Reheat in the air fryer at 350°F for 3–4 minutes to revive crispiness.

Why are my onion rings soggy?
Overcrowding the basket traps steam. Cook in batches if needed, and ensure rings aren’t touching. For more troubleshooting, Food Network’s air fryer guide has great tips.

Can I make these gluten-free?
Absolutely! Swap flour for almond flour and use gluten-free panko. Check out my gluten-free air fryer roundup for more ideas.

What dipping sauces work best?
Try sriracha mayo, classic ranch, or this homemade BBQ sauce from Simply Recipes.

Can I freeze uncooked breaded rings?
Yes! Freeze on a parchment-lined tray, then transfer to bags. Cook from frozen, adding 2–3 extra minutes.

Whether you’re serving these alongside juicy burgers (may I suggest my Air Fryer Turkey Burgers?) or enjoying them as a solo snack, these onion rings prove that comfort food can be both indulgent and wholesome. The next time that craving hits, skip the drive-thru—your air fryer’s got you covered. Happy crunching!


Print
clock clock iconcutlery cutlery iconflag flag iconfolder folder iconinstagram instagram iconpinterest pinterest iconfacebook facebook iconprint print iconsquares squares iconheart heart iconheart solid heart solid icon

Air Fryer Onion Rings

  • Author: Chef Crispy

Description

These air fryer onion rings are perfectly crispy on the outside and tender on the inside, with a fraction of the oil used in deep frying. A quick and easy snack or side dish that everyone will love!


Ingredients

Scale

For the Crust:

  • For the onion rings:
  • 1 large sweet onion
  • 1 cup all-purpose flour
  • 1 teaspoon paprika
  • 1 teaspoon garlic powder
  • 1/2 teaspoon salt
  • 1/4 teaspoon black pepper
  • 2 large eggs
  • 1 tablespoon milk
  • 1 cup panko breadcrumbs
  • For serving (optional):
  • 1/2 cup ketchup
  • 1/2 cup ranch dressing

Instructions

1. Prepare the Crust:

  1. 1. Slice the onion into 1/2-inch thick rings and separate them.
  2. 2. In a shallow bowl, mix flour, paprika, garlic powder, salt, and pepper.
  3. 3. In another bowl, whisk eggs and milk together.
  4. 4. Place panko breadcrumbs in a third bowl.
  5. 5. Dredge each onion ring in the flour mixture, then dip in the egg mixture, and finally coat with panko breadcrumbs.
  6. 6. Preheat the air fryer to 375°F (190°C).
  7. 7. Place onion rings in a single layer in the air fryer basket (work in batches if needed).
  8. 8. Lightly spray with cooking oil for extra crispiness.
  9. 9. Air fry for 8-10 minutes, flipping halfway, until golden brown and crispy.
  10. 10. Serve immediately with ketchup or ranch dressing.

Notes

For best results, do not overcrowd the air fryer basket. If your onion rings aren’t crispy enough, try air frying for an additional 1-2 minutes. You can use regular breadcrumbs if panko isn’t available, but panko gives the crispiest texture.