CHEESY ONION RINGS

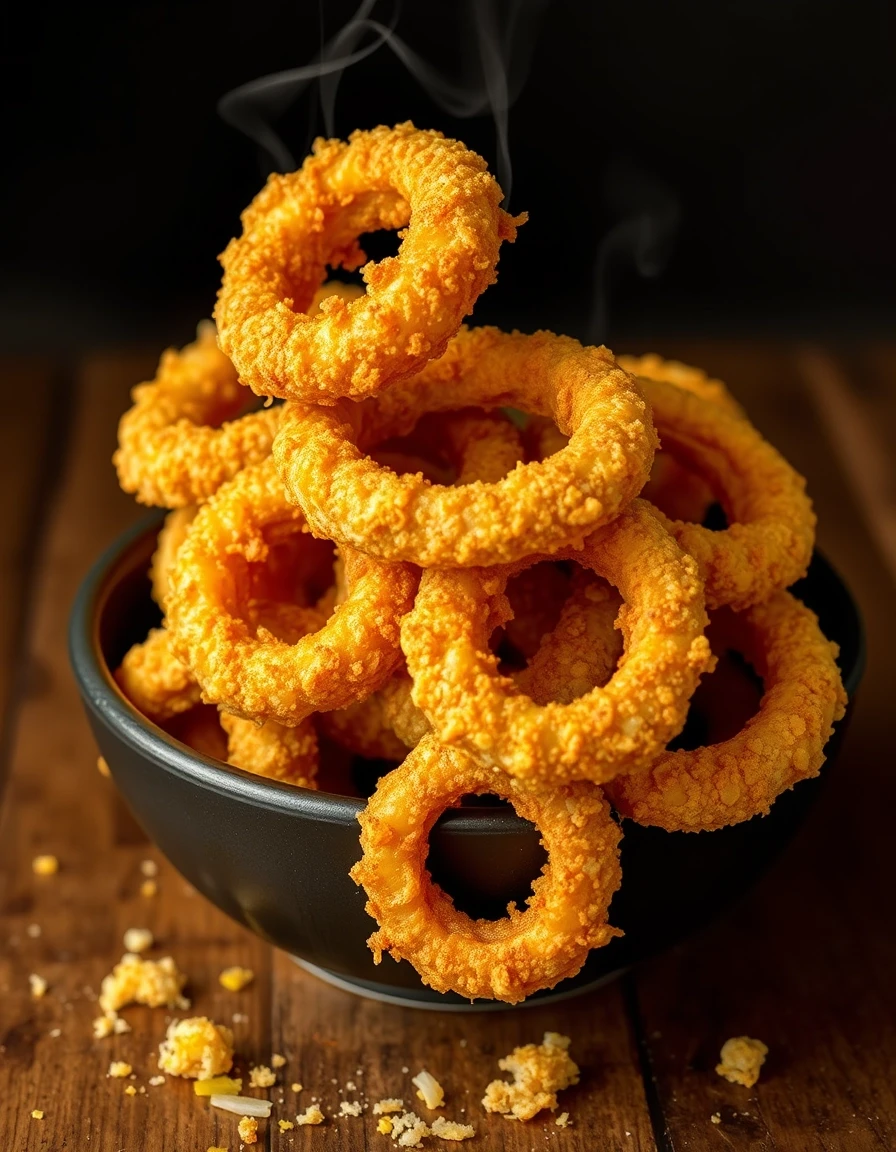
Cheesy Onion Rings: The Ultimate Comfort Food Snack

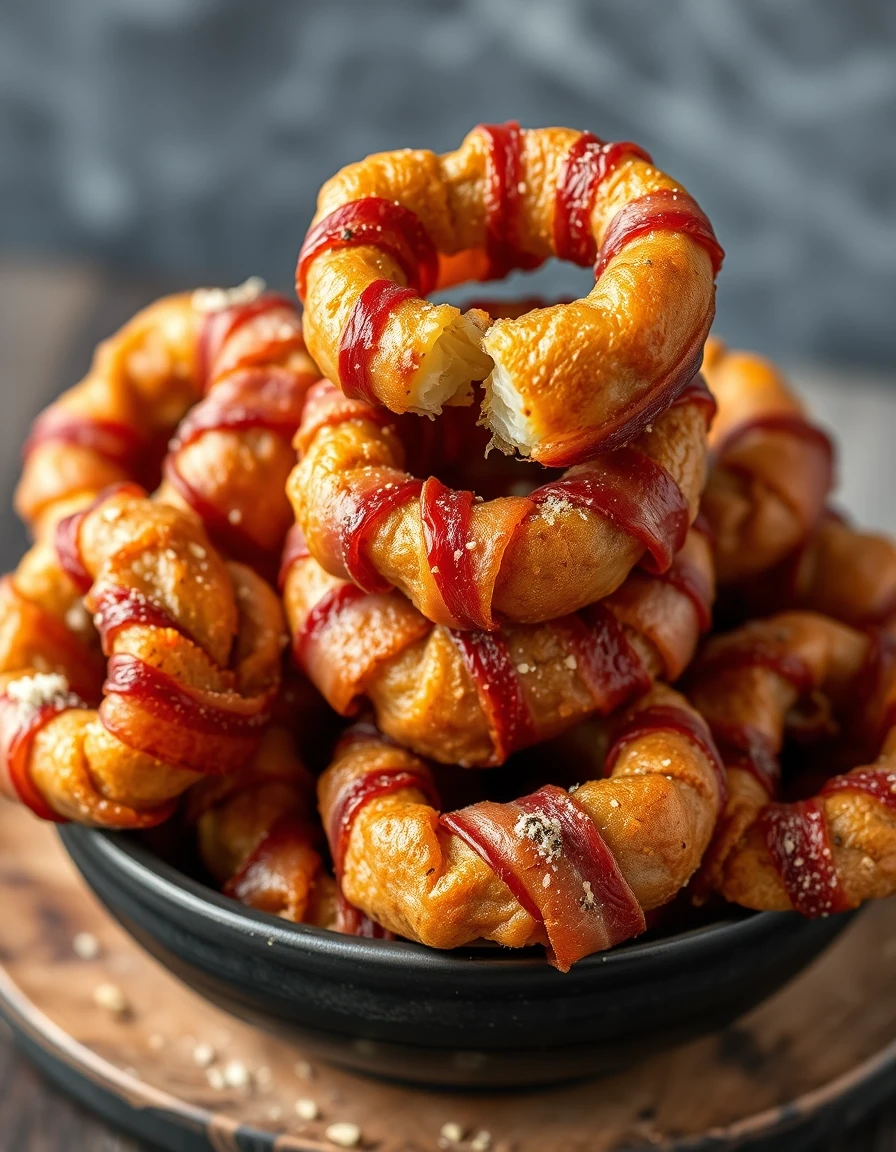
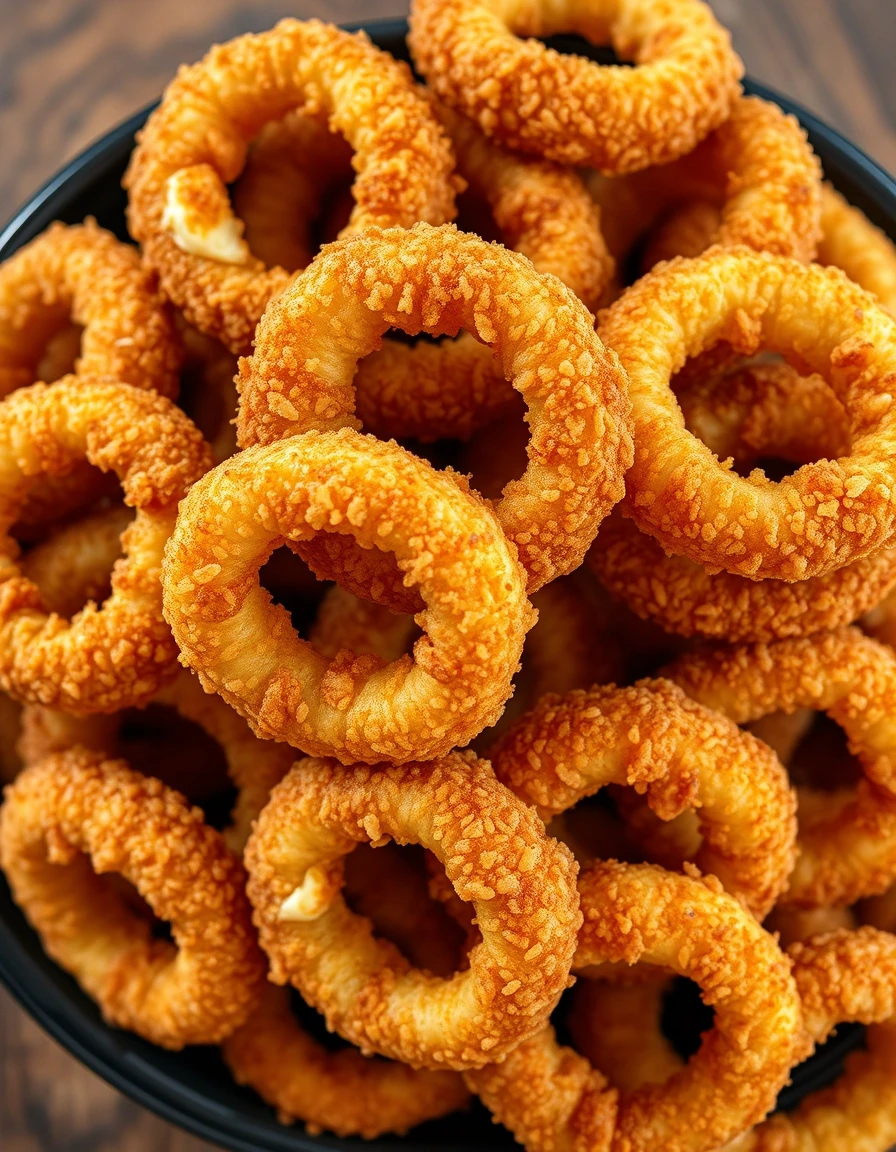
There’s something magical about biting into a crispy, golden onion ring—but what if it were stuffed with gooey, melted cheese? That’s right, these Cheesy Onion Rings take your favorite appetizer to a whole new level of deliciousness. Whether you’re hosting game day, craving a late-night snack, or just treating yourself to something indulgent, these rings are guaranteed to disappear fast.

I first discovered the joy of stuffed onion rings at a local diner, where they were served as a special. One bite, and I was hooked. Determined to recreate them at home, I spent weeks tweaking the recipe until I landed on this foolproof version. The secret? A double-dip in seasoned batter for extra crunch and a blend of cheeses that melt into pure perfection. Trust me, once you try these, there’s no going back to plain onion rings!

Why You’ll Love These Cheesy Onion Rings

These aren’t your average onion rings. Here’s why they’re a must-make:

  • Double the crunch: A crispy outer layer gives way to tender onions and molten cheese.
  • Easy to customize: Swap in your favorite cheeses or add a spicy kick with jalapeños.
  • Crowd-pleaser: Perfect for parties, movie nights, or even a fun twist on burger night.
  • Kid-approved: Even picky eaters can’t resist these cheesy delights.

How to Make Cheesy Onion Rings

Ready to dive in? Here’s everything you’ll need and step-by-step instructions for onion ring success.

Ingredients

  • 2 large sweet onions (like Vidalia)
  • 1 cup shredded mozzarella cheese
  • 1/2 cup shredded cheddar cheese
  • 1 cup all-purpose flour
  • 1 tsp garlic powder
  • 1 tsp paprika
  • 1 cup buttermilk
  • 1 cup panko breadcrumbs
  • Oil for frying (vegetable or canola)
  • Salt to taste

Instructions

  1. Prep the onions: Slice onions into 1/2-inch thick rings. Gently separate the rings, keeping pairs of similar sizes together.
  2. Stuff with cheese: Sandwich a small handful of mozzarella and cheddar between two onion rings, pressing gently to seal.
  3. Dredge: Dip each stuffed ring in flour, then buttermilk, then panko, ensuring full coverage.
  4. Double-dip (optional): For extra crunch, repeat the buttermilk and panko steps.
  5. Fry: Heat oil to 375°F (190°C) and fry rings in batches until golden brown, about 2–3 minutes per side. Drain on paper towels.
  6. Serve hot: Sprinkle with salt and enjoy immediately with ranch, marinara, or homemade BBQ sauce.

Tips for the Best Cheesy Onion Rings

  • Keep the oil hot: Use a thermometer to maintain temperature—soggy rings happen when the oil’s too cool.
  • Dry the onions: Pat rings dry before stuffing to help the cheese stick better.
  • Bake for a lighter option: Arrange rings on a parchment-lined tray, spray with oil, and bake at 425°F (220°C) for 15–20 minutes, flipping halfway.

Pairing Ideas

These cheesy rings are fantastic on their own, but why stop there? Serve them alongside:

  • A juicy classic burger for the ultimate comfort meal.
  • A crisp, refreshing salad to balance the richness.
  • A cold beer or homemade lemonade for the perfect contrast.

Frequently Asked Questions

Can I make cheesy onion rings ahead of time?
For the crispiest results, fry them just before serving. However, you can prep the stuffed rings and refrigerate them for up to 2 hours before frying.

What’s the best cheese for stuffed onion rings?
A mix of mozzarella (for meltiness) and cheddar (for flavor) works best. Pepper jack adds a nice kick!

Can I use an air fryer?
Yes! Spray rings lightly with oil and air fry at 400°F (200°C) for 8–10 minutes, flipping halfway. They’ll be slightly less crispy but still delicious.

How do I store leftovers?
Reheat in an oven or air fryer to revive the crunch. Microwaving will make them soggy.

Why are my onion rings falling apart?
If the cheese leaks, you might be overstuffing or not pressing the onion layers firmly enough. A light flour dusting before stuffing helps bind them.

Are there gluten-free options?
Swap all-purpose flour for gluten-free flour and use gluten-free panko. Check out Beyond Celiac for more gluten-free tips.

There you have it—the ultimate Cheesy Onion Rings that are crispy, gooey, and utterly irresistible. Whether you’re serving them up for a crowd or just treating yourself, these rings are sure to become a new favorite. Don’t be surprised if they steal the show at your next gathering! For more crave-worthy recipes, check out my easy party appetizers roundup. Happy cooking!

Print
clock clock iconcutlery cutlery iconflag flag iconfolder folder iconinstagram instagram iconpinterest pinterest iconfacebook facebook iconprint print iconsquares squares iconheart heart iconheart solid heart solid icon

CHEESY ONION RINGS

  • Author: Chef Delicious

Description

Crispy, golden onion rings stuffed with gooey melted cheese—a perfect appetizer or snack for any occasion. These cheesy onion rings are easy to make and guaranteed to be a crowd-pleaser!


Ingredients

Scale

For the Crust:

  • For the Onion Rings:
  • 2 large yellow onions
  • 1 cup all-purpose flour
  • 1 tsp garlic powder
  • 1 tsp paprika
  • 1/2 tsp salt
  • 1/2 tsp black pepper
  • 1 cup buttermilk
  • 1 1/2 cups panko breadcrumbs
  • For the Cheese Filling:
  • 1 cup shredded mozzarella cheese
  • 1/2 cup shredded cheddar cheese
  • 1/4 cup cream cheese, softened
  • 1/2 tsp onion powder
  • For Frying:
  • 2 cups vegetable oil (for deep frying)

Instructions

1. Prepare the Crust:

  1. 1. Prepare the onions: Slice the onions into 1/2-inch thick rings. Carefully separate the rings and set aside.
  2. 2. Make the cheese filling: In a bowl, mix mozzarella, cheddar, cream cheese, and onion powder until well combined.
  3. 3. Stuff the onions: Take two onion rings of similar size. Place a small amount of cheese mixture between them, pressing gently to seal. Repeat for all rings.
  4. 4. Set up breading stations: In one bowl, mix flour, garlic powder, paprika, salt, and pepper. In another bowl, pour buttermilk. In a third bowl, place panko breadcrumbs.
  5. 5. Bread the onion rings: Dip each stuffed ring into the flour mixture, then the buttermilk, and finally coat with panko breadcrumbs. Place on a tray.
  6. 6. Heat the oil: In a deep pan, heat vegetable oil to 350°F (175°C).
  7. 7. Fry the rings: Carefully fry 2-3 rings at a time for 2-3 minutes until golden brown. Drain on paper towels.
  8. 8. Serve hot with your favorite dipping sauce!

Notes

For extra crispiness, double-coat the onion rings by repeating the buttermilk and breadcrumb steps. If you prefer baking, arrange breaded rings on a greased baking sheet and bake at 400°F (200°C) for 15-20 minutes, flipping halfway.

Easy Air Fryer Caramelized Pineapple Recipe

Easy Air Fryer Caramelized Pineapple Recipe: A Sweet Tropical Treat in Minutes

There’s something magical about caramelized pineapple—the way the sugars deepen into a rich, golden glaze while the fruit stays juicy and tender. But who wants to babysit a skillet when you can let your air fryer do the work? This Easy Air Fryer Caramelized Pineapple Recipe is my go-to when I crave a dessert that feels indulgent but takes almost no effort. Whether you’re hosting a last-minute dinner party or just treating yourself after a long day, this dish delivers tropical vibes with minimal fuss.

I first stumbled upon this trick during a chaotic week when my oven decided to retire mid-casserole. Desperate for a sweet fix, I tossed pineapple slices into the air fryer with a sprinkle of brown sugar—and voilà! The result was even better than stovetop caramelizing, with less mess and perfect results every time. Now, it’s my secret weapon for turning basic fruit into a showstopper. Serve it over vanilla ice cream, yogurt, or even alongside grilled pork for a sweet-savory twist. Trust me, once you try it, you’ll wonder how you ever lived without it.

Why You’ll Love This Air Fryer Caramelized Pineapple

This recipe isn’t just easy—it’s a game-changer. Here’s why:

  • Ready in 10 minutes: Faster than preheating your oven!
  • No fancy ingredients: Just pineapple, sugar, and a hint of spice.
  • Versatile: Eat it solo, pair with desserts, or add to savory dishes.
  • Healthier than deep-fried treats: All the caramelized goodness with minimal oil.

How to Make Easy Air Fryer Caramelized Pineapple

Ingredients You’ll Need

  • 1 fresh pineapple, peeled and cut into 1-inch rings (or 4 cups pre-cut chunks)
  • 2 tbsp brown sugar (or coconut sugar for a refined sugar-free option)
  • 1 tsp cinnamon
  • 1 tbsp melted butter or coconut oil
  • Optional: A pinch of chili powder for a sweet-heat kick

Step-by-Step Instructions

  1. Prep the pineapple: Pat the pineapple dry to help the caramelization process.
  2. Toss with flavors: In a bowl, mix pineapple with melted butter, brown sugar, and cinnamon until evenly coated.
  3. Air fry: Arrange in a single layer in the air fryer basket. Cook at 375°F for 8–10 minutes, flipping halfway, until golden and bubbly.
  4. Serve warm: Top with a scoop of ice cream or a dollop of whipped cream. For extra flair, drizzle with homemade crème anglaise.

Pro Tips for Perfect Caramelized Pineapple

Want to take this recipe to the next level? Try these tricks:

  • Use fresh pineapple for the best texture, but canned rings (drained well) work in a pinch.
  • Don’t overcrowd the air fryer—give each piece space to caramelize evenly.
  • For a boozy twist, brush with rum or bourbon before cooking (adults only!).

If you love air fryer desserts, you’ll adore my Air Fryer Apple Chips for another healthy snack idea.

Frequently Asked Questions

Can I use frozen pineapple?

Yes! Thaw and pat it dry thoroughly to avoid excess moisture.

How do I store leftovers?

Keep in an airtight container in the fridge for up to 3 days. Reheat in the air fryer for 2–3 minutes to revive the crispness.

What’s the best air fryer temperature for caramelizing fruit?

375°F is ideal—hot enough to caramelize sugars without burning.

Can I make this without sugar?

Absolutely! The natural sugars in pineapple will still caramelize, though less intensely. Try a light honey drizzle post-cooking.

What other fruits work well caramelized in the air fryer?

Peaches, bananas, and mangoes are fantastic—check out my Air Fryer Peach Crisp for inspiration!

Is this recipe gluten-free and vegan?

Yes! Just use coconut oil instead of butter for a vegan version.

There you have it—a dessert that’s as easy as it is impressive. Whether you’re a busy parent sneaking in a midnight treat or hosting friends who think you spent hours in the kitchen, this caramelized pineapple will become your new secret weapon. For more quick air fryer wins, explore my 5-Ingredient Air Fryer Donuts. Now, go forth and caramelize with confidence!

Print
clock clock iconcutlery cutlery iconflag flag iconfolder folder iconinstagram instagram iconpinterest pinterest iconfacebook facebook iconprint print iconsquares squares iconheart heart iconheart solid heart solid icon

Easy Air Fryer Caramelized Pineapple

  • Author: Air Fryer Enthusiast

Description

This simple air fryer recipe transforms fresh pineapple into golden, caramelized perfection with minimal effort. The natural sugars caramelize beautifully while the pineapple retains its juicy texture, making it perfect for desserts, toppings, or a healthy snack.


Ingredients

Scale

For the Crust:

  • For the pineapple:
  • 1 medium ripe pineapple (peeled, cored, and cut into 1-inch rings or chunks)
  • For the caramel glaze:
  • 2 tablespoons honey or maple syrup
  • 1 tablespoon melted butter or coconut oil
  • 1/2 teaspoon ground cinnamon
  • Optional toppings:
  • Vanilla ice cream
  • Toasted coconut flakes
  • Chopped mint leaves

Instructions

1. Prepare the Crust:

  1. 1. Preheat air fryer to 380°F (193°C) for 3 minutes.
  2. 2. In a small bowl, whisk together honey/maple syrup, melted butter/oil, and cinnamon to create the glaze.
  3. 3. Brush both sides of pineapple pieces generously with the glaze.
  4. 4. Arrange pineapple in a single layer in the air fryer basket (work in batches if needed).
  5. 5. Air fry for 8-10 minutes, flipping halfway through, until edges are golden brown and caramelized.
  6. 6. For extra caramelization, brush with additional glaze after flipping.
  7. 7. Serve warm with optional toppings like ice cream or coconut flakes.

Notes

• For uniform cooking, cut pineapple into equal-sized pieces. • If using frozen pineapple, thaw and pat dry first. • Glaze will thicken as it cools. • Store leftovers in an airtight container for up to 3 days.

Keto Bacon Wrapped Onion Rings

Keto Bacon Wrapped Onion Rings: A Crispy, Low-Carb Snack You’ll Crave

Picture this: golden, crispy bacon hugging tender, sweet onion rings, fresh from the oven. The aroma alone is enough to make your stomach growl—and the best part? These Keto Bacon Wrapped Onion Rings are entirely guilt-free. Whether you’re hosting a game-day gathering, need a party appetizer that disappears fast, or just want a savory snack that fits your low-carb lifestyle, this recipe is your new best friend.

I first made these for a girls’ night in, and let’s just say they were gone before the wine was poured. There’s something magical about the combination of smoky bacon and caramelized onions that feels indulgent yet wholesome. Plus, they’re surprisingly simple to whip up—no deep fryer required! If you’re looking for more keto-friendly crowd-pleasers, check out my Keto Zucchini Fries for another crunchy favorite.

Why You’ll Love These Keto Bacon Wrapped Onion Rings

These aren’t just any onion rings—they’re a low-carb dream come true. Here’s why they’ll become a staple in your recipe rotation:

  • Perfectly crispy without deep-frying (hello, oven-baked goodness!).
  • Only 4 ingredients—yes, really!
  • Naturally gluten-free and keto-friendly, with just 3g net carbs per serving.
  • Great for meal prep—make a batch ahead and reheat for quick snacks.

How to Make Keto Bacon Wrapped Onion Rings

Ready to dive in? Here’s your step-by-step guide to crispy, bacon-y perfection.

  1. Prep the onions: Slice a large sweet onion into ½-inch rings and separate the layers.
  2. Wrap with bacon: Carefully weave a slice of bacon around each onion ring, overlapping slightly.
  3. Season & bake: Place on a wire rack over a baking sheet, sprinkle with smoked paprika, and bake at 400°F for 25–30 minutes until crispy.
  4. Serve warm: Pair with sugar-free ketchup or your favorite keto-friendly dip.

Recipe Tips for Success

Want to guarantee perfect results every time? Keep these tricks in mind:

  • Use thin-cut bacon—it crisps up faster and wraps more easily.
  • Pat the onion rings dry before wrapping to help the bacon adhere.
  • For extra crispiness, broil for the last 2 minutes (but watch closely!).

Frequently Asked Questions

Can I use turkey bacon for this recipe?
Yes, but it won’t crisp up as much as pork bacon. For best results, brush lightly with olive oil before baking.

How do I store leftover keto onion rings?
Keep them in an airtight container in the fridge for up to 3 days. Reheat in the oven or air fryer to restore crispiness.

Are these keto bacon onion rings spicy?
Not unless you want them to be! The smoked paprika adds depth, but omit it or swap for garlic powder if preferred.

Can I make these in an air fryer?
Absolutely! Cook at 375°F for 12–15 minutes, flipping halfway. Check out my Air Fryer Keto Recipes for more ideas.

What’s the best onion for keto onion rings?
Sweet onions (like Vidalia) work best for flavor, but yellow onions are great too. Avoid red onions—they’re too sharp when baked.

Can I freeze these for later?
Yes! Freeze unbaked bacon-wrapped rings on a tray, then transfer to a bag. Bake from frozen, adding 5–7 extra minutes.

There you have it—a snack so delicious, no one will guess it’s keto. These bacon-wrapped onion rings prove that low-carb eating doesn’t mean missing out on flavor or fun. Next time you’re craving something crispy and satisfying, skip the drive-thru and make these instead. (Pro tip: Double the batch. Trust me.) For more easy keto inspiration, try my Keto Pizza Bites or browse Diet Doctor’s keto guides for extra motivation. Happy cooking!

Print
clock clock iconcutlery cutlery iconflag flag iconfolder folder iconinstagram instagram iconpinterest pinterest iconfacebook facebook iconprint print iconsquares squares iconheart heart iconheart solid heart solid icon

Keto Bacon Wrapped Onion Rings

  • Author: Keto Kitchen Master

Description

Crispy bacon-wrapped onion rings with a keto-friendly twist. Perfect as a low-carb appetizer or snack with irresistible smoky flavor and crunch.


Ingredients

Scale

For the Crust:

  • For the onion rings:
  • 1 large sweet onion (sliced into 1/2-inch rings)
  • 1 tbsp olive oil
  • 1/2 tsp smoked paprika
  • 1/4 tsp garlic powder
  • For the wrapping:
  • 12 slices thin-cut bacon
  • 1/4 cup sugar-free barbecue sauce (for glaze)
  • For serving:
  • 1/4 cup ranch dressing (sugar-free)
  • 1 tbsp chopped fresh chives

Instructions

1. Prepare the Crust:

  1. 1. Preheat oven to 400°F (200°C) and line a baking sheet with parchment paper.
  2. 2. Separate onion slices into rings and toss with olive oil, smoked paprika, and garlic powder.
  3. 3. Wrap each onion ring with 1 slice of bacon, overlapping slightly. Secure with toothpicks if needed.
  4. 4. Arrange on baking sheet and brush lightly with sugar-free barbecue sauce.
  5. 5. Bake for 20-25 minutes until bacon is crispy, flipping halfway through.
  6. 6. Remove toothpicks and serve warm with ranch dressing and chives.

Notes

For extra crispiness, broil for 1-2 minutes at the end. Use kitchen shears to easily cut bacon slices in half for smaller rings.

Easy Air Fryer Blooming Onion – Just Like a Restaurant

Easy Air Fryer Blooming Onion – Just Like a Restaurant

There’s something undeniably fun about ordering a blooming onion at a restaurant—that crispy, golden exterior, the tender layers inside, and that irresistible dipping sauce. But let’s be honest: deep-frying at home can feel messy, intimidating, and, well, a little greasy. That’s where your trusty air fryer comes in! This Easy Air Fryer Blooming Onion gives you all the crunch and flavor of the restaurant favorite, with way less oil and cleanup.

I’ll never forget the first time I tried making a blooming onion at home. It was for a game-day gathering, and I was determined to impress my friends. After a few failed attempts (let’s just say my knife skills needed work), I finally nailed it—and the air fryer made it shockingly simple. Now, it’s my go-to appetizer for parties, movie nights, or just when I’m craving something crispy and satisfying. The best part? No one will guess it’s not straight from a deep fryer!

Why You’ll Love This Air Fryer Blooming Onion

If you’re on the fence about trying this recipe, here’s why it’s a must-make:

  • Healthier than deep-fried: Uses just a fraction of the oil.
  • Same crispy texture: The air fryer gives that perfect crunch.
  • Easy cleanup: No greasy stovetop or splatters.
  • Impressive presentation: It’s a showstopper appetizer!

How to Make an Easy Air Fryer Blooming Onion

Ingredients You’ll Need

  • 1 large sweet onion (like Vidalia)
  • 1 cup buttermilk
  • 1 cup all-purpose flour
  • 1 tsp paprika
  • 1 tsp garlic powder
  • 1/2 tsp cayenne pepper (optional for heat)
  • 1/2 tsp salt
  • Cooking spray or olive oil

Step-by-Step Instructions

  1. Prep the onion: Slice off the top (not the root end!), then make vertical cuts to create “petals.” Gently separate the layers.
  2. Soak in buttermilk: This helps the coating stick and adds flavor.
  3. Coat the onion: Mix flour and spices, then dredge the onion, ensuring every layer is covered.
  4. Air fry: Spray with oil and cook at 375°F for 12–15 minutes, until golden and crispy.
  5. Serve hot: Pair with your favorite dipping sauce!

Tips for the Perfect Blooming Onion

Want to make sure your blooming onion turns out flawless? Here are my tried-and-true tips:

  • Use a sharp knife for clean cuts—dull blades can crush the onion.
  • Don’t skip the buttermilk soak—it tenderizes and adds tang.
  • Shake off excess flour to avoid clumping.
  • Spritz lightly with oil for extra crispiness.

If you love air fryer appetizers, try my Crispy Air Fryer Zucchini Chips next!

What to Serve With Your Blooming Onion

This blooming onion is fantastic on its own, but why stop there? Here are a few pairing ideas:

  • Dipping sauces: Classic ranch, spicy mayo, or even a tangy barbecue sauce.
  • Burgers or sandwiches: Serve alongside a juicy Air Fryer Turkey Burger.
  • Salad: Balance the crunch with a fresh green salad.

Frequently Asked Questions

Can I use a different type of onion?
Yes! Sweet onions work best, but yellow onions are a good substitute.

How do I store leftovers?
Store in an airtight container in the fridge for up to 2 days. Reheat in the air fryer to restore crispiness.

Can I make this gluten-free?
Absolutely! Swap the flour for a gluten-free blend.

Why is my blooming onion soggy?
Overcrowding or too much oil can cause sogginess. Cook in batches if needed.

Can I bake this instead?
Yes, but the texture won’t be as crispy. Bake at 400°F for 20–25 minutes.

What’s the best dipping sauce?
I love a mix of mayo, ketchup, and a dash of hot sauce—like this Food Network-inspired sauce.

There you have it—a restaurant-worthy blooming onion without the deep-fryer mess. Whether you’re hosting a party or just treating yourself, this recipe is sure to delight. The air fryer magic keeps it light yet indulgent, and the best part? You get to enjoy that satisfying crunch guilt-free. So grab an onion, fire up your air fryer, and get ready to impress!

Print
clock clock iconcutlery cutlery iconflag flag iconfolder folder iconinstagram instagram iconpinterest pinterest iconfacebook facebook iconprint print iconsquares squares iconheart heart iconheart solid heart solid icon

Easy Air Fryer Blooming Onion – Just Like a Restaurant

  • Author: Air Fryer Enthusiast

Description

This crispy, golden blooming onion is made healthier in the air fryer but tastes just like the deep-fried restaurant version! Perfect as an appetizer or party snack.


Ingredients

Scale

For the Crust:

  • For the Onion:
  • 1 large sweet onion (Vidalia or Texas Sweet preferred)
  • 1 cup buttermilk
  • 1 cup all-purpose flour
  • 1 teaspoon paprika
  • 1 teaspoon garlic powder
  • 1 teaspoon onion powder
  • 1/2 teaspoon cayenne pepper (optional for heat)
  • 1/2 teaspoon salt
  • 1/4 teaspoon black pepper
  • For the Dipping Sauce:
  • 1/2 cup mayonnaise
  • 2 tablespoons ketchup
  • 1 tablespoon horseradish
  • 1/2 teaspoon paprika
  • 1/4 teaspoon garlic powder
  • 1/4 teaspoon salt

Instructions

1. Prepare the Crust:

  1. 1. Prepare the Onion: Peel the onion and cut about 1/2 inch off the top. Leave the root end intact.
  2. 2. Make Cuts: Turn the onion root-side up. Starting 1/2 inch from the root, make vertical cuts downward all around the onion to create ‘petals.’ Gently spread the petals apart.
  3. 3. Soak in Buttermilk: Place the onion in a bowl and pour buttermilk over it, ensuring it gets between the petals. Let soak for at least 30 minutes.
  4. 4. Mix Dry Ingredients: In a separate bowl, combine flour, paprika, garlic powder, onion powder, cayenne, salt, and black pepper.
  5. 5. Coat the Onion: Remove the onion from buttermilk, letting excess drip off. Dredge in the flour mixture, pressing gently to coat all petals thoroughly.
  6. 6. Air Fry: Preheat air fryer to 375°F (190°C). Lightly spray the onion with cooking oil. Place in the air fryer basket and cook for 12-15 minutes until golden and crispy.
  7. 7. Make the Sauce: While cooking, mix mayonnaise, ketchup, horseradish, paprika, garlic powder, and salt in a small bowl.
  8. 8. Serve: Carefully remove the onion from the air fryer and serve immediately with dipping sauce.

Notes

For extra crispiness, spray the onion with oil halfway through cooking. If petals aren’t spreading easily, make deeper cuts next time. Works best with large, round onions.

AIR FRYER ONION RINGS

Crispy Air Fryer Onion Rings: A Guilt-Free Snack You’ll Crave

There’s something irresistible about onion rings—the satisfying crunch, the sweet bite of onion, that golden perfection. But let’s be honest: deep-fried versions can leave you feeling weighed down (and maybe a little guilty). Enter the air fryer, your trusty kitchen sidekick that delivers all the crispy goodness with a fraction of the oil. These Air Fryer Onion Rings are so good, you’ll forget they’re not straight from a diner fryer!

I first tested this recipe during a girls’ night in, and let’s just say the bowl was empty before the movie’s opening credits finished. My friend Sarah, a self-proclaimed onion ring skeptic, even asked for the recipe—proof that these lighter rings win over everyone. Whether you’re serving them as a game-day snack, burger topper, or just because (no judgment here), they’re a crowd-pleaser. Plus, they’re ready in under 20 minutes—faster than delivery!

Why You’ll Love These Air Fryer Onion Rings

  • Healthier: 80% less oil than traditional frying
  • Foolproof: No messy splatters or thermometer needed
  • Versatile: Pair with burgers, salads, or eat solo with dipping sauces
  • Kid-approved: Even picky eaters gobble them up

How to Make Air Fryer Onion Rings

Ingredients You’ll Need

  • 1 large sweet onion (Vidalia works great!)
  • 1 cup buttermilk (or milk + 1 tbsp vinegar)
  • 1 cup panko breadcrumbs
  • ½ cup all-purpose flour
  • 1 tsp smoked paprika
  • ½ tsp garlic powder
  • Salt and pepper to taste
  • Cooking spray

Step-by-Step Instructions

  1. Prep the onions: Slice onion into ½-inch rings and separate layers. Soak in buttermilk for 10 minutes (this tenderizes and adds flavor).
  2. Mix coatings: In one bowl, combine flour and spices. In another, place panko.
  3. Bread the rings: Shake excess buttermilk off each ring, dredge in flour, then press into panko for maximum crunch.
  4. Air fry: Arrange rings in a single layer (no overlapping!) in your air fryer basket. Lightly spray with oil. Cook at 375°F for 8–10 minutes, flipping halfway, until golden brown.

Pro Tips for the Best Onion Rings

Double-dip for extra crunch: After the first breading, dip rings back in buttermilk and panko for an ultra-crispy shell. It’s the secret behind my air fryer favorites!

Prevent sogginess: Pat onions dry before soaking in buttermilk, and don’t overcrowd the basket—airflow is key. If needed, cook in batches.

Spice it up: Add cayenne to the flour or toss finished rings with grated Parmesan and parsley. For dipping, try this burger sauce from Serious Eats.

Air Fryer Onion Rings FAQs

Can I use regular breadcrumbs instead of panko? Panko gives the crispiest texture, but regular breadcrumbs work in a pinch (just expect a slightly denser coating).

How do I store leftovers? Reheat in the air fryer at 350°F for 3–4 minutes to revive crispiness. They’re best fresh, though!

Do I need to preheat the air fryer? Yes! A hot air fryer ensures even cooking. Most models preheat in just 2–3 minutes.

Can I make these gluten-free? Absolutely! Swap flour for GF flour blend and use gluten-free panko like Aleia’s.

Why are my onion rings falling apart? If the panko isn’t sticking, press firmly after breading. Thicker onion rings (½-inch) also hold up better.

What’s the best onion variety to use? Sweet onions (Vidalia, Walla Walla) balance the savory coating, but yellow onions work too.

Whether you’re hosting friends or treating yourself to a crispy snack, these Air Fryer Onion Rings are a game-changer. They’re proof that comfort food can be easy and wholesome—no deep-fryer required. For more air fryer magic, try my zucchini chips or buffalo cauliflower bites next. Now, who’s ready to dig in?

Print
clock clock iconcutlery cutlery iconflag flag iconfolder folder iconinstagram instagram iconpinterest pinterest iconfacebook facebook iconprint print iconsquares squares iconheart heart iconheart solid heart solid icon

Air Fryer Onion Rings

  • Author: Home Chef

Description

Crispy, golden onion rings made healthier in the air fryer with minimal oil. Perfect as a snack or side dish!


Ingredients

Scale

For the Crust:

  • For the Onion Rings:
  • 2 large yellow onions
  • 1 cup all-purpose flour
  • 2 large eggs
  • 1/4 cup milk
  • 1 cup panko breadcrumbs
  • 1/2 cup cornmeal
  • 1 tsp garlic powder
  • 1 tsp paprika
  • 1/2 tsp salt
  • 1/2 tsp black pepper
  • For Dipping Sauce (Optional):
  • 1/2 cup mayonnaise
  • 2 tbsp ketchup
  • 1 tsp hot sauce
  • 1/2 tsp garlic powder

Instructions

1. Prepare the Crust:

  1. 1. Slice onions into 1/2-inch thick rings and separate them.
  2. 2. In a bowl, mix flour, garlic powder, paprika, salt, and pepper.
  3. 3. In another bowl, whisk eggs and milk.
  4. 4. In a third bowl, combine panko and cornmeal.
  5. 5. Dredge each onion ring in flour mixture, then dip in egg wash, and coat with panko mixture.
  6. 6. Preheat air fryer to 375°F (190°C).
  7. 7. Lightly spray the air fryer basket with oil and arrange onion rings in a single layer (work in batches).
  8. 8. Air fry for 8-10 minutes, flipping halfway, until golden and crispy.
  9. 9. For the dipping sauce, mix mayonnaise, ketchup, hot sauce, and garlic powder in a small bowl.
  10. 10. Serve onion rings hot with dipping sauce.

Notes

For extra crispiness, refrigerate coated onion rings for 15 minutes before air frying. Do not overcrowd the air fryer basket for even cooking.