Easy Iced Vanilla Chai Latte Recipe for a Refreshing Treat

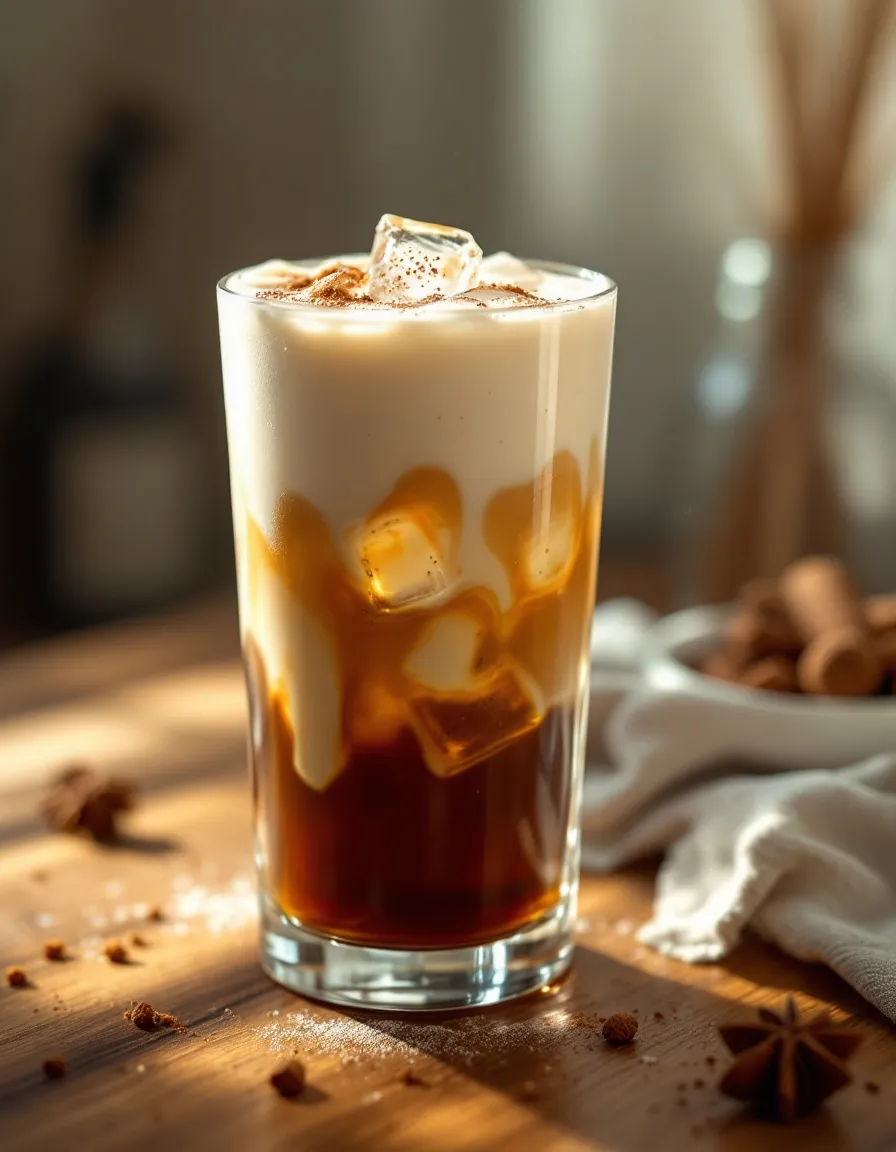
Cool Down with This Easy Iced Vanilla Chai Latte Recipe!

⚖️
Difficulty
Easy

⏲️
Prep Time
10 mins

🕒
Cook Time
5 mins

⏱️
Total Time
15 mins

🍽️
Servings
2 servings

Indulge in the refreshing bliss of a homemade Iced Vanilla Chai Latte, a perfect drink to cool down on a warm day! This delightful beverage combines the warm spices of chai with smooth vanilla and cold milk, resulting in a flavor explosion that delights the senses. The creamy texture, infused with notes of cinnamon and cardamom, combines beautifully with the soothing vanilla, making each sip a luxurious escape.

Imagine sitting on your porch, sipping this chilled, spiced drink while the sun sets. The aroma of freshly brewed chai wafts through the air, creating a cozy ambiance that is both invigorating and comforting. Plus, making this easy iced vanilla chai latte at home means you can customize the sweetness and spice levels to your liking, making it not just a treat, but also a personal favorite.

Quick Recipe Highlights

  • Flavor Profile: This iced vanilla chai latte boasts a balance of sweet and spicy flavors, with deep notes of cinnamon, ginger, and rich vanilla.
  • Texture: It has a creamy consistency that feels smooth on the palate, complemented by the refreshing chill of ice.
  • Aroma: The aromatic blend of warm spices and fragrant vanilla makes every sip a sensory delight.
  • Visual Appeal: The beautiful layering of chai and milk creates an eye-catching beverage, perfect for summer gatherings.
  • Skill Level Needed: This recipe requires minimal cooking techniques, making it accessible for anyone to create.
  • Special Equipment: All you need is a good quality blender or shaker and a glass to serve this delicious drink!

Recipe Overview

  • Difficulty Level: Easy! This iced vanilla chai latte is simple to make and perfect for kitchen novices. The recipe includes straightforward steps that anyone can follow.
  • Category: This drink falls into the category of beverages and can be enjoyed anytime—whether it’s breakfast, an afternoon pick-me-up, or a refreshing dessert.
  • Cuisine: Chai is traditionally an Indian drink, rich in history and culture. It has gained global popularity, often enjoyed in various forms across different regions.
  • Cost: This recipe is budget-friendly, with ingredients that are easily sourced and can be found in most grocery stores.
  • Season: While it’s ideal for warm summer days, this drink can be enjoyed year-round, providing comfort during colder months as well.
  • Occasion: Perfect for casual gatherings, brunch parties, or even quiet afternoons alone with a good book!

Why You’ll Love This Recipe

First and foremost, the taste of this iced vanilla chai latte is simply irresistible! The balance between the cool creaminess and warm spices makes this drink a unique favorite. With the ability to customize sugar and spice levels, experimentation is part and parcel of the fun. You can easily adjust it to suit your taste buds, meaning you can enjoy a perfectly personalized beverage each time.

Convenience is key in today’s fast-paced world. This recipe not only takes minimal time to prepare, but it also allows you to use pantry staples. The quick prep and easy cleanup make this drink an accessible treat for coffee lovers and non-coffee drinkers alike. Imagine a hot summer day where you can whip up a refreshing drink in just 15 minutes!

Nutritionally, chai tea boasts health benefits, including antioxidant properties and digestive support from varied spices. Utilizing real spices keeps the drink wholesome, thus letting you savor it without guilt. The addition of milk or alternative dairy options also contributes to a balanced drink, giving you a little protein hit alongside the serving of flavor.

Socially, sharing this iced vanilla chai latte with friends can transform a simple afternoon into a delightful occasion. Whether you’re hosting a tea party or enjoying it alone, the inviting aroma and beautiful presentation make it a drink to be shared and enjoyed together.

In terms of cost-effectiveness, making your drinks at home can save you a significant amount compared to cafe prices. Not only do you get to indulge in a delectable beverage, but you also gain the satisfaction of crafting a quality drink from the comfort of your kitchen.

Historical Background and Cultural Significance

The origin of chai tea dates back centuries, rooted in Ayurvedic traditions from India. Originally consumed for medicinal benefits, chai has evolved into a beloved everyday drink, swept into cafes and homes worldwide. Each sip pays homage to this rich cultural history.

Culturally, chai is more than just a drink; it embodies warmth and hospitality. In India, serving chai to guests is a cherished tradition, symbolizing welcome and community. It stands as a testament to the art of conversation and connection over shared experiences.

As chai gained international fame, various iterations emerged, leading to adaptations like the iced chai latte. This evolution shows how culinary traditions can reshape and adapt to new tastes while preserving beloved flavors.

Regional variations of chai differ significantly, yet they all reflect local flavors. From the spiciness of masala chai to the creaminess of Kashmiri chai, the concept of chai brings diverse tastes and houses unique stories that contribute to its cultural significance.

Ingredient Deep Dive

Chai Tea: Traditionally brewed with black tea and infused with spices like cinnamon, cardamom, and ginger, chai tea carries a rich heritage from Indian culture. For an iced version, you can steep it stronger for a bolder flavor or opt for tea bags for convenience. The key is to select quality tea that can withstand dilution from ice without losing flavor.

The spices used not only enhance flavor but also offer health benefits such as anti-inflammatory properties. When selecting chai tea, look for blends that incorporate whole spices for an authentic experience. After brewing, store leftover tea in the refrigerator, and make sure to consume it within a few days.

Milk: The choice of milk can significantly impact the overall experience of your iced vanilla chai latte. Whether using dairy, oat, almond, or coconut milk, each variation introduces a different flavor and texture. When going non-dairy, be mindful of the thickness of the alternative; this can alter the drink’s creamy quality.

Choosing the right milk depends on personal taste and dietary preferences. Store milk in a cool environment, and always check the expiry date for optimal freshness. Remember, when substituting, the sweetness of some plant-based milks may change the drink’s flavor profile.

Vanilla Syrup: Vanilla syrup infuses sweetness and an aromatic flavor, enhancing the iced latte’s overall taste. You can either buy premade syrups or make your own from sugar and vanilla extract. A homemade version provides control over sweetness and freshness.

When selecting syrup brands, look for those made with real vanilla for an authentic taste. Store purchased syrups in a cool place after opening. Homemade syrups should be refrigerated and can typically last for a few weeks.

Common Mistakes to Avoid

  • Not brewing tea long enough: Brewing for the right duration ensures a full-bodied flavor, essential for iced drinks where tea flavor may get diluted.
  • Using boiling water for steeping: Pouring boiling water over tea can result in bitterness. Allow it to cool slightly before pouring.
  • Skipping sweeteners: While chai can be enjoyed unsweetened, using some form of sweetener brings out the flavors more effectively—don’t be shy!
  • Not refrigerating the brewed tea: If you’re not using the tea immediately, refrigerating it will preserve the flavor and freshness longer.
  • Choosing low-quality ingredients: A good iced vanilla chai latte starts with high-quality tea and vanilla. Investing in premium ingredients can elevate your drink significantly.
  • Filling the glass with ice before adding the latte: Ice may dilute quickly; to keep your drink cold without watering it down, add your latte first and then ice.
  • Forgetting to balance spice levels: Depending on the brand of chai, the spice profiles can vary significantly; tasting and adjusting is crucial.
  • Not using a large enough glass: This drink looks best in a tall glass, allowing for beautiful layers of chai and milk.

Essential Techniques

Brewing Chai: Brewing chai tea properly is crucial. To enhance the full-bodied flavor, steep the tea longer. Use a fine mesh strainer for easy removal of leaves and spices, and let the aromas deepen by allowing the tea to sit for a moment before serving.

Ice Avoidance: Prevent too much dilution by allowing freshly brewed tea to reach room temperature before mixing with ice. This helps maintain a potent flavor.

Layering: For visual appeal, layer your chai and milk. Pour slowly to create distinct layers, enhancing both appearance and flavor as you sip, inviting drinkers to savor the experience.

Sweetening: Incorporate sweeteners gradually, tasting as you go. Syrups blend differently than granulated sugar, so adjust accordingly to achieve your desired sweetness without overwhelming the drink.

Pro Tips for Perfect Iced Vanilla Chai Latte

1. Always brew the chai stronger than usual since it will be diluted with ice. Aim for a robust flavor.

2. Chill brewed tea in the fridge prior to mixing with ice to keep the drink colder longer.

3. Try experimentation with spices—cardamom and black pepper can add unique twists that elevate your latte.

4. For extra creaminess, consider blending the latte to froth it up before pouring over ice.

5. Use flavored milk or milk alternatives to add an additional flavor dimension to your iced latte.

6. Garnish with a sprinkle of cinnamon or a vanilla bean for a chic presentation.

7. Don’t skimp on the is; fill the glass adequately to keep your drink cold and refreshing.

8. Serve with a straw for an immersive experience—each sip should envelop you in the delightful flavors!

Variations and Adaptations

Experimenting with variations of the iced vanilla chai latte can enhance your experience. Adding seasonal spices such as nutmeg in the fall or pumpkin spice can introduce exciting new flavors.

Consider dietary adaptations; using almond milk makes it suitable for vegan diets, while dairy can bring richness for hearty individuals. Adjusting sweetness levels can cater to those aiming for lower sugar intake.

Regional variations might include the addition of flavored syrups, like hazelnut or caramel, to provide a unique twist on this classic beverage. You can also play around with textures by blending for a frozen chai latte effect, offering a fun summer cooler.

When it comes to presentation, serving in vibrant glassware or incorporating colorful straws might add a delightful visual note. No matter the adaptation, each change brings the iced vanilla chai latte into the realm of your personal tastes!

Serving and Presentation Guide

Plating this iced vanilla chai latte leaves ample room for creativity. Use tall, clear glasses to showcase the beautiful layers of chai and milk. For garnishing, add a garnish of cinnamon or a sprig of mint to introduce a pop of color and aroma.

Traditional accompaniments could include sweet biscuits or a light pastry, enhancing your latte experience. When serving, be aware of temperature; ice should be added just before guests arrive to prevent dilution.

Consider modern serving suggestions like a curated coffee or tea bar, where guests can customize their iced vanilla chai latters, experimenting with various milk options, sweeteners, and spices.

For portion control, consider using smaller glasses for a tasting menu, allowing guests to sample different versions of the latte without overindulging.

Wine and Beverage Pairing

While wine may not be the typical choice to accompany a chai latte, a light Sparkling Rosé can complement the spiced flavors without overshadowing the drink. Its refreshing bubbles enhance the experience of sipping spicy, creamy beverages.

For non-alcoholic alternatives, a light herbal iced tea can balance the rich flavors of the chai without taking away from its intricate taste.

Pairing the iced vanilla chai latte with lighter snacks, such as fruit tarts or mini quiches can enhance the overall experience, as they won’t compete with the strong chai flavors.

When enjoying your iced vanilla chai latte with friends, serving it alongside a variety of beverages can create a wonderful communal experience, making every sip more delightful.

Storage and Shelf Life

Storing brewed iced vanilla chai latte is relatively easy. If you have leftovers, keep the drink in the fridge for no longer than two days to maintain quality. If you prepare in bulk, separate the different components—storing brewed tea, milk, and syrup individually is optimal.

Make sure to use airtight containers for tea and milk, avoiding potential spoilage due to exposure. The ice should always be added at serving time to prevent moisture build-up. For reheating, allow your latte to come back to a mild temperature on low heat or cold-blend to reinstate its chilled aspect.

If you need to store your ingredients, the brewed chai tea can last up to a week in the refrigerator, while dairy items should be consumed within the recommended shelf life of fresh products.

Make Ahead Strategies

Planning smartly for your iced vanilla chai latte can elevate your hosting possibilities. Brew a larger batch of chai tea at the beginning of the week, and store it, allowing you to whip up drinks in an instant.

When making ahead, measure out syrup and refrigerate. For an immediate flavorful boost, consider freezing ice cubes made from brewed chai tea, preventing dilution while keeping the drink flavorful.

Quality impacts when prepared in advance can be minimized by ensuring ingredients are kept fresh and only mixing the drink before serving. You may wish to combine components just before your event to ensure that flavors are vibrant and enjoyable.

Scaling Instructions

Scaling your iced vanilla chai latte is straightforward. If you want to halve the recipe, simply divide all ingredients by two and adjust brewing methods accordingly.

For those looking to double or triple the amounts, consider brewing in larger pots, ensuring that everything is infused according to your desired strength. You may need to adjust brewing times slightly based on quantity.

When working with larger quantities, ensure your serving container is large enough to accommodate sufficient ice and sweeteners. Timing modifications may require a more immediate mixing strategy to ensure every part is enjoyed at its best.

Nutritional Deep Dive

Breaking down macros, a standard iced vanilla chai latte contains protein from milk, healthy fats, and carbohydrates from the sugar and syrup. If made with plant-based alternatives, it can shift nutritionally to cater to specific dietary needs.

The micronutrient analysis shows benefits like calcium from milk, along with vitamins and minerals from spices like cinnamon, known for its anti-inflammatory properties. For health benefits, chai is rich in antioxidants, contributing to overall wellness.

When assessing dietary considerations, balance sweeteners to keep sugars to a minimum. A simple syrup can be swapped for alternative sweeteners, helping manage caloric intake without sacrificing flavor.

In terms of portion analysis, keep in mind that larger serving sizes will elevate calorie counts. If managing weight is a goal, measuring portions can help you enjoy the drink while staying on track with dietary goals.

Dietary Adaptations

This Iced Vanilla Chai Latte can easily adapt to various diets. For gluten-free options, ensure all ingredients, particularly those from mixed spices, are certified gluten-free.

Achieving a dairy-free option is simple by substituting your choice of almond, soy, or oat milk. These alternatives can alter flavor profiles, so choose according to your palate preference!

For a vegan version, replace any dairy components with plant-based options, including using agave or maple syrup for sweetening to avoid honey. The heartiness remains intact.

If you’re following a low-carb or keto diet, consider using sugar substitutes like erythritol or monk fruit sweeteners, allowing you to enjoy the beverage without added sugars!

Paleo and low-FODMAP adaptations can focus on using natural sweeteners and ensuring that the spices used align with dietary restrictions while keeping the drink fresh and flavorful.

Troubleshooting Guide

In the case of texture issues, ensure that chai is brewed strongly enough to stand up to the ice—this prevents the drink from feeling watered down. If you find it too watery after adding ice, try using less ice or brewing a stronger tea base next time.

If the flavor balance seems off, consider adjusting spice quantities. The natural sweetness from the vanilla can overwhelm, so tasting and adjusting sweetener levels throughout the making process is vital.

Temperature problems can sometimes arise when not brewing and chilling tea properly. Allowing brewed chai to cool on the counter before refrigerating ensures there’s no condensation dilution.

For equipment challenges, ensure your blender or shaker is large enough to accommodate the quantities you’re preparing. If not blended well, ingredients can separate—giving an unsightly appearance and uneven texture.

Ingredient substitutions may lead to unexpected results, so always test a small batch before serving larger quantities. This can prevent unwanted surprises and ensure quality experiences.

Timing concerns may crop up when hosting, especially if a group is gathered. Prepare components ahead, but ensure to mix just before serving for freshly blended flavor!

Recipe Success Stories

Community feedback about this recipe has been overwhelmingly positive—readers have shared their variations, such as adding coconut milk or incorporating seasonal fruits, creating individualized experiences.

Many have had success in creating iced vanilla chai latte kits, gifting them to friends as a fun DIY project. The flexibility of this drink has made it a favorite amongst readers.

Adaptation stories have risen, with readers sharing their successful experiences in local cafes using this recipe as a guide to create a business, highlighting the versatility of making a cherished drink!

Photography tips abound, with fans sharing stunning images of their creations on social media. The vibrant colors and elegant garnishes have inspired many to create their versions and share!

Frequently Asked Questions

Can I make this drink vegan? Absolutely! Simply swap the milk for a plant-based option like almond or oat milk and use a vegan sweetener.

How can I make my chai stronger? Brew the chai tea for a longer duration or use more tea leaves to intensify the flavor and spice elements.

Can I store leftover chai mix? Yes, brewed chai can be stored in the refrigerator for up to a week in an airtight container.

What sweeteners work best? Popular choices include regular sugar, honey, or flavored syrups. For lower-calorie options, consider erythritol or stevia.

Is this recipe suitable for kids? Yes! This iced vanilla chai latte is an enjoyable treat for children but monitor the sweetness level according to preference.

Can I freeze leftover chai? Yes, freeze leftover brewed chai in an ice cube tray for later use in iced drinks!

What spices can I add for extra flavor? Experiment with nutmeg, pepper, or cardamom to elevate the traditional chai flavors even further.

Is it possible to adjust the amount of vanilla? Yes, you can increase or decrease the vanilla syrup to your taste. Start small and adjust as desired!

Can I use instant chai mix? While it’s not the traditional method, instant chai mix can work if you’re short on time; adjust milk and sweetness accordingly.

What kind of tea is best for chai? Black tea is traditionally used; however, you can experiment with green tea for a different flavor profile.

Additional Resources

Explore related recipes like Mint Iced Tea or Mocha Iced Coffee to complement your summer beverage repertoire. Dive deeper into technique guides for brewing exceptional chai, or investigate ingredient information for innovative uses of spices in your cooking.

For equipment recommendations, consider investing in a quality tea infuser or milk frother to elevate your drink. Seasonal variations are abundant with chai, allowing for endless possibilities; try adding pumpkin spice in the fall or fresh fruit during spring and summer!

Join the Conversation

We invite you to share your experiences with the iced vanilla chai latte! Share your photos and variations on social media, using the hashtag #IcedVanillaChaiLatte. Join our growing community of chai enthusiasts, where we exchange tips, tricks, and unique presentations to create delightful experiences.

Participation doesn’t just stop with sharing photos; we encourage you to leave feedback and reviews on this recipe! Your insights inspire others and help evolve our recipe collection further.

As you create your perfect iced vanilla chai latte, remember to adapt and share, as every story enriches the tradition behind this cherished drink!

The Recipe

Iced Vanilla Chai Latte

Serves: 2 servings

Prep Time: 10 mins

Cook Time: 5 mins

Total Time: 15 mins

Kitchen Equipment Needed

  • Blender or shaker
  • Measuring cups and spoons
  • Stove or kettle for brewing
  • Fine mesh strainer
  • Tall glasses for serving

Ingredients

  • 2 cups chai tea (brewed strongly)
  • 1 cup milk (dairy or plant-based)
  • 2 tablespoons vanilla syrup
  • Ice cubes
  • Cinnamon for garnish (optional)

Directions

  1. Brew the chai tea according to package instructions, allowing it to steep for 8-10 minutes for a stronger flavor.
  2. In a glass, mix the brewed chai with vanilla syrup.
  3. In another glass, fill with ice cubes, and pour the chai mixture over the ice.
  4. Top with milk, and stir gently to combine. Optionally, you can blend or shake for a frothy texture.
  5. Garnish with a sprinkle of cinnamon and enjoy your iced vanilla chai latte!

Recipe Notes

  • You can adjust the sweetness and spice levels to suit your taste preferences.
  • Store leftover chai in the refrigerator for up to a week for later use.
  • Experiment with different milk alternatives for unique flavor profiles.

Delicious No-Bake Lemon Oatmeal Cookies Recipe to Try Today

Lemon Oatmeal No-Bake Cookies: A Zesty Delight for Your Sweet Tooth

⚖️
Difficulty
Easy

⏲️
Prep Time
10 mins

🕒
Cook Time
0 mins

⏱️
Total Time
10 mins

🍽️
Servings
12 cookies

Lemon Oatmeal No-Bake Cookies are the perfect treat for those who crave sweet and tangy flavors without the need for baking. In just a quick ten minutes, you can whip up these delightful cookies that require minimal ingredients and effort. Imagine biting into a chewy cookie filled with the bright, refreshing taste of lemon, complemented by hearty oats and a hint of sweetness. These cookies not only satisfy your sweet tooth but also evoke memories of summer days, bringing a burst of sunshine into your kitchen.

These no-bake cookies are not only easy to prepare but also perfect for any occasion—whether it’s a family gathering, a picnic, or simply a cozy night at home with a cup of tea. The vibrant lemon flavor sets them apart from traditional oatmeal cookies, making them a zesty alternative that everyone will enjoy. Plus, they are a great treat for kids, and can even be a fun project to make together.

Quick Recipe Highlights

  • Flavor Profile: Bursting with fresh lemon zest and a hint of vanilla, these cookies offer a perfect balance of tartness and sweetness.
  • Texture: Chewy and hearty from the oats, these cookies have a satisfying bite with a soft center.
  • Aroma: The bright and refreshing scent of lemon fills your kitchen, creating an inviting atmosphere.
  • Visual Appeal: Golden-brown cookies dotted with a hint of zest make for an eye-catching dessert.
  • Skill Level Needed: This recipe is perfect for beginners, requiring no baking skills, just basic mixing and chilling.
  • Special Equipment: No special equipment is needed besides mixing bowls and parchment paper.

Recipe Overview

  • Difficulty Level: This recipe is straightforward and forgiving, making it excellent for novice bakers or anyone looking for a quick treat.
  • Category: These cookies fall into the dessert and snack categories, perfect for a sweet bite at any time of day.
  • Cuisine: Inspired by classic American cookie traditions, but with a zesty twist that adds an element of surprise.
  • Cost: Economical to make, with common pantry ingredients keeping costs low.
  • Season: Ideal for warm weather, when a no-bake option is desirable, but enjoyable year-round.
  • Occasion: Great for summer BBQs, birthday parties, or as a delightful afternoon snack.

Why You’ll Love This Recipe

These Lemon Oatmeal No-Bake Cookies offer a delightful combination of taste and texture that will have you reaching for seconds. The refreshing lemon flavor is invigorating, hugging the creamy sweetness of the oats. Their chewy consistency makes them a fulfilling snack, and the absence of baking keeps them soft and moist. Plus, because these cookies set in the fridge, they are easy to make ahead and store for later.

Convenience is another major advantage of this recipe. With only ten minutes required for preparation, you’ll have a homemade treat ready to go in no time. There’s no oven preheating, no messy cleanup from baking sheets, and no waiting around for cookies to cool. Instead, you can quickly mix everything together, scoop it out, and let the fridge do the work.

Packed with wholesome oats, these cookies have nutritional benefits to offer. Oats are a good source of fiber, helping to keep you satisfied longer. Combined with the healthy fats from nut butter, this treat becomes not only delicious but also a great option for a nutritious snack.

Socially, these cookies are perfect for sharing. They make an inviting addition to gatherings and can easily be presented with a cup of tea for afternoon visitors. Their unique flavor also makes them a topic of conversation amongst friends and family.

The cost-effectiveness of this recipe cannot be overlooked. Using simple and easily sourced ingredients, you can create a batch of cookies that satisfy your cravings without breaking the bank. This makes it an excellent choice for budget-friendly baking.

Historical Background and Cultural Significance

Originating in America, no-bake cookies became popular in the mid-20th century as a convenient option for those who wanted sweets without the intricacies of baking. The versatility of the no-bake method allowed for innovative flavors, including this delightful lemon version. The inclusion of oats provides a nod to the traditional oatmeal cookie, while the bright lemon flavor reflects a more modern culinary trend focusing on fresh, zesty ingredients.

Culturally, no-bake cookies often symbolize summer and childhood memories. Many people associate them with family gatherings, pool parties, and fun times spent in the kitchen. They evoke feelings of nostalgia as they remind us of carefree days, often made together with loved ones. The bright yellow color of lemon adds a cheerful note to any dessert tray.

As the recipe evolved, various adaptations emerged, each adding its regional flair. Some variations might incorporate different nuts, fruits, or even chocolate. This continual evolution showcases the adaptability of the no-bake cookie format.

In different regions, you can find variations built around local flavors. For example, in areas where coconut is popular, shredded coconut may be added for a tropical twist. These variations not only highlight the appeal of no-bake cookies but also emphasize the creativity often found in home kitchens.

Ingredient Deep Dive

Oats: Oats are a staple in many cultures, valued for their nutritional benefits and hearty texture. They are low in calories and high in fiber, making them an excellent choice for healthy snacks. Look for rolled oats for the best texture in these cookies. Store oats in an airtight container to prolong freshness, and feel free to substitute rolled oats with quick oats in a pinch.

Lemon: Lemons have a rich history, dating back thousands of years in culinary traditions around the world. Their bright, zesty flavor plays a crucial role in this recipe, providing a refreshing contrast to the sweetness of the cookies. When selecting lemons, look for firm, smooth-skinned fruit. Store them at room temperature for a short time, or refrigerate for longer shelf life. If fresh lemons aren’t available, bottled lemon juice can be used as a substitute.

Nut Butter: Nut butter, whether almond, peanut, or cashew, adds creaminess and a rich flavor to the cookies. Nut butters are great sources of protein and healthy fats, offering nutritional density in a small package. Choose a natural nut butter without added sugars or oils. Store unopened jars in a cool place, and once opened, refrigerate for longevity. Sunflower seed butter can be a great alternative for those with nut allergies.

Sweetener: Natural sweeteners like honey or maple syrup, commonly used in no-bake recipes, lend a healthy twist. Each offers unique flavors that can enhance the overall taste profile of the cookies. Opt for pure varieties without additives for the best quality. Store in a cool, dark place to maintain flavor integrity, and sub out for sugar if preferred.

Common Mistakes to Avoid

  • Skipping the chilling time: Allowing the cookies to set in the fridge is crucial for achieving the right texture.
  • Using too much liquid: Over-measuring your liquid ingredients can result in overly sticky cookies that won’t hold shape.
  • Not mixing thoroughly: Ensure all ingredients are well combined to avoid inconsistency in flavor and texture.
  • Neglecting to use old-fashioned rolled oats: Quick oats may lead to a mushy texture, so stick with rolled oats for the best results.
  • Rushing the process: Patience is key! Allow these cookies to cool completely before diving in for the best results.
  • Forgetting to press down the mixture: Pressing the mixture firmly into the cookie shapes helps them hold together once set.
  • Choosing the wrong nut butter: Some nut butters can be oily or thick; stick with a consistent, creamy texture for the best results.
  • Not adjusting flavors: Taste your mixture before setting to ensure the balance of sweetness and lemon is perfect for your liking.

Essential Techniques

Mixing Ingredients: Mixing is foundational in no-bake cookies. Ensure that all ingredients are evenly distributed for consistent flavor in each bite. Use a sturdy mixing bowl and appropriate tools, like a wooden spoon or spatula, to achieve a thorough blend.

Setting in the Fridge: Allowing the cookies to set properly in the fridge is critical for texture. Chilling hardens the mixture, allowing it to achieve the chewy consistency expected in no-bake cookies. Make sure to spread the mixture evenly in the pan to maintain even cooling.

Pro Tips for Perfect Lemon Oatmeal No-Bake Cookies

1. Experiment with different sweeteners like agave syrup or natural sweeteners to find your ideal flavor balance.

2. For a richer flavor, add a splash of vanilla extract or almond extract to complement the lemon.

3. Incorporate add-ins like mini chocolate chips or dried fruit to elevate your cookie experience.

4. Play with textures by topping your cookies with chopped nuts or seeds once shaped.

5. Ensure your mixing bowl is large enough to accommodate all ingredients without overflowing.

6. If the mixture is too crumbly, add a small amount of coconut oil or nut butter to improve consistency.

7. Keep a close eye on your chilling time—don’t let them set for too long, or they may harden excessively.

8. To easily release cookies from the parchment paper, lightly grease the surface beforehand.

Variations and Adaptations

Changing the flavor profile can quickly adapt the base recipe. For instance, substitute lemon with lime for a tangy twist or use orange for a sweeter flavor. Seasonal fruits can also be folded into the dough, offering fruits like blueberries or strawberries for a summer treat.

For those seeking dietary modifications, nuts can be swapped for seeds for a nut-free version. Crushed graham crackers can substitute oats for a different texture. Adjusting sweetness can also suit dietary preferences; try sugar alternatives like stevia or monk fruit.

Serving and Presentation Guide

When plating these cookies, consider using a bright platter that resonates with the lemon’s vibrant color. Garnishing with a sprinkle of grated lemon peel adds visual appeal and emphasizes the fresh flavor. For serving, these cookies are delightful chilled or at room temperature, perfect alongside an iced tea or lemonade for a refreshing treat.

Wine and Beverage Pairing

For a delightful pairing, consider a crisp white wine like Sauvignon Blanc, which complements the citrus flavors beautifully. If you prefer non-alcoholic options, a sparkling lemonade or herbal tea can enhance the refreshing quality of the cookies. Just ensure your beverages are chilled for a refreshing contrast.

Storage and Shelf Life

Store your cookies in an airtight container in the fridge to maintain freshness, where they will last for up to a week. For longer storage, consider freezing them in a single layer, then transfer to a freezer-safe container. Thaw them in the fridge before serving to maintain their texture.

Make Ahead Strategies

These cookies are perfect for make-ahead planning. You can prepare the dough up to two days in advance and simply roll into shape before chilling. This makes them a convenient option for parties or gatherings. If you’re looking to surprise guests, assembling the cookies earlier in the day allows flavors to meld beautifully by serving time.

Scaling Instructions

If you’d like to halve the recipe, simply divide each ingredient by two while keeping the process the same. Doubling or tripling the recipe is easy, too, just ensure you use a large mixing bowl to accommodate the larger quantity, and consider using multiple baking sheets for chilling if necessary.

Nutritional Deep Dive

These cookies are nutritional powerhouses. With a balance of carbohydrates, healthy fats, and protein from the oats and nut butter, they provide lasting energy. Additionally, the lemon offers vitamin C, boosting your immune system and adding to the overall health benefits these cookies provide.

Dietary Adaptations

If you’re looking for gluten-free options, ensure you use certified gluten-free oats in your recipe. For a vegan option, substitute honey with maple syrup and ensure your nut butter is dairy-free. Low-carb and keto variations can easily be made by using sugar substitutes and almond flour instead of oats.

Troubleshooting Guide

If your cookies aren’t setting properly, check the ratios of liquid to dry ingredients; adding a touch more oats or allowing more chilling time often solves the issue. If flavor is too strong or weak, adjust with additional zest or sweetener as needed.

Recipe Success Stories

Feedback from our community has been overwhelmingly positive, with many sharing their own variations like the addition of coconut flakes or chocolate chips. Readers appreciate how easy and quick the recipe is, and some suggest using nut butter combinations for unique flavors, showcasing the flexibility of this no-bake treat!

Frequently Asked Questions

Can I make these cookies vegan?

Yes! Simply substitute honey with maple syrup and ensure your nut butter does not contain dairy.

How long do these cookies last?

Stored in an airtight container in the fridge, these cookies will last up to one week and even longer in the freezer.

Can I substitute other dried fruits?

Absolutely! Dried cranberries, apricots, or raisins work wonderfully and add to the flavor and texture.

What type of oats should I use?

Old-fashioned rolled oats are ideal for the best texture. Quick oats can be used in a pinch but may result in a softer texture.

What if my mixture is too dry?

If your mixture seems dry and crumbly, a small amount of additional nut butter or sweetener can help bind it together.

Are these cookies gluten-free?

They can be made gluten-free by using certified gluten-free oats.

Can I add chocolate to the recipe?

Yes! Mini chocolate chips or drizzles make a delicious addition to these cookies.

Can I use coconut oil instead of nut butter?

Coconut oil may replace nut butter, but it will alter the flavor and texture slightly; it’s best used in combination with nut butter.

How do I make the cookies firmer?

For a firmer cookie, increase the chilling time and ensure the ratio of oats to liquid is balanced.

What is the best way to serve these cookies?

These cookies are best served chilled or at room temperature, alongside a refreshing beverage such as iced tea or lemonade.

Additional Resources

If you loved this recipe, be sure to check out our other dessert recipes, like no-bake chocolate energy bites and peanut butter protein bars. For tips on mastering no-bake techniques, explore our guide on essential techniques in no-bake baking.

Join the Conversation

We encourage you to share your photos and variations of the Lemon Oatmeal No-Bake Cookies on social media! Your feedback and experiences are valuable and contribute to our community. Let us know how your cookies turned out and any creative twists you added to the recipe!

The Recipe

Lemon Oatmeal No-Bake Cookies

Serves: 12 cookies

Prep Time: 10 mins

Cook Time: 0 mins

Total Time: 10 mins

Kitchen Equipment Needed

  • Mixing bowls
  • Spatula or wooden spoon
  • Parchment paper
  • Cookie scoop or spoon

Ingredients

  • 1 ½ cups rolled oats
  • ½ cup nut butter (peanut or almond)
  • ¼ cup honey or maple syrup
  • ¼ cup fresh lemon juice
  • 1 tablespoon lemon zest
  • 1 teaspoon vanilla extract

Directions

  1. In a mixing bowl, combine rolled oats, nut butter, honey, lemon juice, lemon zest, and vanilla extract.
  2. Mix thoroughly until all ingredients are well combined.
  3. Using a cookie scoop or spoon, drop portions of the mixture onto parchment paper lined on a baking sheet.
  4. Press down each cookie slightly to help it hold its shape.
  5. Place the baking sheet in the fridge for about 30 minutes or until firm.
  6. Once set, remove the cookies from the parchment and enjoy!

Recipe Notes

  • Feel free to experiment with add-ins like chocolate chips or dried fruits.
  • For a nut-free option, substitute nut butter with sunflower seed butter.
  • Store leftover cookies in an airtight container in the fridge for up to a week.

Ultimate Egg Salad Sandwich Recipe for Delicious Lunch Ideas

Delicious Egg Salad Sandwich: A Perfectly Creamy Delight

⚖️
Difficulty
Easy

⏲️
Prep Time
15 mins

🕒
Cook Time
10 mins

⏱️
Total Time
25 mins

🍽️
Servings
4 sandwiches

Egg salad sandwiches are a timeless classic that deliver a delightful blend of flavors and textures, making them an ideal choice for any meal of the day. This easy-to-make sandwich features a creamy filling of hard-boiled eggs, mayonnaise, and a touch of seasoning, all enveloped in soft, fresh bread. The nutritional richness of eggs combined with the satisfying crunch of celery or pickles creates an irresistible offering that is perfect for both lunch and picnics.

Whether you’re enjoying it at a backyard barbecue or packing it for a lunch at work, the egg salad sandwich is versatile and loved by all ages. The creamy mixture paired with fresh greens or tomatoes adds a refreshing note, ensuring every bite is a burst of flavor. This egg salad sandwich recipe is not only quick and simple but also provides endless possibilities for customization, ensuring that it can be enjoyed time and again.

Quick Recipe Highlights

  • Flavor Profile: This sandwich features a rich, creamy flavor complemented by subtle hints of tanginess from the mayo and the crunch of fresh vegetables.
  • Texture: The combination of the smooth, creamy egg filling and the soft bread creates a delightful contrast, enhanced by the crispness of added ingredients like celery.
  • Aroma: The enticing smell of savory eggs mixed with mayonnaise and mustard creates an inviting aroma that draws everyone to the kitchen.
  • Visual Appeal: A picturesque sandwich with the bright yellow of the egg salad, contrasting the light brown of the bread, offers an appetizing display.
  • Skill Level Needed: This recipe is perfect for beginners, requiring no special cooking skills aside from hard-boiling eggs.
  • Special Equipment: A mixing bowl, egg slicer (if available), and a knife are all you need for this straightforward recipe.

Recipe Overview

  • Difficulty Level: This egg salad sandwich is categorized as easy, making it accessible to all cooking levels. The simple preparation steps ensure quick assembly, allowing you to focus on enjoying your meal.
  • Category: The dish falls under lunch or snack categories, making it a quick and satisfying option that can also be served at brunch or as a light dinner.
  • Cuisine: This classic sandwich transcends culinary borders, embraced in both American and European cuisines, showcasing the versatility of eggs as a core ingredient.
  • Cost: With basic ingredients primarily found in most kitchens, the total cost for this recipe is economical, making it a great choice for budget-conscious cooks.
  • Season: Egg salad sandwiches shine all year round but are especially delightful in warmer months when chilled, and hearty meals are preferred.
  • Occasion: Perfect for picnics, potlucks, and casual gatherings, this sandwich invites sharing and social interaction among family and friends.

Why You’ll Love This Recipe

The egg salad sandwich is both delicious and satisfying, offering a comforting meal that is rich in flavor yet light on the palate. The creamy egg salad is a delightful blend of flavors, from the savory eggs to the tangy mayonnaise, all harmonizing beautifully to create a balanced taste. Each bite is a wonderful experience that combines familiar comfort with a refreshing crunch when incorporating fresh greens or crunchy pickles.

Additionally, the convenience of this recipe is unmatched. With minimal prep and cook time, whipping up an egg salad sandwich is an excellent choice for busy individuals and families. Simply hard-boil the eggs, mix the ingredients, and you’re ready to assemble. This recipe not only saves valuable time but also keeps meal prep hassle-free, allowing you to focus on savoring the delicious result.

The nutritional benefits are another incentive that further enhances the appeal of this recipe. Eggs are a fantastic source of protein, vitamins, and minerals that fuel your body while offering essential nutrients. When paired with whole grain bread and fresh veggies, this sandwich transforms into a well-rounded meal that can support your dietary needs without compromising on flavor.

Social gatherings are another occasion where egg salad sandwiches shine. They are not only easy to make in large batches but also a crowd-pleaser that encourages sharing and conversation. Whether it’s a picnic in the park or a potluck dinner, these sandwiches are sure to bring smiles and satisfaction to your guests with their delightful taste and presentation.

Lastly, the cost-effectiveness of this dish is a significant advantage, especially for families looking to stretch their budgets. With simple, inexpensive ingredients readily available, preparing egg salad sandwiches is an economical way to produce an impressive meal that everyone enjoys. The versatility of the ingredients also allows for adaptations based on what’s on hand, making this recipe a staple that can be tailored to suit any household.

Historical Background and Cultural Significance

The egg salad sandwich has its roots in early culinary traditions, growing as a staple in American cuisine during the 19th century. As household cooking evolved, the use of eggs in various dishes became more common, and the concept of combining them with mayonnaise was born. This simple yet hearty dish quickly gained popularity, transcending social classes and becoming a favorite in kitchens across the nation.

Culturally, the egg salad sandwich represents comfort food that connects generations. Many families have passed down their unique recipes, often incorporating personal touches that highlight cultural differences. Whether it’s the addition of spices, herbs, or other ingredients, this sandwich serves as a canvas for creativity in the kitchen, allowing families to celebrate their culinary heritage.

Over the years, the recipe itself has evolved, adapting to dietary preferences and health trends while still honoring its foundational ingredients. From classic versions to modern takes that incorporate organic ingredients or spicy variations, the egg salad sandwich remains relevant in today’s diverse food landscape, appealing to both nostalgic tastes and contemporary palates.

Regionally, the egg salad sandwich sees variations in its preparation. Some areas may prefer additional crunch from celery or a hint of sweetness from pickles or sweet relish, reflecting local ingredient availability and preferences. This adaptability has solidified its status as a beloved dish enjoyed in various forms across the country.

Ingredient Deep Dive

  • Eggs: As the main ingredient, eggs boast not only a rich history but also numerous nutritional benefits such as high protein and essential vitamins. When selecting eggs, opt for those with secure packaging and check the sell-by date for freshness. Store them in the refrigerator, ideally in their original carton, which helps to protect the eggs from absorbing strong odors in the fridge.
  • Mayonnaise: This creamy condiment is essential for achieving the right texture in egg salad. It originated in France and has become a staple in kitchens worldwide. When choosing mayonnaise, consider options made with olive or avocado oil for added health benefits. Store opened mayonnaise in the fridge and use it within a couple of months for optimal freshness.
  • Mustard: A dash of mustard adds tang and enhances the flavor profile of the egg salad. Mustard has historical significance, originating in the ancient world, and has evolved into various types such as Dijon, yellow, or spicy brown. Select mustards that align with your taste preference, and remember to store them in a cool, dark place, using them within a few months of opening.
  • Celery: Adding chopped celery introduces a pleasant crunch and freshness to the sandwich. This crisp vegetable is rich in fiber and provides hydration. When selecting celery, look for firm stalks without any blemishes. Store it in the crisper drawer of your refrigerator, wrapped in a damp paper towel, to prolong its freshness.
  • Seasonings: Spice blends such as salt and pepper, along with herbs like dill or chives, elevate the flavor of the egg salad. These seasonings can be adjusted based on personal preference and availability. Ensure you use fresh herbs when possible for enhanced flavor and store your spices in a cool, dark area to maintain their potency.

Common Mistakes to Avoid

  • Overcooking the eggs: Boiling eggs for too long can lead to a rubbery texture and grey yolks. Aim for a cooking time of 9-12 minutes for perfectly boiled eggs.
  • Using old eggs: Freshness matters! Older eggs may not bind well or may have an off flavor. Check the expiration date and perform the float test to ensure they are fresh.
  • Inconsistent mixing: Failing to mix the egg salad thoroughly can result in uneven texture and flavor. Make sure ingredients are well combined for a cohesive taste.
  • Ignoring seasoning: Without proper seasoning, the egg salad might taste bland. Don’t skimp on salt, pepper, or other flavorings that enhance the overall dish.
  • Using too much mayo: While mayo adds flavor, too much can make the salad overly soggy. Start with a small amount and adjust according to preference.
  • Skipping cooling time: Allow the egg salad to chill for at least 30 minutes before serving for the best flavor infusion.
  • Not balancing richness: If the salad is too rich, consider adding a splash of vinegar or lemon juice for a tangy contrast.
  • Neglecting optional mix-ins: Explore adding ingredients like capers, onions, or a dash of hot sauce for expanded flavor profiles.

Essential Techniques

  • Hard-boiling eggs: This fundamental technique involves cooking eggs in boiling water, ensuring that they don’t crack while boiling. To master this, place the eggs in a pot, cover with cold water, bring to a boil, and then reduce heat. Timing is crucial, as overcooking can ruin their texture. Look for a firm egg white and set yolk when correctly boiled.
  • Chopping ingredients: Properly chopping vegetables ensures even distribution in your egg salad, enhancing flavor and texture. Use a sharp knife and cutting board, and chop celery into small, uniform pieces for a consistent crunch. Avoid large chunks, which can disrupt the smoothness of your salad.
  • Mixing the filling: For a well-blended egg salad, combine ingredients gently to avoid breaking down the eggs too much. A light fold method can help keep some egg chunks intact, providing a pleasant texture. Ensure that seasonings are sprinkled evenly to enhance the amazing flavor.

Pro Tips for Perfect Egg Salad Sandwich

  • Choose the right bread: Opt for whole grain or sourdough bread to add depth of flavor and texture, enhancing the overall sandwich experience.
  • Experiment with flavors: Incorporate unique ingredients like avocado or sriracha for a modern twist on the classic recipe that can elevate the taste.
  • Let it chill: Allow the egg salad to chill in the fridge for at least an hour to meld the flavors together, making it even more delicious.
  • Garnish creatively: Adding a sprinkle of paprika or fresh herbs on top while serving adds color and visual appeal to your sandwich.
  • Make small batches: If you’re unsure about your egg salad’s flavor, make smaller portions to test and adjust ingredients before scaling up.
  • Toast your bread: A light toasting can add an extra dimension to the sandwich’s texture and help prevent it from getting soggy.
  • Fresh ingredients are key: Always use fresh eggs and vegetables to ensure the best flavor and nutritional quality.
  • Use a sturdy spread: Mixing avocado or Greek yogurt with mayonnaise can create a creamy stability that holds up well in the sandwich.

Variations and Adaptations

  • Regional variations: In the southern U.S., egg salad often includes sweet pickle relish, while in the Northeast, it may incorporate herbs like dill for a fresh kick.
  • Seasonal adaptations: In the summer, adding diced cucumber can introduce a refreshing crunch, while in the fall, some spices can bring warmth to the flavor profile.
  • Dietary modifications: For a vegan version, substitute eggs with chickpeas and mayonnaise with vegan mayo, ensuring a plant-based delight.
  • Flavor variations: Add bacon for a savory punch, or mix in curry powder for a unique twist that spices up the traditional flavor.
  • Texture modifications: For more crunch, include toasted nuts or sunflower seeds, elevating the texture and nutritional value of the dish.
  • Presentation alternatives: Use lettuce leaves or mini croissants instead of traditional bread for a creative and appealing serving option.

Serving and Presentation Guide

To enhance the dining experience of your egg salad sandwich, proper plating techniques and garnishing can make a substantial difference. Start by choosing a plate that complements the colors of your sandwich. Arrange the sandwich diagonally across the plate to create visual interest. For garnishing, a sprinkle of fresh herbs like parsley or dill, or a few slices of tomato on the side, can add refreshing flavor and color contrast.

Combine the sandwich with traditional accompaniments such as potato chips or a simple green salad for a well-rounded meal presentation. For modern serving suggestions, place sandwiches on tiered platters for gatherings or serve them as finger sandwiches at parties for an elegant touch. Ensure that the sandwiches are served at room temperature, as this enhances the flavors and texture of the egg salad filling.

Pay attention to portion control, making half sandwiches or quartered pieces for buffets to encourage guests to try more variety. Trust your instincts about how to elevate the overall presentation and make it visually appealing while keeping practicality in mind.

Wine and Beverage Pairing

When it comes to pairing drinks with an egg salad sandwich, consider white wines or sparkling options that enhance the meal without overpowering it. A crisp Sauvignon Blanc or a light Chardonnay can beautifully complement the creamy notes of the egg salad. Additionally, a sparkling wine like Prosecco can add a refreshing zest.

For non-alcoholic alternatives, iced tea infused with lemon or a fruity lemonade can provide a refreshing balance to the richness of the sandwich. Should coffee or tea be the preferred choice, choose a light roast black coffee or herbal teas that won’t overshadow the flavors present in your meal. Always serve beverages chilled to create a refreshing and enjoyable dining experience.

Storage and Shelf Life

Proper storage of your egg salad sandwich ensures you can enjoy it for future meals while maintaining its quality. Store any leftover egg salad in an airtight container in the refrigerator and consume within 3-4 days for optimal freshness. When preparing sandwiches, it’s best to keep the filling separate from the bread until ready to serve, as this prevents sogginess.

For longer storage, consider freezing the egg salad without any mayonnaise or dressing, as these can affect the texture. Store the egg salad in a freezer-safe container and use it within 1-2 months. When ready to eat, thaw in the refrigerator overnight, mix with fresh mayonnaise, and assemble the sandwiches.

Signs of spoilage may include an off smell, discoloration, or any mold growth, so always err on the side of caution by inspecting the salad before consuming. Reheat gently if needed, preferably using a microwave to retain moisture, ensuring it remains delicious.

Make Ahead Strategies

To prepare your egg salad sandwich ahead of time, consider a straightforward prep timeline. Hard-boil the eggs a day in advance and keep them refrigerated. Make the egg salad mixture the night before and store it in the fridge, allowing the flavors to meld together overnight for enhanced taste.

You can store the salad in an airtight container to preserve its freshness and flavor. If you plan to serve it beyond one day, avoid adding mayonnaise until just before serving to prevent the mixture from becoming watery. When ready to assemble, freshening up the mixture with additional mayo or seasoning can elevate its flavor.

For a special touch, consider adding fresh ingredients like lettuce or tomato right before serving to ensure crispness and enhance flavor. This approach keeps the sandwich vibrant and appealing, allowing you to enjoy a fresh meal effortlessly.

Scaling Instructions

If you aim to adjust the serving size of your egg salad sandwiches, simply halve or double the quantity of ingredients proportionately. For a smaller gathering, half the amount of eggs, mayo, and seasonings while ensuring the flavor balance remains intact.

When doubling or tripling the recipe, ensure that your mixing bowl is large enough to contain the accumulated ingredients. Timing for boiling may also increase, so consider cooking the eggs in batches if needed. To prevent the egg salad from overcrowding the container, mix in segments if making larger quantities, providing ease of coating all ingredients evenly.

For long-term storage of scaled portions, freeze the egg salad mixture as described without mayo to preserve texture and off flavors. Always label the containers with dates and serving sizes for easy management and use by your meal plan.

Nutritional Deep Dive

Examining the nutritional value of your egg salad sandwiches reveals significant benefits. Eggs are a natural source of high-quality protein, essential for muscle building and repair. They also contain a multitude of vitamins, including B12 and D, plus minerals like selenium, which supports overall well-being.

In addition to egg benefits, the incorporation of fresh vegetables like celery adds fiber to your meal, aiding in digestion and promoting heart health. When served on whole grain bread, you can enhance carbohydrate content while providing additional vitamins and minerals. An average serving of this sandwich is not only filling but can offer around 300-400 calories depending on portion sizes and additional ingredients.

Pay attention to portion size, as this meal can be calorie-dense if a significant amount of dressing is used. To maintain weight management goals, consider adjusting the mayo quantity and serving the sandwich alongside low-calorie sides, such as a salad, for a balanced meal.

Dietary Adaptations

If your dietary preferences include gluten-free options, simply substitute regular bread with gluten-free varieties widely available. Many bakeries offer gluten-free bread that closely mimics the texture of traditional bread, ensuring that everyone can enjoy this delicious sandwich.

For dairy-free or vegan adaptations, swap out the eggs for mashed chickpeas or tofu and use vegan mayonnaise. This alternative retains the creamy richness while fitting within those dietary guidelines. Low-carb diets can enjoy variations using lettuce wraps to keep the heartiness of the sandwich without the added carbs from bread.

Keto followers might choose to omit the mayonnaise and blend avocado with herbs for a healthy fat option. For those on a low-FODMAP diet, selecting low-glycemic ingredients, such as limited onions and garlic, will provide a safe way to enjoy this classic dish. Always ensure that ingredient substitutions align well with your specific dietary requirements for the best results.

Troubleshooting Guide

For texture issues in your egg salad, if the mix is too runny, try adding more chopped eggs or a touch more mayo to help absorb excess moisture. If it’s too thick, a splash of lemon juice or vinegar can help loosen it for a better spreadability.

Flavor balance can sometimes be off; if the salad tastes bland, consider adding more seasoning, especially salt and pepper, to amplify taste. If it feels too rich or heavy, introducing some acidity with lemon juice can enhance freshness and cut through the creaminess.

When faced with temperature problems, ensure that eggs are not overcooked, as this can lead to a rubbery feeling. If experiencing issues with equipment, such as difficulty in chopping or blending, maintaining sharp knives when prepping can ease this frustration and ensure clean cuts.

Common ingredient substitutions can also present challenges. When switching ingredients, be mindful of the moisture content, especially when replacing eggs with beans or alternatives, as this can alter the overall flavor and texture profile of the egg salad.

Timing concerns can be alleviated by prepping step-by-step. If you’re unsure of proper cooling times for eggs or chilling salad mix, setting a timer and preparing other meal components can help streamline cooking time and ensure everything comes together perfectly.

Recipe Success Stories

Our community has shared countless successful variations of the egg salad sandwich, highlighting how this recipe caters to different tastes and dietary needs. Feedback from readers often emphasizes their creative twists, such as adding spices or substituting veggies for a fresh spin.

Some readers enjoy experiencing how a simple recipe can be elevated, with examples of adapting to personal flavor palettes and ingredient preferences that others may find helpful. The introduction of unique seasonings and creative presentation ideas inspire others to experiment in the kitchen, leading to new family favorites.

On social media, many have shared stunning photographs of their own egg salad sandwich creations, showcasing vibrant colors and innovative serving ideas. These images capture community engagement, enhancing the visual allure of a meal that might seem ordinary but offers so much creativity and possibility.

The adaptability of this recipe has helped readers tailor it to their unique gatherings or needs, ranging from classic picnic sandwiches to elegant brunch presentations that impress guests. Encouraging feedback allows for continuous improvement, and many appreciate the opportunity to connect with others who share a passion for cooking.

Frequently Asked Questions

Q1: How can I make my egg salad sandwich healthier?

A1: You can make your egg salad sandwich healthier by reducing the amount of mayonnaise and substituting it with Greek yogurt. Adding chopped veggies like spinach or celery increases fiber and vitamins without adding extra calories.

Q2: Can I freeze egg salad?

A2: It’s best to freeze the egg salad without mayonnaise and add it fresh when you’re ready to serve. This prevents a change in texture that can occur when mayonnaise is frozen.

Q3: What are some variations I can try?

A3: There are numerous variations you can try, such as adding diced pickle relish, paprika, curry powder, or even bacon bits to enhance the flavor. Experimenting with fresh herbs is a great way to find your favorite combination.

Q4: What should I serve with my egg salad sandwich?

A4: Egg salad sandwiches pair wonderfully with a side salad, fruit, or chips for a light meal. You could also serve them with pickles or olives for a classic touch.

Q5: How do I prevent my bread from getting soggy?

A5: To prevent sogginess, store the egg salad separately from the bread until you’re ready to eat. Also, lightly toast your bread to create a barrier and enhance flavor.

Q6: How long does egg salad last in the fridge?

A6: Properly stored in an airtight container, egg salad can last in the refrigerator for 3-4 days. If it shows any signs of spoilage, such as odor or discoloration, it’s best to discard it.

Q7: Can I use different types of bread?

A7: Absolutely! You can use any kind of bread you prefer, including whole grain, sourdough, or even gluten-free options. Each type adds a unique taste and texture to the sandwich.

Q8: Is this sandwich good for meal prepping?

A8: Yes, egg salad sandwiches are excellent for meal prepping. Prepare the egg salad mix in advance, keep it refrigerated, and assemble sandwiches just before eating for maximum freshness.

Q9: What can I serve instead of mayonnaise?

A9: If you want to avoid mayonnaise, Greek yogurt or avocado work great as alternatives, providing creaminess without the extra calories. Both options also add flavor and nutritional benefits.

Q10: How do I make my egg salad more flavorful?

A10: To enhance the flavor of your egg salad, add spices like dill, a splash of hot sauce, or a squeeze of lemon juice for brightness. Experimenting with different herbs can also elevate the taste.

Additional Resources

For those interested in expanding their culinary skills, consider checking out related recipes, such as tuna salad sandwiches or chicken salad variants, which offer similar flavors with different ingredients. Technique guides on hard-boiling eggs and tips for preparing fresh vegetables will further enhance your kitchen prowess.

Ingredient information is essential, and learning how to choose high-quality eggs and produce can significantly impact your cooking. Lastly, equipment recommendations for essential kitchen gadgets like egg slicers or food processors can simplify the preparation process, making cooking fun and efficient.

Join the Conversation

Join our community of food enthusiasts by sharing your egg salad sandwich creations on social media. Share your favorite variations and adaptations to inspire others, and engage with fellow readers through recipe reviews or suggestions. Your contribution helps foster a supportive cooking environment where ideas and creativity thrive.

Encourage friends and family to participate in the conversation by sharing this recipe together. Sharing tips and tricks along the way can transform cooking from a chore into a passionate pursuit of culinary excellence.

The Recipe

Egg Salad Sandwich

Serves: 4 sandwiches

Prep Time: 15 mins

Cook Time: 10 mins

Total Time: 25 mins

Kitchen Equipment Needed

  • Pot for boiling eggs
  • Mixing bowl
  • Knife
  • Cutting board
  • Spoon for mixing

Ingredients

  • 6 large eggs
  • 1/2 cup mayonnaise
  • 1 tablespoon Dijon mustard
  • 1/4 cup chopped celery
  • Salt and pepper to taste
  • 4 slices of bread
  • Optional: lettuce, tomato, or pickle for garnish

Directions

  1. In a pot, place the eggs and fill with water until eggs are submerged. Bring to a boil, then cover, remove from heat, and let sit for 10 minutes.
  2. Transfer eggs to an ice bath to cool for about 5 minutes, then peel the shells and chop the eggs into small pieces.
  3. In the mixing bowl, combine the chopped eggs with mayonnaise, mustard, celery, salt, and pepper. Mix gently until well blended.
  4. Toast the bread if desired and place a generous scoop of egg salad between two slices of bread.
  5. Garnish with lettuce, tomato, or pickles if using, and cut the sandwich into halves or quarters for serving.

Recipe Notes

  • Feel free to adjust mayonnaise quantity according to your preference for creaminess.
  • Add herbs or spices to enhance flavor—a sprinkle of paprika can make it extra special!
  • To keep the egg salad fresh, store it in an airtight container and consume within 3-4 days.

Delicious Oven Roasted Smoked Sausage and Potatoes Recipe

Oven Roasted Smoked Sausage and Potatoes: A Comforting One-Pan Meal

⚖️
Difficulty
Easy

⏲️
Prep Time
15 mins

🕒
Cook Time
45 mins

⏱️
Total Time
60 mins

🍽️
Servings
4

Oven roasted smoked sausage and potatoes is a delightful dish that perfectly combines savory flavors and comforting textures. This one-pan meal is not only easy to prepare, but it also fills the kitchen with an inviting aroma that makes mealtime feel special. As the sausage roasts to perfection, the potatoes become tender and golden, soaking up all the delicious flavors and juices from the meat. It’s a satisfying dish that caters to the whole family and is ideal for both weekday dinners and weekend gatherings.

This recipe shines with its versatility; you can customize it with your favorite seasonings and vegetables. Whether you’re serving it with a fresh salad or crusty bread, the combination of smoky sausage and hearty potatoes is sure to please. It’s a meal that evokes warmth and nostalgia, reminding us of family dinners and togetherness around the table.

Quick Recipe Highlights

  • Flavor Profile: The smoked sausage provides a rich, meaty flavor and a hint of smokiness, perfectly balanced with the earthy taste of the roasted potatoes.
  • Texture: Juicy sausage complements the crispy, golden edges of the potatoes, creating a delightful range of textures in each bite.
  • Aroma: The dish is infused with aromatic herbs and spices, especially the inviting scent of garlic and thyme, making your kitchen smell heavenly.
  • Visual Appeal: The vibrant colors of the roasted potatoes and sausage make for a visually stunning dish that’s sure to impress your guests.
  • Skill Level Needed: This recipe is beginner-friendly, requiring just a few simple steps for a delicious result.
  • Special Equipment: All you need is a baking sheet and a mixing bowl to bring this recipe to life.

Recipe Overview

  • Difficulty Level: This dish is categorized as easy, making it accessible for cooks of all levels. With minimal preparation and straightforward cooking techniques, even novice chefs can create a crowd-pleasing meal.
  • Category: This recipe falls under the dinner category, particularly as a hearty option for lunch or dinner that suits any occasion.
  • Cuisine: Influenced by Southern and American comfort food, this dish showcases the delicious pairing of protein and potatoes—a staple in many culinary traditions.
  • Cost: The ingredients are generally affordable, with the main components being smoked sausage and potatoes, making this a budget-friendly meal.
  • Season: Best enjoyed during the cooler months, this warming dish is perfect for fall and winter gatherings.
  • Occasion: Ideal for casual family dinners, potlucks, or any time you crave something hearty and satisfying.

Why You’ll Love This Recipe

The taste and texture of oven roasted smoked sausage and potatoes create a comforting experience for your palate. The smoky flavor of the sausage enhances the savory notes of the potatoes, while the crispy exterior provides a satisfying crunch, contrasted by the tender interior. It’s a dish that embraces hearty eating, perfect for cold evenings when comfort food is most needed.

Convenience is another compelling aspect of this meal. With just a few simple ingredients and minimal effort, you can prepare a delicious dinner that will leave everyone satisfied. You can also prepare it in advance, making it perfect for busy weeknights. Simply chop the ingredients, toss them in the seasoning of your choice, and let the oven do the work.

In terms of nutrition, this dish offers a decent balance of protein and carbohydrates, thanks to the sausage and potatoes. It also provides energy for those evening activities and keeps your family fueled and happy. Add in some vegetables, and you’ll boost its nutritional profile even more.

Socially, this oven roasted smoked sausage and potatoes meal is visually impressive and makes for excellent dinner party fare. It invites sharing and encourages conversations over the well-balanced flavors, creating an atmosphere that brings everyone together.

Finally, the cost-effectiveness of this recipe cannot be overlooked. Both sausage and potatoes are cheap ingredients, making it an accessible choice for families on a budget or for anyone seeking a delicious yet affordable meal option. It is a recipe that proves flavor doesn’t have to come at a high price.

Historical Background and Cultural Significance

The origins of smoked sausage can be traced back to various cultures, with each region’s unique take on seasoning and preparation methods. Sausage has been a staple in many societies for centuries, often seen as a means of preserving meat and ensuring it could be stored for extended periods. The method of smoking sausages added flavor and shelf stability, which made it popular across many cuisines.

Culturally, sausages represent a connection to heritage, with many families passing down their recipes through generations. The combination of sausage and potatoes showcases the importance of hearty, filling meals that cater to communal dining. This dish often makes appearances at family gatherings and potlucks, embodying the spirit of sharing food and creating memories.

Over time, the recipe for oven roasted smoked sausage and potatoes has evolved, with various adaptations emerging. In different parts of the United States, this dish has incorporated local spices and vegetables, allowing it to adapt to regional tastes while still retaining its core essence as a comfort food classic.

Regional variations of this dish are plentiful, often incorporating local produce or flavors. For instance, adding peppers or seasonal vegetables can give it a fresh twist, while in some Southern traditions, highlighting Cajun spices adds an exciting depth to the recipe. Each variation tells a story of cultural influences and personal preferences.

Ingredient Deep Dive

Smoked Sausage: Smoked sausage has a rich history that varies across cultures. In European culinary traditions, it serves as a means of preserving meat and showcasing local flavors. Nutritionally, sausage provides protein and essential vitamins but should be consumed in moderation due to its fat content. When selecting sausage, look for high-quality options with natural ingredients and minimal fillers. Store any leftover sausage in the refrigerator, where it can last for several days.

Potatoes: Potatoes are a versatile staple, utilized in various cultural cuisines around the globe. Their rich source of carbohydrates, vitamins, and minerals contributes to a balanced diet while also providing energy. When choosing potatoes for roasting, opt for varieties like Yukon Gold or red potatoes for optimal flavor and texture. To store, keep potatoes in a cool, dark place, avoiding moisture to prevent spoilage.

Common Mistakes to Avoid

  • Choosing the wrong type of sausage can significantly affect the flavor of the dish. Make sure to select a high-quality smoked sausage that complements the other ingredients.
  • Not preheating the oven properly may result in uneven cooking. Always preheat to ensure the sausage and potatoes roast correctly.
  • Overcrowding the baking sheet can lead to steaming rather than roasting. Ensure there’s enough space between the pieces for even cooking.
  • Forgetting to season the potatoes could lead to bland flavor. Remember to generously season with salt, pepper, and your choice of herbs.
  • Using old or improperly stored potatoes may yield unsatisfactory results. Always check for any sign of spoilage before cooking.
  • Not allowing the dish to rest after removing it from the oven can affect texture. Let it cool slightly to improve flavor development before serving.
  • Skipping the step of tossing the ingredients can lead to uneven flavor distribution—always mix well to ensure every piece is seasoned.
  • Failing to check the doneness of both sausage and potatoes can ruin the meal. Use a meat thermometer for the sausage and a fork test for the potatoes.

Essential Techniques

Roasting: Roasting is crucial as it caramelizes the natural sugars in the sausage and potatoes, enhancing their flavors. To master this technique, ensure your baking sheet is preheated and lined to prevent sticking. The visual cue for success is a golden-brown crust while maintaining tenderness inside.

Seasoning: Proper seasoning is essential for elevating flavors. Taste as you go, ensuring the balance is right. A good rule of thumb is to season every layer—the sausage, vegetables, and potatoes all need love! The aroma of herbs added to the dish during cooking can serve as a cue of flavor readiness.

Pro Tips for Perfect Oven Roasted Smoked Sausage and Potatoes

1. Use a variety of vegetables like bell peppers, onions, and carrots to enhance color and flavor.
2. Consider marinating the sausages overnight for deeper flavor infusion.
3. For added crunch, turn on the broiler for the last few minutes of cooking.
4. Experiment with different sausage varieties such as chicken or turkey for lighter options.
5. Add a splash of balsamic vinegar or lemon juice before serving for a fresh flavor twist.
6. When preparing for gatherings, double the recipe and serve it in a large buffet-style presentation.
7. Use fresh herbs like rosemary or thyme for a gourmet feel.
8. Always let the dish rest for a few moments after coming out of the oven to allow flavors to settle.

Variations and Adaptations

For a regional twist, consider adding Cajun spices to your seasoning mix for a Southern flair. Seasonal adaptations can involve including butternut squash in autumn or fresh asparagus in spring. For dietary modifications, using plant-based sausages or omitting them entirely caters to vegan or vegetarian diets while retaining the heartiness with more potatoes. Adjusting flavors is easy; try adding garlic and herb seasoning or spices like smoked paprika or chili flakes. Texture changes can be achieved by swapping out traditional potatoes for sweet potatoes for a unique flavor alongside its health benefits. Lastly, garnishing with fresh parsley or chives before serving can enhance the presentation.

Serving and Presentation Guide

For an appealing presentation, arrange the sausage and potatoes neatly on a platter, allowing the vibrant colors to shine. Garnish with freshly chopped herbs, such as parsley or cilantro, for a touch of freshness. Pair with a colorful side salad to add contrast. Consider serving with a zesty dipping sauce or mustard to elevate flavor. Ensure the dish is served hot and direct from the oven, capturing the crispness and warmth of the ingredients. Portion control can be managed by using small plates, encouraging guests to savor each bite without overindulging.

Wine and Beverage Pairing

When pairing wine with oven roasted smoked sausage and potatoes, consider a medium-bodied red such as Pinot Noir or Zinfandel to complement the smoky flavors. For a white wine option, a Chardonnay, preferably unoaked, can provide a refreshing contrast to the dish’s heartiness. If you prefer non-alcoholic beverages, a sparkling water infused with citrus fruits can cleanse the palate, while unsweetened iced tea offers a nice balance. Serve all drinks chilled, enhancing their refreshing qualities alongside the warm meal.

Storage and Shelf Life

To store leftovers properly, place the cooled meal in an airtight container and refrigerate. It should be consumed within 3 to 4 days for the best quality. For extended storage, consider freezing portions in freezer-safe containers, where they can last up to 3 months. Always label containers with dates for easy tracking. When reheating, ensure the dish reaches an internal temperature of 165°F to guarantee safety. An oven is best for reheating, as it helps maintain the potatoes’ crispiness better than microwaving.

Make Ahead Strategies

To streamline your dinner prep, chop the potatoes and sausage the night before. Store them separately in the refrigerator in airtight containers. Seasoning can also be done in advance, allowing the flavors to deepen overnight. For the best results, assemble the dish and store it covered until you’re ready to bake. The dish can be refrigerated before baking for up to 24 hours, making it a perfect make-ahead option for busy nights.

Scaling Instructions

If you want to halve the recipe, simply reduce each ingredient accordingly and use a smaller baking sheet. For those planning to double or triple the recipe, ensure you have a large enough baking sheet to prevent overcrowding and allow for even roasting. Timing may need to be adjusted, as more ingredients can require a longer cooking time. Always check for doneness using visual cues and a meat thermometer, particularly for the sausage.

Nutritional Deep Dive

Oven roasted smoked sausage and potatoes provide an excellent macro breakdown, with protein from the sausage and carbohydrates from the potatoes. The dish is relatively high in calories due to the sausage’s fat content, making it a satisfying meal for energy needs. From a micronutrient perspective, potatoes are rich in potassium and vitamin C, while the sausage can provide B vitamins. For those monitoring intake, consider the serving size and balance it with light salads or steamed vegetables for a complete meal.

Dietary Adaptations

For those who are gluten-free, opt for gluten-free sausages and ensure all seasonings are gluten-free as well. A dairy-free version can be easily achieved by using olive oil for roasting instead of butter. Vegan adaptations involve substituting plant-based sausage or creating a version without sausage altogether, focusing on the potatoes and seasonal vegetables. Low-carb and keto-friendly options could include swapping potatoes for cauliflower, while still retaining rich flavors, and the paleo adaptation would focus on whole ingredients and natural meats.

Troubleshooting Guide

If you encounter texture issues, like soggy potatoes, it may be due to overcrowding the pan. Ensure that your baking sheet is large enough for even roasting. For flavor balance, if the dish is too salty, adding a dash of sugar can mitigate the saltiness. Temperature problems can arise if the oven isn’t fully preheated; always ensure it is at the right temperature before roasting. For equipment challenges, if your baking sheet is warped, it can lead to uneven cooking. Use high-quality bakeware to prevent this, and adjust timing based on the specific model of your oven.

Recipe Success Stories

Many readers have shared their own experiences with oven roasted smoked sausage and potatoes, noting how they customized it with their favorite vegetables and spices. Adaptations have led to new family favorites, and community feedback highlights the simplicity and satisfaction of making this dish. Some have even photographed their creations, posting them on social media, showcasing the vibrant colors and enticing presentations. As people experiment with their tweaks, creative suggestions continue to enrich this beloved recipe and strengthen its place in home cooking.

Frequently Asked Questions

Q1: Can I use different types of sausage for this recipe?
Yes, feel free to experiment with various sausages like chicken, turkey, or even vegan options to suit your dietary preferences. Each will bring its unique flavor to the dish.

Q2: How do I tell if the sausage is cooked through?
The best way to ensure that sausage is fully cooked is to use a meat thermometer. The internal temperature should reach 160°F for proper safety standards.

Q3: Can I prep this dish ahead of time?
Absolutely! You can chop the vegetables and sausage in advance and store them separately in the refrigerator. This will save you time on busy weekdays.

Q4: What sides pair well with this dish?
A fresh green salad, steamed vegetables, or crusty bread work great as sides alongside this hearty meal, providing a nice balance.

Q5: Are there any essential tips for better flavor?
Experimenting with additional herbs and spices, like smoked paprika, can enhance the flavor. Don’t shy away from using fresh herbs as a garnish for added freshness!

Q6: Is it possible to cook this recipe in a slow cooker?
While the texture may vary, you can adapt this recipe for a slow cooker. Cook on low for 6-8 hours or high for 3-4 hours. You’ll achieve tender sausage and potatoes with a different cooking method.

Q7: How can I store leftovers?
Properly store leftovers in airtight containers and refrigerate for 3 to 4 days, or freeze for up to 3 months. Always reheat thoroughly before serving.

Q8: Can I add other vegetables to this meal?
Absolutely! Feel free to include vegetables like carrots, broccoli, or bell peppers. Just remember to adjust cooking times based on the vegetable’s texture and size.

Q9: Why did my potatoes turn mushy?
If potatoes turn mushy, they may have been overcooked or overcrowded on the baking sheet. Ensure they have enough space for proper roasting and monitor cooking time closely.

Q10: How do I reheat this dish effectively?
To retain the best texture, reheat the dish in the oven at 350°F until warmed through, rather than using the microwave, which can make the potatoes soggy.

Additional Resources

Explore similar recipes that emphasize comfort food to satisfy your cravings. Check out technique guides on roasting and seasoning for a deeper understanding of flavor building in your meals. Ingredient information on sausages can enhance your selection process, ensuring you pick quality products for the best results. Equipment recommendations are also available to help you choose the right bakeware and tools for efficient cooking, including tips on seasonal variations to keep your meals fresh and exciting.

Join the Conversation

We love hearing from our community! Share your photos and feedback after trying the oven roasted smoked sausage and potatoes recipe on social media. Engage with other readers’ adaptations and suggestions or leave a review to inspire fellow cooks. Your unique twist on the recipe can spark further conversation, inviting new ideas and variations that enhance this classic dish.

The Recipe

Oven Roasted Smoked Sausage and Potatoes

Serves: 4

Prep Time: 15 mins

Cook Time: 45 mins

Total Time: 60 mins

Kitchen Equipment Needed

  • Baking sheet
  • Mixing bowl
  • Measuring cups and spoons
  • Cutting board and knife

Ingredients

  • 1 pound smoked sausage, sliced
  • 1.5 pounds potatoes, diced
  • 1 tablespoon olive oil
  • 1 teaspoon garlic powder
  • 1 teaspoon paprika
  • Salt and pepper, to taste
  • Fresh herbs for garnish (optional)

Directions

  1. Preheat your oven to 400°F (200°C).
  2. In a mixing bowl, toss sliced sausage and diced potatoes with olive oil, garlic powder, paprika, salt, and pepper.
  3. Spread the mixture evenly on a baking sheet.
  4. Roast in the oven for 30 minutes, stirring halfway through.
  5. Continue roasting for an additional 15 minutes, or until potatoes are golden and sausage is nicely browned.
  6. Remove from the oven, garnish with fresh herbs if desired, and serve warm.

Recipe Notes

  • Feel free to adjust the seasoning to your taste.
  • Any leftover sausage and potatoes can be stored in an airtight container for up to 4 days.
  • For an extra flavor kick, consider adding your favorite vegetables to the mix.

Best Pink Panther Frappuccino Recipe to Brighten Your Day

You Can Get A Pink Panther Frappuccino From Starbucks To Brighten Your Day

⚖️
Difficulty
Easy

⏲️
Prep Time
10 mins

🕒
Cook Time
0 mins

⏱️
Total Time
10 mins

🍽️
Servings
2

Looking for a delicious and refreshing drink to brighten your day? The Pink Panther Frappuccino from Starbucks is the perfect treat! This delightful beverage offers a unique twist on traditional frappuccinos, combining fruity flavors with a creamy base. Its vibrant pink hue is not only visually appealing but also represents a summertime joy that can instantly lift your spirits.

When you take a sip, the sweet and tangy notes dance on your palate, leaving you refreshed and invigorated. The smooth texture, coupled with the delightful hints of strawberry, will make this drink a favorite for those hot afternoons. Whether you are enjoying it solo or sharing it with friends, the Pink Panther Frappuccino is guaranteed to bring a smile to your face.

Quick Recipe Highlights

  • Flavor Profile: This frappuccino features a delightful mix of strawberry and cream, balanced with hints of vanilla.
  • Texture: Expect a creamy and whipped texture that melts in your mouth, perfectly icy for hot days.
  • Aroma: The fragrant aroma of strawberries combined with sweet vanilla will tantalize your senses.
  • Visual Appeal: Its striking pink color garnished with whipped cream makes for a stunning presentation.
  • Skill Level Needed: Easy to prepare, making it perfect for beginners and seasoned cooks alike.
  • Special Equipment: A blender and a jar for serving are all you need to create this masterpiece.

Recipe Overview

  • Difficulty Level: The Pink Panther Frappuccino is an easy recipe that doesn’t require any special skills beyond basic blending.
  • Category: This drink fits perfectly into the beverage category, ideal for snacks or dessert.
  • Cuisine: Influenced by classic American café culture, this recipe is a modern twist on frappuccino variations.
  • Cost: The ingredients are relatively inexpensive, making it a budget-friendly option for everyone.
  • Season: Best enjoyed in summer, but it’s a lovely treat any time you need a little pick-me-up.
  • Occasion: Perfect for casual gatherings, parties, or a refreshing drink during a sunny day out.

Why You’ll Love This Recipe

The Pink Panther Frappuccino is not just a drink; it’s an experience. From the first taste, you’ll fall in love with its blend of sweetness and creaminess. Each sip delivers a burst of fruit flavor that is incredibly satisfying and refreshing, perfect for a summer day or as a treat any time of year. Its beautiful presentation elevates your drink-drinking experience, making it feel even more special.

Convenience is another big reason to love this recipe. It requires minimal preparation time—truly, just a quick blend followed by serving. This makes it an ideal choice for last-minute gatherings or when you just want to spoil yourself without spending hours in the kitchen. The ingredients are easy to come by, which means you can whip it up whenever your cravings strike.

Nutritionally, this frappuccino strikes a wonderful balance as a treat. While it’s indulgent, it also brings in the benefits of strawberries, which are rich in antioxidants and vitamins. Enjoying this drink allows you to treat yourself without straying too far from nutritious choices. So, you can sip with a smile, knowing you’re indulging responsibly.

Socially, the Pink Panther Frappuccino shines—it’s great for social media, making it a hit for photography lovers. Its eye-catching color and presentation make it perfect for sharing with friends or posting on Instagram. It’s a crowd-pleaser that’s sure to spark conversations and encourage others to try their own versions.

Finally, its cost-effectiveness is unbeatable. By making this drink at home, you can indulge in your favorite Starbucks flavor without breaking the bank. It’s a delicious way to enjoy a café experience in the comfort of your own home.

Historical Background and Cultural Significance

The Pink Panther character, originally introduced in the slapstick animated sequences of the 1963 film “The Pink Panther,” quickly captured the hearts of audiences worldwide, becoming a cultural icon. This beverage draws its inspiration from this beloved character, embracing the playful spirit that embodies joy and fun, making it a fitting tribute for fans of the franchise.

In recent years, specialty coffee shops and franchises like Starbucks have started to offer a variety of unique flavored drinks, elevating the humble frappuccino into an art form. The Pink Panther Frappuccino stands out among these offerings with its vibrant color and enticing flavor profile. Its creation highlights the evolution of coffee culture, where creativity meets traditional beverages.

As drink recipes modernize and take on new flavors, certain variations gain popularity in specific regions, showcasing culinary creativity. This frappuccino exemplifies an innovative take on an all-time favorite, engaging with food trends that focus on customization and personalization, allowing coffee lovers to enjoy their favorite drinks in new, exciting ways.

The regional adaptations of drinks like the Pink Panther Frappuccino can often reflect local ingredients or tastes, showcasing how certain flavors resonate across different cultures. As this drink gains popularity, it may inspire variations localized in other countries, leading to even more delightful explorations in flavor.

Ingredient Deep Dive

Strawberries are the star ingredient in the Pink Panther Frappuccino. These berries carry cultural significance in many parts of the world, representing summer and joy in various dishes. Strawberries are packed with vitamins and antioxidants, making them a nutritious choice. When selecting strawberries, look for bright red colors and firmness, indicating ripeness. Store them in the refrigerator for optimal freshness, and wash them only just before use to prevent spoilage. Alternatives like frozen strawberries can also be used for a thicker texture.

Another crucial ingredient is milk, which lends creaminess to the frappuccino. Milk has a long history in diverse culinary traditions, known for its health benefits, including calcium and protein. Whole milk provides a rich flavor, but alternatives like almond or oat milk work well for those with dietary restrictions. When storing milk, keep it refrigerated and tightly sealed to maintain freshness. Additionally, consider substituting flavored milk or adding vanilla extract for enhanced taste.

Sugar is used to sweeten the frappuccino; its historical significance dates back centuries as a primary sweetening agent in various cultures. While white granulated sugar is commonly used, alternatives like honey or agave syrup can provide a distinct flavor and sweetness level. Always store sugar in a cool, dry place, and consider variations such as brown sugar for a richer taste.

Common Mistakes to Avoid

  • Not using chilled ingredients: Warm ingredients can lead to a less refreshing drink. Always chill your berries and milk before blending.
  • Over-blending: Blending the frappuccino too much can create a watery texture. Aim for a cream-like consistency without overdoing it.
  • Skipping the garnish: Whipped cream not only enhances the flavor but also elevates presentation—never skip it!
  • Not tasting before serving: Ensure the flavor is to your liking before serving. Adjust sweetness if necessary for your palate.
  • Using low-quality strawberries: Fresh, ripe strawberries make all the difference in flavor. Opt for the best quality you can find.
  • Inconsistent measurements: Accurate ingredient measurement ensures a balanced flavor—use measuring cups for best results.
  • Neglecting to layer: For a more visually appealing drink, layer your frappuccino’s components rather than blending everything together immediately.
  • Rushing through prep: Taking your time with preparation will lead to better flavor and texture outcomes. Enjoy the process!

Essential Techniques

Mastering the blending technique is crucial for achieving the perfect frappuccino. To get a smooth texture, start by blending the solid ingredients, and then gradually add the liquids. This method ensures everything incorporates well, resulting in an evenly textured drink. Visual cues for success include a smooth spin without large ice chunks.

Garnishing is another essential technique that elevates your drink’s appeal. Use a piping bag to create swirls or peaks of whipped cream for an attractive presentation. This not only adds aesthetic value but also enhances flavor with each sip. Remember to add garnishes just before serving for the best visual impact.

Pro Tips for Perfect Pink Panther Frappuccino

1. Freeze strawberries ahead of time for a thicker frappuccino and extra cold refreshment.
2. Play with different types of sweeteners to find the best match—experiment with maple syrup or coconut sugar.
3. Add a scoop of vanilla ice cream for an ultra-rich and creamy beverage.
4. Use whole milk or heavy cream for a luxurious texture—your frappuccino will taste even more indulgent.
5. Blend in some protein powder for an added nutritional boost without compromising flavor.
6. For a sharper taste, add a squeeze of lemon juice to enhance the fruity notes of the strawberries.
7. If serving at a gathering, prepare single portions in advance to save time and impress your guests.
8. Utilize a straw to ensure every sip captures the beautiful layered effect of the ingredients.

Variations and Adaptations

Wide variations of the Pink Panther Frappuccino exist, inspired by different flavor profiles. You can experiment by incorporating mango or raspberry puree to introduce new fruity dimensions. Seasonal adaptations such as adding pumpkin spice in the fall deliver a festive twist that keeps the drink relevant year-round.

For dietary modifications, consider making it vegan by substituting milk with almond or oat milk and opting for dairy-free whipped cream. Flavor variations can include adding chocolate syrup for a chocolate-covered strawberry essence or incorporating matcha for a refreshing green twist that retains the frappuccino’s vibrant appearance.

When it comes to texture modifications, blending in some crushed Oreos or cookie crumbles could enhance the overall mouthfeel, adding a delightful crunch. For elegant presentations, consider serving in tall glasses or adding colorful straws to make the drink even more inviting.

Serving and Presentation Guide

Plating techniques for showcasing your Pink Panther Frappuccino greatly enhance its visual appeal. Use tall, clear glasses to highlight the vibrant pink color, layering it for added dramatic effect. Top with generous dollops of whipped cream spiraled on top, adding a pop of color with sprinkles or edible glitter.

Garnishing ideas include fresh strawberry slices perched on the rim of the glass or a mint sprig for a splash of freshness. Traditional accompaniments, like a side of cookies or a slice of cake, can complement the drink beautifully. For modern designs, consider adding straws with fun patterns or colors to draw attention to the drink.

Ensure the frappuccino is served promptly after preparation to enjoy it at the ideal temperature. For portion control tips, serving smaller cups allows guests to taste with less commitment—ideal for sampling multiple variations.

Wine and Beverage Pairing

Pairing the Pink Panther Frappuccino with beverages can elevate a casual drink to a complete experience. Wine pairings typically lean towards sparkling wines, which complement the fruity layers hydratingly. A light Prosecco could harmonize this drink’s refreshing nature, adding fizz on the palate.

For non-alcoholic alternatives, consider pairing it with lemonade for a wash of citrus that can balance the sweet notes. As for coffee pairings, a lightly brewed iced coffee serves as a gentle contrast, inviting drinkers to alternate between contrasting flavors.

Serving temperature is essential when combining drinks. Always ensure both beverages are well-chilled to maintain a delightful drinking experience. Sharing these pairings at brunches or casual gatherings can add a touch of elegance to your event.

Storage and Shelf Life

When it comes to storing the Pink Panther Frappuccino, it’s essential to consume it fresh for the best flavor and texture. If leftovers occur, cover the beverage tightly and store it in the refrigerator for up to 24 hours. However, it’s recommended to blend it fresh whenever possible to avoid separation.

Due to the presence of fresh strawberries and milk, keep the frappuccino at a cool temperature. Signs of spoilage include an off smell or curdled consistency, indicating it should not be consumed. For reheating, gently blend it again to restore its creamy consistency rather than using a microwave, which can alter the texture.

If you wish to make a larger batch, consider freezing individual servings in airtight containers. When ready to enjoy, allow them to thaw in the fridge overnight, then blend again for fresh flavor.

Make Ahead Strategies

Preparing the Pink Panther Frappuccino can be simplified with strategic planning. Create your fruit puree in advance, storing it in the refrigerator for up to three days while keeping flavors vibrant. Building a prep timeline allows you to quickly assemble ingredients when you’re ready to enjoy your drink.

Storage between steps can be accomplished by keeping ingredients in the freezer until needed. For optimal quality, assess how the flavors develop over time—freshly blended will always yield the best results. Assembly tips include keeping blended ingredients chilled until serving, ensuring maximum refreshment on those hot summer days.

For fresh element additions, consider topping off with whipped cream or adding a pop of fresh fruit just before serving to elevate the final product without compromising advance preparation.

Scaling Instructions

Scaling the Pink Panther Frappuccino recipe is easy. To halve it, adjust strawberries and milk proportions accordingly for smaller servings, ensuring flavor balance remains intact. Doubling or tripling the recipe is straightforward, but a larger blender may be required to accommodate the increased volume.

Timing modifications, while blending in larger batches, may require an extra few moments to ensure consistent texture throughout. Storage considerations are important; allow ample room for expansion if freezing any leftovers.

Always keep in mind that enhancing flavors and sweetness may be necessary when scaling, as different ingredient quantities can alter the final taste. Testing small batches will help ensure an accurate scaling process.

Nutritional Deep Dive

Analyzing the nutritional aspects of the Pink Panther Frappuccino reveals a balance of macronutrients. Each serving delivers carbohydrates primarily from strawberries and sugar, which provides energy. Additionally, the inclusion of milk contributes protein and fats, essential for satiety, making it a satisfying treat.

Micronutrient content includes vitamin C from strawberries, known for antioxidant properties that support immune health. Calcium and vitamin D found in milk are beneficial for bone health. Understanding these nutritional elements sharpens awareness of their roles in a balanced diet.

Health benefits abound in this frappuccino, particularly when made with fresh fruits and quality ingredients. Choosing alternatives for sugar and incorporating plant-based milks can enhance its healthy profile further.

Dietary considerations speak to this drink’s versatility; adjusting portion sizes allows it to align with different health goals, whether for weight management or fun enjoyment. Planning allows it to fit seamlessly into various dietary frameworks.

Dietary Adaptations

For those on gluten-free diets, the Pink Panther Frappuccino naturally fits, as all key ingredients contain no gluten. Keeping it gluten-friendly is as simple as ensuring additives like flavor syrups are also gluten-free.

Dairy-free modifications can be made by substituting milk with almond, coconut, or oat milk, as well as using dairy-free whipped toppings. This opens up the drink to vegans and those with lactose intolerant intolerances delighting in creamy indulgence.

For those following low-carb or Keto diets, swap sugars with low-carb sweeteners like stevia or erythritol while using unsweetened almond milk. This modification maintains sweetness without impacting carbohydrate count.

Paleo adaptations involve using natural sweeteners and whole fruits, ensuring you stay true to the Paleo guidelines. Maintaining a focus on fresh ingredients helps retain overall nutritional integrity.

Troubleshooting Guide

Sometimes, you may run into issues while preparing your Pink Panther Frappuccino. For texture issues, if it comes out too thin, consider blending in extra ice cubes or frozen strawberries to thicken their consistency. Similarly, if it’s too thick, adjust by adding a small splash of milk.

When facing flavor balance problems, ensure you taste along the way. If too sweet, add additional strawberries to introduce tanginess or a dash of lemon juice to cut through the sweetness.

Temperature problems can occur if the drink isn’t chilled enough; quickly blend in ice cubes to cool it down, or ensure your milk and fruits are pre-chilled next time for immediate refreshment.

Equipment challenges may arise from blender issues; ensure your blender is capable of crushing ice effectively for a smooth finish—an underperforming blender can lead to less-than-desired outcomes.

Ingredient substitutions can lead to unexpected flavors; always choose fresh ingredients whenever possible and test small modifications before making large batches to avoid disappointments.

Timing concerns are easily solved by preparing in advance, yet ensure leftovers don’t sit too long, which may compromise flavor. Check to ensure freshness by tasting before serving guests.

Recipe Success Stories

Community feedback on the Pink Panther Frappuccino has universally praised its delightful flavor and creative presentation. Many readers share their successes on social media, highlighting modifications they’ve made, further sparking inspiration within the community.

Successes with variations, such as adding different fruits or themed garnishes, have encouraged others to explore. Many readers love to share their recipes inspired by the Pink Panther Frappuccino, creating a variety of delightful interpretations based on personal taste.

Photography tips follow with the recipe as well, noting that capturing its vibrant color against colorful backdrops amplifies its visual appeal. The result? Instagram-worthy creations that encourage more people to try making the frappuccino at home.

Throughout this process, readers express how easy it is to tailor the drink to their preferences. Options become endless, with the recipe serving as a starting point for delicious personal adaptations.

Frequently Asked Questions

What is the Pink Panther Frappuccino?

The Pink Panther Frappuccino is a refreshing, berry-flavored drink inspired by the iconic character, featuring strawberries and cream for a delightful treat.

Can I make this frappuccino vegan?

Yes, you can easily make it vegan by substituting regular milk with a plant-based alternative, like almond or oat milk, and using dairy-free whipped cream.

How long does the frappuccino last in the fridge?

For best flavor and texture, consume your Pink Panther Frappuccino within 24 hours. If you have leftovers, keep them tightly covered in the refrigerator.

Can I use frozen strawberries?

Absolutely! Using frozen strawberries will give your frappuccino a thicker texture and keep it colder, enhancing the refreshing experience.

What sweeteners work best?

You can use sugar, honey, or any zero-calorie sweetener based on your preference. Adjust sweetness to your liking for the perfect balance.

Is it easy to double the recipe?

Yes! Doubling the recipe is simple; just ensure your blender can accommodate the increased volume for smooth blending.

How can I make this drink more indulgent?

Add a scoop of vanilla ice cream or whipped cream on top for a richer, creamier experience—perfect for a dessert treat.

Can I use different fruit flavors?

Certainly! Feel free to experiment with different fruits like raspberries or mangoes to create your own variations of the Pink Panther Frappuccino.

What’s the best way to serve this frappuccino?

Serve in tall, clear glasses to showcase its beautiful pink color, topped with whipped cream and garnished with fruit for added visual appeal.

Can I prepare this drink in advance?

While best served fresh, you can prepare components ahead of time, such as blending strawberries. Keep them chilled until ready to mix.

Additional Resources

If you loved the Pink Panther Frappuccino, you may want to try other refreshing beverage recipes available on our blog. Explore vibrant smoothies or creatively crafted lemonade variations. For those looking for technique guides, we offer a plethora of tips on mastering your blender for smooth results.

Expand your ingredient knowledge with our detailed posts about strawberries and other fruit varieties, maximizing your culinary adventures. Explore equipment recommendations focusing on blenders and kitchen essentials for all your recipe needs.

Finally, consider seasonal variations incorporating fruits specific to the time of year, keeping your drinks fresh and exciting throughout the seasons.

Join the Conversation

We want to hear from you! Share your experience about making the Pink Panther Frappuccino, including any modifications or personal twists you incorporated. Posting your successes and favorite adaptations helps inspire others within our community to explore this delightful beverage.

Engage with us on social media by posting pictures of your creation and tagging us. We love to see your culinary artistry and creativity come to life! Provide your feedback, rate the recipe, and encourage your friends to try making their own delicious beverages.

Be part of our thriving community, where sharing ideas and experiences around food brings us together. Your stories not only enhance our collective culinary journey but also serve as inspiration and motivation for others on their cooking adventures.

The Recipe

Pink Panther Frappuccino

Serves: 2

Prep Time: 10 mins

Cook Time: 0 mins

Total Time: 10 mins

Kitchen Equipment Needed

  • Blender
  • Measuring cups
  • Serving glasses
  • Piping bag for whipped cream (optional)

Ingredients

  • 1 cup fresh strawberries (hulled)
  • 1 cup milk (any kind)
  • 2 tablespoons sugar (adjust to taste)
  • 1 cup ice cubes
  • Whipped cream for topping
  • Optional: edible glitter or sprinkles for garnish

Directions

  1. In a blender, combine the hulled strawberries, milk, sugar, and ice cubes.
  2. Blend until smooth and creamy, ensuring no ice chunks remain.
  3. Taste and adjust sweetness if necessary—blend again if adding more sugar.
  4. Pour the frappuccino into serving glasses, filling each halfway.
  5. Top generously with whipped cream and sprinkle with edible glitter or sprinkles if desired.
  6. Serve immediately and enjoy your refreshing Pink Panther Frappuccino!

Recipe Notes

  • Feel free to substitute the strawberries for your favorite berries or mixes.
  • If using frozen strawberries, reduce ice amounts for a thicker consistency.
  • This recipe can be easily doubled or adjusted for larger gatherings.
  • Experiment with flavors by adding a hint of vanilla or other extracts for variation.